Tippmann SL-68 II User manual

WARNING:
• This paintball marker/gun is not a toy nor is
it intended for unsupervised use by persons
under the age of 18 years.
• Misuse may cause serious injury or death.
• Eye Protection designed for paintball use
must be worn by the user and any person
within range.
• Read operation manual before using.
• Do not field strip or remove any parts while
marker is pressurized.
• Always keep in mind that the sport of
Paintballwillbeviewedandjudgeduponyour
safe and sportsmanlike conduct.
TIPPMANN
PNEUMATICS, INC.
Get YGet Y
Get YGet Y
Get Yoo
oo
our Hearur Hear
ur Hearur Hear
ur Heart Pt P
t Pt P
t Poo
oo
oundund
undund
unding Witing Wit
ing Witing Wit
ing With Ah A
h Ah A
h A
TT
TT
Tippmann!ippmann!
ippmann!ippmann!
ippmann!
SL-68 II
Owner’s Manual
CO2POWERED
PAINTBALL MARKER

CONGRATULATIONS onyourpurchaseofour"TIPPMANN
SL-68
II
" Paintball Gun! We believe it to be the most
accurateanddurable paintball gunavailable atanyprice, and
itwill give many years of dependable serviceif cared for properly.
Pleasetake time to readthrough this manual thoroughlyand
become familiar with the "TIPPMANN SL-68
II
" parts,
operation,and safety precautions beforeyou attempt toload
or fire the weapon. INDEX
Table of Contents ..................................................... Page
Warning/Liability Statement ..............................................1
Safety ................................................................................1
General .............................................................................3
Specifications ....................................................................3
Operating Instructions
1. CO2Cylinder Connection............................................4
2. Safety Switch ..............................................................4
3. Loading / Unloading ...................................................4
4. Firing ...........................................................................5
5. CO2Cylinder Removal................................................5
6. Velocity Adjustment .....................................................5
Schematic (Exploded view of gun)............................. 6 & 7
Maintenance
1-M. Field Barrel Cleaning ..............................................8
2-M. Field Stripping / Reassembly ..................................9
3-M. General Maintenance ...........................................10
4-M. General Troubleshooting ......................................10
5-M. Valve Troubleshooting........................................... 11
CO2Cylinder Refilling Instructions..................................12
Warranty & Repair Policy ................................................13
1. Warranty & Repair Procedure ...................................14
Warranty Card .......................................Complete and mail
WARNING / LIABILITY STATEMENT
This weapon is classified as a dangerous weapon and
is surrendered by Tippmann Pneumatics, Inc. with the
understanding that the purchaser assumes all liability
resulting from unsafe handling or any action that
constitutes a violation of any applicable laws or
regulations. Tippmann Pneumatics, Inc. shall not
be liable for personal injury or loss of property or
life resulting from the use of this weapon under any
circumstances, including the intentional, reckless,
negligent or accidental discharges.
All information contained in this manual is subject to
change without notice, and in no way represents a
commitment on the part of Tippmann Pneumatics, Inc.
We reserve the right to make changes and improvements
to products without incurring any obligation to incorporate
such improvements in products previously sold.
SAFETY IS YOUR RESPONSIBILITY!
The ownership of this weapon places upon you the total
responsibility of its safe and lawful use. You must observe
the same safety precautions as you would any firearm to
assure the safety of not only yourself but everyone around
you. Outlinedhereare somegeneral precautionstobe aware
of, the user should at all times use common sense when
using this weapon and always remember that the game of
Paintball can only survive and grow if it remains SAFE!
• Do not load or fire this gun or operate its parts until you
have read this manual and are familiar with its mechanical
operation and handling characteristics.
•Handle this and any other weapon as if it was loaded
at all times.
• Neverpoint theweapon atanythingyoudon't intendto shoot.
• Always keep the muzzle pointed down or in a safe direction
-Even if you stumble or fall.
•
All persons within 200 yards radius should always
wear eye protection in the form of approved goggles
or full face mask and never shoot at a person who is
not similarly protected.
(SAFETY Continued next page)
1
TIPPMANN
PNEUMATICS, INC.
3518 Adams Center Road, Fort Wayne, IN 46806
P) 260-749-6022 •F) 260-749-6619
www.tippmann.com

2
WARNING: This gun is not a toy nor is it intended
for unsupervised use by persons under the age
of 18 years. Always keep in mind that the sport
of Paintball will be viewed and judged upon your
safe and sportsman like conduct.
SAFETY IS YOUR RESPONSIBILITY(Continued from page 1)
•Pressurize and load the weapon only when you are using it.
Unloadand removeCO2 cylinderimmediatelyafteruseforsafe
storage.
•Dressforsafety when playing the game, avoid any areas of
exposed skin especially the face and throat. Even a light
layer will absorb some of the impact and protect your skin
from cuts produced by the gelatin paintball shell fragments
when hit at close ranges.
•Keep exposed flesh away from escaping CO2 gas when
installing or removing bottles or cartridges of gas from the
weapon or from a filling cylinder. CO2gas is very cold and
can cause frostbite under certain conditions.
•Use only .68 caliber paintball pellets. Never load or fire any
foreign objects.
•DoNot field strip orotherwisedisassemble this gun whileit is
pressurized with gas. Remove CO2cylinder or CO2cartridge
before doing any disassembly.
•Do not look directly into the barrel. Accidental discharge
into the eyes may cause permanent injury or death.
•Avoid alcoholic beverages before and during the use of this
weapon. Handling guns while under the influence of drugs
or alcohol is a criminal disregard for public safety.
•Avoidshooting anopponentat pointblank(three feetorless).
•If you purchased a 12 gram cartridge adaptor with this
gun be sure to read and follow the instructions that came
with the adaptor.
•Never fire your weapon at personal property of others, the
paintball can stain the paint of automobiles and houses if left
on the surface for a few hours.
GENERAL
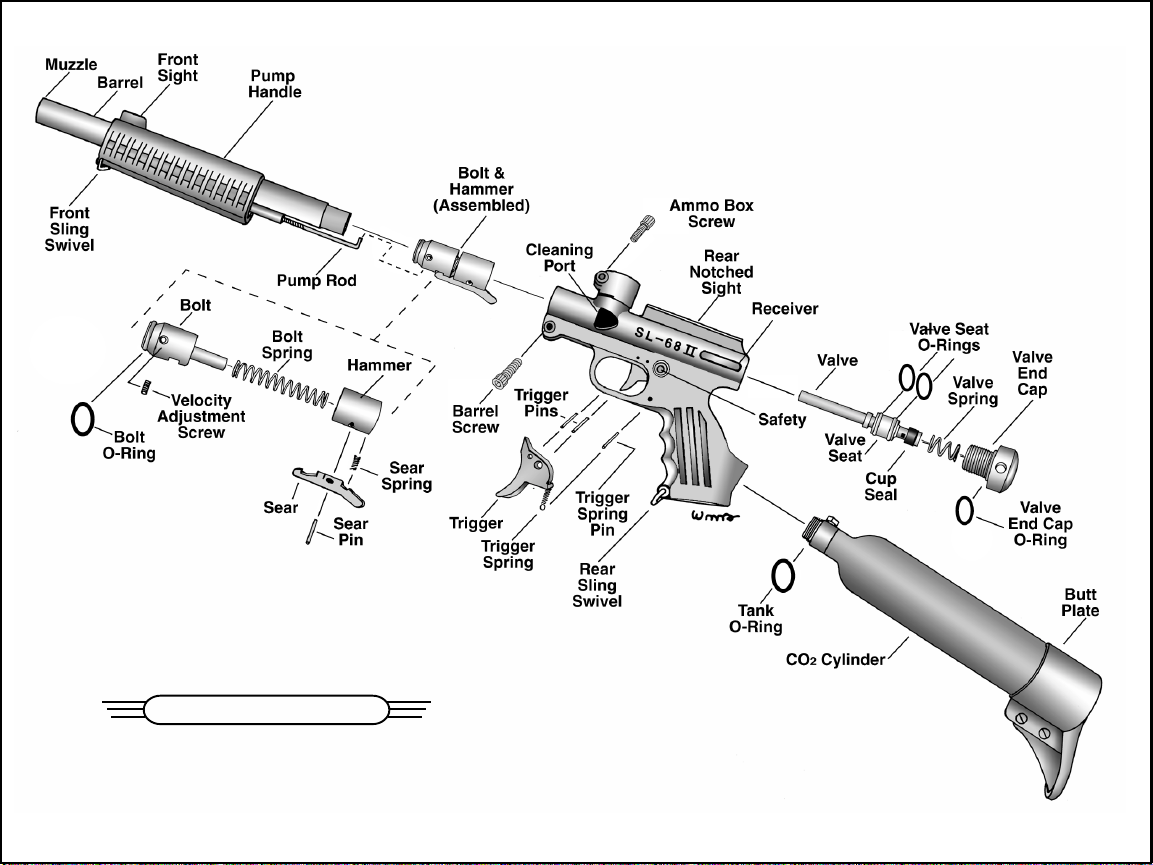
The SL-68 II represents a totally original design by
Tippmann Pneumatics, Inc. It's design objectives were
durability, extreme accuracy and low cost. We have met our
objectivesandare proudto offeryouthis highqualityweapon.
The receiver is super strong aluminum—magnesium alloy
and has the feed elbow and gas port cast in place for the
ultimate in simplicity and durability. The barrel is aluminum
and is also held in place by a built in clamp on the receiver,
both clamps are operated by a 3/16 allen wrench. All
internal parts are noncorrosive including trigger and sear
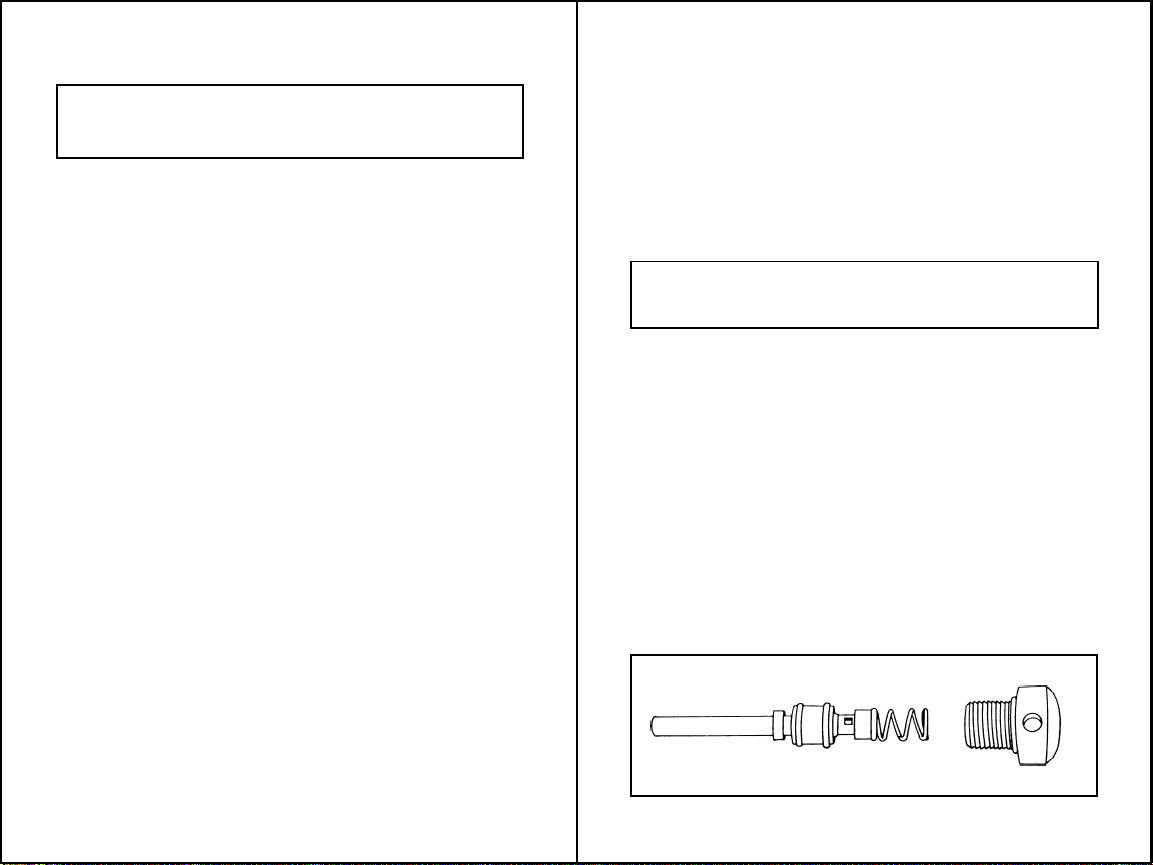
group. The valve system has been redesigned to eliminate
the common breakage of tubes with other guns and we
guarantee the seal to last a lifetime. The cleaning port on
the left side of the receiver has been designed to clean
barrel from the breach end, to visually inspect chamber and
feeding, and allow velocity adjustment without gun disassembly .
To load a ball pull the pump handle rearward until it bottoms
against the receiver. This will cock the weapon and a ball
will drop into the receiver to be loaded. Push the pump back
forward and the bolt will push the ball into the barrel.
Pull the trigger to fire the ball (this gun cannot be recocked
until previous has been fired). The design of the trigger
incorporates an auto-trigger effect, with a constant pull on
thetrigger the SL-68 II willfire each time thepump is cycled.
SPECIFICATIONS
Model ................................................... Tippmann SL-68 II
Caliber........................................................................... .68
Action .....................................................Slide action pump
Power .............Optional CO2 gas in cylinders or cartridges
Muzzle Velocity ..........Approx. 215-315 F.P.S. (adjustable)
CO2 Capacity........ 450+ shots per (optional) 9 oz. cylinder
Feed ........................................................................ Gravity
Standard Barrel Length ................................................. 11"
Sniper Model Barrel Length .......................................... 14"
Length - Overall (with Standard barrel & 9 oz. tank) ..... 27"
Weight with 9 oz. tank (empty).................................. 4 lbs.
Effective Range...................................................... 150+ ft.
Sight ............ Front post and combination dovetail grooved
................................. scope mount, and notched rear sight
Material ................................Aluminum and stainless steel
3

OPERATING INSTRUCTIONS
1. CO2Cylinder Connection:
•VISUALLY inspect chamber to be sure weapon is not
loaded.
•Be sure the muzzle is pointed in a safe direction.
•Hold the gun with your left hand. With your right hand
twist the cylinder clockwise into the port at the rear of the
pistol grip until it stops. Gun is now ready to fire.
•The valve stem visible in the end of the cylinder tank
valve is depressed on the last turn into the receiver. If a
CO2leak is present in the tank to receiver connection
the o-ring has been damaged and must be replaced. A
small amount of Lithium grease on the threads and o-
ring will prolong o-ring life.
2. Safety Switch:
The gun safety switch is located on the side of the gun
just above the trigger. With your gun facing forward in a
safe direction, push the safety to the right for the "safe"
position. To fire the gun, push your safety to the left.
Familiarize yourself and your playing partners with the
rules of safety on pages 1 & 2.
3. Loading / Unloading Ammo:
Loading: InsertAmmo-box into the spout of the receiver.
Tighten clamp bolt to secure box but be careful not to
over tighten and collapse ammo box feed tube.
•Fill ammo box with .68 caliber paintballs.
Do not force excessive numbers of paintballs into the
ammo box.
Unloading: To unload, remove ammo box or open ammo
box then turn gun upside down to shake all balls from
ammo box and chamber area. Then fire gun in a safe
direction to clear any balls that may be in barrel or
chamber area.
WARNING: When you pressurize your SL-68 II or
any paintball gun it is possible that a leak in the
valve would allow air to pass into the chamber and
fire a ball unintentionally!
4
4. Firing:
Grip the pump handle with your left hand and the pistol
grip in your right hand, pump the handle rearward until it
runs out of travel then push it back forward until it again
runs out of travel. This should be done in one fluid motion
for best feeding results. Take gun off safety by pushing
safety button to the left (off) position. Gun is now ready to
point in a safe direction and pull trigger to fire.
5. Removing CO2Cylinder
Twist cylinder counterclockwise 3/4 turn. This closes
the cylinder valve. Then point the gun in a safe direction
and pull the trigger.
(Caution: Gun will fire approximately 3 more times until
CO2charge in receiver is gone.)
Now, twist cylinder free from receiver for storing or when
not in use.
Caution: If this procedure is not followed
you could destroy your tank o-ring, causing CO2 cylinder
to leak when reconnected to the gun.
6. Velocity Adjustment :
The SL-68 II is factory pre-adjusted to approximately 300
F.P.S. It can be adjusted from 215 to approximately 315
F.P.S. with the velocity adjustment set screw. This enables
you to adjust the velocity of your SL-68 II to meet the
playingfield standards under avariety of condition extremes
such as temperature, humidity and altitude which can
affect performance.
SET SCREW LOCATION: The velocity adjustment set
screw is visible in the port and can be adjusted without
any gun disassembly.
WARNING: Do not exceed 300 F.P.S. for maximum
accuracy and minimum use of CO2. Most playing fields
require 300 F.P.S. or Lower velocities for safe play.
TOOLS: A 3mm allen wrench has been included with
your SL-68 II for set screw velocity adjustment.
Velocity Adjustment continued on page 8.
5
NOTE: Removing the constant air cylinder from the
receiver while the weapon is still charged with CO2 will
damage the o-ring.

7
TIPPMANN
PNEUMA
T
ICS, INC.
3518ADAMS CENTER ROAD
FORT WAYNE, IN 46806
260/749-6022 FAX: 260/749-6619
INTERNET: www.tippmann.com
TIPPMANN SL-68 II
SLIDE ACTION PUMP CALIBER .68
CO2POWERED PAINTBALL GUN
6

Velocity Adjustment continued from page 5.
ADJUSTMENT TO INCREASE VELOCITY —Insert 3mm
allen wrench into set screw in port and turn counter clockwise
(set screw moves out).
NOTE: One full turn of this set screw will change the
velocity approximately 12 F.P.S.
TO DECREASE VELOCITY —Insert 3mm allen wrench
intosetscrew in port and turn clockwise (set screw moves in).
NOTE: One full turn of the set screw will change the
velocity approximately 12 F.P.S.
MAINTENANCE
1-M. Field Barrel Cleaning
The cleaning port in the left side of the receiver has been
designed to clean the barrel from the breech end in the
field quickly and efficiently with our specially designed
cleaning cable.
If this gun is kept clean and good paintballs are used
there is little chance of a ball breaking. However, if a
ball should break in the field, follow these simple instruc-
tions to get back into the game.
•Remove cleaning cable from its storage position in the
bottom of the pump handle.
•Turn weapon right side down to prevent a ball from
dropping into the chamber and pump action all the way
rearward. Insert small end of cleaning cable into the
port and feed it into the barrel until it extends out of
the muzzle.
•Grasp small end of cable and pull it through the barrel
& it will pull the paint and shell fragments out of the bar-
rel. You can now tilt the receiver back up to let a ball fall
into the chamber and pump it closed.
•Replace cable into its slot under pump handle.
IMPORTANT: Do not remove the set screw totally
or you will lose velocity. IMPORTANT: If set screw
is turned out past flush, the gun will not cock.
89
2-M. Field Stripping / Reassembly
Field Stripping: Loosen field strip bolt at the front of
the receiver with the 3/16 allen wrench that has been
enclosed with your SL-68 II. The barrel will now pull
straight out of the receiver along with the pump handle
and rod which is attached to the bolt. The hammer spring
and hammer can be removed by tilting the receiver for-
ward and allowing them to fall out. The valve system
will remain in the receiver.
This is the only disassembly required to perform periodic
cleaning or barrel change.
Reassembly: Reassembly is in reverse order of field
stripping. Be sure to insert hammer facing the correct
way, which is with the "hook" of the sear towards the front
of the receiver.
Due to the Anti-Kink design of the bolt it is possible to
assemble bolt and hammer with spring compressed and
sear holding hammer to bolt. Then inserting all into front
of the receiver as an assembly. USE CAUTION if using
this method as the sear could accidently disengage from
the bolt and would be shot off the bolt by the hammer
spring.
WARNING: Do not field strip / disassemble, assemble
or perform any type of maintenance to the SL-68 II
while it is loaded or pressurized with CO2gas.
WARNING: Do not over tighten clamp bolt when
reassembling. It takes very little clamp pressure to
hold barrel firmly in place. Over tightening could
prevent gun from cocking properly.

10
3-M. General Maintenance
The SL-68 II is constructed entirely of noncorrosive
materials. It will not rust if exposed to water or the
environment. All internal parts have been designed
to be super durable and they are nearly maintenance
free. However, to assure long life and smooth operation
all internal parts must be kept clean and lightly oiled. After
each use the SL-68 II should be field stripped, cleaned
and visually inspected for wear. Barrel must be clean
and dry for optimum accuracy.
4-M. General Troubleshooting
•Blast of gas out the barrel when pumping.
Cause —Pump rod screwed to far out of pump handle.
Solution—Turnrod intopump handle twoturns, reassemble
and test. Repeat if necessary.
•Gun will not cock.
Cause —Pump rod screwed to far into pump handle.
Solution—Turnrodoutofpumphandletwoturns,reassemble
and test. Repeat if necessary.
Cause —Velocity adjuster is to far out.
Solution —Turn velocity adjuster in (clockwise) until it is
flush with bolt and gun will cock.
• Gas leak around tank to receiver connection.
Cause —Worn out or damaged tank o-ring.
Solution —Replace tank o-ring. Do not remove tank under
pressure, see page 5 for correct removal instructions.
• Minor gas leak.
Cause —Worn or damaged valve seat o-rings.
Solution—Replace valve seat o-ring or return valve it is
defective.
WARNING: Do not clean, disassemble, assemble or
perform any type of maintenance to the SL-68 II while
it is loaded or pressurized with CO2gas.
5-M. Valve Troubleshooting
The valve is virtually maintenance free and we do not
recommend its removal unless it develops a leak. The
seal on the valve has a lifetime guarantee and should
never wear out or leak. Unlike the tank o-ring, the valves
two o-rings are stationary and not stressed due to wear.
In the case of leaking o-rings simply replace the two valve
o-rings to correct the problem. If the seal is leaking return
entire valve assembly to us and we will replace at no
charge to you.
VALVE REMOVAL: To remove the valve, unscrew the
rear end cap by inserting an allen wrench through the
hole in the end cap and turning counterclockwise. Remove
the end cap and then pull the spring and valve out. If the
valve does not easily pull out, field strip the gun which
allows you to push the valve out through the rear end
cap opening.
VALVE INSTALLATION: Inspect the o-rings for wear and
lubricate before reassembly to avoid o-ring damage.
Insert the valve into the rear end cap opening (valve tube
first) with the valve spring in place as shown below.
Complete the installation by inserting the rear end cap
against the valve spring and tightening. Do not over-
tighten as damage to the end cap o-ring could result.
WARNING: Do not attempt to remove valve while
system is pressurized.
11

INSTRUCTIONS FOR FILLING
TIPPMANN PNEUMATICS 9 OZ. CO2 CYLINDERS
•Cylinders must be completely empty to fill properly: To
empty, depress pin valve on top of cylinder firmly against
small round object until completely empty.
•Bulk cylinders for filling small CO2 Cylinders must have a
siphon tube. Bulk cylinders with siphon tubes are marked
with red paint around top of cylinder.
•To fill cylinder, first weigh the TPI 9 oz. cylinder when it is
completely empty then install the filling adaptor on bulk cyl-
inder. Then crack hand valve open until the gas in siphon
tube escapes and liquid CO2appears in the form of white
vapor. Next, install empty 9 oz. cylinder into adaptor (hand
tight) against rubber washer inside adaptor; then open bulk
cylinder hand valve. After approximately 30 seconds, turn
hand valve off and remove 9 oz. cylinder.
NOTE: If 9 oz. cylinder was frosty cold when filled it will now
have approximately 9 oz. of CO2 gas in it. If 9 oz. cylinder
was warm, it will have approximately 5 oz. of CO2 gas in it.
To fill to 9 oz., depress pin valve on top of cylinder against
small round object until completely empty again. This will
frost or chill cylinder for final fill. While cylinder is chilled,
repeat filling operations. Second filling should now fill cylin-
derto approximately9 oz.of CO2gas,butitmust beweighed.
•To weigh cylinders, first weigh the cylinder when it is com-
pletely empty. Then weigh cylinder again when it is filled.
Subtract the empty weight from the filled weight to tell the
net weight of CO2 gas in the cylinder. Do not exceed 9 oz.
net weight.
NOTE: If 9 oz. cylinder leaks after filling and removing from
bulk cylinder, tap valve pin with small ball peen hammer to
clear dry ice from the valve seat.
12
WARNING: Do not overfill 9oz. cylinders. Do not store
full cylinders in a high temperature area. Always use
caution when filling and handling high pressure con-
stant air cylinders.
Warranty and Repair Policy
Tippmann Pneumatics, Inc. is dedicated to providing
you with the ultimate paintball gun and the quality
support necessary for the utmost satisfaction in its use.
Tippmann Pneumatics, Inc. warrants that this product
is found free from defects in materials and workmanship
for a period of 1 year from the original date of purchase
by the initial owner/purchaser. On claims submitted as
outlined, Tippmann Pneumatics, Inc. will repair or
replace, without charge, any of its guns that have failed
through defect in material or workmanship.
In the event warranty or other non-warranty related
repairs are required, send the product(s) to Tippmann
Pneumatics, Inc. We strive to complete the necessary
repair work within 24 hours and return it to you via
regular ground UPS. For assistance with warranty and
repair call 1-800-533-4831.
Note: If you should encounter any problems with your
gun and you have aftermarket parts on your gun, please
test it with the original stock parts before sending it in.
13

Warranty or Repair Procedure
For warranty and non-warranty repair, ship or deliver
your product(s) to Tippmann Pneumatics, Inc., with
postage or delivery charges prepaid. Include a brief
statement regarding the requested repair, your name,
return address and telephone number where you can
be reached during normal business hours, if possible.
If you wish to have it returned quicker, request for next
day air and include your credit card number with the
expiration date.
Note:
The model number is just the name
of the gun and the serial number is
on the side of the gun. (Not the Pat. #)
Ship to: Tippmann Pneumatics, Inc.
3518 Adams Center Road
Fort Wayne, IN 46806
14
WARRANTY REGISTRATION CARD
MODEL ______________________ SERIAL # ________________________________
PURCHASED FROM ____________________________________________________
DATE_______ CITY ___________________________ STATE _______ ZIP _______
_____________________________________________________________________
YOUR NAME (Please print) _______________________________________________
STREET ______________________________________________________________
CITY ________________________________________ STATE _______ ZIP _______
PHONE # _____________________________________________________________
TIPPMANN PNEUMATICS, INC. 3518 ADAMS CENTER ROAD FT. WAYNE, IN 46806
P) 260-749-6022 F) 260-749-6619 www.tippmann.com
Model SL-68 II
COMPLETE WARRANTY CARD,
CAREFULLY TEAR OFF AT
PERFORATION AND MAIL. TIPPMANN
PNEUMATICS, INC.
Mail Completed Card to:
Tippmann Pneumatics, Inc.
3518 Adams Center Road
Fort Wayne, IN 46806
Table of contents
Other Tippmann Paintball Equipment manuals
Popular Paintball Equipment manuals by other brands

PLANET ECLIPSE
PLANET ECLIPSE GSL user manual

PLANET ECLIPSE
PLANET ECLIPSE CS3 .68CAL Workshop manual

BLACKPOINT
BLACKPOINT MARK 30 Owner's/operator's manual

PLANET ECLIPSE
PLANET ECLIPSE MG 100 user manual

PLANET ECLIPSE
PLANET ECLIPSE GEO2 Operator's manual

DIABLO PAINTBALL
DIABLO PAINTBALL LED MONGOOSE BBS user manual