TIS Aero Share User manual


Table of contents
Table of contents ____________________________________________________________ 2
Important Safety precautions __________________________________________________ 3
Besides, this user manual aims to provide the most updated and accurate information to
customers, and thus all contents may be modified from time to time without prior notice. Please
check with your local dealer for the latest version of this manual. _________________________ 3
Product Feature Synopsis: ____________________________________________________ 4
Feature Synopsis: _________________________________________________________________ 4
Package Content: __________________________________________________________________ 5
Product Specification: ______________________________________________________________ 6
Hardware Introduction: Transmitter _____________________________________________ 7
Overview: ________________________________________________________________________ 7
LED indicator of AeroShare Hardware Transmitter: ______________________________________ 7
Video Mode and Presentation Mode on Tx: ____________________________________________ 7
Hardware Introduction: Receiver _______________________________________________ 8
Overview: ________________________________________________________________________ 8
How to install AeroShare Receiver (Rx): _______________________________________________ 8
Assemble the Power adapters: _______________________________________________________ 9
How to pair Rx & Tx: Wi-Fi Pairing/ Hotspot Mode ________________________________ 10
Hotspot mode: Use AeroShare as an Access Point _____________________________________ 10
Wi-Fi mode: Use local Wi-Fi as an Access Point. _______________________________________ 12
Function Introduction _______________________________________________________ 13
Key introduction: Home Page _______________________________________________________ 13
Assistive Touch: _________________________________________________________________ 14
Assistive Helper __________________________________________________________________ 14
Setting in the function pie: _________________________________________________________ 15
Operation: _________________________________________________________________ 17
A. Annotation: Annotation tool could be open any time. _______________________________ 17
B. AirView: _____________________________________________________________________ 19
C. Screenshot: _________________________________________________________________ 19
D. Record: _____________________________________________________________________ 20
E. Streaming ___________________________________________________________________ 21

Important Safety precautions
About this guide:
Please read and understand all safety information before installing and using this product. Follow
all instructions marked on the product and described in this, or other documents to ensure a safe
use, maintain the full-service life, and bring the best performance of the product into full play. Pay
attention all the usage and installation warnings and safety precautions. Store this user’s manual
near the product for later reference, and to instruct all future users of this product.
Besides, this user manual aims to provide the most updated and accurate information to
customers, and thus all contents may be modified from time to time without prior notice. Please
check with your local dealer for the latest version of this manual.
The illustrations and images in this guide are for your reference.

Product Feature Synopsis:
Introduction:
AeroShare is a wireless device for mirror-casting content in any HDMI-interfaced devices. It is
most ideal for use in corporate presentation, video viewing in large group, or, even live-
streaming. Users expect device can cast their display instantly, apps to launch and to control at
their fingertips, and high resolution with reliable, scalable way. It is a device which is compatible
not only with hardware, but software solution from other Operating System as Android OS,
windows OS, iOS, MacOS, Chrome OS are also available with. AeroShare provides a brain new
idea with improving meeting room efficiency, engagement, and productivity.
Feature Synopsis:
Features
Description
Plug & Play
Set up AeorShare Rx with HDMI & power adapter, and
connect HDMI & USB cables on Tx, and click the button on
your Tx to start presenting immediately.
No Software Installation
No need for software installation or execution. Just plug into
your PC or Mac with HDMI & USB interface and start
presenting immediately.
Video/ Conference Mode
Switch button between Conference mode and Video mode for
precise frame rate and smooth 1080p video.
Point to Point Connection
You could use the Rx as Wi-Fi router, and start the
presentation without using environment Wi-Fi.
4 Split-screens
Support 4 split screens mirroring. It would enhance the
meeting efficiency for group meeting communication and
information integration.
Cross Platform Compatible
Compatible with Windows OS, Mac OS, Android, Chrome,
iOS,
Touch-back Control
Using Interactive Flat Panel with AeroShare would be able to
control the laptop/computer while doing the presenting. It
supports max. 10 points touch.
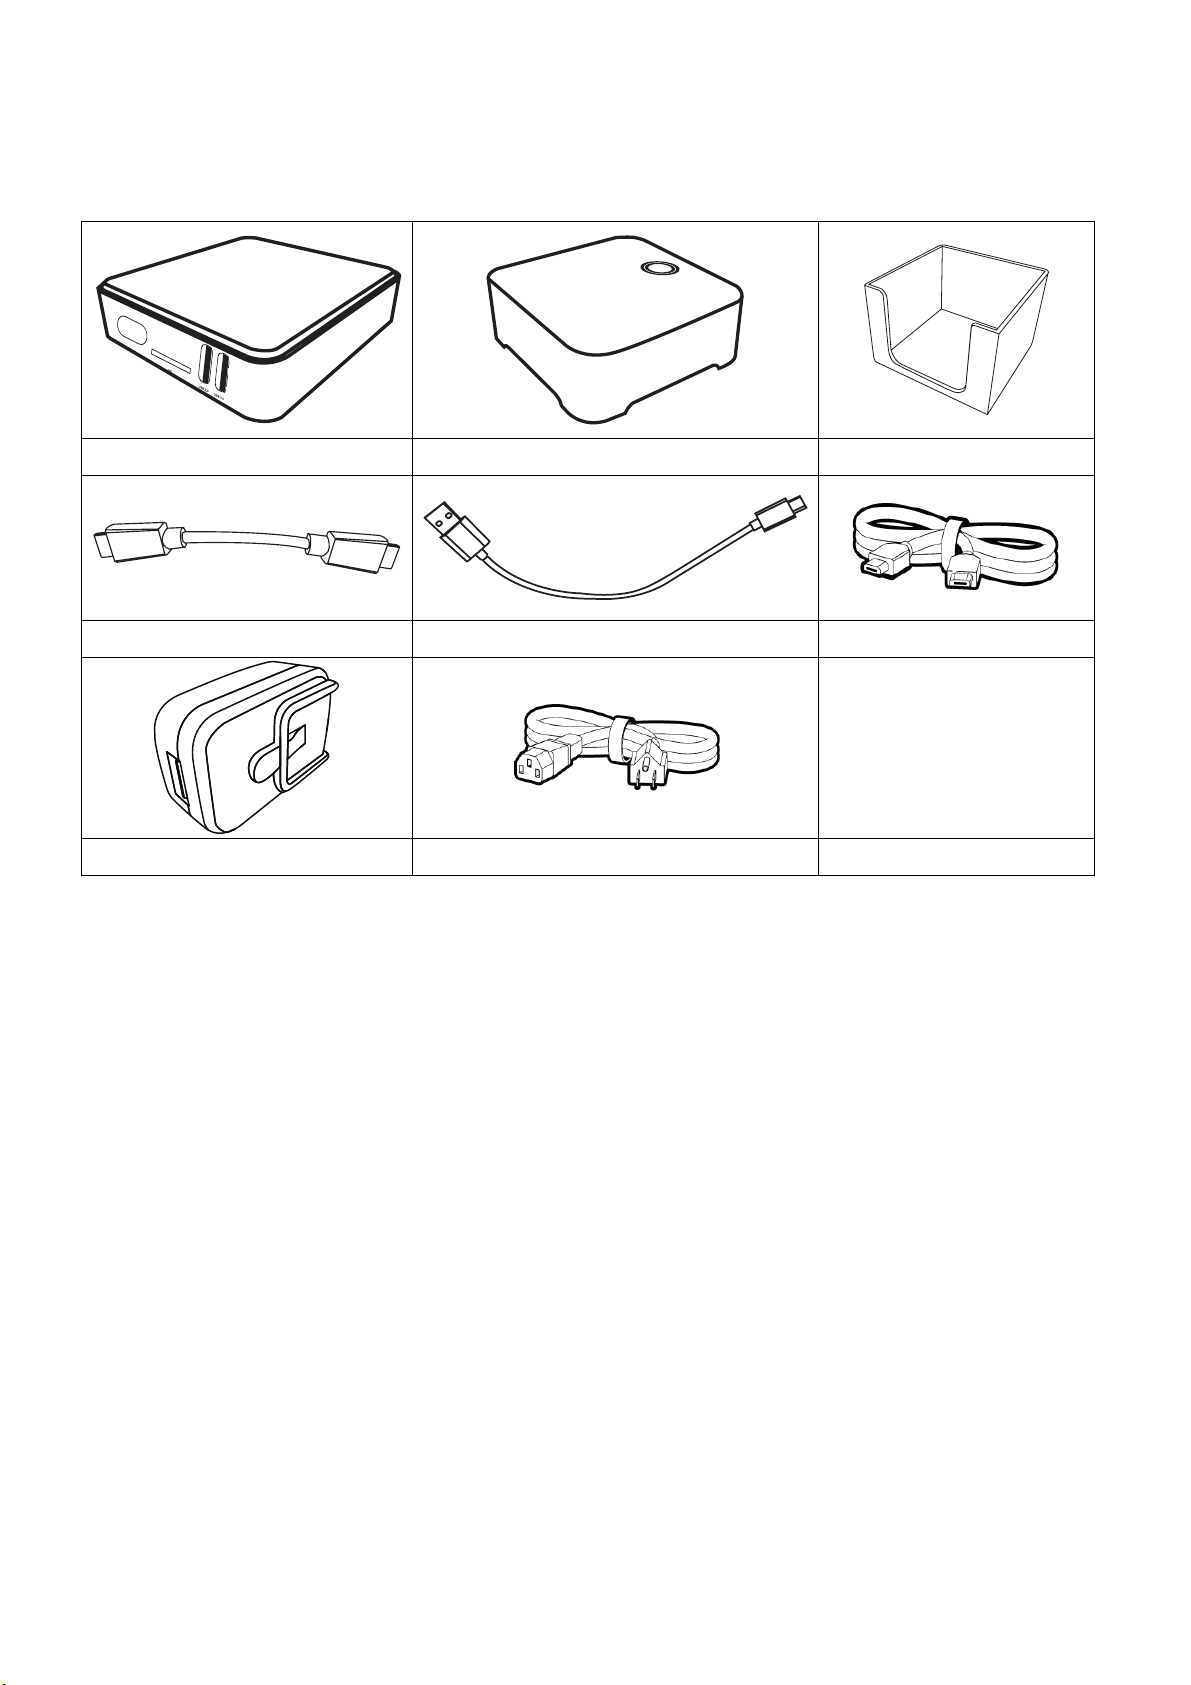
Package Content:
1x Receiver (Rx)
2x Transmitter (Tx)
1x Tx Holder
2x HDMI cable for Tx
2x USB cable for Tx
1x HDMI cable for Rx
1x AC adapter
1x AC adapter cable
Quick Start Guide
l Always keep the product and accessories out of reach of children.
l Use Original accessories to ensure compatibility.
l Available accessories and the pictures shown here may different from the product supplied
for your region.
l The standard AeroShare kit consists of a AeroShare Receiver and two Transmitters. If
needed, you can buy additional Transmitter and holder to store the Transmitter.

Product Specification:
General Specifications
Support Platform
Windows, Mac, Chrome, Android, iOS
Video Outputs
HDMI 1.4a comply with HDCP
Output Resolution
Max. 1920x 1080
Input Resolution
Max. 1920x 1080
Simultaneoulsy
Connections
Max. 64*
Reach
Max. 10m
Operating Temp.
-5℃~45℃
Operating Humidity
20%~80% RH
Storage Temp.
-20℃~60℃
Storage Humidity
5%~93% RH
AeroShare Transmitter
Wi-Fi
802.11 b/g/n, 2.4G 2T2R
Connection
MicroUSB x1, HDMI Type-A x1
Mode Key
Conference Mode/ Video Mode
Power Key
5V/900mA
Dimension
70 x 70 x 20 mm
LED
Red (Boosting), Green (Ready for connection),
Blue (Presenting)
AeroShare Receiver
Wi-Fi
2.4G/5G 802.11ac/a/b/g/n
USB
2 (USB Type-A 2.0x1+ USB Type-A 3.0x1)
HDMI In
1 (Type-A)
HDMI Out
1 (Type-A)
Power
DC Jack (DC 5521)
LAN
1 (RJ45)
SD Card Slot
1
Dimension
100 x 106 x 25mm
Power Supply
5V 2.5A
Button
Power Key
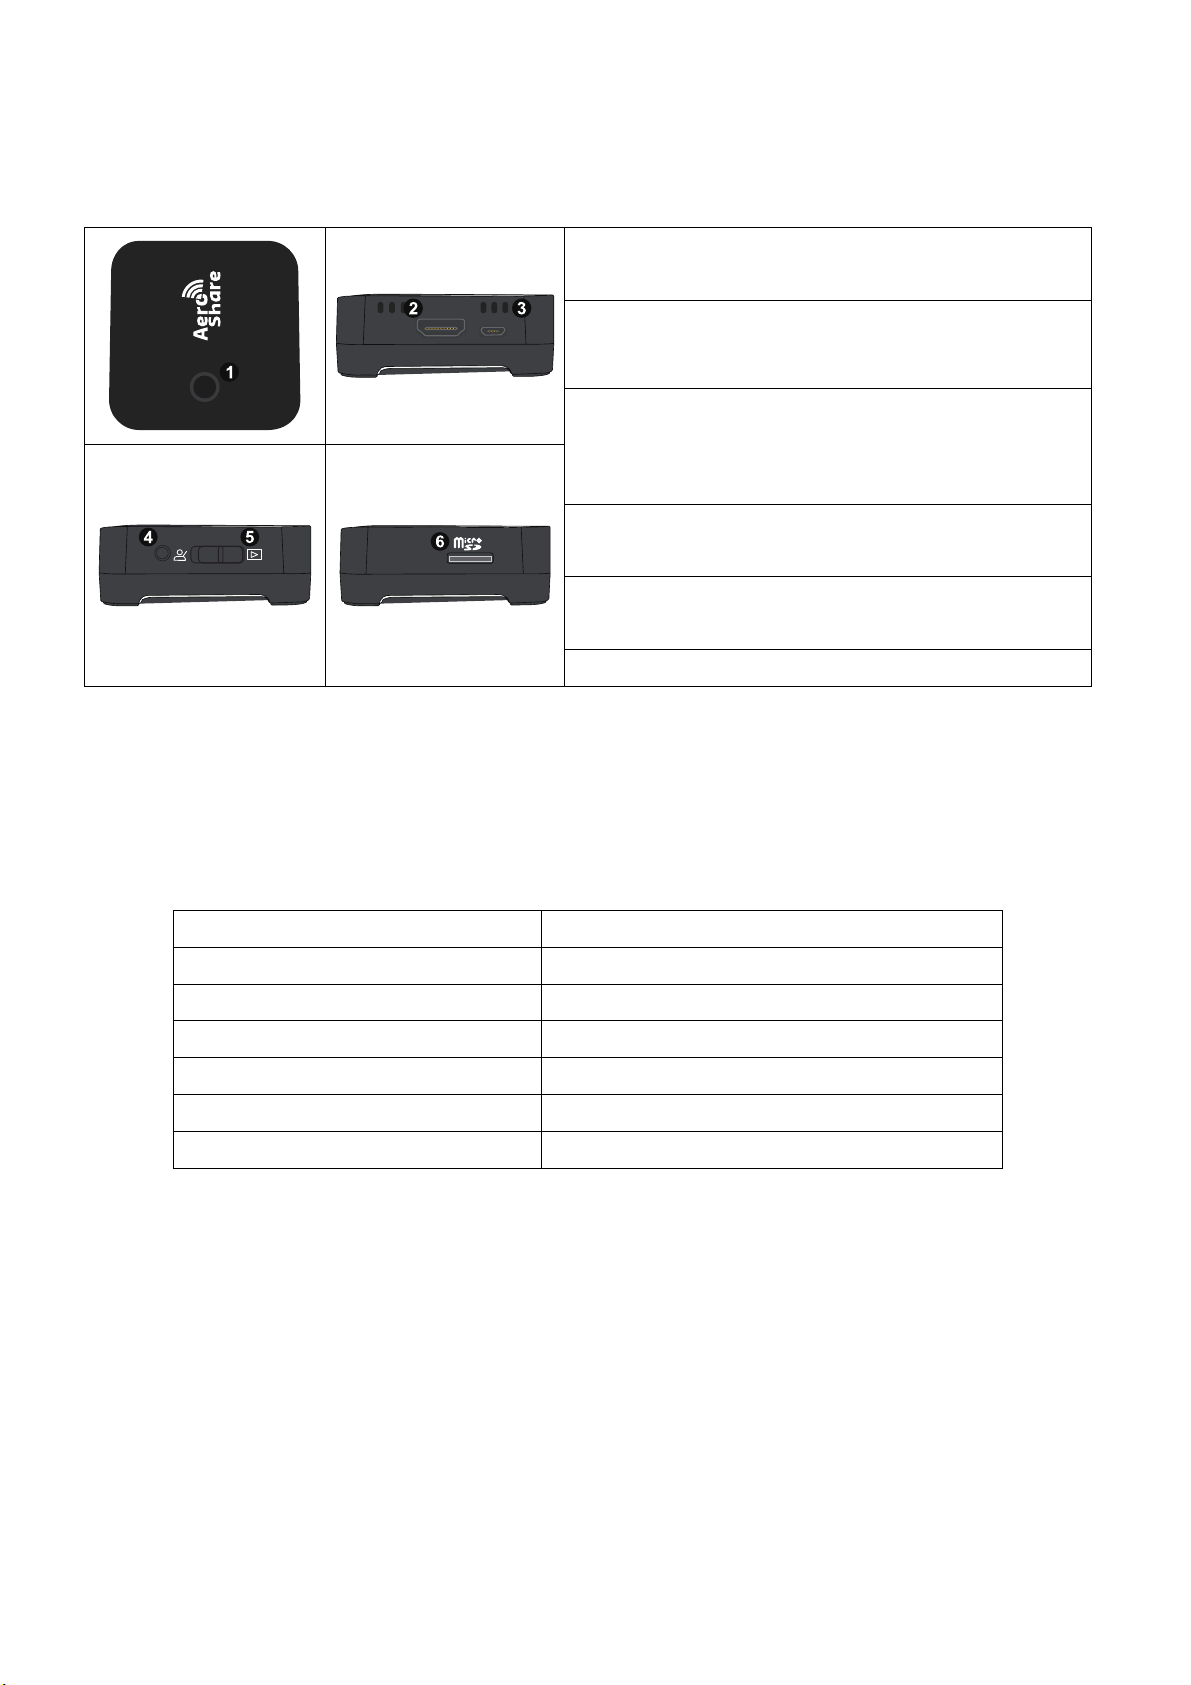
Hardware Introduction: Transmitter
Overview:
1.
Present key with LED indicator. (For LED
indicator, please see the tablet below.)
2.
HDMI: Provide Image and audio from the
computer
3. Micro USB: Provide Tx power & Touch back
control.
4. F1: Press and hold for 5 seconds to reboot
Tx
5. Slide Switch: Switch between conference
Mode/ Video Mode
6. Micro SD card slot
LED indicator of AeroShare Hardware Transmitter:
Please refer to the tables below for detailed indicator and status descriptions for
AeroShare Tx.
LED indicators on Transmitter
Status Description
Static Blue
The device is presenting
Flashing green
The device is unstable connecting.
Static green
The device is ready to start present.
Flashing orange
The device is not HDMI input source.
Flashing red
The device is not connecting.
Flashing white
The device is in pairing state.
Video Mode and Presentation Mode on Tx:
1. Presentation Mode:
By enabling presenter to quickly customize the projection productivity or wireless Full HD
video, users can confidently clear text, graphs, pictures by using presentation mode.
2. Video Mode:
If the presenter want to present video smoothly, switch to Video mode on Tx. The video image
on the display can play full HD video smoothly
HDMI
MicroUSB
F1
Mode

*AeroShare is primarily for the use of business presentation which documents such as
PowerPoint, Word, Excel, PDF.
How to connect Hardware Transmitter solution with computer
Connect the Transmitter HDMI (20cm) and USB connector to
the corresponding inputs of your laptop. The LED indicator of
the AeroShare Transmitter button will turn RED before pairing.
When the AeroShare is ready to present, the LED indicator will
turn Green
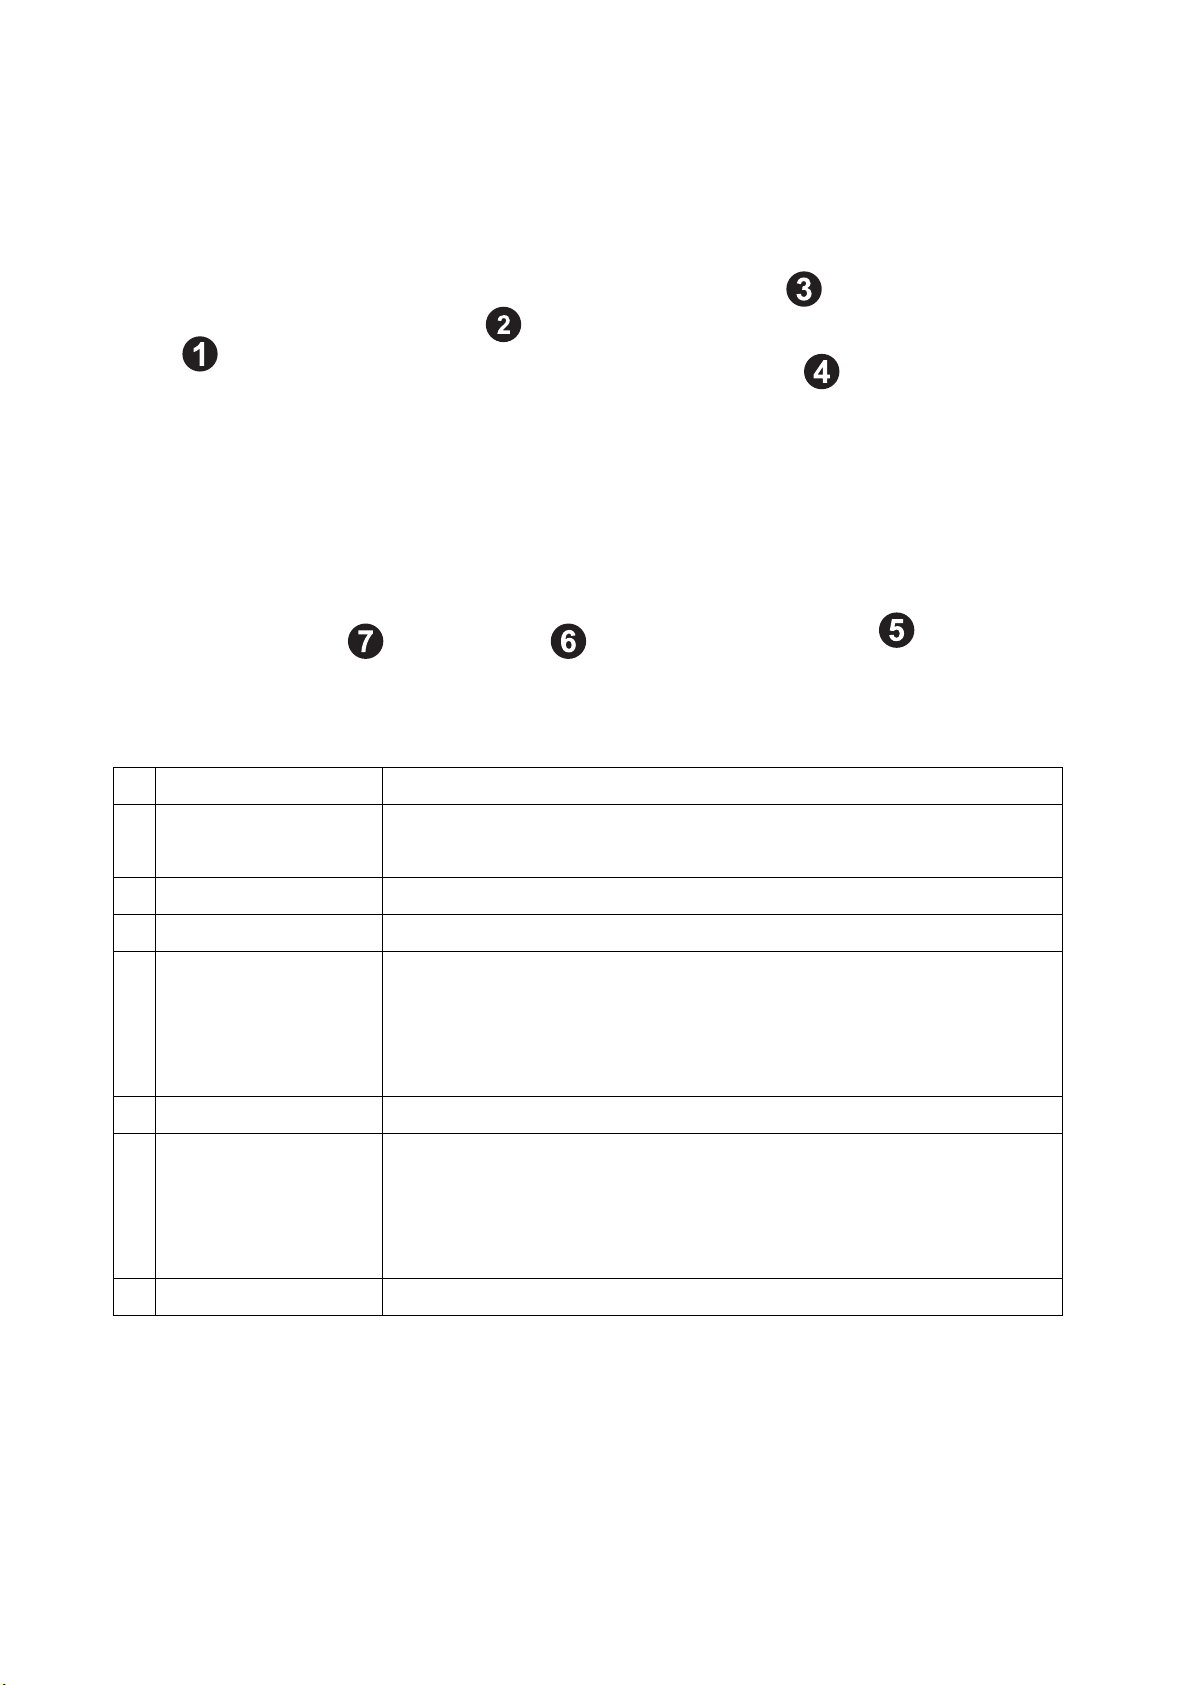
Hardware Introduction: Receiver
Overview:
1. Power Key: Press to turn the AeroShare Rx
on and off.
2. USB 2.0/ 3.0 port: Connect to USB 2.0 for
Touch cable, or, USB 2.0/3.0 for mouse.
3. SD Card Slot: Provide extra 32GB memory
to storage screenshot or videos.
4. LAN: Access to internet
5. HDMI IN
6. HDMI Out: Connect to a display using a
cable HDMI(A) to HDMI(A)
7. DC power port: Connect to an adapter for
power supply.
How to install AeroShare Receiver (Rx):
AeroShare Receiver is compatible with almost any HDMI interface devices, such as: IFPD, TV,
Projector...etc.
IR
NET POWER
USB 2.0 USB 3.0
SD
2
HDMI IN HDMI OUTLAN IR BLASTER DC
l USB B-type is only using for Touch device. You can also use USB mouse device to control
AeroShare.
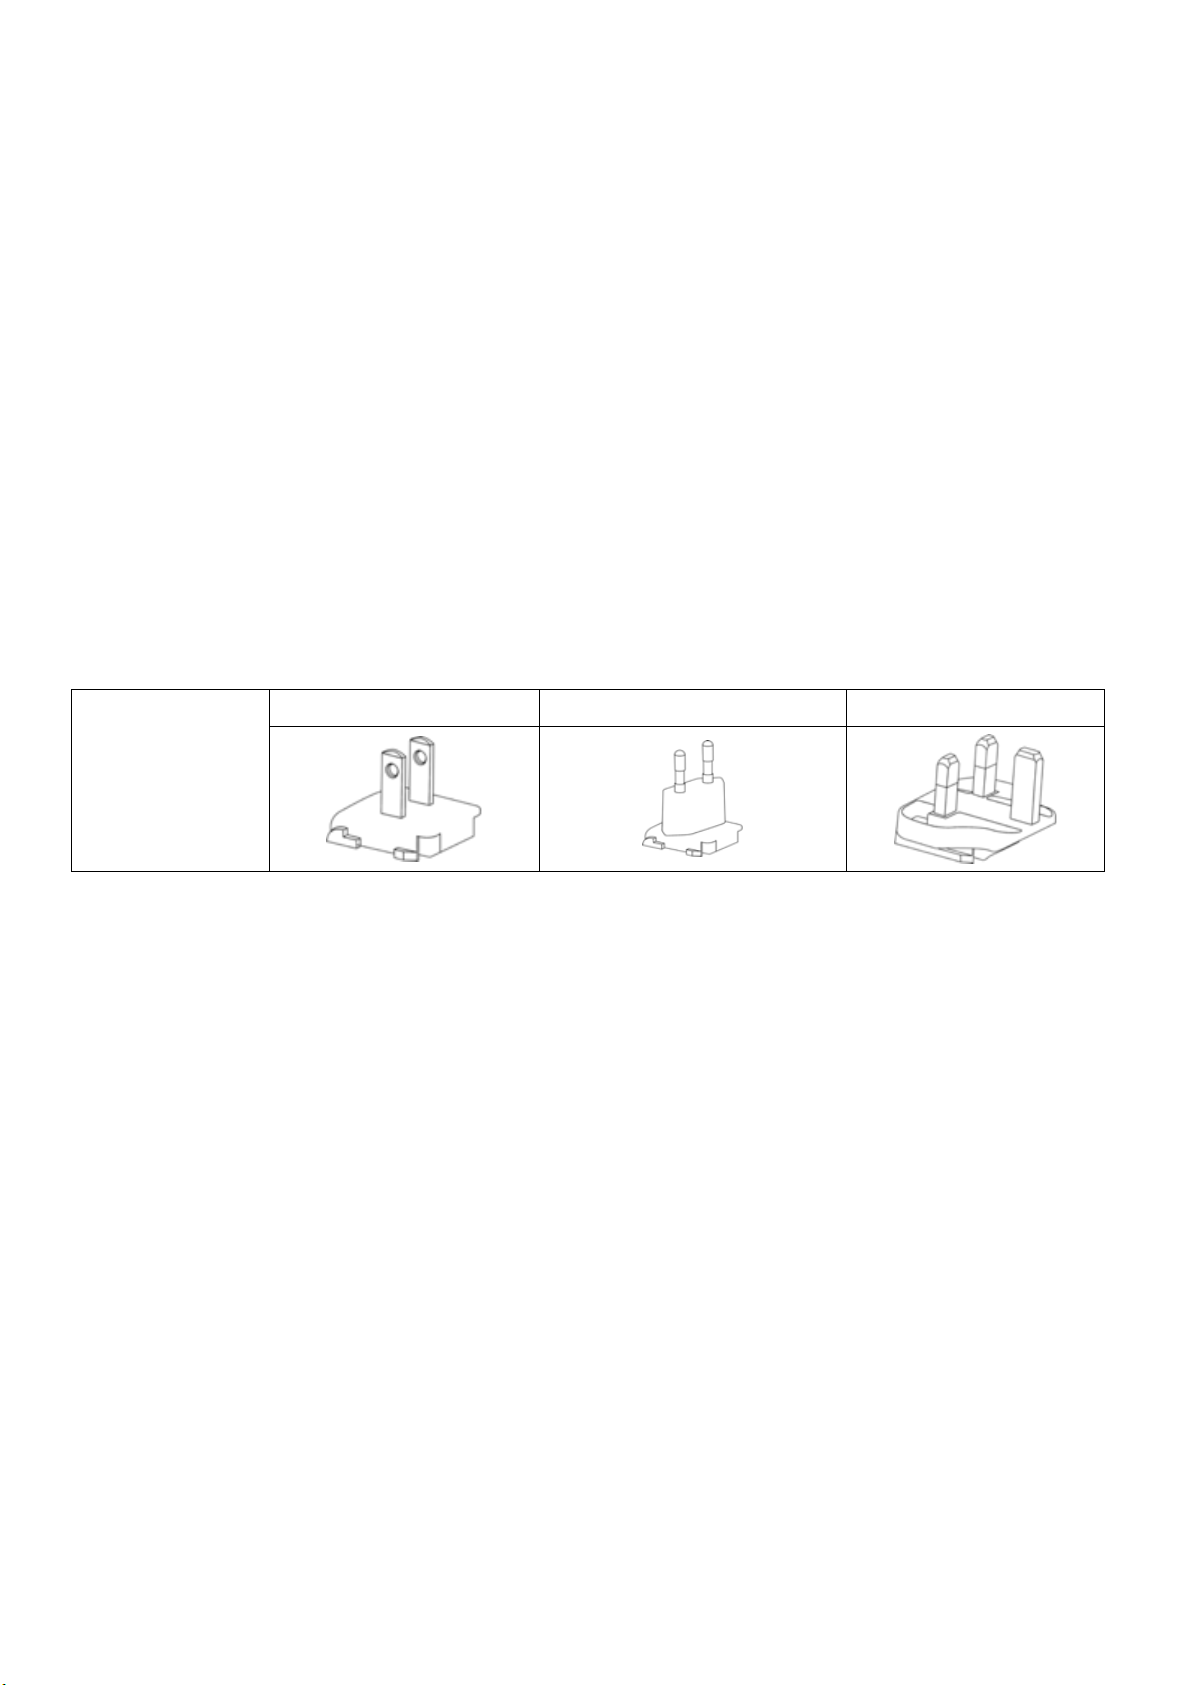
Assemble the Power adapters:
In the AeroShare Hardware box, there are three power plug adapters: USA, Europe, and UK, as
shown below:
Type
USA
Europe
UK
To connect the plug of your choice, follow the step below:
1. Align and insert the bottom hook to the adapter.
2. Close the gap by pushing the plug.
3. The adapter is successfully assembled when it clips into place.
Connect the supplied USB power adapter to the DC power jack of the AeroShare Rx and plug the
other end into a wall socket. The LED indicator on the power button of AeroShare Rx lights up
static Green when it starts.

How to pair Rx & Tx: Wi-Fi Pairing/ Hotspot Mode
Note: All Tx & Rx are paired in factory, therefore it is not required to pair again if you are using it
out of box.
However, when changing to Wi-Fi or adding additional Tx, please follow the pairing steps below:
Hotspot mode: Use AeroShare as an Access Point
Note:
l You can plug in the LAN cable in RJ45 port, if you need to access internet while using
AeroShare hotspot mode. However, please completely connected before power on. If not,
please press the power button on Rx to re-start to avoid double IP occurrence.
Step 2
Press hold down until the
LED flashes white.
F1
Mode
Step 1 Open the Basic setting mode, and choose “Wi-Fi
HDMI Tx Pairing”.
Wi-Fi HDMI Tx Pairing
AeroShare 1234Software Sever Name
Login Code
Login Code Switch Random
Basic Mode Overwise On
Attendee Preview 3
Basic
Step 3 Get the password of Wi-Fi router and start pairing.
SSID of WiFi router
Password of WiFi router
AeroShare 1234
..................
Firmware update Pairing
Step 4 The LED turn green & restart the AeroShare app
again.
F1
Mode
F1
Mode
Flash
Red Green
After Pairing

Setting Hotspot:
In Android setting, click “more” and choose “Tethering & portable hotspot” to the hotspot setting.
You could also choose “Set Device Name” to change the hotspot SSID.
Click set up Wi-Fi hotspot, it would be able to check hotspot setting and passwords. (Note: The
default of hotspot password is: 12345678)

Wi-Fi mode: Use local Wi-Fi as an Access Point.
1: Open Wi-Fi: Open Android Setting menu and click Wi-Fi to the setting menu.
2: Select the name of your Wi-Fi network from the list of available networks.
3: Enter your Wi-Fi password and then tap Connect to finish.
Back to the homepage, the SSID would be shown under the Connect To sign.
Note: if you change Wi-Fi/ hotspot setting, the paired hardware Transmitter must be paired again.
Please follow “How to pair hardware Transmitter” step instruction below
Function Introduction
Key introduction: Home Page
Item
Description
1
Assistive Touch
Control panel for other function such as screenshot, system
setting, application.
2
Receiver Name
The receiver name of this device.
3
Mode
Basic Mode/ Conference Mode
4
Connect To
a. Show the upper AP router SSID via Wi-Fi connection.
b. Show the “Receiver Name” when using the receiver as the
Wi-Fi hotspot.
c. Show “LAN” via LAN connection.
5
Assistive Helper*
The control panel and main functions of AeroShare Display.
6
AirView
When connecting to the same network domain, enter the IP
address through internet browser to see screen mirroring on
your own device.
Share the image to Max. 64 participants**.
7
Login Code
4 digits to ensure client connect to the correct receiver server.
*For more details about “Assistive Helper”, please see the function introduction on Page 14
** The max. Participants of AirView is depends on the internet environments.
Assistive Touch:
Item
Function
Floating
Ball
Click to expand the floating ball on the left hand side of
AeorShare home page.
See the functions button below.
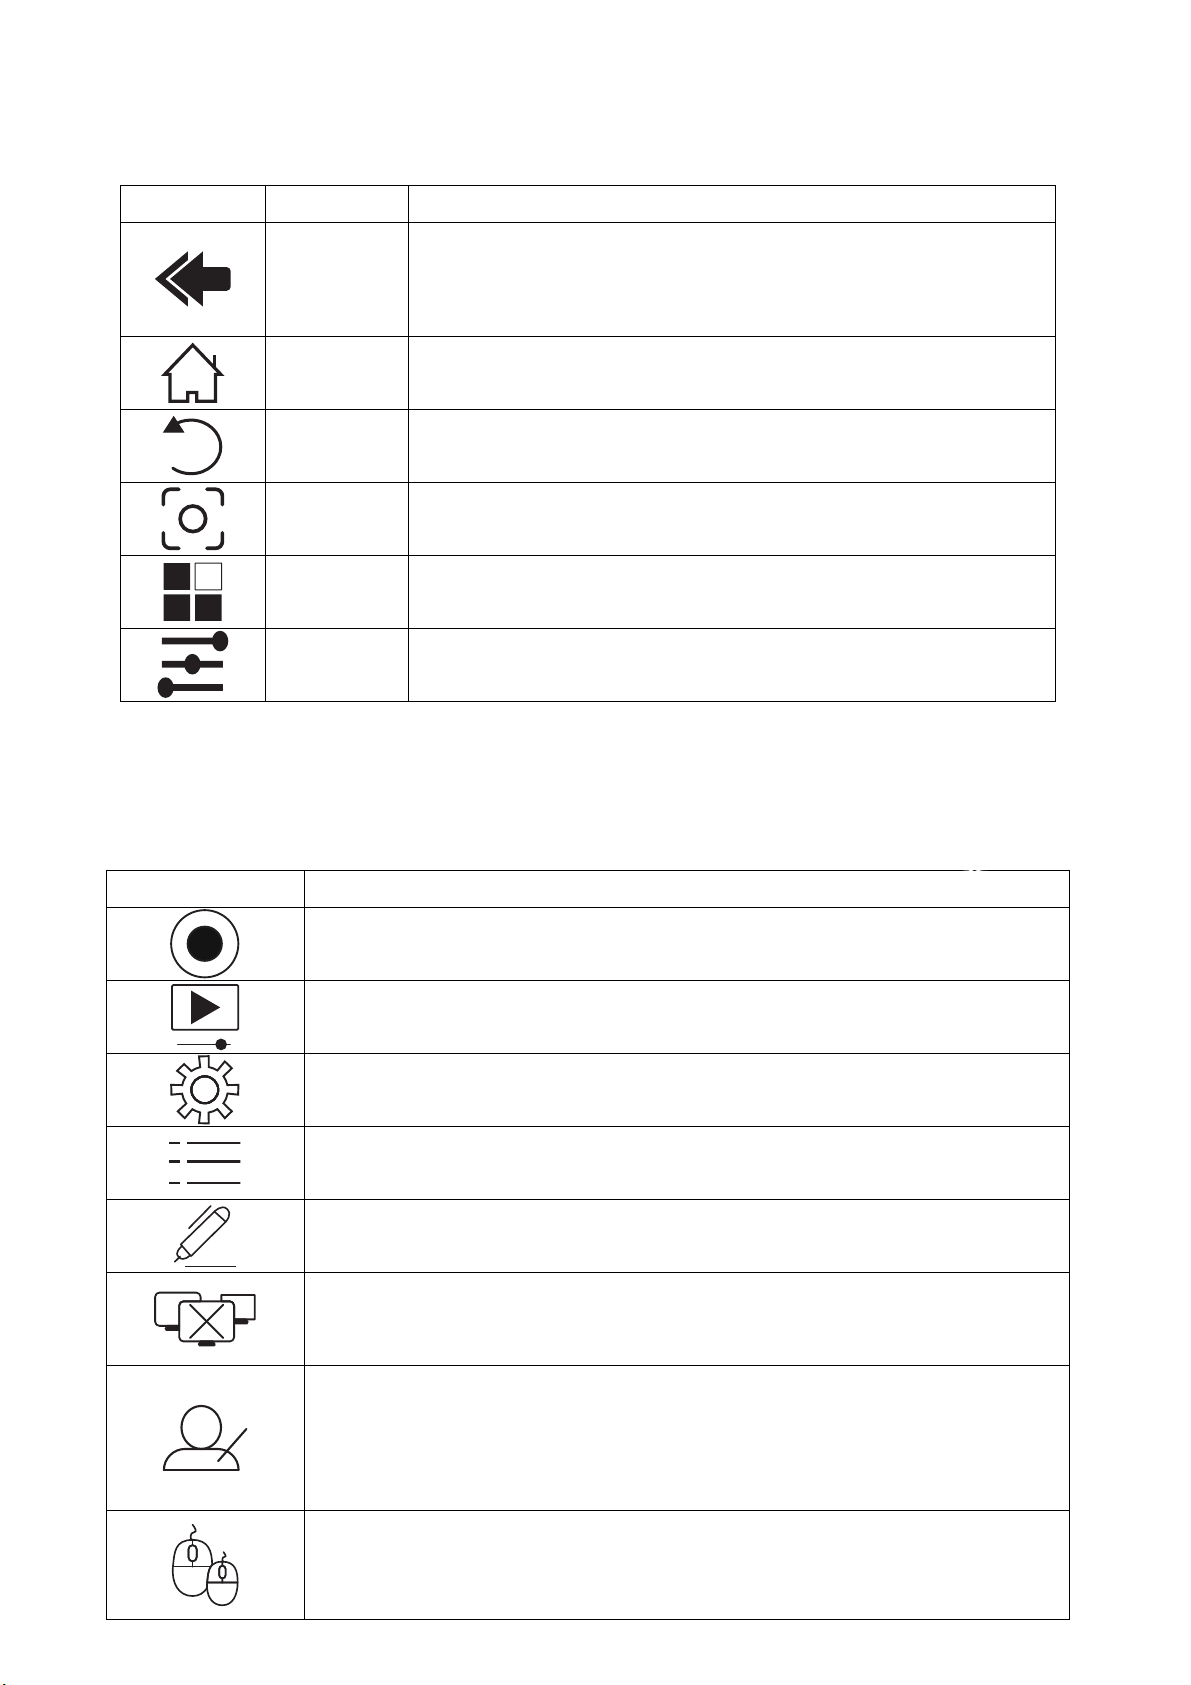
Home
Return to the Home page
Back
Return to the previous page.
Screenshot
Take screenshot, and keep in the AeorShare Rx memory.
Application
Open application installed in the Tx.
Android
Settings
Open Android settings.
Assistive Helper
Press the Assistive Helper to open the function pie in anytime, press again
to fold the function pie
Function Key
Description
Record: Record your screen into storage.
Live Stream: Live stream your screen to the streaming platform.
Go to the settings window of AeroShare receiver server.
Show Tx’s screens preview on the left side bar.
Annotation: Drawing annotation on the screen and save the image in
the storage.
Stop: Stop all mirroring screens on the receiver.
Switching between Basic Mode and Conference Mode.
Basic Mode: No matter what kind of device would be able to log in only
if they can get the login code.
Conference mode: Only H/W Transmitter could share their image.
Enable/ Disable Touch-back control function. Controlling from Display
to Windows/ Mac/ Chrome PC.

Setting in the function pie:
Basic:
Software Server Name
Setting Device Name
Login Code
Setting Login Code when Login Code Switch to “ON”
Login Code Switch
Off/On/Random
Basic Mode Overwrite
On/Off
Attendee Preview
Preview list setting in conference mode
Version
AeroShare Firmware could update if there’s new
version release.
Network Priority
Wi-Fi or Ethernet
Enable AriView
Enable/ disable AirView function

Live: Setting information while streaming on YouTube
Resolution
1080p@ 30fps
Bit Rate
Normal
RTMP URL
The data information would be assignment automatically when
click “URL & Key File” and choose the txt. Document.
Stream Key
Record:
Record Target
Storage
Record To
Primary: Movies
Resolution
1080p@60fps/ 1080p@30fps/ 720@60fps
Bite Rate
High/ Normal/ Low

Operation:
A. Annotation: Annotation tool could be open any time.
Pen Tool
Adjust the size and color of Pen.
Highlight Tool
Adjust the size, transparency, color or
highlight.
Shape Tool
Adjust the Size, shape, color.

Text Tool
Adjust font size, font color, font type.
Eraser
Adjust the size of eraser
New Page
Create new page.
Setting
Adjust the color of your background,
Select ‘Version’ to check the annotator
version that installed
Select ‘Cancel ’to return to annotator
Select ‘Apply’ to apply any change
Exit
Select ‘Pause’ to pause annotator
Select ‘Exit’ to exit annotator
Minimize

B. AirView:
AirView allows screen content sharing from main display to laptop, tablet PC and smart phone
devices while having a meeting in a large convention room. Access the IP listed on AeroShare
opening screen, and connect to the same SSID with AeroShare, viewers may see main display
content on his own device without installing any software.
C. Screenshot:
Click the assistive Touch and choose the screenshot button. It would be storage in the internal
storage or SD card.
How to move the screenshot to USB flash driver:
1. Open the Android setting menu, and choose storage & USB.
2. Choose the internal storage and check the “Images file” in your memory.

3. Choose the screenshot picture and press the picture for 5 seconds to select the image you
want to move.
4. On the menu of your right, choose the menu: copy to, to choose the destination of the image.
D. Record:
Record Directory set up: Click “Browse” to choose a directory, and click “setting button” at the top
right, and choose “show SD card”. Select the Storage to save the record file.
Table of contents


