Tisira TFGC969E User manual

USER MANUAL
UPRIGHT COOKERS
TFGC969E
IMPORTANT // Please ensure that you read through this manual prior to
installation and use. This user manual contains important information to ensure
optimal performance and keep you safe.
1
www.tisira.com

HELLO
CONGRATULATIONS ON THE SELECTION OF THIS TISIRA APPLIANCE.
TISIRA APPLIANCES HAVE BEEN SPECIFICALLY DESIGNED FOR
AUSTRALIAN AND NEW ZEALAND KITCHENS.
Please read through this user manual carefully as it contains information that
will ensure that your appliance is installed correctly, important operating &
care instructions and also some advice of what you need to do if this
appliance is not performing as intended.
pg 2

CONTENTS
HELLO 2
CONTENTS 3
WARNINGS 4
OPERATING INSTRUCTIONS 5-8
OVEN TIMER 9-12
TABLE OF COOKING TIMES 13
MAINTAINING YOUR COOKER 14-16
INSTALLATION
17-18
CONNECTIONS 19-21
PRODUCT SPECIFICATIONS 22
TROUBLESHOOTING 23
CONTACT INFORMATION 28
pg 3

WARNINGS
• DO NOT MODIFY THIS APPLIANCE.
• DO NOT SPRAY AEROSOLS IN THE VICINITY OF THIS APPLIANCE WHILE IT IS IN
OPERATION.
• DO NOT STORE OR USE FLAMMABLE MATERIALS IN THE APPLIANCE STORAGE
DRAWER OR NEAR THIS APPLIANCE.
•
• DO NOT USE THIS APPLIANCE AS A SPACE HEATER.
• Servicing should be carried out only by authorised personnel.
• Do not remove the plug by pulling the cable.
• In order to prevent accidental tipping of the appliance, for example by a child climbing
onto the open oven door, the anti-tilting chain must be installed. Refer to the
instructions on page 14.
• To avoid burns, young children should be kept away.
• This appliance is not intended for use by persons (including children) with reduced
physical, sensory or mental capabilities, or lack of experience and knowledge, unless
they have been given supervision or instruction concerning use of the appliance by a
person responsible for their safety.
• Children should be supervised to ensure that they do not play with the appliance.
• Accessible parts may become hot when the grill is in use. Children should be kept away.
• Very important: keep this instruction booklet with the appliance for handy references
• This appliance is designed for domestic use only.
• Keep packaging out of reach of children at all times. To avoid burns, young
children should be kept away.
• AFTERMARKET LIDS ARE NOT SUITABLE.
pg 4
OPERATING
INSTRUCTIONS
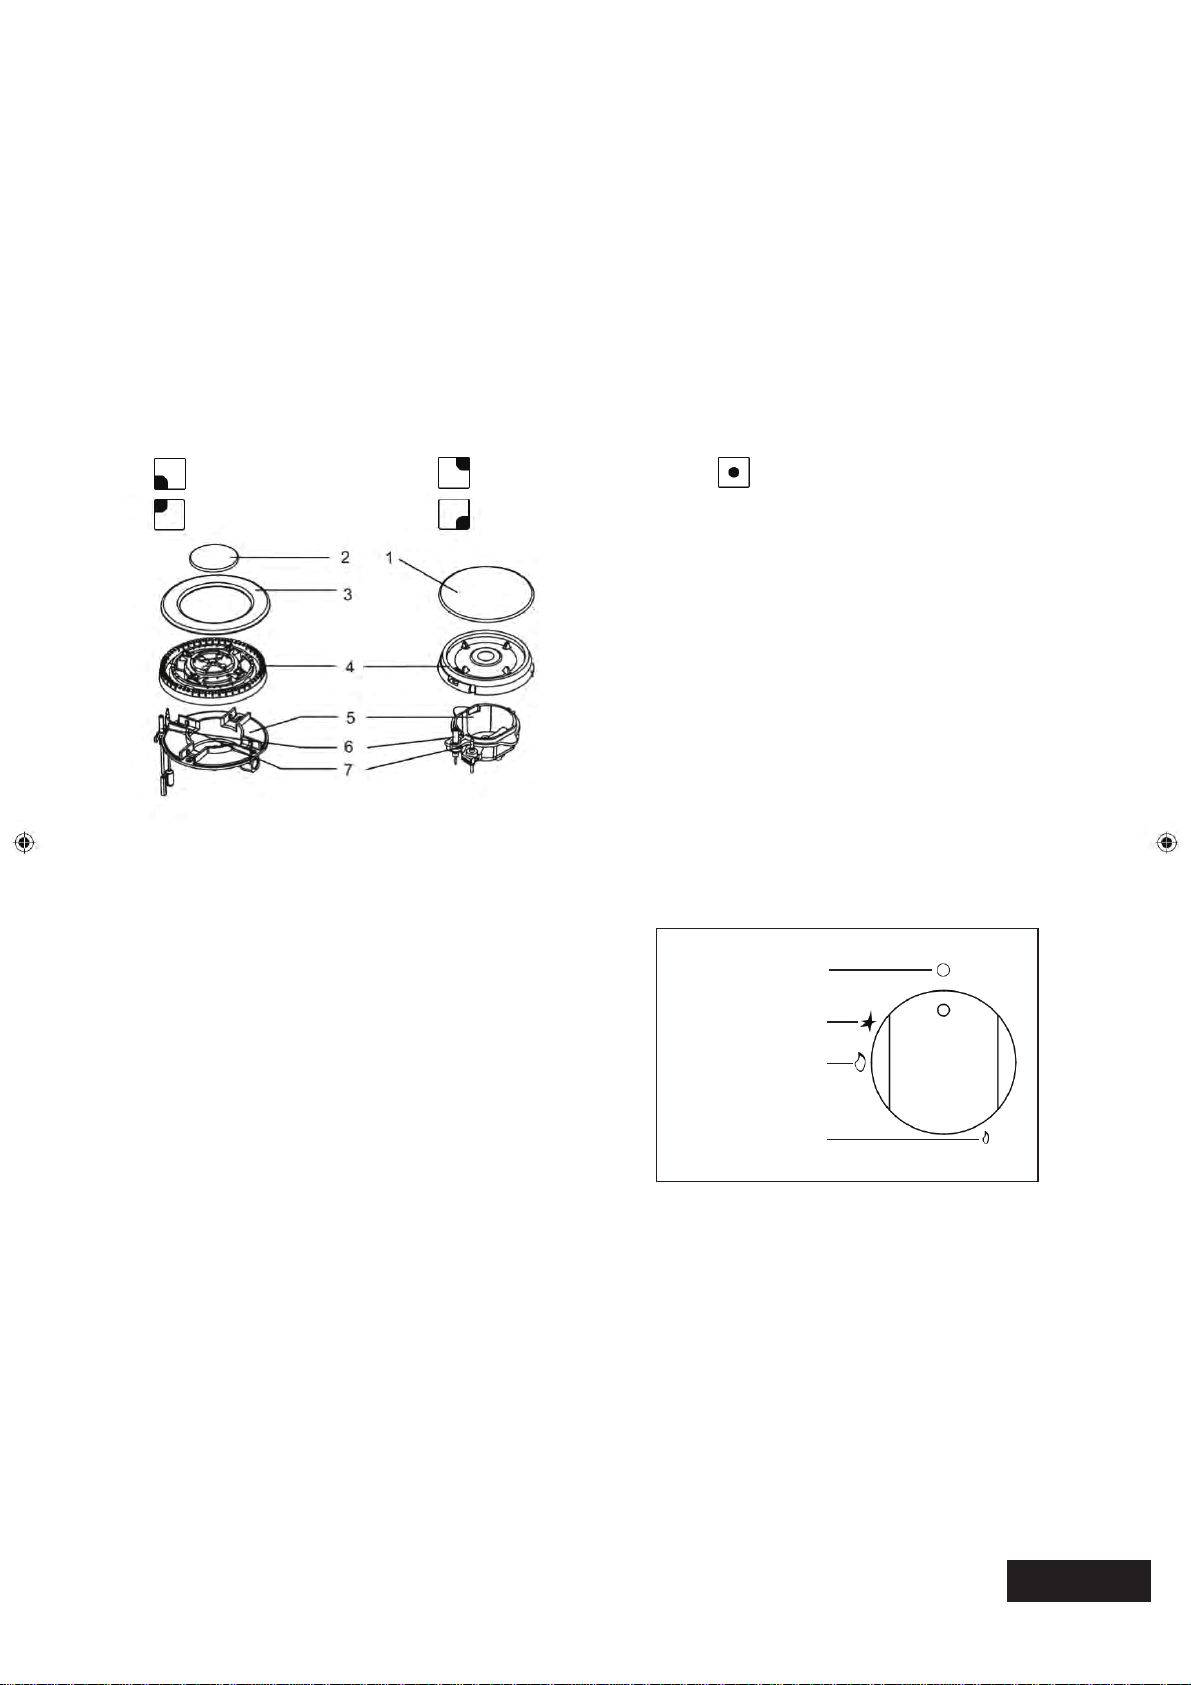
Description of symbols
Front Left Burner Rear Ri
g
ht Burner Central Burner
Rear Left Burner Front Ri
g
ht Burner
Burner cap
1.
2. Inner burner cap
3. Outer burner cap
4. Burner head
(
di user
)
5. Burner base
(
cup
)
6. I
g
nition candle
7. Flame failure device
(
thermocouple
)
INSTRUCTIONS FOR USE OF COOKTOP
Ignition and operation of the burners
•• To ignite a burner, push in the knob and rotate
anti-clockwise to the High Flame symbol.
•• Keep the knob depressed for 3-4
seconds to ensure that the flame failure
device keeps the burners lit.
•• Adjust the heat level by rotating the
knob between the Low Flame and High
flame symbols.
•• To turn the burner off, rotate the knob
clockwise to the Off symbol.
When the burners are lit check that the
flame is always regular. Before removing
the saucepans turn the burners off.
There shall be adequate ventilation of the
room when a rangehood is used at the
same time as appliances burning gas.
When a rangehood is not in use, ensure
that natural ventilation outlets are open.
1
1. Off 2
2. Spark 3
3. Hi
g
h Flame
4. Low Flame
4
Be careful not to place saucepans with
unstable or deformed bottoms on the
burners to avoid overturning or spilling.
If a burner shuts off accidentally, turn off at
the conrol knob and wait at least one
minute to re-ignite it.
pg 5

OPERATING
INSTRUCTIONS
Use the correct cookware.
•• Cookware should be centralised on the burner when in use.
•• Do not use round bottomed pans (e.g woks) without appropriate wok support
recommended by the manufacturer.
•• Adjust the flame according to the size of your cookware, not allowing the flame to extend
past the edge of the pan.
pg 6

OPERATING
INSTRUCTIONS
INSTRUCTIONS FOR USE OF OVEN
Adjusting the shelf/tray position
When adjusting or positioning your shelf, please ensure the
following:
1. Ensure that the shelf / tray is located between the two
wire sideracks. (see point 1)
2. The shelf stops should be facing downwards and towards
the rear. (see point 2)
3. The guard rail should always be located at the rear of the
oven (see point 3)
Before using the oven for the first time:
•• Remove all the special film covering the oven door glass.
•• Heat the empty oven at maximum temperature for 45
minutes.
•• Wait for oven to cool down then carefully clean inside with
a soft cloth moistened with warm soapy water and dry
with a soft cloth.
Using the Thermostat Control
•• Set the temperature by turning the thermostat control to
the desired level.
•• When a temperature is selected, thermostat light will
illuminate.
•• When the selected temperature is reached, the light will
turn off.
Thermostat Control
Attention // During use, the appliance becomes hot. Care should be taken to avoid
touching heating elements inside the oven.
Never line the oven with aluminium sheets as this can cause damage to the enamel.
pg 7
OPERATING
INSTRUCTIONS
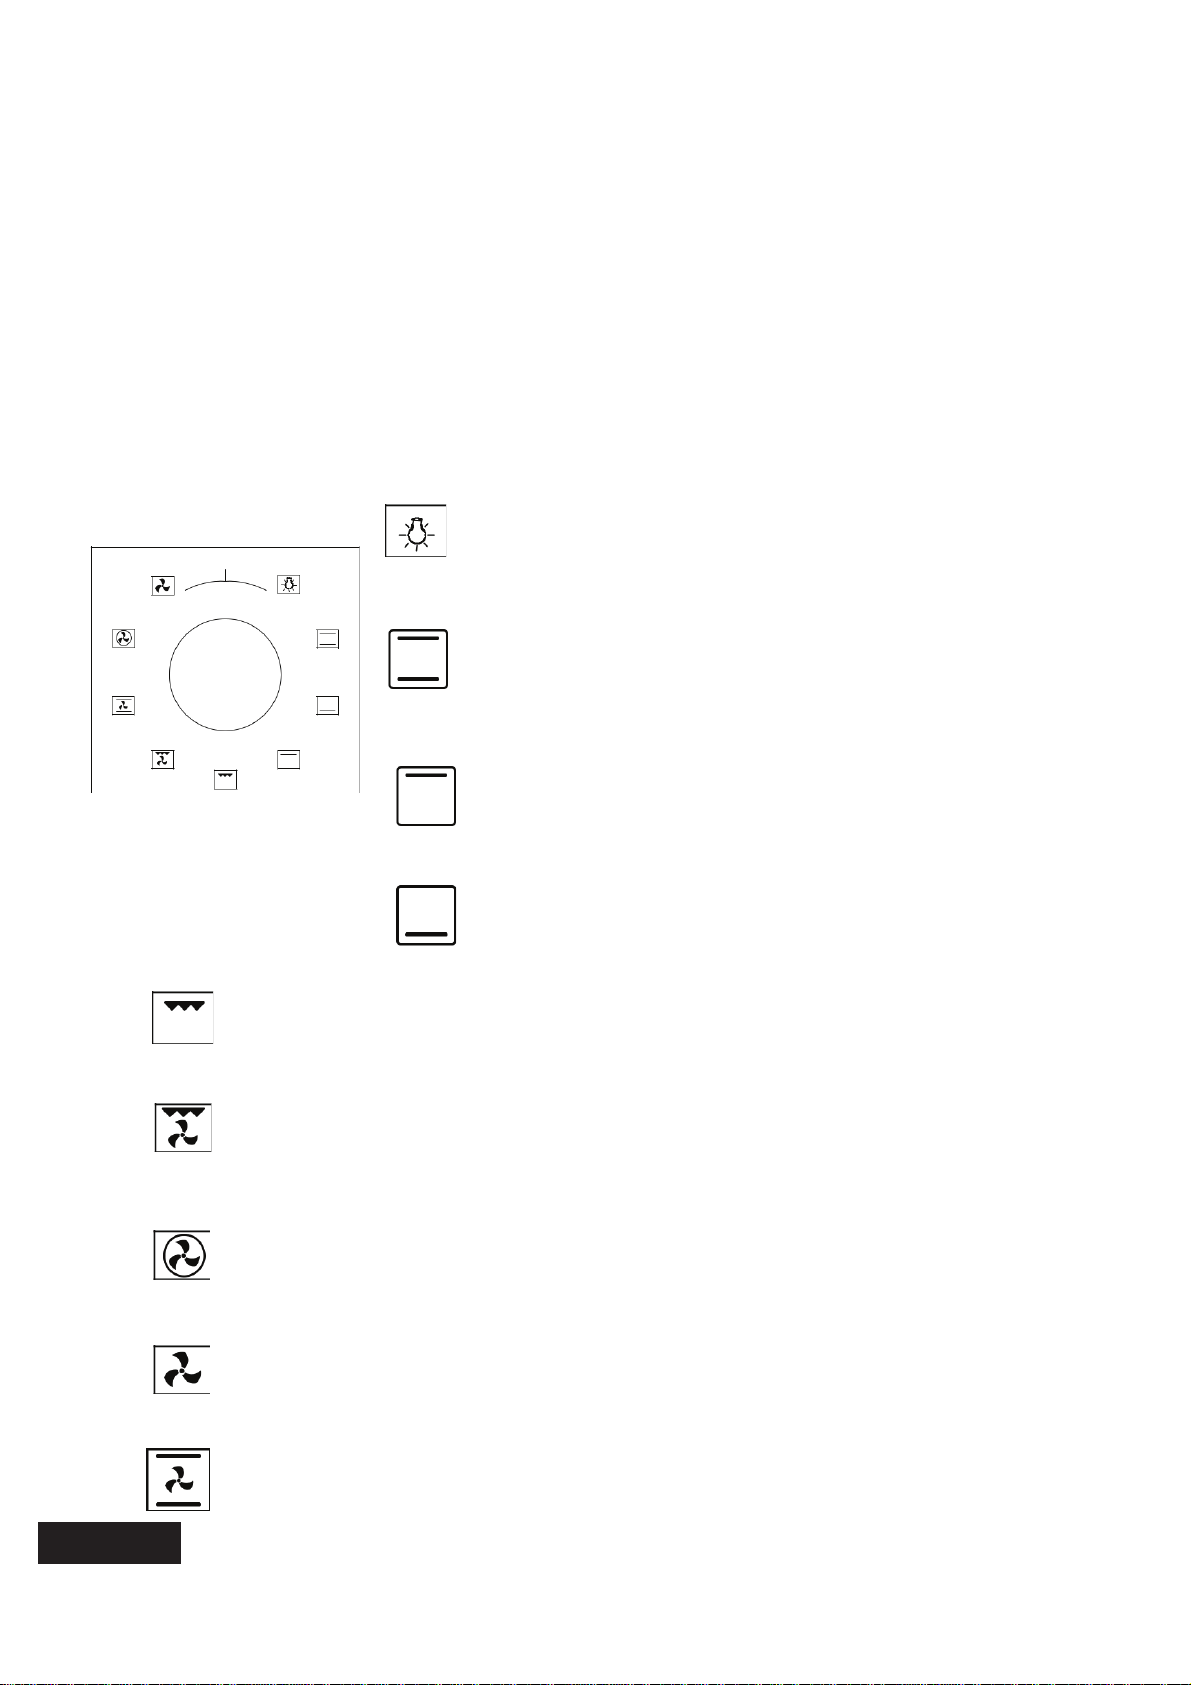
Using the Oven Function Selector
0
Function Selector
Lamp Function
The lamp can be turned on with no heating elements and
will turn on with all oven functions.
Conventional Cooking
Conventional cooking utilises the top and bottom elements.
This function is recommended for use with the middle shelf
position and is good for slow cooking casseroles, etc.
Top Oven
Top Oven cooking is recommended for use to brown the
top of food at the end of cooking.
LOWER HEATING ELEMENT
Select this program towards end of cooking time if
lower part of the food cooked will be roasted.
Grill Cooking
Grill Cooking should be used for melting cheese, toasting & browning. Ideally it should
be used for no more than 5 minutes. Use the upper shelf positions for best results.
Fan-assisted Grill
Fan-assisted Grill uses the grill element and oven fan to cook meats, vegetables
and poultry. In this mode, heat is radiated down then spread throughout the oven.
To achieve the best results, use the middle tray position.
Fan-Forced Cooking
Fan-forced cooking uses a circular element and the oven fan to evenly spread heat
throughout the oven. Food can be cooked in any shelf position when using this mode.
Defrost Mode
Defrost mode uses the oven fan to circulate room temperature air around the food. It can
be used for all types of food. The defrosting process can be accelerated by using the “Fan-
Forced” function on low heat. For the best results, use the middle tray position.
CONVENTIONAL COOKING-FAN
The program suitable for cooking foods like cakes, dried cakes, lasagne. Suitable for
cooking meat dishes, as well.
pg 8
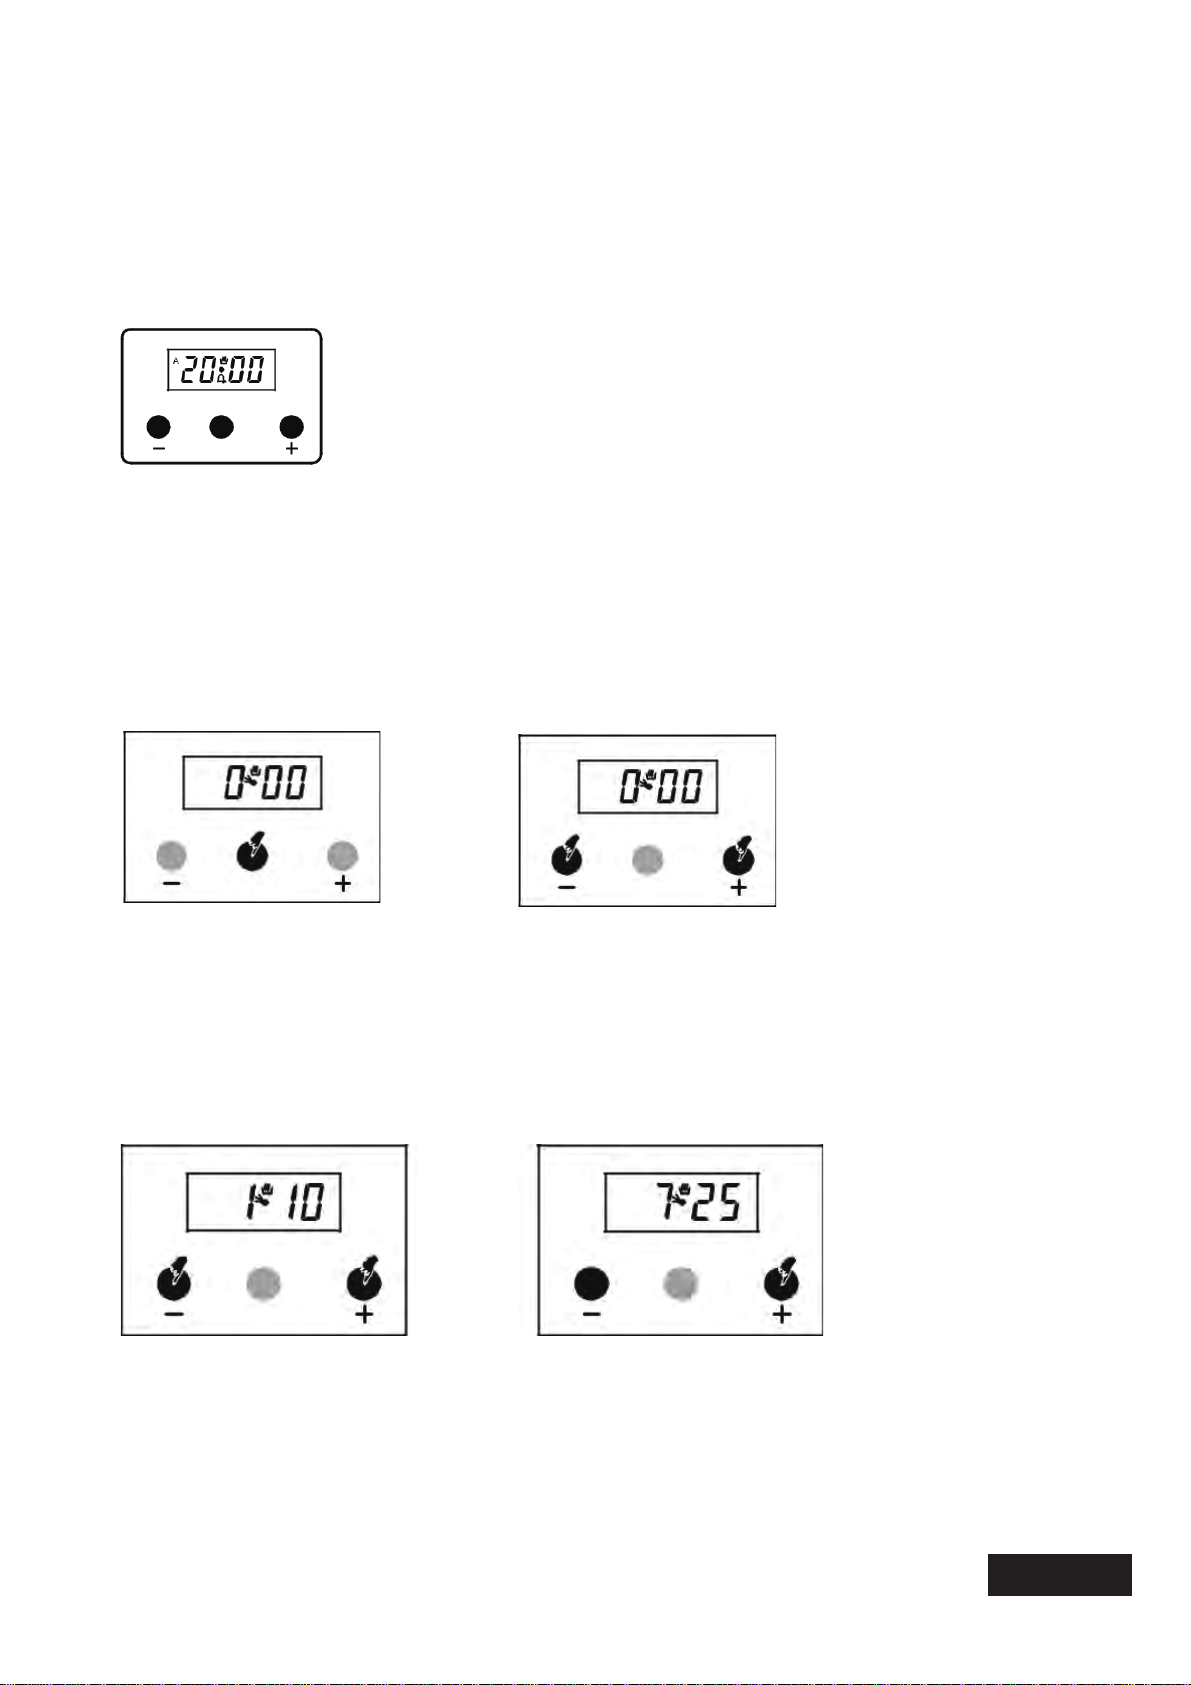
OVEN TIMER:
GENERAL OVERVIEW
Is an electronic timer, which enables you to get the food ready to serve at the desired time. The only thing to
be done is to program the cooking time and ready time. It can also be used as an alarm clock, where you just
give in the amount of time after which it should remind you by a buzzer tone.
POWER UP
On power up, clock (0:00) and ‘A’ is flashing on the screen. The timer cannot be programmed and the clock
has to be adjusted. In order to program the timer, you have to enter first the manual mode.
MANUAL MODE
or
TIME OF DAY ADJUSTMENT
This adjustment can only made when no cooking program is in progress. First, press buttons + and –
simultaneously. Then adjust the clock forward direction using + button and reverse direction using – button.
Long presses of those buttons will result in fast changes.
Note:Unless the + or – button are pushed within 5 seconds, time of the adjustment mode will be set
automatically. If you want to set the time manually, press + and – buttons simultaneously.
1. Press ‘M’ button in
order to enter enter
manual mode.
2. Press + and – buttons
simultaneously in order
to enter manual mode.
1. Press + and –
simultaneously. 2. Using + and – buttons
adjust time of the day.
pg 9
M
M
M
M
ADJUSTING THE BUZZER ALARM
With this feature, you can program after how much elapsed time you should be warned by a buzzer sound.
CANCELLING THE BUZZER SOUND
AUTOMATIC COOKING PROGRAM
If you want to start cooking immediately, you just have to give in the cooking time.
Example: We placed our food into the oven and want it to be cooked for 2 hours 15 minutes.
Now, you have programmed your oven to cook the food for 2 hours and 15
minutes. Please do not forget the function and/or the temperature knobs of your
oven to appropriate positions.
Note: You may cancel the automatic cooking mode any time by entering ‘M’.
1. Select adjusting the
buzzer alarm pressing
‘M’ button once. Icon
will flash.
2. Set the time with the +
or – buttons.
3. A few seconds later, the
screen will return to displaying
the current time.
1. Buzzer will sound
after the programmed
amount of time.
2. Press any button to
cancel sound.
M
M
M
M
M
+
M
M
M
1. Current time is 18:30
2. Switch to ‘M’ button 2
times to enter cooking
adjustment mode.
3. Adjust the cooking time
using the + and - buttons.
4. After a few seconds, the
screen will indicate that
cooking has started and
show the current time.
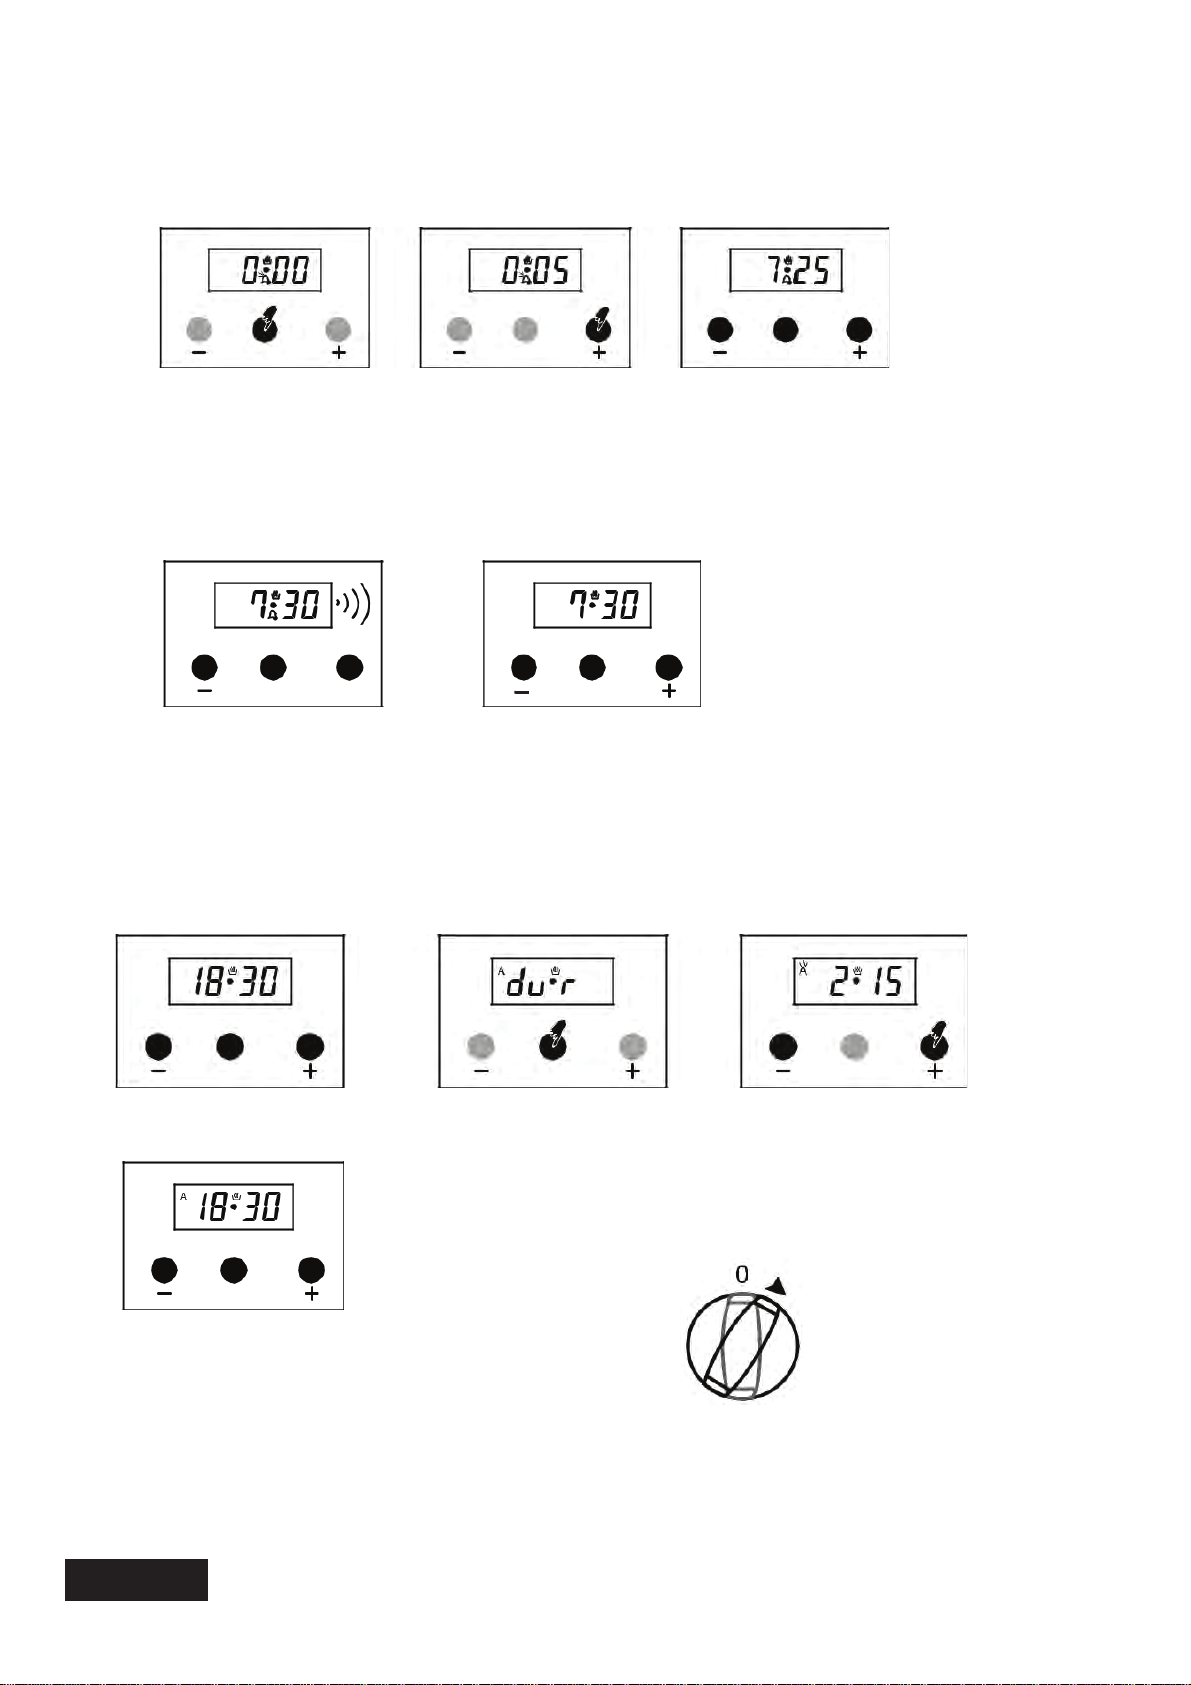
M
pg 10
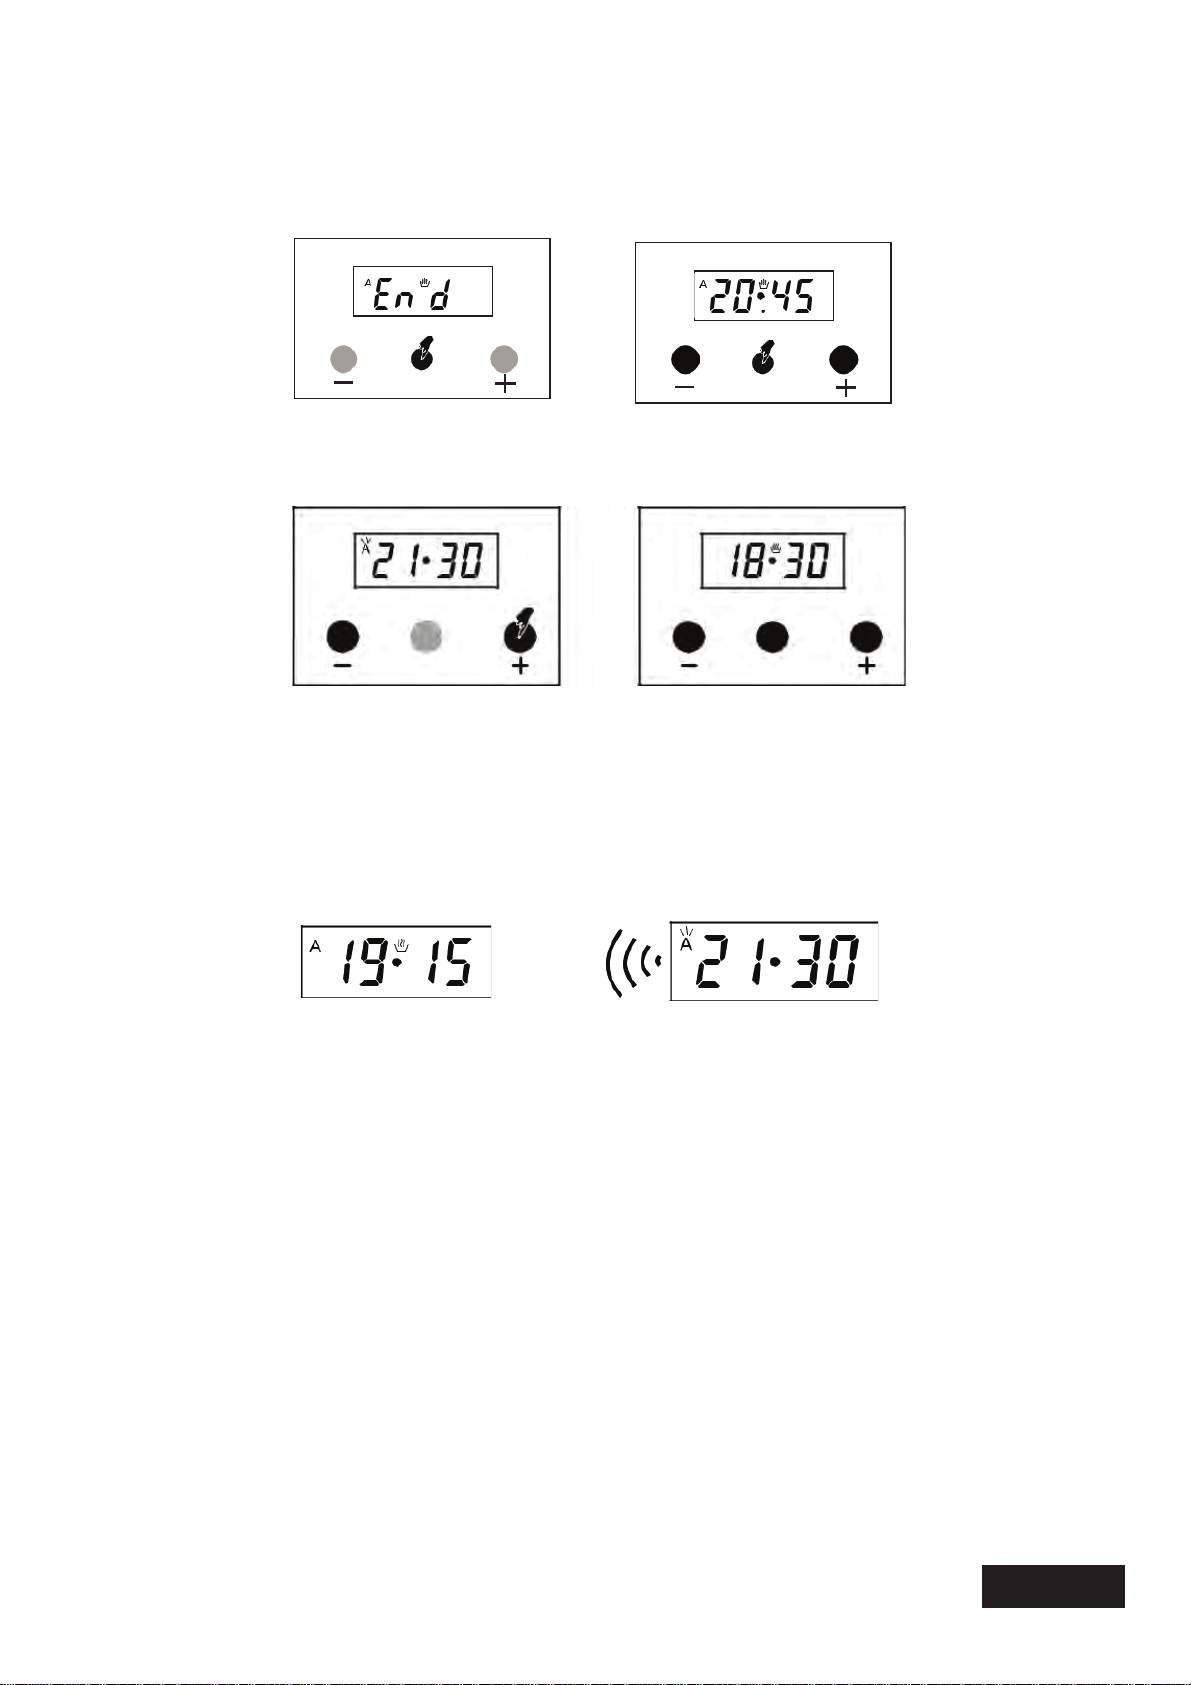
In the example above, cooking immediately started after giving in the cooking period. By the pressing 3 times
‘M’ button, you can see and adjust the ready time. In the example below, the ready time will be set at 21:30.
1. Press ‘M’ button 3 times. The screen will display ‘End’ and ready time which is
18:30 + 2:15 = 20:45 respectively.
We now have programmed our oven to get the food ready at 21:30. Since the cooking time was
pre-programmed as 2 hours and 15 minutes, your oven will start cooking at 19:15, so that the food is ready
at 21:30.
When automatic cooking is completed, a buzzer alarm is heard and will sound, if not stopped, for 7 minutes.
M M
M
M
2. Set it to the desired time
by using + or – or buttons. 3. In a few seconds, screen
switches back to clock.
Screen just when
cookin
g
starts. Screen just when
cookin
g
ends.
pg 11

Note: Your oven will be inoperative until you reset.
In the example shown, cooking time has been programmed first; the ready time was calculated
automatically and was edited by us. It is also possible first to program the ready time. In that case, the
cooking time will be calculated automatically and should be edited thereafter.
IN CASE OF MAINS POWER LOSS
Your oven will be inoperative for security reasons. At that time, the clock will appear as a flashing 0:00
together with the ‘A’ symbol. Any cooking program in progress will also be cancelled. The clock will appear
0:00, it should be corrected. Firstly, enter manual mode and adjust the clock using ‘+’ or ‘–’ buttons.
Note: In case of short duration mains power loss, system will be conserved itself.
Note: If you will not use your oven right now, be sure that that it is in ‘OFF’ position.
Flashing ‘A’ shows that the oven is inoperative and you should enter manual mode in order to return
normal working conditions.
ADJUSTING THE BUZZER TONE:
You may adjust the hearing buzzer tone of the timer.
1- Pressing ‘–’ button, you can hear the current buzzer tone.
2- Releasing and pressing again ‘–’ button will switch to the next tone. (3 Different tones available)
3- The buzzer tone will be set to the last adjusted tone.
Note: As factory setting, the buzzer volume is set to the high tone. In case of a long power loss, the set buzzer
tone will be this one.
1. Switch OFF the oven.
2. Reset the timer.
pg 12

Table of Cooking Times
The table below provides examples of the function, temperature, tray position and estimated
cooking times for various types of food.
IMPORTANT // Please note that this table is a guide only and times can vary according to the type of food,
volume and quantity of food being cooked.
COOKING TIME TABLE
WARNING: Oven must be preheated for 7-10 minutes before placing the food in it.
Food
Cookin
g
Cookin
g
Cookin
g
Cookin
g
function
temperature
(
°C
)
rack
time
(
min.
)
Cake Static 180 2 70
Small cake Static 180 2 40
Pie Static 200 2 70
Pastr
y
Static+Fan 180-200 2 20-25
Cookie Static 175 2 20
Apple pie Static 180-190 1 150
Spon
g
e cake Static 175 2 45-50
Pizza Static 190 2 25
Lasa
g
ne Static 180-200 2 50-60
Merin
g
ue Static 100 2 60
Grilled chicken * Grill+Fan 220 4 25-35
Grilled fish * Grill+Fan 220 4 35-40
Calf steak * Grill Max. 4 30
Grilled meatball * Grill Max. 4 40
* Food must be turned after half of the cooking time.
pg 13

MAINTAINING
YOUR COOKER
Maintenance and Cleaning
Before any operation disconnect the appliance from the power supply and wait for it to cool down.
•• Do not use steam for cleaning.
•• Wash the enamelled parts with lukewarm water and detergent.
•• Wash the diffusers frequently with boiling water and detergent make sure to remove any
deposits which could block the flame outlet.
•• Rinse the stainless steel parts well with water and dry them with a soft cloth.
•• To clean the hob use slightly damp sponges and wiping cloths: if too much water is used it could
penetrate the internal parts and damage electrical parts.
•• The trivets of the hob can be washed in the dishwasher.
•• For persistent stains use normal non-abrasive detergents, or hot vinegar.
•• Clean the glass parts with hot water and a soft cloth.
•• To prevent lighting difficulties, carefully clean the ignition candles regularly.
•• It is necessary to clean the oven after each use.
•• Once the oven is cold, you will be able to remove the fat deposits with a sponge or a cloth damp
with warm soapy water or a common detergent.
•• Do not use harsh abrasive cleaners or sharp metal scrapers to clean this appliance.
ALWAYS CLEAN THE APPLIANCE IMMEDIATELY AFTER ANY FOOD
SPILLAGE. TO MAINTAIN SAFE OPERATION, IT IS RECOMMENDED THAT
THE PRODUCT BE INSPECTED EVERY FIVE YEARS BY AN AUTHORISED
SERVICE PERSON.
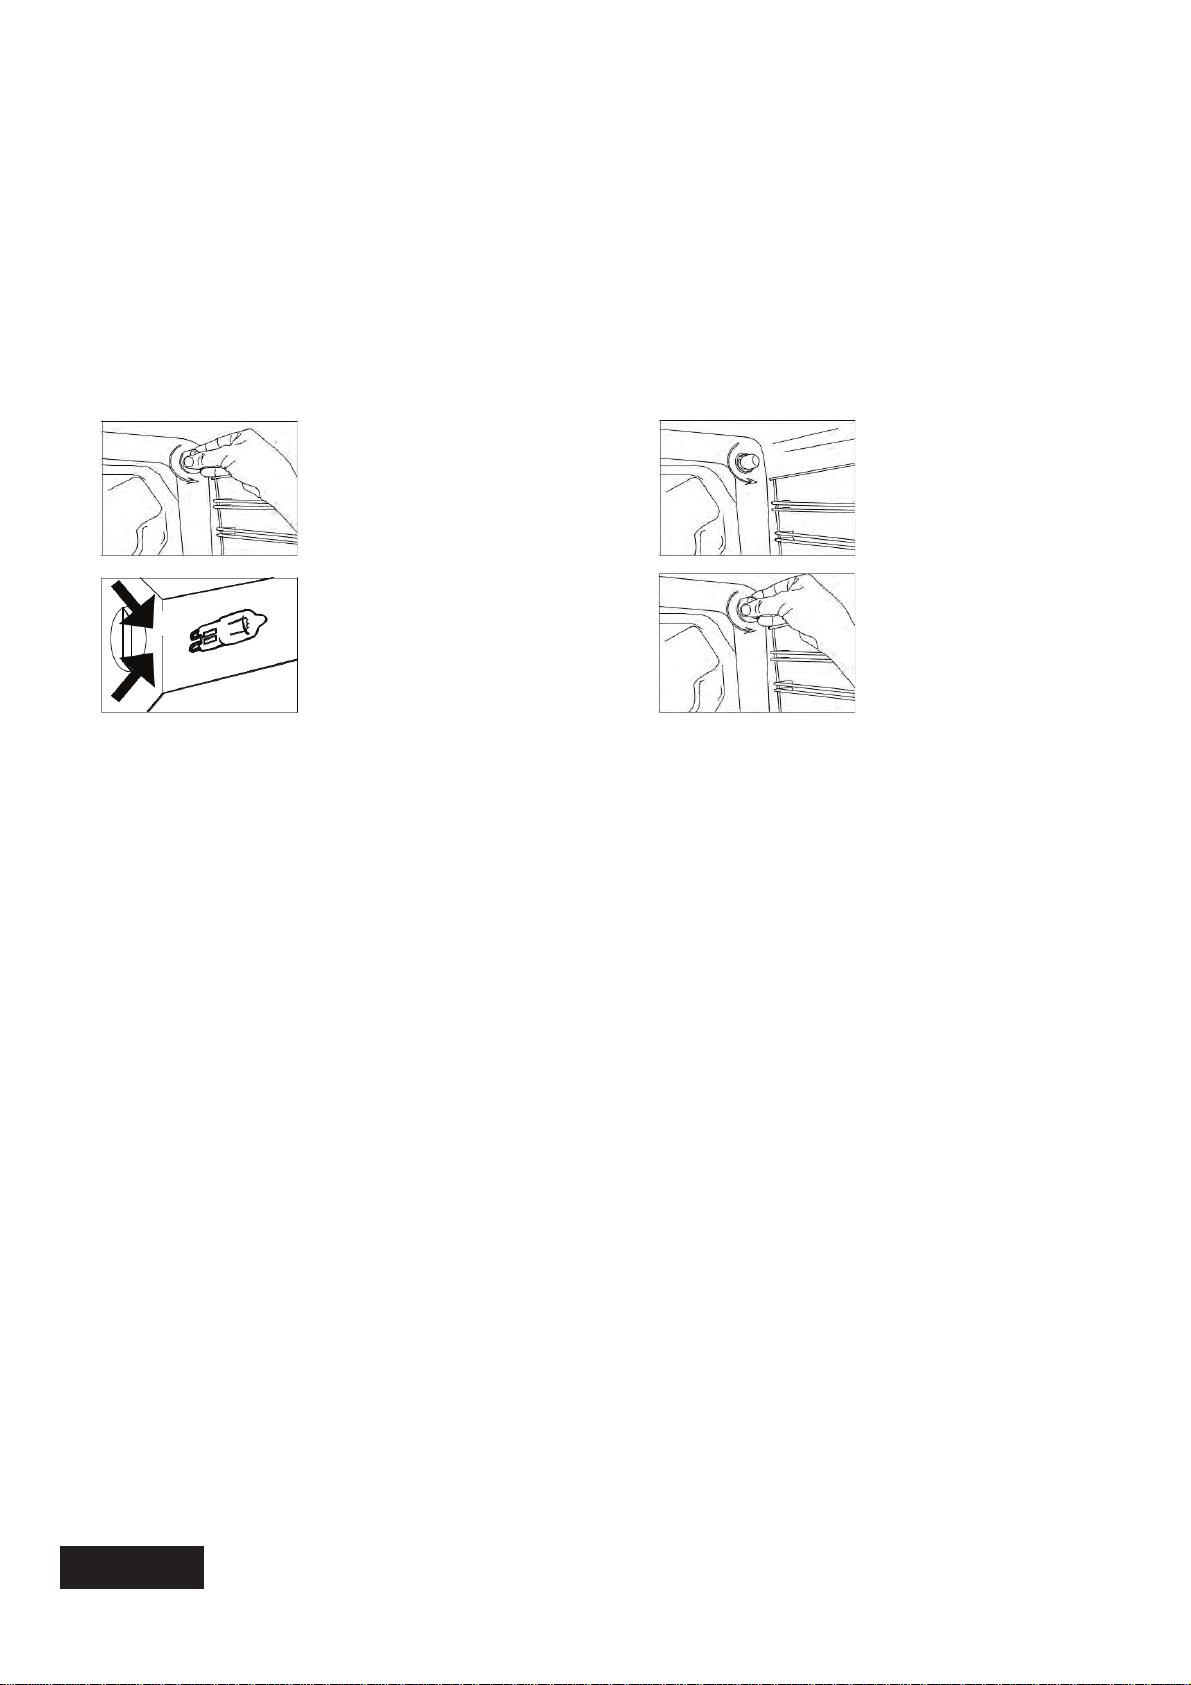
Cleaning And Maintenance Of The Oven’s Front Door Glass
Remove the profile by pressing the plastic latches on both left and right sides as shown in
figure 1 and pulling the profile towards yourself as shown in figure 2. Then remove the
inner-glass as shown in figure 3. If required, middle glass can be removed in the same way.
After cleaning and maintenance are done, remount the glasses and the profile in reverse
order. Make sure the profile is properly seated in its place.
pg 14

MAINTAINING
YOUR COOKER
Figure 1 Figure 2
fi
g
ure 1.1 Fi
g
ure 1.2
Completel
y
open the Brin
g
the hin
g
e lock
oven door b
y
pullin
g
it to the widest an
g
le as
to
y
our-self. shown in Fi
g
ure 1.2.
A
fterwards, perform Brin
g
both hin
g
es
the un-lockin
g
connectin
g
the oven
process b
y
pullin
g
the door to the oven to
hin
g
e lock upwards the same position.
with the help of a
screw driver as shown
in Fi
g
ure 1.1.
Figure 2.1
Afterwards, close
the oven door as to
lean on the hinge
lock as shown in
Figure 2.1.
Figure 2.2
To remove the oven
door, pull it upwards
by holding it with both
hands when close to
the closed position as
shown in Figure 2.2.
In order to replace the oven door, perform the abovementioned steps in reverse.
pg 15
Changing The Oven Lamp
WARNING: To avoid electric shock, ensure that the appliance circuit is open before changing the
lamp. (having circuit open means power is off) First disconnect the power of appliance and ensure that
appliance is cold.
Remove the glass protection by turning as indicated in the figure on the left side. If you have difficulty
in turning, then using plastic gloves will help you in turning.
Then remove the lamp by turning, install the new lamp with same specifications. Reinstall
glass protection, plug the power cable of appliance into electrical socket and complete
replacement. Now you can use your oven.
Type G9 Lamp Type E14 Lamp
220-240 V, AC
220-240 V, AC 15 W
15-25 W
WARNING // It is important not to touch the bulb with your hands as acids from your skin
can damage the bulb.
WARNING // Ensure that the appliance is switched off before replacing the bulb to avoid
the risk of electric shock.
pg 16

INSTALLATION
The manufacturer declines any and all responsibilities for damages to things or injuries
to persons or animals deriving from incorrect installation or use of the equipment.
INSTRUCTIONS FOR INSTALLATION
WARNING:
• Prior to installation, ensure that the local distribution conditions [nature of the gas
and gas pressure) and the adjustment of the appliance are compatible
• The adjustment conditions for this appliance are stated on the data plate or under
the product specifications section on page 18
• There shall be adequate ventilation of the room when a rangehood is used at the
same time as appliances burning gas. When a rangehood is not in use, ensure that
natural ventilation outlets are open.
• This appliance shall be installed only by authorised persons and in accordance with
the manufacturer’s installation instructions, local gas fitting regulations [AS5601),
municipal building codes, electrical wiring regulations, and local water supply
regulations.
pg 17

INSTALLATION
Installing the anti-tilting chain
The cooker is supplied with an anti-tilting
chain to prevent the appliance from tilting
forward and accidentally damaging the gas
pipe. The anti-tilting chain should be fitted
as follows:
1. Take the expansion with hook and make
an adequate hole in the wall behind, at
the same height as the chain fixing area.
2. Insert the plug into the hole and then
screw in the hook until it is firmly fixed
to the wall.
3. Fix the chain to the hook.
4. Adjust to level of the cooker inserting
the feet provided.
In situations where the cooker is installed
between two cabinets:
1. Drill a 16mm hole in each cabinet, at
the same height as the chain.
2. Feed the chain through the left and right
holes respectively.
3. Move cooker to desired position.
4. Tighten and fix chains to back-side of
cabinet.
Combustible Surfaces
Any adjoining wall surface situated within
200mm from the edge of any hob burner
must be a suitable non-combustible
material for a height of 150mm for the
entire length of the hob.
Any combustible construction above the
hotplate must be at least 600mm above the
top of the burner and no construction shall
be within 450mm above the top of the
burner. Zero clearance is permitted on side
and rear adjoining surfaces below the hob.
pg 18

CONNECTIONS
ELECTRICAL CONNECTION
Equipment type: Free standing (Class 1)
Insulation class: Class 1
The appliance is fitted with an approved 15
Amp flexible cord and plug which must be
connected to a correctly earthed socket
outlet.
CONNECTION OF THE SUPPLY
CABLE TO THE MAINS
Connect the supply cable to a plug suitable
for the load indicated on the rating plate of
the product. In case of a direct connection
to the mains (cable without plug), it is
necessary to insert a suitable omnipolar
switch before the appliance, with minimum
opening between contacts of 3 mm (the
grounding wire should not be interrupted by
the switch).
Before connecting to the mains, make
sure that:
1. All components used to make the
electrical connection are adequate to
withstand the maximum load required
(see rating plate).
2. The supply system is regularly
grounded, according to the regulations in
force.
3. The socket or the omnipolar switch
can easily be reached after the
installation of the oven.
WARNING // Never use reductions, shunts,
adaptors which can cause overheating or
burning.
ELECTRICAL FEATURES
NOTE // After carrying out the connection to
the mains, check that the supplying cable
does not come into contact with parts subject
to heating.
ATTENTION // If the supply cord is
damaged, it must be replaced by the
manufacturer, its service agent or similarly
qualified persons in order to avoid a hazard.
Oven Light
Upper Element
Bottom Element
Grill Element
Circular Element
Oven Fan Motor
Cooling Fan
15-25W
1500W
2000W
3250W
*1250Wx2 / 2200W
24W
15W
* only double turbo fan products.
pg 19

CONNECTIONS
GAS CONNECTION
xThe connection must be performed by an
authorised person according to the relevant
standards.
xThis appliance is suitable for use with
Natural Gas or ULPG. The gas range is shipped
from the factory set and adjusted for Natural
Gas. It can be converted for use with ULPG
following the instructions in this manual.
xThe connection must be made at the rear of
appliance. Ensure the pipe does not cross the
cooker.
xThe inlet not used must be closed off with
the cap and sealing gasket supplied.
xThe gas connection is male ½” BSP and is
situated 55mm from the right and 560mm from
the floor
ADJUSTMENT TO
DIFFERENT GAS TYPES
To perform the adjustments to different types of
gas, the qualified installer shall follow the
instructions given on this section.
Make sure that the gas supply pressure
respects the values presented in the table
“Burner and nozzle specifications” on page 18.
NATURAL GAS
This appliance leaves the factory set to operate
using Natural Gas.
Make sure that the Natural Gas regulator
supplied with the appliance is installed and, with
the triple ring burner operating at its maximum,
adjust the test point pressure to 1.0kPa.
UNIVERSAL LPG
To convert from Natural Gas to Universal LPG,
ensure that the Natural Gas regulator is
replaced by the Test Point Assembly supplied
with the appliance. Adjust the test point
pressure to 2.75kPa.
To adapt the appliance to a gas different from
that for which it was set up (see gas type label
inside the warming compartment door) proceed
as follows:
1. Remove the trivets
2. Remove the burners caps and diffusers
3. With a 7 mm socket spanner unscrew
and remove the injectors.
4. Replace the injectors with those
supplied corresponding to the gas
available (see burner and injector
characteristics table)
5. Replace the various parts proceeding in
reverse.
IMPORTANT!
ƔCheck the correct positioning of the
gas regulator. The arrow on the back of
the gas regulator must be oriented
toward the connector.
pg 20
Table of contents
Other Tisira Cooker manuals


Popular Cooker manuals by other brands


Aurora
Aurora AU 4473 manual

DeLonghi
DeLonghi A 1026 G Installation and service instructions

Parkinson Cowan
Parkinson Cowan SIG 400 Operating and installation instructions

Electrolux
Electrolux EKC7051BOW user manual

Heinner
Heinner HFSC-V50LITWH manual

M-system
M-system MF-64 Instruction for the use - installation advice


