Titan Electronics PCIe-400 User manual


1
The computer programs provided with the hardware are supplied under a license.
The software provided should be used only with the NCOM series hardware
designed and manufactured by TITAN Electronics Inc.
Trademarks
TITAN and the logo is a registered trademark of TITAN Electronics Inc. in Taiwan.
Microsoft, Windows, Windows XP, Windows Vista, Windows Server, Windows 7,
Windows 8, Windows 10 are trademarks of Microsoft Corporation. All other
trademarks and brands are property of their respective owners.
Copyright
Copyright © TITAN Electronics Inc. 2016. All right reserved. Reproduction of the
manual and software without permission is prohibited.
Disclaimer
TITAN Electronics Inc. provides this document and computer programs “as is” without
warranty of any kind, either expressed or implied, including, but not limited to, its
particular purpose. TITAN Electronics Inc. reserves the right to make improvements
and changes to this user manual, or to the products, or the computer programs
described in this manual, at any time.
Information provided in this manual is intended to be accurate and reliable. However,
TITAN Electronics Inc. assumes no responsibility for its use, or for any infringements
on the rights of third parties that may result from its use.
This product might include unintentional technical or typographical errors. Changes
are periodically made to the information herein to correct such errors, and these
changes are incorporated into new editions of the publication.

2
Contents
INTRODUCTION..............................................................................................................3
FEATURES.......................................................................................................................4
SPECIFICATIONS .............................................................................................................5
PIN-OUT INFORMATION ................................................................................................6
RS-232 Pin-out for DB9 Connector ............................................................................6
Pin-out of DB44 Female Connector for Four RS-232 Ports........................................6
INSTALLATION................................................................................................................7
UNINSTALLING WINDOWS DRIVERS............................................................................13

3
INTRODUCTION
The PCIe-400 and PCIe-400LP PCI Express 4-port serial I/O cards are plug and play high-
speed serial I/O expansion cards for the PCI Express bus. Connecting to a PCI Express
bus on your computer, the PCI Express 4-port serial I/O card instantly adds four RS-
232 serial I/O communication ports to your system. The PCI Express 4-port serial I/O
cards are designed to utilize the Exar XR17V354 PCI Express to UART chip. The PCIe-
400 & PCIe-400LP support high-speed data rate up to 921.6kbps. Each serial port is
fully compatible with 16C550 UART, with enhanced feature of 256 bytes TX and RX
FIFO buffer for higher performance.
The PCI Express 4-port serial I/O card is an advanced and high efficient solution for
serial data communication and industrial automation applications.

4
FEATURES
PCI Express 2.0 Gen 1 compliant
PCI Express 1 Lane compliant
16C550 compatibility
256 bytes receive FIFO buffer
256 bytes transmit FIFO buffer
Automatic RTS/CTS or DTR/DSR hardware flow control with programmable
hysteresis
Automatic Xon/Xoff software flow control
Drivers provided for Windows and Linux OS
Wide ambient temperature operation 0°C to 60°C (32°F to 140°F)
CE, FCC approval
Supports four high speed RS-232 serial ports with data transfer rate up to
921.6kbps
Provides 15KV ESD protection for all serial signals
Four DB9 male connectors for serial data communication
RS-232 data signals: DCD, RxD, TxD, DTR, GND, DSR, RTS, CTS, RI
Includes one adapter cable converting a DB44 female connector to four DB9 male
connectors. Cable length: 30cm
PCIe-400 with standard profile bracket
PCIe-400LP with low profile bracket for slim case

5
SPECIFICATIONS
General
Bus
PCI Express; Single-Lane (×1)
Chipset
EXAR XR17V354
Interface
RS-232
Plug & Play
Supported
IQR & IO Address
Assigned by system BIOS
Mechanical
PCIe-400 with standard bracket
PCIe-400LP with low profile bracket for slim case
Serial Port
No. of Ports
Four
Connectors & Cables
One DB44 male connector on card
One DB44 female to four DB9 male adapter cable included
RS-232 Signals
DCD, RxD, TxD, DTR, GND, DSR, RTS, CTS, RI
Max. Bitrates
921.6kbps
Serial Configuration
Data bits: 5, 6, 7, 8
Parity: None, Odd, Even, Mark, Space
Stop bits: 1, 1.5, 2
UART FIFO Buffer Size
Each port with 256 bytes FIFO for transmit & receive
Environment
Operating Temperature
0°C to 60°C
Storage Temperature
-40°C to 85°C
Humidity
0 to 80% RH. Noncondensing
Safety Approvals
CE, FCC
6
PIN-OUT INFORMATION
The following are the connector pin-out for PCIe-400 & PCIe-400LP PCI Express serial
I/O card.
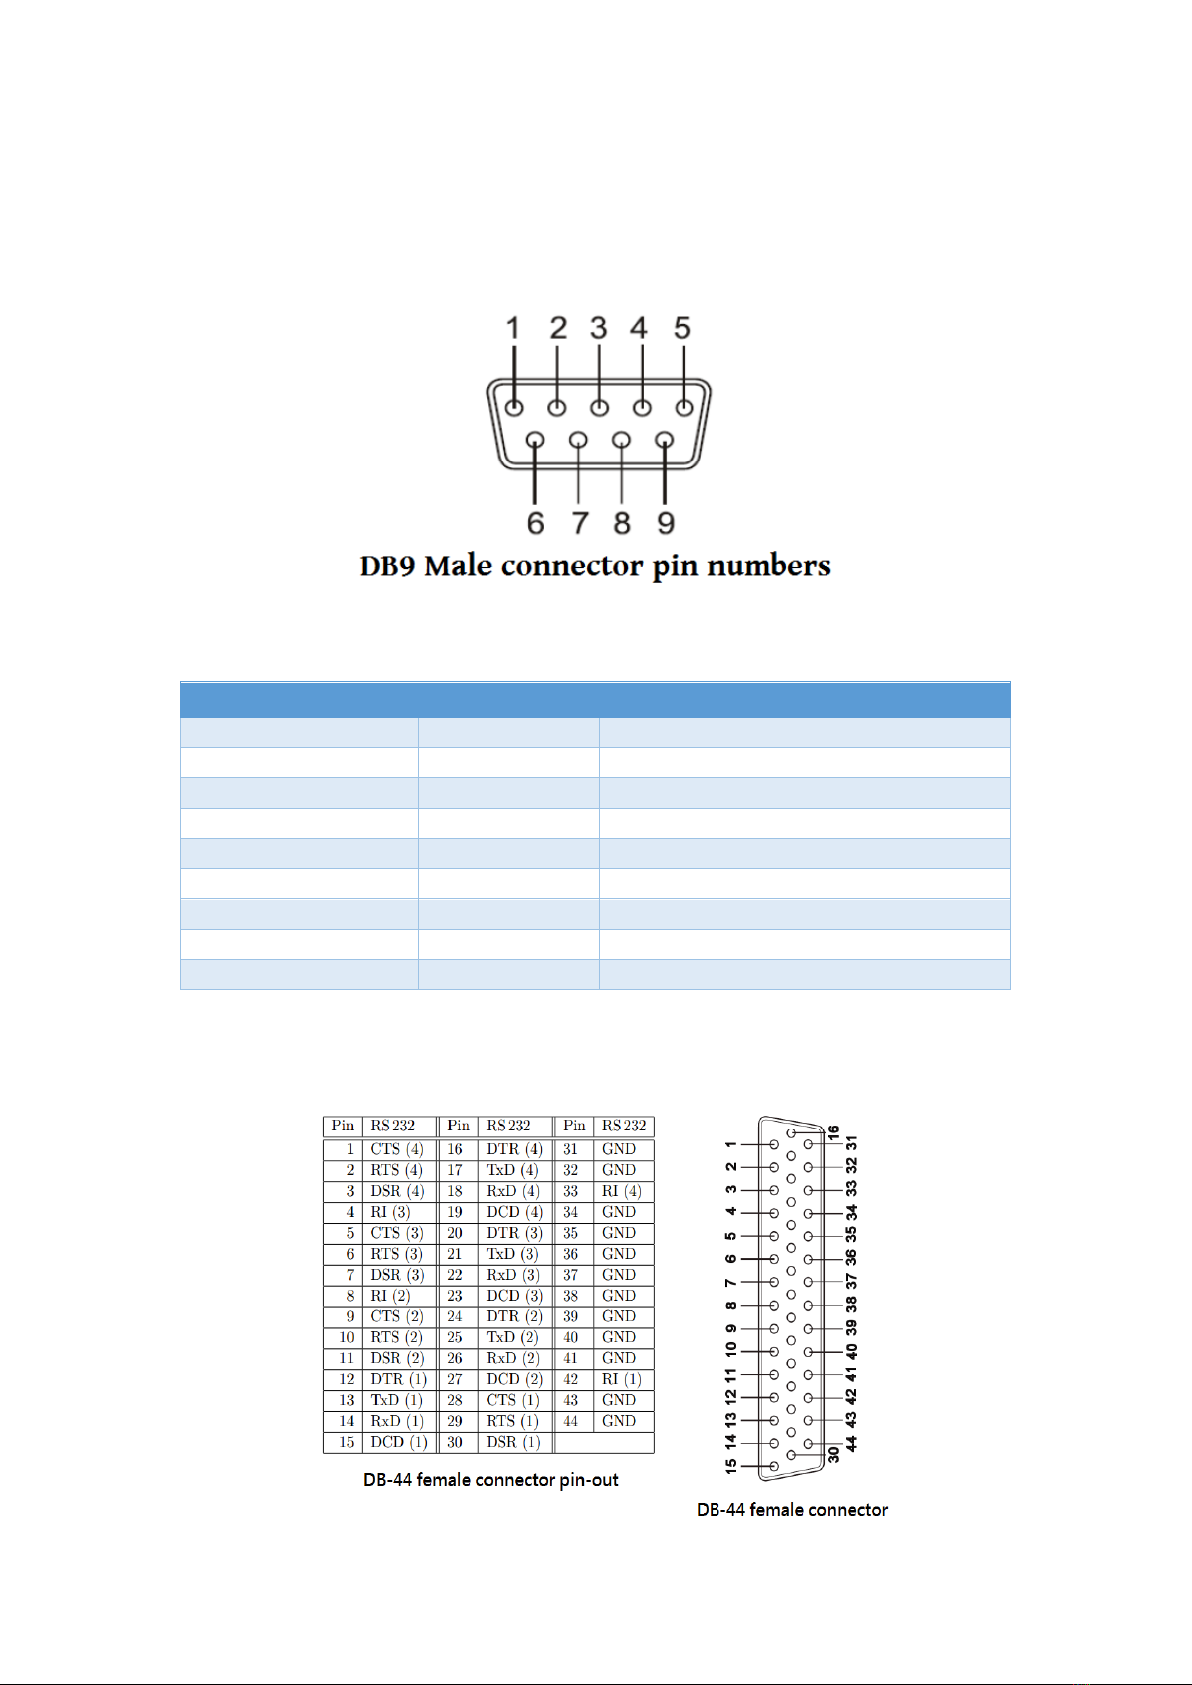
RS-232 Pin-out for DB9 Connector
Pin Number
Pin Type
Description
1
Input
DCD: Data Carrier Detect
2
Input
RxD: Receive Data
3
Output
TxD: Transmit Data
4
Output
DTR: Data Terminal Ready
5
Ground
GND: Signal Ground
6
Input
DSR: Data Set Ready
7
Output
RTS: Request to Send
8
Input
CTS: Clear to Send
9
Input
RI: Ring Indicator
Pin-out of DB44 Female Connector for Four RS-232 Ports
7
INSTALLATION
Windows 8.1/8/7 32-bit & 64-bit Drivers Installation
To install the Windows driver from Device Manager for PCI Express 4-port industrial
serial I/O card, please follow the steps below:
1. Switch off the computer.
2. Insert PCI Express industrial serial I/O card into a free PCI Express Bus slot.
3. Switch on the computer and start Windows OS.
4. Windows OS will automatically detect the PCI Express I/O Card.
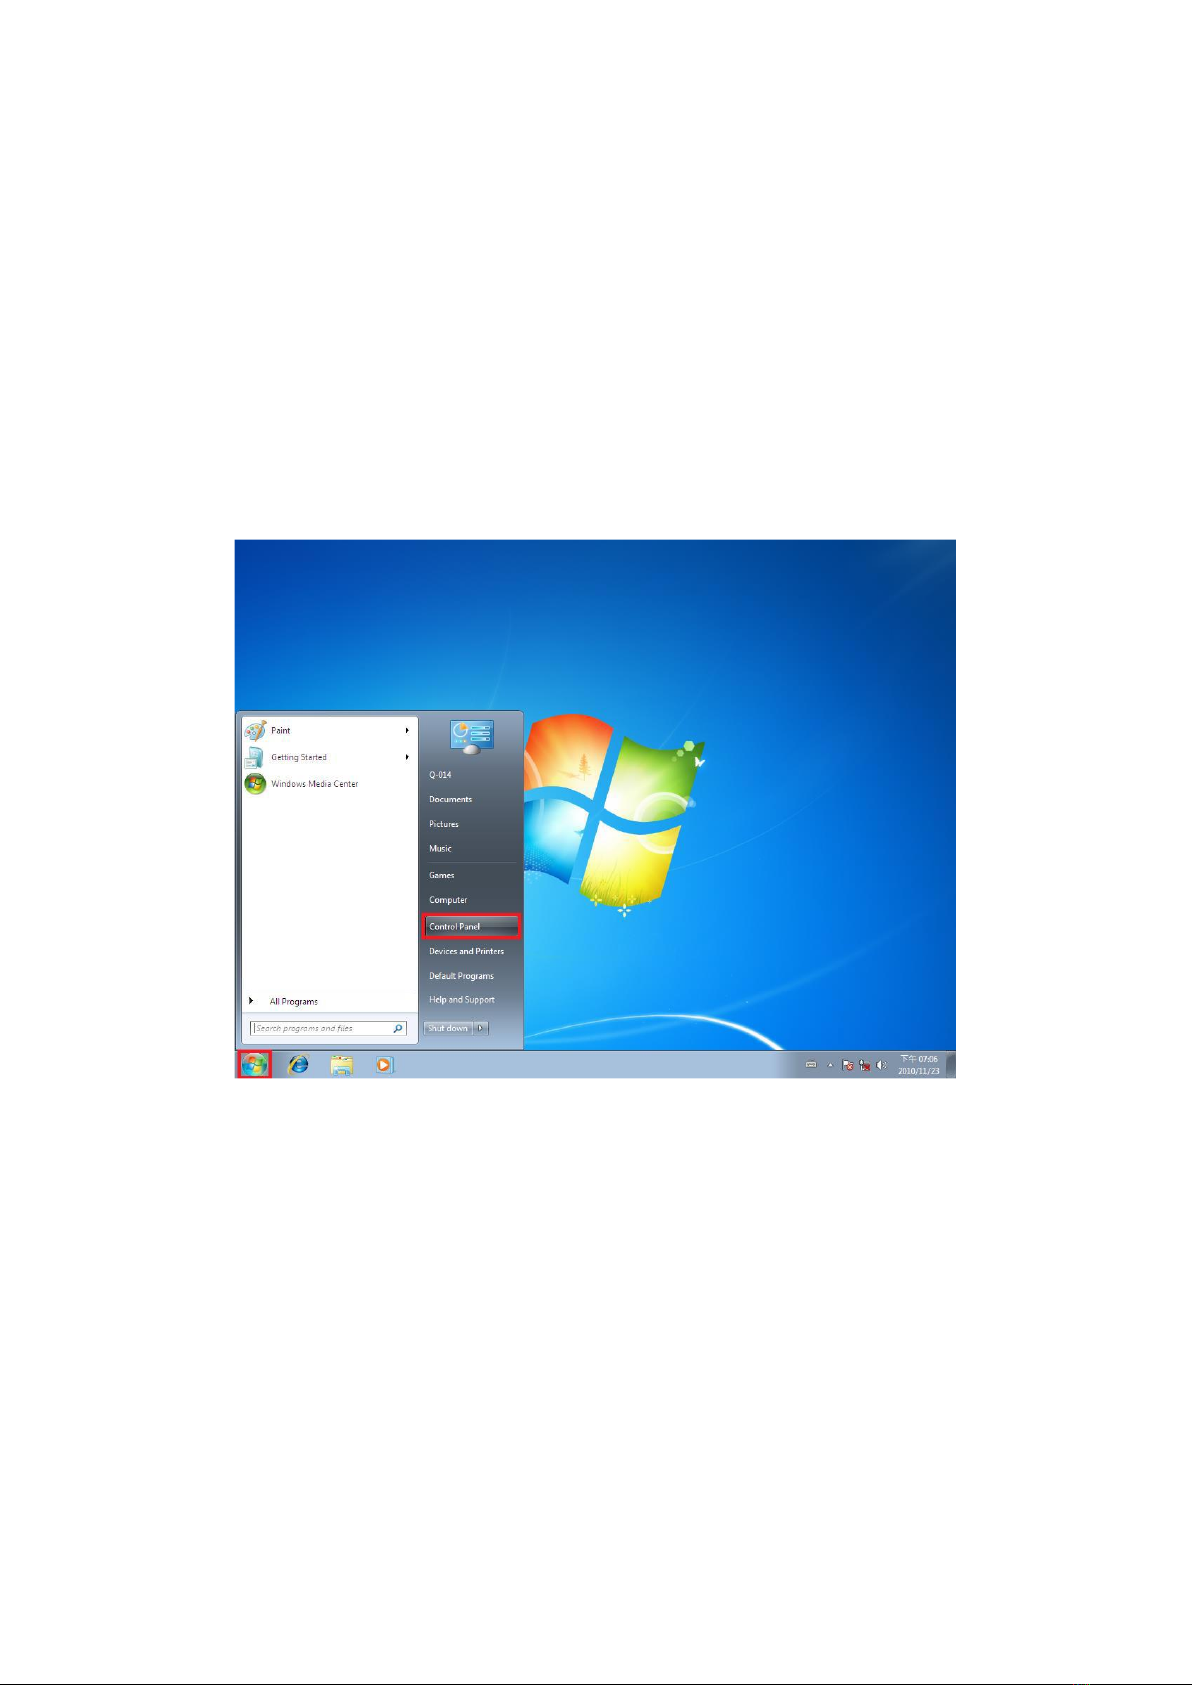
5. Press “START” button and select “Control Panel”.

8
6. Select “Hardware and Sound”.
7. Select “Device Manager”.
9
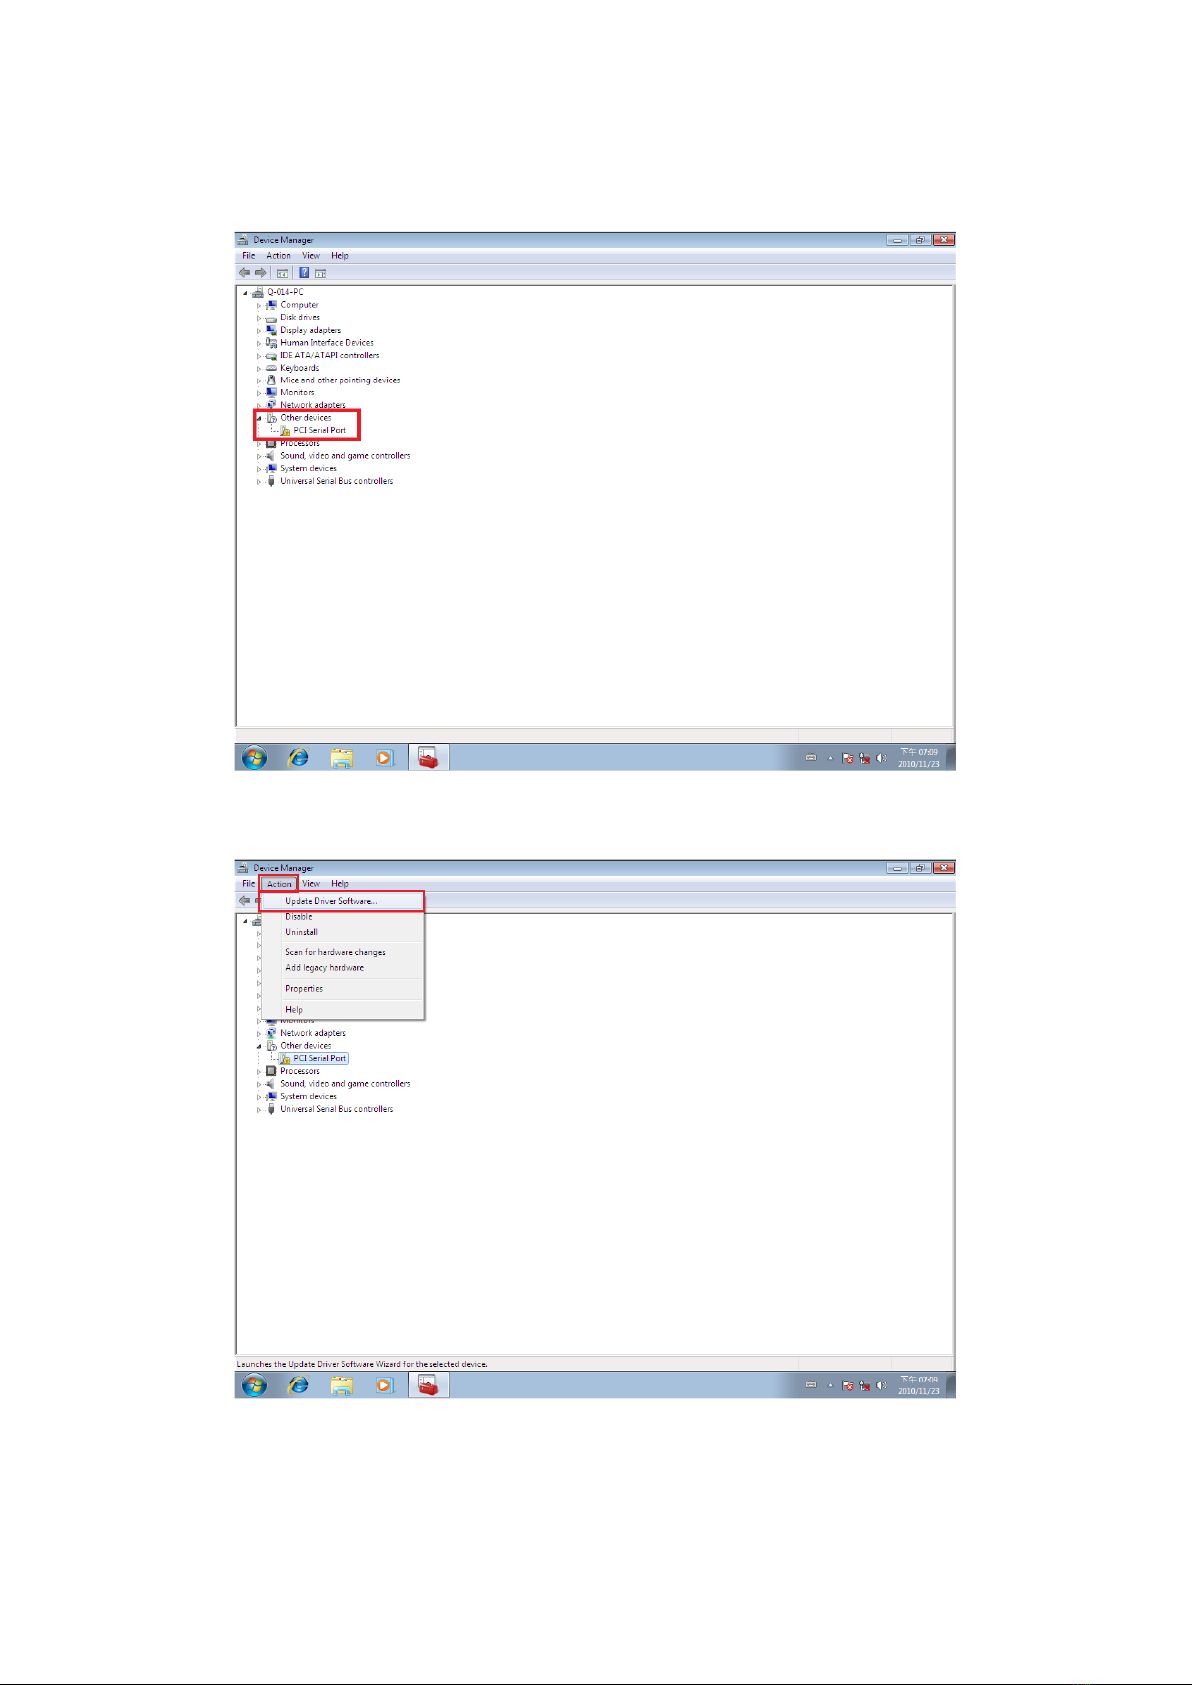
8. Under “Device Manager” of the system properties, you can find “PCI Serial Port”
attached to “Other devices”. Select “PCI Serial Port”.
9. Select “Action” and execute “Update Driver Software”.
10
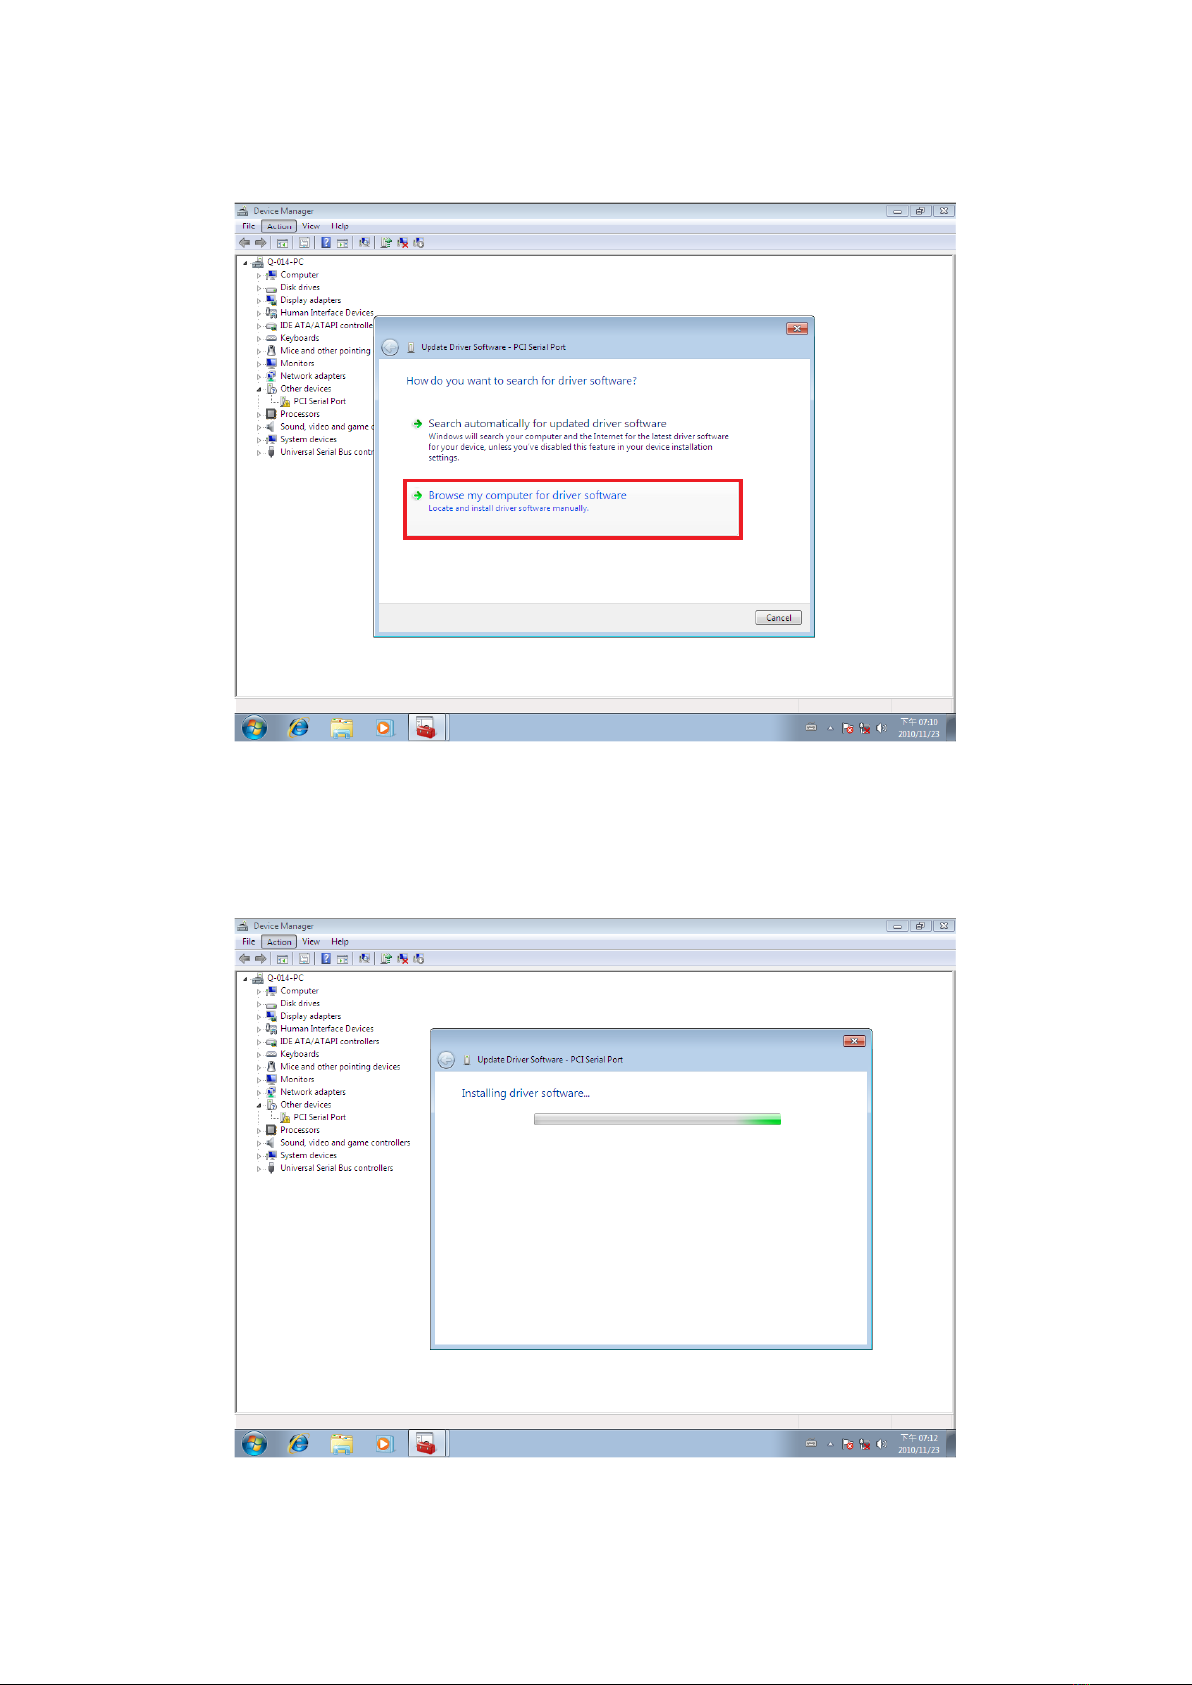
10. Click “Browse my computer for driver software”.
11. Insert the driver CD into the CD-ROM or DVD-ROM drive.
12. Select the directory "\PCIe Drivers\x86” for 32 bits Windows OS (“\PCIe
Drivers\x64 for 64 bits Windows OS”) as the target. Click on "OK", and on “Next”
to install driver.
11
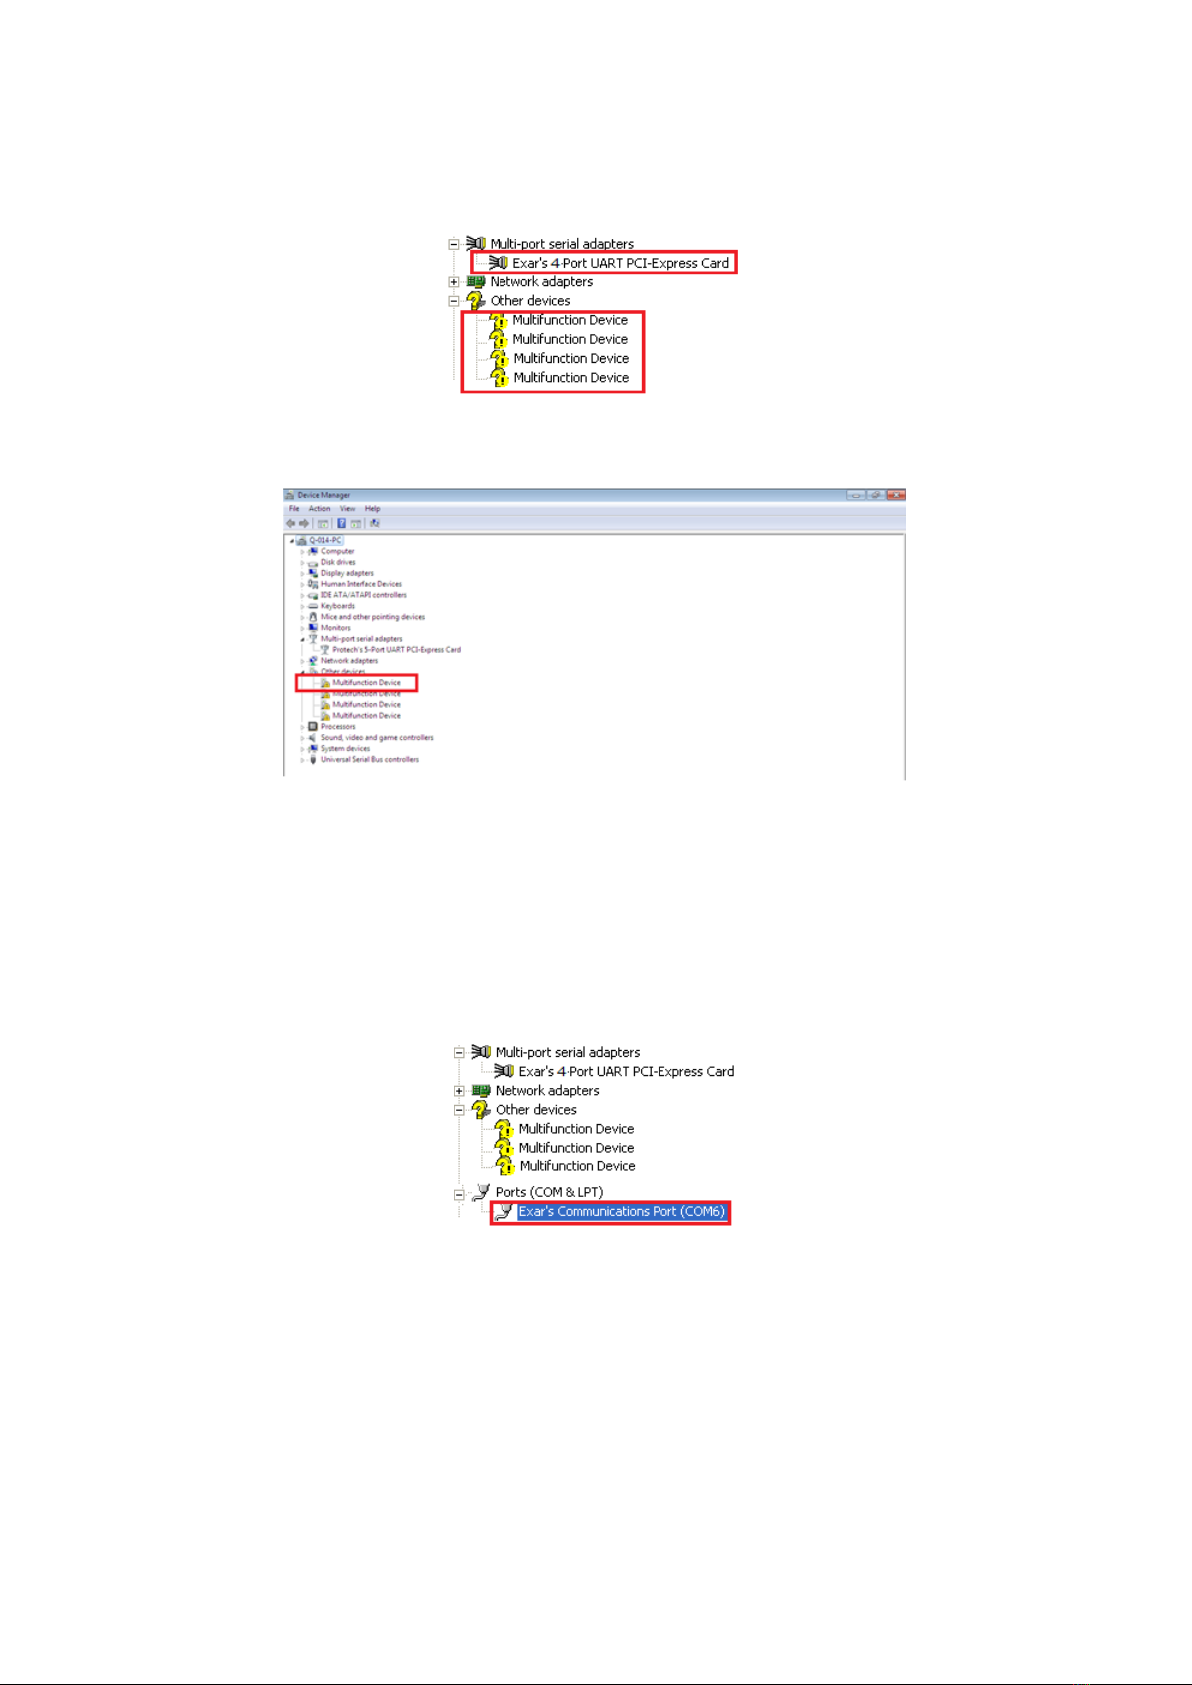
13. After driver installation is done successfully, you will find “Exar’s 4-Port UART PCI-
Express Card” and four instances of “Multifunction Device” under Device Manager.
14. Select the first “Multifunction Device”.
15. Select “Action” and execute “Update Driver Software”.
16. Click “Browse my computer for driver software” again.
17. Select the directory "\PCIe Drivers\x86” for 32 bits Windows OS (“\PCIe
Drivers\x64 for 64 bits Windows OS”) as the target. Click on "OK", and on “Next”
to install COM port driver.
18. After COM port driver installation is done successfully, you can find the first “Exar’s
Communications Port (COMx)” under “Ports (COM & LPT)” in Device Manager.
19. Select the next “Multifunction Device” and repeat steps 15~17 to install all of the
COM port drivers.

12
20. After all COM port driver installations are done successfully, you will find four
“Exar’s Communications Port (COMx)” under “Ports (COM & LPT)” in Device
Manager.
21. Restart computer to complete installation.

13
UNINSTALLING WINDOWS DRIVERS
To uninstall the Windows driver from Device Manager for PCI Express 4-port serial I/O
card, please follow the steps below:
1. Right click on “Exar’s Communications Port (COMx)” under Device Manager and
select “Uninstall” to start Exar’s Communications Port (COMx) driver uninstall.
2. Under the “Confirm Device Uninstall” window, check “Delete the driver software
for this device.” Click “OK” to uninstall the software driver. If there is no “Delete
the driver software for this device” checkbox, just click “OK” to uninstall the
software driver.
3. Right click on the remaining “Exar’s Communications Port (COMx)” drivers and
repeat steps 1 and 2 to uninstall all Exar’s Communications Port drivers.

14
4. Right click on “Exar’s 4-Port UART PCI-Express Card” under Device Manager to and
select “Uninstall” to start uninstalling “Exar’s 4-Port UART PCI-Express Card”
software driver.
5. Under the “Confirm Device Uninstall” window, check “Delete the driver software
for this device.” Click “OK” to uninstall the software driver. If there is no “Delete
the driver software for this device.” message, just click “OK” to uninstall the
software driver.
6. If you installed more than one PCI Express 4-port serial I/O cards in your system,
please right click on the other “Exar’s 4-Port UART PCI-Express Card” drivers and
repeat steps 4~5 to uninstall all PCI Express 4-port serial I/O cards software drivers.
Table of contents
Other Titan Electronics PCI Card manuals


