manuals.online logo
Brands
  1. Home
  2. •
  3. Brands
  4. •
  5. Titanium
  6. •
  7. Lighting Equipment
  8. •
  9. Titanium TT-ACC-MOV-01 User manual

Titanium TT-ACC-MOV-01 User manual

TT-ACC-MOV-01
• Recessed motion detector.
Amperage 12 ~ 24vCC
Power 30w-60w
Output input
connector 2,1mm
Cut hole 16mm
5/8"
359
TITANIUM TECHNOLOGY - 2022
1. WARNING : RISK OF ELECTRIC SHOCK / ATTENTION : RISQUE DE CHOC ÉLECTRIQUE
Ce document peut être modifié à tout moment et sans préavis de la part de Titanium Technologie. / This document can be modified at any time and without notice from Titanium Technology.
Electrical connections / Connexions électriques
To avoid the risk of electric shock, turn off the power at the electrical panel before doing any installation or maintenance.
The installation must comply with the electrical code in force in your region.
Pour éviter les risques de choc électrique, couper l’alimentation à partir du panneau électrique avant de faire l’installation ou l’entretien.
L’installation doit être conforme au code électrique en vigueur dans votre région.
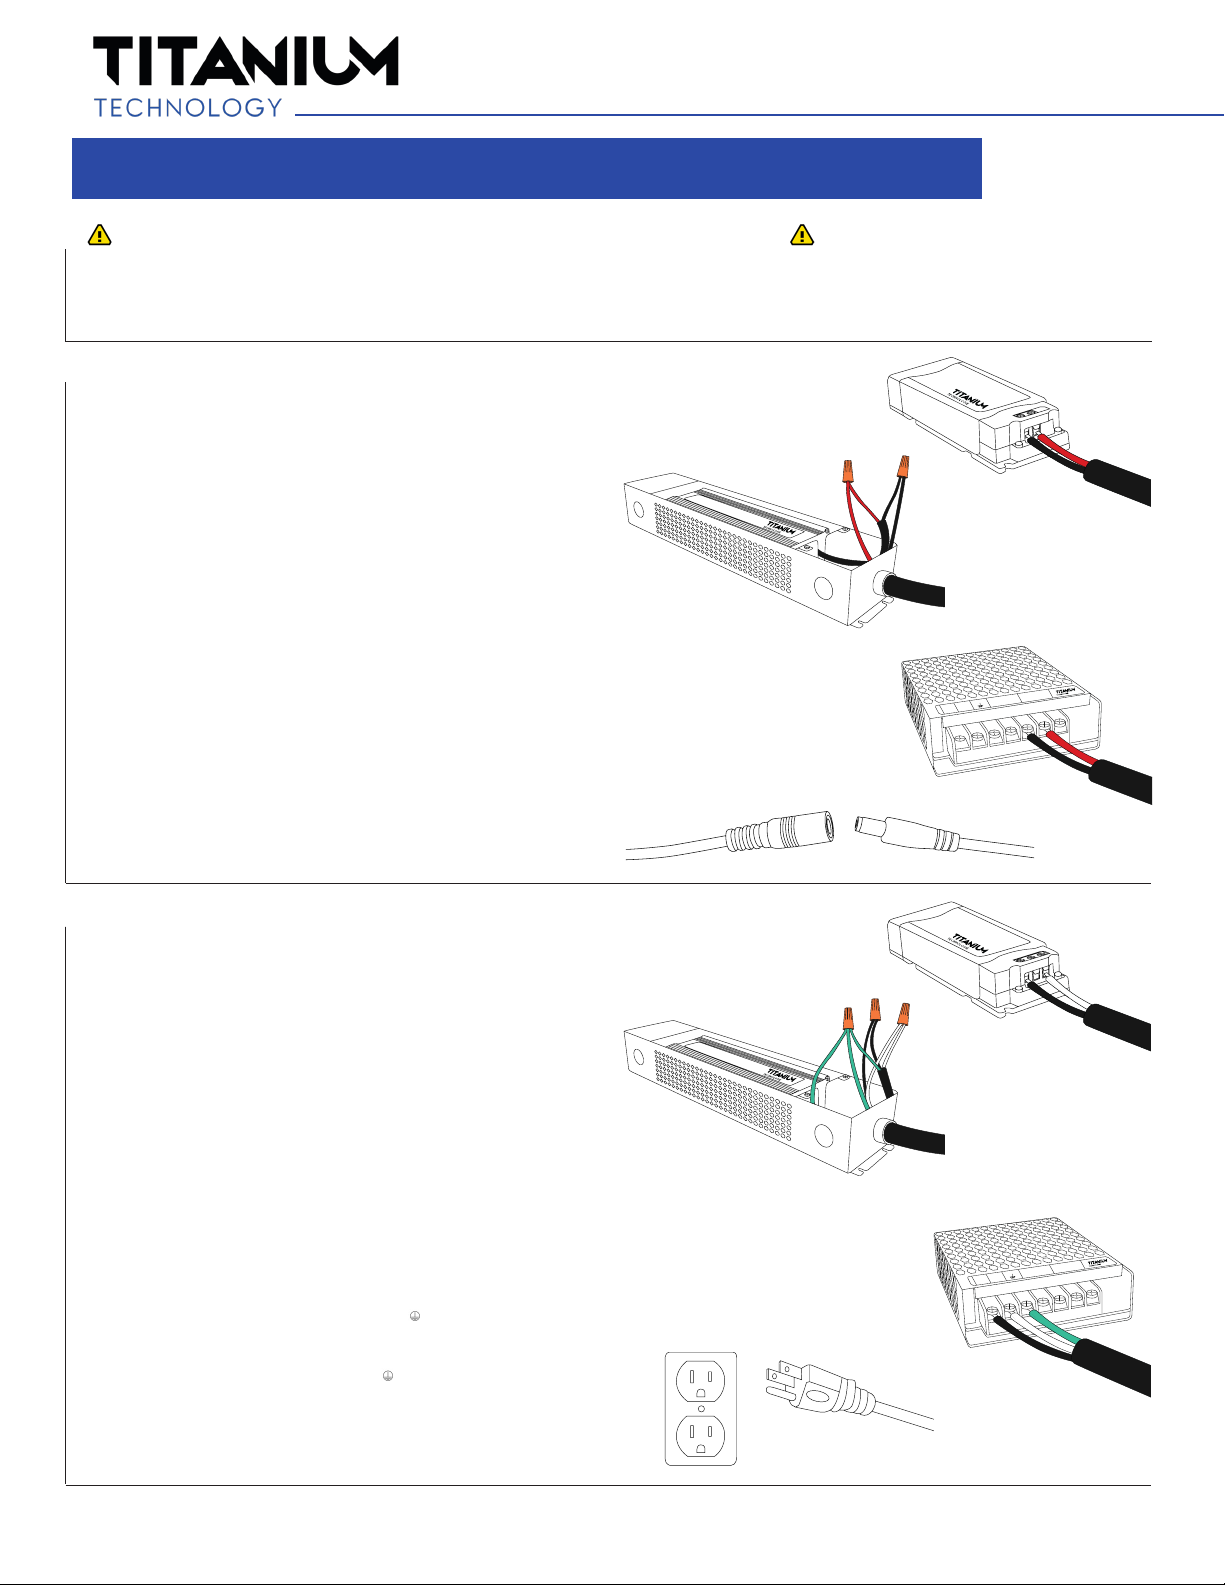
2. LOW VOLTAGE CONNECTION / BRANCHEMENT DU BAS VOLTAGE
A. CONNECTION IN THE TT-DR-CV / RACCORDEMENT DANS BOÎTIER TT-DR-CV
• Remove the plastic cover from the DC side
• Insert and secure in the V- terminal block the black wire coming from the led strip.
• Insert and fix in the V+ terminal block + the red or white wire coming from the led strip.
• Replace the plastic cover on the transformer.
• Retirer le couvercle de plastique du coté DC
• Insérer et fixer dans le bornier V- le fil noir provenant du raban del
• Insérer et fixer dans le bornier V+ le fil rouge ou blanc provenant du ruban del
• Replacer le couvercle de plastique sur le transformateur.
B. CONNECTION IN TT-DR-CV-BOX / RACCORDEMENT DANS BOÎTIER TT-DR-CV-BOX
• Remove the housing cover
• Install a cable gland in the appropriate opening of the housing on the DC side
• Insert the cable of the led strip into the DC compartment of the housing via the cable gland
• Join the black wire of the output of the transformer to the black wire of the led strip
• Join the red or white wire of the output of the transformer to the white or red wire of the led tape
• Close the housing cover.
• Retirer le couvercle du boîtier
• Installer un presse-étoupe dans l’ouverture appropriée du boîtier du coté DC
• Insérer le câble du ruban del dans le compartiment DC du boîtier via le presse-étoupe
• Joindre le fil noir de la sortie du transformateur au fil noir du ruban del
• Joindre le fil rouge ou blanc de la sortie du transformateur au fil blanc ou rouge du ruban del
• Refermer le couvercle du boîtier.
C. CONNECTION TO TT-PSU TERMINAL BLOCK / RACCORDEMENT SUR BORNIER TT-PSU
• Attach the black cable of the LED ribbon to the terminal block marked with a V- on the transformer
• Attach the red or white cable from the led strip to the terminal block marked with a V + on the
transformer
• Fixer le câble noir du ruban del au bornier indiqué d’un V- sur le transformateur
• Fixer le câble rouge ou blanc du raban del au bornier indiqué d’un V+ sur le transformateur
D. CONNECTION WITH PLUG 2.1MM / RACCORDEMENT AVEC FICHE 2.1MM
• Connect the 2.1mm connectors of the led strip and the appropriate DC transformer.
• Brancher les connecteurs 2.1mm du ruban del et du transformateur DC approprié.
3. LINE VOLTAGE CONNECTION / BRANCHEMENT HAUTE TENSION
A. CONNECTION IN THE TT-DR-CV / RACCORDEMENT DANS BOÎTIER TT-DR-CV
• Remove the plastic cover from the AC side
• Insert and fix in terminal block N the white wire coming from the power supply wire
• Insert and fix in the terminal block L the black wire coming from the power supply wire
• Replace the plastic cover on the transformer.
• Retirer le couvercle de plastique du coté AC
• Insérer et fixer dans le bornier N le fil blanc provenant du fil d’alimentation
• Insérer et fixer dans le bornier L le fil noir provenant du fil d’alimentation
• Replacer le couvercle de plastique sur le transformateur.
B. CONNECTION IN TT-DR-CV-BOX / RACCORDEMENT DANS BOÎTIER TT-DR-CV-BOX
• Remove the housing cover
• Install a cable gland in the appropriate opening of the box on the AC side
• Insert the power cable into the AC compartment of the box via the cable gland
• Secure the earth of the power cable to the green earth screw of the housing
• Join the white wires of the transformer and the power cable with a twist-on
• Join the black wires of the transformer and the power cable with a twist-on
• Close the housing cover.
• Retirer le couvercle du boîtier
• Installer un presse-étoupe dans l’ouverture appropriée du boîtier du coté AC
• Insérer le câble d’alimentation dans le compartiment AC du boîtier via le presse-étoupe
• Fixer la mise à la terre du câble d’alimentation à la vis verte de mise à la terre du boîtier
• Joindre les fils blanc du transformateur et du câble d’alimentation avec une marette
• Joindre les fils noir du transformateur et du câble d’alimentation avec une marette
• Refermer le couvercle du boîtier.
C. CONNECTION TO TT-PSU TERMINAL BLOCK / RACCORDEMENT SUR BORNIER TT-PSU
• Check that the voltage selector is on 115V if available
• Secure the earth cable to the terminal block indicated with a
• Attach the white wire of the power cable to the terminal block indicated N on the transformer
• Attach the black wire of the power cable to the terminal block marked with an L on the transformer
• Bien vérifier que le sélecteur de tension soit sur 115V si disponible
• Fixer le câble de mise à la terre au bornier indiqué d’un
• Fixer le fil blanc du câble d’alimentation au bornier indiqué N sur le transformateur
• Fixer le fil noir du câble d’alimentation au bornier indiqué d’un L sur le transformateur
D. CONNECTION WITH PLUG 2.1MM / RACCORDEMENT AVEC FICHE 2.1MM
• Connect the transformer power cord to the electrical outlet.
• Brancher le cordon d’alimentation du transformateur à la prise électrique.
1TITANIUM TECHNOLOGY - 2022
L N -V +V
L N -V +V
A
A
B
B
C
C
D
D
Ce document peut être modifié à tout moment et sans préavis de la part de Titanium Technologie. / This document can be modified at any time and without notice from Titanium Technology.
Modification date :
Wiring diagrams / Schémas de branchements
1. LINE VOLTAGE CONNECTION / BRANCHEMENT HAUTE TENSION
TT-PSU serie / 0-10V TT-DR-CV Serie
TT-PSU Serie / TT-DR-CV Serie
2. LOW VOLTAGE CONNECTION / BRANCHEMENT BASSE TENSION
TT-AMP-4-32
0-10V
TT-AMP-5-50
TT-U-E4S RGBW Controller
TT-U-E5S RGBCCT Controller
TT-DMX-4C with RGB
TT-DMX-4C with RGBW
TT-DMX-5C with RGBCCT
TT-U-M3
TT-U-M4
TT-ACC-IR Serie
TT-U-02 3way DC
TT-U-01 / TT-U-13 / TT-U-14 / TT-U-06
2
TITANIUM TECHNOLOGY - 2022
21/03/22
Titanium Technology offers this limited warranty for one (1) year from the date of purchase of this
Titanium Technology product (hereafter : the «Product»). A list of all the Titanium Technology products
covered by this limited warranty is given at the end of this document.
This limited warranty is valid only for the Product and it may not be transferred.
The present limited warranty is not meant to exclude, restrict, limit or modify the legal warranty given by
law to the purchaser of the Product.
This is a quality Product. It was made and selected with care. If the Product contains a manufacturing defect or if one or more
parts of the Product is defective, the retailer commits to replace or repair, at its sole discretion, the defective part of parts
without charge under the following cumulative conditions : 1) the purchaser muste contact the retail store where the Product
was purchased; 2) the purchaser must return the defective part of parts or the Product to the retailer; 3) the purchaser must
provide the retailer the invoice as proof of purchase and date of purchase of the Product; 4) the purchaser must supply the
Product identication information, including the serial number or the model number; and 5) the period of one (1) year covered
by this limited warranty must not be expired. If the retailer decides to replace the defective part or parts, the replacement part
or parts would be new or reconditioned, equivalent to new parts.
EXCLUSIONS AND LIMITATIONS OF THE LIMITED WARRANTY
This limited warranty is not applicable :
1. to consumable parts;
2. to normal wear;
3. when the Product is used for purposes other than those determined by the manufacturer;
4. when the Product is not installed by a qualied electrician when electrical work is required;
5. when the serial number or other identication information or the Product is erased or withdrawn;
6. to damages that are only aesthetic and do not affect the normal use of the Product, including scartches, bumps etc.;
7. to labour costs such as installation, de-installation or shipping of the Product which must be paid by the purchaser;
8. to service call costs, when the service call is made while the warranty is not valid;
9. when the damages, defects, faults or other problems arise from :
a. an abnormal use of the Product;
b. an inadequate maintenance of the Product;
c. a faulty installation of the Product or an installation that is not in accordance with the installation guide
(if one is provided);
d. a modication, a repair or dismantling of the Product by a person not authorized by the retailer or the manufacturer;
e. the transportation by the purchaser, his employee, ofcer or representative;
f. a negligence by the purchaser, his employee, ofcer or representative;
g. an accident;
h. a case of force majeure (are considered force majeure : nature disasters, lightning, ood, re etc.);
i. any event that is not caused by the Product itself.
In no circumstance can the manufacturer or retailer be held responsible for any extroordinary, special, inderect, accessory or
consecutive damages resulting from the use of or the incapacity to use the Product. Their responsibility is limited to the sale
price of the Product as indicated on the notice and paid by the purchaser at the time of purchase. It is understood that this is
not meant to limit, restrict or exclude the protection given by the legal warranty.
FRENCH VERSION VS ENGLISH VERSION
In case of discrepancy between the French and the English versions of the text of this limited warranty, the French
version shall prevail.
MODIFICATIONS
The present warranty text is subject to change at any time.
List of Titanium Technology products covered under this limited warranty :
1) Nicolaudie Controller
2) LTECH Controller
3) TT-ACC-XX
4) TT-AMP-XX
5) TT-CAB-XX
6) TT-DMX-XX
7) TT-PSU-IP20 / PLUG-IN
8) TT-U-XX
9) TT-WiFi
10) Aluminium prole
Note : This product list may not be up to date. Please refer to the product itself (including the package or installation guide)
to make sure it is covered by this limited warranty.
LIMITED ONE (1) YEAR WARRANTY
www.titaniumtechnology.com
[email protected]
1-866-476-8115
1
AN
YEAR
G
A
R
A
N
T
I
E
L
I
M
I
T
É
E
L
I
M
I
T
E
D
W
A
R
R
A
N
T
Y
G
A
R
A
N
T
I
E
L
I
M
I
T
É
E
L
I
M
I
T
E
D
W
A
R
R
A
N
T
Y
1AN
YEAR
Modication date : 21/03/22

Other Titanium Lighting Equipment manuals

Titanium TT-DR-CV-040 User manual

Titanium

Titanium TT-DR-CV-040 User manual

Titanium TT-TRK-15W-1R User manual

Titanium

Titanium TT-TRK-15W-1R User manual

Titanium TT-TRK-164D User manual

Titanium

Titanium TT-TRK-164D User manual

Titanium TT-TRK-12X1W-C User manual

Titanium

Titanium TT-TRK-12X1W-C User manual

Titanium TT-FL02-65W User manual

Titanium

Titanium TT-FL02-65W User manual

Titanium TT-TRK-120C User manual

Titanium

Titanium TT-TRK-120C User manual

Titanium TT-TRK-10W-1R User manual

Titanium

Titanium TT-TRK-10W-1R User manual

Titanium TT-PUCK-3W-S User manual

Titanium

Titanium TT-PUCK-3W-S User manual

Titanium TT-FL00-2P4P-F-X User manual

Titanium

Titanium TT-FL00-2P4P-F-X User manual

Titanium TT-TRK-5W-1R User manual

Titanium

Titanium TT-TRK-5W-1R User manual

Titanium TT-U-UX8 User manual

Titanium

Titanium TT-U-UX8 User manual

Titanium TT-TRK-84D User manual

Titanium

Titanium TT-TRK-84D User manual

Titanium TT-TRK-5W-1 User manual

Titanium

Titanium TT-TRK-5W-1 User manual

Titanium TT-ACC-FASTCLIP-2 User manual

Titanium

Titanium TT-ACC-FASTCLIP-2 User manual

Titanium TT-PSU-IP67 User manual

Titanium

Titanium TT-PSU-IP67 User manual

Titanium TT-FL05-60W User manual

Titanium

Titanium TT-FL05-60W User manual

Titanium TT-FL04-24W User manual

Titanium

Titanium TT-FL04-24W User manual

Titanium TT-TRK-323D User manual

Titanium

Titanium TT-TRK-323D User manual

Titanium TT-38-3000-O User manual

Titanium

Titanium TT-38-3000-O User manual

Titanium TT-08-3000-O User manual

Titanium

Titanium TT-08-3000-O User manual

Titanium TT-TRK-TRACK-R1/4 User manual

Titanium

Titanium TT-TRK-TRACK-R1/4 User manual

Titanium TT-2216-L1280 User manual

Titanium

Titanium TT-2216-L1280 User manual

Titanium TT-TRK-640 User manual

Titanium

Titanium TT-TRK-640 User manual

Titanium TT-335-L600 User manual

Titanium

Titanium TT-335-L600 User manual

Popular Lighting Equipment manuals by other brands

EuroLite LED BAR-252 RGB 10mm user manual

EuroLite

EuroLite LED BAR-252 RGB 10mm user manual

Integral LED SensorLux quick start guide

Integral LED

Integral LED SensorLux quick start guide

GARANT 081448 200 user guide

GARANT

GARANT 081448 200 user guide

LED Linear XOOLIGHT IP40 installation instructions

LED Linear

LED Linear XOOLIGHT IP40 installation instructions

Manfrotto Lastolite Setting up

Manfrotto

Manfrotto Lastolite Setting up

KAM DMX LASER 120 PRO instruction manual

KAM

KAM DMX LASER 120 PRO instruction manual

Velleman HQ Power VDP250SC6 manual

Velleman

Velleman HQ Power VDP250SC6 manual

HUBBELL LIGHTING DUAL LITE EVHC Series installation instructions

HUBBELL LIGHTING

HUBBELL LIGHTING DUAL LITE EVHC Series installation instructions

SloanLED LEDStripe installation guide

SloanLED

SloanLED LEDStripe installation guide

NANLITE PavoTube II 15X user manual

NANLITE

NANLITE PavoTube II 15X user manual

Stahl 6470/2 Series manual

Stahl

Stahl 6470/2 Series manual

Gama Sonic 143iP2902KIT instruction manual

Gama Sonic

Gama Sonic 143iP2902KIT instruction manual

Home Accents Holiday TY094-1614-1 Use and care guide

Home Accents Holiday

Home Accents Holiday TY094-1614-1 Use and care guide

InoTec CLS 24.1-7Ah Mounting and operating instructions

InoTec

InoTec CLS 24.1-7Ah Mounting and operating instructions

VanGaa VG-FL470A user manual

VanGaa

VanGaa VG-FL470A user manual

REMKO SLE Series Assembly and operating instructions

REMKO

REMKO SLE Series Assembly and operating instructions

TRADINGZONE Stehlampe Free MPP-SEN installation manual

TRADINGZONE

TRADINGZONE Stehlampe Free MPP-SEN installation manual

mbj Domelight Series operating manual

mbj

mbj Domelight Series operating manual

manuals.online logo
manuals.online logoBrands
  • About & Mission
  • Contact us
  • Privacy Policy
  • Terms and Conditions

Copyright 2025 Manuals.Online. All Rights Reserved.