manuals.online logo
Brands
  1. Home
  2. •
  3. Brands
  4. •
  5. LUMENWERX
  6. •
  7. Lighting Equipment
  8. •
  9. LUMENWERX RIM LINEAR User manual

LUMENWERX RIM LINEAR User manual

Use the canopy plate (C) as a model to mark 4 holes.
C
Loosen the decorative nut (A) on the canopy (B).
Separate the canopy (B) from the canopy plate (C).
B
C
A
NOTE: Wire dimming conductors as Class 1
Unscrew to remove the canopy driver (D) from the
canopy plate (C) in the order of the numbers.
Mount and turn the canopy plate (C) to place on the
junction box (E).
POWER SIDE NON POWER SIDE
Remove the canopy plate. Drill holes (Ø 1/4”)
following the marks. Install #8 screw anchors (F) .
POWER SIDE NON POWER SIDE
Pass all cables (H) through the canopy (B). Insert
them into the griplock (G). Adjust the cables (H) by
pushing the feeder tube.
B
H
G
D
C
CE
F
www.lumenwerx.com (T) 514-225-4304 (F) 514-931-4862 © All rights are reserved to LumenWerx ULC. RIM-PENDANT-REMOTE-DRIVER-POWER-OVER-CABLES-INST. October 7, 2019 Page: 1 / 3
LumenWerx ULC. reserves the right to change or modify product specifications without notification
4
2
1
5
3
6
PENDANT - CANOPY DRIVER BOX - POC
RIM LINEAR
IMPORTANT: Installation instructions are shown with RIM 4 and applies to all RIM LINEAR fixtures
WWW.LUMENWERX.COM
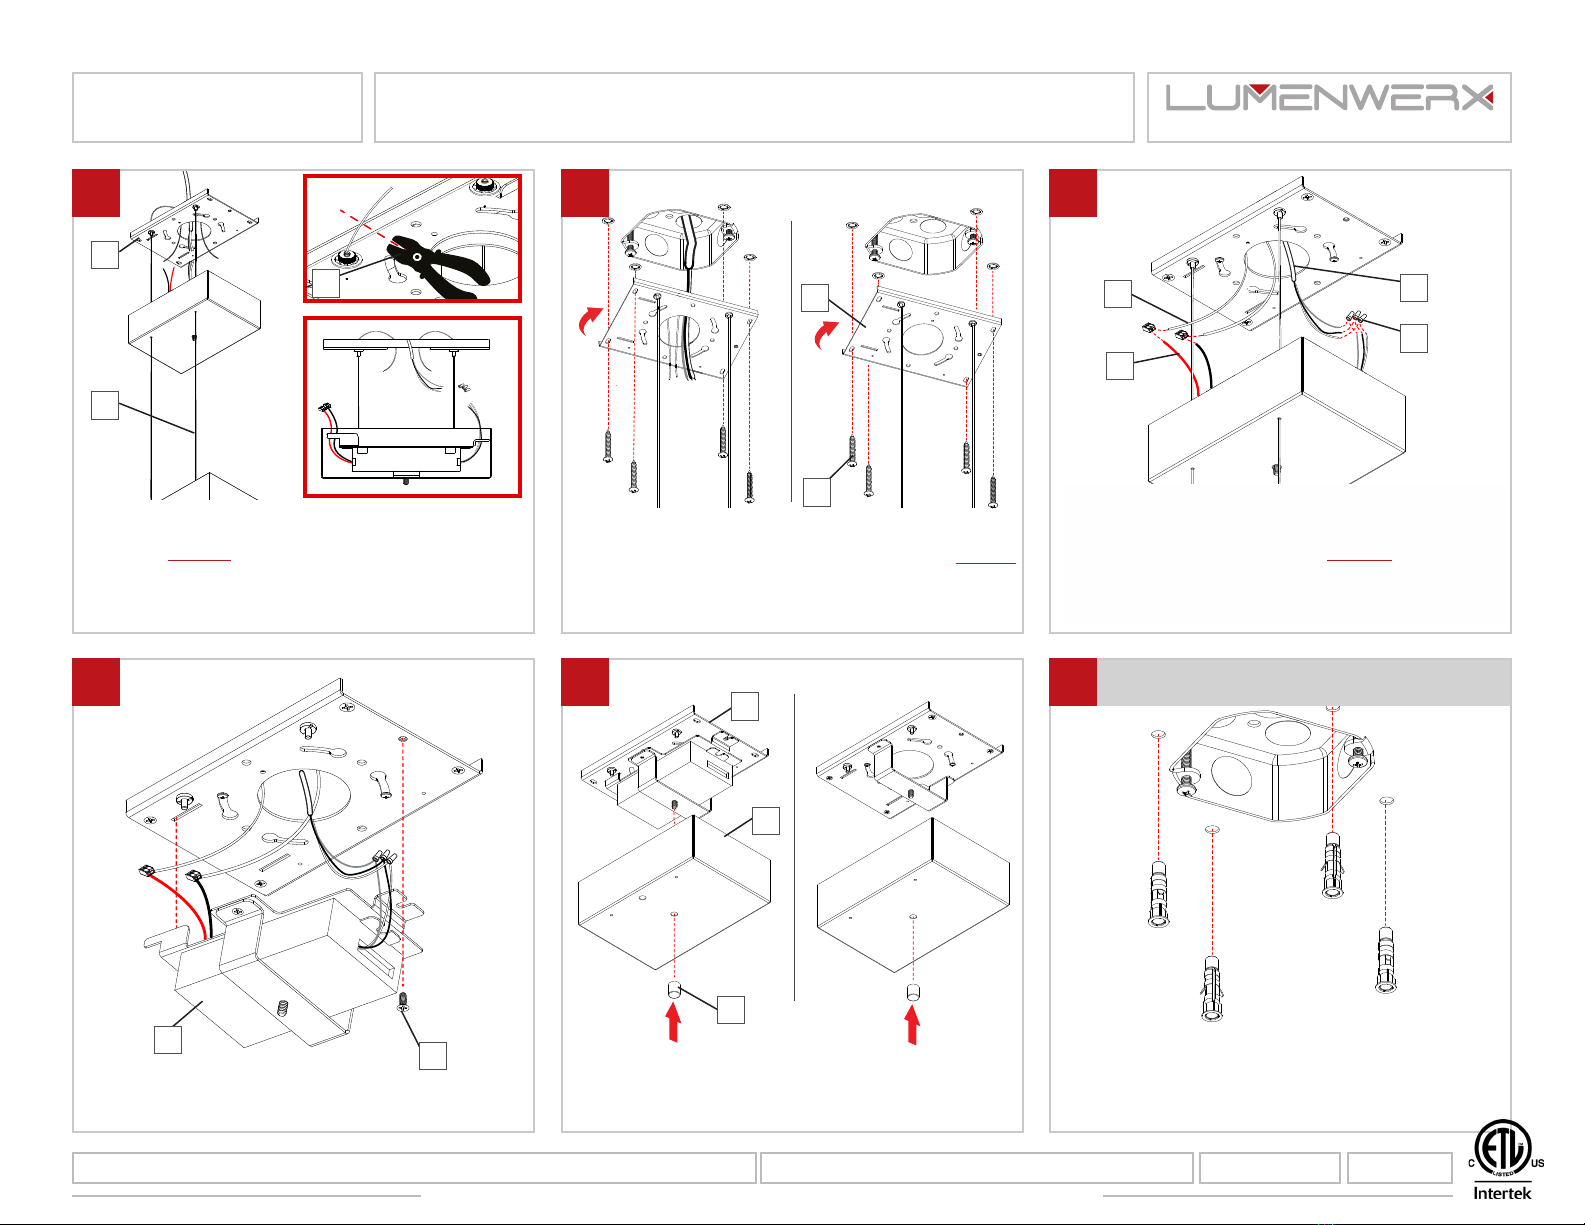
Fix canopy plate (C) with four screws (J). Notes:
Make sure to have a steady hold of the fixture. So,
it is never hanging loosely from POC if installation
is not complete.
J
POWER SIDE NON POWER SIDE
Make electrical connections between POC (Power
Over Cable) (K) and the remote driver feed (L). Then,
make connections between the driver and the main
power (M) with marettes (N). Notes: Connect the
negative (-) POC (black mark on the fixture) to the
black wire and the positive (+) POC (red mark on
the fixture) to the red wire.
C
Secure the canopy driver (D) with screw (O).
O
D
Put the canopy plate (B) and canopy (C) back in place
using the decorative nut (A).
POWER SIDE NON POWER SIDE
CONTINUOUS SYSTEM
For a continuous system, repeat steps 1 to 11 for all
mountings.
A
B
C
IK
L
M
N
Pull all wires (H) out through canopy plate (C)
and cut the excess cable with an aircraft cable
cutter(I). Notes: POC (Power Over Cable) should
have just enough length to make the connection
inside of J-box. Height adjustment of the fixture
must be done at this step.
DRIVER
H
C
www.lumenwerx.com (T) 514-225-4304 (F) 514-931-4862 © All rights are reserved to LumenWerx ULC. RIM-PENDANT-REMOTE-DRIVER-POWER OVER-CABLES-INST. October 7, 2019 Page: 2 / 3
LumenWerx ULC. reserves the right to change or modify product specifications without notification
7 8 9
10 11 12
PENDANT - CANOPY DRIVER BOX - POC
RIM LINEAR
WWW.LUMENWERX.COM
Slide first fixture (P) into second fixture (Q). Lock
them together using mallet (R).
P
Q
RS
Secure all fixtures with screws (S).
2
1
www.lumenwerx.com (T) 514-225-4304 (F) 514-931-4862 © All rights are reserved to LumenWerx ULC. RIM-PENDANT-REMOTE-DRIVER-POWER OVER-CABLES-INST. October 7, 2019 Page: 3 / 3
LumenWerx ULC. reserves the right to change or modify product specifications without notification
13 14
PENDANT - CANOPY DRIVER BOX - POC
RIM LINEAR
WWW.LUMENWERX.COM

Other LUMENWERX Lighting Equipment manuals

LUMENWERX CUBITO User manual

LUMENWERX

LUMENWERX CUBITO User manual

LUMENWERX RIM VERSO ACOUSTIX User manual

LUMENWERX

LUMENWERX RIM VERSO ACOUSTIX User manual

LUMENWERX POP COLOR User manual

LUMENWERX

LUMENWERX POP COLOR User manual

LUMENWERX QUAD N-W FLUORESCENT User manual

LUMENWERX

LUMENWERX QUAD N-W FLUORESCENT User manual

LUMENWERX MIKRO User manual

LUMENWERX

LUMENWERX MIKRO User manual

Popular Lighting Equipment manuals by other brands

Holtkoetter 2517/1 P1 Series Assembly instructions

Holtkoetter

Holtkoetter 2517/1 P1 Series Assembly instructions

Martin Professional MAC 2000 Profile II user manual

Martin Professional

Martin Professional MAC 2000 Profile II user manual

EuroLite LED D-12 RGBA user manual

EuroLite

EuroLite LED D-12 RGBA user manual

EuroLite PAR-16 Spot user manual

EuroLite

EuroLite PAR-16 Spot user manual

Flash F7100443 user manual

Flash

Flash F7100443 user manual

CADMEN CM-AF142SO installation instructions

CADMEN

CADMEN CM-AF142SO installation instructions

LIVARNO home 1020-B manual

LIVARNO home

LIVARNO home 1020-B manual

lumishore eclipse CL30 installation guide

lumishore

lumishore eclipse CL30 installation guide

Satco NUVO 67-120 Installation and safety instructions

Satco

Satco NUVO 67-120 Installation and safety instructions

GE Tetra Contour LS installation guide

GE

GE Tetra Contour LS installation guide

IN HOUSE LED HUB-RD-PIR user manuel

IN HOUSE LED

IN HOUSE LED HUB-RD-PIR user manuel

Derksen Lightbrush RGB-Module 1500 manual

Derksen

Derksen Lightbrush RGB-Module 1500 manual

LiRON LiGHTING LEDBLR installation guide

LiRON LiGHTING

LiRON LiGHTING LEDBLR installation guide

IMMAX NEO SMART SIRENA ZIGBEE 3.0 user manual

IMMAX

IMMAX NEO SMART SIRENA ZIGBEE 3.0 user manual

Vision & Control LDLF60x360-R633/24V Instructions for use

Vision & Control

Vision & Control LDLF60x360-R633/24V Instructions for use

Lights.com LC004778 installation instructions

Lights.com

Lights.com LC004778 installation instructions

SpeedTech Lights K-Force Super TD 47 instruction manual

SpeedTech Lights

SpeedTech Lights K-Force Super TD 47 instruction manual

EuroLite LED Scan TSL-300 60W user manual

EuroLite

EuroLite LED Scan TSL-300 60W user manual

manuals.online logo
manuals.online logoBrands
  • About & Mission
  • Contact us
  • Privacy Policy
  • Terms and Conditions

Copyright 2025 Manuals.Online. All Rights Reserved.