TIVA TVAHTR USA User manual

Owner’s Manual
USA
Carbon Infrared Heater
TIVA Heater - USA - User Manual - BDUSAV1.indd 1TIVA Heater - USA - User Manual - BDUSAV1.indd 1 10/06/2021 10:47:37 a.m.10/06/2021 10:47:37 a.m.

Congratulations on purchasing the TIVA™Heater Indoor/Outdoor.
Before installing and using the heater, please read this owner’s
manual carefully, and keep it somewhere safe for future reference.
TIVA Heater - USA - User Manual - BDUSAV1.indd 2TIVA Heater - USA - User Manual - BDUSAV1.indd 2 10/06/2021 10:47:39 a.m.10/06/2021 10:47:39 a.m.
3
SAFETY INSTRUCTIONS
Read all instructions before installing and using this heater.
When using electrical appliances, basic safety precautions should always be
followed to reduce the risk of fire, electric shock and injury to persons, including the
following:
WARNINGS:
• This appliance is not intended for use by persons (including children) with
reduced physical, sensory or mental capabilities, or lack of experience and
knowledge, unless they have been given supervision or instruction concerning
use of the appliance by a person responsible for their safety.
• Children of less than 3 years should be kept away unless continuously supervised.
• Children aged from 3 years and less than 8 years should only switch on/
off the appliance provided that it has been placed or installed in its intended
normal operating position and they have been given supervision or instruction
concerning use of the appliance in a safe way and understand the hazards
involved.
• Children aged from 3 years and less than 8 years should not plug in,regulate and
clean the appliance or perform user maintenance.
• Children should be supervised to ensure they do not play with the appliance.
• CAUTION — Some parts of this product can become very hot and cause burns
Particular attention has to be given where children and vulnerable people are
present.
• WARNING: In order to avoid overheating, do not cover the heater.
• If the supply cord is damaged,it must be replaced by the manufacturer,its service
agent or similarly qualified persons in order to avoid a hazard.
• This heater is not equipped with a device to control the room temperature.
• Do not use this heater in small rooms when they are occupied by persons not
capable of leaving the room on their own,unless constant supervision is provided.
WARNING: FIRE RISK EXISTS IF THE HEATER
IS COVERED BY OR POSITIONED CLOSE
TO CURTAINS OR OTHER COMBUSTIBLE
MATERIALS.
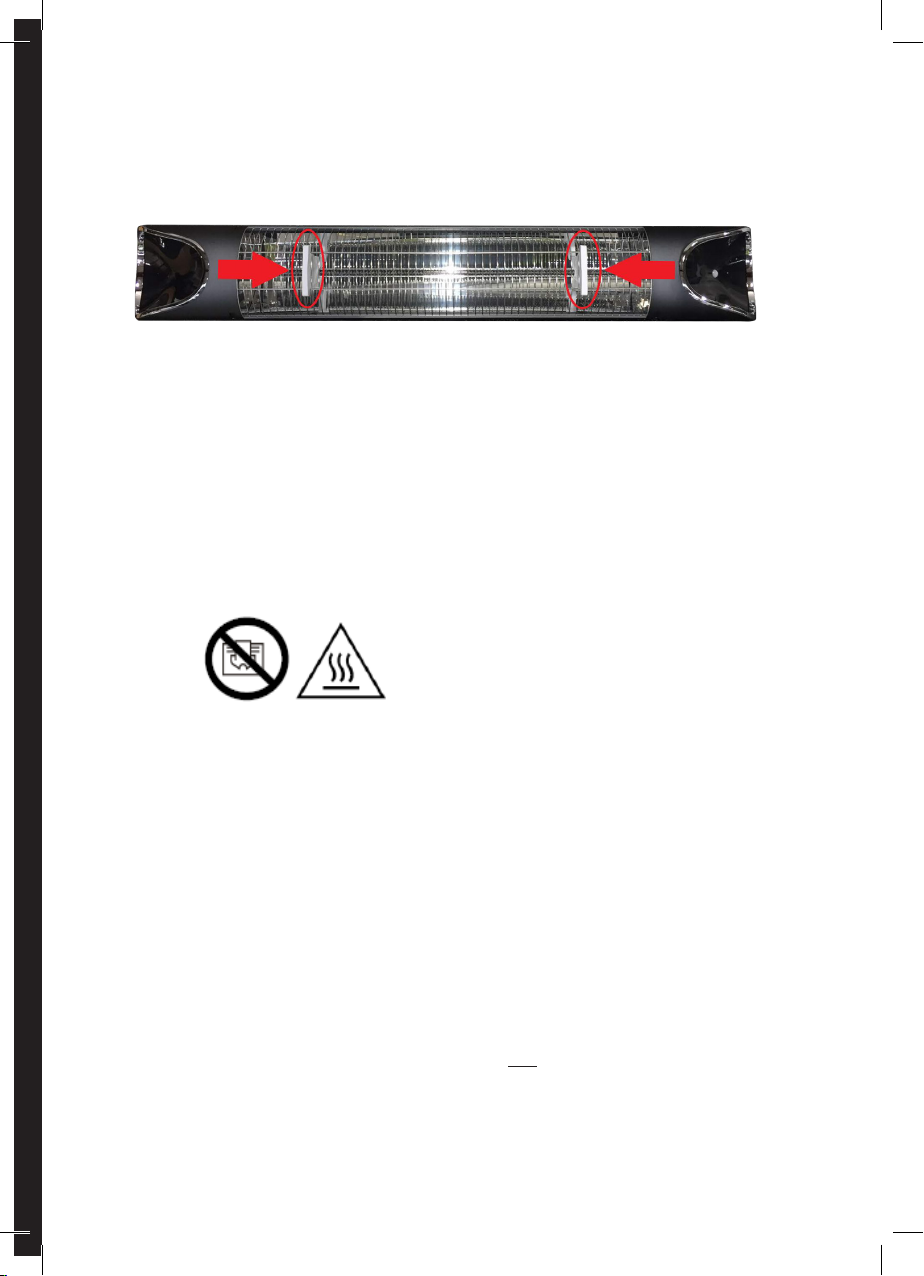
IMPORTANT:
The support tabs holding the heating element must be removed before use.Any
damage caused by leaving these tabs in and using the heater is not covered
under warranty and will incur a refurbishment fee to cover the cost of new parts
and a servicing charge.
When returning a TIVA™Heater Indoor/Outdoor it must be returned in it’s original
packaging, including all packaging inserts. If a returned heater is damaged in
transit and does not have the correct packaging, the customer will be held
responsible for the damage and be required to pay a refurbishment fee to
cover the cost of new parts and a servicing charge.
REMOVE REMOVE
TIVA Heater - USA - User Manual - BDUSAV1.indd 3TIVA Heater - USA - User Manual - BDUSAV1.indd 3 10/06/2021 10:47:39 a.m.10/06/2021 10:47:39 a.m.
4
• The heater must be installed at least 2.4m (7ft 11in) above the floor.
• This heater is designed for use on a 120V AC supply only.
•Use this heater only as described in this manual.Any other use not recommended
by the manufacturer may cause fire, electric shock, or injury to persons.
•The fireguard of this heater is intended to prevent direct access to heating
elements and must be in place when the heater is in use.
•The fireguard does not give full protection for young children and persons with
reduced physical, sensory or mental capabilities.
• This heater must be earthed. Connect to properly grounded outlets only.
• Ensure both plug and socket are clean and free from dust when using.
• To disconnect the heater from the power supply, turn off the heater, switch off the
power point, grip the plug and pull from the power socket.
• Never pull by the cord.
• Never touch the plug with wet or moist hands.
•Avoid the use of an extension cord because the extension cord may overheat
and cause a risk of fire. However, if you have to use an extension cord, the cord
shall be No. 16 AWG minimum size and rated not less than 1800 watts.
•Regularly inspect the power cord and plug for wear or damage and do not
operate the heater with a damaged cord, plug or loose socket or after the heater
malfunctions, or has been dropped or damaged in any manner.
• We recommend not using a multi-board with your heater.
• Do not use the heater if the heating element is cracked or broken.
•The heater must not be located immediately below or in front of a socket outlet
or connection box.
•This heater is hot when in use. To avoid burns, do not let bare skin touch hot
surfaces. Keep combustible materials such as furniture, pillows, bedding, paper,
clothes and curtains at least 1.5m (5 ft) from the front of the heater and keep
them away from the sides and rear.
• Do not allow the supply cord to sit or hang in front of the heater while in use.
•A heater has hot and arcing or sparking parts inside. Do not use the heater in
areas where gasoline, paint, flammable liquids or highly combustible dusts are
used or stored.
•If this heater is to be used in bathroom, it is to be installed so that switches and
other controls cannot be touched by a person in the bath or shower or using a
sink or anything else that may involve wet hands or skin.
• Never locate heater where it may fall into a bathtub or other water container.
•Extreme caution is necessary when any heater is used by or near children or
invalids and whenever the heater is left operating and unattended.
• Never use the heater while sleeping.
• Do not cover the heater.
• Do not insert any object into the heater.
• Never touch the heater while in use.
•Always disconnect the heater from the electricity supply and allow it to cool
before adjusting the position or attempting to work on it.
•The heater is in stand-by mode when plugged in and can be turned on by the
remote. When not in use, turn off the power switch, remove the plug from the
socket outlet to completely turn off the heater.
•When used outdoors, always use a weatherproof power outlet and a residual
TIVA Heater - USA - User Manual - BDUSAV1.indd 4TIVA Heater - USA - User Manual - BDUSAV1.indd 4 10/06/2021 10:47:39 a.m.10/06/2021 10:47:39 a.m.
5
INTRODUCTION
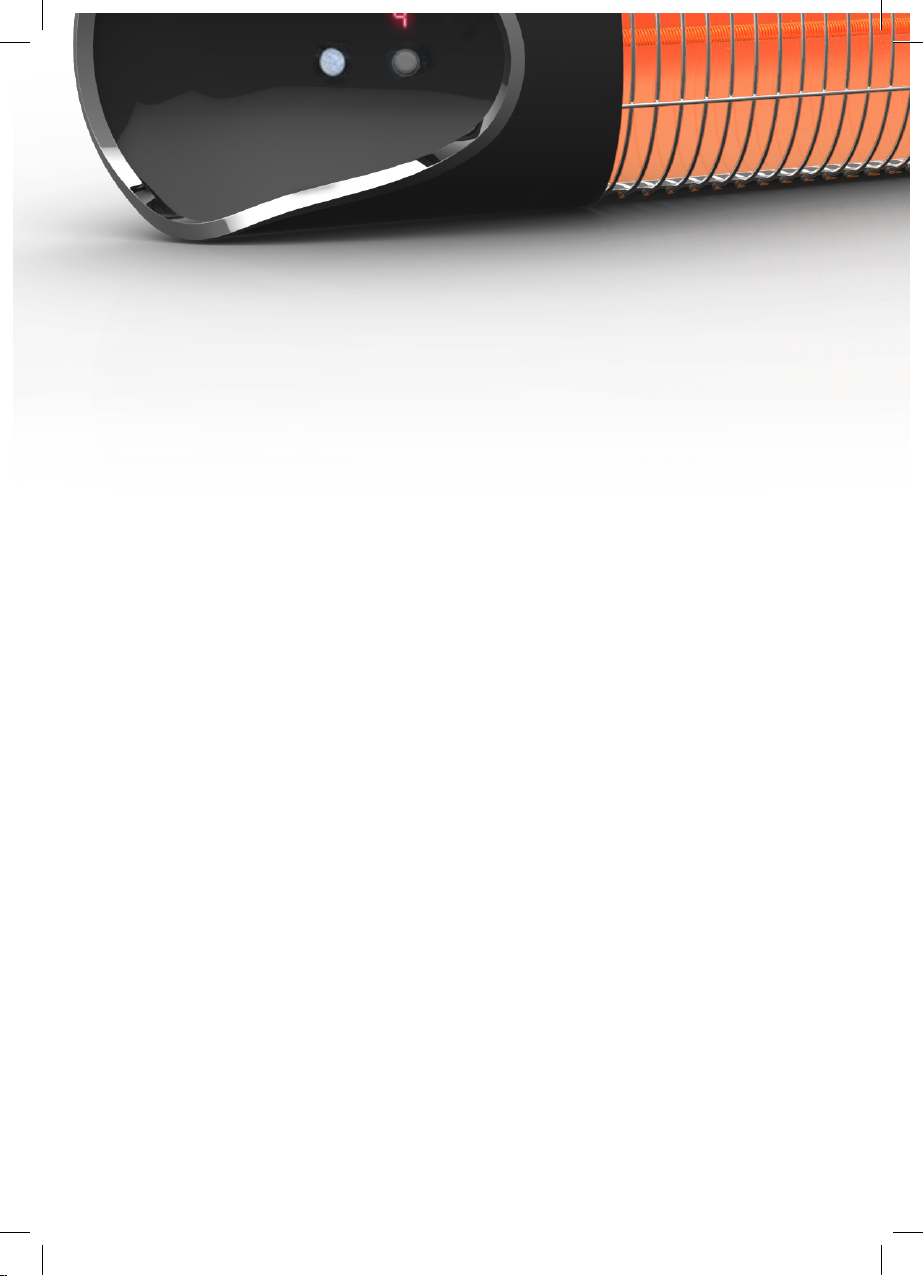
Your TIVA™Heater Indoor/Outdoor is a robust and weatherproof heater, ideal for
both indoor and outdoor use. Requiring no time to heat up, it provides comfortable
heat instantly.
That’s because the TIVA™Heater Indoor/Outdoor’s carbon infrared lamp
produces instant radiant heat. Unlike conventional convection heating, the
TIVA™Heater Indoor/Outdoor doesn’t heat the air. Rather, it transfers radiant
heat from the TIVA™Heater Indoor/Outdoor lamp to an object, just like the
warmth of the sun heating a rock, or the feeling of sunshine on your face.
INDOORS
Used indoors, your TIVA™Heater Indoor/Outdoor will only warm you and objects
in the room, such as carpets or furniture. It won’t heat and dry out the air.
OUTDOORS
In an outdoor environment, the surrounding air is constantly moving. This makes
convection heating impractical because once the air is heated, it just blows away
– leaving you without the warmth you desire. But the TIVA™Heater Indoor/Outdoor
enables you to target outdoor areas, warming only the people and objects in the
heater’s path, for maximum warmth and maximum efficiency.
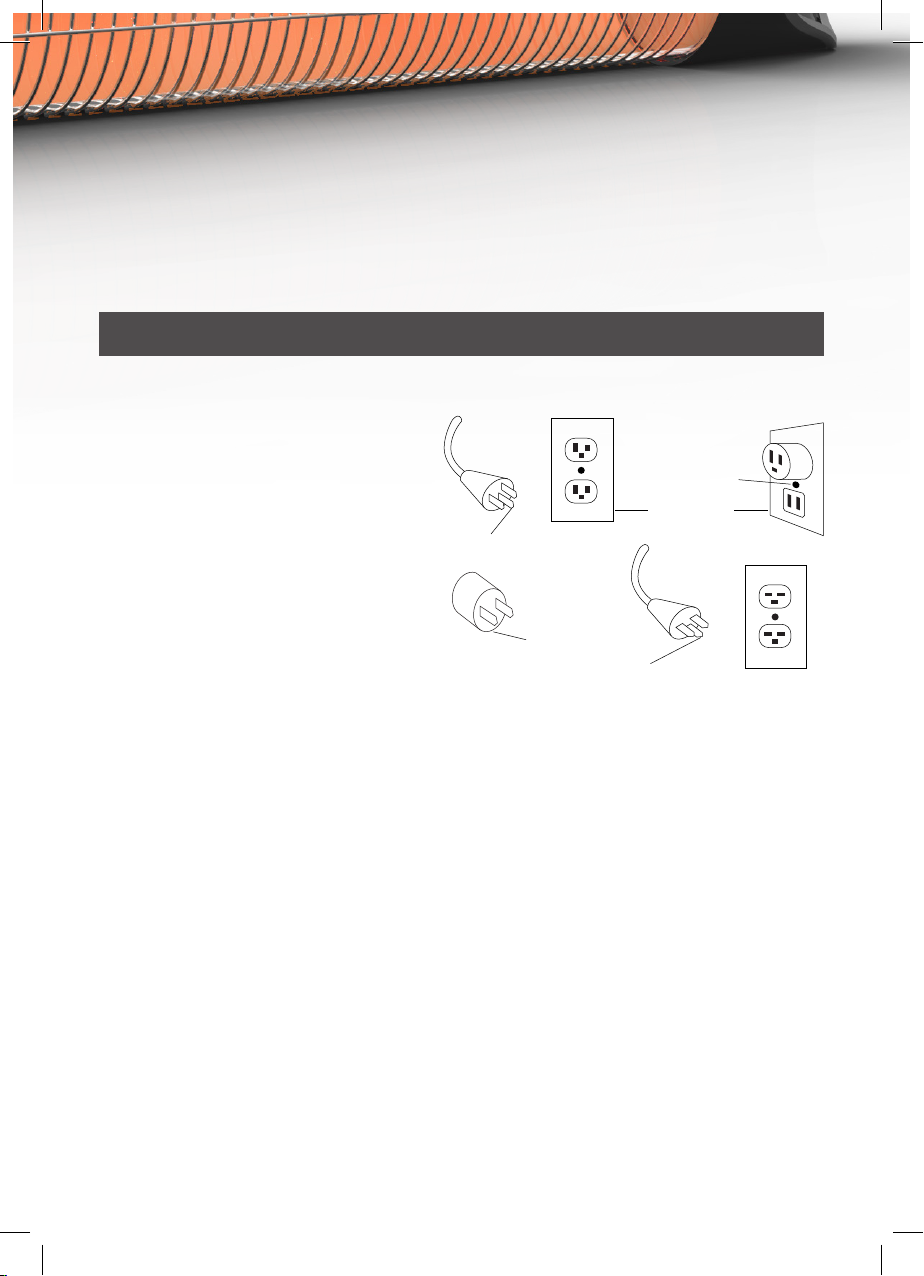
WARNING
This heater is for use on 120 volts.
The cord has a plug as shown at A
in Figure 61 .1. An adapter as shown
at C is available for connecting three-
blade grounding-type plugs to two-
slot receptacles.The green grounding
lug extending from the adapter
must be connected to a permanent
ground such as a properly grounded
outlet box. The adapter should not
be used if a three-slot grounded
receptacle is available.
(A)
Grounding
Pin
Grounding
Pin
Grounding
Mains
Adapter
Metal Screw
Cover of Gounded
Outlet Box
Figure 61.1
Grouding Methods
(C)
(D)
(B)
current device (RCD).
• The TIVA™Heater Indoor/Outdoor is protected from rain sprays. Do not direct
water at the heater, e.g. splashing or from a garden hose.
• Do not operate any heater after it malfunctions. Disconnect power at service
panel and have heater inspected by a reputable electrician before reusing.
• Do not insert or allow foreign objects to enter any ventilation or exhaust opening
as this may cause an electric shock or fire, or damage the heater.
• To prevent a possible fire, do not block air intakes or exhaust in any manner.
SAVE THESE INSTRUCTIONS
TIVA Heater - USA - User Manual - BDUSAV1.indd 5TIVA Heater - USA - User Manual - BDUSAV1.indd 5 10/06/2021 10:47:39 a.m.10/06/2021 10:47:39 a.m.

6
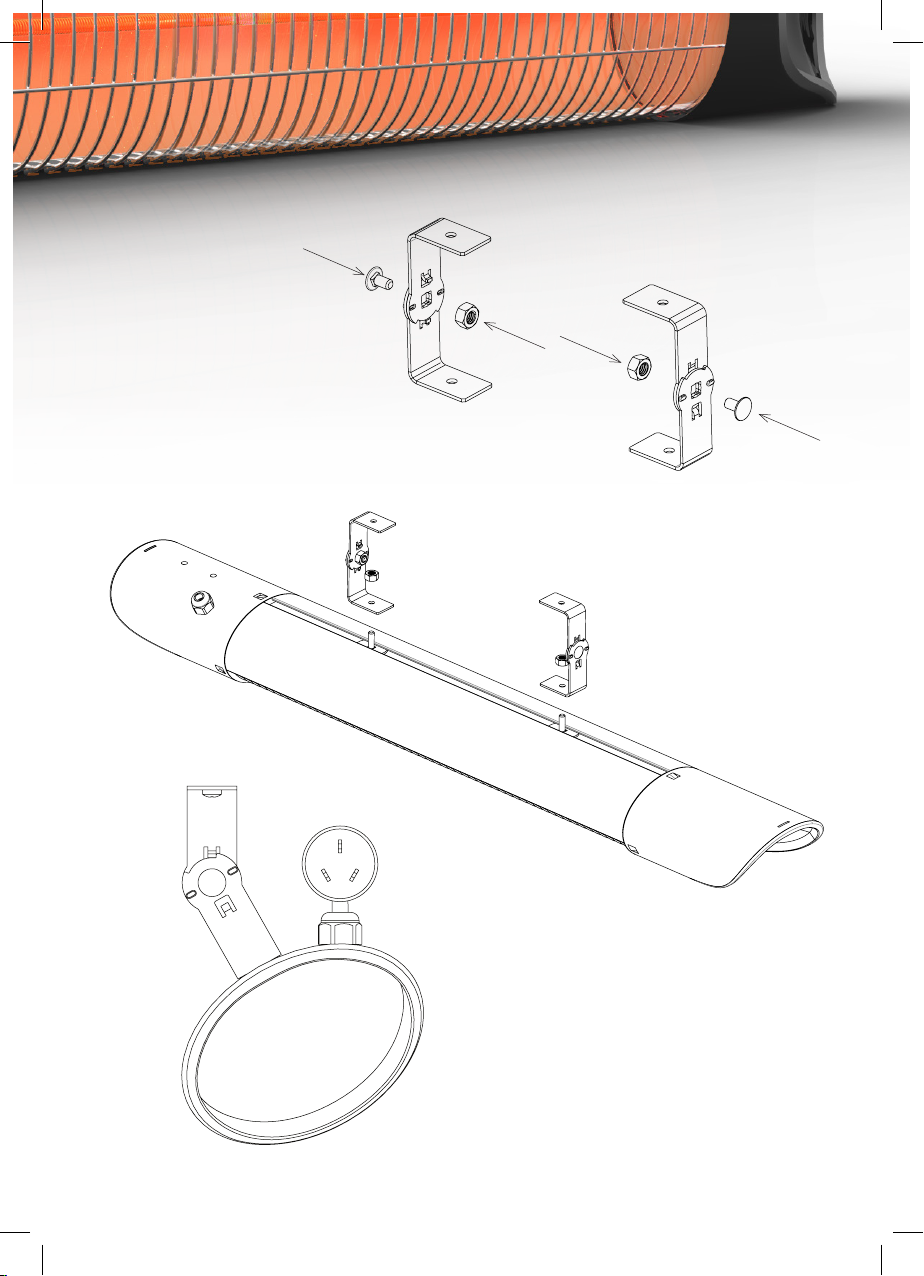
PARTS & ASSEMBLY
CEILING MOUNTING
1. Measure & secure 2 mounting
brackets on the ceiling up
to a maximum of 530mm
horizontally apart, measured
from the hole centres. Where
possible locate solid fixing
points in the ceiling such as
the ceiling joists which will
provide the most secure fixing
point and usually will not
require plasterboard anchors.
If the studs cannot be located
or are not in a convenient
location then ensure you use
the correct ceiling anchors
for your ceiling, plasterboard
anchors are supplied.
Maximum 530mm
(drawings not to scale
4x Mounting Brackets 2x Plasterboard
Anchors
2x M5
Taping Screws
2x M8
Coach Bolts
2x M8
Nuts
2x M6
Nuts
TIVA Heater - USA - User Manual - BDUSAV1.indd 6TIVA Heater - USA - User Manual - BDUSAV1.indd 6 10/06/2021 10:47:40 a.m.10/06/2021 10:47:40 a.m.
7
2. Bolt the remaining 2
mounting brackets to
the ceiling mounted
brackets loosely using
the supplied M8
coach bolts and nuts.
3. Lift the heater up to the ceiling mounted
brackets, feed the bolts on the back of the
heater through the brackets and secure
using the supplied M6 nuts, tightening fully.
4. Adjust the heater to the desired
angle,then tighten the M8 bolts and
nuts once in the desired position.
TIVA Heater - USA - User Manual - BDUSAV1.indd 7TIVA Heater - USA - User Manual - BDUSAV1.indd 7 10/06/2021 10:47:40 a.m.10/06/2021 10:47:40 a.m.
8
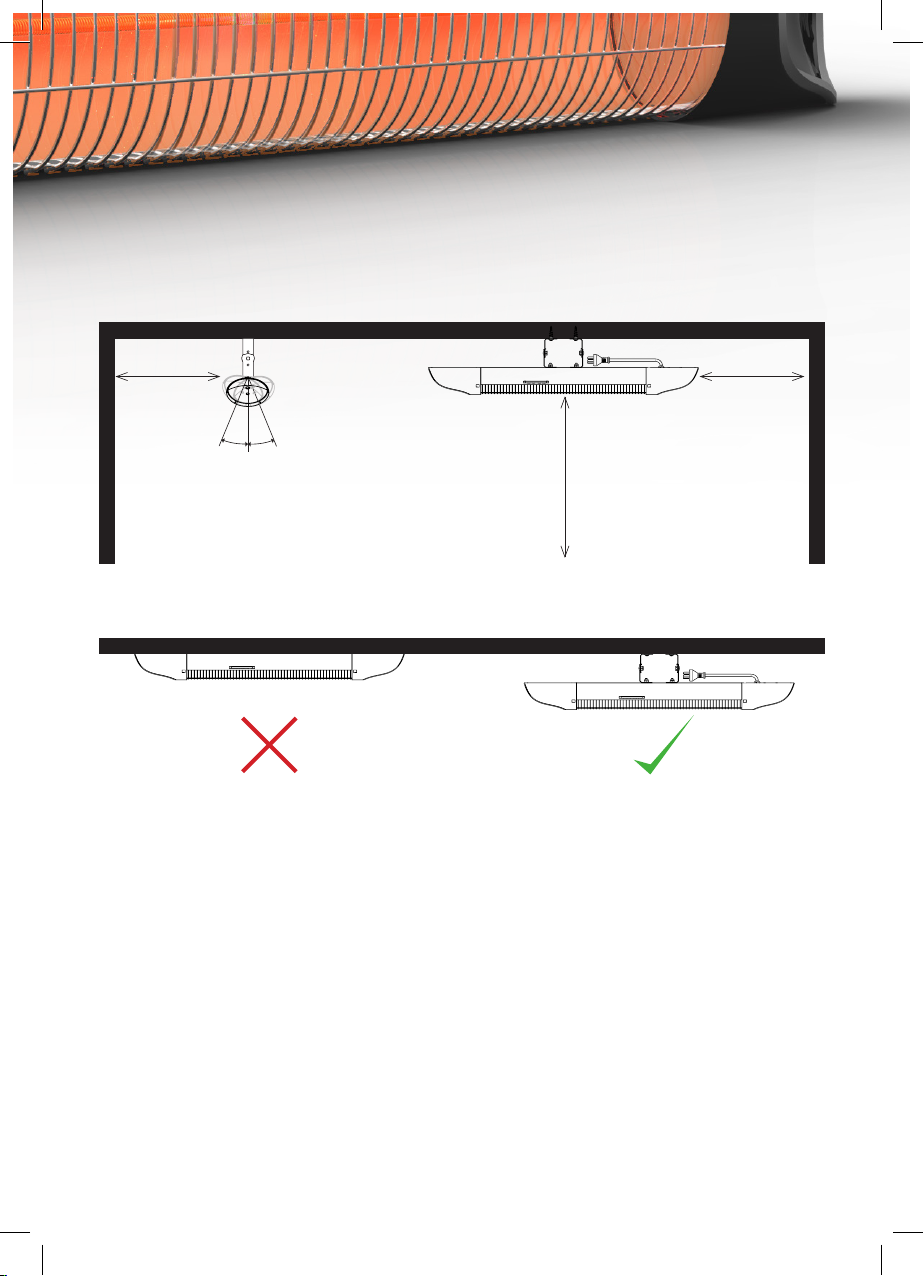
CEILING MOUNTING INSTALLATION
• The TIVA™Heater Indoor/Outdoor must be mounted horizontally only. If using the
standard plug, an electrician is not required for installation.A qualified electrician
is only required if the TIVA™Heater Indoor/Outdoor is being hard wired into the
ceiling or wall.
• DO NOT install the heater on an inflammable surface.To reduce the risk of fire, do
not store or use gasoline or other flammable vapors and liquids in the vicinity of
the heater.
• The lowest part of the heater must be located at or above a minimum height of
2.4m (7 ft. 11 in.) from ground level, so that the heater cannot be touched when
in operation.
• When mounting, do not angle the face of the heater higher than 22.5° in both
directions from 0° (Refer to the installation diagram on the next page).
• Keep the power cord away from the body of the heater, as the body will get hot
when the heater is in use.
• When mounting the heater, pay attention to the minimum safe distance between
the heater body and inflammable surfaces.
• The heater should always have a minimum clearance of 0.5m (1 1/2 ft) from
adjacent walls.
• When used outdoors, always use a weatherproof power outlet and a residual
current device (RCD).
• Before drilling mounting holes, make sure there are no wires or
water pipes behind the wall or ceiling onto which the heater is to
be mounted.
• The heater must be installed using the mounting brackets provided.
• Fasten the brackets securely to the mounting surface and the back of the heater
using the nuts and bolts supplied.
• Fasten the heater securely onto the brackets using the nuts and
bolts supplied.
• The brackets can be used to adjust the direction of the heater.Adjust the heater
angle by loosening the two bolts that connect the bracket halves, adjust and
retighten.
TIVA Heater - USA - User Manual - BDUSAV1.indd 8TIVA Heater - USA - User Manual - BDUSAV1.indd 8 10/06/2021 10:47:40 a.m.10/06/2021 10:47:40 a.m.
9
End View Side View
Min: 500mm
(1 1/2ft)
Min: 500mm
(1 1/2ft)
Min: 2400mm
(7 11/12 ft)
Wall
Do not install the heater hard
against the ceiling
Use the L Brackets provided
to mount the heater
Wall
CEILING INSTALLATION
Max: 22.50
Min: 00
Max: 22.50
TIVA Heater - USA - User Manual - BDUSAV1.indd 9TIVA Heater - USA - User Manual - BDUSAV1.indd 9 10/06/2021 10:47:40 a.m.10/06/2021 10:47:40 a.m.

10
HEATER OPERATION
• To turn the heater on, press the stand-by button on the unit or on the remote.
• Using the remote,press the level button then change the power setting by pressing
the up or down arrow buttons.
• Press the timer button then set the sleep timer by pressing the arrow buttons.
• To go back to stand-by mode, press the stand-by button on the unit or on the
remote.
• Press the sensor button on the remote to set to the motion sensor mode. While
in this mode, when motion is detected, heater will stay on for 15 minutes. if no
motion is detected during this 15 minute period, the heating element will turn off
(during this mode, the LED will display A-).
If no motion is detected within 1 hour of this state, the heater
will revert to the normal standby mode (need to press stand-by
button to turn on heater, and no longer in motion sensor mode).
To activate motion sensor mode again, press the sensor button on the remote.
stand-by button
Battery Compartment
stand-by button
LED Display
CAUTION: THE HEATER MUST BE PROPERLY INSTALLED BEFORE IT IS USED.
TIVA Heater - USA - User Manual - BDUSAV1.indd 10TIVA Heater - USA - User Manual - BDUSAV1.indd 10 10/06/2021 10:47:41 a.m.10/06/2021 10:47:41 a.m.

11
CLEANING AND MAINTENANCE
• Always disconnect the heater from the power supply and allow it to cool before
attempting any maintenance.
• If the heater has collected dust or dirt inside the unit or around the heating
element, DO NOT operate the heater in this condition. Always have the unit
cleaned by a qualified service agent.
• The only maintenance required by the owner is cleaning of the external surfaces.
• Use a damp cloth to wipe the outside of the heater.DO NOT use abrasive or solvent
cleaning fluids when cleaning the heater as they may damage the plastic parts.
• If the heater is to be removed from its mounting position when not in use, always
store it carefully in a safe, dry, childproof location.
• Do not touch the heating element with bare fingers,as residue from your hand could
affect the life of the lamp. If the lamp is accidentally touched, remove the finger
marks with a soft cloth moistened with methylated spirits or alcohol.Always allow the
methylated spirits or alcohol to completely evaporate before using the heater.
• Do not attempt to repair or adjust any electrical or mechanical functions on the
heater.
• The heater contains no user-serviceable parts. Should the product suffer damage
or breakdown, it must be returned to the manufacturer or its service agent.
• Damaged power cords are to be replaced by the manufacturer, service agent or
similarly qualified person.
STORAGE
Store the heater in a cool, dry location when not in use to prevent dust and dirt build
up. Use packaging carton to store.
RECYCLING
At the end of the product’s useful life it should not be disposed of with household
waste. Please check with your local authority or get recycling advice in your country.
Always recycle where facilities exist.
REPLACING THE REMOTE CONTROL BATTERY
• Press the battery compartment release button and then slide out the battery tray.
• Remove the old battery and put the new battery in, making sure that the battery’s
positive side is facing up. Use only a CR2025 or CR2032 battery in this remote
control.
• Slide the battery tray back into the remote control until it clicks.
Note: Do not allow water or liquid to get into the remote control.
TIVA Heater - USA - User Manual - BDUSAV1.indd 11TIVA Heater - USA - User Manual - BDUSAV1.indd 11 10/06/2021 10:47:41 a.m.10/06/2021 10:47:41 a.m.
12
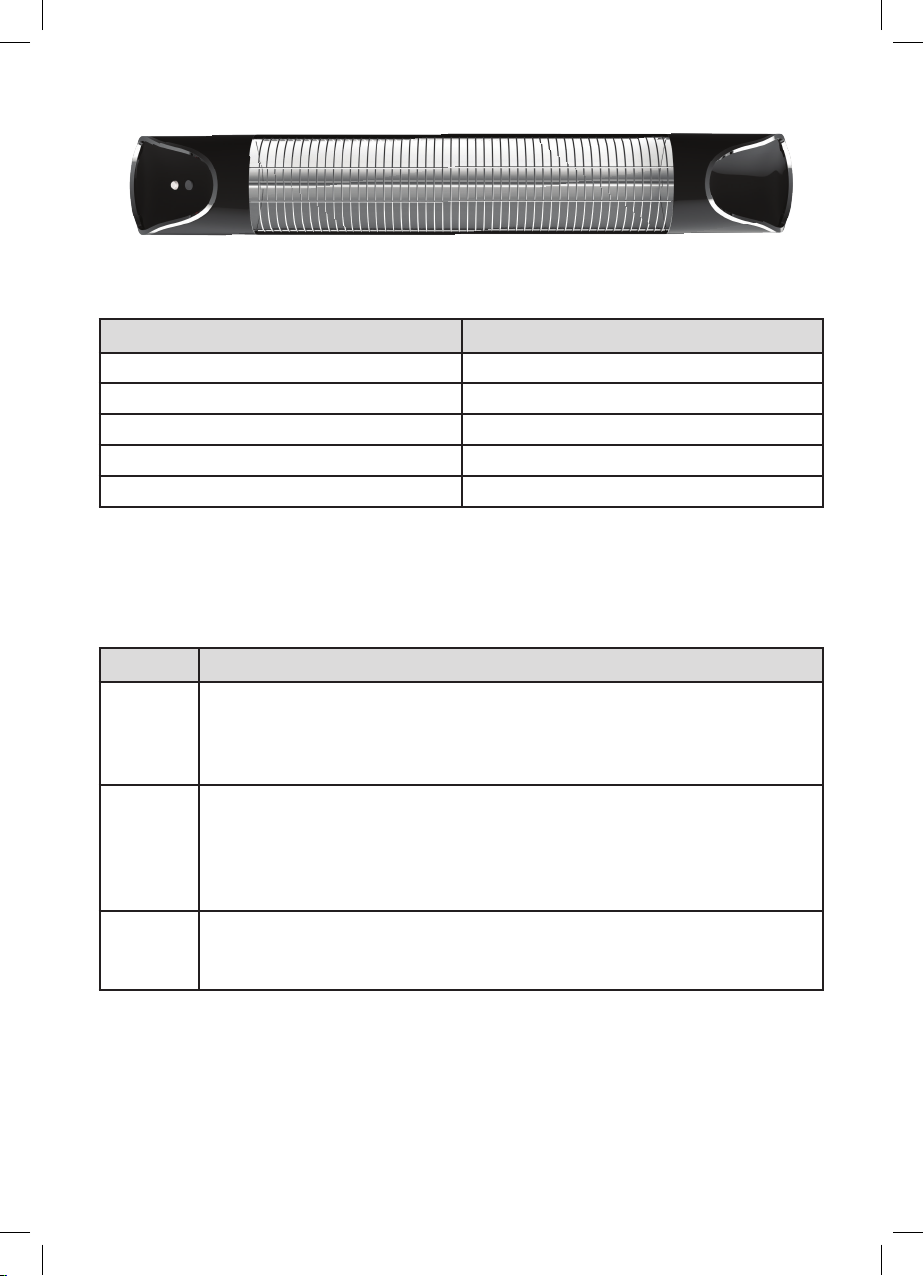
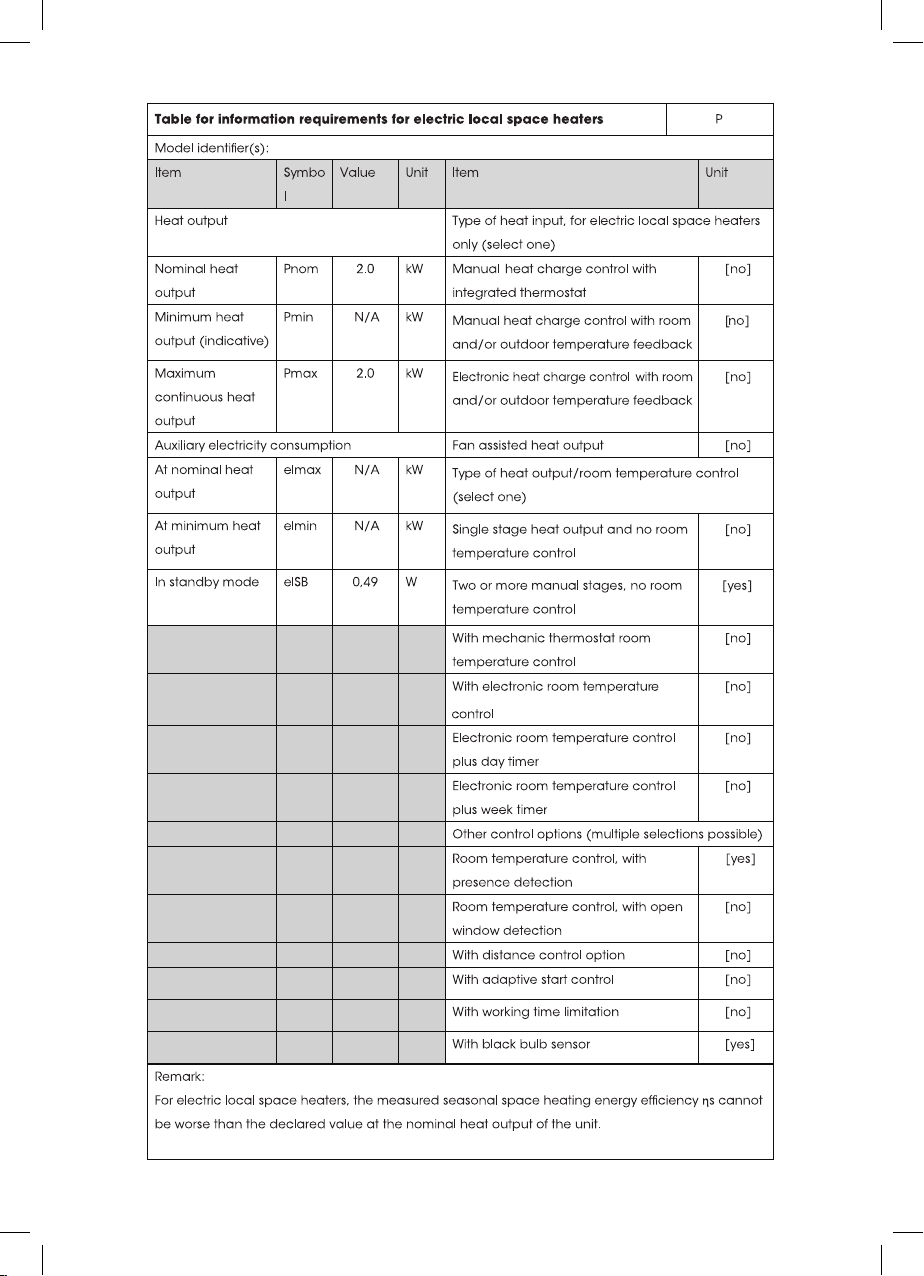
Specifications
Troubleshooting Error Codes
Model TVAHTR_USA
Voltage (V) 120V AC , 60 Hz
Power (W) 1500W
Water Ingress Protection IPX4
Dimensions W x H x D (mm) 900 x 130 x 90
Weight (kg) 2.6kg
Code Reasons & Solutions
E1 This refers to the internal high temperature. When the PCB
temperature is detected as too high it will automatically shut
off.Allow the heater to cool and when the temperature drops,
it will work normally.
E2 This refers to incorrect position or installation of the heater.
eg the heater has been knocked or moved. If the heater has
been knocked or moved, switch the power off, let the heater
cool down then adjust to the correct angle, then the heater
can be switched back on for normal use.
E3 This is an internal circuit error.The power cord should be
pulled out and do not use the heater, instead contact
Customer Service.
TIVA Heater - USA - User Manual - BDUSAV1.indd 12TIVA Heater - USA - User Manual - BDUSAV1.indd 12 10/06/2021 10:47:42 a.m.10/06/2021 10:47:42 a.m.
13
BD PRODUCTS, LLC
110 Phoenixville Pike
Suite 400
Malvern, Pa 19355
Customer Care
Phone: 800.895.8235
Email: [email protected]
If your product (the “Product”) becomes defective due to faulty material or workmanship within a period of 1
year from the date of purchase, we warrant to do the following:
We will replace the Product with a new product, free of charge, or repair the product at our cost, at our discretion.
Your warranty is subject to the following conditions:
• DO NOT operate the Product with a damaged plug or cord, or if the unit has been dropped, damaged or dropped
in water. To avoid the risk of electric shock, do not disassemble or attempt to repair the appliance on your own.
If the supply cord is damaged, it must be replaced by a qualied electrician in order to avoid a hazard.
Incorrect re-assembly or repair can cause a risk of electric shock or injury to persons when the appliance is used.
• The item has not been misused, abused, neglected, altered, modied or repaired by anyone.
• The item has only been subjected to normal wear and tear.
• The item has not been used for trade, professional or hire purposes.
• The item has not sustained damage.
Your warranty does not cover;
• Components that are subject to natural wear and tear caused by normal use in accordance with operating
instructions.
• Unauthorized or improper maintenance or handling or overload.
• Accessories that are supplied with this item.
This warranty applies only to the original purchaser and may not be transferred.
Replacement items will be covered by the limited warranty for the balance of the warranty period from the date of the
original purchase.
For warranty claims, you will need to submit a proof of purchase in the form of a valid receipt that displays date and
place of purchase.
Please note: Only the defective product or parts returned to place of purchase will be replaced under this warranty.
Dispute Resolution:
In the unlikely event that you have a dispute with us regarding the Product or this Limited Warranty, you agree that any
claim or dispute in connection with the Product or this Limited Warranty shall be resolved in a cost eective manner
through binding arbitration. The arbitration shall be instated through an established alternative dispute resolution
provider mutually agreed upon by the parties.
If the foregoing arbitration clause does not apply for any reason, you agree to submit to the personal jurisdiction of the
state courts located within San Diego County, California and the federal courts in the Southern District of California
for the purpose of litigating all such claims or disputes, which courts shall have exclusive jurisdiction of such claims
or disputes. Notwithstanding the foregoing, we may seek injunctive or other equitable relief to protect its intellectual
property rights in any court of competent jurisdiction.
Contact: To receive this warranty, please contact Customer Care on the phone number below.
How State Law Applies: This warranty gives you specic legal rights, and you may also have other rights that vary
from state to state.
This Limited Warranty shall be governed by the laws of the State of California without giving effect to any conflict of
laws principles that may provide the application of the law of another jurisdiction.
ONE (1) YEAR LIMITED REPLACEMENT WARRANTY STATEMENT
TIVA Heater - USA - User Manual - BDUSAV1.indd 13TIVA Heater - USA - User Manual - BDUSAV1.indd 13 10/06/2021 10:47:42 a.m.10/06/2021 10:47:42 a.m.
14
TIVA Heater - USA - User Manual - BDUSAV1.indd 14TIVA Heater - USA - User Manual - BDUSAV1.indd 14 10/06/2021 10:47:45 a.m.10/06/2021 10:47:45 a.m.

15
TIVA Heater - USA - User Manual - BDUSAV1.indd 15TIVA Heater - USA - User Manual - BDUSAV1.indd 15 10/06/2021 10:47:45 a.m.10/06/2021 10:47:45 a.m.
BDUSAV1
Distributed by:
BD Products, LLC
110 Phoenixville Pike
Suite 400
Malvern Pa, 19388
USA Customer Care: 800.895.8235
TIVA Heater - USA - User Manual - BDUSAV1.indd 16TIVA Heater - USA - User Manual - BDUSAV1.indd 16 10/06/2021 10:47:46 a.m.10/06/2021 10:47:46 a.m.
Table of contents
Other TIVA Heater manuals

Popular Heater manuals by other brands

EQUATION
EQUATION PF01D-G Assembly, Use, Maintenance Manual

dyras
dyras HGH-8002 instruction manual

Ideal Heating
Ideal Heating Halo user guide

Silvercrest
Silvercrest SOR 2600 A1 operating instructions

Tropicair
Tropicair KOWHAI Mk3 installation instructions

Mathius
Mathius AX 84 Installation instructions and user guide


Paloma
Paloma PG-511FR Operating and installation instructions

Rowi Electronics
Rowi Electronics HKT 2000/3/2 ODF operating instructions

Crane
Crane EE-8068 instruction manual

All Seasons Hire
All Seasons Hire Hot Block 25 operating instructions

LIFEPLUS
LIFEPLUS IPH-01 user manual

UNITED
UNITED UHR-832 instruction manual