Tivoli Audio PAL+BT User manual

Owner’s Manual
Brugermanual
Benutzerhandbuch
Manuel Utilisateur
Manuale D’uso
Handleiding
Brukermanual
Ohjekirja
Användarmanual
Portable Audio Laboratory™

English........................................................................................03
Dansk .........................................................................................16
Deutsch ......................................................................................29
Français......................................................................................43
Italiano........................................................................................57
Nederlands .................................................................................71
Norsk..........................................................................................84
Suomi .........................................................................................97
Svenska....................................................................................110
Portable Audio Laboratory™
™

3 – ENGLISH
Important Safety Instructions
1. Read these instructions.
2. Keep these instructions.
3. Heed all warnings.
4. Follow all instructions.
5. WARNING – To reduce the risk of re or electric shock, do not expose this apparatus to rain or moisture.
6. Clean only with dry cloth.
7. Do not block any ventilation openings. Install in accordance with the manufacturer’s instructions.
8. Do not install near any heat sources such as radiators, heat registers, stoves, or other apparatus (including
ampliers) that produce heat.
9. Do not defeat the safety purpose of the polarized or grounding-type plug. A polarized plug has two blades
with one wider than the other. A grounding type plug has two blades and a third grounding prong. The wide
blade or the third prong are provided for your safety. If the provided plug does not t into your outlet, consult
an electrician for replacement of the obsolete outlet.
10. Protect the power cord from being walked on or pinched particularly at plugs, convenience receptacles, and
the point where they exit from the apparatus.
11. Only use attachments/accessories specied by the manufacturer.
12.
Use only with the cart, stand, tripod, bracket, or table specied by the manufacturer, or
sold with the apparatus. When a cart is used, use caution when moving the cart/apparatus
combination to avoid injury from tip-over.
13. Unplug this apparatus during lightning storms or when unused for long periods of time.
14. Operate this product only from the type of power source indicated on the rear panel. For products using an
external power supply, use an exact replacement if lost or damaged. For products operating from battery
power, refer to the user manual.

4 – ENGLISH
15. Unplug this product from the wall outlet and refer servicing to qualied service personnel under the following
conditions:
a. When the power supply cord or plug is damaged
b. If liquid has been spilled or objects have fallen into the product.
c. If the product has been exposed to water or rain.
d. If the product does not operate normally by following the operating instructions.
e. If the product has been dropped or damaged in any way.
f. When the product exhibits a distinctive change in performance.
16. When replacement parts are required, be sure your service technician has used replacement parts specied
by the manufacturer or have the same characteristics as the original part. Unauthorized substitutions may
result in re, electric shock, or other hazards.
17. Upon completion of any service, ask the service technician to perform safety checks to conrm the product
is in proper operating condition.
18. Apparatus shall not be exposed to dripping or splashing and no objects lled with liquids, such as vases,
shall be placed on the apparatus.
19. The recommended operating temperature range is 5ºC to 40ºC (41ºF -104ºF).
20. The 9 VDC input is suited for operating this product in a boat or camper using an optional 9 VDC, 1 A fused
adapter.
21. Keep this product a safe distance away from naked ame, such as a lit candle.
22. WARNING – The mains are not disconnected in the o position, but the circuits are de-powered.
23. Canada complies with RSS210, ICES-003.
24. The power cord plug serves as the disconnect device and should remain readily accessible.
This product can be recycled. Products bearing this symbol must NOT be thrown away
with normal household waste. At the end of the product’s life, take it to a collection point
designated for recycling of electrical and electronic devices. Find out more about return and
collection points through your local authority.
The European Waste Electrical and Electronic Equipment (WEEE) Directive was implemented
to dramatically reduce the amount of waste going to landlls, thereby reducing the environ-
mental impact on the planet and on human health. Please act responsibly by recycling used
products. If this product is still useable, consider giving it away or selling it.

5 – ENGLISH
PAL+BT Instructions
Congratulations on your purchase. We believe the PAL+BT to be one of the nest portable DAB/DAB+/DMB/FM
radios on the market today. With the addition of Bluetooth wireless technology, you can stream your music wire-
lessly to the PAL+BT.
We know you are eager to begin listening to your new radio, but in order to take full advantage of what your
PAL+BT is capable of, please take a moment to read this owner’s manual and the safety instructions. If you have
any questions, please do not hesitate to contact your dealer or Tivoli Audio.
Please save the carton and original packing should you ever need to ship your radio, as shipping damage
is not covered by the factory warranty.
On behalf of all of us, thank you for choosing Tivoli Audio and enjoy your new PAL+BT!
Packed with your PAL+BT you should nd:
• One (1) external power supply
• One (1) Li-Ion battery pack (installed)
• One (1) remote control (battery installed)
Please contact your dealer/distributor or Tivoli Audio if any of these items are missing.
Getting Started
1. Extend the antenna.
2. Connect the included power supply to the PAL+BT and plug it into a wall outlet.
3. Briey press the Power/Volume knob on the front of the PAL+BT or, if it is plugged in, press the
button on the remote control. Wait for the Full Scan to nish.
4. Press the or buttons on the remote control to view available stations and highlight the
station you wish to listen to.
5. Press the Menu/Select button on the remote control to tune the highlighted station.
6. Press the Volume or buttons on the remote control to adjust the volume level to your prefer-
ence, or rotate the Power/Volume Knob.

6 – ENGLISH
Guide To Features (Front Panel)
1. Power/Volume Knob: The Power/Volume Knob serves
many functions:
• Power: When the PAL+BT is o, press the knob
briey to power the unit on. When the PAL+BT
is on in any source, press and hold the knob to
power the unit o. (Note: the remote’s Power
button will not turn the PAL+BT on when the unit
is o and not connected to the external power
supply.)
• Volume: When the PAL+BT is on in any source,
rotate the knob clockwise to increase the volume
level and counter-clockwise to decrease the
volume level.
• Source: When the PAL+BT is on in any source,
press the knob to switch between sources.
2.
Tuning Knob: The Tuning Knob serves many functions.
• Tuning: When the PAL+BT is on in any source except Aux, rotate the knob clockwise to manually
tune up and counter-clockwise to manually tune down.
• Snooze: When the alarm sounds, press the knob to engage Snooze. A icon will show on the
display when Snooze is active. The Snooze time is xed at 7 minutes. Press again during Snooze
to cancel the Snooze. The Snooze function works when the PAL+BT is connected to the external
power supply. When operating on battery-only power, pressing Snooze will have no eect.
• PRESETS: Press briey to recall the station associated with that specic preset. In FM mode, the
preset number will be indicated on the display. There are 5 presets for each band.
LCD:
: Volume level FM: FM band
: Sleep timer DAB: DAB/DAB+/DMB band
: Snooze timer AUX: Auxiliary
: Alarms 1 and 2 : Battery power/charging status
(center digits): Time : Mono/Stereo indicator for headphone output
: Reception level T: Manual tuning mode
1 2

7 – ENGLISH
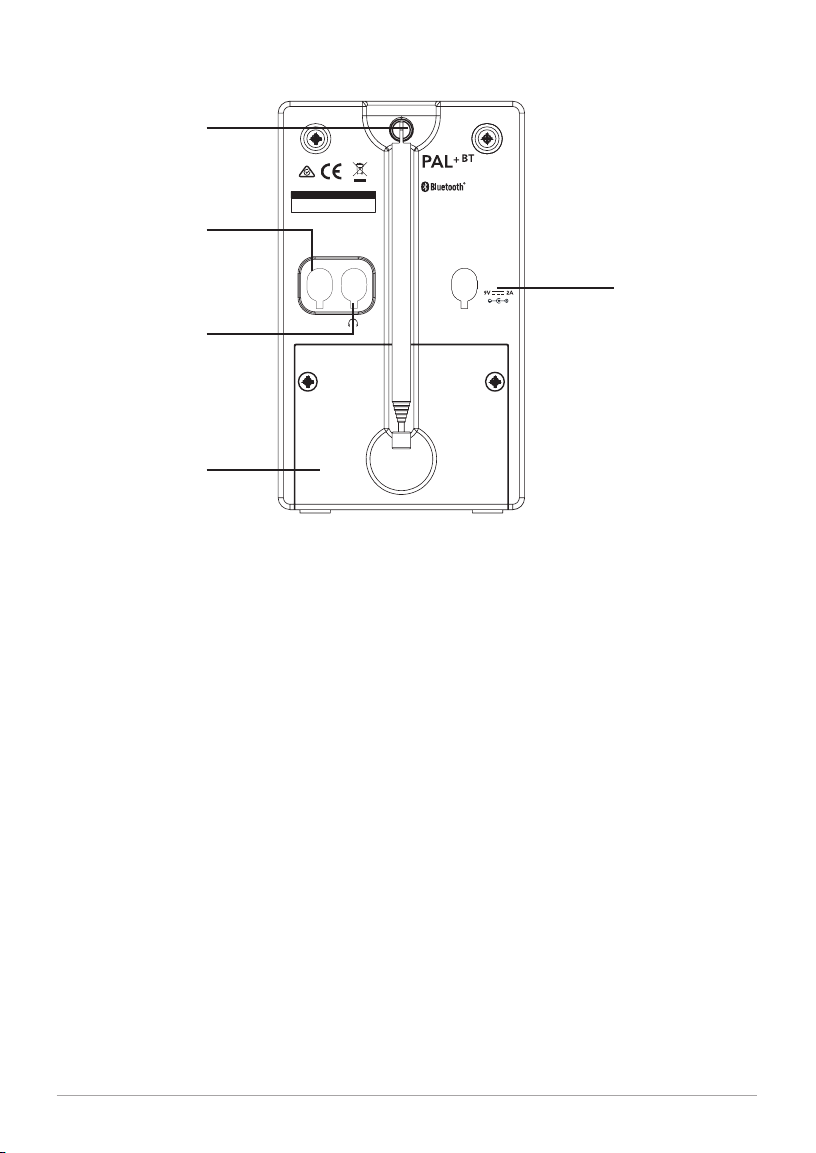
Guide To Features (Rear Panel)
1. FM/DAB ANTENNA: When listening to FM, adjust this telescoping antenna and position it for best reception.
In strong FM signal locations, reducing the antenna’s length may provide better reception. When the unit is
not in use keep the antenna retracted to protect it.
2. AUXILIARY INPUT: To hear audio from another device (such as a portable CD or MP3 player) through the
PAL+BT’s main speaker, connect the device’s audio output to this input and set the radio's source to Auxiliary
Input. This jack accepts a 1/8" stereo male mini plug. Note that you may need to adjust the volume level dif-
ferently for an auxiliary device than the level normally used for radio listening. Keep the rubber plug inserted
when this input is not in use.
3.
HEADPHONE OUTPUT: Connect a headset to this stereo output for private listening. The headphone volume
will be controlled by the PAL+BT’s volume knob. Connecting a pair of headphones will mute the PAL+BT’s
main speaker. This jack accepts a 1/8" stereo male mini plug. You may also record from the PAL+BT or use it
as a high quality stereo tuner by using this output. Keep the rubber plug inserted when this output is not in use.
4. BATTERY COMPARTMENT: Stores the Lithium-ion battery pack. Do not load any other type of batteries in
the compartment. See “Replacing the battery pack.”
5.
DC INPUT: Use this input to operate the PAL+BT using its included Tivoli Audio 9V 2A power supply. Use only
the power supply provided with this product. Should the power supply get damaged or misplaced, contact
Tivoli Audio for a replacement. Keep the rubber plug inserted when this input is not in use.
Developed and manufactured
Portable Audio Laboratory
by Tivoli Audio
Boston, MA
USA
1-877-297-9479
MADE IN CHINA
AUX IN
1
2
4
3
5
8 – ENGLISH
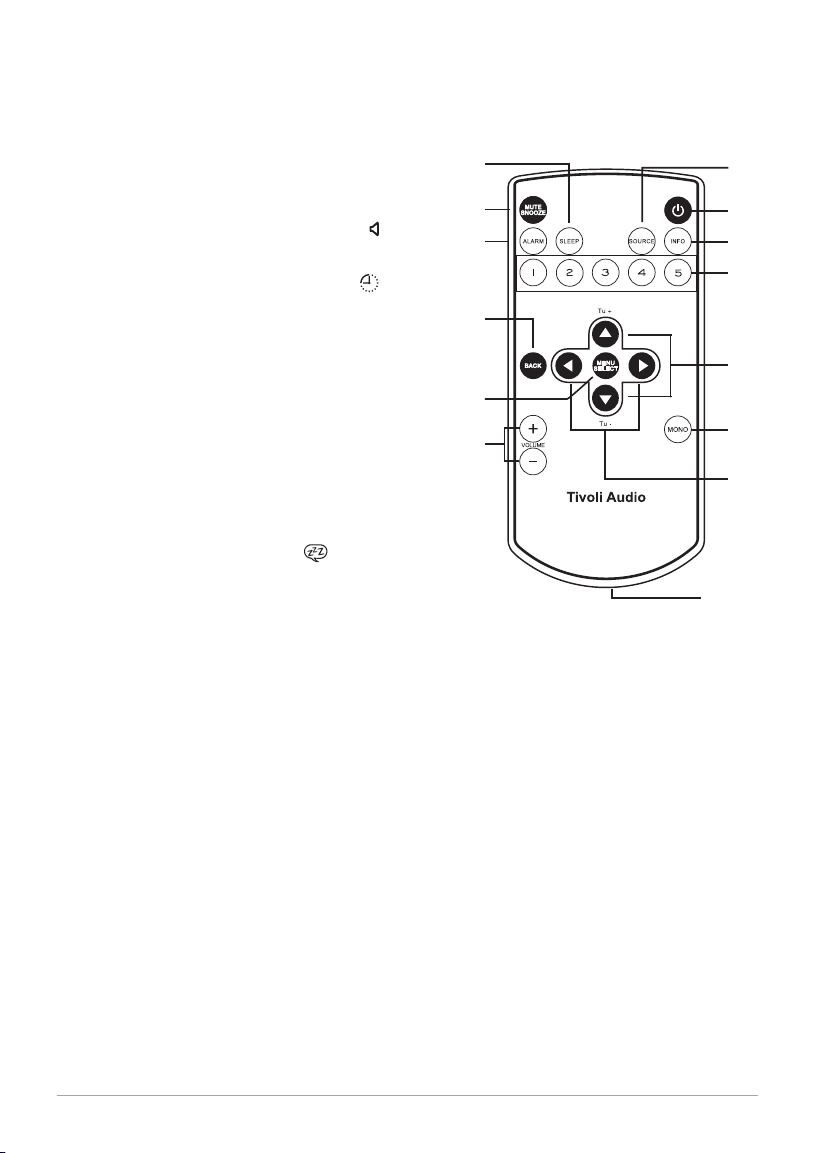
Remote Control
In addition to duplicating most of the front panel controls, the remote control adds the following functions:
1.
POWER: Press briey to power the PAL+BT on. The
radio will power on to the last source used. Press again
to power o. The remote’s Power button will not turn the
PAL+BT on when the unit is o and not connected to the
external power supply.
2. Mute/Snooze: Press to mute the audio (the icon will
show no volume bars) while the unit is playing and press
again to restore sound, or adjust the volume. Press to
mute the alarm after the alarm sounds. A icon will
show on the display when Snooze is active. The Snooze
time is xed at 7 minutes and is not adjustable. The
Snooze function works when the PAL+BT is connected
to the external power supply. When operating on battery-
only power, pressing Snooze will have no eect.
3.
ALARM: Use the tu and Select buttons pq to adjust and
set the alarms. For very important notes and a complete
step-by-step guide, refer to the section titled “How to
set the Alarm”.
4. SLEEP: Press repeatedly to view the amount of time the
radio will play before it turns o automatically and press
the Select button to select that time. When the sleep timer
is active you can check the remaining time by pressing
the Sleep button on the remote. A will show on the
display when the Sleep timer is active. To cancel Sleep,
press the Sleep button until the display shows “O”.
When operating on battery-only power (external adapter
not plugged-in), if Sleep is engaged and the alarm is set,
after Sleep ends, the alarm will not sound. To use both
Sleep and Alarm features, please be sure the external
adapter is connected.
5. SOURCE: Press repeatedly to change sources.
6. INFO: Press repeatedly to cycle through the information available depending on the source mode. This func-
tion does not work in Auxiliary mode.
7. PRESETS 1-5: Press and hold to store the currently tuned station. Press briey to recall the station associ-
ated with that specic preset. In FM mode, the preset number will be indicated on the display. There are 5
presets for each band.
8. VOLUME +/–: Press the Volume + button to raise the volume level or the Volume – button to lower the volume
level. If the audio ever sounds distorted, lower the volume level to avoid damaging the speaker. Adjusting the
volume while the PAL+BT is muted will cancel the muting.
9. pq: Press to navigate within the menus. Use these same buttons to manually tune up or down when in FM
mode and to Full Scan stations. A “T” will show on the display to indicate manual tuning mode. Press and hold
to move quickly through the frequencies. It will take a second until the frequencies begin to change. Press for
1.5 seconds and release to Full Scan to the next station detected. The display will show “Scanning…” Also
refer to “Scan Setting” under the section “Menu and Specic Features”.
10. tu:The right arrow button duplicates the Select button. The left arrow button duplicates the “Back” button
in certain menu items.
11. MENU/SELECT: Press and hold to enter the main menu and press briey to select items within the menu.
For more, see the section marked “Menu”.
5
1
4
2
36
7
9
13
10
14
11
12
8

9 – ENGLISH
12. BACK: Press to go back to the previous menu page.
13. MONO: Press to change the Stereo/Mono setting. The display will show “ST” for stereo. “Mono” or “Stereo”
will also be one of the elds shown when pressing the Info button on the remote in FM mode. If you are listen-
ing to a noisy FM station in stereo, switching to mono may improve reception. Note: only FM mode can be
changed to Mono. Also see “Balance” under “Menu and Specic Features”.
14. BATTERY HOLDER: Remove the protective strip protruding from the battery holder before using the remote
control. Should you ever need to replace the remote’s battery, use Lithium button cell battery model CR2025.
CAUTION: Danger of explosion if the battery is incorrectly replaced. Replace only with the same or
equivalent type. Dispose of spent battery according to your country’s regulations.
Menu and Specic Features
Press and hold the Menu button on the remote to enter the main menu. Use the remote’s tu buttons and the
Select button to change the items within the menu. Use the Back button to navigate back, or wait for 15 seconds
until the timeout expires.
An asterisk (*) indicates the shown menu item is currently set.
1.
SCAN SETTING (FM MODE ONLY): Press the Select button and use the pq and Select button to choose
between “Strong stations only” or “All stations” when performing an Full Scan (see #9 (pq) under “Remote
Control”). Selecting “All stations” increases the sensitivity of the scan, possibly resulting in the Full Scan
stopping on noise. This feature is not accessible in Auxiliary mode.
2.
EQUALIZER: Press the Select button and use the t u buttons to select the desired EQ setting from
the following options: Normal, Classic, Jazz, Pop, Rock, and Speech. Press the Select button to enable the
desired EQ setting.
3. TIME (FOUND UNDER SETTINGS):
Set 12/24 hour: Press the Select button and use the pq and Select buttons to choose a 12 or 24 hour clock
format.
Set Time/Date: Press the Select button and use the pq and Select buttons to adjust the hour and then minutes,
immediately followed by the date. You must set the Auto update to “No update” in order to set the time manually.
For more, refer to “Auto update” below.
Auto Update: Press the Select button and use the pq and Select buttons to choose between “Update from any”,
“Update from DAB” (also DMB), or “Update from FM” (RDS). For any of the auto updates to work, you must
have consistent reception of DAB or FM RDS with a time/date signal provided. It could take up to a minute or
more for the clock to update. Tivoli Audio is not responsible for inaccurate time/date information provided
by the auto update signal.
To set the clock manually, select “No Update”, and then select “Set Time/Date” under the “Time” menu using
the pq or t u buttons and the Select button to set the hour. Repeat to set the minutes and press Select to
save. Within this same “Time” menu are additional options to set the date format and 12/24 hour clock mode.
NOTE: During a power outage, the alarm time(s) and clock will be maintained by an integrated back-up
memory. When “Auto update” is set to “Update from any”, the radio may nd the clock signal from the
last listened station, even when the PAL+BT is in standby.
Set Date Format: Press the Select button and use the pq and Select buttons to choose the date format you
prefer.
4. BACKLIGHT (FOUND UNDER SETTINGS):
Timeout: The backlight level is congured at the factory to be constant. However, you can customize the
backlight to automatically change to a “Dim level” setting after a xed period of time whenever no controls
are used. Once a control on the unit or the remote is pressed, the normal backlight level is restored.
Press Select and use the pq and the Select buttons to set the amount of time it will take for the backlight
to change to the dim level from 10, 20 ,30, 45, 60, 90, 120, or 180 seconds, or to keep the timeout feature O.

10 – ENGLISH
On Level: Press Select and use the pq and Select buttons to choose the intensity of the backlight.
Dim Level: If you selected a time for the backlight to change to a dim setting under “Timeout”, press Select
and use the pq and Select buttons to choose the intensity of the backlight when it changes to this dim setting.
Setting the Dim level to “O” may be desirable if the display backlight is bothersome while sleeping. Using
the Dim level feature may also help to maximize battery playback time.
5.
LANGUAGE (FOUND UNDER SETTINGS): Press Select and use pq and Select buttons to set your
language.
6. FACTORY RESET (FOUND UNDER SETTINGS): Press Select and use the pq or tuand Select buttons to
conrm (Yes) or reject (No) the factory reset. A factory reset will restore factory defaults and cancel all your
personal settings, such as station presets and language. The Factory Reset may not be accessible when
operating on battery-only power.
7. ID (FOUND UNDER SETTINGS): Press Select to view the ID. If you contact your dealer or Tivoli Audio with a
question, you may be asked to provide the number shown in this eld.
8. SLEEP (FOUND UNDER SETTINGS): Press Select and use the pq button and the Select buttons to set
the sleep timer to one of the available times. There is also a dedicated Sleep button on the remote control. A
small clock face will show on the display when the Sleep timer is active.
NOTE: When operating on battery-only power (external adapter not plugged-in), if Sleep is engaged and the
alarm is set, after Sleep ends, the alarm will not sound. To use both Sleep and Alarm features, please be sure
the external adapter is connected.
How to Set the Alarm
Access the alarm setting either through the main menu or by pressing the alarm button on the remote.
1. Alarm 1 is shown rst. Use the Alarm and Select buttons to choose between Alarm 1 and Alarm 2. Note:
At any point you can navigate through the alarm menu by using the Back or t buttons, and the Select or
ubuttons.
2. Use the pq and Select buttons to set the alarm on or o. If the time and date are not set, the PAL+BT will
prompt you to set the Time/Date rst.
3. Use the pq buttons to set/change the hour, then press Select. Repeat this process to set/change the minutes,
followed by AM/PM (if time is set to 12 hour format), then press Select.
4. Use the pq buttons to select how long you want the alarm to sound, then press Select.
5. Use the pq buttons to select the source you wish to wake to, then press Select. If you set the source to DAB
(includes DAB+/DMB) or FM, use the pq buttons to select the station preset or last listened, then press
Select. If the alarm source is set to DAB and the last listened or preset station is unavailable at the time the
alarm sounds, the alarm will default to the tone.
6. Use the pq buttons to set how often the alarm should be set to wake, then press Select. If “Once” is selected,
you must set the date you wish the one time alarm to sound.
7. Lastly, use the pq buttons to set the volume level of the alarm, then press Select.
8. Repeat this process for Alarm 2 if desired.
If you make a mistake at any point in the process, press the Back button on the remote and begin again.
Your settings will not be saved unless you complete the entire process and the display shows “Alarm Saved”.

11 – ENGLISH
IMPORTANT NOTES:
• The alarm cannot sound if the PAL+BT is o and not connected to the external adapter.
• The alarm volume will ramp-up over time. It will take several seconds until the alarm reaches the volume
level set in the alarm menu.
• Should power be lost or the battery becomes discharged, the alarm time will be saved, but the alarm
cannot sound without power to the PAL+BT.
ALARM OPTIONS:
Alarm Quick Set: With the PAL+BT in standby, repeatedly press the alarm button briey to toggle each alarm
on or o.
Alarm O: To stop the alarm, press the Alarm or Power button on the remote.
Snooze: To activate Snooze, press the Snooze button on the remote. The Snooze time is not adjustable. When
operating on battery-only power, pressing Snooze will have no eect.
Note: When in Snooze mode, you can see the remaining Snooze time by pressing the Snooze button on the
remote. If you press the Alarm or Power button on the remote, then the Snooze countdown will be cancelled and
the PAL+BT will go into Standby or o if operating on battery-only power.
Digital Radio (DAB/DAB+/DMB) Mode
STATION LIST: Use the pq buttons on the remote to show all available DAB/DAB+/DMB stations. Use the
pq buttons to highlight a specic station and the Select button to tune that station. The Station list will disappear
after 7 seconds.
Press and hold the Menu button on the remote to enter the main menu. Use the pq buttons and the Select
button to change the items within the menu. Use the Back button to navigate back, or wait for 15 seconds until
the timeout expires.
An asterisk (*) indicates the shown menu item is currently set.
NOTE: Upon entering Digital radio mode, if the Station list is empty, a full scan will initiate.
1. FULL SCAN: Searches the entire frequency range. If you move the PAL+BT to another location, you must
perform a new scan so the radio will nd stations in the new location. To cancel the auto scan, press the Back
button on remote.
2. EQUALIZER: Please refer to the section marked “Menu and Specic Features”.
3. MANUAL TUNE: Press the pq buttons to manually tune specic DAB/DAB+/DMB frequencies, then press
Select to tune the displayed frequency.
4. DRC: Dynamic Range Control allows you change the sound level of stations to make quiet passages louder
to compensate for a noisy environment, or when listening at a low volume level.
5. ADVANCED MODE: If the PAL+BT is relocated to a dierent area, you may nd stations with the same name.
If you enable “Advanced View”, “Long labels”, and “Show Ensemble” under Advanced Mode, you will be able to
dierentiate between extended station names.
For DAB/DAB+, we suggest disabling all the Advanced Mode settings. For DMB, we suggest enabling them.
6. PRUNE: If the PAL+BT is relocated to a dierent area, some stations may become unavailable. Select “Prune”
to remove unavailable stations from the Station list. Use the pq or t u buttons and the Select button to
conrm (Yes) or deny (No) removing unavailable stations.
NOTE: When moving the PAL+BT to another location where there may be dierent DAB stations from
the previous location, it is recommended to run a “Prune” to remove unavailable stations.

12 – ENGLISH
DAB DISPLAY MESSAGES:
Secondary Services: Secondary stations will be indicated by a >> symbol next to the station name. Secondary
services may not be available in your area.
“?”: If this symbol appears next to the station name, it means the station is invalid or inactive.
“Not Available”: Shown when tuning a DAB station with an insucient signal.
Bluetooth Operation
Prior to pairing, verify your device supports Bluetooth 5.0 and that your device is not connected to any other
Bluetooth product. Devices may pair dierently. Below is a general guide.
1. Change the source to Bluetooth, then press and hold the Scan button. Turn the volume up about ¼ to start. Also
turn up the volume on the source device (the device you are streaming from).
2. Turn on the Bluetooth wireless technology on your enabled device.
3. Select “Tivoli Audio PAL+BT ” when it appears on your device’s screen to initiate searching. Some devices
may prompt you for a PIN. If so, enter “0000”. “Tivoli Bluetooth” will change from “Not Paired” to “Connected”.
4. Once the radio displays “BT Connected” on its screen, you are paired to the radio and can begin playing
your music wirelessly. Adjust the volume level on your device. You should not have to pair your device again.
Depending on your device, you may need to make multiple attempts at Pairing and/or Connecting to
the PAL, but please give your device adequate time to Pair or Connect before repeating the process.
NOTE:
• The PAL+BT will remember pairing information for up to 8 devices. Additional devices can be paired, but
the least-recently used device will be replaced by the newly paired device.
• If the audio drops out or stops during playback, move your device closer to the PAL+BT, or check to be
sure another wireless device is not interfering with the signal.
• When switching from Bluetooth to DAB or FM, you may need to re-adjust (lower) the radio’s volume level.
About The Battery Pack
The PAL+BT uses a sealed pack of Lithium Ion cells. Use only an authorized Tivoli Audio PAL Series Lithium-Ion
battery. The estimated battery life on a full charge is 12 hours.
CHARGING:
To charge the battery, plug the PAL+BT in and place it in Standby. From full discharge, the battery will be
completely charged within approximately 3.5 hours. Because the battery is new, it may take 4-5 full charge/
discharge cycles until you experience average playback performance times. During charging, the bat-
tery icon on the LCD will ash. The battery icon will stop ashing and all 3 bars will be shown on the LCD
once the battery is fully charged. The battery does not charge while the PAL+BT is plugged in and turned on,
but the battery icon will still show the status of the battery. In short, with the PAL+BT plugged in, place it in standby
whenever you want to charge the battery.
LOW BATTERY
When running solely on the battery, as the battery becomes discharged, the battery icon will drop from 3 bars, to
2 bars, to 1 bar, and nally show an empty battery. The audio will begin to sound distorted when the battery starts
to reach a low level. This is normal and is an audible warning the battery should be charged soon. Because the
PAL+ Li-Ion battery has no memory, it is not necessary to wait until the battery is exhausted before recharging,
although recharging from a discharged battery will not harm the battery.

13 – ENGLISH
The battery icon is an approximation of power/charging status. It may also take several seconds for the icon status
to stabilize. If the battery is removed and the PAL+ operates solely from the external adapter, the icon on the LCD
will show an empty battery.
Leaving the PAL+BT plugged in, even when not in use, ensures the batteries will be charged when you need them.
If the PAL+BT is not plugged in, the batteries will self-discharge as a safety measure. There is no harm in continu-
ously operating the PAL+BT with the power supply.
Note: It may take up to 4 charge/discharge cycles before the batteries are operating at full capacity when
new or left unused for several weeks.
REPLACING THE BATTERY
Should you ever need to replace the battery, lift the antenna up and use a philips-head screwdriver to remove the
two screws holding the battery cover in place. Lift the battery cover o and take note of how the lead is connected
to the battery pack prior to disconnecting. Replace the pack making sure to re-connect the leads correctly. Replace
the battery cover by inserting the bottom lip rst, then screw the cover back on.
CAUTION: To reduce the risk of re or personal injury, use an exact-replacement battery pack available
through Tivoli Audio or our authorized dealers and dispose of the spent battery pack according to your country’s
regulations. The battery pack must not be exposed to excessive heat such as sunlight, re, or the like. Use of a
non-Tivoli Audio battery pack could damage the PAL+BT.
For information about the remote control’s battery refer to Point 14 of the “Guide to Features (Remote Control)”.
Digital Radio/FM Reception
When moving the PAL+BT to another location where there may be dierent DAB stations from the previous loca-
tion, it is recommended to run a “Prune” to initiate a new scan to refresh the DAB station list.
FM: In strong signal locations, reducing the antenna’s length may provide better reception.
RDS (FM band only)
The Radio Data System (RDS) transmits text data along with the audio broadcast. Not all FM stations utilize this
service, thus text may not be present with some stations. For stations broadcasting RDS, the text still might not
appear, or might appear scrambled if the signal is too weak. This is not a fault of the PAL+BT. In such cases,
experiment with the position of the FM antenna. Note RDS content is determined by each individual FM station.
Handling the PAL+BT
• The PAL+BT is weather resistant, but it is not weather proof. It should not be immersed in water or held
under running water. It also should not be exposed to extreme temperatures.
• The PAL+BT is designed to be portable, but it is not indestructible. Do not drop it, throw it, or subject it to
strong impacts.
• Always grip the PAL+BT using the side indentations to reduce the chance of it slipping out of your hand.
Cleaning
Never use any harsh cleansers or solvents on your radio. Normal everyday wear and tear or damage resulting
from cleaning or chemicals is not covered under the factory warranty. To clean the PAL+BT use a soft cloth and
do not rub hard.

14 – ENGLISH
Limited Warranty
Tivoli Audio manufactures its products to very high standards and we are condent our products will perform
well. Accordingly, we provide a limited warranty on this product against manufacturing defects in material and
workmanship to the original owner. This warranty is non-transferable.
Products purchased in the European Union and Norway have a minimum warranty term of two years. For countries
where minimum warranty terms are determined by statute, the warranty term is the statutory period required. In
all other locations, the warranty term is one year.
This Limited Warranty covers the functionality of the product for its normal, intended use as specied in this Owner’s
Manual. It does not cover a malfunction or damage that has resulted from improper or unreasonable use or instal-
lation, using the charger to charge alkaline batteries, faulty ancillary equipment, modications, unauthorized repair,
shipping damage or loss, abuse, accidents, use on improper voltage/current, power surges, lightning or other acts
of God, excess moisture, normal wear and tear, commercial use, or purchase from unauthorized dealers. Proof
of purchase as evidence the unit was purchased from an authorized dealer may be required for warranty service.
Please contact the dealer of purchase or local distributor for warranty service or repair.
Please refrain from opening this product or taking it apart as doing so will void this Limited Warranty. There are no
user serviceable parts inside. Tivoli Audio will not pay for costs incurred due to correction of reception problems,
elimination of externally generated static/noise, loss of time, inconvenience, loss of use of product, or damage
caused by improper use of this product.
In the event the product is returned during the warranty term and is eligible for service under this Limited Warranty,
we will repair or replace any defective parts within a reasonable period of time and free of charge.
THIS LIMITED WARRANTY GIVES YOU SPECIFIC LEGAL RIGHTS SUBJECT TO SPECIFIED CONDITIONS. YOU
MAY ALSO HAVE OTHER LEGAL RIGHTS WHICH APPLY TO THE PRODUCT YOU HAVE ACQUIRED. THESE
LEGAL RIGHTS VARY FROM COUNTRY TO COUNTRY. SOME PLACES DO NOT ALLOW THE EXCLUSION,
RESTRICTION, OR MODIFICATION OF CERTAIN IMPLIED RIGHTS OR THEIR EFFECT. IN THOSE SITUATIONS
THIS LIMITED WARRANTY WILL ONLY APPLY TO THE EXTENT THAT THE APPLICABLE LAW ALLOWS.
The laws of your country may provide you with legal claims against the seller or manufacturer of this product. This
Limited Warranty does not aect those rights.
The provisions of the Limited Warranty are in lieu of any other warranties or conditions, except those provided
by law. This Limited Warranty does not aect any legal rights provided to you by law and does not preclude any
remedy you may have under law.
In countries where liability limits are not precluded by statute, the maximum liability of Tivoli Audio shall not exceed
the purchase price paid by you for the product. In countries where limitations of liability are precluded by law, Tivoli
Audio shall be liable for no more than the direct damages for bodily injury, and/or real or personal property arising
from the negligence of Tivoli Audio.
Where not prohibited by law, Tivoli Audio shall not be liable for special, incidental, consequential, or indirect dam-
ages. Some places do not allow limitations on the exclusion or limitation of relief, special, incidental, consequential
or indirect damages, or the limitation of liability to specied amounts, so the above limitations or exclusions may
not apply to you.
This Limited Warranty is void if the label bearing the serial number has been removed or defaced.
If you purchased an extended service contract from your dealer and service is required after the term of this Limited
Warranty has expired, please contact your extended service contract provider to obtain service.
For your convenience, you may register your product for warranty service online at our website www.tivoliaudio.
com. There is no legal obligation for you to provide personal information. However, such information allows us
to maintain a record of the Tivoli Audio products acquired by you and better understand the purchasers of our
products. The information collected will be used for marketing purposes by Tivoli Audio and, where permitted,
to contact you in relation to the products you have acquired or other products which might be of interest to you
from Tivoli Audio or other companies. The information that you provide may be processed in another country.
For service, please contact your dealer or local distributor.

15 – ENGLISH
Specications
Model: PAL+BT
Type: Portable DAB/DAB+/DMB/FM radio with Bluetooth
wireless technology
Driver: 2.5" full range, video shielded
Receiveing Bands: FM: 87.5-108.0MHz (receiving range may vary by region)
DAB (Band III)/DAB+/DMB: 174-240MHz
Power: 9VDC nominal
Battery: Li-ion, 7.4V, 2750mAh
AC Adapter" Model DYS818-090200-K:
Input: 100-240V - 50/60Hz, 0.5A Max
Output: 9.0v, 2.0A
Dimensions: 153 mm H x 92 mm W x 115 mm D
(6"H x 3.6"W x 4.5"D)
Weight: 0.91 Kg
All specications subject to change without notice. Tivoli Audio reserves the right to make product changes without
notice. Tivoli Audio, the Tivoli Audio logo, PAL+BT, and Portable Audio Laboratory are trademarks of Tivoli Audio,
LLC. The Bluetooth word mark and logos are registered trademarks owned by Bluetooth SIG, Inc. and any use of
such marks by Tivoli Audio is under license. Other trademarks and trade names are those of their respective owners.

16 – DANSK
Vigtige sikkerhedsinstrukser
1. Læs disse instruktioner.
2. Opbevar disse instruktioner.
3. Overhold alle advarsler.
4. Følg alle instruktioner.
5. ADVARSEL - Udsæt ikke dette apparat for regn for at reducere risikoen for brand eller elektrisk stød eller fugt.
6. Rengør kun med en tør klud.
7. Bloker ikke ventilationsåbninger. Installer i overensstemmelse med producentens anvisninger.
8. Installer ikke i nærheden af varmekilder, såsom radiatorer, varmeapparater, ovne eller andet udstyr (inklusive
forstærkere), der producerer varme.
9.
Undgå at overvinde sikkerhedsformålet med det polariserede stik eller jordstikket. Et polariseret stik har to knive
med den ene bredere end den anden. Et jordforbindelse har to blade og et tredje jordforbindelse. Det brede
blad eller den tredje tand er til din sikkerhed. Hvis den medfølgende stikket ikke passer ind i stikkontakten,
skal du kontakte en elektriker for at udskifte det forældede stikkontakt.
10.
Beskyt netledningen mod at blive trukket på eller klemt, især ved stik beholdere og det punkt, hvor de kommer
ud af apparatet.
11. Brug kun tilbehør / tilbehør, der er speciceret af producenten.
12. Brug kun med den vogn, stativ, stativ, beslag eller bord, der er speciceret af producenten,
eller sælges med apparatet. Når der bruges en vogn, skal du være forsigtig, når ytning af
vognen / apparatkombinationen for at undgå personskade ved væltning.
13. Tag dette apparat ud under tordenvejr, eller når det ikke bruges i lange perioder af tid.
14. Brug kun dette produkt fra den type strømkilde, der er angivet på bagpanelet. Til produkter Brug en ekstern
strømforsyning, brug en nøjagtig udskiftning, hvis den går tabt eller beskadiges. Til produkter ved hjælp af
batteristrøm, se brugervejledningen.

17 – DANSK
15.
Tag dette produkt ud af stikkontakten og henvis service til kvaliceret servicepersonale under følgende
betingelser:
a. Når ledningen eller stikket er beskadiget
b. Hvis der er spildt væske, eller der er faldet genstande i produktet.
c. Hvis produktet har været udsat for vand eller regn.
d. Hvis produktet ikke fungerer normalt ved at følge betjeningsvejledningen.
e. Hvis produktet er faldet eller beskadiget på nogen måde.
f. Når produktet udviser en markant ændring i ydeevne.
16.
Når der kræves udskiftningsdele, skal du sørge for, at din servicetekniker har brugt udskiftning dele speciceret
af producenten eller har de samme egenskaber som den originale del. Uberettiget udskiftninger kan resultere
i brand, elektrisk stød eller andre farer.
17. Efter afslutningen af enhver service skal serviceteknikeren udføre sikkerhedskontrol for at bekræfte produktet
er i korrekt driftstilstand.
18. Apparatet må ikke udsættes for dryp eller stænk og ingen genstande fyldt med væsker, sådan som vaser
skal placeres på apparatet.
19. Det anbefalede driftstemperaturområde er 5 ° C til 40 ° C (41 ° F -104 ° F).
20. 9 VDC-indgangen er velegnet til betjening af dette produkt i en båd eller autocamper ved hjælp af en valgfri
9 VDC, 1 A smeltet adapter.
21. Hold dette produkt i sikker afstand fra åben ild, såsom et tændt lys.
22. ADVARSEL - Strømforsyningen er ikke afbrudt i slukket position, men kredsløbene er frakoblet.
23. Canada overholder RSS210, ICES-003.
24. Stikket til netledningen fungerer som frakoblingsenhed og skal forblive let tilgængeligt.
Dette produkt kan genbruges. Produkter, der bærer dette symbol, må IKKE kastes med normal
husholdningsaald. I slutningen af produktets levetid skal du tage det med til et indsam-
lingssted, der er bestemt til genbrug af elektriske og elektroniske apparater. Find ud af mere
om retur- og indsamlingspunkter igennem din lokale myndighed.
Det europæiske direktiv om aald af elektrisk og elektronisk udstyr (WEEE) blev implementeret
til reducere mængden af aald, der går til lossepladser dramatisk, og derved reducere miljøpå-
virkningen på planeten og på menneskers sundhed. Vær ansvarlig ved at genbruge brugte
produkter. Hvis dette produktet stadig kan bruges, overvej at give det væk eller sælge det.

18 – DANSK
PAL+BT Instruktioner
Tillykke med din nye Tivoli Audio PAL+BT. Vi tror på, at PAL+BT er en af de neste DAB / DAB+ / DMB / FM trans-
portable radioer på markedet i dag. Med Bluetooth trådløs teknologi kan du streame musikken trådløst til PAL+BT.
Vi ved, at du sikkert er ivrig efter at begynde at lytte til din nye radio, men tag dig tid til at læse denne sikkerheds-
og brugervejledning for at få det fulde udbytte af dit nye produkt. Hvis du har spørgsmål, kan du kontakte din
lokale forhandler eller distributør.
Vi anbefaler, at den originale emballage gemmes, således at produktet kan pakkes korrekt ned ved forsendelse
til og fra service-værksted, da garantien ikke dækker skader påført produktet under forsendelse, hvor årsagen
skyldes dårlig eller forkert indpakning.
Tak fordi du valgte Tivoli Audio og god fornøjelse med PAL+BT!
I æsken med PAL+BT skal følgende være inkluderet:
• EN (1) ekstern strømforsyning
• EN (1) Li-Ion batteripakke (installeret)
• EN (1) fjernbetjening
Kontakt venligst din forhandler, hvis nogen af disse genstande mangler.
Opstart
1. Træk antennen op.
2. Tilslut den medfølgende strømforsyning til PAL+BT og sæt den i en stikkontakt.
3.
Tryk knappen på fjernbetjeningen eller tryk kortvarigt på Power/Volumen-knappen på forsiden af PAL+BT.
Vent på at Full Scan udføres.
4. Tryk på op eller ned knapperne på fjernbetjeningen for at se tilgængelige stationer og fremhæv den station,
du ønsker at lytte til.
5. Tryk på Menu / Select-knappen på fjernbetjeningen for at indstille den markerede station.
6. Tryk på Volumen eller knapper på fjernbetjeningen for at justere volumen til dit ønskede niveau, eller skru på
Power/Volumen-knappen.

19 – DANSK
Guide til egenskaber (Forside)
1.
Power/Volumen-knap:Power/Volumen-knappen har
mange funktioner:
• Tænd: Når PAL+BT er slukket, tryk på knap-
pen for at tænde for enheden. Når PAL+BT er
tændt, tryk og hold knappen nede for at slukke
for enheden. (Bemærk: Fjernbetjeningens power
knap vil ikke tænde for PAL+BT, når enheden
er slukket og ikke forbundet til en ekstern
strømforsyning.)
• Volumen: Når PAL+BT er tændt, drej knappen
med uret for at forøge volumeniveauet og mod
uret for at skrue ned for volumeniveauet.
• Kilde: Når PAL+BT er tændt, tryk på knappen for
at skifte mellem kilder.
2.
Indstillingsknap: Indstillingsknappen har mange
funktioner
• Indstilling: Når PAL+BT er tændt med enhver kilde, med undtagelse af AUX, kan knappen drejes
manuelt med uret eller mod uret for at indstille.
• Snooze: Når alarmen lyder, tryk på knappen for at aktivere Snooze. Et ikon vil blive vist på displayet,
når Snooze er aktiv. Snooze er fastsat til 7 minutter. Tryk igen på Snooze for at annulllere Snooze.
Snooze funktionen virker, når PAL+BT er forbundet til en ekstern strømforsyning. Hvis enheden kun
kører på batterier, vil Snooze ikke have nogen eekt.
• Presets: Tryk kortvarigt for at genkalde stationen associeret med den specikke indstilling. I FM til-
stand vil Preset nummer blive vist på displayet. Der er 5 presets for hvert bånd.
DISPLAYET:
: Volumen FM: FM band
: Sleep timer DAB: DAB/DAB+/DMB
: Snooze timer AUX: Aux
: Alarms 1 og 2 : Batteristatus
: Klokkeslæt : Mono/stereo indikator til hovedtelefon udgang
: Niveau for modtagelse T: Manuel indstilling
1 2
20 – DANSK
Guide Til Funktioner (Bagpanel)
1. FM ANTENNA: Når der lyttes til FM, juster teleskopantennen og position for bedste modtagelse af signal. I
gode FM signal lokationer kan reducering af antennes længde forbedre modtagelsen. Når enheden ikke er
i brug eller når der lyttes til AM, kan antennen holdes sammenklappet for at beskytte den. Denne antenne
har ingen eekt på AM modtagelse. For AM, drej selve PAL+BT for at justere den interne antenne for bedre
signalmodtagelse.
2.
AUXILIARY INPUT: For at høre audio fra andre enheder (så som en transportabel CD eller MP3 afspiller)
gennem PAL+BT's hoved højttaler, forbind enhedens audio udgang til dennes indgang og skift kilde til AM.
Dette stik accepterer et stereomini-stik (han) på 1/8". Bemærk, at du måske skal tilpasse lydstyrken for den
eksterne enhed forskelligt fra den lydstyrke, der normalt bruges til radioen. Hold gummistikket sat i, når denne
indgang ikke er i brug.
3.
HEADPHONE OUTPUT: Forbind hovedtelefoner til denne stereo udgang for privat lytning. Hovedtelefon
volumen vil blive kontrolleret af PAL+BT's volumenknap. Forbindelse af et sæt hovedtelefoner vil afbryde
PAL+BT's hovedhøjttaler. Dette stik accepterer et stereomini-stik (han) på 1/8". Du kan også optage fra
PAL+BT ved at bruge den som en højkvalitetes stereo tuner ved at bruge denne udgang. Hold gummistikket
indsat, når denne udgang ikke er i brug.
4.
BATTERIRUM: Til opbevaring af litiumionbatteriet. Sæt ikke andre batterier i rummet. Se "Udskiftning af
batteriet."
5. DC INPUT: Benyt dette input til at betjene PAL+BT ved at bruge den inkluderede PAL+BT Tivoli Audio 9 V 2
A strømforsyning. Benyt kun den medfølgende strømforsyning. Hvis strømforsyningen bliver beskadiget eller
mistet, skal du kontakte Tivoli Audio for at få en erstatningsstrømforsyning. Hold gummistikket indsat, når
denne indgang ikke er i brug.
Developed and manufactured
Portable Audio Laboratory
by Tivoli Audio
Boston, MA
USA
1-877-297-9479
MADE IN CHINA
AUX IN
1
2
4
3
5
Table of contents
Languages:
Other Tivoli Audio Portable Radio manuals

Tivoli Audio
Tivoli Audio HenryKloss User manual

Tivoli Audio
Tivoli Audio SongBook100 User manual

Tivoli Audio
Tivoli Audio SongBook User manual

Tivoli Audio
Tivoli Audio PAL + User manual

Tivoli Audio
Tivoli Audio iPAL User manual

Tivoli Audio
Tivoli Audio ISONGBOOK User manual

Tivoli Audio
Tivoli Audio PAL BT User manual

Tivoli Audio
Tivoli Audio PAL + User manual

Tivoli Audio
Tivoli Audio PAL BT User manual


