Tivoli Audio PAL BT User manual
FM
OFF
AM
BT
OWNER’S MANUAL
™
Portable Audio Laboratory™

Table of Contents:
English...................................................................................................04
Deutsch .................................................................................................15
Español..................................................................................................28
Français.................................................................................................41
Italiano................................................................................................... 54
PAL™ BT
Portal Audio Laboratory™

3 – ENGLISH
Important Safety Instructions
1. Read these instructions.
2. Keep these instructions.
3. Heed all warnings.
4. Follow all instructions.
5. Do not use this apparatus near water. For example, do not use near a bathtub, in a
wet basement, near a swimming pool, and the like. WARNING! Do not expose this
product to rain or moisture.
6. Clean only with a dry cloth.
7. Do not block any ventilation openings. Install in accordance with the manufacturer’s
instructions.
8. Do not install near any heat sources such as radiators, heat registers, stoves, or other
apparatus (including amplifiers) that produce heat.
9. Do not defeat the safety purpose of the polarized or grounding-type plug. A polarized
plug has two blades with one wider than the other. A grounding type plug has two
blades and a third grounding prong. The wide blade or the third prong are provided
for your safety. If the provided plug does not fit into your outlet, consult an electrician
for replacement of the obsolete outlet.
10. Protect the power cord from being walked on or pinched particularly at plugs, conve-
nience receptacles, and the point where they exit from the apparatus.
11. Only use attachments/accessories specified by the manufacturer.
12. Use only with the cart, stand, tripod, bracket, or table specified by the
manufacturer, or sold with the apparatus. When a cart is used, use
caution when moving the cart/apparatus combination to avoid injury
from tip-over.
13.
Refer all servicing to qualified service personnel. Servicing is required
when the apparatus has been damaged in any way, such as power-supply cord or plug
is damaged, liquid has been spilled or objects have fallen into the apparatus, the apparatus
has been exposed to rain or moisture, does not operate normally, or has been dropped.

4 – ENGLISH
14. For added protection for this product during a lightning storm, or when it is left unat-
tended and unused for long periods of time, unplug it from the wall outlet and
disconnect the antenna or cable system. This will prevent damage to the product to
lightning and power-line surges.
15. This product has been tested and found to comply with the limits for Part 15 of the
FCC rules. These limits are designed to provide reasonable protection against harmful
interference in a residential installation. This product generates, uses, and can radiate
radio frequency energy and, if not installed and used in accordance with the instruc-
tions, may cause harmful interference with radio communications. However, there is
no guarantee that interference will not occur in a particular installation. If this equip-
ment does cause harmful interference to radio or television reception, which can be
determined by turning the product on and off, the user is encouraged to try to correct
the interference by one or more of the following measures: If liquid has been spilled
or objects have fallen into the product.
• Reorient or relocate the receiving antennas.
• Increase the separation between the equipment and the receiver.
• Connect the equipment to an outlet on a circuit different from that to which the
receiver is connected.
16. Operate this product only from the type of power source indicated on the back panel.
For products using an external power supply, use an exact replacement if lost or dam-
aged. For products operating from battery power, refer to the user manual.
17.
Unplug this product from the wall outlet and refer servicing to qualified service
personnel under the following conditions:
a. When the power supply cord or plug is damaged.
b. If liquid has been spilled or objects have fallen into the product.
c. If the product has been exposed to water or rain.
d. If the product does not operate normally by following the operating instructions.
e. If the product has been dropped or damaged in any way.
f. When the product exhibits a distinctive change in performance.
18. Keep this product a safe distance away from naked flame, such as a lit candle.
19. Do not expose this product to splashing or dripping. Objects containing liquid, such
as vases or drinking glasses, should not be placed on top of this product.
20. The recommended operating temperature range is 41˚ F to 104˚ F (5˚ C to 40˚ C).
21. Canada complies with RSS210, ICES-003.
22. The power adapter serves as the disconnect device and should remain readily
accessible.
This product can be recycled. Products bearing this symbol must NOT
be thrown away with normal household waste. At the end of the prod-
uct’s life, take it to a collection point designated for recycling of electrical
and electronic devices. Find out more about return and collection points
through your local authority.
The European Waste Electrical and Electronic Equipment (WEEE) Direc-
tive was implemented to dramatically reduce the amount of waste going
to landfills, thereby reducing the environmental impact on the planet
and on human health. Please act responsibly by recycling used prod-
ucts. If this product is still useable, consider giving it away or selling it.

5 – ENGLISH
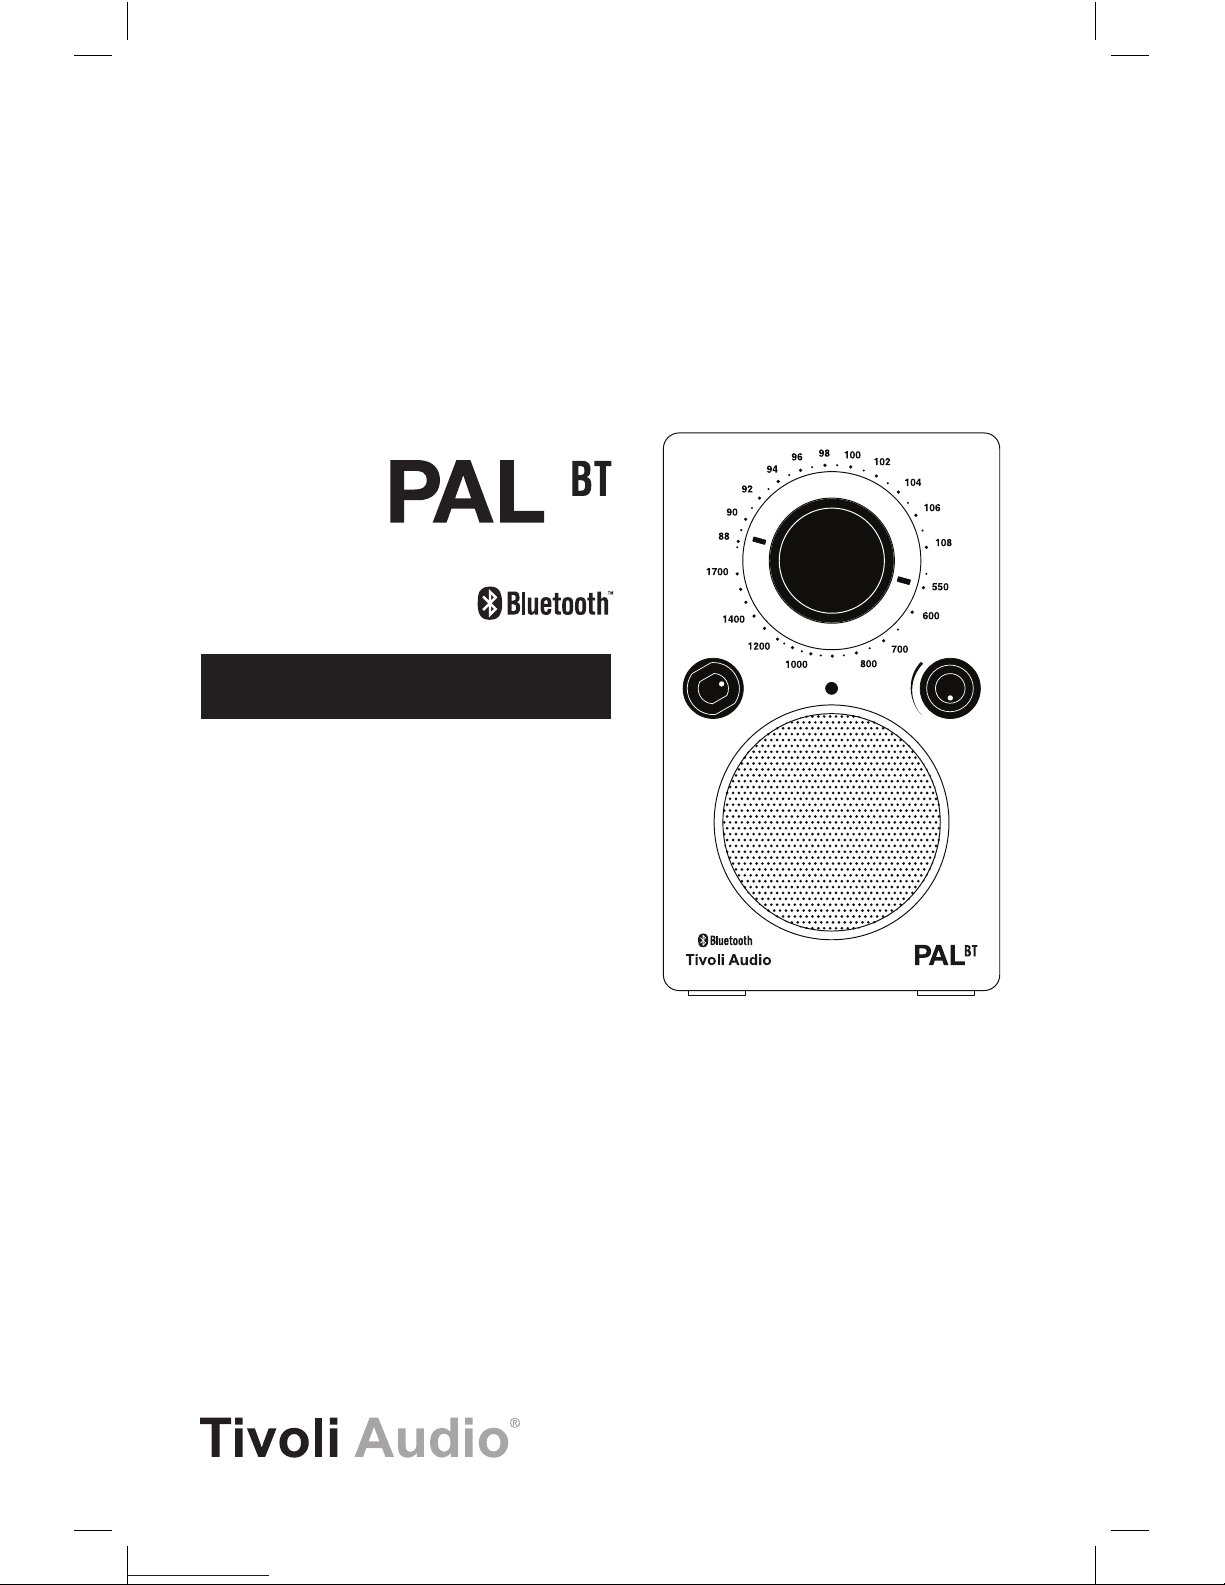
PAL BT Instructions
Congratulations on your purchase of a truly unique entertainment product. We believe the
rechargeable and weather resistant Portable Audio Laboratory (PAL BT) is one of the
finest portable audio products on the market. It is sure to enhance your radio listening
experience at home or on the go. With the addition of Bluetooth®wireless technology, you
can stream your music wirelessly to the PAL BT.
In order to take full advantage of what your new radio is capable of, please take a moment
to read this owner’s manual and the safety instructions. If you have any questions, please
do not hesitate to contact your dealer or Tivoli Audio directly.
Please save the carton and original packing should you ever need to ship your radio,
as shipping damage is not covered by the factory warranty.
On behalf of all of us, thank you for choosing Tivoli Audio, and enjoy your new PAL BT!
About Tivoli Audio
Tivoli Audio was founded by Tom DeVesto with the mission of bringing simple to use,
elegantly designed, high quality audio products to consumers. As CEO and head of research
and development at his former company, Cambridge SoundWorks*, Tom was responsible
for the development of many of the best selling home entertainment and multi-media products
on the market. He also held senior management positions in product development at both
Advent and Kloss Video.
*Cambridge SoundWorks is a registered trademark of Creative Labs, Singapore.

6 – ENGLISH
Packed with your PAL BT you should find:
• One (1) AC power supply
• One (1) Nickel Metal Hydride battery pack (installed)
Please contact your dealer or Tivoli Audio if any of these items are missing.
Tivoli Audio, LLC
Seaport Center
70 Fargo Street, Suite 900
Boston, MA 02210 USA
1.877.297.9479 (US Only)
1.617.345.0066
www.tivoliaudio.com
help@tivoliaudio.com
Before you begin:
For your safety, the PAL BT is shipped from the factory with discharged batteries. However, it
is normal if the PAL BT plays straight out of the box. With the unit off, connect the power supply
to the PAL BT and plug it into a wall outlet to charge the batteries. (See “Fast Charge Mode”).
Like many rechargeable devices, there may be a delay before the LED starts to blink when
the PAL BT is brand new and first plugged in, or when left unused for several weeks. This
is a feature of the Power Management System designed to protect the batteries from
damage. Should you experience this, you may “jump start” the “Fast Charge Mode” by
playing the PAL BT (while plugged in) for approximately 2-3 hours and then turning it off
(but still plugged in). The green LED should begin to flash at that time indicating Fast Charge
Mode is active. In order to complete the charge cycle, leave the PAL BT plugged in for an
additional 4-5 hours even if the LED has stopped blinking.
Bear in mind it may take up to 4 charge/discharge cycles before the batteries are operating
at full capacity when the PAL BT is new or has been unused for several weeks.
Leaving the PAL BT plugged in even when not in use ensures the batteries will be charged
when you need it. If the PAL BT is not plugged in, the batteries will gradually self-discharge
as a safety measure. There is also no harm in playing the PAL BT continuously while
plugged in.
Jump Start
In the event there is no power from the battery after giving it a full charge, the battery may
have self-discharged. In this case, try this simple procedure:
1.
Play the PAL BT at moderate volume for 3 hours while connected to the external adapter.
2.
After 3 hours, switch the PAL BT off. The green power LED should begin to flash
indicating the battery is charging.
3. When the LED stops flashing, keep the PAL BT switched off but leave it plugged into
the external adapter for an additional 4-5 hours to complete the charging process.
7 – ENGLISH
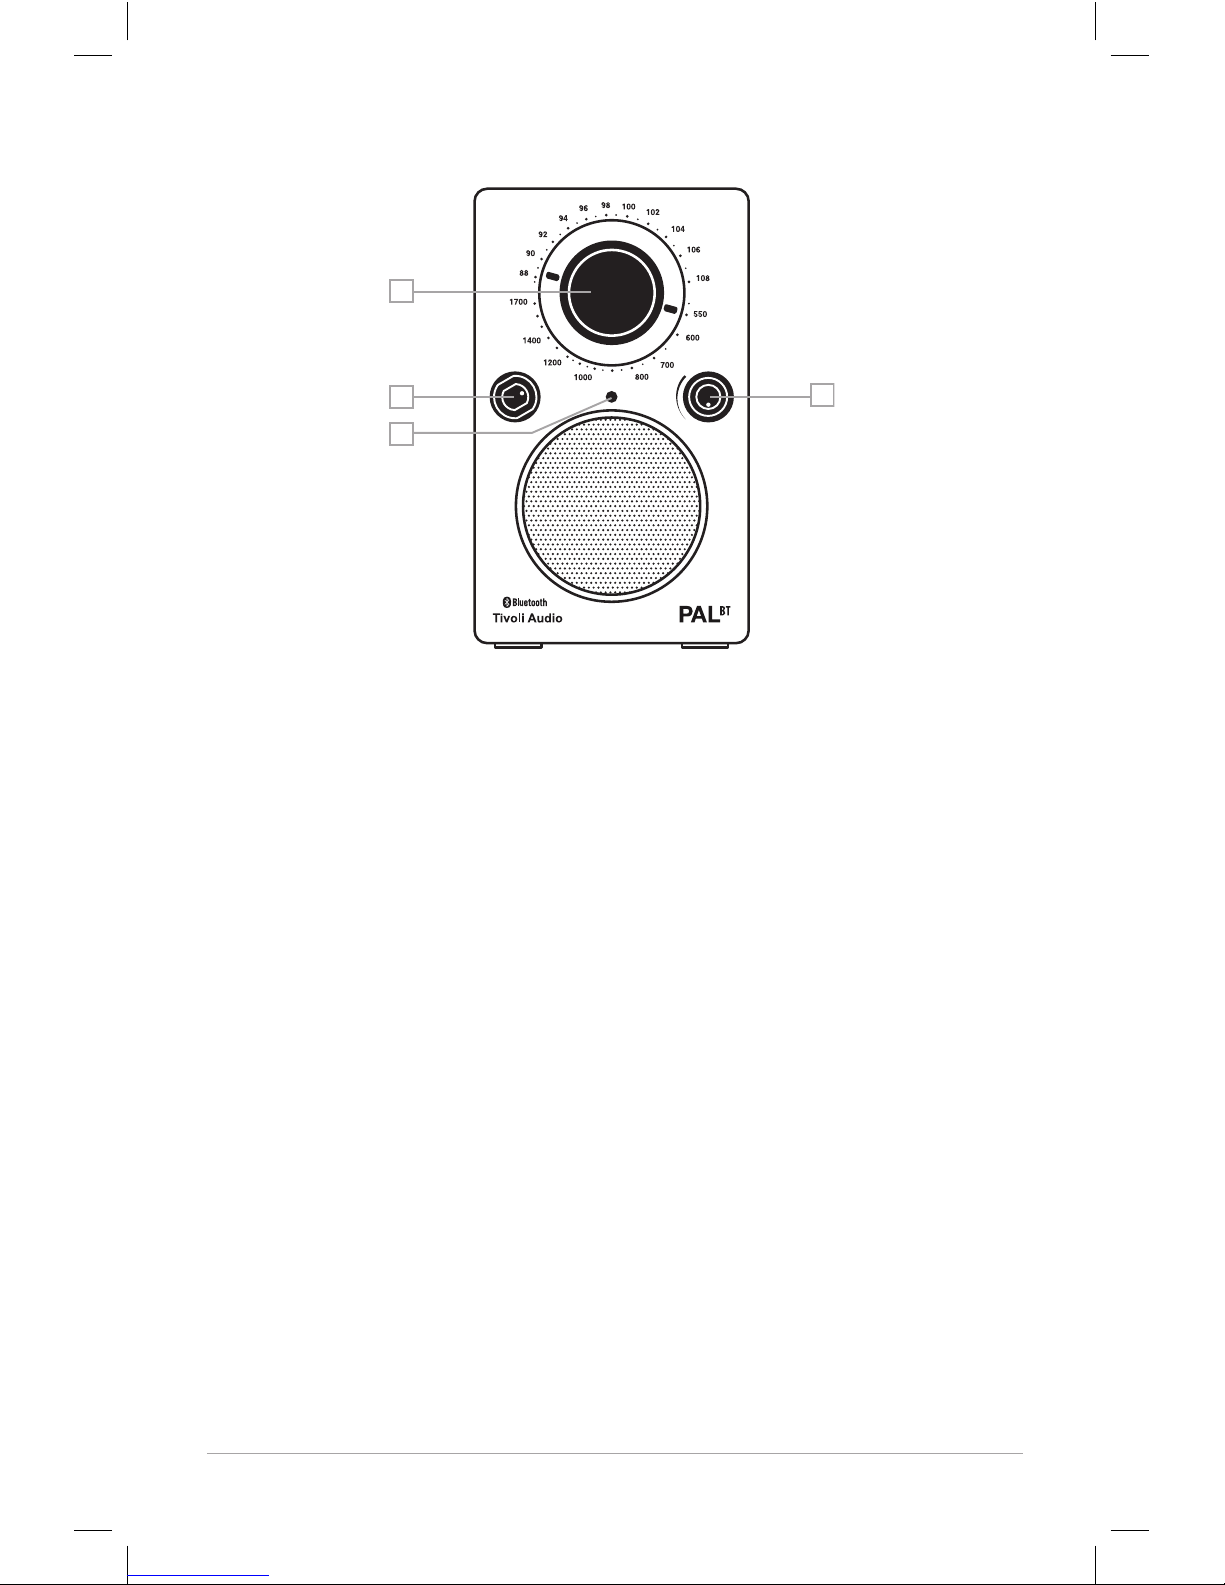
Guide to Features (Front):
1. TUNING DIAL: Turn the analog dial to the right or to the left to change the FM and AM
frequency range. The 5:1 tuning gear ratio provides easy, accurate tuning.
2. POWER INDICATOR: Indicates when the unit is on as well as the charging mode and
battery status. See the section marked “About the battery pack”.
3.
SOURCE KNOB: Turn the knob 1 click up to select the FM band or 2 clicks up to select
the AM band. To activate Bluetooth, switch to BT and follow the steps outlined in the
“Bluetooth Operation” section.
4. VOLUME: Turn the volume knob up to increase the volume or down to decrease the
volume of the PAL BT’s speaker. Since the PAL BT is portable, please be considerate
of others around you when increasing the volume level. This knob will also control the
level of headphones (not included) when connected.
FM
OFF
AM
BT
2
1
2
34
1
4
5
3

8 – ENGLISH
Guide to Features (Rear):
1. FM ANTENNA: When listening to FM, adjust this telescoping antenna and position it
for best reception. In strong FM signal locations, reducing the antenna’s length may
provide better reception. When the unit is not in use or when listening to AM, keep the
antenna retracted to protect it. This antenna has no affect on AM reception. For AM,
rotate the PAL BT itself to align the internal antenna for improved reception.
2. AC/DC INPUT: Use this input to operate the PAL BT using its included PAL BT-PS
Tivoli Audio AC power supply or an optional 12VDC nominal, 500mA fused source.
Use only the power supply provided with this product. Should the power supply
get damaged or misplaced, use only a like replacement. The connector is a
5.5mm/2.1mm center positive connector. Keep the rubber plug inserted when this
input is not in use.
3. HEADPHONE OUTPUT: Connect a headset to this stereo output for private listening.
The headphone volume will be controlled by the PAL BT’s volume knob. Connecting
a pair of headphones will mute the PAL BT’s main speaker. This jack accepts a 1/8"
stereo male mini plug. You may also record from the PAL BT or use it as a high quality
stereo tuner by using this output. Keep the rubber plug inserted when this output is
not in use.
4.
AUXILIARY INPUT: To hear audio from another device (such as a portable CD or MP3
player) through the PAL BT’s main speaker, connect the device’s audio output to this
input. This jack accepts a 1/8" stereo male mini plug. Note that you may need to adjust
the volume level differently for an auxiliary device than the level normally used for radio
listening. Keep the rubber plug inserted when this input is not in use.
5. BATTERY COMPARTMENT: Stores the Nickel-Metal-Hydride battery pack. Do not
load any other type of batteries in the compartment. See “Replacing the battery pack.”
Note: We suggest keeping the rubber covers in place over the rear jacks to protect them
when not in use.
FM
OFF
AM
BT
2
1
2
34
1
4
5
3

9 – ENGLISH
Bluetooth®Operation:
Prior to pairing, verify your device supports Bluetooth 2.1+EDR A2DP and your device is
not connected to any other Bluetooth product. Devices may pair differently. Below is a
general guide.
1.
Turn the PAL BT to the “BT” position. This will power on the Bluetooth. Turn the volume
up about ¼ to start. Also turn up the volume on the source device (the device you are
streaming from).
2. Turn on the Bluetooth wireless technology on your enabled device.
3.
Select “Tivoli Bluetooth (Not Paired)” when it appears on your device’s screen to initiate
searching. Some devices may prompt you for a PIN. If so, enter “0000”. “Tivoli Blue-
tooth” will change from “Not Paired” to “Connected”.
4. You will hear a ring tone from the PAL BT confirming connection and you can begin
playing your music files wirelessly. Adjust the volume level on your device. You should
not have to pair your device again. Depending on your device, you may need to make
multiple attempts at Pairing and/or Connecting to the PAL BT, but please give
your device adequate time to Pair or Connect before repeating the process.
Pairing a Bluetooth®wireless technology enabled iPhone/iPod touch/iPad:
1.
Turn the PAL BT to the “BT” position. This will power on the Bluetooth. Turn the volume
up about ¼ to start. Also turn up the volume on the source device (the device you are
streaming from).
2. Select “Settings”.
3. Select “General”.
4. Select “Bluetooth”.
5. Switch Bluetooth “On” to initiate searching.
6.
Select “Tivoli Bluetooth (Not Paired)” when it appears on the display. If you are
prompted to enter a PIN, enter “0000”. “Tivoli Bluetooth” will change from “Not Paired”
to “Connected”.
7. You will hear a ring tone from the PAL BT and you can begin playing your music files
wirelessly. Adjust the volume level on your device. You should not have to pair your
iPhone/iPod/iPad again.
The volume output level of music files varies. If you prefer an even higher output level,
check the settings in your iPhone/iPod touch/iPad: Set the EQ Off, the SoundCheck Off,
and the Volume limit Off.
If you encounter a problem Pairing, press the small arrow to the right of “Tivoli Bluetooth”
on your iPhone/iPod touch/iPad display and select “Forget this Device”, then repeat the
Pairing process. Depending on your device, you may need to make multiple attempts
at Pairing and/or Connecting to the PAL BT, but please give your device adequate
time to Pair or Connect before repeating the process.
When streaming music, you can press the blue arrow to the right of the next track button >>/ on
the iPhone/iPod touch/iPad display to alternate between the iPhone/iPod/iPad and Bluetooth.
• The PAL BT will remember pairing information for up to 8 devices. Additional devices can
be paired, but the least-recently used device will be replaced by the newly paired device.
• If the audio drops out or stops during playback, move your device closer to the PAL
BT, or check to be sure another wireless device is not interfering with the signal.
• When switching from Bluetooth to AM or FM, you may need to re-adjust the PAL BT’s
volume level.

10 – ENGLISH
About the battery pack:
The PAL BT uses a sealed pack of 6 high capacity Nickel Metal Hydride (NiMH) cells. Unlike
Nickel Cadmium (NiCd) batteries, NiMH batteries have no memory effect, provide a longer
operating time, and do not use toxic metals. The front panel green LED serves both as a
power indicator and battery power and charge status indicator thanks to the PAL BT’s
innovative Power Management System.
Fast Charge Mode:
With the PAL BT turned Off but plugged in, from full discharge, the batteries will be com-
pletely charged within approximately 3.5 hours. During this period, the green LED will blink
with a long off/short on cycle. The LED will turn off when the batteries are fully charged.
Once the PAL BT has been fully charged using the Fast Charge Mode, do not unplug it
and then immediately plug it back in again, as this will restart the Fast Charge Mode even
though the batteries are fully charged. Doing this repeatedly will damage the batteries.
See also “Before You Begin”.
Trickle Charge Mode:
With the PAL BT On and plugged in, the batteries will be completely charged in approxi-
mately 24 hours. During this period, the LED will remain On continuously.
Low Battery:
With the PAL BT turned On but not plugged in, as the batteries become discharged, the
Power Management System will cause the green power indicator LED to blink with a short
off/long on cycle, indicating the batteries are in need of being recharged. The blinking will
grow faster as the batteries get closer to discharge until the PAL BT shuts itself off to protect
the batteries. The remaining playback time from the moment the blinking begins until the
PAL BT shuts off is estimated between 20 minutes and several hours. It is difficult to be
more precise due to many factors including how long and how loud the radio is played, and
the remaining charge left in the batteries. For instance, the PAL BT will likely play longer off
of the batteries at a low volume than at higher volume levels. As you use your PAL BT, you
will develop a better idea of how much playback time you have before recharging is neces-
sary.You may also notice reduced battery playback time with PAL BT when using Bluetooth
Wireless Technology. Using the Bluetooth wireless technology when on battery-only power
will reduce the average playback time experienced with just radio listening.
If the PAL BT is turned on to FM or AM and the power indicator is off, then the batteries
require recharging. However, it is normal for the radio to play for a brief period if turned on
after the LED has gone out.
If the PAL BT is to be used away from an AC or other power source for an extended period
of time, it is wise to “top-off” the charge before use, especially if the LED is blinking.
To do this, follow the procedure described under “Fast Charge Mode”.
Note that the power indicator LED will blink with a different cycle during Fast Charge Mode
while the batteries are charging. Because the PAL BT’s NiMH batteries have no memory,
it is not necessary to wait until the batteries are exhausted before recharging, although
recharging from complete discharge will also do no harm.
Leaving he PAL BT plugged in, even when not in use, ensures the batteries will be charged
when you need them. If the PAL BT is not plugged in, the batteries will self-discharge as a
safety measure. There is no harm in continuously operating the PAL BT with the power supply.

11 – ENGLISH
Note: It may take up to 4 charge/discharge cycles before the batteries are operating
at full capacity when new or left unused for several weeks.
Replacing the battery pack:
When it comes time to replace the battery pack, lift the FM antenna up, remove the two
screws that hold the battery cover in place with a small Philips-head screwdriver. Lift the
battery cover off, disconnect the lead from the battery pack and replace the batteries,
making sure to correctly connect the leads. Replace the battery cover by inserting the
bottom lip first, then screwing the cover back on. Replacement battery packs may be
purchased from your authorized dealer/distributor or Tivoli Audio.
CAUTION: To reduce the risk of fire or personal injury, use an exact replacement
battery pack, available through Tivoli Audio or its authorized dealers, and dispose
of the spent battery pack according to your state/country’s regulations.
Handling the PAL BT:
• The PAL BT is weather resistant, but it is not weather proof. It should not be
immersed in water or held under running water. It also should not be exposed to
extreme temperatures.
• The PAL BT is designed to be portable, but it is not indestructible. Do not drop it or
subject it to strong impacts.
• Always grip the PAL BT using the side indentations.
• The PAL BT’s non-slip, weather resistant paint is durable, but it is
not impervious to scratches.
• The PAL BT’s speaker is magnetically shielded, permitting use near
a computer monitor or a television set.
• It is normal for the power supply to become warm during use.
Cleaning:
To clean the PAL BT, use only a soft cloth and do not rub hard. Use a very mild cleaner
only when necessary. If something is spilled on the cabinet, wash it off as soon as possible
to prevent possible damage. Normal every day wear and tear, or damage resulting from
cleaning or chemicals, is not covered under the factory warranty.
Headphones:
Avoid using headphones (not included) at high volume levels to prevent possible hearing
damage. Do not wear headphones while operating a motor vehicle.

12 – ENGLISH
Limited Warranty Outside North America
Tivoli Audio manufactures its products to very high standards and we are confident our
products will perform well. Accordingly, we provide a limited warranty on this product
against manufacturing defects in material and workmanship to the original owner. This
warranty is non-transferable.
Products purchased in the European Union and Norway have a minimum warranty term
of two years. For countries where minimum warranty terms are determined by statute, the
warranty term is the statutory period required. In all other locations, the warranty term is
one year.
This Limited Warranty covers the functionality of the product for its normal, intended use
as specified in this Owner’s Manual. It does not cover a malfunction or damage that has
resulted from improper or unreasonable use or installation, using the charger to charge
alkaline batteries, faulty ancillary equipment, modifications, unauthorized repair, shipping
damage or loss, abuse, accidents, use on improper voltage/current, power surges, light-
ning or other acts of God, excess moisture, normal wear and tear, commercial use, or
purchase from unauthorized dealers. Proof of purchase as evidence the unit was pur-
chased from an authorized dealer may be required for warranty service. Please contact
the dealer of purchase or local distributor for warranty service or repair.
Please refrain from opening this product or taking it apart as doing so will void this Limited
Warranty. There are no user serviceable parts inside. Tivoli Audio will not pay for costs
incurred due to correction of reception problems, elimination of externally generated static/
noise, loss of time, inconvenience, loss of use of product, or damage caused by improper
use of this product.
In the event the product is returned during the warranty term and is eligible for service
under this Limited Warranty, we will repair or replace any defective parts within a reason-
able period of time and free of charge.
THIS LIMITED WARRANTY GIVES YOU SPECIFIC LEGAL RIGHTS SUBJECT TO SPECI-
FIED CONDITIONS. YOU MAY ALSO HAVE OTHER LEGAL RIGHTS WHICH APPLY TO
THE PRODUCT YOU HAVE ACQUIRED. THESE LEGAL RIGHTS VARY FROM COUNTRY
TO COUNTRY. SOME PLACES DO NOT ALLOW THE EXCLUSION, RESTRICTION, OR
MODIFICATION OF CERTAIN IMPLIED RIGHTS OR THEIR EFFECT. IN THOSE SITUA-
TIONS THIS LIMITED WARRANTY WILL ONLY APPLY TO THE EXTENT THAT THE
APPLICABLE LAW ALLOWS.
The laws of your country may provide you with legal claims against the seller or manufac-
turer of this product. This Limited Warranty does not affect those rights.
The provisions of the Limited Warranty are in lieu of any other warranties or conditions,
except those provided by law. This Limited Warranty does not affect any legal rights pro-
vided to you by law and does not preclude any remedy you may have under law.
In countries where liability limits are not precluded by statute, the maximum liability of
Tivoli Audio shall not exceed the purchase price paid by you for the product. In countries
where limitations of liability are precluded by law, Tivoli Audio shall be liable for no more
than the direct damages for bodily injury, and/or real or personal property arising from the
negligence of Tivoli Audio.

13 – ENGLISH
Where not prohibited by law, Tivoli Audio shall not be liable for special, incidental, conse-
quential, or indirect damages. Some places do not allow limitations on the exclusion or
limitation of relief, special, incidental, consequential or indirect damages, or the limitation
of liability to specified amounts, so the above limitations or exclusions may not apply to
you. This Limited Warranty is void if the label bearing the serial number has been removed
or defaced.
If you purchased an extended service contract from your dealer and service is required
after the term of this Limited Warranty has expired, please contact your extended service
contract provider to obtain service.
For your convenience, you may register your product for warranty service online at our
website, www.tivoliaudio.com. There is no legal obligation for you to provide personal
information. However, such information allows us to maintain a record of the Tivoli Audio
products acquired by you and better understand the purchasers of our products. The
information collected will be used for marketing purposes by Tivoli Audio and, where
permitted, to contact you in relation to the products you have acquired or other products
which might be of interest to you from Tivoli Audio or other companies. The information
that you provide may be processed in another country.
For service, please contact your dealer or local distributor.
North American Limited Warranty
Tivoli Audio manufactures its products to very high standards and we are confident our
products will perform well. Accordingly, we provide a limited warranty on this product
against manufacturing defects in material and workmanship to the original owner, for a
period of one year from the original date of purchase. This warranty is non-transferable.
This Limited Warranty covers the functionality of the product for its normal, intended use
as specified in this Owner’s Manual. It does not cover a malfunction or damage that has
resulted from improper or unreasonable use or installation, faulty ancillary equipment,
modifications, unauthorized repair, shipping damage or loss, abuse, accidents, use on
improper voltage/current, power surges, lightning or other acts of God, excess moisture,
normal wear and tear, commercial use, or purchase from unauthorized dealers. Proof of
purchase as evidence the unit was purchased from an authorized dealer may be required
for warranty service. Please contact the dealer of purchase or local distributor for
warranty service or repair.
Returns of any model purchased directly from Tivoli Audio via our website, telephone, mail,
or fax: must have a Return Authorization (RA) number clearly indicated on the outside of
the package. An RA number can be obtained by phoning Tivoli Audio customer service
(1.877.297.9479) with the product’s model name, serial number, approximate date of pur-
chase, and detailed description of the problem, or by filling out the RA form on our web
site (www.tivoliaudio.com). PRODUCTS RETURNED TO TIVOLI AUDIO WITHOUT A VALID
RA # WILL BE RETURNED UNOPENED TO THE SENDER.
Please refrain from opening this product or taking it apart as doing so will void this Limited
Warranty. There are no user serviceable parts inside. Tivoli Audio will not pay for costs
incurred due to correction of reception problems, elimination of externally generated static/
noise, loss of time, inconvenience, loss of use of product, or damage caused by improper
use of this product.

14 – ENGLISH
Specifications:
Model: Portable Audio Laboratory™(PAL™BT)
Type: Portable, weather resistant AM/FM radio with
Bluetooth Wireless Technology
Driver: 1 x 2.5"treated, magnetically shielded, full range driver
Power: 12VDC nominal - 15VDC maximum, 500mA
Battery Pack: NiMH, 7.2V, 1400mA
Battery Current: 500mA
AC Adapter:
Model PAL BT-PS:
CE: 230V-50Hz, 80mA, 12VDC, 500mA
UL: 120V-60Hz, 18W, 12VDC, 500mA
Dimensions: 15.88cm H x 9.37cm W x 9.86cm D
(3.69"W x 6.25"H x 3.88"D)
Weight: 0.85 kg (1.88 lbs)
All specifications subject to change without notice.
Tivoli Audio reserves the right to make product changes without notice.
Tivoli Audio, the Tivoli Audio logo, PAL, and Portable Audio Laboratory are trademarks of Tivoli Audio, LLC.
The Bluetooth®word mark and logos are registered trademarks owned by Bluetooth SIG, Inc. and
any use of such marks by Tivoli Audio is under license. Other trademarks and trade names are those
of their respective owners.
iPhone, iPod touch and iPad are trademarks of Apple Inc, registered in the U.S. and other countries.
Wichtige Sicherheitsanweisungen
1. Lesen Sie diese Anweisungen sorgfältig durch.
2. Bewahren Sie diese Anweisungen auf.
3. Beachten Sie alle Warnhinweise.
4. Befolgen Sie alle Anweisungen.
5. WARNUNG – Setzen Sie dieses Gerät nicht Regen oder anderer Feuchtigkeit aus, um
das Risiko eines Brands oder Stromschlags zu verringern.
6. Reinigen Sie das Gerät nur mit einem trockenen Tuch.
7. Stellen Sie sicher, dass die Belüftungsöffnungen nicht versperrt sind. Schließen Sie
das Gerät gemäß den Anweisungen des Herstellers an.
8.
Schließen Sie das Gerät nicht in der Nähe von Wärmequellen wie z.B. Heizkörpern,
Heizauslässen, Öfen oder anderen wärmeerzeugenden Geräten (inklusive Verstärkern) an.
9.
Setzen Sie nicht die Sicherheitsfunktion des verpolungssicheren oder geerdeten
Steckers außer Kraft. Ein verpolungssicherer Stecker ist mit zwei unterschiedlich
breiten Kontakten ausgestattet. Ein geerdeter Stecker ist neben den zwei Kontakten
außerdem mit einem Massekontakt ausgestattet. Der breite Kontakt bzw. der
Massekontakt dienen zu Ihrer Sicherheit. Falls der gelieferte Stecker nicht in Ihre
Steckdose passt, wenden Sie sich zum Austausch der entsprechenden Steckdose
bitte an einen Elektriker.
10.
Stellen Sie sicher, dass besonders an den Steckern, Steckdosen und der
Geräteaustrittsstelle nicht auf das Stromkabel getreten oder das Kabel geknickt wird.
11.
Benutzen Sie ausschließlich die vom Hersteller angegebenen Anbau- und
Zubehörgeräte.
12. Verwenden Sie das Gerät nur mit den Wagen, Gestellen, Stativen, Halterungen bzw.
Tischen, die vom Hersteller angegeben oder mit dem Apparat verkauft wurden. Gehen
Sie bei dem Bewegen eines Wagens mit Vorsicht vor, um Verletzungen durch ein
Umstürzen der Kombination Apparat/Wagen zu vermeiden.
13.
Ziehen Sie den Stecker dieses Gerätes bei Gewittern oder bei längerer
Nichtverwendung heraus.
15 – DEUTSCH
14.
Lassen Sie jegliche Wartungsarbeiten nur von qualifiziertem Wartungspersonal
durchführen. Eine Wartung oder Reparatur wird erforderlich, wenn das Gerät auf
irgendeine Weise beschädigt wurde, wie z.B. durch eine Beschädigung von
Stromversorgungskabel oder Stecker, wenn Flüssigkeit auf das Gerät verschüttet
wurde oder Gegenstände in das Gerät gefallen sind, das Gerät Regen oder anderer
Feuchtigkeit ausgesetzt wurde, das Gerät nicht ordnungsgemäß funktioniert oder
fallen gelassen wurde.
15. Schützen Sie das Gerät zusätzlich dadurch, dass Sie den Stecker bei einem Gewitter
oder wenn Sie das Gerät für eine längere Zeit unbeaufsichtigt lassen oder nicht
benutzen wollen aus der Steckdose ziehen. Dies verhindert eine Beschädigung des
Produktes durch Blitzschlag und andere Stromspitzen.
16. Betreiben Sie das Gerät nur mit den auf der Rückseite angegebenen Stromquellen.
Verwenden Sie bei Geräten mit einer externen Stromversorgung im Fall von Verlust
oder Beschädigung nur ein identisches Ersatzteil. Entnehmen Sie bei Geräten mit einer
Batteriestromversorgung dem Benutzerhandbuch die notwendigen Informationen.
17.
Ziehen Sie das Gerät von der Steckdose ab und lassen Sie die Wartungsarbeiten durch
qualifiziertes Fachpersonal durchführen, wenn folgende Fälle auftreten:
a. Beschädigung von Stromversorgungskabel oder Stecker.
b. In das Gerät verschüttete Flüssigkeit oder hineingefallene Gegenstände.
c. Das Gerät wurde Wasser oder Regen ausgesetzt.
d. Das Gerät funktioniert nicht ordnungsgemäß, wenn die Bedienungsanleitung
befolgt wird.
e. Das Gerät wurde fallen gelassen oder auf eine andere Weise beschädigt.
f. Das Gerät weist eine deutliche Veränderung der Leistung auf.
18.
Halten Sie das Gerät in sicherer Entfernung zu offenen Flammen wie z.B. brennenden Kerzen.
19.
Setzen Sie das Gerät nicht Tropf- oder Spritzwasser aus und platzieren Sie keine
Gegenstände auf dem Gerät, die mit Flüssigkeiten gefüllt sind (z.B. Vasen).
20. Der empfohlene Betriebstemperaturbereich liegt zwischen 5 °C und 40 °C (41 °F
und 104 °F).
Dieses Produkt ist recyclingfähig. Produkte mit diesem Symbol dürfen
NICHT im normalen Hausmüll entsorgt werden. Entsorgen Sie das
Produkt am Ende der Nutzungsdauer bei einer ausgewiesenen Recy-
cling-Sammelstelle für elektrische und elektronische Geräte.
Weiterführende Informationen über Rücknahme- und Sammelstellen
erhalten bei Ihren örtlichen Behörden.
Die europäische WEEE-Richtlinie (Elektro- und Elektronikgerätegesetz)
wurde eingeführt, um die Abfallmenge auf Mülldeponien erheblich zu
verringern und so die Umweltauswirkungen auf unseren Planeten und
die Gesundheit der Menschen zu reduzieren. Handeln Sie bitte verant-
wortungsbewusst, indem Sie Altgeräte dem Recycling zuführen. Falls
das Produkt noch verwendbar sein sollte, sollten Sie ein Verschenken
oder einen Weiterverkauf in Betracht ziehen.
16 – DEUTSCH

PAL BT Instructies
Gefeliciteerd met uw aankoop van een echt uniek entertainment product. Wij geloven dat
de oplaadbare en weerbestendig Portable Audio Laboratory (PAL BT) is een van de beste
draagbare audio-producten op de markt. Het is zeker om uw radio te luisteren ervaring
thuis of onderweg te verbeteren. Met de toevoeging van draadloze Bluetooth technologie
kunt u draadloos streamen van uw muziek naar de PAL-BT.
Om ten volle te profiteren van wat uw nieuwe radio is in staat om te nemen, neem dan even
de tijd om deze handleiding en de veiligheidsinstructies te lezen. Als u vragen heeft, aarzel
dan niet om uw dealer of Tivoli Audio direct contact op te nemen.
Bewaar de doos en de oorspronkelijke verpakking moet je ooit nodig hebt om uw radio
verzenden, transportschade valt niet onder de fabrieksgarantie.
Namens ons allen, ik dank u voor het kiezen van Tivoli Audio, en geniet van uw nieuwe
PAL BT!
Over Tivoli Audio
Tivoli Audio werd opgericht door Tom DeVesto met de missie te brengen eenvoudig,
elegant ontworpen, hoge kwaliteit audio producten maken gebruik van de consument. Als
CEO en hoofd van onderzoek en ontwikkeling van zijn vorige bedrijf, Cambridge Sound-
Works*, Tom was verantwoordelijk voor de ontwikkeling van veel van de best verkochte
home entertainment en multimedia-producten op de markt. Ook bekleedde hij senior
management posities in productontwikkeling, zowel op Advent en Kloss Video.
*Cambridge SoundWorks is een geregistreerd handelsmerk van Creative Labs, Singapore.
Verpakt met uw PAL BT je vindt:
• Een (1) AC-voeding
• Een (1) nikkelmetaalhydride accu (geïnstalleerd)
Neem contact op met uw dealer of Tivoli Audio als een van deze items ontbreken.
Tivoli Audio, LLC
Seaport Center
70 Fargo Street, Suite 900
Boston, MA 02210 USA
1.877.297.9479 (alleen VS)
1.617.345.0066
www.tivoliaudio.com
help@tivoliaudio.com
Voordat u begint:
Voor uw eigen veiligheid is de PAL BT het verlaten van de fabriek met ontladen accu's. Het
is echter normaal dat het PAL-BT speelt recht uit de doos. Met het toestel uit, sluit de
voeding aan op de PAL BT en steek de stekker in een stopcontact om de batterijen op te
laden. (Zie "Fast Charge Mode").
17 – DEUTSCH

Net als veel andere oplaadbare apparaten, kan er een vertraging voordat de LED begint
te knipperen wanneer de PAL-BT is gloednieuw en eerst wordt aangesloten, of wanneer
het apparaat voor enkele weken. Dit is een functie van de Power Management System is
ontworpen om de batterijen te beschermen tegen schade. Mocht u dit ervaren, kunt u
"vliegende start", de "Fast Charge Mode" door het spelen van de PAL-BT (terwijl aanges-
loten) voor ongeveer 2-3 uur en deze uit te zetten (maar nog steeds aangesloten). De groene
LED moet beginnen te knipperen op dat moment aangeeft Fast Charge-modus actief is.
Om de lading te voltooien, laat de PAL BT aangesloten tegen 4-5 uur, zelfs als de LED
knipperen gestopt.
Houd in gedachten dat kan duren tot 4 laad / ontlaad cycli voordat de batterijen op volle
capaciteit als de PAL-BT nieuw is of niet is gebruikt voor enkele weken.
Het verlaten van de PAL BT aangesloten, zelfs wanneer niet in gebruik zorgt ervoor dat de
batterijen worden opgeladen wanneer u het nodig hebt. Als de PAL BT niet is aangesloten,
de accu's zal geleidelijk aan zelf-ontlading als een veiligheidsmaatregel. Er is ook geen
kwaad in het spelen van de PAL-BT continu wanneer aangesloten inch.
Jump Start:
In het geval er geen stroom uit de accu na het geven van een volledig opgeladen, kan de
batterij zelf-ontladen. In dat geval dient u deze eenvoudige procedure:
1. Speel de PAL BT op normaal volume gedurende 3 uur tijdens het aangesloten op de
externe adapter.
2. Na 3 uur, schakelt u de PAL BT uit. De LED groene stroom zou moeten beginnen te
knipperen met vermelding van de batterij wordt opgeladen.
3.
Als de LED stopt met knipperen, houdt u de PAL BT uitgeschakeld, maar laat het is
aangesloten op de externe adapter voor een extra 4-5 uur om het laadproces te voltooien.
18 – DEUTSCH

Funktionen (Frontseite des Geräts):
1. SENDERSUCHER: Drehen Sie diesen Regler nach links oder rechts, um im Frequen-
zbereich FM und AM nach Sendern zu suchen. Das Abstimmungsverhältnis 5:1
gewährleistet eine einfache und genaue Abstimmung.
2.
LED “STROMVERSORGUNG”: Diese Kontrolleuchte leuchtet bei Einschaltung
des Geräts sowie im Status “Batterieladung“ und “Batteriebetrieb” auf (siehe
Abschnitt “Batteriesatz”).
3. WAHLSCHALTER: Zur Einstellung auf die Bandbereiche FM (Pos. 1) und AM (Pos. 2).
4. LAUTSTÄRKE: Drehen Sie den Lautstärkeregler zur Steigerung der Lautstärke nach
rechts und zur Reduzierung der Lautstärke nach links. Da es sich um ein tragbares
Gerät handelt, sollten Sie die Lautstärke so einstellen, daß niemand gestört wird. Der
Regler dient ebenfalls zur Einstellung der Lautstärke eines evtl. angeschlossenen
Kopfhörers (Sonderzubehör).
FM
OFF
AM
BT
2
1
2
34
1
4
5
3
19 – DEUTSCH

Funktionen (Rückseite des Geräts):
1. FM-ANTENNE: Richten Sie diese ausziehbare Antenne zur genauen Abstimmung im
FM-Bandbereich aus. In Gegenden mit starkem FM-Signal könnten Sie einen besseren
Empfang erzielen, wenn Sie die Antenne nicht ganz ausziehen. Wenn das Gerät ausge-
schaltet ist oder auf den AM-Bereich eingestellt ist, sollten Sie die Antenne einziehen, so
daß sie gut geschützt ist. Die Ausrichtung der Antenne hat keinen Einfluß auf den Empfang
im AM-Bereich. Zur Abstimmung im AM-Bandbereich können Sie das Gerät selbst auf
die beste Empfangsposition drehen, da die AM-Antenne im Gerät eingebaut ist.
2.
EINGANG WS/GLS: Zum Anschluß des zum Gerät gehörenden Ws-Netzgerätes sowie
zum Laden der Batterie oder zum Anschluß eines Gls-Netzgerätes (Sonderzubehör).
Steckverbinder: 5,5 mm / 2,1 mm, positiver Pol mittig. Lassen Sie den Gummistöpsel
eingesteckt, wenn dieser Eingang nicht benutzt wird.
3. KOPFHÖRERAUSGANG: Stereoausgang zum Anschluß eines Kopfhörers. Die Laut-
stärke des Kopfhörers wird über den Lautstärkeregler des Geräts (4) geregelt. Bei
Anschluß eines Kopfhörers wird der Lautsprecher des Geräts automatisch abgeschaltet.
Der Ausgang ist für 1/8"-Stereo-Ministecker ausgelegt. Sie können den Ausgang auch
für Direktaufnahmen vom Gerät oder zum Anschluß des Radioteils des Geräts an eine
Heim-Hi-Fi-Anlage benutzen. Lassen Sie den Gummistöpsel eingesteckt, wenn dieser
Ausgang nicht benutzt wird.
4. HILFSEINGANG: Benutzen Sie diesen Eingang zum Anschluß externer Audiogeräte
(tragbarer CD- oder MP3-Player) an den Lautsprecher des Geräts. Der Eingang ist für
1/8"-Stereo-Ministecker ausgelegt. Beachten Sie, daß Sie die Lautstärke bei Anschluß
eines externer Audiogeräts möglicherweise anders als beim Radiohören über das
Gerät regeln müssen. Lassen Sie den Gummistöpsel eingesteckt, wenn dieser Eingang
nicht benutzt wird.
5.
BATTERIEFACH: Zur Aufnahme von Nickel-Metall-Batterien. Setzen Sie keine anderen
Batterien ein.
FM
OFF
AM
BT
2
1
2
34
1
4
5
3
20 – DEUTSCH
Other manuals for PAL BT
5
Table of contents
Other Tivoli Audio Portable Radio manuals

Tivoli Audio
Tivoli Audio SongBook User manual

Tivoli Audio
Tivoli Audio PAL BT User manual

Tivoli Audio
Tivoli Audio HenryKloss User manual

Tivoli Audio
Tivoli Audio PAL + User manual

Tivoli Audio
Tivoli Audio PAL+BT User manual

Tivoli Audio
Tivoli Audio ISONGBOOK User manual

Tivoli Audio
Tivoli Audio PAL + User manual

Tivoli Audio
Tivoli Audio iPAL User manual

Tivoli Audio
Tivoli Audio SongBook100 User manual


