TKH PD900 User manual

Our Brands: FlinQ | iProtect | Park Assist | ParkEyes | Siqura | VDG
Installations in over 80 countries
TKH Security B.V. | +31 182 592 333 | info.nl@tkhsecurity.com | tkhsecurity.com
Meridiaan 32
2801 DA, Gouda
The Netherlands
PD900/PD910/PD920
January 4, 2021
Installation Manual
Page 1
PD900/PD910/PD920
Installation Manual
Status:
v2.1
9-Oct-22
Author:
Onno Verkerk

Our Brands: FlinQ | iProtect | Park Assist | ParkEyes | Siqura | VDG
Installations in over 80 countries
TKH Security B.V. | +31 182 592 333 | info.nl@tkhsecurity.com | tkhsecurity.com
Meridiaan 32
2801 DA, Gouda
The Netherlands
PD900/PD910/PD920
January 4, 2021
Installation ManualPD900/PD910/PD920
Page 2
Revision history
Nr
Date
Remarks
1
9-okt-2022
Version 2.1 reworked into new format

Our Brands: FlinQ | iProtect | Park Assist | ParkEyes | Siqura | VDG
Installations in over 80 countries
TKH Security B.V. | +31 182 592 333 | info.nl@tkhsecurity.com | tkhsecurity.com
Meridiaan 32
2801 DA, Gouda
The Netherlands
PD900/PD910/PD920
January 4, 2021
Installation ManualPD900/PD910/PD920
Page 3
Copyright © 2022 TKH Security B.V.
All rights reserved.
PD900/PD910/PD920 Installation Manual v2.1
Nothing from this publication may be copied, translated, reproduced, and/or published by means of
printing, photocopying, or by any other means without the prior written permission of TKH Security.
TKH Security reserves the right to modify specifications stated in this manual without prior notice.
Brand names
Any brand names mentioned in this manual are registered trademarks of their respective owners.
Liability
TKH Security accepts no liability for claims from third parties arising from improper use other than
that stated in this manual.
Although considerable care has been taken to ensure a correct and suitably comprehensive
description of all relevant product components, this manual may nonetheless contain errors and
inaccuracies. We invite you to offer your suggestions and comments by email. Your feedback will
help us to further improve our documentation.
How to contact us
If you have any comments or queries concerning any aspect related to the product, do not hesitate
to contact:
TKH Security B.V.
Meridiaan 32
2801 DA Gouda
The Netherlands
General : +31 182 592 333
Fax : +31 182 592 123
E-mail : [email protected]
WWW : https://tkhsecurity.com
TKH Security LLC
5340 Spectrum Drive, Suite C
Frederick, Maryland 21703
United States of America
General : +1 301 444 2200
Email : [email protected]
Note: To ensure proper operation, please read this manual thoroughly before using the product
and retain the information for future reference.

Our Brands: FlinQ | iProtect | Park Assist | ParkEyes | Siqura | VDG
Installations in over 80 countries
TKH Security B.V. | +31 182 592 333 | info.nl@tkhsecurity.com | tkhsecurity.com
Meridiaan 32
2801 DA, Gouda
The Netherlands
PD900/PD910/PD920
January 4, 2021
Installation ManualPD900/PD910/PD920
Page 4
Table of Contents
1About this manual........................................................................................................ 6
2Functions overview...................................................................................................... 7
2.1 Features............................................................................................................................................... 7
2.2 Package contents ................................................................................................................................ 8
2.3 Dimensions ........................................................................................................................................ 11
2.4 Connectors ........................................................................................................................................ 12
3Connect cables............................................................................................................15
3.1 Connect Power .................................................................................................................................. 17
3.2 Connect Ethernet cable ..................................................................................................................... 18
3.3 Connect Audio/Alarm I/O and RS-485............................................................................................... 18
3.4 Surge protection ................................................................................................................................ 20
4Installation with NPS-NPT coupler ............................................................................21
4.1 Before installation .............................................................................................................................. 21
4.2 Application ......................................................................................................................................... 21
5System requirements..................................................................................................24
6Get Access to the Camera..........................................................................................25
6.1 Factory default network settings and login information ..................................................................... 25
6.2 Get Access via SDM2 Device Manager ............................................................................................ 26
6.3 Get Access via Web Browser ............................................................................................................ 27
7Set Video Resolution ..................................................................................................29
8Export/Import configuration files...............................................................................30
8.1 Export configuration file ..................................................................................................................... 30
8.2 Import configuration file ..................................................................................................................... 30
9Technical Support.......................................................................................................31
9.1 No Video on Chrome, Firefox, Edge.................................................................................................. 31
9.2 Delete Previously Installed Siqura Viewer......................................................................................... 31
9.3 Allow ActiveX Control Installation ...................................................................................................... 31

Our Brands: FlinQ | iProtect | Park Assist | ParkEyes | Siqura | VDG
Installations in over 80 countries
TKH Security B.V. | +31 182 592 333 | info.nl@tkhsecurity.com | tkhsecurity.com
Meridiaan 32
2801 DA, Gouda
The Netherlands
PD900/PD910/PD920
January 4, 2021
Installation ManualPD900/PD910/PD920
Page 5

Our Brands: FlinQ | iProtect | Park Assist | ParkEyes | Siqura | VDG
Installations in over 80 countries
TKH Security B.V. | +31 182 592 333 | info.nl@tkhsecurity.com | tkhsecurity.com
Meridiaan 32
2801 DA, Gouda
The Netherlands
PD900/PD910/PD920
January 4, 2021
Installation ManualPD900/PD910/PD920
Page 6
1About this manual
What's in this manual
This is version 1 of the installation assistance provided for the PD9x0 Series camera. The manual
gives you all the information you need to install the product. It tells you:
•How to connect cables
•How to get access to the camera
•How to set up video resolution
•How to export and import configuration files
•How to delete previously-installed Viewer software and to enable Siqura Viewer installation
Where to find more information
Find additional manuals, and the latest firmware for this product at https://tkhsecurity.com. We
advise you to make sure that you have the latest version of this manual.
Who this manual is for
These instructions are for all professionals who will install PD9x0 Series cameras.
What you need to know
You will have a better understanding of how the camera works if you are familiar with:
•Camera technologies
•CCTV systems and components
•Ethernet network technologies and Internet Protocol (IP)
•Windows environments
•Video, audio, data, and contact closure transmissions
•Video compression methods
Before you continue
Before you continue, read and obey all instructions and warnings in this manual. Keep this manual
with the original bill of sale for future reference and, if necessary, warranty service. When you
unpack your product, make sure there are no missing or damaged items. If any item is missing, or if
you find damage, do not install or operate this product. Ask your supplier for assistance.
Why specifications may change
We are committed to delivering high-quality products and services. The information given in this
manual was current when published. As we continuously seek to improve our products and user
experience, all features and specifications are subject to change without notice.

Our Brands: FlinQ | iProtect | Park Assist | ParkEyes | Siqura | VDG
Installations in over 80 countries
TKH Security B.V. | +31 182 592 333 | info.nl@tkhsecurity.com | tkhsecurity.com
Meridiaan 32
2801 DA, Gouda
The Netherlands
PD900/PD910/PD920
January 4, 2021
Installation ManualPD900/PD910/PD920
Page 7
2Functions overview
This chapter gives an overview of the functions offered by the PD900/PD910/PD920. It also gives
information about the package contents, camera dimensions and connectors.
In the PD910/PD920, the bubble-less mechanical is introduced for the crystal clear images without
any distortion. No matter it is at night or in any low or zero lux environments, the camera provides
effective illumination to objects 200 meters away.
The camera features Servo Feedback technology, which enables the camera to return precisely to
the previous position without stalling, and ensures the target-monitoring region is fully secured. The
camera is compliant with the IP66 standard with various installation. Combining zero downtime
power switching (ZDT) technology, the camera ensures smooth streaming without sudden power-
loss.
2.1 Features
•Multiple progressive scan CMOS sensor support up to 3 MP resolution.
•Up to 40x optical zoom
•Multi exposure HDR
•Electrical image stabilizer (EIS) support
•Multi codec support (H.265 / H.264 / MJPEG)
•Low latency streaming
•Quad streams support
•True day/night function (ICR)
•IR LED (working distance up to 200 m)*
•BNC analogue output for installation support
•RS-485 support
•3D motion compensated noise reduction (MCTF)
•Smart event function
•External input / Motion detection / Network failure detection / Periodical event / Manual
trigger / Audio detection / Loitering Detection / Intrusion Detection / Object Abandoned
•Text overlay and privacy masks
•Micro SD/SDHC/SDXC card support
•ONVIF profile S/G/T support
•Smart low bitrate control
•Weatherproof (IP66)
•Servo feedback – guarantees no drifting
•Zero downtime (ZDT) power switching

Our Brands: FlinQ | iProtect | Park Assist | ParkEyes | Siqura | VDG
Installations in over 80 countries
TKH Security B.V. | +31 182 592 333 | info.nl@tkhsecurity.com | tkhsecurity.com
Meridiaan 32
2801 DA, Gouda
The Netherlands
PD900/PD910/PD920
January 4, 2021
Installation ManualPD900/PD910/PD920
Page 8
2.2 Package contents
Make sure that the package contains the following items.
PD900 package contents
Camera unit with cap
Quick start guide
M4 security screw with rubber
2-Pin power terminal block
3-Pin power terminal
block (AC 24V use)
14-Pin Alarm/Audio I/O
terminal block
Security torx
Rubber stopper
Cautions:
If you use an external power supply, contact TKH Security to make sure that the power supply has the
proper power specifications. Make sure that the power supply complies with LPS requirements.
For PoE input connection, use only with UL listed I.T.E. with "PoE" output. Description for the "PoE" is
intended to be connected to not exposed (outside plant) networks or equivalent statement in installaion
instructions. The PD900 requires standard 802.3at class 4 power supply to the camera.
Battery replacement shall not be applied in view of the risk of explosion.
Dispose of used batteries according to the instructions.

Our Brands: FlinQ | iProtect | Park Assist | ParkEyes | Siqura | VDG
Installations in over 80 countries
TKH Security B.V. | +31 182 592 333 | info.nl@tkhsecurity.com | tkhsecurity.com
Meridiaan 32
2801 DA, Gouda
The Netherlands
PD900/PD910/PD920
January 4, 2021
Installation ManualPD900/PD910/PD920
Page 9
PD910 package contents
Quick start guide
M4 security screw with rubber
2-Pin power terminal block
3-Pin power terminal
block (AC 24V use)
14-Pin Alarm/Audio I/O
terminal block
Rubber stopper
Camera unit
1.5” threaded tube adapter
Cautions:
If you use an external power supply, contact TKH Security to make sure that the power supply has the
proper power specifications. Make sure that the power supply complies with LPS requirements.
For PoE input connection, use only with UL listed I.T.E. with "PoE" output. Description for the "PoE" is
intended to be connected to not exposed (outside plant) networks or equivalent statement in installation
instructions. The PD910 required UPoE max 51W power supply with PoE Handshaking to the camera.
Battery replacement shall not be applied in view of the risk of explosion.
Dispose of used batteries according to the instructions.

Our Brands: FlinQ | iProtect | Park Assist | ParkEyes | Siqura | VDG
Installations in over 80 countries
TKH Security B.V. | +31 182 592 333 | info.nl@tkhsecurity.com | tkhsecurity.com
Meridiaan 32
2801 DA, Gouda
The Netherlands
PD900/PD910/PD920
January 4, 2021
Installation ManualPD900/PD910/PD920
Page 10
PD920 package contents
Quick start guide
M4 security screw with rubber
2-Pin power terminal block
3-Pin power terminal
block (AC 24V use)
14-Pin Alarm/Audio I/O
terminal block
Rubber stopper
Camera unit
1.5” threaded tube adapter
PoE adapter
SFP adapter
Cautions:
If you use an external power supply, contact TKH Security to make sure that the power supply has the
proper power specifications. Make sure that the power supply complies with LPS requirements.
For PoE input connection, use only with UL listed I.T.E. with "PoE" output. Description for the "PoE" is
intended to be connected to not exposed (outside plant) networks or equivalent statement in installaion
instructions. The PD920 required UPoE max 51W power supply with PoE Handshaking to the camera.
Battery replacement shall not be applied in view of the risk of explosion.
Dispose of used batteries according to the instructions.
Our Brands: FlinQ | iProtect | Park Assist | ParkEyes | Siqura | VDG
Installations in over 80 countries
TKH Security B.V. | +31 182 592 333 | info.nl@tkhsecurity.com | tkhsecurity.com
Meridiaan 32
2801 DA, Gouda
The Netherlands
PD900/PD910/PD920
January 4, 2021
Installation ManualPD900/PD910/PD920
Page 11
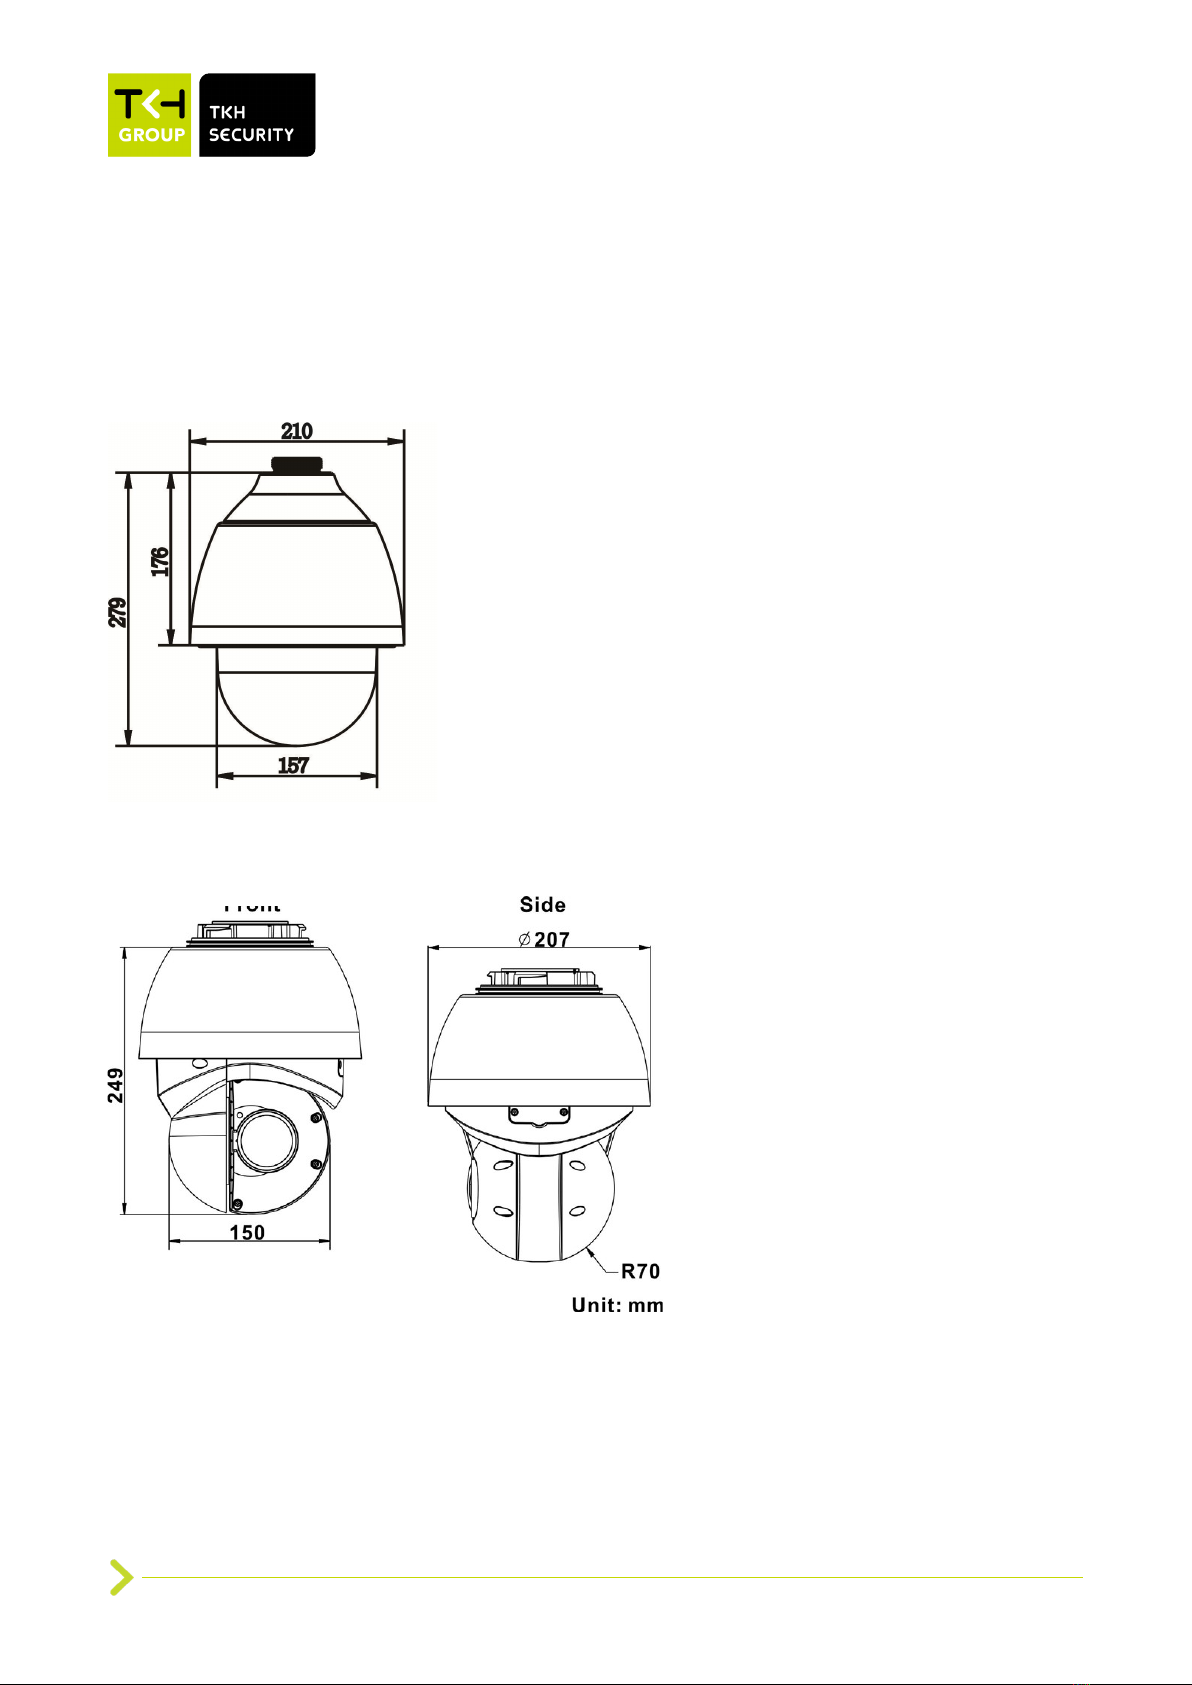
2.3 Dimensions
PD900 dimensions
PD910/PD920 dimensions
PD900 dimensions
Unit:

Our Brands: FlinQ | iProtect | Park Assist | ParkEyes | Siqura | VDG
Installations in over 80 countries
TKH Security B.V. | +31 182 592 333 | info.nl@tkhsecurity.com | tkhsecurity.com
Meridiaan 32
2801 DA, Gouda
The Netherlands
PD900/PD910/PD920
January 4, 2021
Installation ManualPD900/PD910/PD920
Page 12
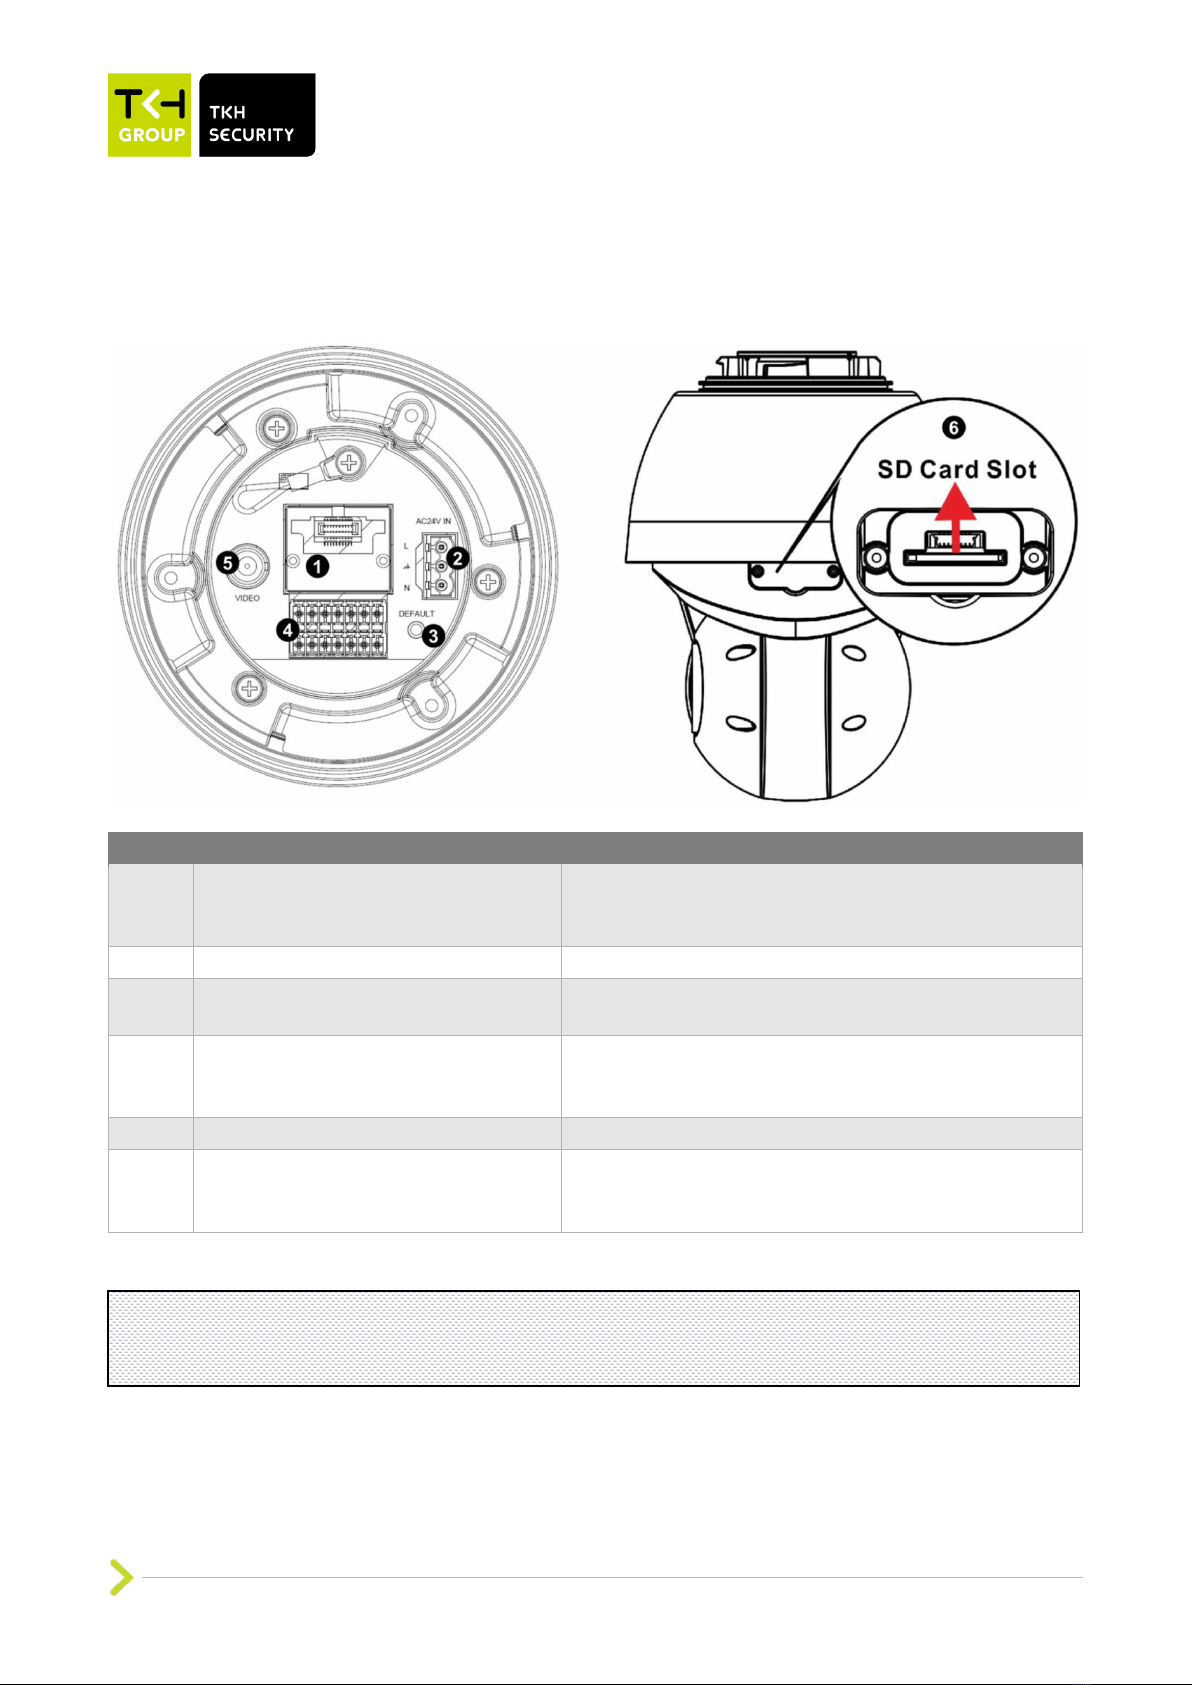
2.4 Connectors
PD900 connectors
Nr
Connector
Definition
1
Power Connector (12 VDC)
12 VDC power connection (selected models)
2
Console Connector
This connector is used by manufacturer for support
and diagnostics.
3
RJ-45 Port
For network communications and optional UPoE
power supply. Contact TKH Security for a
compatible UPoE injector.
4
Power (24 VAC)
24 VAC power connection
5
BNC
Analog video output
6
Audio/Alarm I/O & RS-485
Audio/Alarm I/O and RS-485 connection
Do not connect external power to the alarm I/O
connector of the camera.
7
Reset button
Press the button with a proper tool for at least 20
seconds to restore the system.
8
SD card slot
Insert the SD card into the card slot to store videos
and snapshots. Do not remove the SD card when
the camera is powered on.
Note: It is not recommended to continuously (24/7) record with the micro SD card, as the
camera may not support long-term continuous data read/write. Contact the manufacturer of
the micro SD card for information about the card’s reliability and life expectancy.

Our Brands: FlinQ | iProtect | Park Assist | ParkEyes | Siqura | VDG
Installations in over 80 countries
TKH Security B.V. | +31 182 592 333 | info.nl@tkhsecurity.com | tkhsecurity.com
Meridiaan 32
2801 DA, Gouda
The Netherlands
PD900/PD910/PD920
January 4, 2021
Installation ManualPD900/PD910/PD920
Page 13
PD910 connectors
Nr
Connector
Definition
1
Power Connector (12 VDC)
12 VDC power connection (selected models)
2
RJ-45 Port
For network communications and optional UPoE
power supply. Contact TKH Security for a
compatible UPoE injector.
3
Power (24 VAC)
24 VAC power connection
4
Reset button
Press the button with a proper tool for at least 20
seconds to restore the system.
5
Audio/Alarm I/O & RS-485
Audio/Alarm I/O and RS-485 connection
Do not connect external power to the alarm I/O
connector of the camera.
6
BNC
Analog video output
7
SD card slot
Insert the SD card into the card slot to store videos
and snapshots. Do not remove the SD card when
the camera is powered on.
Note: It is not recommended to continuously (24/7) record with the micro SD card, as the
camera may not support long-term continuous data read/write. Contact the manufacturer of
the micro SD card for information about the card’s reliability and life expectancy.
Our Brands: FlinQ | iProtect | Park Assist | ParkEyes | Siqura | VDG
Installations in over 80 countries
TKH Security B.V. | +31 182 592 333 | info.nl@tkhsecurity.com | tkhsecurity.com
Meridiaan 32
2801 DA, Gouda
The Netherlands
PD900/PD910/PD920
January 4, 2021
Installation ManualPD900/PD910/PD920
Page 14
PD920 connectors
Nr
Connector
Definition
1
Network connection point:
SFP option: for SFP module
RJ45 option: for UPoE Ethernet
Use the adapter of RJ-45 or SFP based on the
application.
2
Power (24 VAC)
24 VAC power connection
3
Reset button
Press the button with a proper tool for at least 20
seconds to restore the system.
4
Audio/Alarm I/O & RS-485
Audio/Alarm I/O and RS-485 connection
Do not connect external power to the alarm I/O
connector of the camera.
5
BNC
Analog video output
6
SD card slot
Insert the SD card into the card slot to store videos
and snapshots. Do not remove the SD card when
the camera is powered on.
Note: It is not recommended to continuously (24/7) record with the micro SD card, as the
camera may not support long-term continuous data read/write. Contact the manufacturer of
the micro SD card for information about the card’s reliability and life expectancy.
Our Brands: FlinQ | iProtect | Park Assist | ParkEyes | Siqura | VDG
Installations in over 80 countries
TKH Security B.V. | +31 182 592 333 | info.nl@tkhsecurity.com | tkhsecurity.com
Meridiaan 32
2801 DA, Gouda
The Netherlands
PD900/PD910/PD920
January 4, 2021
Installation ManualPD900/PD910/PD920
Page 15
3Connect cables
This section gives instructions for connecting the camera.
The models are IP66-rated to prevent water from entering the camera. However, water may still
enter the camera if the camera is not properly installed. Therefore, make sure to strictly follow the
steps below before you connect any cables.
1. Make sure that all cables and the power adapter are in a dry and water-proof environment,
for instance waterproof boxes. This is to prevent moisture accumulation inside the camera
and moisture penetration into the cables, which may lead to device breakdown.
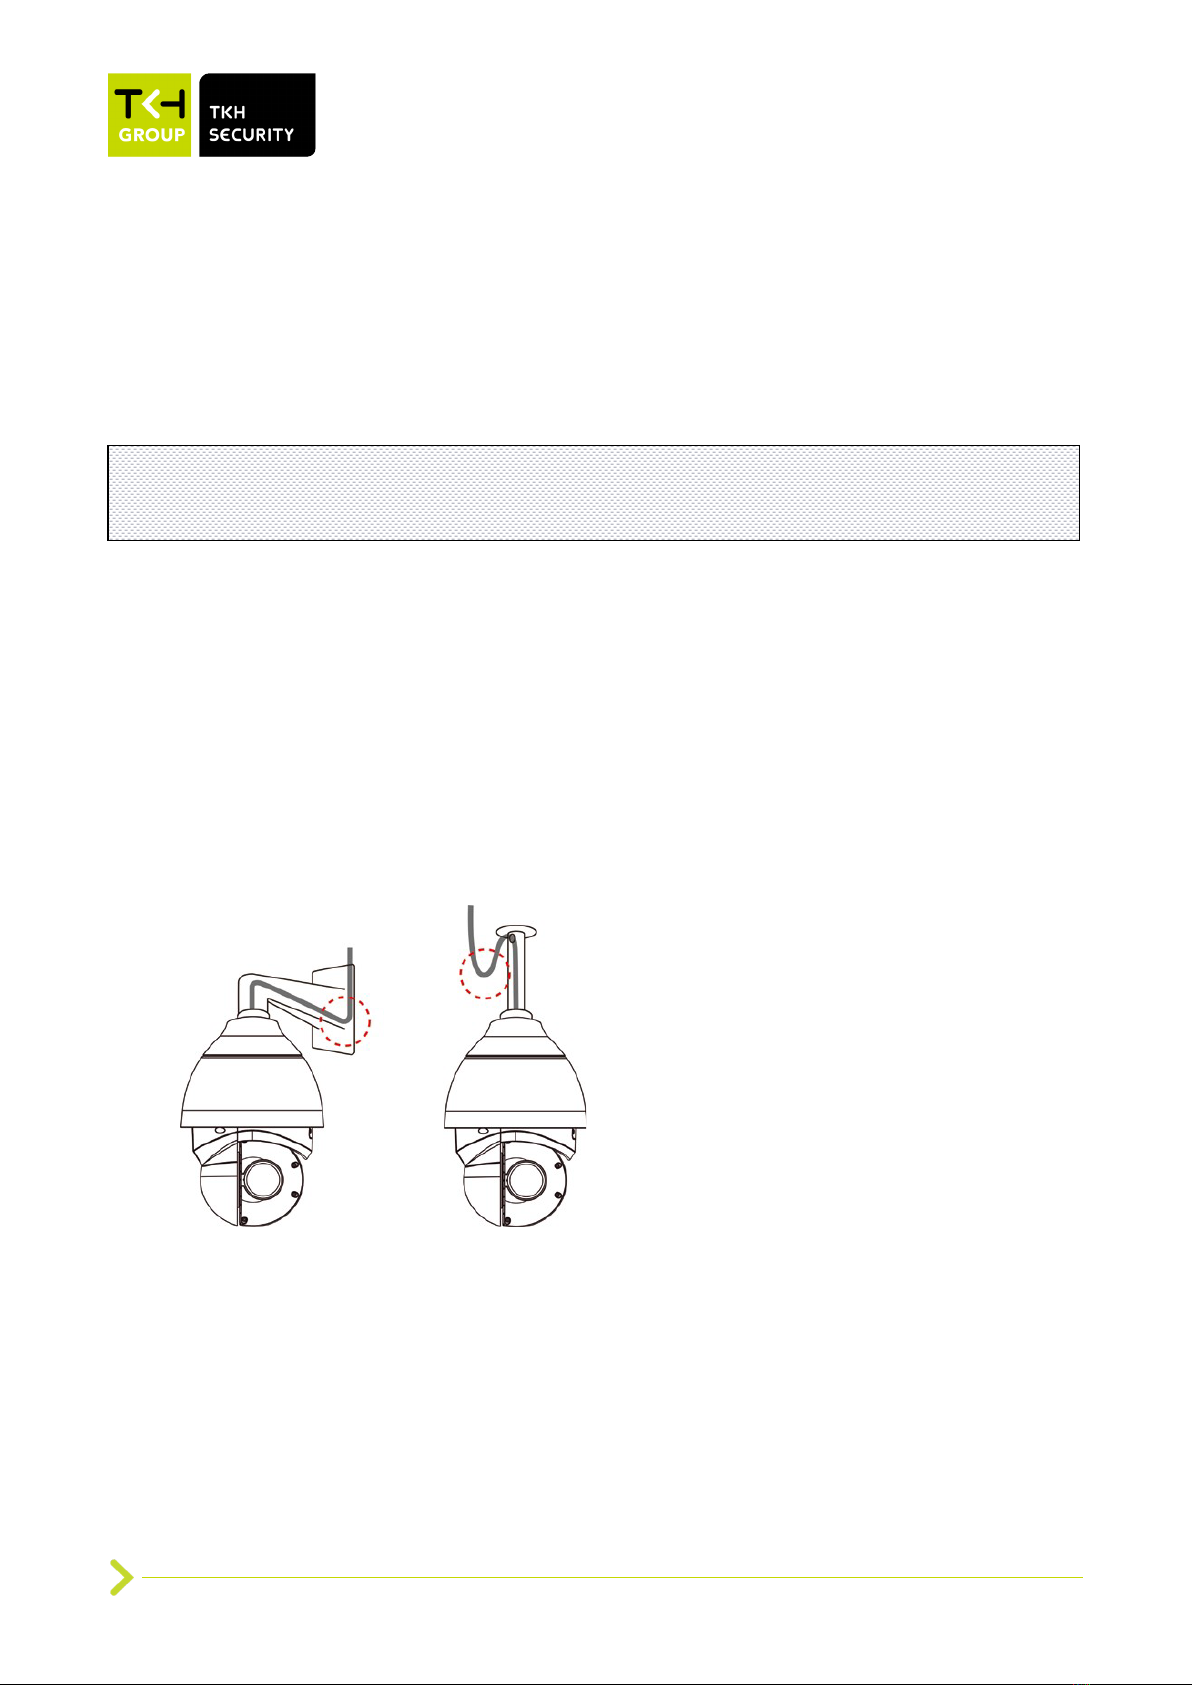
2. While running cables, slightly bend the cables to a U-shaped curve to make a low point (as
shown below). This is to prevent water from entering the camera along the cables from
above.
3. Seal the cable entry hole of the mounting kit (see below) with thread seal tape to prevent
water from entering the camera.
4. Fasten the M4 security screw with rubber on the cap.
Caution:
The camera shall be installed by qualified personnel only.
Installation shall be in accordance with local procedures.

Our Brands: FlinQ | iProtect | Park Assist | ParkEyes | Siqura | VDG
Installations in over 80 countries
TKH Security B.V. | +31 182 592 333 | info.nl@tkhsecurity.com | tkhsecurity.com
Meridiaan 32
2801 DA, Gouda
The Netherlands
PD900/PD910/PD920
January 4, 2021
Installation ManualPD900/PD910/PD920
Page 16
5. If the long sky mounting or J-type (Candy Cane type) bracket is used, the rubber stopper is
designed to stop the ingress of condensation water inside the J-type bracket. Sudden
temperature changes may cause excessive condensation on the inner side of the J-type
tube. The below picture shows how the rubber stopper and cabling should be installed on
the tube adapter. The wider side of rubber stopper shall be at the top of cap. To seal of the
rubber stopper additional silicon-grease (O-ring grease) is essential. Apply the outdoor rated
silicone grease or sealant on the areas indicated by red dots.
Please note: security screw must be properly installed to avoid water ingress to the camera
housing. Outdoor rated silicone sealant should also be added before the screw is fitted.
The tube adapter thread is NPS 1.5” type
(https://en.wikipedia.org/wiki/National_pipe_thread) which is an straight thread in- and
ouside. Teflon tape should be used to seal the threads when attaching the tube adapter to
the bracket pipe or coupler. Refer to chapter 4 for installation guide of NPS-NPT coupler.
Note: The accessory “Rubber stopper” is available for PD900 and PD910.
6. The cables shall be applied with electrical plumber tape to prevent shortage caused by
water.

Our Brands: FlinQ | iProtect | Park Assist | ParkEyes | Siqura | VDG
Installations in over 80 countries
TKH Security B.V. | +31 182 592 333 | info.nl@tkhsecurity.com | tkhsecurity.com
Meridiaan 32
2801 DA, Gouda
The Netherlands
PD900/PD910/PD920
January 4, 2021
Installation ManualPD900/PD910/PD920
Page 17
3.1 Connect Power
To power up the camera:
Connect the DC 12V (selected models) or the AC 24V power adaptor to the power connector of the
camera and the power outlet. See the diagram and pin definitions below for AC 24V power
connection.
24 VAC power connector
Pin
Definition
1
24 VAC L
2
GND
3
24 VAC N
12 VDC power connector (selected models)
Pin
Definition
1
12 VDC -
2
12 VDC +
Alternatively, connect an Ethernet cable to the RJ-45 connector of the camera, and use a UPoE
power injector/switch to power the camera up. Consult TKH Security for more advise on the choise
of UPoE powering devices.

Our Brands: FlinQ | iProtect | Park Assist | ParkEyes | Siqura | VDG
Installations in over 80 countries
TKH Security B.V. | +31 182 592 333 | info.nl@tkhsecurity.com | tkhsecurity.com
Meridiaan 32
2801 DA, Gouda
The Netherlands
PD900/PD910/PD920
January 4, 2021
Installation ManualPD900/PD910/PD920
Page 18
Zero Downtime Power (ZDT) Switching (selected models)
If you connect the DC 12V power jack and PoE at the same time, the power input will come from the
DC 12V connector.
If the DC 12V power source fails, the camera will seamlessly switch power input to the RJ-45
port, until the DC 12V power source is restored.
3.2 Connect Ethernet cable
For Ethernet cable connection, follow these steps:
1. Connect one end of the Ethernet cable to the RJ-45 connector of the camera.
2. Plug the other end of the cable to the network switch or PC.
3. Check the status of the power and the network activity indicator LEDs. If a LED is unlit,
check the corresponding connection.
•The green link LED is lit when there is a good network connection.
•The orange network LED flashes to indicate that there is network activity.
3.3 Connect Audio/Alarm I/O and RS-485
See the diagram and pin definitions below for audio/alarm I/O and RS-485 connection.
Pin
Definition
Pin
Definition
1
Audio OUT
8
RS-485 D-
2
GND (Audio I/O)
9
Alarm IN 4
3
Alarm OUT A1
10
Alarm IN 3
4
Alarm OUT A2
11
Alarm IN 2
5
Alarm OUT B1
12
Alarm IN 1
6
Alarm OUT B2
13
GND (Alarm I/O and RS-485)
Note: In some cases, Ethernet crossover cable may be needed when connecting the camera
directly to the PC.

Our Brands: FlinQ | iProtect | Park Assist | ParkEyes | Siqura | VDG
Installations in over 80 countries
TKH Security B.V. | +31 182 592 333 | info.nl@tkhsecurity.com | tkhsecurity.com
Meridiaan 32
2801 DA, Gouda
The Netherlands
PD900/PD910/PD920
January 4, 2021
Installation ManualPD900/PD910/PD920
Page 19
7
RS-485 D+
14
Audio IN
Our Brands: FlinQ | iProtect | Park Assist | ParkEyes | Siqura | VDG
Installations in over 80 countries
TKH Security B.V. | +31 182 592 333 | info.nl@tkhsecurity.com | tkhsecurity.com
Meridiaan 32
2801 DA, Gouda
The Netherlands
PD900/PD910/PD920
January 4, 2021
Installation ManualPD900/PD910/PD920
Page 20
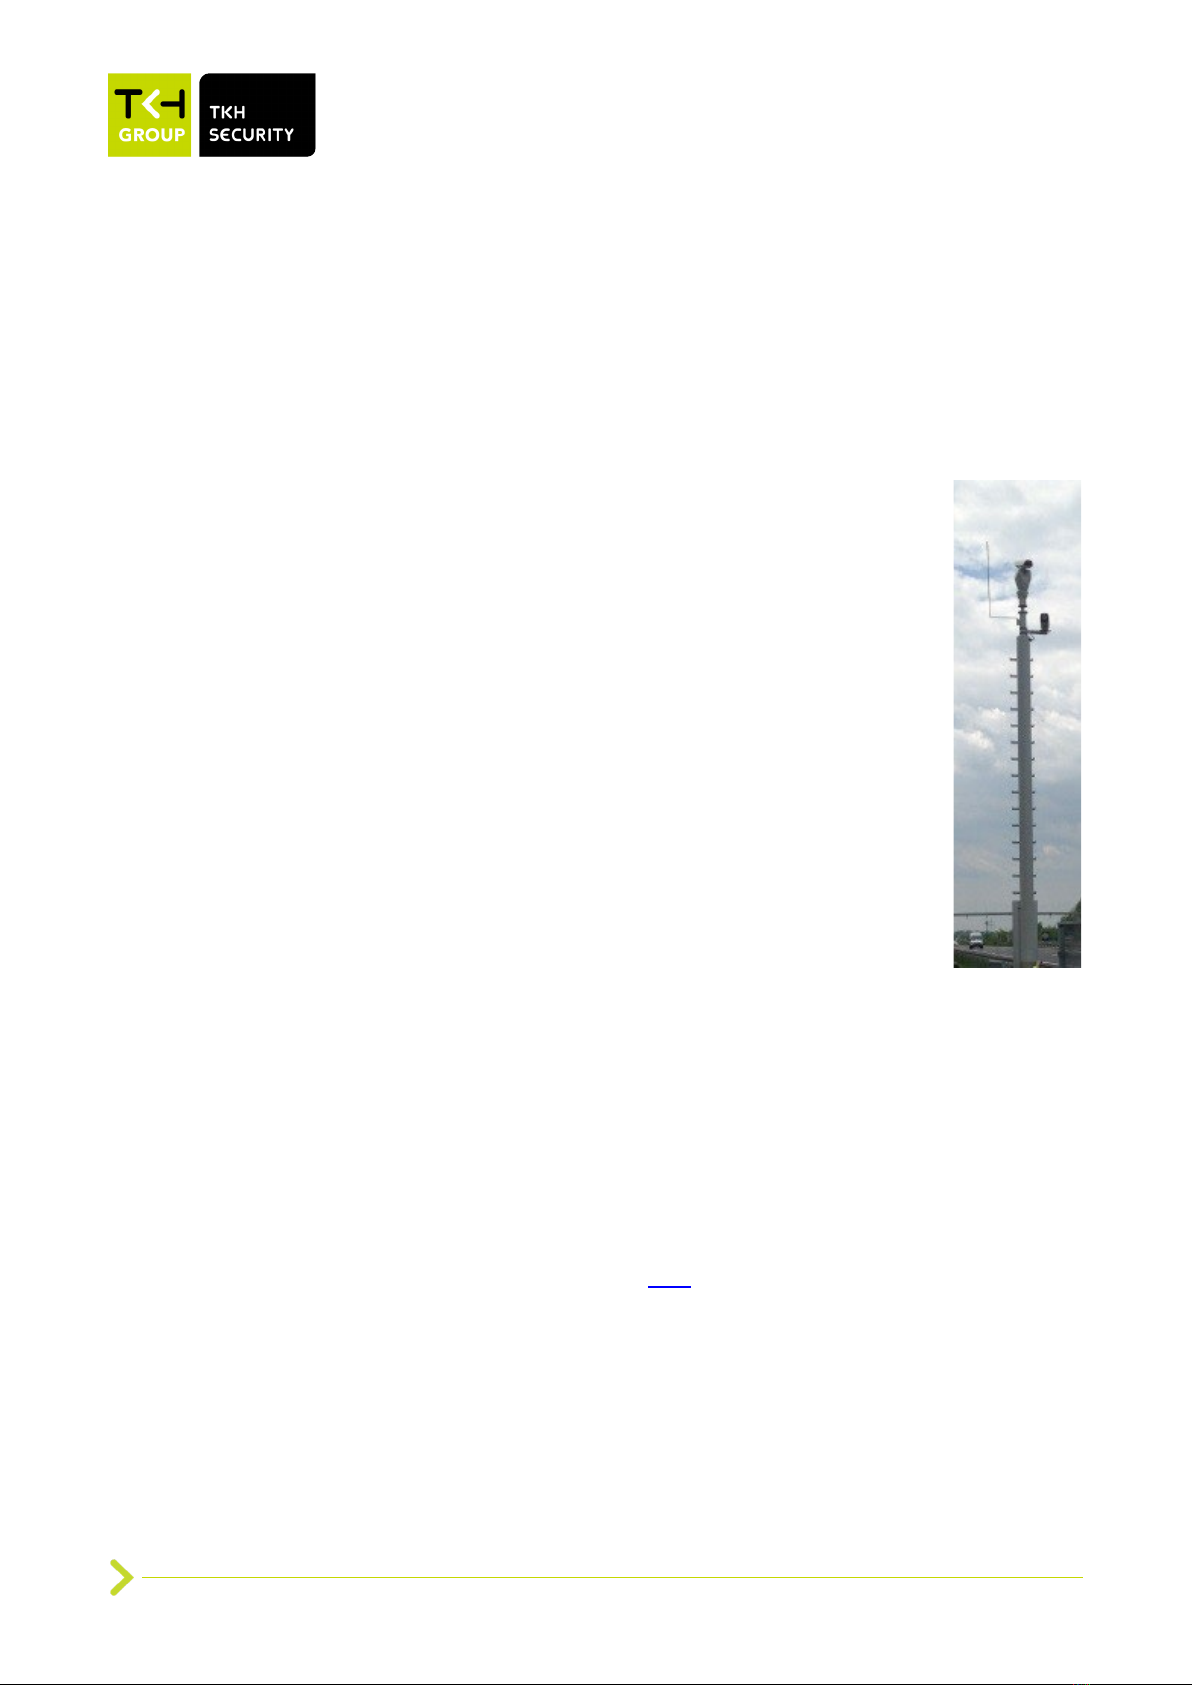
3.4 Surge protection
Protection against lightning strikes (direct and indirect)
Additional protection against direct or indirect lightning strikes is required according the IEC 62305
series standards, or equivalent standards. Consideration shall be given to the following:
•The use of properly earthed air-termination rods for pole mounted or high mounted cameras
(see illustration on the right)
•Avoid wiring loops
•Locate protection devices close to the protected equipment (within 1m)
•Keep wiring to protection devices short.
Ethernet port surge protection
Outdoor Ethernet wiring with or without PoE needs additional surge protection at
both ends:
•Close to the camera, to protect the camera and close to the Ethernet switch
or PoE injector, at the building entry.
•An external surge protector with isolation transformer in the signal lines, like
AETEK SD-101 or SD-201 is recommended.
Note: Surge protectors with gas-discharge tubes (GDTs) only shall be
avoided (*).
•Make sure the surge protector is properly grounded
•Make sure the camera housing is properly grounded
Prevent ground loops.
•Shielded Ethernet cable is preferred
•The AETEK I69-200 or I69-200-V2 UPoE injector has built in surge protection
up to 12kV, so in this case surge additional protection is only required at the
camera side.
PoE injectors for PD900/PD910/PD920 shall support following:
- PoE+ 802.3at class 4 for PD900
- UPoE with PoE Handshaking for PD910/PD920
- PoE++ 802.3bt type 3 class 6 for PD950/PD980
(*) This is because of the fact that GDTs do not trigger at the same time. A differential surge voltage
with a very fast rise time is created by the GDT being triggered one after another. The surge can
cause current to flow into port on one conductor in the cable and back out of the port on another
conductor in the same cable. Through Ethernet transformer coupling, this will induce a surge on the
secondary side of the transformer, potentially damaging the Ethernet transceiver chip (often on the
surveillance camera). More information, please refer to here
(https://incompliancemag.com/article/designing-ethernet-cable-ports-to-withstand-lightning-surges/).
This manual suits for next models
2
Table of contents
Other TKH Lighting Equipment manuals


