TM Stagetec Systems digital PA Service manual

Unit 6, 476 Gardeners Rd, Alexandria, NSW 2015 Phone +612 8011 0500 Email info@tm-systems.com.au
Administrator Guide
Desk 16 Mini
(Standalone)
Version 1.0
February 2022

IMPRINT
Manual - Version 1.0
February 2022, Australia
Published as a digital PDF document
Publisher
tm stagetec systems
Unit 6 / 476 Gardeners Road Alexandria NSW 2015
Tel.: (02) 8188 0500
Fax: (02) 8072 1858
Email: info@tm-systems.com
Managing Director: Treva Head
General Manager: Mark Lownds
This document is subject to changes without prior notification.
All rights reserved.

1. Introduction.................................................................................................................. 1
2. Product Description ................................................................................................. 2
3. Getting Started............................................................................................................ 3
4. Device Configuration ............................................................................................... 4
5. Operation.....................................................................................................................12
6. Technical Specifications.......................................................................................14
7. Device Pinouts...........................................................................................................15
8. Dimensions.................................................................................................................16
CONTENTS

1. INTRODUCTION
Thank you for choosing tm stagetec systems’s Desk 16 Mini – Standalone.
We created the Desk 16 Mini as a high quality paging microphone for Audio over IP networks. It boasts a 2 port
Ethernet switch (1x 1Gb Copper and 1x SFP cage - allowing for various fibre or copper connections), Dante Network
audio, Mic Input, Line Input, Line Output, an inbuilt speaker with volume control and GPIO.
The Desk 16 Mini is powered by PoE (Power over Ethernet) or runs via an external PSU. Redundancy is provided
between both power sources.
The Desk 16 Mini (Standalone) supports up to 8 paging and 8 intercom zones routable over a Dante network.
Please read this manual before attempting to operate your new device to ensure reliable operation for years
to come. For any additional questions that are not addressed in this document, feel free to contact tm stagetec
systems directly.
1

2. PRODUCT DESCRIPTION
2
2.1 Interfaces
SFP Transceiver Cage
LAN Port (optional PoE)
12 to 48vDC Input
Audio & Control (DB9)
AES Port

3
3. GETTING STARTED
3.1 What’s in the box?
Start by removing the Desk 16 Mini from its shipping carton and check it for possible damage. Also check whether
all accessories have been supplied.
Please be careful while unpacking as sharp edges may cause injuries.
The shipping carton contains:
• Desk 16 Mini
• Gooseneck Microphone
• Power Supply
• Owner’s manual
If anything appears to be missing, please contact tm stagetec systems.
3.2 Installation
Install the Desk 16 Mini in the designated location. Please be aware that the chosen installation location should be
a dry area that is not subjected to extreme heat and has suitable ventilation.
Never remove the outer casing of the Desk 16 Mini under any circumstance. Doing so may compromise electrical
safety and mechanical protection. Be aware that any modification to the unit will void warranty.
3.3 Connections
Powering the device
Please use the supplied power supply to power the device by connecting the phoenix connector to the power input
of the Desk 16 Mini. Be sure to follow all local safety regulations regarding power connections.
Alternatively, if you have a switch with POE (Power Over Ethernet) capabilities you may connect an ethernet cable
from the switch to Lan Port 1 on the Desk 16 Mini to power it.
Sockets/Interfaces
Now you are ready to establish all required connections. The following sockets are provided:
• RJ45 ethernet connection (POE enabled)
• AES In/Out (RJ45) - Not available on standalone model
• SFP cage for fibre or copper SFP
• DB9 Connection for Line level audio and GPIO connections.

4. DEVICE CONFIGURATION
4
Accessing the device web interface
Configuration of the Desk 16 Mini is performed via a web browser individually for each device. Please read the
following page for information on how to configure the device.
Software
• Web browser – Internet Explorer 8 or later
• iOS – from 6.1.3 or later
• Safari – from 6.0.3 or later
• Firefox
• Google Chrome
To access the web interface of a Desk 16 Mini, you have two options:
1. Power up the Desk 16 mini and connect it to a computer via ethernet or fibre. Enter the device’s IP address into
a web browser. You can find a devices IP address using Audinate Dante Controller software, available from: www.
audinate.com/support/softwaredownload/ DanteController
2. Using the device name of the Desk 16 Mini with the .local suffix. i.e. “DIOB-xxxxxx”. In a web browser, go to
address “http://DIO-B-XXXXXX.local”
When accessing the web page, you will be prompted provide a password to login, by default this is “password”

5
Menu - Status
Upon login, you will be directed to the device status page. Here, information regarding the installed software
version, Dante configuration and network settings are displayed. You will also have access to the device
configuration menu. Here you have the following options
Status
Status information
System
System configurations
Inputs
Configuration of INPUTS
Outputs
Configuration of OUTPUTS
Dante Metering
Metering of Dante receivers and transmitters
GPIO
Configuration of device general purpose I/O
Save Configuration
Storing the configurations
Download Configuration
Downloading the configurations
Restore Configuration
Restoring configurations
Factory Reset
Restore the device to its default settings
Reboot
Reboot the device
Logout
A configuration session remains active for 30 minutes.
To prevent abuse, please logout after completing the
configuration.

6
Device Status Page

7
Menu - System
The System tab contains the Dante device and network configuration settings. Such as:
Device Name - This is the name that will
appear in Dante Controller.
Password - This sets the password for
accessing the device web interface.
Dante Redundancy - This displays the current
Dante redundancy mode of the device
Dante Redundancy after Reboot -
This parameter is used for setting the Dante
redundancy mode of the device. These changes
are applied after a device reboot.
Dante Preferred Master Clock - This option sets the device as the preferred leader clock for the Dante Network.
Dante Receive Latency - This parament sets the receive latency for the Dante receivers.
Dante Channels per Flow - This sets the amount of channels included in a Dante Unicast flow.
The system tab also allows for the
configuration of the Desk 16 mini’s
IP address settings for both network
ports. As well as monitoring the clock
status of the Dante interface, and
bandwidth utilization.

8
Inputs – Channels
Inputs – Channels
The Input – Channels tab allows for
control over the analog inputs of the
Desk 16 Mini.
CH 1 of the Desk16 mini is dedicated
to the panels gooseneck microphone.
Here you can adjust the input gain
and automatic level control settings.
The Input - Names tab allows for the
configuration of the channel names
of the Desk 16 Mini’s Dante module.
Changes here will be displayed under
the device in Dante Controller.

9
Outputs – Icom Buttons
The Outputs – Icom Buttons tab is the
configuration menu for the panels
button labels. Labels configured
here with be displayed on the Desk
16 Mini’s OLED display while the
corresponding button is pressed.
10
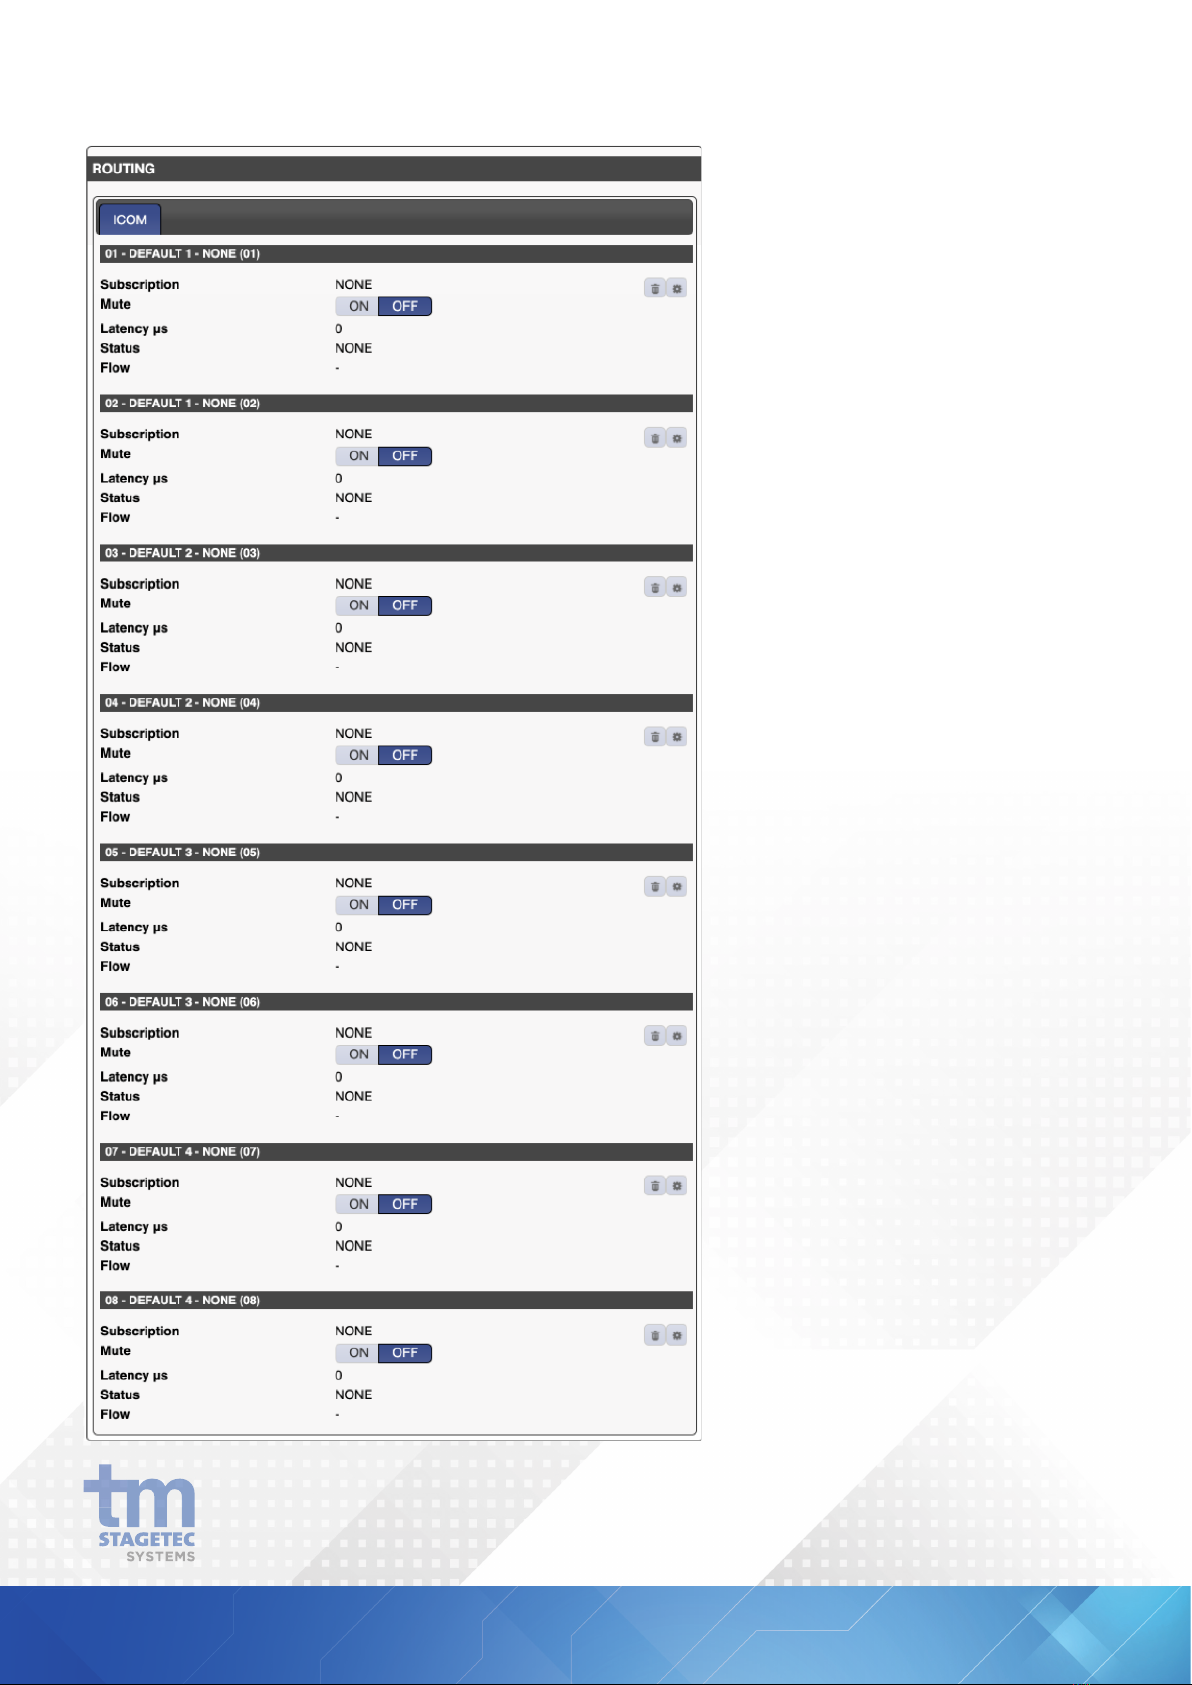
Outputs – Routing
Under the Menu option Outputs -
Routing the following settings are
available for ICOM outputs:
1.Use the trash can symbol to clear
the subscription of the respective
Dante output.
2.Use this button to select the input
signal of the respective
3.Enables or Disables the output.

11
Outputs – Names
Dante Metering – Receivers
Dante Metering – Transmitters
Under the Menu option Outputs - Names you are able to change the name of each output.
Under the Menu option Dante Metering - Receivers you are able to access the level meters for each input.
Under the Menu option Dante Metering - Transmitters you are able to access the level meters for each output.

5. OPERATION
The Desk 16 Mini features 16 multifunction buttons. On the Standalone model, the first 12 are assigned to
Dante Transmitters of the device, with each button sending the microphone out a single Dante Transmitter or a
combination of Transmitters. The final 4 buttons are assigned to functions of the panel.
12

13
When a button is pressed, the panels microphone input is routed out the corresponding Dante Transmitter(s).
When a signal is received on a Dante receiver, the corresponding button/channel will flash, and the signal will be
routed to the built-in monitor speaker.
Volume Down – Decreases the volume of the panel’s built-in speaker.
Volume Up – Increases the volume of the panel’s built-in speaker.
Answer – When a page is received, pressing the Answer key will route the microphone out the corresponding
output to where the signal was received. i.e If a page is received on Dante receiver 2, the answer key will route the
microphone out Dante Transmitter 2.
Up to 8 Desk 16 Mini’s can be used in a simple intercom system, without any external matrix mixers. With an
external Matrix, the system can be scaled further.

14
6. TECHNICAL SPECIFICATIONS
Balanced Inputs Balanced Outputs
Connection Type DB9 DB9 Connector
Channel - 1 x Balanced,
- Max input level +24dBu - 1 x Balanced,
- Max output level+24dBu
Sample Rate 48kHz (24bit) 48kHz (24bit)
Dynamic Range > 95dB (A weighted) > 97dB (A weighted)
THD - < -83dB 1kHz +18dBu input - -6dBFs output - < -86dB 1kHz -6dBFs - 18dBu ouput
Frequency Response 20Hz -20kHz 20Hz -20kHz
Channel Gain Control +6dB to -12dB in 0.5db increments +20dB to -57dB in 0.5db increments
Soft Clipper N/A N/A
External Volume Control N/A N/A
Input (Microphone)
Input Gain Block +55.5 to -12dB in 0.75db lncrements
Dynamic Range > 95dB (A weighted) unity gain ,-112 dBu EIN 150ohm reference -50dBu input level
Frequency Response 20Hz - 20kHz
THD < -80dB 1khz OdBu input ,-3dBFs output
Attack TC 6ms to 2000ms
Release TC 24ms to 786430ms
Hold 2ms to 87491ms
Noise Gate Threshold 30 to -77db relFS
Phantom Power +48v selectable
External DC output +24v 40ma
Power
External 12-48 Volts
Power Over Ethernet POE Switch required
Power 10 watts
Redundancy power is provided between both inputs
Ethernet/Dante
Input (RJ45 Connector)
Sample Rate 48 kHz (32bit)
Modes Transparent / Non Transparent
Redundancy 2 x Buffered inputs (via Dante)
GPIO
Inputs Opto Input - Max 5mA Sink
Output lsolated Output - 200V Max 150mA
Digital Audio
Input (RJ45 Connector)
Sample Rate 48 kHz (32bit)
Modes Transparent / Non Transparent
Redundancy 2 x Buffered inputs (via Dante)
Output (RJ45 Connector)
Sample Rate 48 kHz (32bit)

15
7. DEVICE PINOUTS
Front Panel 5 Pin XLR Connector
Function
Pin 1 GND
Pin 2 Mic +
Pin 3 Mic -
Pin 4 24V +
Pin 5 Mic LED

16
1. Line IN +
2. Line OUT+
3. GPI-CA
4. GPI+24
5. GPO-1
6. Line IN -
7. Line OUT -
8. GPI-1
9. GPO-CE
8. DIMENSIONS
Width - 165mm
Depth - 240mm
Front height - 30mm
Back height - 125mm
240mm
125mm
30mm
165mm
DB9 Female Connector

17
This manual suits for next models
1
Table of contents


