Toa IT-310M User manual

IR-310MINFRARED WIRELESS MICROPHONE
OPERATING INSTRUCTIONS
Thank you for purchasing TOA’s Infrared Wireless Microphone.
Please carefully follow the instructions in this manual to ensure long,
trouble-free use of your equipment.
TABLE OF CONTENTS
1. SAFETY PRECAUTIONS ......................................................................................................... 2
2. GENERAL DESCRIPTION ....................................................................................................... 3
3. FEATURES ................................................................................................................................. 3
4. HANDLING PRECAUTIONS .................................................................................................... 4
5. NOMENCLATURE AND FUNCTIONS ................................................................................... 4
6. BATTERY INSERTION ............................................................................................................. 5
7. WHEN OPERATING ON RECHARGEABLE BATTERIES ................................................... 6
7.1. How to Charge ....................................................................................................................... 6
7.2. Charging Timing .................................................................................................................... 7
8. OPERATION .............................................................................................................................. 7
9. INFRARED WIRELESS MICROPHONE USAGE TIPS ........................................................ 8
9.1. When Holding the Microphone By Hand or Hanging It Around the Neck ............................ 8
9.2. Setting the Microphone Sensitivity Selector Switch ............................................................ 8
9.3. Microphone-to-Mouth Distance ............................................................................................ 9
9.4. When Using the Clip ............................................................................................................. 9
10. CHANNEL SETTING ............................................................................................................ 10
11. TROUBLESHOOTING .......................................................................................................... 10
12. SPECIFICATIONS ................................................................................................................. 11
Accessory .................................................................................................................................. 11
Optional products ...................................................................................................................... 11
ON/OFF

2
1. SAFETY PRECAUTIONS
•Beforeinstallationoruse,besuretocarefullyreadalltheinstructionsinthissectionforcorrect
and safe operation.
•Be sure to follow all the precautionary instructions in this section, which contain important
warnings and/or cautions regarding safety.
•Afterreading,keepthismanualhandyforfuturereference.
Indicates a potentially hazardous situation which, if mishandled, could
result in death or serious personal injury.
WARNING
Indicates a potentially hazardous situation which, if mishandled, could
result in moderate or minor personal injury, and/or property damage.
CAUTION
WARNING
When the Unit is in Use
•Use TOA’s IR-310BC Battery Charger when
recharging.
The infrared wireless microphone can be
powered by optionally available nickel metal
hydride (NiMH) batteries. The use of any
otherthanthespeciedcharger couldresult
in re, personal injury or environmental
contamination due to battery rupture or
leakage.
•Stop charging if the batteries are not fully
charged within 3 hours. Failure to do so may
cause the batteries to re, explode, leak, or
heat.
•Never short-circuit the charging terminals
on the bottom of the microphone with metal
objects.
Doing so could result in electric shocks or
burns.
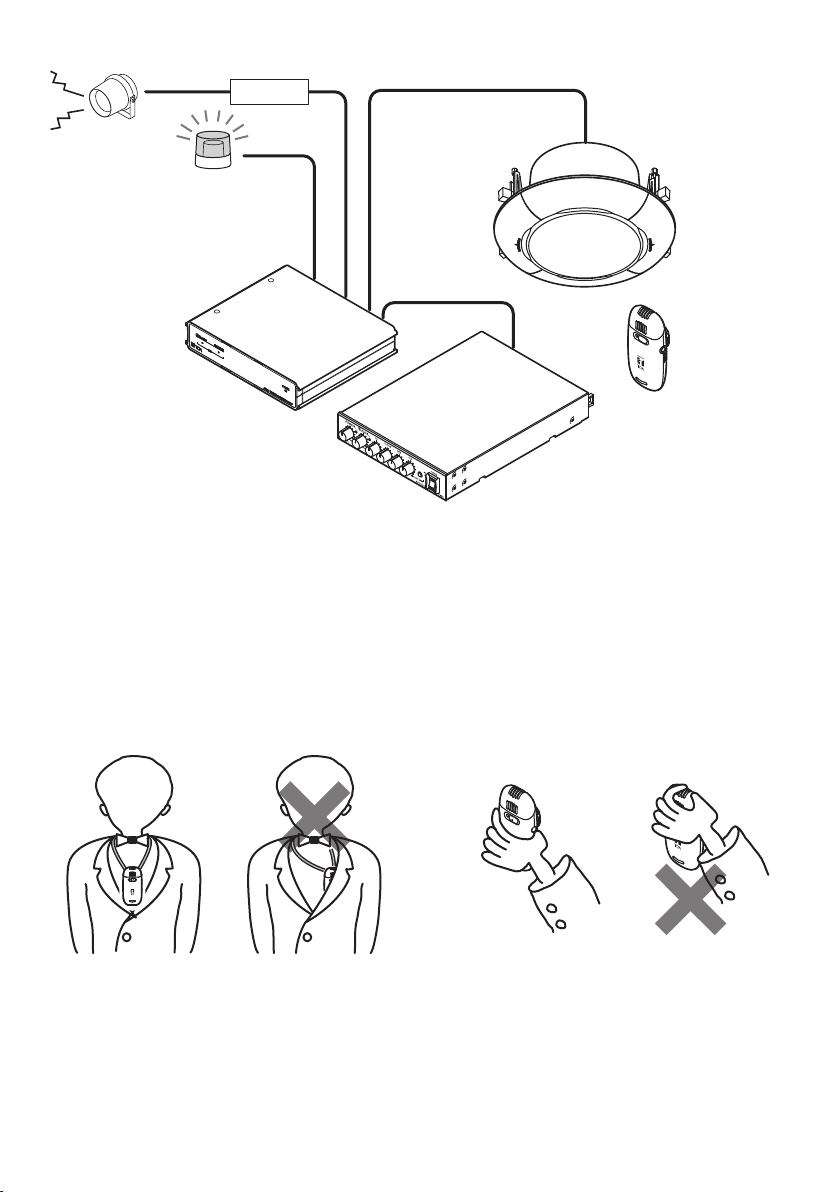
•To prevent the electromagnetic wave from
badly inuencing medical equipment, make
sure to switch off the unit’s power when
placing it in close proximity to the medical
equipment.
When the Unit is in Use
•When the unit is not in use for 14 days or
more, be sure to take the batteries out of
the unit because battery leakage may cause
a re, personal injury, or environmental
contamination.
•Makesuretoobservethefollowinghandling
precautions so that a re or personal injury
doesnotresult fromleakageorexplosionof
the battery.
·Be sure to use only the IR-200BT
RechargeableBatterydesignedforusewith
the infrared wireless microphone.
· Do not short, disassemble, heat nor put the
batteryintoare.
· Do not solder a battery directly.
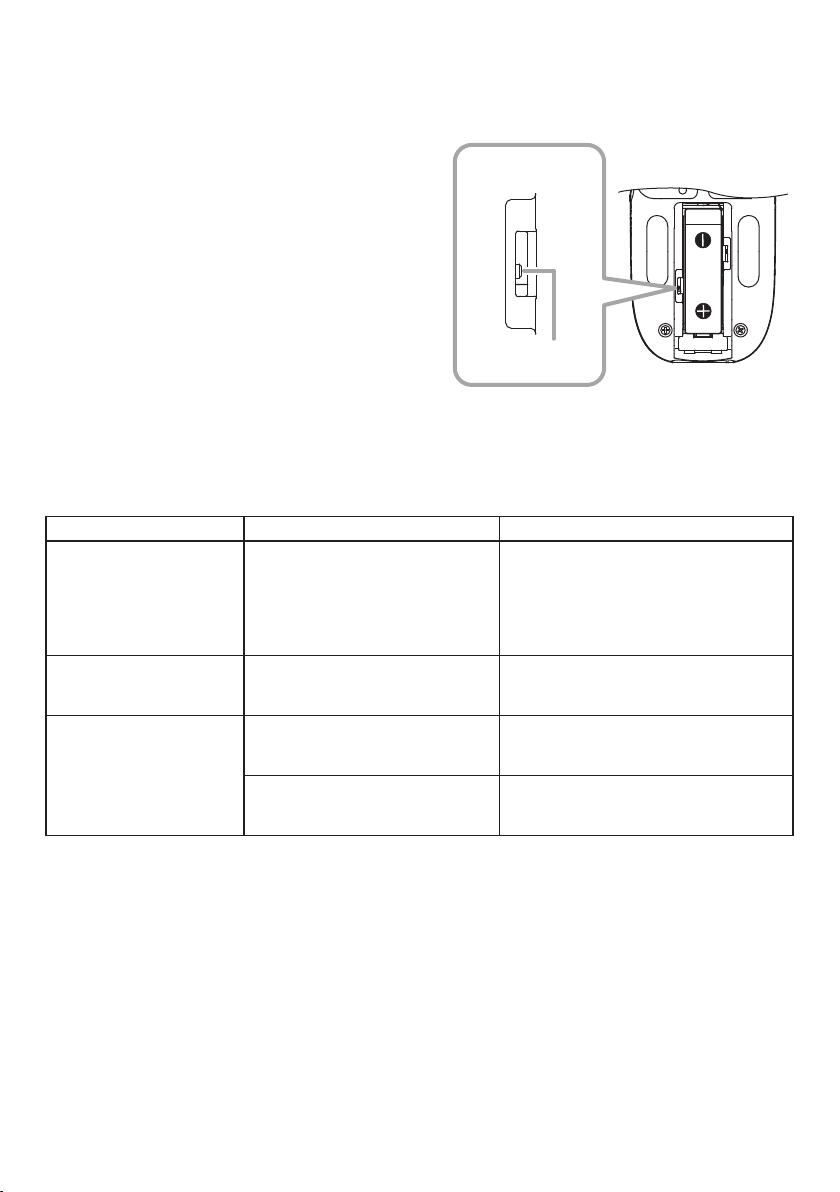
· Note correct polarity (positive and negative
orientation) when inserting a battery in the
unit.
·Avoid locations exposed to the direct
sunlight, high temperature and high humidity
when storing batteries.
•When you discard batteries, please contact
the local dealer from whom you bought.
CAUTION

3
2. GENERAL DESCRIPTION
TheIR-310M(hands-freetype)infraredwirelessmicrophoneisintendedforspeechapplications
and uses unidirectional electret condenser microphone unit featuring high sensitivity and clear
sound.
3. FEATURES
• Selectableoneof2differentfrequencies.
•EquippedwithaFunctionbuttontocontrolexternalequipmentlikepagingsystem,strobe
light or message repeater when using with the unit in conjunction.
(This function is enabled only when the unit’s transmitting frequency is set to Channel "A.")
• PoweredbyanIR-200BTrechargeableNiMHbattery.
• TheIR-310Misequippedwithanexternalmicrophoneinputterminal,allowingittobeused
in combination with the Q-EM-77 Single Ear Microphone, YP-M301 Headset Microphone, or
WH-4000H Headset Microphone.
• The microphone system’s infrared transmission eliminates problems with interference
or eavesdropping, allowing simultaneous use in adjacent conference rooms or school
classrooms.
ThisdevicecomplieswithPart15oftheFCCRules.Operationissubjecttothefollowing
two conditions:
(1) this device may not cause harmful interference, and
(2) this device must accept any interference received, including interference that may cause
undesired operation.
AnymodicationsmadetothisdevicethatarenotapprovedbyTOACorporationmayvoid
the authority granted the user by the FCC to operate this equipment.
FCC Compliance
Note: This equipment has been tested and found to comply with the limits for a Class B digital
device, pursuant to Part 15of the FCC Rules. These limitsare designedto provide reasonable
protection against harmful interference in a residential installation. This equipment generates,
uses and can radiate radio frequency energy and, if not installed and used in accordance with
the instructions, may cause harmful interference with radio communications. However, there is
no guarantee that interference will not occur in a particular installation. If this equipment does
cause harmful interference to radio or television reception, which can be determined by turning the
equipment off and on, the user is encouraged to try to correct the interference by one or more of
the following measures:
• Reorientorrelocatethereceivingantenna.
• Increasetheseparationbetweentheequipmentandthereceiver.
• Connecttheequipmentintoanoutletonacircuitdifferentfromthattowhichthereceiveris
connected.
• Consultthedealeroranexperiencedradio/televisiontechnicianforhelp.

4
5. NOMENCLATURE AND FUNCTIONS
4. HANDLING PRECAUTIONS
• Donotcovertheinfraredwirelessmicrophone’sinfraredemitterwiththehandorhidethe
microphone by placing it inside clothes. Covering the infrared emitter will disable light
transmission.
• AvoidusingtheinfraredmicrophoneincloseproximitytoplasmadisplaysorinfraredLAN,
which could lead to noise or microphone malfunctions.
• Donotdismantleormodifytheinfraredmicrophone.
• Takecarenottodroptheinfraredmicrophoneontheoororhititonhardobjects,asthis
could lead to microphone failures.
• Theinfraredmicrophonecannotbeusedoutdoorsorinareasexposedtodirectsunlight.
• Do not place the infrared microphone in high-temperature locations, such as in a car
parked with its doors closed in summer, or in highly humid locations, as this could lead to
microphone failure.
• Avoidusingtheinfraredmicrophoneinlocationsthatcanbesplashedwithperspirationor
seawater, as this could lead to microphone failures.
• Whencleaningtheinfraredmicrophone,besuretoturnthepowerswitchtoOFF.Wipewith
a soft dry cloth. If it gets very dirty, use the soft cloth slightly moistened in neutral cleanser.
Never use volatile spirits like thinner, benzine, or alcohol. Such chemicals may damage its
plastic surface.
• Cleanthechargingterminalsregularlyusingadrycottonswab.Dirtyterminalscancause
poor electrical contact and cause batteries to be charged incorrectly.
FUNCTION
ON/OFF
MIC
A B
H L
[Inside of the cover]
[Top]
[Front][Left side] [Right side]
[Rear]
[Bottom]
1
2
3
4
5
6
7
8
9
10
11
12

5
1. Power switch
Push the switch to switch ON the unit’s
power.
To switch it OFF, push the switch again.
2. Power/battery indicator
Turning on the power switch causes this
indicator to come on, allowing it to also
function as a battery indicator.
This indicator continuously lights green while
the battery is fully charged, and gradually
changes to red as the battery becomes
weaker.
3. Built-in microphone
4. External microphone input terminal
Used to connect a headset microphone or
otherexternalmicrophone.
5. Infrared emitter
Transmits the infrared beam for communications.
6. Function button
This button can be used only when the
Channel selector switch (10) is set to "A"
position.
TheIR-801AFkeepsoutputtingChannelA’s
audio signals of the IR-310M and providing
a closed contact output while this button is
pushed.(Refertop.7"OPERATION.")
7. Clip
UsedtoxtheIR-310Mtothefrontofyour
clothes for hands-free use.
8. Battery cover
Contains the battery compartment.
Be sure to open and close the cover
correctly.
(Refertop.5"BATTERYINSERTION.")
9. Neck strap
Used to hang the infrared wireless
microphone around the neck.
(Refer to p. 8 "INFRARED WIRELESS
MICROPHONEUSAGETIPS.")
10. Channel selector switch
Set the selector switch to the desired
channel "A" or "B."
(Refertop.10"CHANNELSETTINGS.")
11. Microphone sensitivity selector switch
Used to select the microphone sensitivity.
(Refer to p. 8 "Setting the Microphone
Sensitivity Selector Switch.")
12. Charging terminal
(Refer to p. 6 "WHEN OPERATING ON
RECHARGEABLEBATTERIES.")
A B
H L
3
Arrow mark
IR-310M (rear) IR-310M (rear)
6. BATTERY INSERTION
Step 1. Switch the unit’s power OFF.
Step 2. Removethebatterycover.
Slide the battery cover in the direction of the
arrow while pressing on the arrow mark.
Step 3. Insert an IR-200BT rechargeable NiMH
battery, noting correct polarities (+ and –)
indicated in the battery compartment.
Step 4. Replacethebatterycoversecurely.
ON/OFF
IR-310M (front)
Power switch

6
IR-310M
IR-310BC
Charging indicator (red)
Full-charge indicator
(green)
CHARGE
FULL
ON/OFF
7. WHEN OPERATING ON RECHARGEABLE BATTERIES
When charging, never insert rechargeable battery other than the
specifiedIR-200BTbatteryintheIR-310M.
Charging any other than the IR-200BT battery may result in fire or
personal injury due to battery rupture.
CAUTION
Notes
• Whenoperatingonrechargeablebattery,theoptionalIR-310BCBatteryChargerisrequired.
• Forrechargeablebattery,besuretousetheoptionalIR-200BTbattery.Donotuseotherbattery.
7.1. How to Charge
Step 1. SwitchtheIR-310M’spowerOFF.
Note
Battery cannot be correctly charged if the power is
ON.
Step 2. Place an IR-200BT rechargeable battery in the IR-
310M.
(Refertop.5"BATTERYINSERTION.")
Step 3. Fully insert the IR-310M into the microphone
receptacleoftheIR-310BCBatteryCharger.
The IR-310BC’s charging indicator lights red and
charging begins.
Chargingiscompletedinabout3hoursandtheIR-
310BC’s full-charge indicator lights green.
Notes
• Insert the IR-310M so that both front sides of
theIR-310MandtheIR-310BCfacetothesame
direction as shown at right.
• Iftheredchargingindicatordoesnotlightevenif
theIR-310Mhasbeeninsertedintothecharger,
checktoseeiftheIR-310Mhasbeencorrectly
inserted.
• The IR-310M becomes warm after charging
completion, however this is not a failure.
Note: For more information, please read the instruction
manual enclosed with the IR-310BC Battery
Charger.

7
A B
H L
IR-310M (rear)
Channel selector
switch
[Inside of the
battery cover]
1
A B
ON/OFF
IR-310M (front)
Battery indicator
8. OPERATION
Step 1. ConrmthattheIR-310Mhasbeensetto
the desired channel "A" or "B."
(Refertop.10"CHANNELSETTING.")
Step 2. Switch the IR-310M’s power ON and
conrm that the battery indicator lights
green.
Step 3. (When wishing to use the Function button,
which is enabled only when the unit’s
transmitting frequency is set to Channel
"A.")
Push the Function button while speaking
into the microphone.
AudiosignalsarealsooutputfromtheIR-
801AF Audio Interface Unit, besides the
IR-801AF’scontactoutputisclosed.(See
thenextpage.)
Step 4. Switch the IR-310M’s power OFF after
use.
7.2. Charging Timing
As discharge progresses, the battery indicator’s color gradually
changes from green to red. If the indicator lights red during use,
charge the IR-310M immediately since the microphone will be
disabled several minutes after the indicator has lit red.
[Guidelines on the rechargeable battery operation time]
Continuous usage time: About 8 hours
Notes
• WhenusingtheIR-200BTrechargeablebatteryforthersttimeorwhenusingitafterithas
been stored for a long period of time, be sure to charge it before use.
• The IR-200BT battery is designed to cycle through about 500 charges and discharges.
Whenthemicrophoneoperationintervalbecomesextremelyshortafterprolongedrepeated
use, change the battery with a new one.
• Donotfrequentlyinsertandremovethemicrophonefromthechargerduringcharging,as
this couldreduce thenumberoftimesthattheIR-200BTcan beeffectivelycharged and
discharged.
FUNCTION
ON/OFF
23
Power switch
Function button
IR-310M (front)

8
9. INFRARED WIRELESS MICROPHONE USAGE TIPS
9.1. When Holding the Microphone By Hand or Hanging It Around the Neck
Note:
Do not cover the infrared wireless microphone’s infrared emitter with the hand or hide the
microphone by placing it inside clothes. Covering the infrared emitter will disable light transmission.
[Hands-free use] [Hand-held use]
[Correct] [Incorrect]
ON/OFF
ON/OFF
ON/OFF
[Correct] [Incorrect]
Hang the microphone around the neck so that
its infrared emitter is oriented toward the front.
Do not cover the unit’s infrared emitter with the
hand or hide the unit by placing it inside clothes.
Covering the infrared emitter will disable light
transmission.
IR-820SP
Infrared Wireless Speaker
IR-801AF
Audio Interface Unit
Speaker
Revolving light
IR-802T
Infrared Wireless Tuner
IR-310M
Infrared Wireless
Microphone
Audio output
Control output
Amplifier
ON/OFF
[Example of Function button usage]
Push the Function
button while speaking.
9.2. Setting the Microphone Sensitivity Selector Switch
Themicrophonesensitivitycanbesetto"H"(High)or"L"(Low).
To obtain better sound quality, it is recommended to set "H" position when hanging the microphone
aroundyourneckand"L"positionwhenholdingitbyhand.Inaddition,whenusingtheIR-310M
in conjunction with the optional microphone to be connected to the external microphone input
terminal, the following position settings are recommended to obtain better sound: "H" position for

9
About 5 – 10 cm
(2" – 4")
ON/OFF
9.3. Microphone-to-Mouth Distance
To obtain better sound quality, it is advisable that the
microphone be kept 5 – 10 cm (2" – 4") from the mouth.
For hands-free use, adjust the neck strap length so as to
position the microphone within this distance range.
Note
Do not speak loudly with the microphone close to the mouth
(within 5 cm or 2").
The voice will sound muddy and hard to hear.
A B
H L
IR-310M (rear)
Microphone sensitivity
selector switch
[Inside of the
battery cover]
2
H L
the Q-EM-77 Single Ear Microphone and "L" position for the YP-M301 or WH-4000H Headset
Microphone.
Ifreproducedvoicesaredistorteddependingontheenvironmentofuse,setthesensitivityto"L"
position.
Notes
• Besuretoswitch the unit’s power OFF before setting.
• Avoid bringing the microphone too close to your mouth or speaking too loud into the
microphone. Otherwise, reproduced voices may become muddy or cracking.
• Thesensitivityisfactory-setto"H"position.
Step 1. Check that the power is switched OFF,
thenremovethebatterycover.(Referto
p.5"BATTERYINSERTION.")
Step 2. Set the microphone sensitivity selector
switch to the desired position.
Step 3. Replace thebatterycase andtighten it
rmly.
9.4. When Using the Clip
Inthecaseofhands-freeuse,tokeeptheunitfrommoving,xittothefrontofyourclotheswith
the clip.
When clipping the microphone to your clothes front, use one of the clip tabs and orient the
microphone vertically as shown below.
Clip
IR-310M (rear)
Clip
Clothes

10
11. TROUBLESHOOTING
Symptom Possible cause Remedy
Battery indicator does
not light even if the
power is switched on.
•Batterypolaritiesnotcorrect.
•Speciedbatterynotused.
•Batterynotcharged.
•Reinsertbatteriescorrectly.
•ReplacethebatterieswiththeIR-
200BT rechargeable batteries for
the infrared wireless microphone.
•ChargeusingIR-310BCBattery
Charger.
When the power is
switched on, the battery
indicator lights red.
•Batterydischarged. •ChargeusingtheIR-310BCBattery
Charger.
Interferes with other
infrared microphone
being used
simultaneously.
•Twoinfraredwireless
microphones set to the same
channel.
•Setchannelscorrectly.
(Referto"CHANNELSETTING"
above.)
•Infraredwirelessmicrophone
used too close to the tuner.
•Keeptheinfraredmicrophoneat
least 50 cm (20") away from the
infrared tuner.
10. CHANNEL SETTING
Note: MakesurethattheIR-310M’schannelissettothedesiredchannel"A"or"B."
Step 1. Switch the unit’s power OFF.
(Refertop.5"BATTERYINSERTION.")
Note
If the channel is changed when the power
is on, the transmitting frequency changes
immediately and noises may occur.
Step 2. Removethebatterycover.
(Refertop.5"BATTERYINSERTION.")
Step 3. Set the channel selector switch to the
desired channel "A" or "B."
Step 4. Replacethebatterycoversecurely.
A B
H L
IR-310M (rear)
Channel selector
switch
[Inside of the
battery cover]
1
A B

11
Traceability Information for Europe
Manufacturer:
TOA Corporation
7-2-1,Minatojima-Nakamachi,Chuo-ku,Kobe,Hyogo,
Japan
Authorized representative:
TOAElectronicsEuropeGmbH
Suederstrasse 282, 20537 Hamburg,
Germany
12. SPECIFICATIONS
Battery One piece of IR-200BT-2 rechargeable battery for the infrared
wireless microphone (option)
Current Consumption Typ. 215 mA (1.2 V)
Infrared Emitter
Wavelength 870 nm (AM: Brightness modulation)
Modulation Method Frequency modulation
Carrier Frequency Channel A: 3.100 MHz
Channel B: 3.350 MHz
Transmission Distance
Approx.15mor50ft(inanunobstructedspace)
Tone Signal 32.768 kHz
Modulation Sensitivity ±4.8kHz(1kHz,whenSPLof84dBisinput)
Microphone Element Electret condenser microphone, Uni-directional
MaximumInputSound
Pressure
120dBSPL
Input Sensitivity
Adjustment
Adjustmentrange:2levels(High,Low)
FrequencyResponse 100 Hz – 12 kHz
Preemphasis 300 µs
Input External microphone input (ø3.5 monaural mini jack, phantom
powered)
Switch Power switch, Channel selector switch, Microphone sensitivity
selector switch, Function button
Indicator Power/battery indicator
Battery Operation Time Approx. 8 hours (when used with one piece of IR-200BT-2
rechargeable battery)
Operating Temperature 0 to 40 ºC (32 to 104 ºF)
Operating Humidity 90%RHorless(nocondensation)
Finish Control section: ABS resin, White
Filter section: Polycarbonate,opticalcutlter
Dimensions 54.2(w)x109(h)x27(d)(2.13"x4.29"x1.06")
Weight 95 g or 0.21 lb (with battery and strap)
Note: Thedesignandspecicationsaresubjecttochangewithoutnoticeforimprovement.
• Accessory
Neck strap .............................................................. 1
• Optional products
BatteryCharger: IR-310BC
Rechargeablebattery:IR-200BT-2(containing2pieces)

URL:http://www.toa.jp/
133-07-325-60
Table of contents
Other Toa Microphone manuals