Todays Healthy Home VC3000 User manual

OWNERS MANUAL
MODEL
VC3000/VS3000
Steamy 4000 / 3 Liter
VAPOR CLEANING SYSTEM
SAFETY INSTRUCTIONS
OPERATIONS
CARE AND MAINTENANCE
TROUBLESHOOTING
WARRANTY
BEFORE USING THIS VAPOR CLEANING SYSTEM
READ THESE INSTRUCTIONS CAREFULLY

CONTENTS
Page
Introduction 1
Important Safety Instructions 2
Grounding Instructions 3
Specifications 4
Unpacking the Vapor Cleaning System 5
Indicators and Controls 6
Attaching and Removing Accessories 7
Getting Started 8
Troubleshooting and Maintenance 9
Warranty 10

1
INTRODUCTION
Thank you for purchasing the Vapor Cleaning System.
Before using it, please read this manual completely.
With this purchase of the Vapor Cleaning System you have acquired a highly
effective cleaning system which will provide you with efficient cleaning
satisfaction.
Your Vapor Cleaning System uses only tap water, which, through heating, is
converted into vapor. The Vapor Cleaning System uses the power of vapor
heat to clean and does not require the use of any chemicals or other
additives. With the proper use of attachments, cleaning most surfaces is
easier and faster.
Product Features
Your Vapor Cleaning System has the following features:
Portable
Boiler is made of Stainless Steel
Weighs approximately 34 pounds with attachments
Produces heat of up to 275 degrees Fahrenheit
May works up to 3 hours without refilling
Adjustable Pressure up to 65 PSI
Automatic steam pressure relief cap
No chemicals or other additives are needed
Uses only tap water
WARNING!
* TO PREVENT SCALDING OR BURNING, KEEP BODY AWAY FROM
VAPOR OUTPUT NOZZLES.
* NEVER OPEN FILLER CAP WHILE THE VAPOR CLEANING SYSTEM IS
OPERATING.
* NEVER OPEN FILLER CAP WHILE THE VAPOR CLEANING SYSTEM
SHOWS ANY PRESSURE ON THE PRESSURE GAUGE.

2
IMPORTANT SAFETY INSTRUCTIONS
READ ALL INSTRUCTIONS BEFORE USING THE VAPOR CLEANING SYSTEM.
WARNING:
TO REDUCE THE RISK OF FIRE OR ELECTRICAL SHOCKS, FOLLOW ALL
INSTRUCTIONS EXACTLY.
When using the Vapor Cleaning System, always use basic precaution, including the
following:
1. Unplug the Vapor Cleaning System from outlet when not in use, or before servicing.
2. Do not allow the Vapor Cleaning System to be used as a toy. Close attention is necessary when the
system is being used around children. Never allow children to use or play with the system.
3. Use only as described in the manual. Only use original manufacturer attachments.
4. Do not use the Vapor Cleaning System with a damaged cord or plug. If the Vapor
Cleaning System has been dropped, damaged, left outdoors, or submersed in water, return
the System to the SERVICE CENTER.
5. Do not pull or carry the Vapor Cleaning System by the cord.
6. Do not use the cord as a handle. Never close a door on the cord. Never pull it around
edges or corners. Never run appliances over the cord. Keep cord away from heated surfaces.
7. Do not unplug by pulling the cord. To unplug, grasp the plug, not the cord.
8. Do not handle the plug with wet hands.
9. Do not allow objects to get into the output nozzles. Do not try to operate the Vapor Cleaning
System with any of the openings blocked. Keep opening free of dust, lint, hair, or
anything that might reduce the Vapor flow.
10. Keep all parts of the body away from output nozzles and moving parts of the System.
11. Use extra care when using the Vapor System on stairs.
12. Use extra care when cleaning around water sources (swimming pools, spas, toilets, etc.)
13. Do not use the Vapor System to clean animals.
14. Never point the steam toward humans or animals.
15. Turn off all controls before unplugging the Vapor System.
16. Do not fill the Vapor System with anything but clean tap water.

3
GROUNDING
WARNING!
Your Vapor Cleaning System MUST BE PLUGGED INTO A GROUNDED OUTLET
or electrical shock can occur. Check with a qualified electrician if you do not know if the
outlet is grounded.
Do not modify the plug provided with the Vapor System, if it will not fit the outlet, than
have a proper outlet installed by a qualified electrician.
NOTE:
In Canada, the use of a temporary adaptor is not permitted by the Canadian Electrical
Code.
NOTE:
In the event that an extension cord is used with this System, it must be a minimum of
14 gauge, 3 wire, grounded, SJ quality, 60 degree C.
THIS UNIT MUST BE GROUNDED
If the unit should malfunction or break down, grounding provides a path of least resistance of electrical
current to reduce the risk of electrical shock. The unit is equipped with a cord having equipment grounding
conductor and grounding plug. The plug must be inserted into an appropriate outlet that is properly
grounded in accordance with all local codes and ordinances.
This unit is designed for use with a normal 110/120 volt circuit, and has a grounded plug that looks like the
plug illustrated in sketch ( A ) . A temporary adaptor that looks like the one illustrated in sketch (B) or ( C
) may be used to connect the plug to a 2 pole receptacle as shown in sketch (B ) if a properly grounded
outlet is available. The temporary adapter should only be used until a properly grounded outlet sketch ( A )
can be installed by a qualified electrician.
Whenever the adapter is used, it must be held in place by a metal screw.

4
SPECIFICATIONS
MATERIAL STAINLESS STEEL
POWER SUPPLY 110/120 VOLTS
DIMENSIONS 17 X 12 X 11
MAX PRESSURE UP TO 65 PSI
WATER CAPACITY 3 LITERS
POWER CONSUMPTION 1400 WATTS
WEIGHT FILLED 32 POUNDS
MAX TEMPERATURE IN BOILER 298 DEG. F.
HEATING TIME UP TO 20 MINUTES
OPERATING TIME UP TO 3 HOURS

5
UNPACKING
* Do not open the box with a sharp tool.
* Carefully remove the unit from the packing carton.
* Check that all of the accessories shown are in the box. All of the
accessories are packed with the unit, so make sure you don’t
discard any of them with packing materials. If anything is
missing, contact your dealer.
ACCESSORIES
6
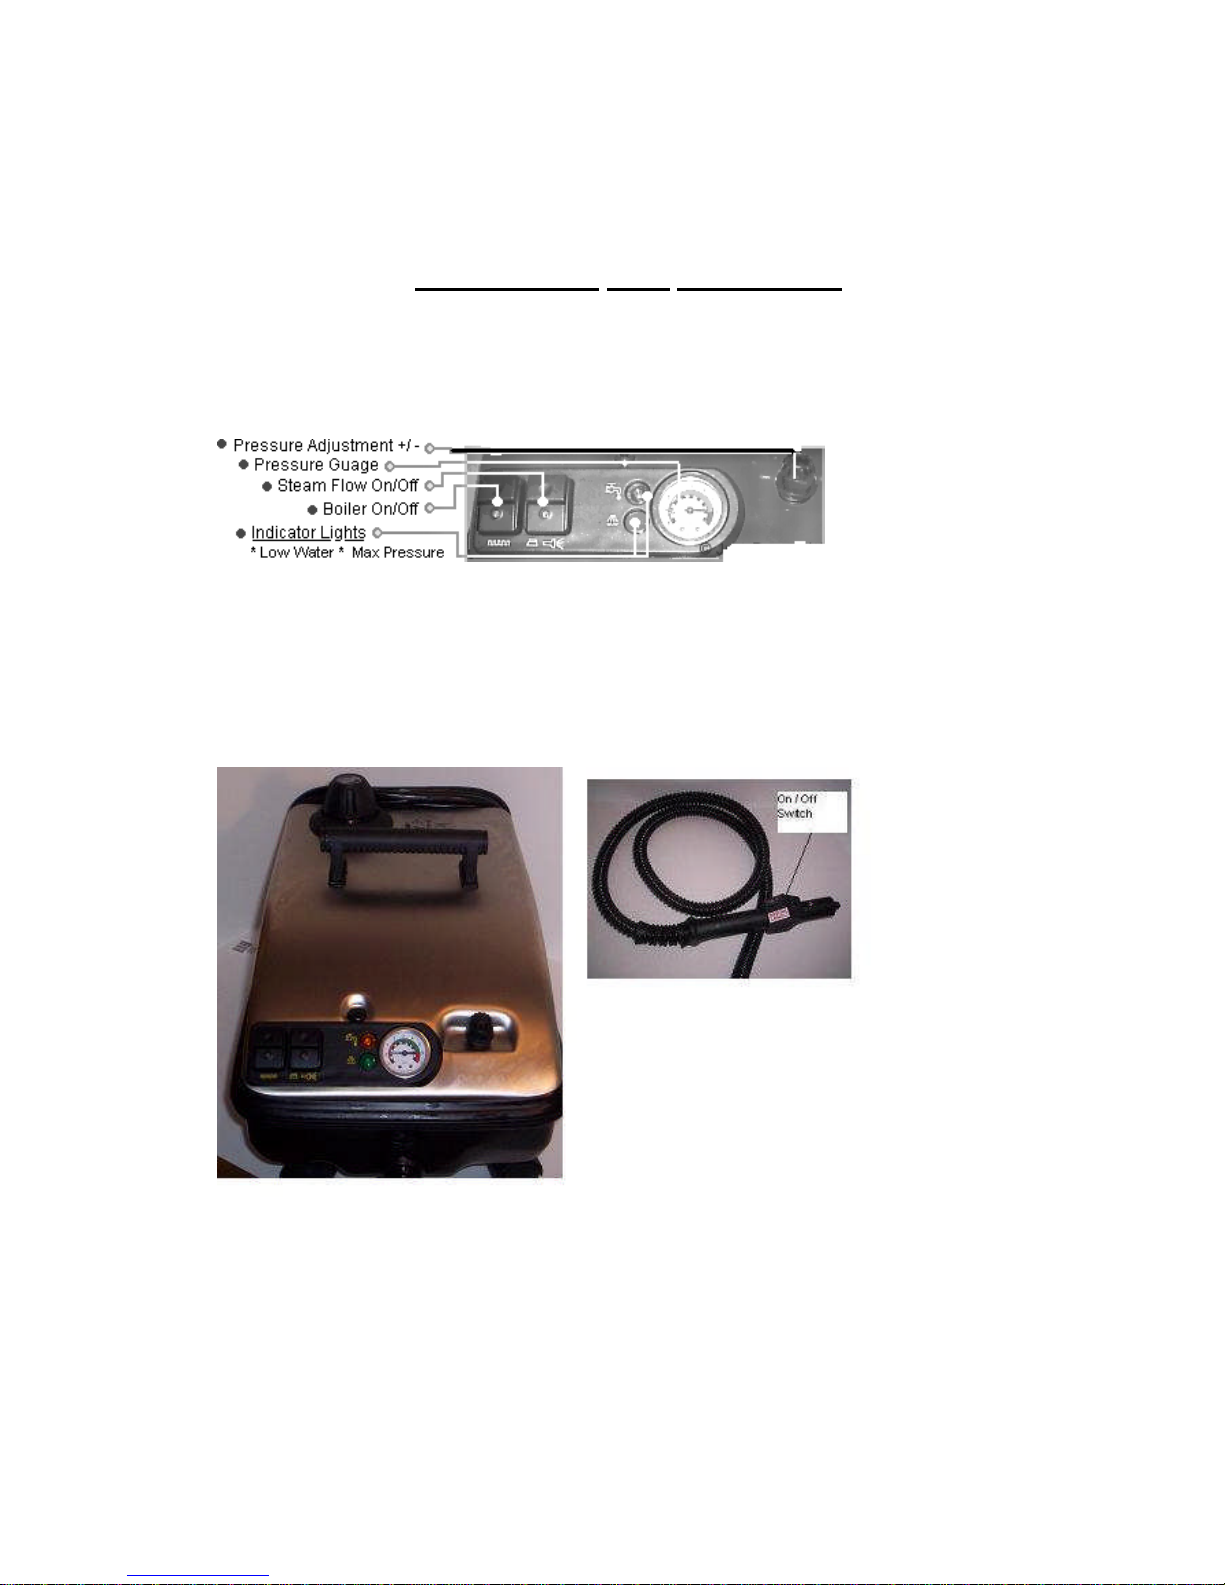
INDICATORS AND CONTROLS
Pressure Relief Cap
\ /

7
ATTACHING AND REMOVING
ACCESSORIES
1. Flexible Hose and accessories handle
All accessories attach to the handle with a button that’s snaps
through
a hole on the accessories.
2. Brush attachment ( Nozzle )
The brush attachment is easy to slide onto either the hose handle, or
the straight extensions. Make sure the attachment is pushed all the
way on, and the button snaps through the hole. To remove it, simply
push the button and slide the brush off.
3. Extension
Extensions may be used in any combination. They connect in the
same way as the brush attachment.
4. Large area brush
This can be used with or without extensions. It also attaches with the
Button.
5. Medium brush
This can be used the same way as the large area brush.
6. Medium round or triangle brushes
Push onto the end of the nozzle from the brush
attachment. Make sure you push them on firmly so they don’t fall off
while you are using them.
7. Small detail brushes
Push onto the nozzle from the brush attachment.
OUTPUT NOZZLES AND ATTACHMENTS WILL BE
EXTREMLY HOT!
TO AVOID INJURY, WARNING!
* Always make sure you have the steam trigger lock in the lock
Position before attaching or removing any of the attachments or
brushes.
* Never open the filler cap during operation
* Never open the filler cap when the unit is warm, or the pressure
gauge is not on zero
* Use caution and appropriate safeguards when
removing/attaching
accessories.

8
GETTING STARTED
STEP 1. Make sure the Vapor System is not plugged in and is cool,
and the pressure gauge must be on zero.
STEP 2. Press down the pressure relief cap and turn counter clockwise
until it comes out.
STEP 3. Place filler funnel into the tank opening and fill with 3 liters
of clean tap water. To replace cap, press down while turning
clockwise. Do not over tighten the cap.
STEP 4. Plug the power cord into a regular 110/120 grounded outlet.
STEP 5. Push the power boiler on/off switch and the steam on/off
switch (see page 6 ) into the “ON “position.
STEP 6. When the green steam ready light is on, the unit is ready for
use.
STEP 7. Hold the nozzle over the sink for a few seconds and turn the
steam switch (see page 6) into the on position to allow any
air that may be in the tank or hose to escape.
STEP 8. Wait for the green ready light until its stays on again.
During operation, the steam ready light will go on and off as the unit
requires more heat to maintain pressure.
When the low water indicator light comes on, you need to add water.
Go back to STEP 1 at the top of this page.
You can adjust the steam pressure by turning the Pressure Adjustment
Knob (see page 6).

9
TROUBLESHOOTING AND MAINTENANCE
MAINTENANCE:
Your Vapor System is made of high quality materials and requires very
little maintenance.
* After using, store your Vapor System in a dry safe place
* If you are not going to use it again for several weeks, it is advisable
to empty the tank. To do this, you must let the unit cool down
completely, then remove the Pressure Relief Cap, remove the
drain plug (see picture below) to empty the boiler tank completely.
* Always clean the Vapor System and the accessories after
each use. Do not leave the unit outside, overnight or in the rain.
* Do not allow water to get inside, other than in the boiler.
After approximately 20 hours of use, clean the boiler with the same
solution you clean your coffee maker. Pour the solution into to the tank;
let it sit for a few minutes, then remove the nut from the bottom of the
unit to allow it to drain completely.
TROUBLESHOOTING:
Heater On/Off switch or Vapor On/Off switch won’t turn on:
Check to see if the cord and plug are in good shape and the plug is
plugged into the outlet. Try another outlet, and then check the breaker
box.
The lights are on, but the system won’t steam:
Check the trigger lock on the handle.
Water has bad odor:
Clean the water tank as described in the MAINTENANCE section
above. If troubleshooting does not resolve the problem, call your dealer.

10
LIMITED WARRANTY
The factory warrants to the original purchaser that this product, excluding
accessories shall be free from defects in manufacturing and material, under
normal and reasonable use for a period of one year parts and labor. A lifetime
warranty is granted for the Boiler. Three years on parts from date of sale. The
sole and exclusive remedy under this warranty is repair or replacement at the
manufacturer’s option, of any product that proves to be defective in
manufacture or materials within the above stated period.
There will be no cash refunds on equipment that has been used.
For this warranty to apply, the owner must follow the instructions provided in
this manual completely. A copy of the original invoice must accompany the
unit when it is returned for service, together with a note explaining the
problem. It must be shipped, in a protective carton, preferable in the original
box if possible. The manufacturer recommends that the shipment be insured
against loss or damage in transit. The manufacturer or dealer is not
responsible for damage or loss in transit.
Certain parts of the equipment are not covered by warranty because in the
course of use, normal wear and tear will occur. Equipment not covered by
warranty includes: cords, hoses, switches, wheels and all accessories.
The warranty is void if:
1. Damage results from accident, misuse, fire, act of god, improper
operating, use of voltage other than indicated in this manual, or
unauthorized repair or alterations.
2. The product has been used with any substance other than clean tap
water.
3. The product has been used by an unauthorized person.
The manufacturer is not liable for any consequential or incidental damage,
including personal injury, property damage, or monetary loss that may be
incurred from purchase, use, or improper use of the product. Maximum
liability shall not exceed the purchase price of the product, paid by the original
purchaser. All expressed and implied warranties for this product, including
implied warranties of merchantability and fitness for a particular purpose, are
limited in duration to the warranty period, and no warranties, expressed or
implied, will exceed the warranty period. Some states do not allow the
exclusion or limitation or consequential damages, so the above exclusion may
not apply to you. This warranty gives you special rights which may vary from
state to state.
The factory does not authorize any party to assume any other warranty
obligation with the sale of this product.
For service please contact your dealer.
This manual suits for next models
1
Table of contents


