Toku TAB-300B User manual
AIR WINCH
TAW-300B
TAW-500
TAW-1000
TAW-1500A
TAW-2000
TOKU PNEUMATIC PRODUCTS
M A N U A L
INSTRUCTION MANUAL
Carefully read all instructions before operating
Or servicing any TOKU tools.
Air & Allied Sales (Pacic) Pty Ltd
Head Oce: 1/50 Success Street, Acacia Ridge, Brisbane, Queensland, Australia 4110
TOKU PNEUMATIC CO., LTD. No.3
14-04
www.air-allied.com.au
Air & Allied Sales (Pacific) Pty Ltd
www.air-allied.com.au

1
INTRODUCTION
Thank you for purchasing the Toku Air Winch.
This manual is a guide which will show you how to use the Air Winch safely and efficiently.
Please read the manual in its entirety and understand the contents before proceeding to
operate the Air Winch. Also convey this information to the actual operators of the winch.
The Air Winch was designed to operate on compressed air to pull or lift loads. As a result before
operating the Air Winch, it is necessary to also read the instruction manual for the compressor.
In addition, for proper regulations about usage of the Air Winch, consult the “ Crane safety
regulations standards “ Usage other than the ones written in this manual should be
performed safely and with responsibility.
Before reading the manual it is important to understand the following terms. Precautions
concerning safety, the following points should be obeyed.
◆With regards to the safety precautions, the following words are used to identify safety
messages in the manual.
△
! WARNING; This word is used on safety messages and labels where a potential
dangerous situation could result in serious injury or death if the hazard is not
avoided.
△
! CAUTION; This word is used in safety messages and on labels for hazards which could
result in minor or moderate injury if the hazard is not avoided. This word may
indicate hazards whose result could be damage to the equipment. Please also
note a caution mark can lead to serious injury depending on the situation.
◆ Store this manual nearby and read it over continuously.
◆ If this manual is damaged or is lost, immediately contact your dealer to have it replaced.
◆ If the winch is used by more than one person, please have the new person read this manual
before operating the winch.
◆ If the winch is transferred to another location, please make sure this manual is read by the
next operator/owner.
(Please note this manual contains general information about Precautions in operating the
purchased item, as a result some diagrams may not relate to the product.)
If you have any questions about the winch or the instruction manual, please contact:
Air & Allied Sales (Pacic) Pty Ltd
PLEASE UNDERSTAND THE FOLLOWING POINTS BEFORE
READING THIS MANUAL;
Air & Allied Sales (Pacific) Pty Ltd
www.air-allied.com.au

2
CONTENTS
Page
Introduction……………………………………………………………………………… 1
Contents………………………………………………………………………………… 2
Precautions concerning safety………………………………………………………… 3
Precautions during operation………………………………………………………… 5
Basic Precautions……………………………………………………………………… 6
Specifications…………………………………………………………………………… 7
Description of Parts…………………………………………………………………… 7
Preparation before operation………………………………………………………… 8
Before Operation………………………………………………………………………… 11
How to Operation……………………………………………………………………… 14
Maintenance and Inspection……………………………………………………………… 16
Trouble shooting………………………………………………………………………… 17
Air & Allied Sales (Pacific) Pty Ltd
www.air-allied.com.au
3
PRECAUTIONS CONCERNING SAFETY
△
! WARNING;
・When operating the Air Winch, obey the safety precautions stated in this manual.
△
! WARNING; Obey facility safety rules
・Operators who use the Air Winch must have training.
・Obey all facility rules, safety precautions and operational regulations.
・When operating the Air Winch jointly with a partner, make sure proper signals are
agreed upon before operating.
△
! WARNING; Wear proper clothing and safety equipment
・Wear proper clothing during operation of the Air Winch.
・Do not forget to wear a Helmet, safety boots and gloves when operating the Air
Winch. If the Noise level is high, it is necessary to wear ear protectors.
・Do not operate the Air Winch while wearing a tie or with open sleeves. It is possible
that these loose items may get rolled in with the cable or rope.
△
! WARNING; Safe operation starts from a stable position
・Do not operate the Air Winch in a unstable position. Always have good footing and a
stable base when operating the Air Winch.
△
! WARNING; Install hose and rope securely
・Make sure the rope is securely attached to the drum and clamped. Always keep a
minimum of 3 turns of rope left on the drum for safety. (To prevent the rope from
removing from the drum.)
△
! WARNING; Do not modify the Air Winch
・Do not remove screws or covers which are on the Air Winch.
・Do not modify and operate the Air Winch. It is a very dangerous practice.
The manufacture will not take any responsibility if a unit has been modified and an
accident results from the modification.
△
! WARNING; Do not use the rope or equipment as earth (ground)
・When performing welding operations, do not use the rope or Air Winch as ground or
earth. This may become the cause of an accident or breakage of the Air Winch.
Air & Allied Sales (Pacific) Pty Ltd
www.air-allied.com.au
4
△
! WARNING; Mount the Air Winch securely to the platform. And also secure using
bolts
・If the Air Winch is not securely attached to the platform with bolts, and the
attachment loosens, it will lead to major damages of the Air Winch and also will
cause a fatal accident.
△
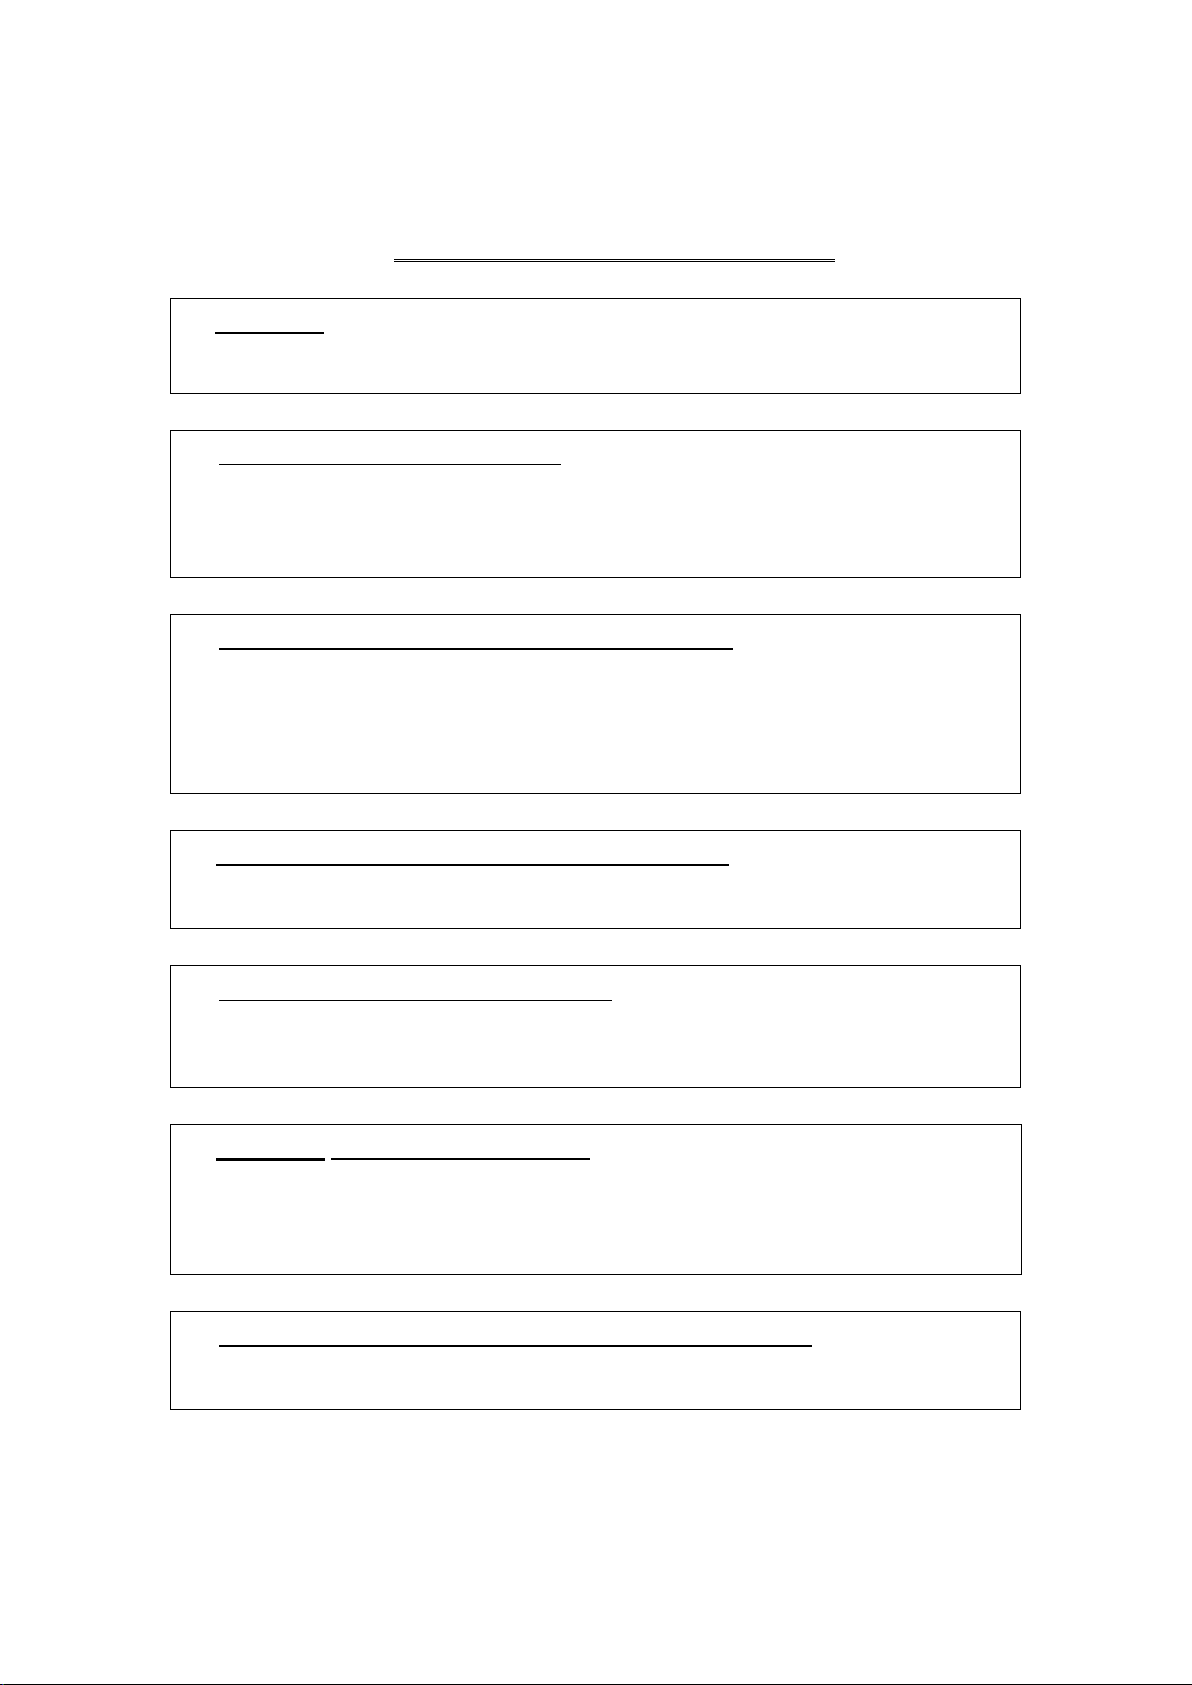
! WARNING; Do not use the Air Winch as a
lifting device for people
・The Air Winch is to pull or lift loads. Never lift
or pull people using the Air Winch.
△
!WARNING; Do not leave the site when using
the Air Winch
・Do not leave the job site when a load is on
the Air Winch. Always remove the load
before leaving the site.
△
! WARNING; When a load is lifted stay away
from the load
・When the load is lifted stay a minimum of 5
meter away from the lifted load.
△
! WARNING; Balance the load
・When using wire or a sling, make sure the
load is balanced before lifting.
△
!WARNING; Do not lift or lower the load
suddenly
・Do not lift or lower the load suddenly. The
load may loose its balance and may cause
an accident. Also it may lead to breakage of
the Air Winch as well and the rope/wire.
Air & Allied Sales (Pacific) Pty Ltd
www.air-allied.com.au

5
PRECAUTIONS DURING OPERATION
△
! CAUTION; Confirm signals when using the Air Winch with a partner.
When operating the Air Winch with a partner, make sure to confirm signals for safe
operation. Always obey the safety rules.
△
! CAUTION; Do not handle the operating switch when not necessary.
Do not operate the Air Winch until preparation is performed for lifting. This may lead to
un-safe preparation of the load and cause an accident.
△
! CAUTION; Do not over load the Air Winch.
Before operating the Air Winch make sure the load is within the rated load of the Air Winch
being used. Also, when pulling the load side ways, confirm the tensile strength of the rope
before proceeding.
△
! CAUTION; Do not over wind or proceed past the final 3 winds on the drum.
Over winding may result in override of rope from the drum.
Proceeding past the final 3 winds on the drum may lead to wire/rope override from the
drum.
If the rope falls from the drum it will cause a sudden shock to the load increasing the tension
on the wire/rope. It will also lead to an over load to the Air Winch causing a possible
accident.
Make sure the portion of the wire/rope which is connected to the drum is not directly holding
the load. It will release if the weight of the rated load is put on the connector. As s result it is
absolutely necessary to have a minimum of 3 winds of rope on the drum at all times.
△
! WARNING; Do not turn “clutch handle” OFF while loading material.
・ This air winch is equipped with a “Clutch” to link the air motor and drum and to
release the air motor and drum. If this “clutch handle” is set-off while loading any
material, the drum is set free, and it might cause an accident of dropping load
material after the rope is rapidly wound off by the tension of the wire rope.
Air & Allied Sales (Pacific) Pty Ltd
www.air-allied.com.au

6
BASIC PRECAUTIONS
△
! CAUTION; Keeping the area tidy is the first step to safety.
・Keeping the job site tidy is the first step to a safe environment.
・Keep the facility clean and neat at all times.
△
! CAUTION; Stay away from the job site if you are not operating the Air Winch.
・If you are not the operator, stay away from the job site, especially children.
△
! CAUTION; Difficult operations will lead to accidents.
・Do not use the Air Winch for operations over its capacity. These operations may lead to
damage to the Air Winch and should be avoided.
△
! CAUTION; Stop operating the Air Winch if trouble is detected.
・When operating the Air Winch, if trouble is found, immediately stop operating the Air
Winch and inspect or repair.
△
! CAUTION; Handle the Air Winch with care.
・Do not drop or hit the Air Winch externally. This will lead to cracks and damage the Air
Winch. Also do not stamp or engrave information directly onto the Air Winch. If a crack
develops, and air leaks through this crack, do not operate the Air Winch.
△
! CAUTION; Good maintenance will extend the life of the Air Winch.
・Keep a good maintenance program for the Air Winch and keep it clean.
△
! CAUTION; Periodic inspection of the Air Winch is basic safety.
・Periodic inspection of the Air Winch will allow your Air Winch to operate smoothly and
safely. Refer to the crane safety standards. Daily and monthly inspection programs
should be performed.
△
! CAUTION; For inspection or repair of the Air Winch, consult your dealer.
・Contact your dealer for repairs or inspection of the Air Winch. When parts need to be
replaced, use only genuine TOKU parts.
△
! CAUTION; Storage of the Air Winch is also very important
・Store the Air Winch away from children in a dry area. When storing the Air Winch for a
longer period of time, to prevent internal rust, apply 5 cc of lubrication into the air hose
and operate the hoist for 5 seconds.
Air & Allied Sales (Pacific) Pty Ltd
www.air-allied.com.au

7
SPECIFICATIONS
※ Conditions for speed and air consumption in above specification: Air pressure 0.6MPa,
Winding lated load, and winding 1st layer of drum.
※ Winding performance and air consumption fluctuates depend on operating air pressure,
layers of wind, winding load etc.
DESCRIPTION OF PARTS
TAW-300B 300 6 x 37 27 3.4 42 Rc 3/4 M10 x 4
TAW-500 500 8 x 61 20 3.4 75 Rc 3/4 M12 x 4
TAW-1000 1000 10 x 91 11.5 3.9 90 Rc 3/4 M12 x 6
TAW-1500A 1500 12 x 60 8.5 4.1 90 Rc 3/4 M12 x 6
TAW-2000 2000 16 x 45 5.7 4.9 130 Rc 3/4 M12 x 6
Air Supply
Inlet Size
(Inch)
Mounting Bolts
(Size x Q'ty)
Model
Rated
Load
(Kgf)
Wire rope
Dimensions
(mm x m)
Rope
Speed
(m/min)
Air
Consumption
(m3/min)
Weight
(Kg)
Air & Allied Sales (Pacific) Pty Ltd
www.air-allied.com.au

8
PREPARATION BEFORE OPERATION
1.Selection of a compressor and method of draining the system.
・Method of selection; (Please refer to the specification chart to see the air consumption
for each model.)
( Air Consumption × 10 ) × No. of units ≦ Horse Power of Compressor
・Method of Draining the system;
If water or oil accumulates inside the system, this will result in rust and eventually cause
damage or a breakdown. Before using the equipment, loosening the drain plug which is
located at the bottom of the tank on the compressor and drain the accumulated
water/moisture or oil. Make sure clean dry air is used. (For details and instructions refer
to the Compressor Instruction manual.)
2.Piping
△
! CAUTION; Install an air filter, regulator and line oiler near the air winch.
Size; 1B(25mm) is recommended. (To assure performance)
△
! CAUTION; Install a drain in the lowest area in your piping and drain the system
regularly.
If the air contains a lot of moisture or water, it may cause the silencer on the Air
Winch to freeze. Also it may lead to a breakdown due to rust developing inside
the Air Winch.
Air & Allied Sales (Pacific) Pty Ltd
www.air-allied.com.au
9
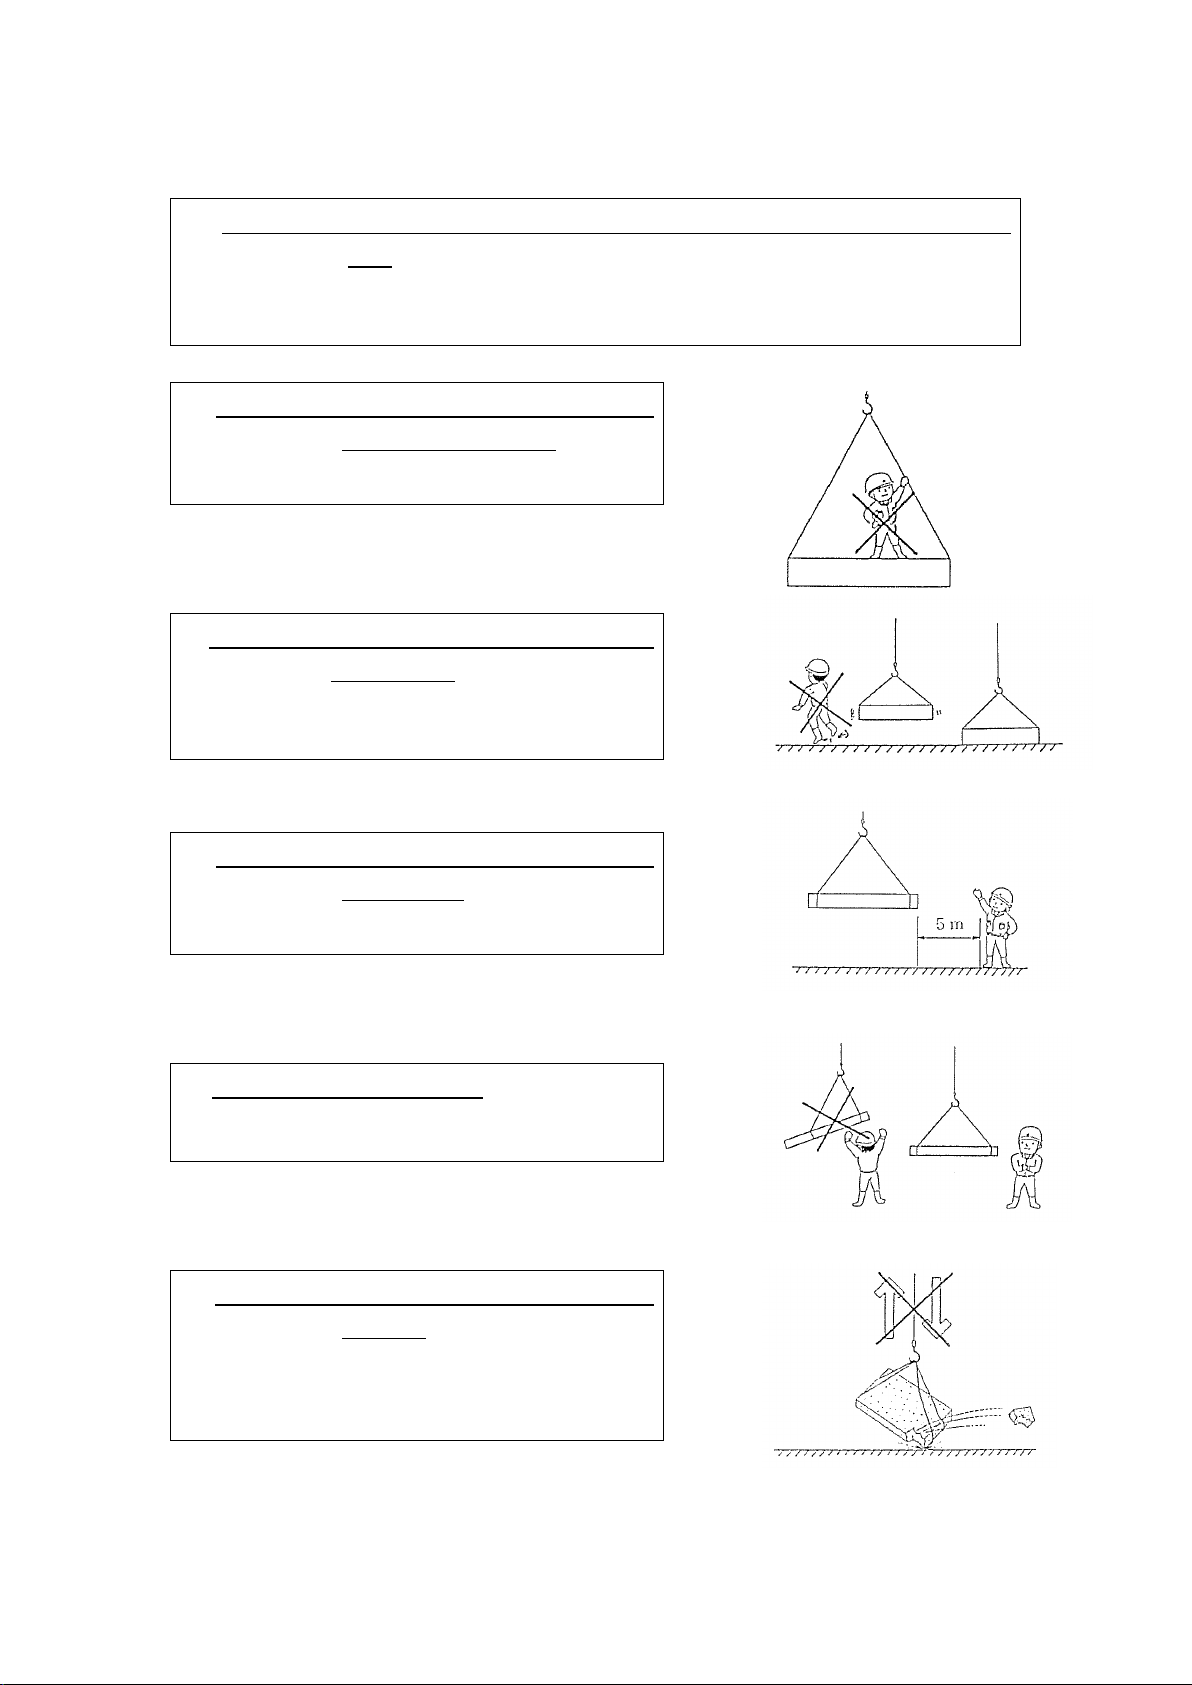
3.Preparation of Hose and connection
・Size of Hose;
The hose should have an inside diameter of 19mm.
△
! CAUTION; If the hose length is too long, this will result in reduction in air
pressure and reduce the power.
Please refer to the chart below concerning the reduction in air pressure.
Hose
Dimensions
Air
Pressure
Total length of hose; 10 Meters free air flow (m3/min)
(mm) (MPa)
1.50 2.00 2.50 3.00 3.50 4.00 4.50
19
0.4 0.0122
0.0216
0.0339
0.0447
0.0643
0.0840
0.1062
0.5 0.0106
0.0180
0.0282
0.0407
0.0536
0.0700
0.0886
0.6 0.0091
0.0156
0.0243
0.0348
0.0460
0.0600
0.0760
0.7 0.0079
0.0141
0.0213
0.0306
0.0402
0.0525
0.0664
25.4
0.4 0.0031
0.0055
0.0083
0.0121
0.0137
0.0189
0.0239
0.5 0.0026
0.0047
0.0069
0.0101
0.0121
0.0158
0.0200
0.6 0.0026
0.0040
0.0059
0.0081
0.0104
0.0135
0.0172
0.7 0.0020
0.0035
0.0053
0.0076
0.0090
0.0119
0.0150
(MPa)
※ Above table shows the volume of pressure loss at each air pressure level and
volume. The secondary air pressure at the hose outlet port is the volume deducted
each volume of pressure loss from the air pressure at the hose inlet port.
※ If the hose length is longer than 10m, the hose length and volume of pressure loss
are proportionally related. If the hose length is 20m, the volume of pressure loss is
double the volume on the above chart.
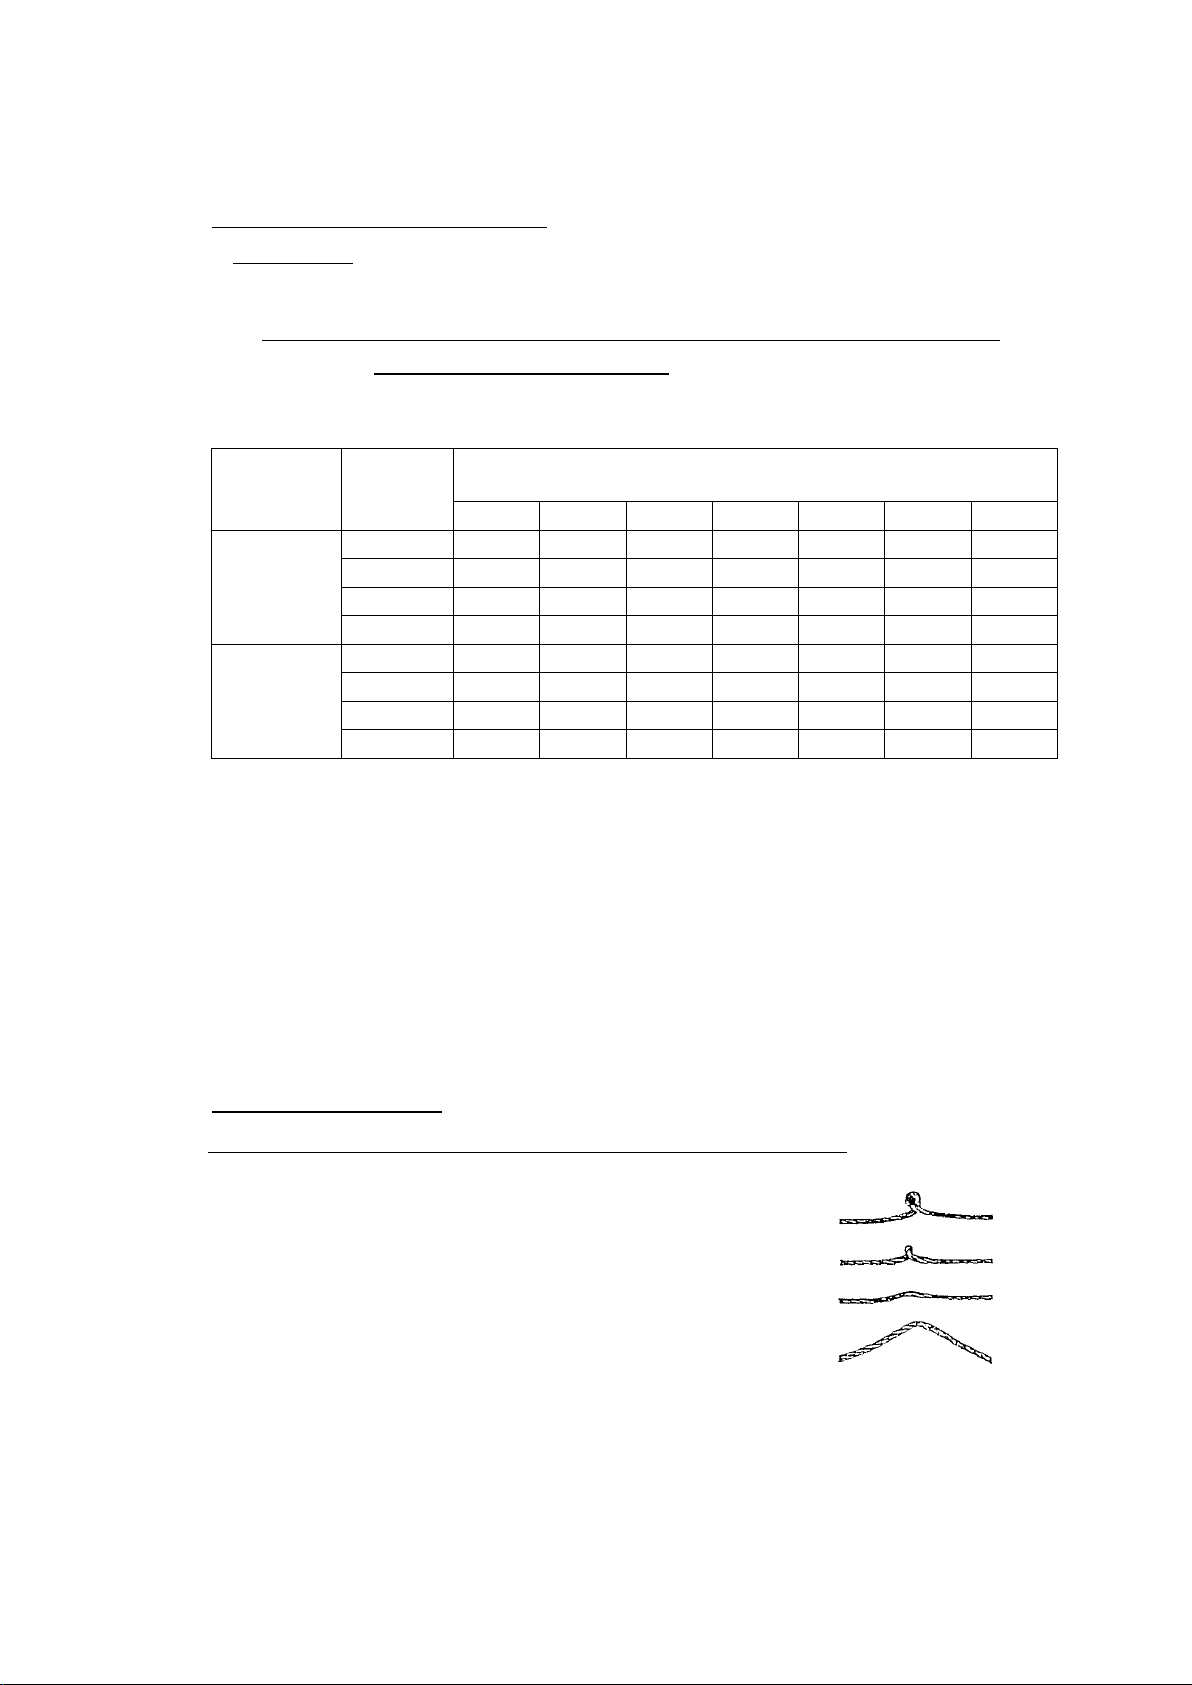
4.Inspection of Wire Rope.
△
!CAUTION; Do not use a Wire Rope which has a kink or is deformed.
(See sketch to the right) Do not use a wire rope which
has broken strands. This will result in serious injury or
accident.
Air & Allied Sales (Pacific) Pty Ltd
www.air-allied.com.au
10
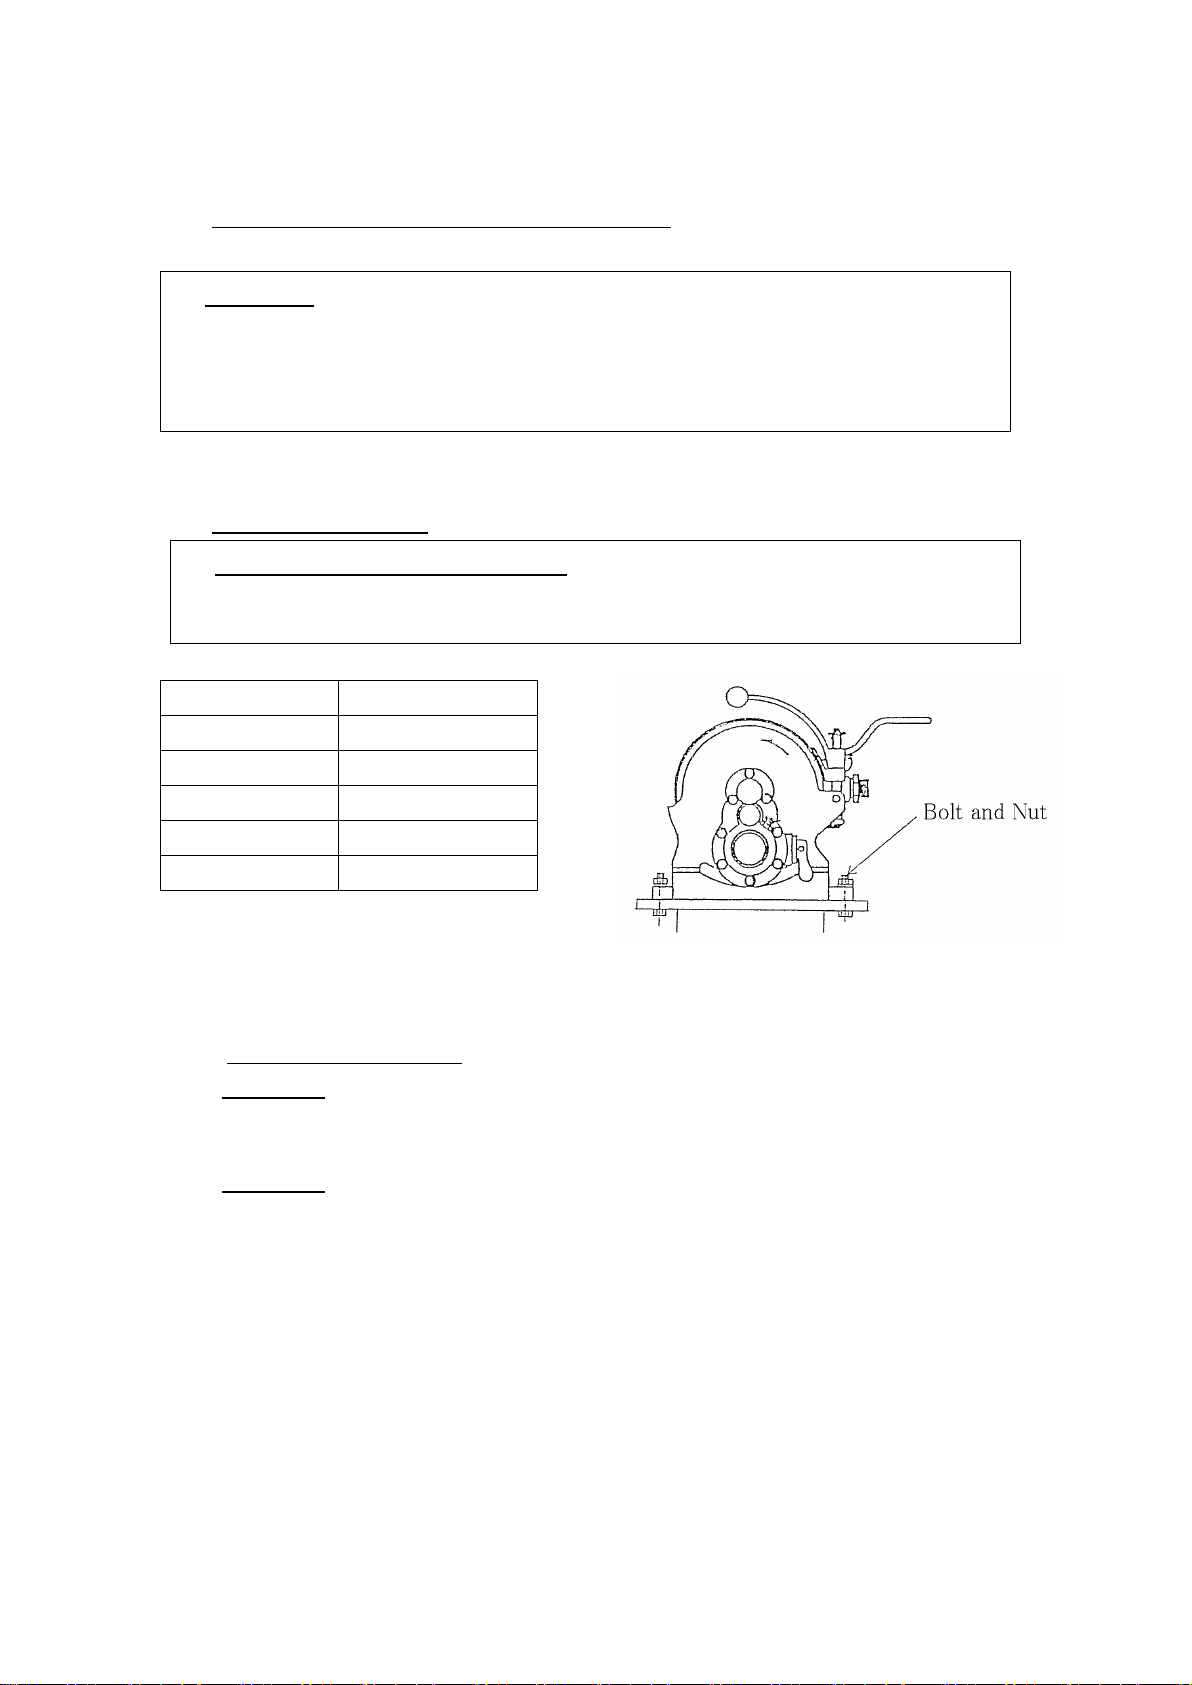
5. Confirmation of the strength of mounting location.
6.Mounting the Air Winch.
△
! WARNING; Mount the winch securely
Make sure the Air Winch Bed and the assembly base is fastened using bolts and
the bolt quantity meets regulation.
Bolt or Nut fastening Torque;
Model Fastening torque
TAW-300B 25 N・m
TAW-500 40 N・m
TAW-1000 40 N・m
TAW-1500A 40 N・m
TAW-2000 40 N・m
7.Connecting the Air Winch
△
! CAUTION;
Before connecting the air hose to the Air Winch, always blow flush the air inlet area.
This will prevent any foreign substances from entering the Air Winch.
△
! CAUTION;
Before connecting the air hose to the Air Winch, apply about 5 cc Lubrication into the
Inlet port of the Air Winch. This will provide the initial lubrication to the Air Motor.
After the above procedures are completed, attached the air hose to the Air Winch.
△
! WARNING;
・Before mounting the air winch, confirm the strength of the mounting location if it
meets the sufficient safety rate to hold the body and rated capacity.
If above condition is not met, do not mount the winch.
Air & Allied Sales (Pacific) Pty Ltd
www.air-allied.com.au
11
BEFORE OPERATION
1. Remove the cap of the exhaust port
△
! WARNING;
In the case of a brand new winch, the cap is attached on the exhaust port when
shipped from the factory.(except TAW-300B)
Please remove this cap, otherwise, the winch will not operate.
Depending on conditions, this cap might blow off and lead to an accident.
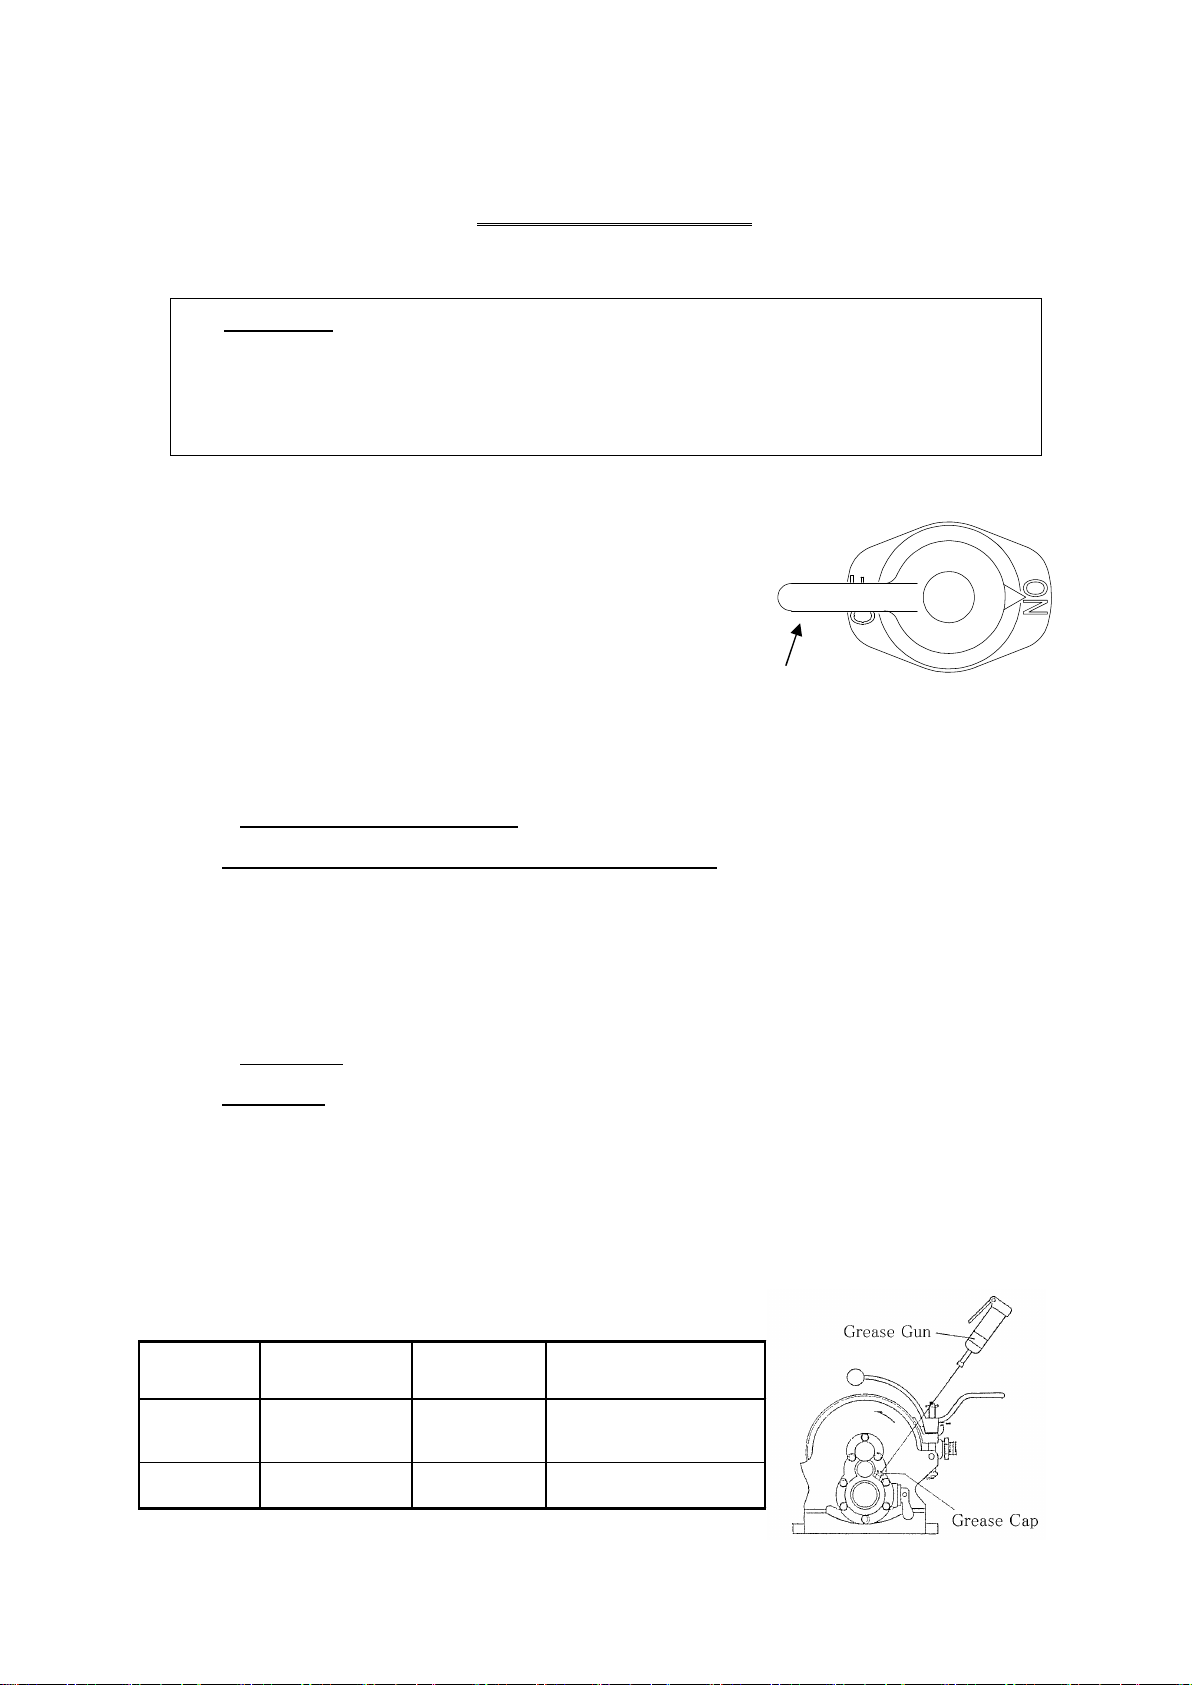
2. Turn clutch handle on
This air winch is equipped with a “Clutch” to link
the air motor and drum(ON) and to release the air motor
and drum(OFF).
This clutch is controlled by Clutch handle.
Please turn this handle ON as shown in the drawing to the
Right, this will connect the air motor and drum. In the
OFF position the air motor runs idle and drum will not
operate.
3.Check Operation Air Pressure
△
! CAUTION; The operating air pressure is 0.4-0.6 MPa
If the air pressure is below 0.4MPa or exceeds 0.6MPa, this will effect the
performance, shorten the life of parts or will become a safety hazard. It is
necessary to keep good consideration concerning the pressure, volume and piping
for the compressor being used.
4.Lubrication
△
! CAUTION;
・Lubrication to the motor is performed through the line oiler installed into the piping.
Oil flow to the motor should be 10-15 drops/min.
・The reduction gears should be greased once every month using a grease gun.
When the gear box is dis-assemblied, the grease should be changed.
・Apply lubrication to the wire rope. This should be performed periodically.
Clutch Handle
Lubrication Oil
Oil Grade Application Lubricating method
Additive
Turbine oil ISOVG32-46 Air motor part Line oiler
Lithium grease NLGINo.2 Rope, Gear Apply to rope and gear case
Air & Allied Sales (Pacific) Pty Ltd
www.air-allied.com.au
12
5.Connecting the Wire Rope to the Drum
△
! CAUTION; Make sure the wire end is secured firmly.
The end of the wire rope must be securely fastened to the fastening point on the
winch drum. After inserting the wire end into the hole, refer to the following chart to
fasten the bolt.
Model Bolt Size Fastening Torque
TAW-300B M8 25 N・m
TAW-500 M8 25 N・m
TAW-1000 M12 60 N・m
TAW-1500A M12 60 N・m
TAW-2000 M16 120 N・m
△
! WARNING;
Please confirm that the direction of the Wire
Rope is in the direction of the Arrow as
shown in the drawing to the right.
Operate the winch with the wire turning between the
Drum and the Winch frame. Otherwise, the
excessive load will be put on the winch and become
the cause of an accident.
Set screw (2pcs)
Air & Allied Sales (Pacific) Pty Ltd
www.air-allied.com.au
13
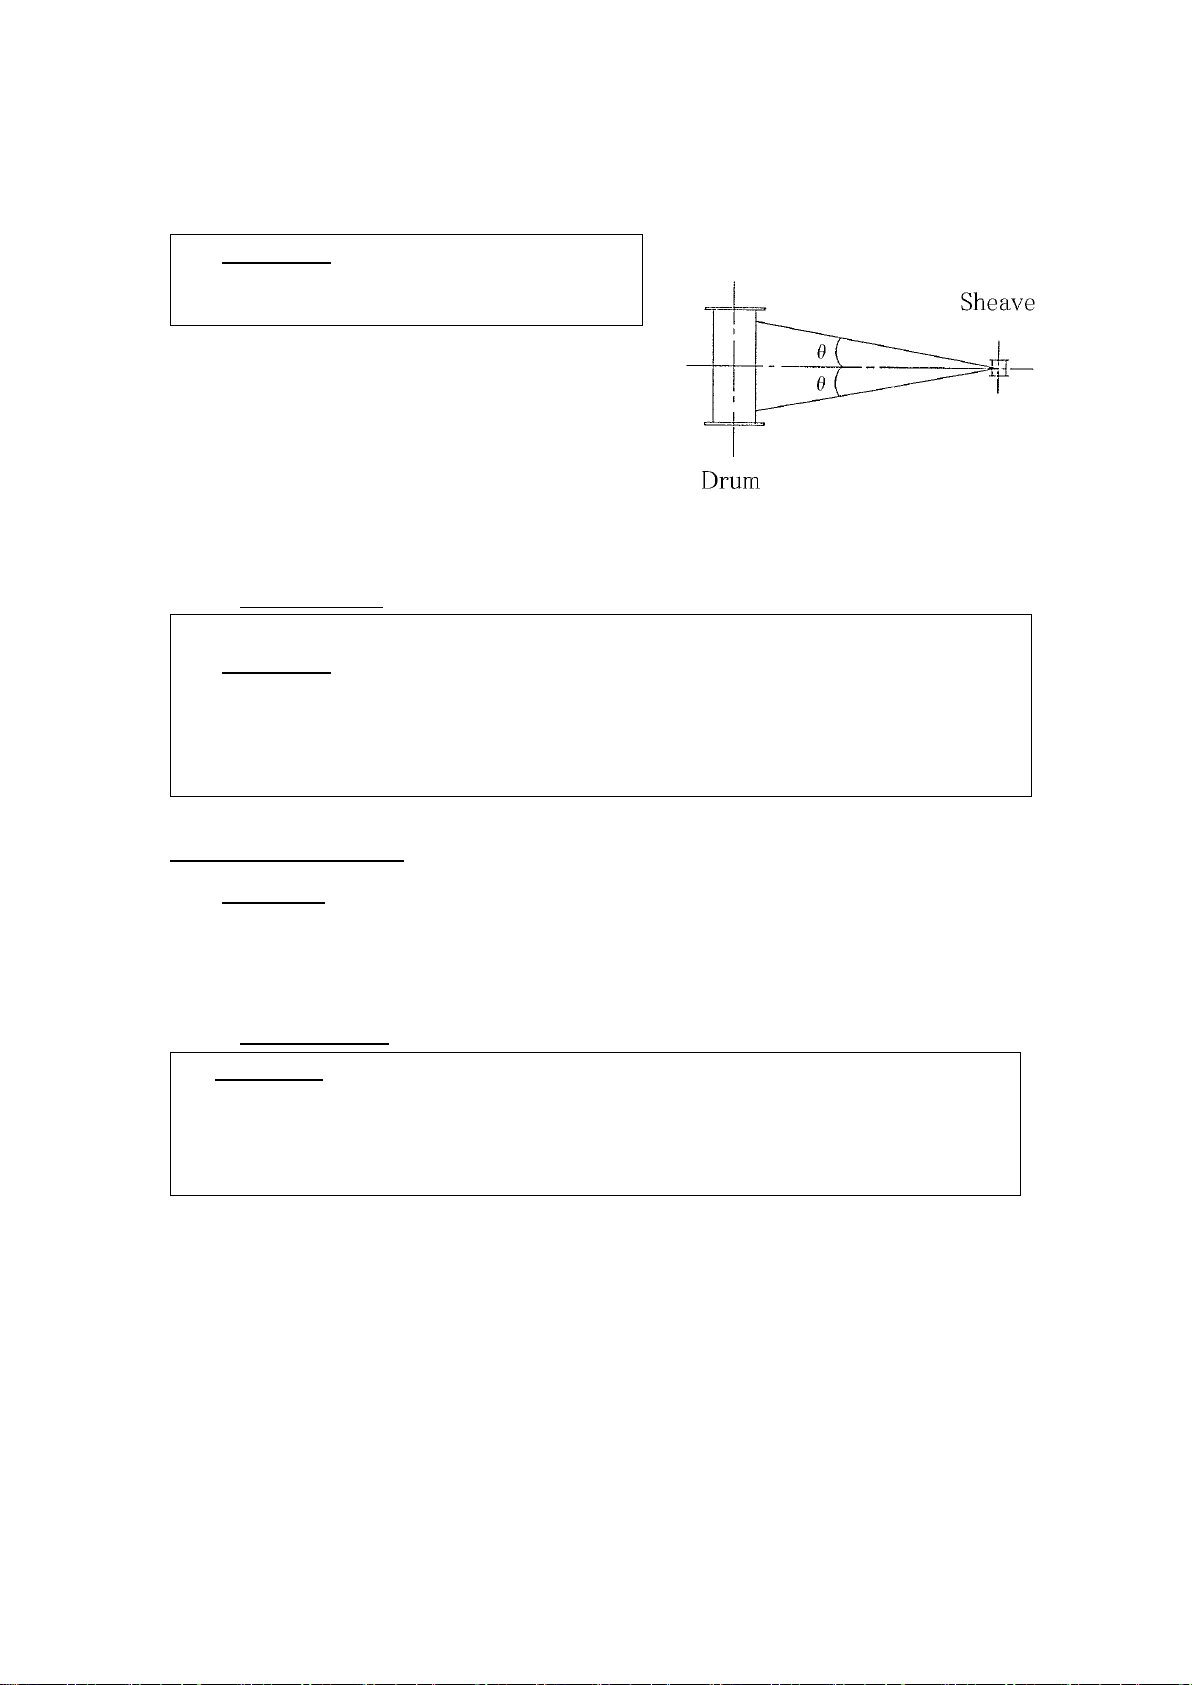
△
! WARNING;
The Fleet Angle (θ) for the wire rope and
drum should be within 2 degrees.
If the fleet angle exceeds 2 degrees this will
lead to wire falling off the drum, as a result
leading to abnormal wear and become the cause
of an accident.
6.Test Operation;
Winding and Un-winding operation
△
! WARNING;
Please review the relationship of the un-winding length for the wire rope checking the
time to un-wind. In this case make sure 3 winds on the drum is maintained at all
times.
Also, do not over wind the drum since the wire will over ride the drum walls.
Checking the Wire Rope;
△
! CAUTION;
As shown on page 9, make sure the wire rope is not deformed. Also check slings
and other attachment devices before usage.
7.
Re-confirmation
△
!WARNING;
Before using slings, wire ropes, sling chains or hooks, always check the rated load,
and also check for damages before usage. It is very dangerous if not checked
properly.
Air & Allied Sales (Pacific) Pty Ltd
www.air-allied.com.au

14
HOW TO OPERATE
1. Confirmation of clutch
Confirm if the clutch which connects air motor and drum
is “ON” as explained in the previous page.
2. Release of Handle brake
Release the Handle brake before operating.
This air winch is equipped with an Automatic brake
that connects the air motor separately from the Hand brake.
So, when any material is loaded , the wire rope cannot
wind off due to this auto brake system
even if the hand brake is released.
* The condition is that the Clutch which connects the air motor and drum is ON.
3. Operating and Stop
Following the instructions below, the direction of the operating handle for “winding off” and
“winding roll” wire rope. Once the handle is released, the winch will stop.
TAW-500~2000 TAW-300B
4. Speed control for winding roll and winding off
You can fine adjust the speed of winding the roll and winding off by operating handle.
If you move the handle in small increments, the speed will be slow, and if you move the handle
in larger increments, the speed will increase. You can adjust the speed with single step.
Wind off
Wind roll
Wind roll
Wind off
Clutch is ON
Stop Stop
Air & Allied Sales (Pacific) Pty Ltd
www.air-allied.com.au

15
5. Lifting and lowering load
① Set the load to the wire rope in a well-balanced position
② Wind roll with slow speed until the wire rope tightens and stop the winch operation to hold.
③ Check if the load is connected to the wire rope securely and has not slipped.
④ Wind roll a little at slow speed first, then wind roll at the speed needed if there is no
problem.
⑤ Make sure the landing site for the load is stable and safe. Then, lower the load at slow
speed.
6.Apply the Hand Brake
Although this hoist is equipped with an Automatic brake which is connected to the air motor,
for safety reasons, please apply the hand brake by tightening it clockwise when you stop the
loading operation of the material.
Air & Allied Sales (Pacific) Pty Ltd
www.air-allied.com.au

16
MAINTENANCE AND INSPECTION
△
! WARNING;
・To operate the hoist safely, it is necessary to inspect the hoist regularly.
When the hoist is in use, obey the regulations in the crane safety standards
and perform the following inspections.
★DAILY INSPECTION
1.Inspection of Air pressure and Oil.
Confirm that the hoist is operating between 0.4-0.6 MPa air pressure. Also make
sure the line oiler is operating correctly. If oil does not get to the motor, this will
lead to early wear of the motor parts.
2.Inspection of the Wire Rope
Check the wire rope for the following;
Is the wire rope lubricated.
Is there signs of rust on the wire rope.
Are there any strands broken.
If the wire rope is not lubricated properly, this will lead to premature wear of the
wire.
3.Does the Air Winch operate smoothly without abnormal sounds?
Stop the Air Winch if you hear any abnormal sounds when the Air Winch is
operating.
★MONTHLY INSPECTION
1.Check the wire rope
Check the wire rope for damage or broken strands. If a problem is seen, the wire
rope should be replaced.
2.Check Operation of the brake.
Check the operation of the brake. If
the rated load slowly moves down,
the operation of the Air Winch should
be stopped and the Brake adjustment
screw should be adjusted clockwise.
If it is not possible to adjust, the brake
band has worn out and it is necessary
to change this part.
Air & Allied Sales (Pacific) Pty Ltd
www.air-allied.com.au
17
3.Check for loose bolts, rust, paint removal or other damaged areas. If any of these
problems are seen, repairs should be performed immediately.
★ANNUAL INSPECTION
1.The Air Winch should be dis-assemblied and inspected once a year. (For details
contact your dealer or distributor.)
2.For repairs, contact your dealer or distributor.
★STORAGE
1.Remove all debris or dirt from the Air Winch.
2.After using the Air Winch in order to prevent rust build up, apply about 50 cc of
lubricating oil into the inlet of the Air Winch and operate for about 5 seconds.
3.To prevent dirt or debris from entering the inlet of the Air Winch, apply a plug before
storage.
4.To prevent rust, store the hoist in a dry place.
TROUBLE SHOOTING
△
! WARNING ; If the Air Winch needs to be dis-assembled and repaired, please bring
the Air Winch to a service shop or the dealer.
ITEM CAUSE COUNTERMEASURE
Not enough power * Not enough air pressure * Check air supply
to wind * Friction in air hose * Select new size hose
* Vane wear * Replace parts
* Not enough lubrication * Check exhaust for lubrication
* Brake is not open fully * Check air pressure, air leakage
or rust.
Does not operate * Foreign matter in motor * Dis-assemble and clean
* Brake is not open fully * Replace brake piston o-ring
* Brake release hole is plugged
* Rust in automatic brake * Dis-assemble and repair
* No air supply * Bent hose and check valve
Air is leaking * Breakage of o-ring, packings
* Replace parts
Air & Allied Sales (Pacific) Pty Ltd
www.air-allied.com.au

CUSTOMER MEMO
Record information such as the distributor name, model number and serial number.
It will be of good use when you bring the unit in for servicing.
Date of Purchase Distributor Name
Model
Serial Number
This is a high precision manufactured product. As a result if the unit does not work
Operate properly do not attempt to repair the unit. Contact our distributor Air & Allied Sales
(Pacific) Pty Ltd. Also, if parts are needed of if you have any questions about how the unit works,
please do not hesitate to contact Air & Allied Sales (Pacific) Pty Ltd.
Air & Allied Sales (Pacific) Pty Ltd
www.air-allied.com.au
This manual suits for next models
4
Table of contents
Popular Winch manuals by other brands

Harken
Harken 16.2 Two Speed Winch Installation service

ArboTeam
ArboTeam ATD Installation and maintenance manual

Mile Marker
Mile Marker HI9000 Installation & operator's manual

Monzana
Monzana DBSW003 instructions

Pfeifer
Pfeifer HIT Series Translation of the original operating manual

Gude
Gude GSZ 500/1000 manual


