ToKViA T102 Service manual

T102
Quick Reference Manual
For PDF version,
for After-Sales support,
please get in touch with us at

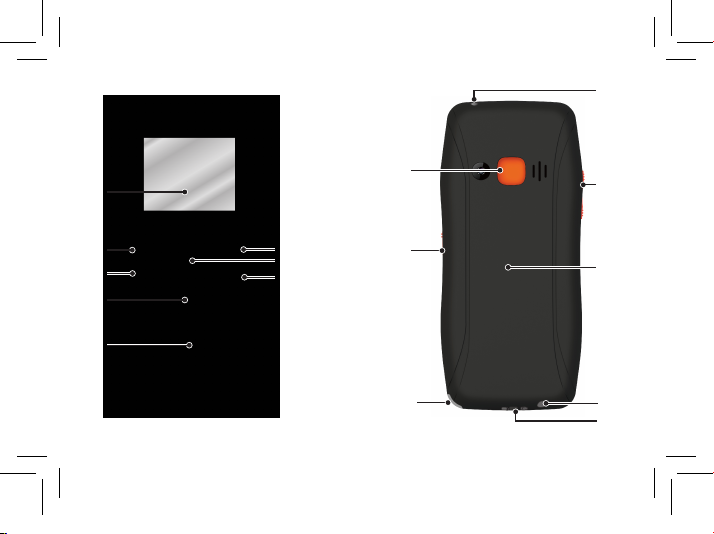
General View
The following illustration shows details of the mobile phone.
Familiarise yourself with all the operating elements before starting to
use the mobile phone.
1 9
2 10
311
4 12
5 13
6 14
7 15
8
Display
Softkey, left
Call key
Camera/Speaker key
Keypad
Softkey, right
Navigation key
On-hook key 16
Torch lamp (LED)
SOS key
Volume key
Keypad lock / unlock key
Battery compartment cover
Headphone connection port
Type C connection port
Battery cover slot
1
2
3
4
5
6
7
8
15
14
9
10
11
13
12
16
2020
2
3
1
5
6
7
8
1
2
3
4
9
10 11
12
13
14
15
16

4
Package Contents
Before starting up the mobile phone, check the package contents.
If anything is missing or damaged, please contact our Service depart-
ment.
JOY II mobile phone Charging cradle
Battery USB connection cable
Charging adapter Quick reference manual
Inserting the SIM Card and Micro SD
Only use SIM cards of the size illustrated
(standard SIM). If you want to use a micro or nano
SIM card, you will need the SIM adapter in the box.
1 Put your finger in the battery cover slot to
remove the battery cover.
2 Insert the SIM card in the slot SIM.
T102 is a 2G GSM only mobile phone. Please
make sure your SIM card can support 2G network.
A microSD memory card is necessary, for
instance, when you want to use the camera.
1 Place the microSD memory card with the
contacts facing down in the compartment, as
illustrated.
SIM 1
SD
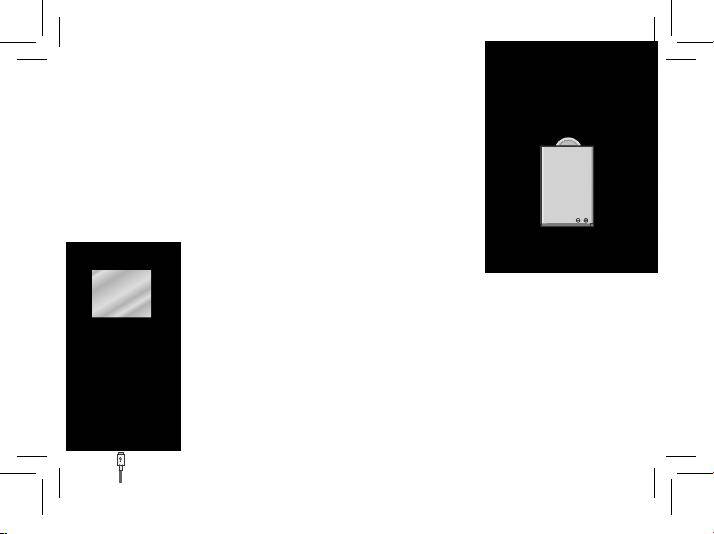
Inserting the Battery
1 Insert the battery as illustrated. Ensure the
battery is aligned correctly.
Charging the Battery
1 Connect the power adapter plug to a properly
installed power socket.
2 Connect the Type C plug to the Type C
connection port on the mobile phone.
3 When the phone battery is fully charged, disconnect the
connection to the power supply. This reduces power
consumption. 5

6
Navigate up or down in the menu.
When the start screen is displayed: Open the phone
book or start the camera.
Open a submenu or conrm your entries.
Discard the settings or navigate one menu level back.
Switching On the Mobile Phone
Press the On-hook key for 3 seconds.
Switching Off the Mobile Phone
Press the On-hook key for 3 seconds.
Operating the Mobile Phone
Navigate up or down in the menu.
When the start screen is displayed, press up: open
message, press down: Photo contact speed dial.
Open a submenu or confi rm your entries.
Discard the settings or navigate one menu level back.
On home screen, access PhoneBook.

Take an incoming call or begin a conversation.
End a call in progress or Reject an incoming call.
Click M1 or M2 to call the preset contact.
When you want to enter phone numbers and digits or
delete entries, use the following keys:
Delete entries. Enter digits and letters.
When you want to take, end or reject calls, use the following keys:
7

8
When you want to enter phone numbers and digits or delete entries,
use the following keys:
Take an incoming call or begin a conversation.
End a call in progress.
Reject an incoming call.
Enter digits and letters.
The operating elements on the sides or rear of the phone
are assigned the following functions:
Trigger an
emergency call to
the stored phone
numbers.
Charge the mobile
phone battery or
establish a connection
to a computer.
When you want to take, end or reject calls, use the following keys:
If you want to lock the operating keys on the mobile
phone, press the following in succession: push up the
side Keypad lock key. The keys are now locked
against use.
To unlock the keys, push down the side Keypad lock
key: You can now use the operating keys as usual.
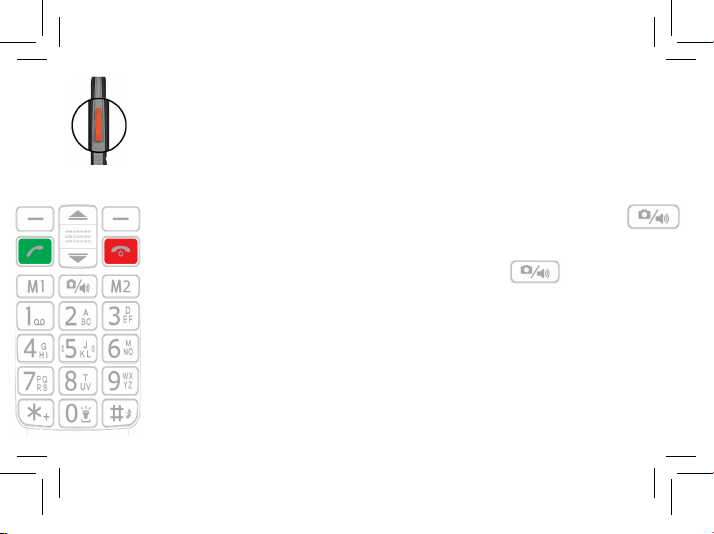
When the phone is in standby mode, press up to increase the
ringtone volume, press down to decrease the ring tone volume.
During a phone call, press up to increase the call volume and
press down to reduce the call volume.
When the phone is in standby mode, click the Camera key
to start the camera (A SD card is needed to take photos).
to activate
During a phone call, press the Speaker key
the speaker mode.
When the phone is in standby mode, press and hold the digit
(from 2 to 9) to dial the pre-set phone number.
When the phone is in standby mode, press and hold the digit
"0" to turn on/off the torch. Press and hold "#" to switch
between General and Silent mode.
9

10
Overview of the Most Important Functions
Italics texts are provided in the following operating steps. These italics
indicate texts which can appear on the display of the mobile.
Setting the language
1 Press the left-hand softkey to open the main menu.
2 Navigate to the menu Settings > Phone Settings > Language.
3 Select the required language.
Setting the time and date
1 Press the left-hand softkey to open the main menu.
2 Navigate to the menu Settings > Phone Settings > Time and Date.
3 Enter the current time and date. Select Save to activate the setting.
Change ringtone and other alarms
1 Press the left-hand softkey to open the main menu.
2 Navigate to the Settings > Profiles, choose a profile and press Option
> Customize, then change the ringtone or other alarms.

11
Overview of the Most Important Functions
Framed texts are provided in the following operating steps. These
frames indicate texts which can appear in the display of the mobile
phone.
Setting the language
1 Press the left-hand softkey to open the main menu.
2 Navigate to the menu options ┣Settings┫ ┣Phone Settings┫ ┣Language┫.
3 Select the required language.
Setting the time and date
1 Press the left-hand softkey to open the main menu.
2 Navigate to the menu options ┣Settings┫ ┣Phone Settings┫ ┣Time and Date┫
┣Time and Date┫.
3 Enter the current time and date.
4 Select ┣Save┫ to activate the setting.
Adding a contact to the phone book
You can store up to 200 contacts in the phone book.
1 Press the left-hand softkey to open the main menu.
2 Navigate to the menu options Phonebook > Add new contact.
3 Select a storage location (To SIM or To Phone).
4 Enter the name and phone number.
5 Press the left-hand softkey and select Save.
Searching a contact
1 Press the left-hand softkey to open the main menu.
2 Navigate to Phonebook > contacts.
3 Press the letters on the keypad.
Setting Direct number
1 Press the left-hand softkey to open the main menu.
2 Navigate to Phonebook > Direct Number.
3 Select M1 / M2, enter the name and number, and select Save.
4 Click M1 or M2 on the keypad, the stored number is dialed.

12
Speed dial
1 Press the left-hand softkey to open the main menu.
2 Navigate to Phonebook > Speed dial > Set numbers. Set the
speed dial contacts. 8 contacts can be stored to digit 2-9.
3 On the start screen, press and hold a digit, the stored contact is
dialled.
Dialling Photo contact
You can assign a picture to each of your eight favourite contacts. These
pictures are displayed in the Photo contact menu.
Adding contacts to the Photo Contact
1 Press the Navigation down to open the Photo Contact.
2 Select the entry you want and then select the Edit option.
3 Enter the data related to the contact and select Option > Save.

13
Dialling Picture Contacts
You can assign a picture to each of your eight favourite contacts.
These pictures are displayed in the Caller Picture menu. On selecting
a picture, the phone number of the contact assigned to the picture is
manual at www.olympia-vertrieb.de.
Adding contacts to the caller picture menu
1Press the right-hand softkey to open the Caller Picture menu.
2Select the entry you want and then select the ┣Edit┫ option.
3Enter the data related to the contact and select ┣Options┫ ┣Save┫
the data.
Adding a picture to Photo Contact
When you want to assign a picture to a contact, you can either use the
camera integrated in the mobile phone or transfer a picture stored on
your computer to the mobile phone. In this case, you need a microSD
memory card.
1 Press the Navigation down to open the Photo Contact menu.
2 Select the required picture contact.
3 Press the left-hand softkey and select Edit > Option > Edit
>Caller picture > Option > Select!From camera/Select from file.
4Use the File Manager to assign a picture or take a photo with the
camera integrated in the mobile phone.
5Press the left-hand softkey and confirm by selecting OK.
Dialling via Photo contact
1 Press the Navigation down to open the Photo contact.
2 Select the required picture contact.
3 Press the call key, the stored number is dialled.

SOS Key (Emergency Call Function)
You can initiate an emergency call by using the SOS key on the
rear of the mobile phone. An alarm signal is issued first of all. Then the
SOS text message is sent to the phone numbers saved for this
purpose. After that, the respective phone numbers stored are dialled in
succession in handsfree mode.
You can store up to 5 phone numbers which can be assigned to the
emergency call function.
Press the left-hand softkey to open the main menu.
Navigate to the menu options ┣Settings┫ ┣SOS┫ ┣SOS alarm┫.
Press the left-hand softkey and select ┣On┫.
Press the left-hand softkey to open the main menu.
Navigate to the menu options ┣Settings┫ ┣SOS┫ ┣SOS phone numbers┫.
Do not assign any ocial emergency call service numbers. A false
alarm can lead to considerable costs which could be charged to
you.
Select a free storage location and enter the required phone number
or select a contact from the phone book.
Press the left-hand softkey and conrm your settings by selecting
┣Yes┫.
14
Number announcement for visual impairment
The number is announced when it is dialed. It helps people who
are visually impaired.
1 Press the left-hand softkey to open the main menu.
2 Navigate to Settings > Profiles > General (or another profile)
> Customize >Keypad.
3 Press Option, and select Human voice tone.
4 Press Option > Save to save.

15
1Use the File Manager to assign a picture or take a photo with the
camera integrated in the mobile phone.
2Press the left-hand softkey and conrm your settings by selecting
┣OK┫.
Key (Emergency Call Function)
You can initiate an emergency call by using the SOS key on the
rear of the mobile phone. An alarm signal is issued rst of all. Then
the SOS text message is sent to the phone numbers saved for this
purpose. After that, the respective phone numbers stored are dialled in
succession in handsfree mode.
You can store up to 5 phone numbers which can be assigned to the
emergency call function. Further information on the SOS function is
available online in the detailed operating manual at
www.olympia-vertrieb.de.
Activating the Emergency Call Function
1 Press the left-hand softkey to open the main menu.
2 Navigate to the menu options Settings > SOS settings SOS alarm.
3 Select On / Off to activate/deactivate.
Adding a Phone Number to the SOS Function
1 Press the left-hand softkey to open the main menu.
2 Navigate to the menu Settings > SOS > Settings > SOS numbers.
3 Select a free storage location and enter the required phone number
or select a contact from the phonebook.
4 Press the left-hand softkey to save.
Restore factory settings
1 Press the left-hand softkey to open the main menu.
2 Navigate to Settings > Restore factory setting > OK .
3 Enter password (default 0000), press OK to confirm.

16
Technical Properties
GSM: 850 / 900 / 1,800 / 1,900 MHz
Bluetooth: 2,402 - 2,480 GHz
GSM: 1.86 W
Bluetooth: 3.1 mW
Frequency band
Sending power (max.)
Power supply
Battery
Display
Dimensions
Weight
Ambient conditions
Connections
SIM
Type C, 3.5mm jack socket
Single
Input: 100 - 240V, 50 - 60Hz, 0.3A
Output: 5V, 0.55Ah
3.7 V, 800 mAh, charging time approx. 2h,
up to 250h standby, up to 5h talk time
1.77″ LCD with back-lighting
Approx. 127 * 58.8 * 14.7 mm
Approx. 81g incl. battery
-10 °C to 40 °C at 30% to
75% rel. humidity
Table of contents


 quick start guide")