Tomate TOM04I-P User manual
Tomate
eco - friendly & efficiency
INDUCTION
MODEL: TOM04I-P
(PANORAMIC series)
MANUAL USER
www.tomate.com.vn

EN
USER INSTRUCTION TOM02I (HYBIRD series)
Page 2
TABLE OF CONTENTS
1. INSTALLATION INSTRUCTIONS ........................................................................................................................... 7
1.1. USERINTERFACE INITIAL CALIBRATION.................................................................................................................. 7
1.2. INITIAL LIGHT CONDITIONS......................................................................................................................................7
2. BASIC CONTROL FUNCTIONS.............................................................................................................................. 8
3. SWITCHING ON/OFF THE COOKTOP .................................................................................................................. 9
4. SELECTING A POWER LEVEL FOR A HEATER ...............................................................................................10
5. FAST BOIL (BOOSTER) FUNCTION..................................................................................................................... 11
6. SWITCHING OFF A HEATER .................................................................................................................................12
7. POWER MANAGEMENT................................................................................................................................... 12
8. KEY LOCK............................................................................................................................................................ 12
PART A
GENERAL INFORMATION & QUICK GUIDE ............................................................................................... 3, 4, 5, 6
PART B: INSTRUCTIONS
EN
USER INSTRUCTION TOM04I-P (PANORAMIC series)
9. AUTOMATIC SAFETY OFF.....................................................................................................................................................15
10. OPERATING THE TIMER.......................................................................................................................................................16
10.1. ACTIVATING THE TIMER.......................................................................................................................................................16
10.2. SELECTING A TIMED HEATER..............................................................................................................................................16
10.3. SELECTING THE TIME...........................................................................................................................................................16
10.4. STARTINGTIMERCOUNTDOWN.........................................................................................................................................17
10.5. CHANGING THE TIME............................................................................................................................................................17
10.6. TIMERCOUNTDOWNEND ...................................................................................................................................................18
10.7. SWITCHING OFF THE TIMER ................................................................................................................................................18
10.8. AUTOKEY-LOCK.....................................................................................................................................................................18
11. DISPLAYING SOFTWARE VERSIONS............................................................................................................................18
12. DISPLAYING SPECIAL STATUSES.................................................................................................................................. 20
13. ................................................................................................................................................................... 21
HEATER ERRORS
EN USER INSTRUCTION TOM04I-P (PANORAMIC series)
Page 3
GENERAL
Carefully read the contents of this leaet since it provides important instructions regarding safety of
installation, use and maintenance. Keep the leaet for possible future consultation. All the operations
relating to installation (electrical connections) must be carried out by specialised personnel in accordance
with current regulations.
SAFETY INSTRUCTIONS
This apparatus is not suitable for use by children or people who need supervision.
For safety reasons, never place large ferromagnetic objects (e.g. oven plates for cakes) on the cooking
area of the breglass top.
People carrying pacemakers are advised to consult a doctor before using the induction cooking areas.
Metal objects such as knives, forks, spoons or lids must not be placed on the surface of the cooking top
because they can become hot.
IMPORTANT: After use, switch the cooking top o using the control device.
IMPORTANT:
- Avoid spilling liquid, therefore reduce the heat when boiling or heating liquids.
- Do not leave the heating elements on without recipients or with empty recipients.
- When you have nished cooking, switch o the relevant heating element using the control
indicated below.
If the surface of the hob is cracked, turn o the appliance and
disconnect it from the electrical mains in order to prevent any
possible electric shocks
.
PART A: GENERAL USE AND QUICK GIUDE
EN USER INSTRUCTION TOM04I-P (PANORAMIC series)
Page 4
Fig.
A
Cabinet Dimensions
Fig. B
CAUTION!!
THIS PRODUCT IS SENSIBLE TO "ESD"
AND MUST BE MANIPULATED IN
ELECTROSTATIC PROTECTED AREA(EPA)
Brackets Fixing Points
SelfTapping Screw
3.5x9.5
(x4)
B
B
FINAL ASSEMBLY
510 mm
770 mm
490 mm
750 mm
Max. 30 mm
EN USER INSTRUCTION TOM04I-P (PANORAMIC series)
EN
USER INSTRUCTION TOM02I (HYBIRD series)
Page 5
Fig. C
Min.
20
mm
Min.
30
mm
F
OVEN WITH
COOLING FAN
Min.
20
mm
Min.
30
mm
G
NO DRAWER ALLOWED
UNDER THE INDUCTION MODULE
Min.
5
mm
57,50
53,6
DETALLE F
ESCALA 1 : 6
Min.
5
mm
DETALLE G
ESCALA 1 : 6
SECURITY DISTANCES WITH FURNITURE
A - ON/OFF key > switch the appliance on and off
B - Timer Plus key > increase timer value (OPTIONAL)
C - Timer Minus key > decrease timer value (OPTIONAL)
D - Lock key > activate control panel lock /child lock
E - Plus key > increase power level of cooking zone
F - Minus key > reduce power level of cooking zone
Fig. D Touch control Guide
A
B
C
D
E
FE
FE
F
E
F
EN
USER INSTRUCTION TOM04I-P (PANORAMIC series)
EN
USER INSTRUCTION TOM04I-P (PANORAMIC series)
Page 6
Fig.F
Fig.E
Ⓐ
Ⓑ
H
Fig.
The recipients must contain
iron for induction heater
COOKING RECIPIENTS
CLEAN: by suitable product
or cloth/paper
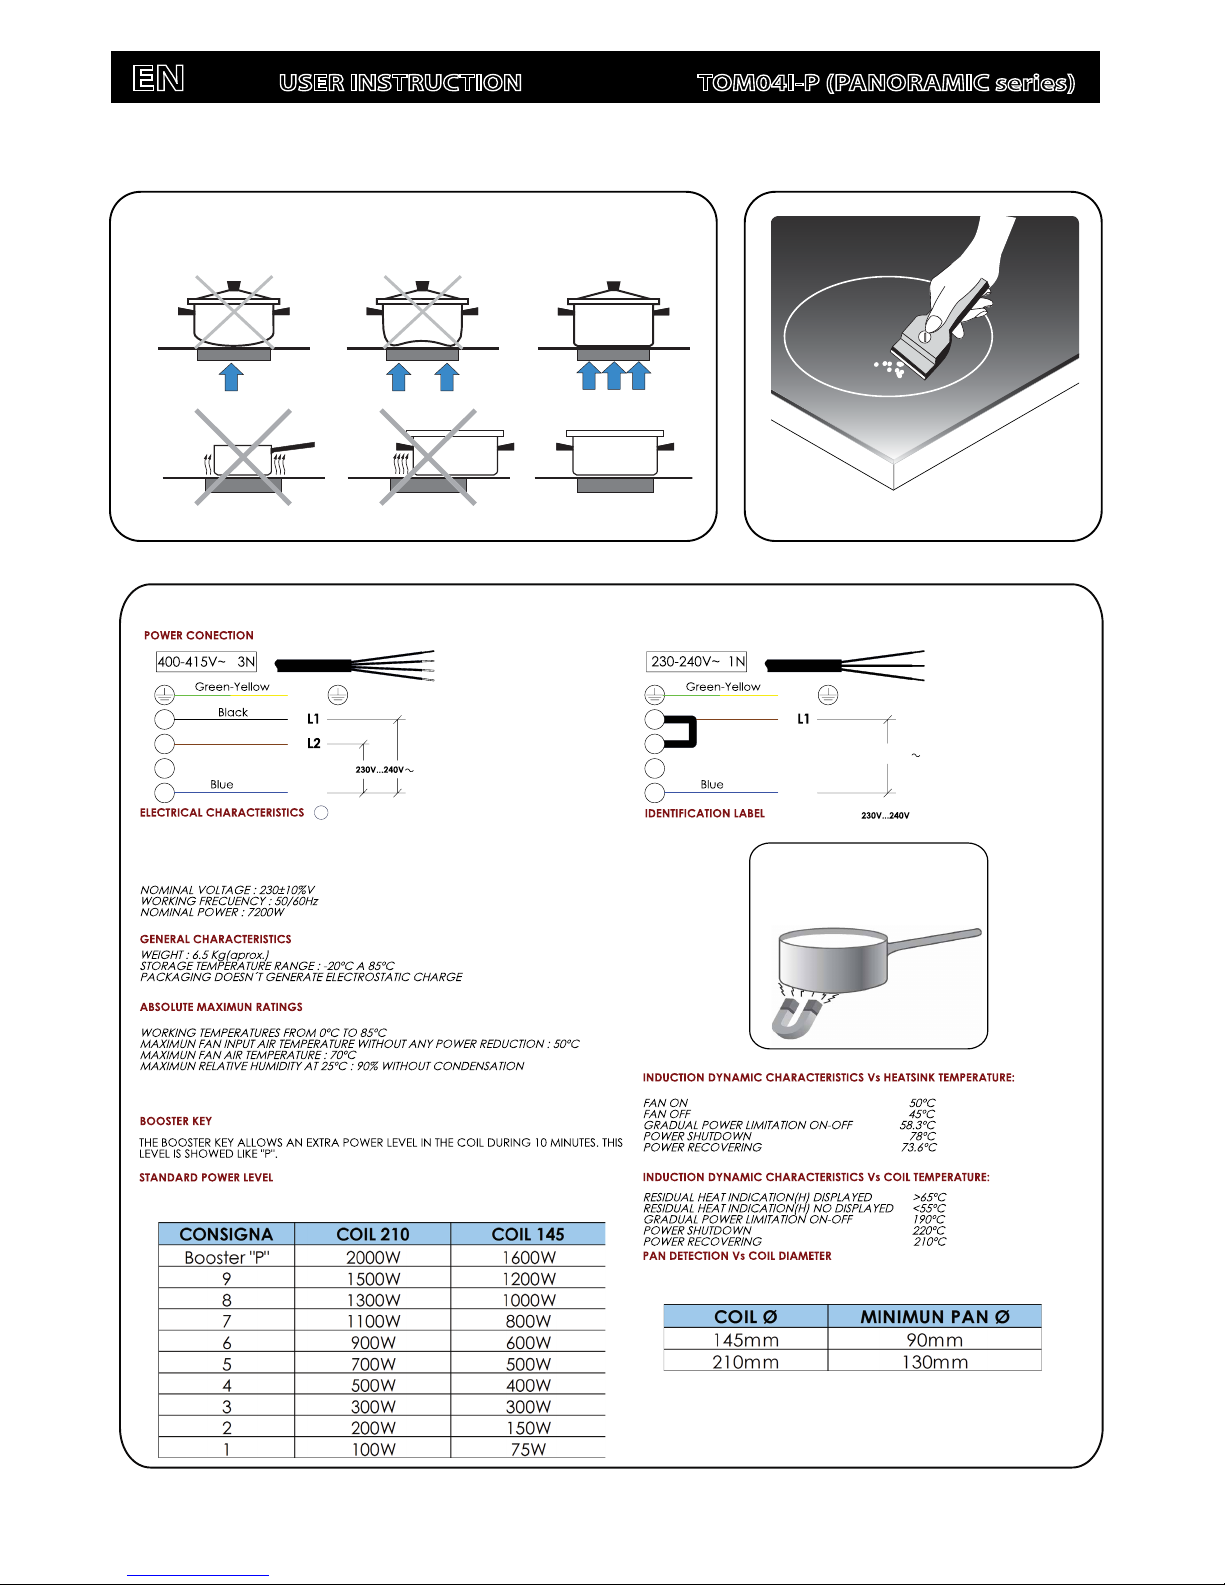
TECHNICAL SPECIFICATIONS
1
2
3
4
Brown
PE
N
PE
N
1
Brown
3
4
2
a
Fig. G
EN
USER INSTRUCTION TOM04I-P (PANORAMIC series)
EN USER INSTRUCTION TOM02I (HYBIRD series)
Page 7
1.1.User interface initial calibration
The User Interface has implemented an initial keyboard calibration focused to adapt the sensibility of the keys, to the
final mechanical, environmental and user conditions.
Any time the Cooktop is plugged or there is a power failure that generates a reset in the user interface, the first time the
Key Lock
is touched the sensitivity of the keyboard is readjusted. This first touch of the Key Lock must be done in certain
conditions:
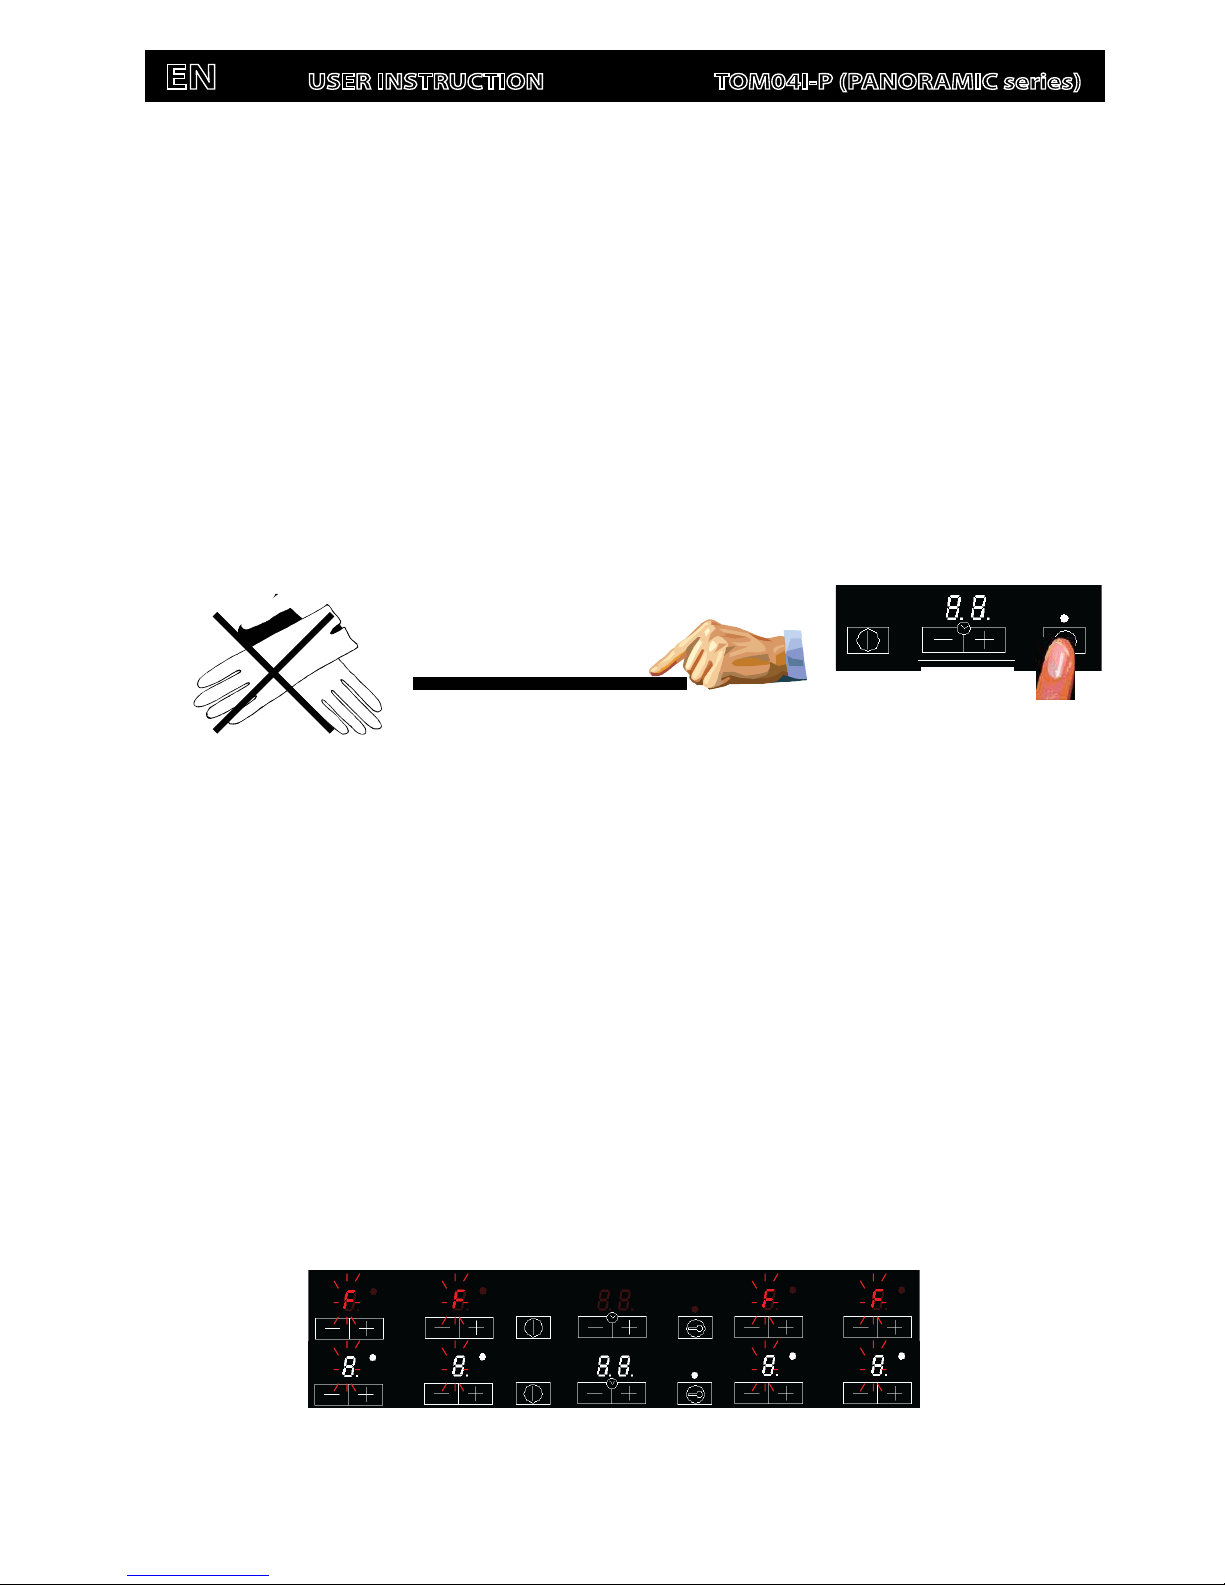
Do not use gloves Use a clean finger. Touch the glass (smooth touching).
1. INSTALATION INSTRUCTION:
1.2. Initial Light Conditions
When power is initially applied to the Cooktop, the touch control conducts a calibration process for the touch keys, which
requires a low level of ambient light in the area of the touch keys.
If during this calibration process excessive ambient lighting is detected the User Interface displays "FL" (Infrared
Ambient Light Error) and the control calibration process is suspended. In order to rectify the process any lighting that could
effect the calibration process should be switched off (e.g. halogen cooker hood lighting). The error will disappear when
satisfactory ambient lighting is detected and the touch control calibration procedure will now complete satisfactorily.
Notes:
1) The "FL" error can only be generated within approx 3s of initial power being applied to the cooktop.
2) We recommend that the user switches off all cooker hood lighting and lighting directed towards the cooktop when
power is initially applied to the cooktop.
3) After the touch control has conducted its initial calibration process, (approx 3s) any cooker hood or other lighting can
be switched on as normal and will not affect the operation of the touch control.
PART B: INSTRUCTIONS
EN USER INSTRUCTION TOM04I-P (PANORAMIC series)

EN
USER INSTRUCTION TOM02I (HYBIRD series)
Page 8
2. Basic control functions
•The control allows different layout configurations:
oFull Induction up to 4 heaterswith different heater diameters.
•Key Lock function.
•Fastboilfunction.
•Indication of residual heat for each heater.
•Thermal control protection.
•Protection from accidental activation of keys:
-One or more keys activated for more than 10 sec. -> Switching off the touch control. A warning beep sounds every 10
sec., while the key/s is/are activated.
-With all heaters at zero power during 10 sec. -> The Cooktop is switched off. If the switching off is due to an accidental
activation of keys, the touch control actuates as above.
•Acoustic warning to attract the user’s attention.
•Pan detection for induction heaters; After 60 sec. with no pan, the heater switches off.
GENERAL KEYS
-1 key for switching On/Off the Cooktop [ON/OFF].
-1 key for locking the keyboard [KEYLOCK].
-2 key for timer time set [-TIMER] [+TIMER].
HEATER KEYS
-2 keys for each heater to select the cook set [- HEATERx] [+HEATERx].
-1 Key for each heater to select Booster function [BOOSTER] *NOTE
*NOTE: Onlyavailable for the XLL User Interface
Fig. 2: XLS UI complete configuration
[KEYLOCK][ON/OFF]
[+][-][- TIMER][+ TIMER] [-][+][-][+][-] [+]BoosterBoosterBoosterBooster
[- TIMER] [+ TIMER]
[KEYLOCK][+][-]
[ON/OFF]
[+][-]
[+]
[KEYLOCK][ON/OFF]
[+][-][ ] ] [-][+][-][+][-]
Fig. 1:
XLL
UI
complete configuration
Fig. 3: XLD UI complete configuration
-TIMER [+ TIMER
EN
USER INSTRUCTION TOM04I-P (PANORAMIC series)
EN
USER INSTRUCTION TOM02I (HYBIRD series)
Page 9
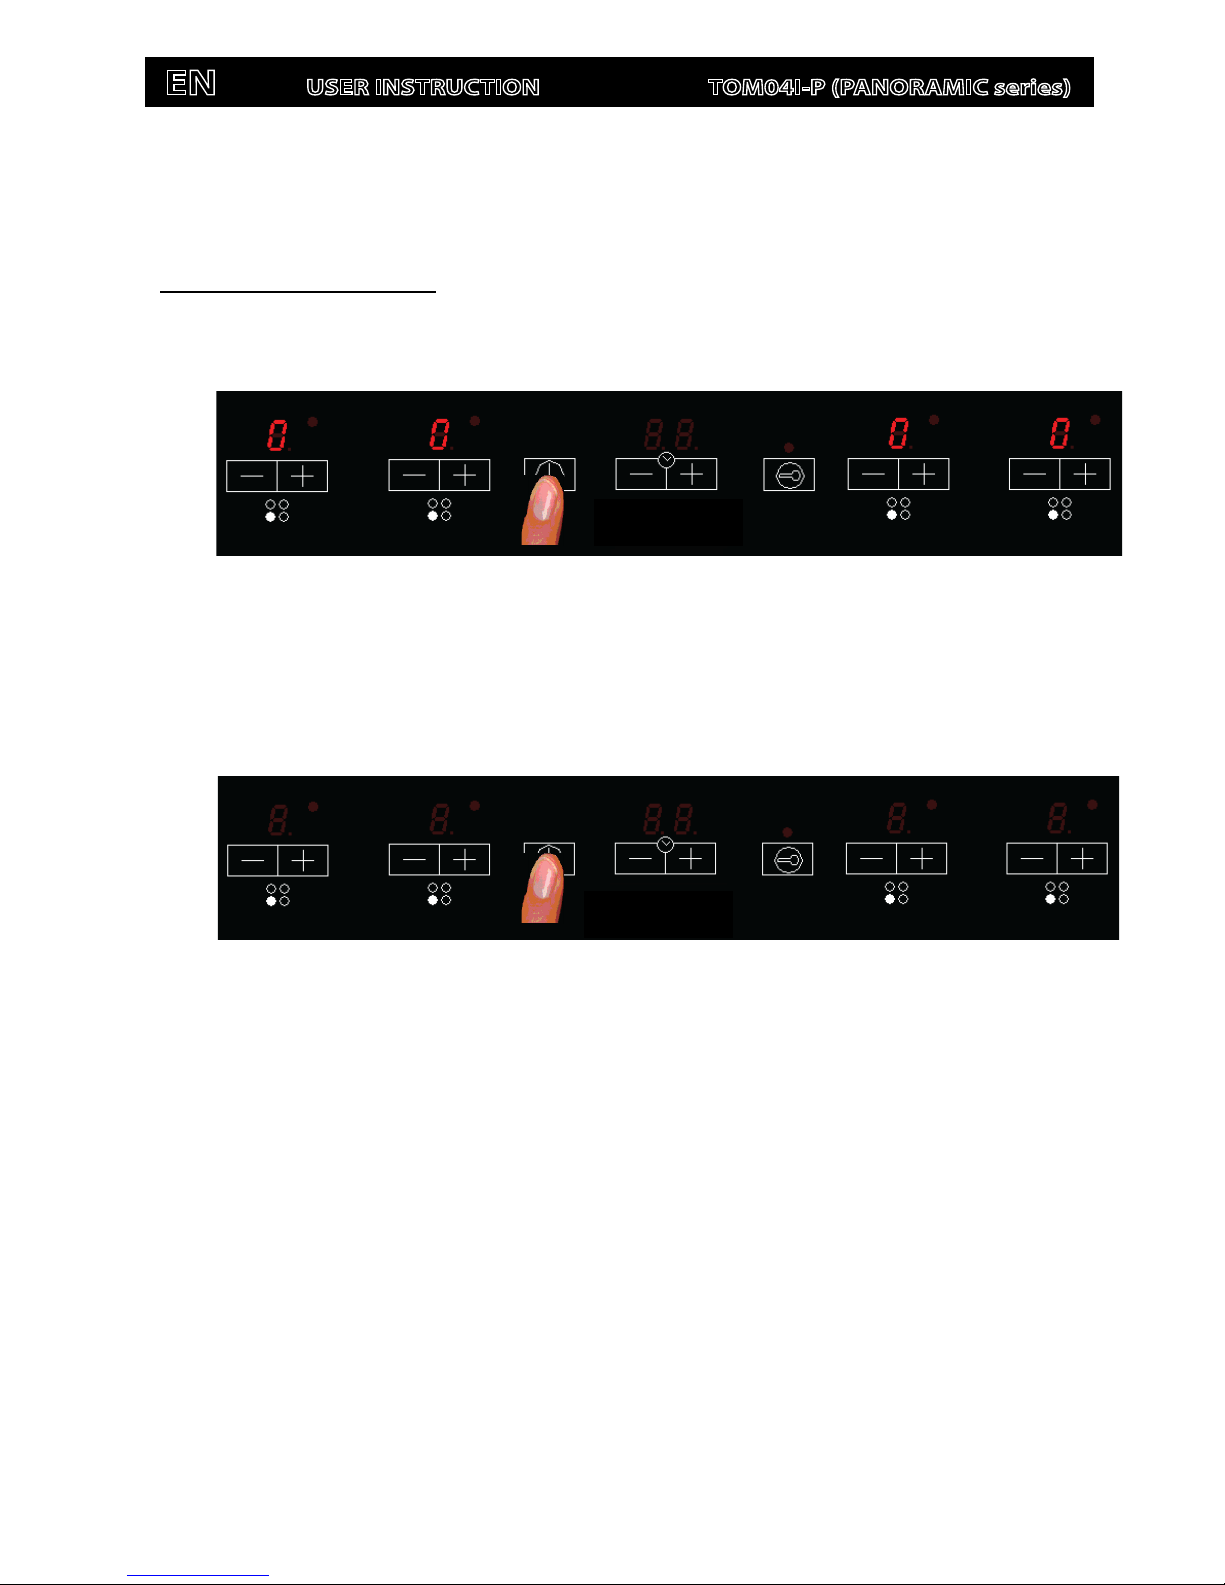
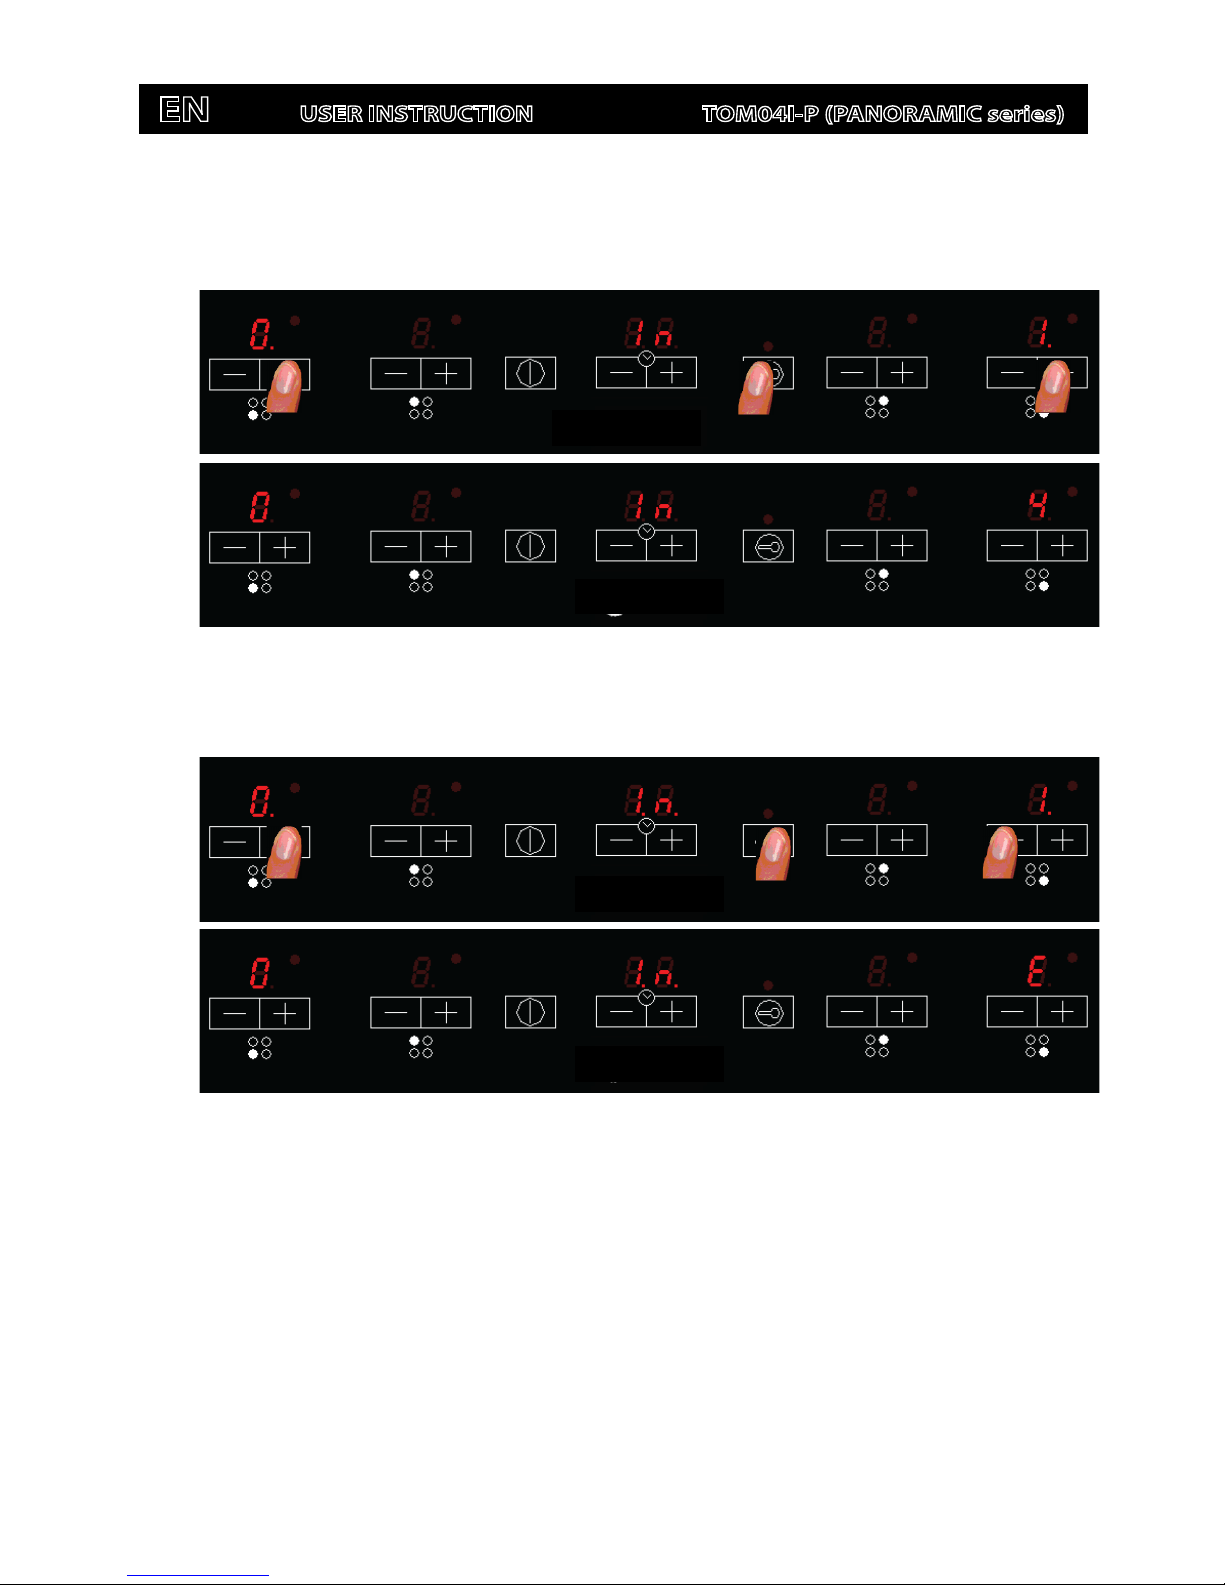
3. Switching On/Off the Cooktop
The Cooktopis switched ON by touching the [ON/OFF] key for 1 sec. A beep sounds and all the heater displays show
a ‘0’.
If the selection of a cook set for a heater is not done in 10 seconds, the Cooktop will be turned off automatically.
The Cooktopis switched OFFby touching the [ON/OFF]key for 1 sec. A beep sounds and all the heaters are switched
off.
The [ON/OFF] key willbe locked to switch On the Cooktop:
if the key lock is activated (KEYLOCK LED on),
or if there is any appliance error.
Fig. 2: Switching OFF the cooktop
Fig. 1: Switching ON the cooktop
EN
USER INSTRUCTION TOM04I-P (PANORAMIC series)
EN
USER INSTRUCTION TOM02I (HYBIRD series)
Page 10
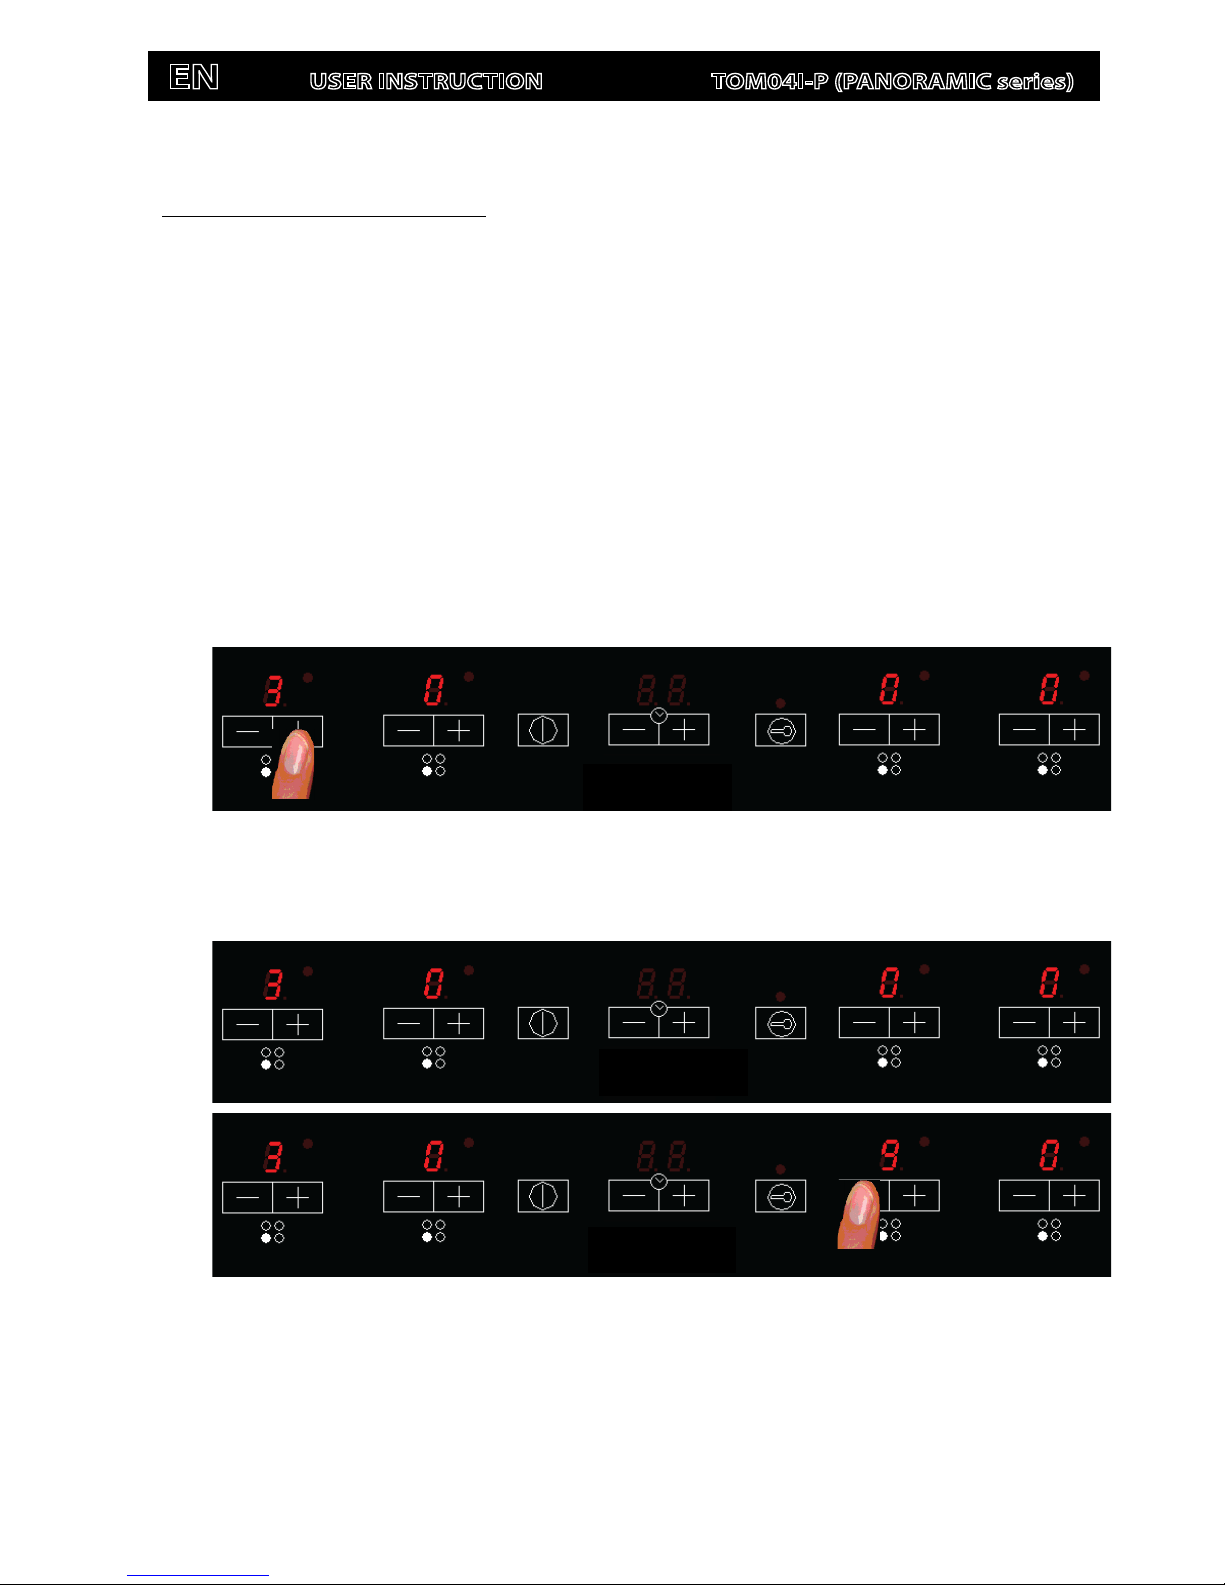
4. Selecting a power level for a heater
When the Cooktopis on, the power level for a heater can be selected by touching the heater [-] [+] keys. In each
increase/ decrease a beep sounds and the corresponding display shows the new power level.
The touch sends the new power level to the InductionControl Unit.
The [-] [+] keys will be locked:
oIf the Cooktopis off, or
oif the key lock is activated (KEYLOCK LED on), or
oif there is any heater erroror appliance error.
If the finger is held down on the key, the action is repeated twice every second. The [+] key raises the cooking level to
9, whereas the [-] key reduces the cooking level to 0.
With the heater at power level 0, the [-] key raises the cooking level to 9.
Fig. 3: Select cookset for a heaters.
Fig. 4: Selected cookset 9 from 0.
EN
USER INSTRUCTION TOM04I-P (PANORAMIC series)

EN
USER INSTRUCTION TOM02I (HYBIRD series)
Page 11
5. Fast Boil (Booster) Function
If the user interface configuration has specific keys for the Booster function, the [Booster] key raises the cooking level
to Booster level a beep sounds and the heater display shows “P”.
With the heater at Booster level, if the [Booster] key is Touched a beep sounds and the cook set is reduced to 9.
The [Booster] keys will be locked:
oIf the Cooktop is off, or
oif the key lock is activated (KEYLOCK LED on), or
oif there is any heater error or appliance error.
*NOTE: The [Booster] keyis only available for the XLL UI models.
If the user interface configuration hasnot specific keys for the Booster functionWith the heater at power level 9, the [+]
key raises the cooking level to Booster level a beep sounds and th e heater display shows “P”.
With the heater at power level 9, the [+] key raises the cooking level to Booster level a beep sounds and the heater
display shows “P”.
With the heater at Booster level, if the [+] key is Touched an error beep sounds and the cook setdoesn’t change.
With the heater at Booster level, if the [-] key is Touched a beep sounds and the cook setis reduced to 9.
The heater will work at maximum power level for 10 minutes. After these 10 minutes a beep sounds and the heater will
return to level “9”.
Fig. 4: Selected Booster function for a heater.
Fig. 5: Cancelling Booster function for a heater.
EN
USER INSTRUCTION TOM04I-P (PANORAMIC series)
EN USER INSTRUCTION TOM02I (HYBIRD series)
Page 12
EN USER INSTRUCTION TOM04I-P (PANORAMIC series)
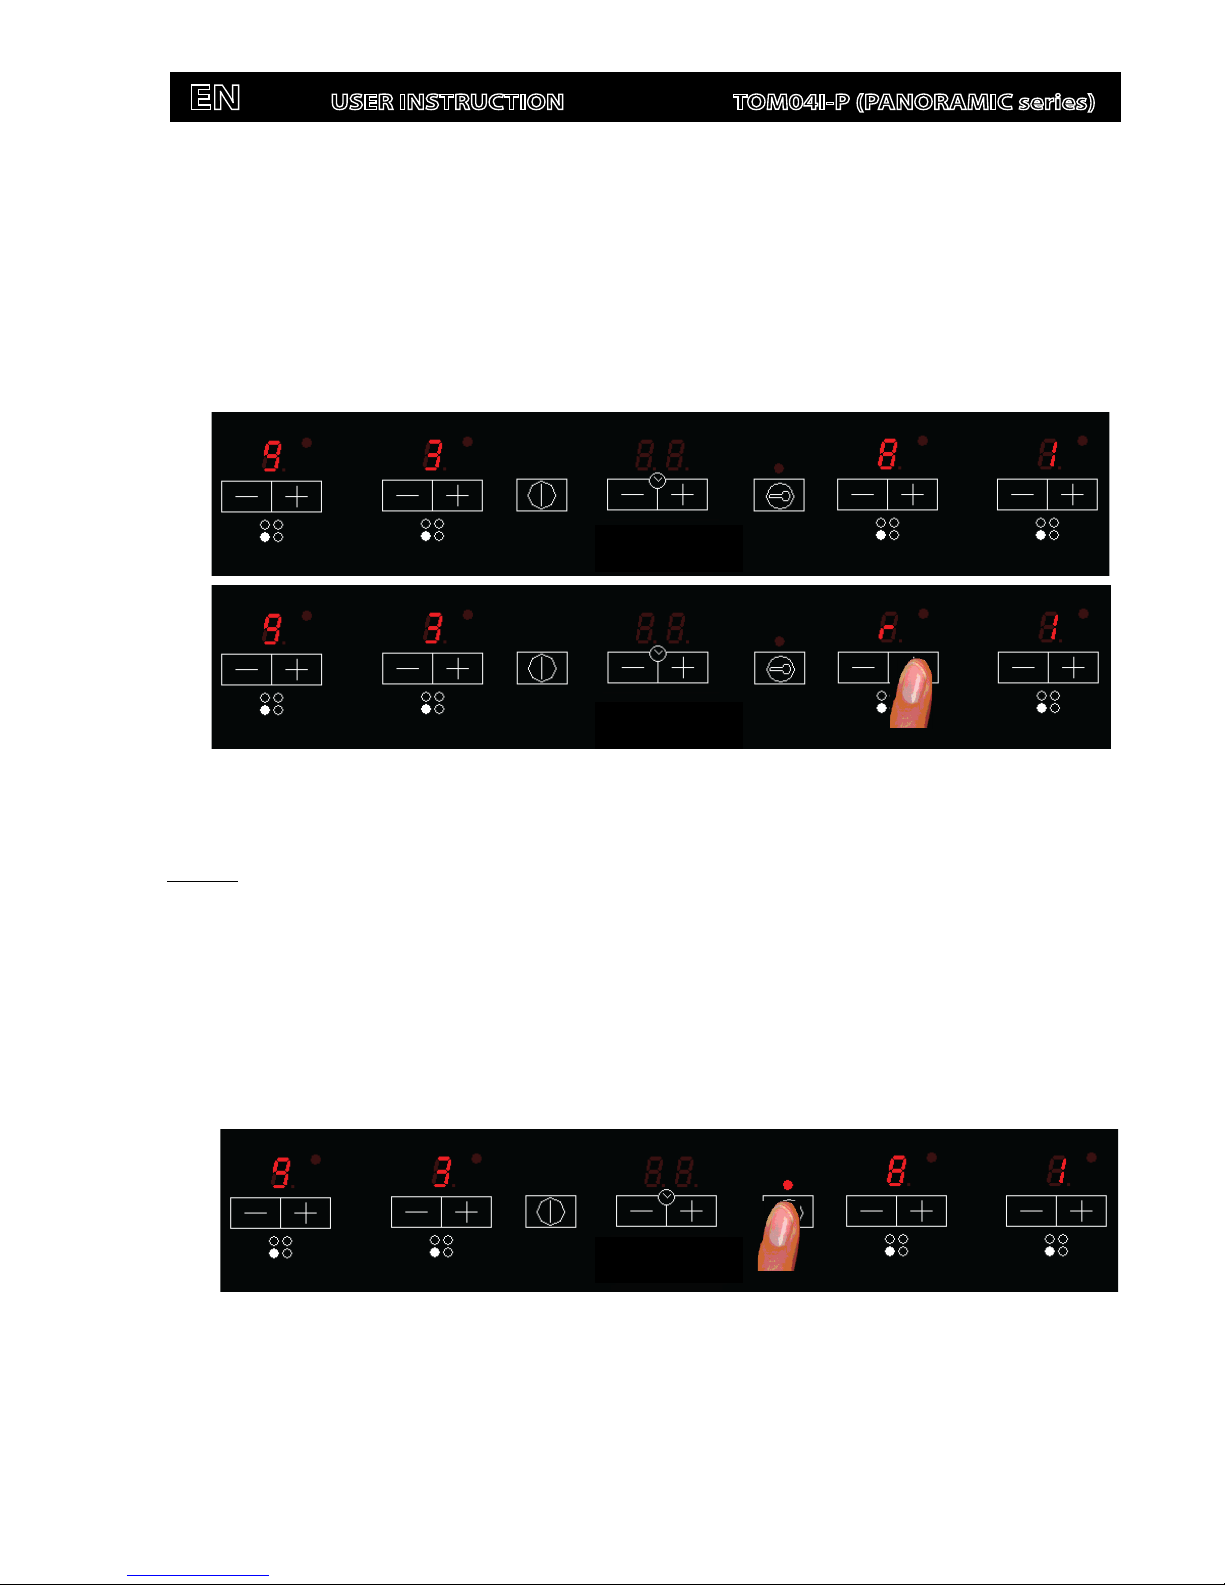
6. Switching Off a Heater
When a heater is on, the heater can be switched off by touching the heater [-] and [+] keyssimultaneously. A beep
sounds and the corresponding display shows “0”.
7. Power Management
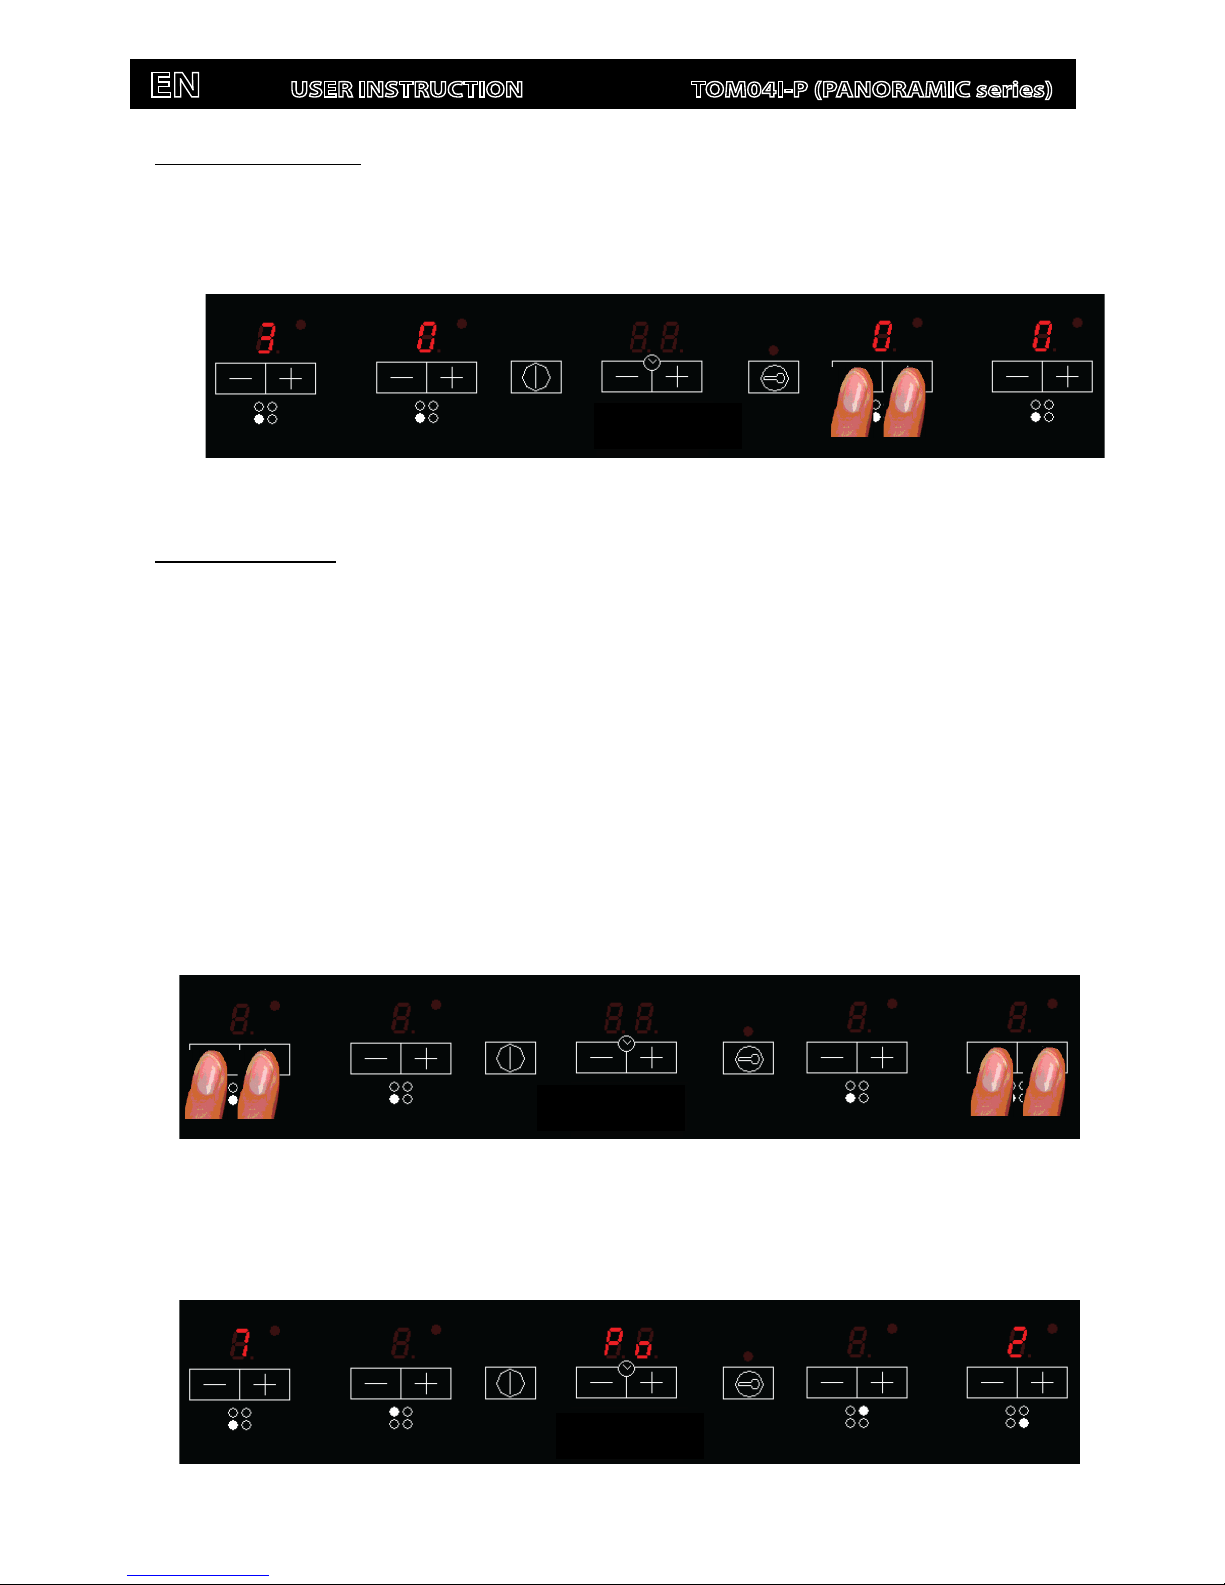
The Cooktopmaximum power limit(7200W*NOTE)can be reduced by the user to 2800W, 3500W or 6000W**NOTE(ECO
Power Limits).
*NOTE: Even if the cooktop maximum power is lower than 7200W.
**NOTE: The selectable power limits are 2800W, 3500W or 6000W even if the cooktop maxi mum power is lower than 6000W.
7.1. Setting Cooktop ECO Power Limit
The sequence to set a new Cooktop Power Limit is:
•During the first 30 seconds after plugging the appliance
•The Touch has to be unlocked and all Heaters Off
•Pressat the same time the left and right end heaters [+] and [-] keys.
•Once this is done, a beep sounds and“Po” characters will be in the timer displays and the “actual Cooktop
Power Limit” will be in the left and right end heater displays.
Fig. 7: First step to set a new Cooktop Power Limit.
Fig. 6: Switching OFF a heater with the [+] end [
-
] keys.
Fig. 8: Showing the Cooktop power limit.
EN USER INSTRUCTION TOM02I (HYBIRD series)
Page 13
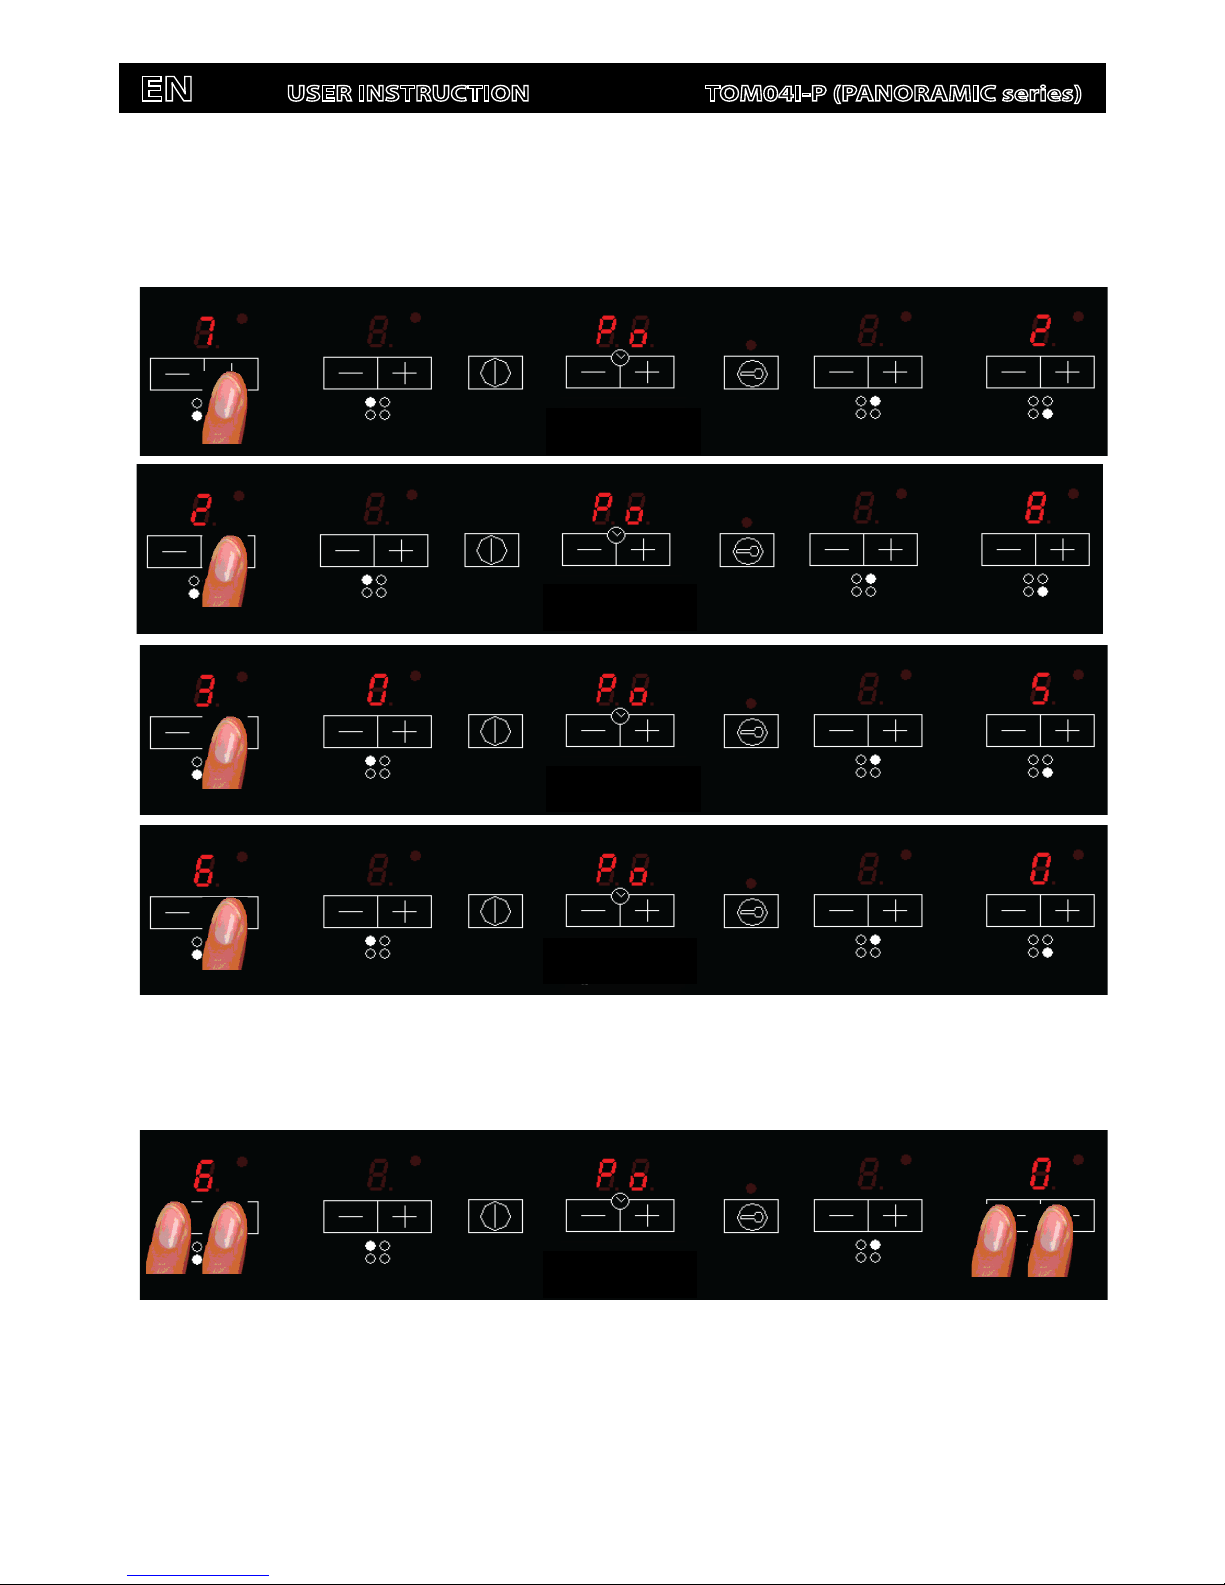
For selecting a new Power Limit:
•With the (+) and (-) keys, the Power Limit is increased. The selectable powers are: 2800W, 3500W,6000W or
7200W. When the power is 7200W, if the [+] or [-] key is touched the power changes to 2800W.
The sequence to finish recording the new Cooktop Power Limit is:
•Press at the same time the left and right end heaters [+] and [-] keys.
•Once this is done, new Cooktop Power Limit is recorded and there is a system reset.
To finish without recording changes:
•If during 60 seconds there is no action,changes are not recorded and there is a system reset.
Fig. 9: Selecting the Cooktop power limit.
Fig. 10:Accepting the selected Cooktop power limit.
EN USER INSTRUCTION TOM04I-P (PANORAMIC series)
EN
USER INSTRUCTION TOM02I (HYBIRD series)
Page 14
EN
USER INSTRUCTION TOM04I-P (PANORAMIC series)
7.2. Power management for ECO Cooktop
For ECOpowercook tops, each time the user tries to increase the power, the total power level of the Cooktop is
calculated. If this total power level is greater than the Cooktoppower limit, the power increase is not allowed. An error beep
sounds and the heater display shows an ‘r’for 3 seconds .
8. Key lock
Touching the [KEYLOCK] key for 1 second, the key lock function is activated and deactivated. If the LEDassociated to
the key lock key is on, the keyboard is locked.
The locking function can be activated when the heaters are on or when the cook top is off. If the cook top is on, the key
lock function locks all the keys except the general [ON/OFF] key and the [KEYLOCK].
When the cook top is off, the key lock function locks all the keys, including the general [ON/OFF] key.
The key-lock is always activated at the start up of the control.
Fig. 12: Key Lock
Fig. 3: Selected cookset 0 for all the heaters. Heater selection finished
Fig. 11:Power increment not allowed.

EN USER INSTRUCTION TOM02I (HYBIRD series)
Page 15
EN USER INSTRUCTION TOM04I-P (PANORAMIC series)
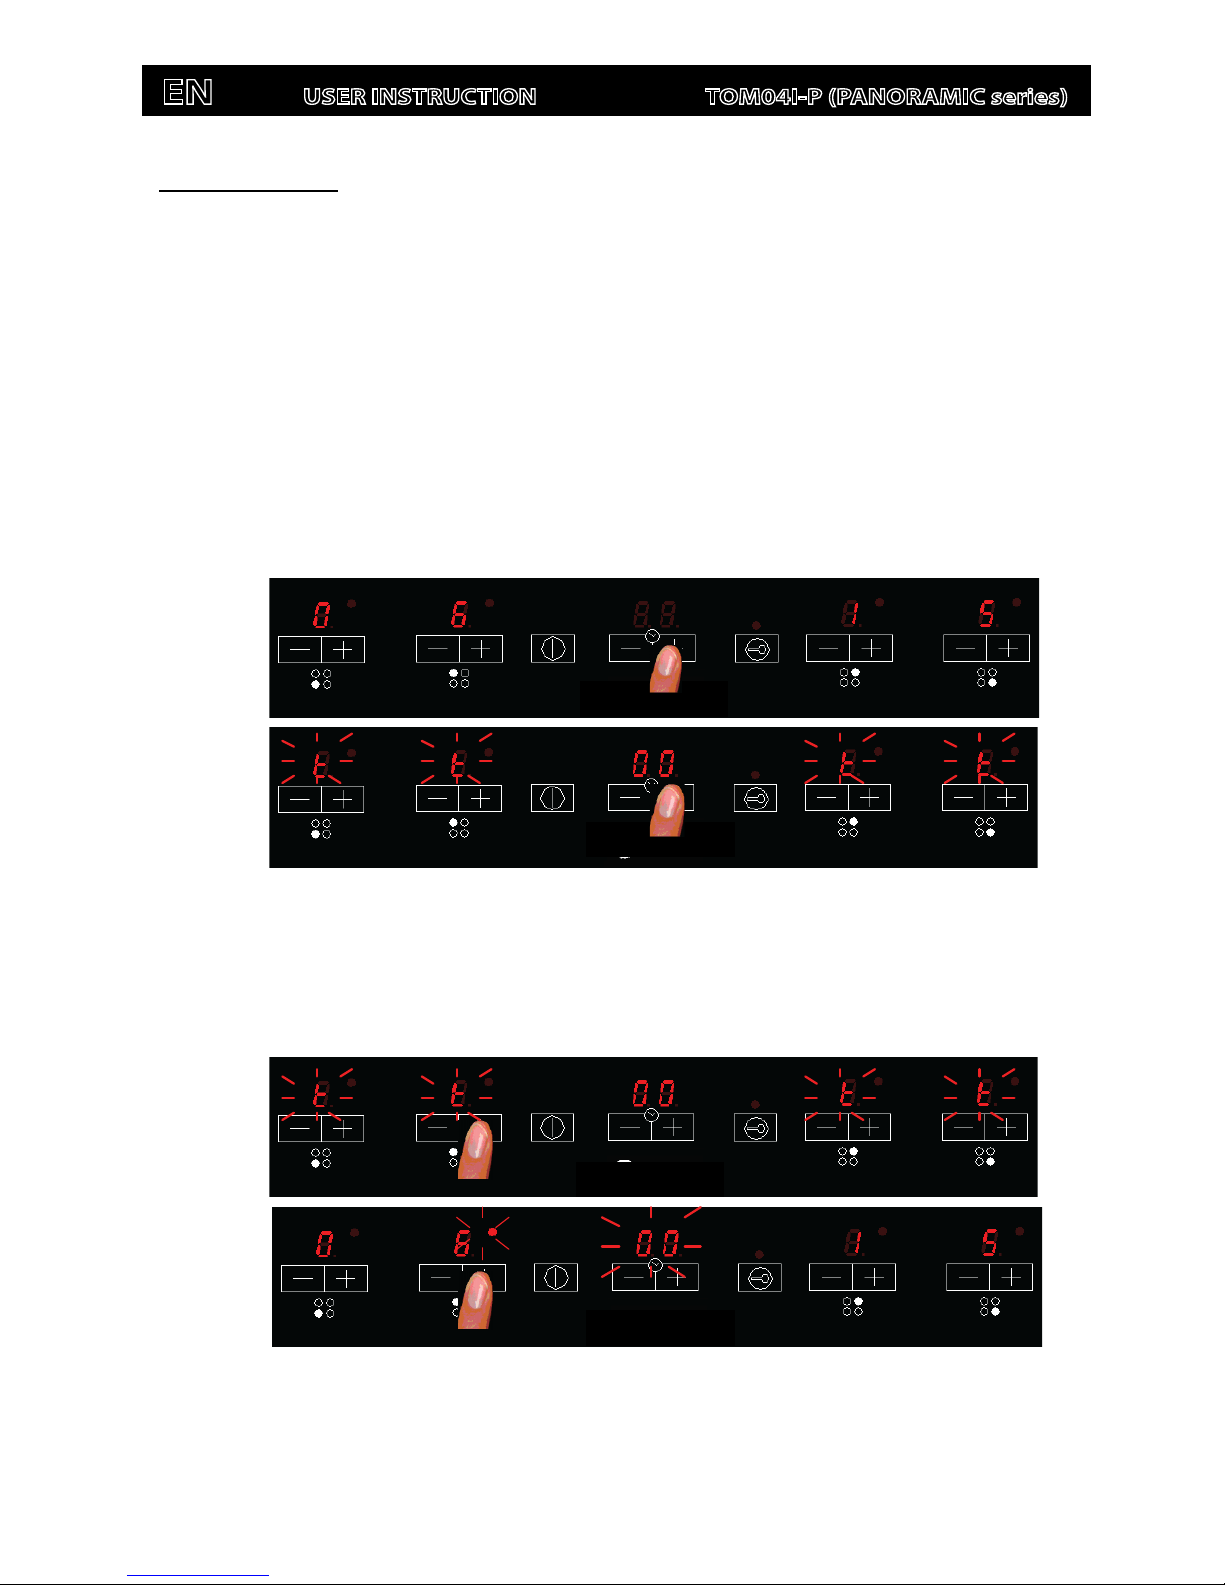
9. Automatic safety off
If the power level is not changed during a preset time, the corresponding heater turns off automatically.
The maximum time a heater can stay on, depends on the selected cooking level.
Power level
Max. time on (hours)
1
10
2
10
3
10
4
10
5
10
6
10
7
10
8
10
9
3
Table.1: Heater Auto switch off
EN
USER INSTRUCTION TOM02I (HYBIRD series)
Page 16
EN
USER INSTRUCTION TOM04I-P (PANORAMIC series)
10.Operating the timer
The timer value can be selected between 1 and 99 minutes. It is possible for the user to time a heater at any power level
(0...Bo). The user can select only one heater on which the timer function is to operate. The timer last minute will be displayed in
seconds.
The [+TIMER] [-TIMER] keys will be locked:
oIf the Cooktopis off, or
oif the key lock is activated (KEYLOCK LED on).
10.1. Activatingthe timer
Whenthe timer off, it is activated by pressing the timer keys [+TIMER] or [-TIMER]. A beep sounds, the timer display
shows a “00” and the heater displays show a “t” blinking indicating that a heater has to be selected.
10.2. Selecting a timed heater
When the timer is waiting a heater selection, the timed heater is selected by pressingany heater key. A beep sounds,
the LED next to the heater display starts blinking if no power is selected, or is on if any power is selected. The timer display
startsblinkingindicating that the time has to be selected.
The user can selectonly one heater at a time.
The heater selection can be done beginning from timer off status.
Fig. 13:
Activating the timer
Fig. 14:
Selecting a timed heater

EN
USER INSTRUCTION TOM02I (HYBIRD series)
Page 17
EN
USER INSTRUCTION TOM04I-P (PANORAMIC series)
The heater must always be selected before the time is set. When the timer is waiting for heater selection, if the timer
key [+TIMER] or [-TIMER] is pressed, the timer is switched off.
If the heater is not selected before 10 seconds, the timer is switched off.
10.3. Selecting the time
When the timer is in waiting a time selection, the timer value can be selected between 1 and 99 minutes touchingthe
[+TIMER] or [-TIMER]keys ,.
If the key [+TIMER] or [-TIMER]associated with the timeris held down, the change speed is increased automatically.
This makes possible to reach the desired timesetting more quickly.
If the time is not selected before 10 seconds, the timer is switched off.
If the selected time is “00” after 10 seconds the timer is switched off.
10.4. Starting Timer Countdown
The countdown starts 10 seconds after the last operation over the [+TIMER] or [-TIMER]key. A beep sounds and the
timer display stop blinking andalso led heater stops blinking if anypower is selected.
The last minute will be displayed in seconds.
10.5. Changing the time
When the timer is in countdown the user can change the time at any time by touching the timer [+TIMER] or [-TIMER]
key, the countdown stops and the timer changes to time selection status waiting a time selection.
Fig. 15:
Selecting
ter time
Fig. 16: Timer countdown

EN
USER INSTRUCTION TOM02I (HYBIRD series)
Page 18
EN
USER INSTRUCTION TOM04I-P (PANORAMIC series)
and the
10.6. Timer Countdown End
When the time set on the timer has run out, the timed heater is switched off, the timer display and the timed heater led
startsblinking and a timer alarm beep sounds for one minute.
The timer alarm can be cancelled by the user at any time, even during the first minute of the alarm . When the timer is in
alarm status, by pressing any key of the touch control the timer is switched off.
10.7. Switching off the timer
To cancel the operation of the timer, select the time value of “00” using the [-TIMER] key or pressing the [+TIMER] and
[-TIMER]keysat the same time.
10.8. Autokey-lock
When all the heaters are not powered, and one heater is temporized at zero power level, the key-lock function is
activated after 1 minute.
Fig. 17: Timer countdown end
Fig. 18: Timer off
11.Displaying software versions
The sequence to show the software version is:
•During the first 30 seconds after plugging the appliance
•The Touch has to be unlocked and all Heaters Off
User interface’s software version is shown by pressingat the same time the left and right end heaters [-] keys
Key-Lock key.
Fig. 19: UI software version
EN
USER INSTRUCTION TOM02I (HYBIRD series)
Page 19
EN
USER INSTRUCTION TOM04I-P (PANORAMIC series)
Induction microcontroller 1 software version is shown by pressing at the same time the left and right end heaters [+]
keys and the Key-Lock key.
Induction microcontroller 2 (only for 3 or 4 heaters cooktops) software version is shown by pressing at the same time
the left end heaters [+] key, the right end heaters [-] key and the Key-Lock key.
A beep sounds and the rear heater displays show the software version. Software version is composed of two parts:
functional part and safety part. To distinguish between the two parts, when safety version is shown the dots of the displays are
activated.
The message is kept for 10 seconds or until any key or combination of keys is touched. When the message disappears
a beep sounds and the user can continue with normal operation.
Fig. 21: Induction microcont
roller2 software version
Fig. 20: Induction microcontroller1 software version
EN
USER INSTRUCTION TOM02I (HYBIRD series)
Page 20
EN
USER INSTRUCTION TOM04I-P (PANORAMIC series)
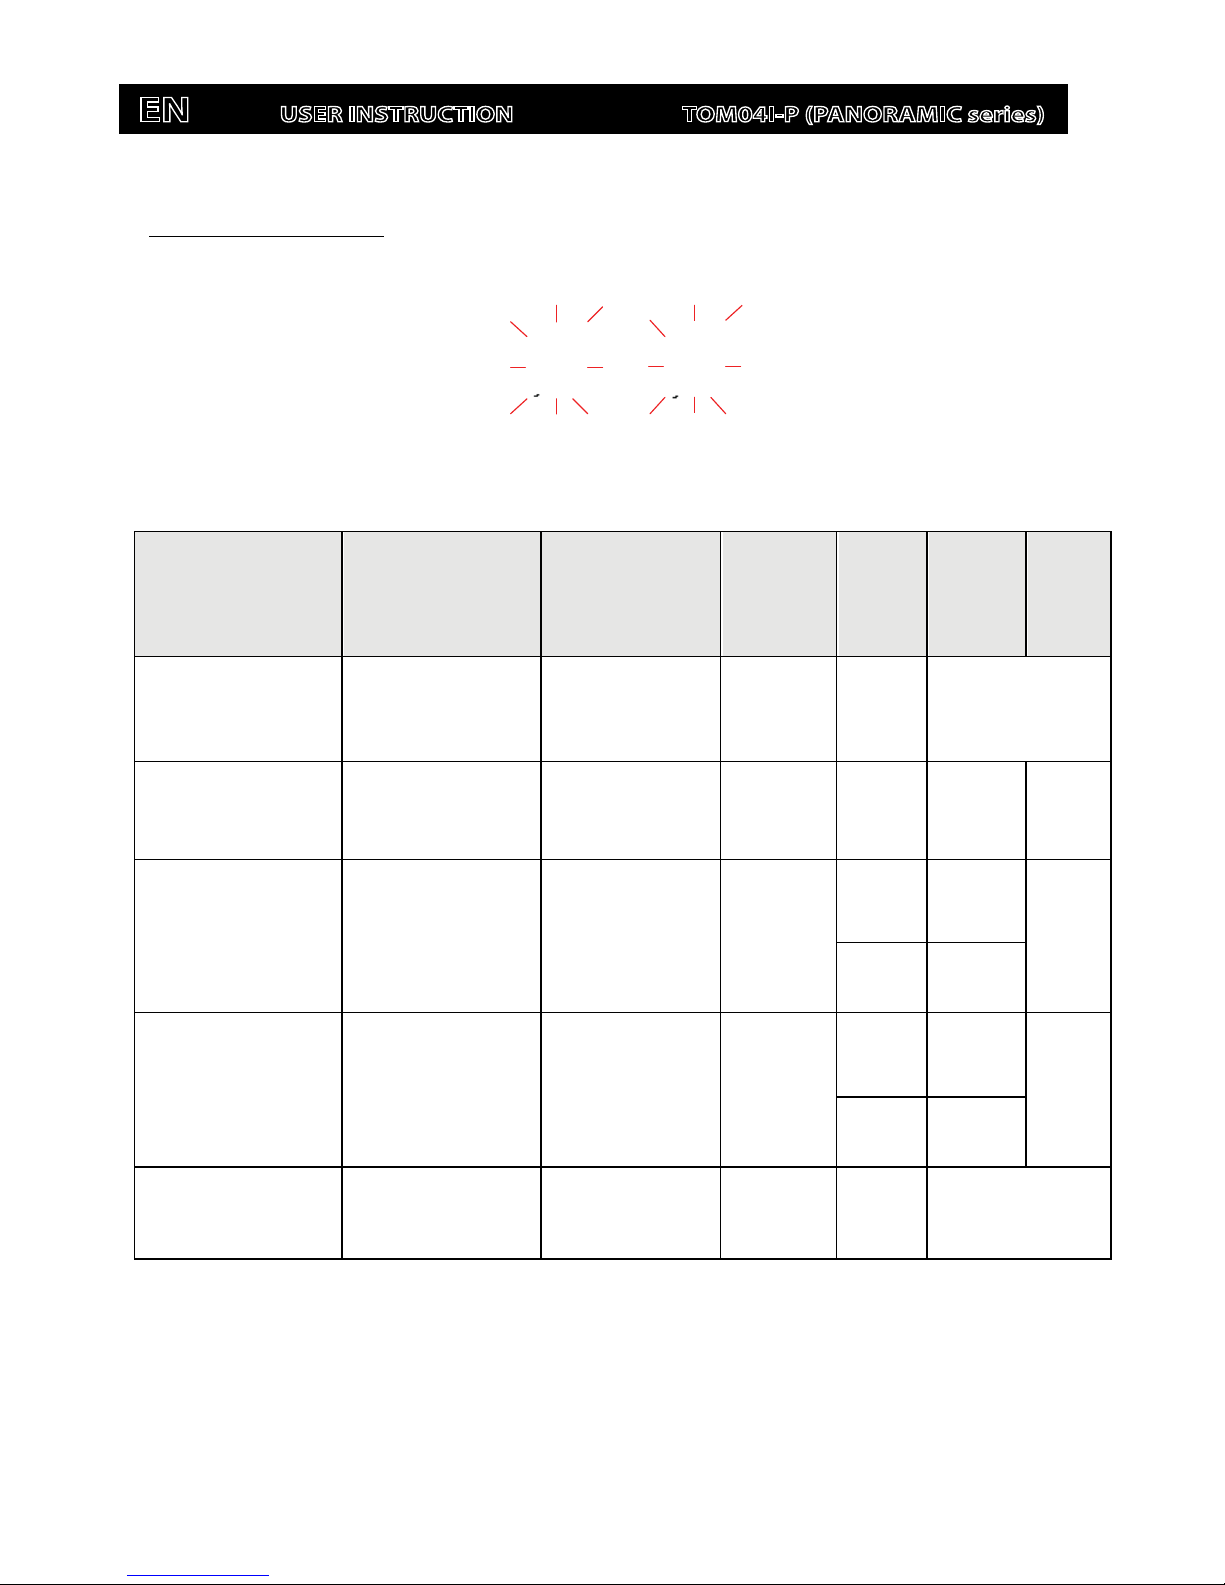
12. Displaying Special Statuses
The corresponding heater display alternates between twocharacters depending on the status.
Event
(Visualization Priority Order)
Start
conditions
End
conditionsActionHeater
status
Heater
Display
fore
(1 sec.)
Heater
Display
back
(1 sec.)
Power increment not
allowed
(only for ECO models)
Asked Cooktop
power > Cooktop
ECO power limit
2 sec
Power
increment
not allowed
On/Off‘r’
Heater without suitable
pan or without pan
No pan or not suitable
pan over the heater
Suitable pan over
the heater
After 1
minute
Heater off
On ‘Power’‘?’
Induction heater
overtemperature
COIL
TEMPERATURE
>T1(1)
COIL
TEMPERATURE
<T2(1)
No power is
delivered to
the heater
Off
‘’ or
‘H’‘C’
On ‘Power’
Induction generator
overtemperature
HEATSINK
TEMPERATURE
>T3(1)
HEATSINK
TEMPERATURE
>T4(1)
No power is
delivered to
the heater
Off‘’ or
‘H’‘c’
On ‘Power’
Hot glass over a heater
(residual heat)
COIL
TEMPERATURE
>T5(1)
COIL
TEMPERATURE
<T6(1)
---------- Off‘H’
(1)For T1, T2, T3, T4, T5 and T6 values see the corresponding drawing.
Table of contents
Other Tomate Cooktop manuals


Popular Cooktop manuals by other brands

St George
St George 5667100 Operating and care instructions

K&H
K&H SV-IN-2001 User instruction manual

Kenmore
Kenmore ELITE 790.428 Use & care guide

Keating Of Chicago
Keating Of Chicago MG-2 manual

Glem
Glem C64ECT Installation diagram

Kenyon
Kenyon Lite-Touch Portrait B40547 Installation guide & operation manual

KitchenAid
KitchenAid KECD806RBL05 parts list

Bosch
Bosch NIT8666UC use and care manual

Bosch
Bosch NETP069SUC User and care manual

Bompani
Bompani BO294MB/N Instructions for the installation and use

Caso
Caso Touch 3500 Original operating manual

Christie
Christie Spyder Stereoscopic Option 2 Installation and user manual


