Tomcat GT User manual

Operating Instructions (EN)
Read these Instructions before
using the machine.
Read these Safety Messages
before using the machine.
COMMERCIAL CLEANING EQUIPMENT
www.tomcatequip.com
1711 South Street
Racine, WI 53404 (USA)
(800) 450-9824 | (+001) 262-681-6470 VERSION 15.167
©2015 RPS Corporation GT-OP-EN
Scan With Phone for more Information

- 2 - GT-OP-EN
INTRODUCTION
This manual is furnished with each new machine. This manual will allow the Operator to get the best performance out of
your RPS manufactured Scrubber-Drier, Sweeper, Burnisher, or Orbital Scrubber. Read this manual thoroughly before
operating or servicing the machine.
This machine will provide excellent performance, but the best results will be obtained at the most minimum costs if:
• The machine is regularly maintained - per the machine Preventative Maintenance instructions provided.
• The machine is operated with reasonable care and caution.
• The machine is maintained with manufacturer supplied parts.
ABOUT THIS MANUAL
TABLE OF CONTENTS: Tells you where to look in the manual.
SAFETY MESSAGES: Section contains important information regarding hazard or unsafe practices of the machine. Lev-
els of hazards are identified that could result in product or personal injury, or severe injury resulting in death.
OPERATION CONTROLS / MACHINE COMPONENTS: Shows you the different machine controls and features.
MACHINE SETUP: Tells you how to setup machine from un-crating to installing squeegee and brushes.
MACHINE OPERATION: Section is to familiarize the operator with the operation and function of the machine.
BATTERY CHARGING: Shows you how to charge the batteries (on-board and off board charging).
MAINTENANCE: This section contains preventative maintenance to keep the machine and it’s components in good work-
ing condition. They are listed in this general order:
• Batteries
• Brooms
• Service Schedule
• Machine Trouble Shooting
TROUBLE SHOOTING: A list of common problems that may occur.
MACHINE SPECS: Tells you Machine Specifications for the various parts of the machine.
MACHINE INSTALL FORM: Should be filled out upon machine installation and faxed to 1-866-632-6961 or online at
www.rpscorporation.com.
WARRANTY POLICY: Tells you coverage, exclusions and limitations to warranty.
NOTE: The serial number of your machine is located on the lower half of the control panel of the machine.
AS OUR POLICY IS ONE OF CONSTANT IMPROVEMENT - ALL INFORMATION AND
SPECIFICATIONS ARE SUBJECT TO CHANGE WITHOUT NOTICE.
SERIAL NUMBER

GT-OP-EN - 3 -
TABLE OF CONTENTS
Introduction 2
About This Manual 2
Table of Contents 3
Safety Messages 4
Safety Label Locations 6
Operation Controls 7
Operation Controls 8
Machine Components 9
Machine Setup 10
Un-Crating Machine: 10
Connecting Batteries: 10
Installing Main Broom: 10
Installing Side Brooms: 11
Adjusting Side Brooms: 11
Machine Operation 11
On-Board Charger 14
On-Board Battery Charging: 14
Description of LED 14
Battery Charging 15
External Battery Charging (Optional): 15
Battery Maintenance Guide 16
Safety: 16
Inspection and Cleaning: 16
Storage: 16
Watering: 16
Maintenance 17
Daily Maintenance: 17
Weekly Maintenance: 17
Monthly Maintenance: 17
Yearly Maintenance: 17
Storing Machine: 17
Checking Battery Specific Gravity: 17
GT PM Records 18
Trouble-shooting 20
Machine Specs 21
Common Wear Parts 22
Cylindrical Brooms: 22
Side Brooms: 22
Filter Kits: 22
Seal kits: 22
Standard Warranty Policy 23
Machine Install / Warranty Registration 24

- 4 - GT-OP-EN
SAFETY MESSAGES
You will see four kinds of safety reminders in this manual:
DANGER
DANGER indicates a hazardous situation which, if not
avoided, will result in death or serious injury.
WARNING
WARNING indicates a potentially hazardous situation
which, if not avoided, could result in death or serious
injury.
CAUTION
CAUTION indicates a potentially hazardous situation
which, if not avoided, could result in minor or moderate
injury or damage to this machine or nearby objects. CAU-
TION also can be used to alert against unsafe practices.
NOTICE
NOTICE indicates information considered important, but
not hazard-related. This safety message may be related
to property damage or warranty warnings.
Your safety, and that of others, is very important. Operating this machine safely is an important responsibility.
DO NOT OPERATE THIS MACHINE UNLESS:
• You are trained and authorized to do so
• You have read and understood this Operator’s Manual
• On surfaces with greater than a 2% grade unless this machine is equipped with a functional parking brake.
WHEN OPERATING THIS MACHINE:
• Remove loose objects from the floor that could be projected from the rotating Brushes
• Keep your hands and feet away from the rotating Brushes
• Do not operate this machine where flammable liquids are present
• Use caution when maneuvering
BEFORE LEAVING THE MACHINE:
• Park the machine on a level surface
• Turn the machine off
BEFORE SERVICING THE MACHINE:
• Disconnect the Batteries
DANGER
Explosive hydrogen gas forms when Batteries are
charging. An open flame or spark can cause this gas
to explode. Serious personal injury or property damage
could occur. Only charge the Batteries in this machine in
a well ventilated area.

GT-OP-EN - 5 -
WARNING
The Batteries in this machine produce hazardous
voltage which can cause electrical shock, burns and/
or electrocution. Always disconnect Batteries before
servicing this machine.
WARNING
This unit is intended for use indoors, and on dry
surfaces. If outdoor use is necessary, remain on solid
ground (not gravel or sand). Avoid standing water and
be familiar with the use of the “wet-sweep” bypass.
WARNING
The Batteries in this machine contain sulfuric acid,
which causes burns to skin. If battery acid contacts
clothing or skin, rinse the effected area with cold water
immediately. If battery acid gets on your face or in your
eyes, flush the area immediately with cold water and
seek medical attention.
WARNING
To avoid electrical shock, do not operate this machine
over electrical floor outlets.
WARNING
Dress safely. Do not wear rings or metal wrist watches
when servicing this machine, as they can cause an
electrical short circuit which can cause serious burns.
WARNING
Do not remove, paint over or destroy warning decals. If
warning decals become damaged, call 1-262-681-3583
for free replacements.
WARNING
Dress safely. Do not wear a neck tie, scarf, or any
loose or dangling clothing while operating this machine.
Loose or dangling clothing or neck-wear can tangle in
rotating parts, causing serious injury or death.
WARNING
Always turn off this machine before leaving it unat-
tended. Do not allow untrained persons to operate this
machine.
WARNING
NO RIDERS. Do not carry passengers on this ma-
chine. Do not use this machine as a stepladder or work
platform.
WARNING
Understand the dynamic braking system before you
operate the machine on ramps. Machine may coast.
WARNING
Before you service a Battery, always wear face protec-
tion, protective gloves and protective clothing. Battery
acid or battery explosion can cause serious injuries.
CAUTION
Do not operate this machine if any parts have been
damaged or removed.
CAUTION
Always use the automatic battery charger provided by
the manufacturer of this machine to charge the Batter-
ies of this machine. It is designed to charge the Batter-
ies at the appropriate rate. If you must use a different
charger, disconnect the Batteries before charging to
avoid damage to the electronic speed controller.
CAUTION
To avoid damage to the electronic control components
of this machine, Do not store this machine outdoors. Do
not pressure wash this machine.

- 6 - GT-OP-EN
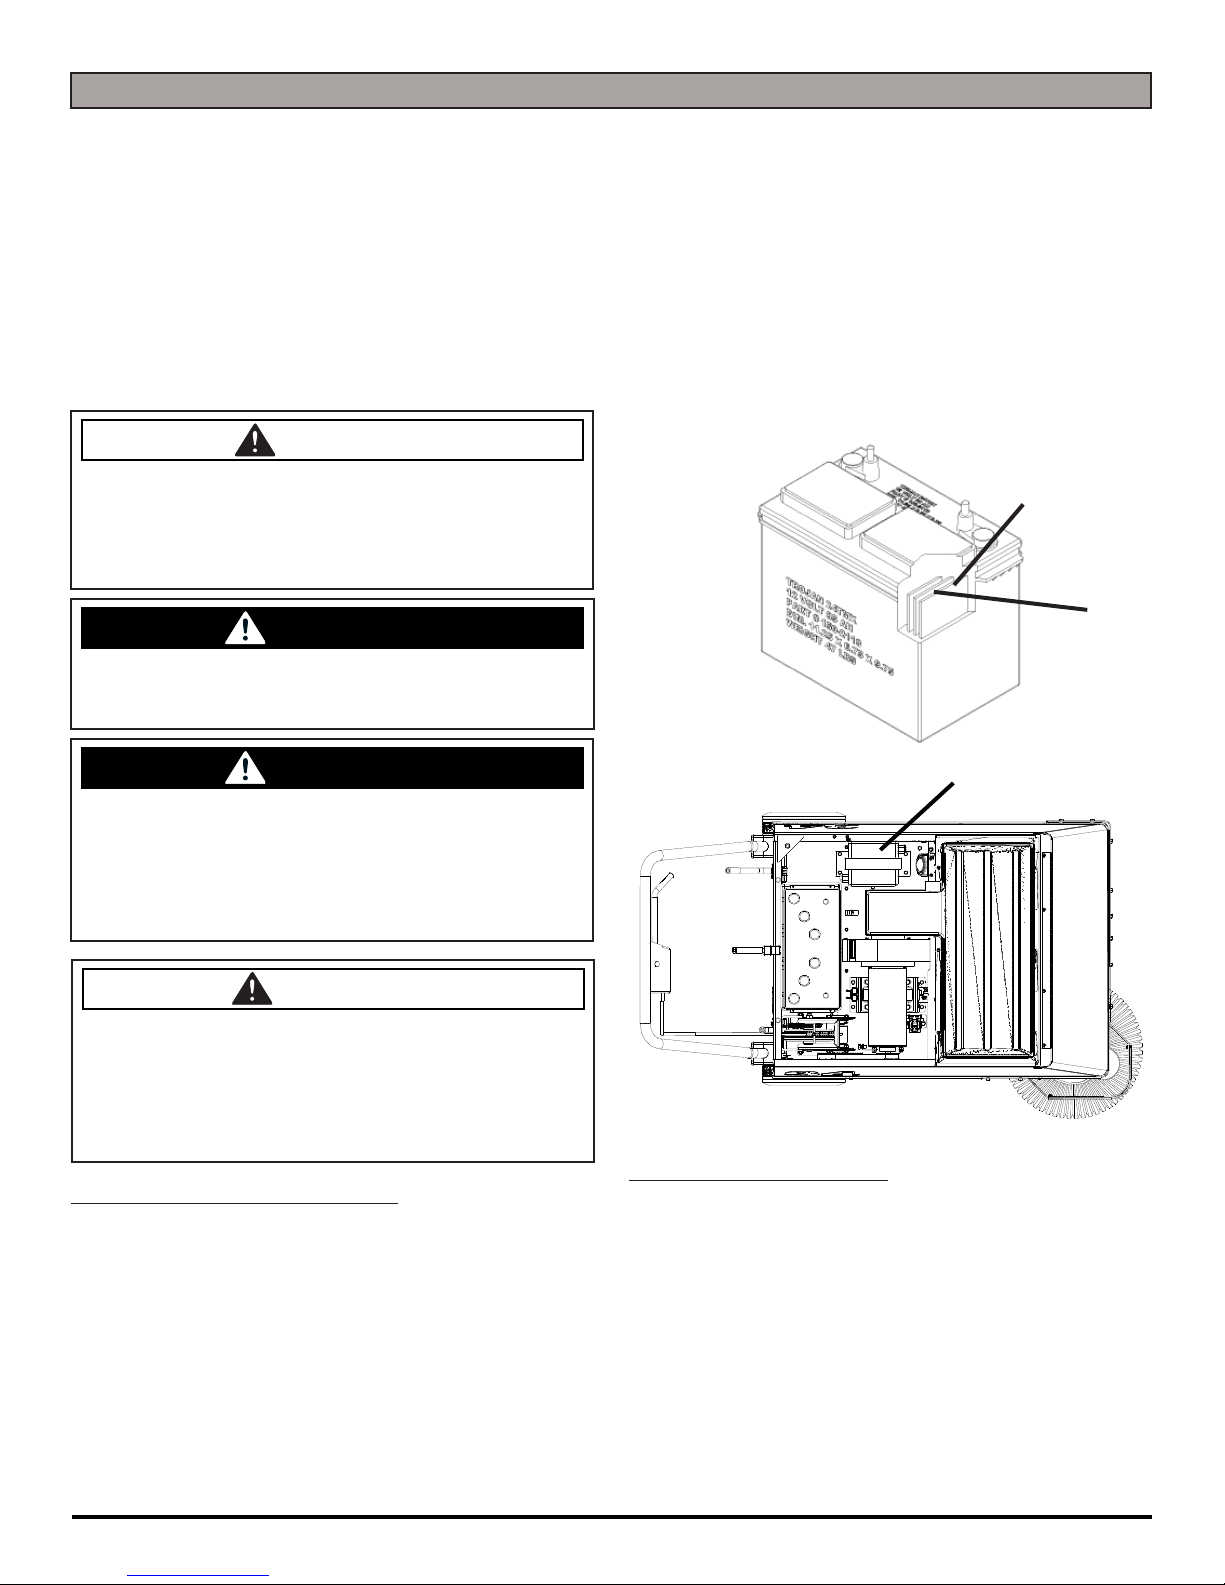
SAFETY LABEL LOCATIONS
Read and obey all Safety Labels on your GT Floor Sweeper. If you have questions about these labels, ask your
supervisor.
These images indicate where on the GT Safety Labels are located. If ever the labels become illegible, worn off, or torn,
promptly report it to your supervisor and replace it.
USE ONLY DISTILLED WATER IN THE BATTERIES. USE
ONLY THE OEM CHARGER PROVIDED WITH THE MA-
CHINE. ALWAYS DISCONNECT THE BATTERY BEFORE
SERVICING THE MACHINE.
REFER TO MANUAL OR CALL +011-262-681-3583
DANGER
EXPLOSION RISK!
EXPLOSIVE HYDROGEN GAS FORMS WHEN
BATTERIES ARE CHARGING. AN OPEN FLAME
OR SPARK CAN CAUSE THIS GAS TO EXPLODE.
ONLY CHARGE THE BATTERIES IN THIS MA-
CHINE IN A WELL VENTILATED AREA.
BATTERY CHARGING LABEL
PART #: 253-7280
USEONLY DISTILLED WATERIN THE BATTERIES. USE
ONLYTHE OEM CHARGER PROVIDEDWITH THE MA-
CHINE. ALWAYSDISCONNECTTHE BATTERY BEFORE
SERVICINGTHE MACHINE.
REFERTO MANUALOR CALL +011-262-681-3583
DANGER
EXPLOSION RISK!
EXPLOSIVEHYDROGEN GAS FORMS WHEN
BATTERIESARE CHARGING. AN OPEN FLAME
ORSPARK CAN CAUSE THIS GASTO EXPLODE.
ONLYCHARGE THE BATTERIESIN THIS MA-
CHINEIN A WELL VENTILATED AREA.

GT-OP-EN - 7 -
OPERATION CONTROLS
1. HANDLEBAR ADJUSTMENT CLAMPS: Loosen clamps to adjust the total height of the handlebar
2. RECHARGE CYCLE METER: Shows the amount of charges on a machine
3. MAIN BROOM POSITION LEVER: Controls whether the Main Broom is UP (Lever to the left) or Main
Broom is DOWN (Lever to the right)
4. MAIN POWER OFF/MAIN/SIDEBROOM SWITCH: Controls what on the machine has power - If in the
middle position, only Main Broom has power while in the top position the Side Broom has power as well
5. BATTERY GAUGE / HOUR METER: Indicates the amount of battery charge remaining along with total
hours used
6. CLUTCH AND BRAKE LEVER: Pulling on the lever engages the clutch wheel to drive Rear Wheels
and lowering the lever engages the Brake
7. ADJUSTABLE HANDLEBAR: Handlebars being adjustable by loosening and lowering or raising the
full handlbar piece allows Operators of any height to operator the machine comfortably
8. CLUTCH AND BRAKE CABLE ADJUSTMENT: The Clutch and Brake operator with the same control
and by way of the same clutch donut - for adjusting see Clutch and Brake Adjustment
9. HOOD LATCH: Locks the hood down in place - Release to gain access underneath the hood
10. SIDE BROOM POSITION LEVER: Contols whether the Side Broom is UP (Lever to the right) or Side
Broom is DOWN (Lever o the left)
11. FILTER SHAKER CRANK: Turn the Filter Crank to clean out the filter before emptying the Hopper -
Crank must be vertical before reomoving or replacing the Hopper
6
78
9
10
11
1
2
3
4
5

- 8- GT-OP-EN
OPERATION CONTROLS
1. SAFETY SHUT-OFF SWITCH: Safety Switch that doesn’t apply motors to operate unless depressed -
Automatically operated by closing the Hood
2. ONBOARD BATTERY CHARGER: Onboard charger allows operator to charge machine wherever the
need may arise
3. WET-SWEEP BYPASS DOOR: Door closed to operate on normal floors - open door for sweeping on WET
floors
4. DUST FILTER ACCESS PLATE: Access Plate holds Filter in place - if need to replace filter should arise
remove Access Plate to gain access to the Filter
5. SIDE BROOM ADJUSTMENT KNOB: Adjust Knob in the right direction to elevate the Down position of
the Side Broom - likewise adjust knob left to lower the Down position of the Side Broom
6. BATTERY ANDERSEN CONNECTOR: Disconnect batteries easily and quickly with the quick
disconnect Andersen Connector on the battery
1
2
3
4
5
6
5
6

GT-OP-EN - 9 -
MACHINE COMPONENTS
1. MACHINE HOOD: Machine Hood automatically hits Motor Safety Switch upon closure
2. REAR WHEELS: Rear Wheels driven by the Clutch Lever
3. SIDE BROOM: Machine is equipped with a Side Broom - to activate the Side Broom, ensure
that the Power Switch is to UP position
4. HD BUMPER (OPTIONAL): For extra protection for the Side Broom system against Walls and
other objects
5. FRONT CASTER: 180° Swivel Front caster allows easy maneuverability of the machine
6. HOPPER: Stores all dust and debris from sweeping - To empty, release latch and pull out
from under machine
1
2
3
4
5
6

- 10 - GT-OP-EN
MACHINE SETUP
UN-CRATING MACHINE:
Carefully check the crate for any signs of damage and that
the batteries are in the unit.
To un-crate the machine, remove banding strips from
around the crate. Take off the top and sides and dispose
properly. Remove brackets from machine wheels.
Remove bolts from pallet, then remove board. Carefully
roll the machine off of the base. Notify the carrier
immediately if concealed damage is discovered.
CONNECTING BATTERIES:
Your machine is equipped with (1×) 12-Volt/ 175 AH, (1×)
12-Volt/ 215 AH, or (1×) 12-Volt/ 225 AH Wet Lead Acid,
AGM, Industrial, or Deep Cycle Battery which form a 12
Volt system.
(SEE PICTURE BELOW FOR CORRECT CABLE
CONNECTIONS)
1. Turn all switches to the OFF position and remove Key
(Optional).
2. Release Machine Hood Latch and open Machine
Hood. Attach all Battery Cables to Terminals as shown
below.
3. Turn ON main power switch and check the Battery
Meter to ensure correct installation. Charge Batteries
if needed (SEE BATTERY CHARGING).
NOTICE
Batteries are a possible environmental hazard. Consult
your Battery supplier for safe disposal methods.
INSTALLING MAIN BROOM:
1. Turn Key Switch to the OFF position and remove Key
(Optional). Unplug Battery Connector.
2. Shake the filter and ensure that the Main Broom and
the Side Broom are off the ground.
3. Remove Hopper and unscrew 3 screws to remove the
Broom Access Door.
4. Remove bolt holding Idler Arm in place (A) (SEE
BELOW).
5. Remove Idler Arm and pull out old Broom.
6. Slide the new Broom in. With new Broom on Driver,
spin until Driver engages Broom.
7. Reinstall Idler Arm and tighten bolt.
8. If Broom is not level, loosen bolt and run Main Broom
motor for a couple seconds.
9. Retighten bolt and ensure Broom is level.
NOTICE
For correct Main Broom application - Contact your Local
Servicing Dealer.
DRIVER ALIGNED NOT ALIGNED
12V
12 VOLTS
A

GT-OP-EN - 11 -
INSTALLING SIDE BROOMS:
1. Lower the Side Broom by moving the lever and
adjusting it to the left.
2. Remove the Side Broom from the box.
3. Install the Side Broom onto the Motor Shaft. Use the
bottom hole on the shaft to install the Clevis Pin and
Saftey Clip (A) (SEE BELOW).
4. Check Side Broom height to see if Adjustments are
needed.
ADJUSTING SIDE BROOMS:
1. To adjust Side Broom height, turn Adjustment Screw
Clockwise to raise and Counterclockwise to lower (B)
(SEE BELOW).
2. The Side Broom bristles should contact the floor in a
11 o’clock to a 5 o’clock pattern when the Broom is in
motion (SEE BELOW).
A
B
MACHINE OPERATION
PRE-CLEANING CHECKLIST:
Read and understand the Safety Messages section on
Pages 3 and 4 before operating the machine.
1. Check Battery Condition Gauge. Make sure Batteries
are fully charged before using.
2. Check the condition of the Brooms.
3. Check to make sure Hopper is empty.
4. Disconnect Charger and close Hood.
5. Adjust the Handle Bar height if needed.
6. Turn the Power Switch ON and drive to the area to be
cleaned. The Power Switch is a three position switch.
The Down position is machine OFF. The Middle position
turns ON the Machine and Main Broom. The Up position
turns ON the Side Brooms while keeping the Machine
and Main Broom running.
7. Confirm the Side Brooms height is correct, if not adjust
using the Side Broom Height Adjustment knob.
8. Lower the Main Broom and the Side Brooms using the
Broom Position Levers.
9. Drive slowly by pulling the Clutch lever.
OPERATING HINTS:
1. Observe the amount of dirt/debris that the machine is
sweeping up. If dirt/debris is left on ground make sure
that the Wet Sweep By-Pass is not open. This feature
reduces dust control and should only be used when
operating on a floor with water on it.
2. Always operate at lower speeds when sweeping around
walls and objects. You should reduce the speed to
maintain control when turning.
3. Change or turn over Brooms when dirty.
4. Stay clear of objects protruding from the floor such as
sockets, grates, etc, for they will damage the Brooms.
5. Always keep an eye on your gauges. They let you know
the status of a particular system at a glance. If your
battery gauge is reading low you must stop immediately
and recharge. Running the Batteries dead will result in
damage to the Batteries.
6. When you are ready to stop, raise the Side Brooms,
raise the Main Broom, turn OFF the Side Broom Switch
and drive the machine back to the charging area. Be
sure to clean the Hopper thoroughly before storing the
machine.

- 12 - GT-OP-EN
SWEEPING:
1. Turn on machine Power Switch (A). Switch
in the Middle position will power Main
Brooms only. Switch in the Up position will
power Main Brooms and Side Brooms.
2. Check the Battery Gauge to ensure proper
charge before starting to sweep (B).
3. Lower the Main Broom to the floor by dropping
the Main Broom Lift Lever forward (C).
4. Lower the Side Brooms head to the floor by
dropping the Side Broom Lift Lever forward (D).
5. Begin sweeping by pulling the Clutch lever
(E) slowly and then to the speed required.
6. To operate the machine in reverse, simply
release the Clutch Lever (E) to its neutral
position and push or pull machine.
7. To stop the machine, move the Clutch Lever
all the way forward to activate the brake (E).
Always raise the Brooms before stopping to
prevent flattening of the Broom bristles.
WET SWEEPING:
1. Turn on machine Power Switch (A). Switch
in the Middle position will power Main
Brooms only. Switch in the Up position will
power Main Brooms and Side Brooms.
2. Check the Battery Gauge to ensure proper
charge before starting to sweep (B).
3. Lower the Main Broom to the floor by dropping
the Main Broom Lift Lever forward (C).
4. Lower the Side Brooms head to the floor by
dropping the Side Broom Lift Lever forward (D).
5. Open the WET Sweep By-Pass door by rotating
it clockwise (F). This door being open reduces
the Dust Control. Always remember to close
door when sweeping again once on dry ground.
6. Begin sweeping by pulling the Clutch lever
(E) slowly and then to the speed required.
7. To operate the machine in reverse, simply
release the Clutch Lever (E) to its neutral
position and push or pull machine.
8. To stop the machine, move the Clutch Lever
all the way forward to activate the brake (E).
Always raise the Brooms before stopping to
prevent flattening of the Broom bristles.
E
D
C
A
B
F

GT-OP-EN - 13 -
CLEANING FILTER:
1. If dust begins to blow through the Vacuum Motor, is
leaking out of the sides, or machine begins to not
sweep well, then the filter needs to be cleaned.
2. Before cleaning Filter, turn off Main
Broom and Side Broom motors.
3. Clean the Filter by turning the Beater
Bar Shaker for 20 seconds (B).
NOTICE
After using the Shaker Switch let the machine sit for 30
seconds to allow the dust time to settle.
CHANGING FILTER:
1. To remove Filter, open Machine Hood by releasing the
Hood Latch (C).
2. Undo the three Keps Nuts and lift open the Filter
Chamber Lid (D).
3. Pull out old Filter and replace with new one.
EMPTY HOPPER:
1. After machine usage, stop and shake filter.
2. Turn machine OFF.
3. Relase the Hopper Access Latch (E) and remove the
Hopper (F). Always ensure that Beater Bar is in the
upright position before removing Hopper. Damage can
occur if Hopper removed incorrectly.
4. Clean Hopper thoroughly before sliding back in
machine.
A
B
FD
E
F
- 14 - GT-OP-EN
ON-BOARD CHARGER
Charger Specifications
• Output voltage of 12 Volts
• Output current of 25 amps max
• Input voltage of 110 Volts/ 60 Hz
(220V/50 Hz available)
• Automatic shut off circuit
• Made for Deep Cycle Batteries
DANGER
Explosive hydrogen gas forms when Batteries are
charging. An open flame or spark can cause this gas
to explode. Serious personal injury or property damage
could occur. Only charge the Batteries in this machine
in a well ventilated area.
WARNING
Before you service a Battery, always wear face protec-
tion, protective gloves and protective clothing. Battery
acid or battery explosion can cause serious injuries.
WARNING
The Batteries in this machine contain sulfuric acid,
which causes burns to skin. If battery acid contacts
clothing or skin, rinse the effected area with cold water
immediately. If battery acid gets on your face or in your
eyes, flush the area immediately with cold water and
seek medical attention.
CAUTION
Always use the automatic battery charger provided by
the manufacturer of this machine to charge the Batter-
ies of this machine. It is designed to charge the Batter-
ies at the appropriate rate. If you must use a different
charger, disconnect the Batteries before charging to
avoid damage to the electronic speed controller.
ON-BOARD BATTERY CHARGING:
1. Transport machine to a well ventilated area for
charging.
2. Turn the machine off. Open the Machine Hood.
3. Check the water in each Battery (A). Do not charge
the machine unless the water is slightly higher than
the plates. If needed, add enough distilled water to
just slightly cover the plates. Be careful not to over fill.
Batteries can overflow during charging. Replace caps
before charging.
4. Plug the Charger power cord (B) into a grounded
standard wall outlet (SEE BELOW).
5. The charger will automatically begin charging and
automatically shut off when fully charged.
6. After the Charger has turned off, unplug the Charger
from the wall outlet.
7. Recheck the cell level after charging. If needed, add
distilled water up to the correct level. Be certain to
replace the caps securely and to wipe off the top of the
Batteries with a clean cloth.
DESCRIPTION OF LED
Red LED: Battery level low
Yellow LED: Battery at 1⁄2charge
Green LED: Battery fully charged
WATER LEVEL SHOULD BE
1/8'' ABOVE PLATES
A
B

GT-OP-EN - 15 -
BATTERY CHARGING
Charger Specifications
• Output voltage of 12 Volts
• Output current of 25 amps max (Optional)
• Input voltage of 110 Volts/ 60 Hz
(220V/50 Hz available)
• Automatic shut off circuit
• Made for Deep Cycle Batteries
DANGER
Explosive hydrogen gas forms when Batteries are
charging. An open flame or spark can cause this gas
to explode. Serious personal injury or property damage
could occur. Only charge the Batteries in this machine
in a well ventilated area.
WARNING
Before you service a Battery, always wear face protec-
tion, protective gloves and protective clothing. Battery
acid or battery explosion can cause serious injuries.
WARNING
The Batteries in this machine contain sulfuric acid,
which causes burns to skin. If battery acid contacts
clothing or skin, rinse the effected area with cold water
immediately. If battery acid gets on your face or in your
eyes, flush the area immediately with cold water and
seek medical attention.
CAUTION
Always use the automatic battery charger provided by
the manufacturer of this machine to charge the Batter-
ies of this machine. It is designed to charge the Batter-
ies at the appropriate rate. If you must use a different
charger, disconnect the Batteries before charging to
avoid damage to the electronic speed controller.
EXTERNAL BATTERY CHARGING (OPTIONAL):
1. Transport machine to a well ventilated area for
charging.
2. Turn the machine off. Open the Machine Hood.
3. Check the water in each Battery (A). Do not charge
the machine unless the water is slightly higher than
the plates. If needed, add enough distilled water to
just slightly cover the plates. Be careful not to over fill.
Batteries can overflow during charging. Replace caps
before charging.
4. First, disconnect the batteries by unplugging the yellow
50 Charger plug. Connect the yellow 50 Charger plug
to the machine’s Charger (B). While the Charger
plug is connected, plug the charger power cord into a
grounded 110 Volt standard wall outlet (C).
5. The Charger will automatically begin charging and
automatically shut off when fully charged (check
Battery gauge).
6. After the Charger has turned off - First, unplug
the Charger from the wall outlet. Second, unplug
the yellow 50 Charger plug from the Batteries and
reconnect the Batteries.
7. Recheck the cell level after charging. If needed, add
distilled water up to the correct level. Be certain to
replace the caps securely and to wipe off the top of the
Batteries with a clean cloth.
WATER LEVEL SHOULD BE
1/8'' ABOVE PLATES
A
B
C

- 16 - GT-OP-EN
BATTERY MAINTENANCE GUIDE
SAFETY:
DANGER
Explosive hydrogen gas forms when Batteries are
charging. An open flame or spark can cause this gas
to explode. Serious personal injury or property damage
could occur. Only charge the Batteries in this machine
in a well ventilated area.
WARNING
Before you service a Battery, always wear face protec-
tion, protective gloves and protective clothing. Battery
acid or battery explosion can cause serious injuries.
WARNING
The Batteries in this machine produce hazardous
voltage which can cause electrical shock, burns and/
or electrocution. Always disconnect Batteries before
servicing this machine.
WARNING
The Batteries in this machine contain sulfuric acid,
which causes burns to skin. If battery acid contacts
clothing or skin, rinse the effected area with cold water
immediately. If battery acid gets on your face or in your
eyes, flush the area immediately with cold water and
seek medical attention.
WARNING
Dress safely. Do not wear rings or metal wrist watches
when servicing this machine, as they can cause an
electrical short circuit which can cause serious burns.
INSPECTION AND CLEANING:
• Keep Batteries clean and dry from residue
• Check that all vent caps are tight
• Use a solution of baking soda and water to clean if
acid residue on Batteries or corrosion on the terminals
• Protective spray of petroleum jelly should be applied to
terminals to reduce corrosion
STORAGE:
• Batteries should be fully charged prior to and during
storage
• Never store discharged Batteries
• Store Batteries in a cool, dry place but never below
freezing - Recharge in storage a minimum of every 30
days
• Recharge Batteries before putting them back into
service
WATERING:
• Add water, NEVER ACID, to cells (distilled water
recommended).
• Do not over water
• Before charging the Batteries, only add water if the
plates are exposed. Add just enough water to cover
the plates, then charge the batteries. Once fully
charged, add water to the proper level as indicated
below.
• For full charge plus series Batteries add water to the
maximum water level indicator (A).
• After watering, secure vent caps back on Batteries.
WATER LEVEL SHOULD BE
1/8'' ABOVE PLATES
A

GT-OP-EN - 17 -
MAINTENANCE
DAILY MAINTENANCE:
1. Remove the clean Brooms. Never use soiled Brooms
when cleaning. Replace Brooms when they become
worn.
2. Turn Beater Bar for 20 seconds to clean out Filter.
Inspect filter.
3. Pull out Hopper to empty and clean before machine
storage.
4. Wipe down machine if needed. Use a non-abrasive,
non-solvent cleaner or a clean damp cloth.
5. Recharge the Batteries if needed.
WEEKLY MAINTENANCE:
1. Check Battery water level in each cell of the Batteries
and fill as needed. Always use distilled water to refill
Batteries. Batteries should be filled approximately
3⁄4'' to 1'' above the plates. Overfilling will cause the
Batteries to leak during charging. The charging
process creates gas bubbles inside the Battery, which
effectively increases the volume of the electrolyte.
2. Clean Battery tops to prevent corrosion.
3. Flip Brooms.
4. Pull out Hopper to empty and clean before machine
storage.
MONTHLY MAINTENANCE:
1. Check Main Broom Jackshaft Belt for wear and
tension.
2. Check machine for Vacuum Leaks.
3. Inspect the Dust Curtains and replace if torn or worn.
4. Check to see if Battery cables are tightened. Tighten,
if needed, 8-10 ft/lb MAX.
5. Inspect all Cables and Springs.
6. Inspect all Nuts, Bolts, and Fasteners.
YEARLY MAINTENANCE:
Call your local dealer for yearly maintenance.
STORING MACHINE:
1. Be sure to clean the Hopper out completely.
CHECKING BATTERY SPECIFIC GRAVITY:
Use a hydrometer to check the Battery specific gravity.
Checking Gravity:
• Hydrometer
• Battery
NOTICE
Do not take readings immediately after adding distilled
water. If water and acid are not thoroughly mixed, the
reading may not be accurate.
Check the hydrometer against this chart
SPECIFIC GRAVITY
@ 80°F (27°C)
BATTERY
CONDITION
1.265 100% Charged
1.225 75% Charged
1.190 50% Charged
1.155 25% Charged
1.120 Discharged
NOTICE
If the readings are taken when the battery electrolyte
is any temperature other than 80°F(27°C), the reading
must be temperature corrected. To find the corrected
specific gravity reading when the temperature of the
battery electrolyte is other than 80°F(27°C): add (+) to
the specific gravity reading 0.004 (4 points), for each
10°F(6°C) above 80°F(27°C). Subtract (-) from the
specific reading 0.004 (4 points), for each 10°F(6°C)
below 80°F(27°C).
WATER LEVEL SHOULD BE
1/8'' ABOVE PLATES

- 18- GT-OP-EN
GT PM RECORDS
CUSTOMER INFORMATION
CUSTOMER EMAIL
ADDRESS PHONE
CITY STATE ZIP CONTACT
MACHINE INFORMATION
MODEL #: SERIAL #:
WORK ORDER#: HOUR METER (Key):
CHASSIS HOUR METER: HOUR METER (Traction):
RE-CHARGE COUNTER: HOUR METER (Scrub):
BATTERY CONDITION CELL 1 CELL 2 CELL 3 CELL 4 CELL 5 CELL 6
BATTERY 1 HYDROMETER
BATTERY 1 ELECTROLYTE CLARITY
(Clear, Cloudy, Particulate, Dark)
BATTERY 1 WATER LEVEL
(Overfilled, Full, Low, Dry)
CLEAN BATTERY TOPS. CHECK BATTERY CABLE AND TERMINAL CONDITION.
NOTES:
PAD/BRUSH CONDITION
MAIN BROOM FIBER LENGTH ROTATED BRUSHES
BROOM DRIVER GOOD WORN NEEDS REPLACEMENT
BROOM DRIVER & IDLER HUBS GOOD WORN NEEDS REPLACEMENT
SIDE BROOM CONDITION GOOD WORN NEEDS REPLACEMENT ROTATED SIDE TO SIDE
CHECK OPERATION AND CONDITION OF: IN SPEC REPAIR PROBLEM
MAIN POWER SWITCH OR KEY SWITCH
BATTERY / HOUR METER GAUGE
BROOM AMP GAUGE
MAIN BROOM LEVER
SIDE BROOM LEVER
FILTER SHAKER
MAIN BROOM BELTS
MAIN BROOM MOTOR
SIDE BROOM OPERATION
BATTERY CHARGER CONNECTORS
BATTERY CHARGER
CLEAN AND / OR LUBRICATE IN SPEC REPAIR PROBLEM
FILTER (20 SEC W/ SHAKER SWITCH)
HOPPER
SIDE BROOM LINKAGE
REMOVE BROOM & CHECK DRIVERS FOR DEBRIS
VISUALLY INSPECT IN SPEC REPAIR PROBLEM
SEAL UNDER FILTER
HOPPER CURTAIN
HOPPER SIDE CURTAIN
MAIN BROOM CURTAIN (REAR)
SIDE DOOR CURTAIN

GT-OP-EN - 19 -
INNER SIDE CURTAIN
VACUUM HOSE
FRONT CASTER CONDITION
REAR WHEELS CONDITION
COMMENTS
SERVICING DISTRIBUTOR: ____________________________________
TECHNICIAN’S NAME: _______________________ DATE: ____________ SIGNATURE: ____________________
CUSTOMER’S NAME: ________________________ DATE: ____________ SIGNATURE: ____________________

- 20 - GT-OP-EN
TROUBLE-SHOOTING
PROBLEM CAUSE SOLUTION
No power - Nothing operates Faulty Power Switch Contact Local Servicing Dealer
Batteries need charging See CHARGING BATTERIES
Faulty Batteries Replace Battery
Loose Battery Cable Tighten loose cable
Main Broom does not sweep Main Broom is not down Slide Main Broom Lever to the down
position
Carbon Brushes worn Contact Local Servicing Dealer
Hood Safety Switch not depressed Check Safety Switch
Defective Relay Check Relay
Fault Motor or Wires Contact Local Servicing Dealer
Clutch Drive does not operate Inspect the Clutch Donut Contact Local Servicing Dealer
Faulty Drive Motor Contact Local Servicing Dealer
Faulty Wiring Contact Local Servicing Dealer
Poor Dust Control Filter clogged Turn Filter Shaker for 20 seconds
Hopper Gasket faulty Replace Gasket
Hopper full Empty Hopper
Faulty Vacuum fan Contact Local Servicing Dealer
Battery Charge is low Fully charge batteries
Wet Sweep By-pass Door is open Close By-pass Door
Poor Sweeping quality Main Broom worn out Replace Main Broom
Debris stuck to Main Broom Remove debris
Broken Main Broom belt Replace Belt
Broken Jackshaft belt Replace Belt
Main Broom Belt fell off Reinstall Belt
Jackshaft Belt fell off Reinstall Belt
Battery charge is low Fully charge Batteries
Broom has flat spots Replace Broom
Main Broom noisy / bounces Debris stuck in Main Broom Remove debris
Main Broom out of round Replace Main Broom
Debris stuck in Main Broom belt Remove debris
Tires noisy / Poor traction Rear Tires loose Tighten Lug Nuts
Worn Front Drive Tire Contact Local Servicing Dealer
Low run time Batteries run down Contact Local Servicing Dealer
Batteries still down Contact Local Servicing Dealer
Batteries low on Water See Battery Maintenance
Batteries over cycled Contact Local Servicing Dealer
Table of contents
Other Tomcat Blower manuals


Popular Blower manuals by other brands


Makita
Makita DUB143 instruction manual

4iQ
4iQ SW-1E Instructions for use

Minuteman
Minuteman HC8880K HC8880KHC9408H Operation service parts care

Fayat Group
Fayat Group SCARAB M25H Operating and Basic Maintenance Instructions

Harbor Freight Tools
Harbor Freight Tools 65003 Set up and operating instructions

Poulan Pro
Poulan Pro SM400 instruction manual


