TomTec MP1045 User manual

English User Manual
Media Player
MP1045

MP1045
2
Preface
In order to operate this player freely as soon as possible, please read this instruction carefully before using. The
information in this manual is subject to changes without prior notice and we will not bear the responsibility of
any accident caused by the mistake or neglect in this manual.
Main Functions
•2.8″full touch screen, 240×320 matrix full-color high-speed TFT display screen
•Touch screen function
•In-built microphone, super-long sound recording
•2 x Stereo Earphone Output
•In-built mono speaker
•Supports MP3, WMA and music formats
•Supports WAV (32kbps / 64kbps) Voice file format
•Supports JPEG / BMP format picture browse
•Supports TXT format electronic book reading
•Power saving setting, brightness adjustable, auto power off
•Support multi languages OSD
•USB2.0 high-speed transmission
•Support game function
•USB mobile disk function
•Supports firmware upgrade
•Supports T-Flash extension card up to 8GB
For all questions about your original product during the warranty period, you can call:
HELPDESK
NL: 0900-5624357
BE: 070-650650
UK: 0905-6920022
DE: 01805-080802
FR: 0826-101792

MP1045
3
1. About Player Battery
Player has an internal, non–user-replaceable battery. For best results, the first time you use player, let it charge
for about two to three hours or until the battery status icon shows that the battery is in full.
Battery Status Icon
Battery is in full
Note: Player continues to use battery power after it’s been turned off, if unit isn’t used for a while, the battery
might need to be charged.
a. Charging the Battery:
You can charge the player battery in two ways:
•Connect player to your computer. Or,
•Use the USB power charger, available separately.
b. Connection and Charging:
•Once you have connected the Player to your computer, then you will see the connect icon display on
screen. And the battery is charging in background.
Connect Icon
•If you have connected the power charger to Player, then you will see the battery status icon with the
level bars is running display on screen. The battery is in charging.
Important: The battery does not charge when your computer is in sleep. The USB port on most keyboards does
not provide enough power to charge the player. Connect player to a USB port on your computer only to
prevent charge problem.
MP1045
4
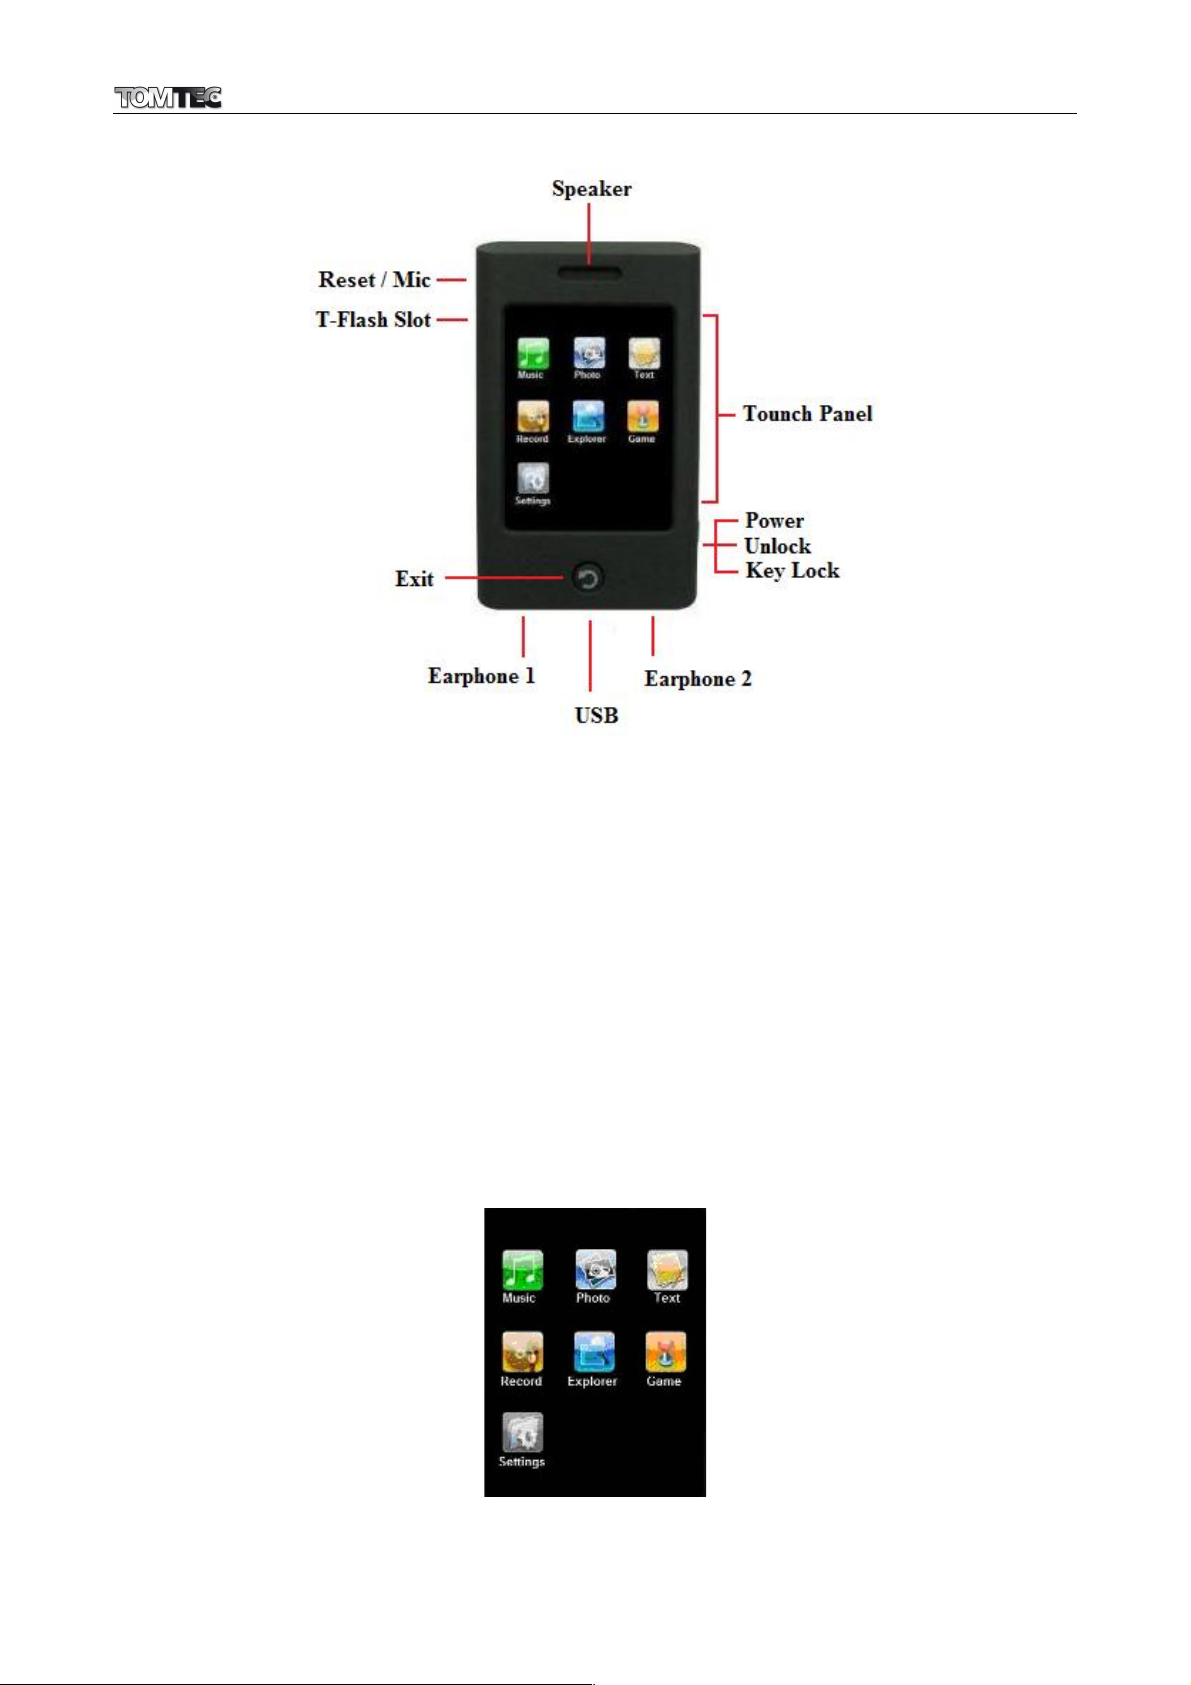
Appearance and Keys
2. Getting start the player
a. Power ON / OFF
•Slide and hold power switch to “Power” position for 3 seconds the player will turn ON in second.
•Slide and hold power switch to “Power” position for 3 seconds to turn OFF the player if it is in ON
mode.
b. Access main interface menu
•Once the player is turned to ON, the opening screen and then main interface will displayed on
screen to use
•Then you can tap shown icons to enter different menu as you desired in main interface menu.
c. Return to previous menu / main interface menu
•Press “Exit” button to return to previous menu in any sub-menu or interface. Or,
•Press and hold “Exit” button to return to main interface menu directly.
Main Interface Menu

MP1045
5
3. Settings sub-menu
You might need to change some default setting as you desired in settings menu before you start to use the
player.
To change setting, from main interface menu, tap “Settings” icon, a settings interface menu appear to use.
Setting Interface Menu
a. Music menu
There are four options in this music menu, including Repeat Mode, Play Mode, EQ Select and User EQ Set.
Repeat Mode
•In Repeat mode, tap “Once / Repeat one / Folder Once / Folder Repeat / All Once / All Repeat /
Intro”as you desired.
Play Mode
•In Play Mode, tap “Order / Shuffle”as you desired.
EQ Select
•In EQ Mode, tap “Normal / 3D / Rock / Pop / Class / Bass / Jazz / User EQ”as you desired.
User EQ Set
•In User EQ set, there are five frequencies and every frequency has six grades available for adjust.
•Tap on “60Hz / 300Hz / 1Khz / 3KHz / 6KHz” center button, then the selected frequency button will
highlight in yellow.
•Then tap “Up” and “Down” arrow to adjust the levels as you desired.
b. Record menu
Record Quality
•Tap “High Quality / Normal Quality”as you desired. (64kbps / 32kbps)
REC Volume
•Tap “+1 / +2 / +3 / +4 / +5”as you desired. The higher the number is the higher the volume is.
c. Display menu
BLight Time (Backlight Time)Tap “5 / 10 / 15 / 20 / 30 Seconds / Always On” as you desired.
Lum (Luminance)
•Tap “1 / 2 / 3 / 4 / 5” as you desired. The higher the number is the higher brightness is.
Blight Mode (Backlight Mode)
•Tap “Normal / Power Saving”as you desired. Choose power saving will increase the player battery
performance.

MP1045
6
d. Auto Play menu
In this menu, there are two options available, which set the auto play time of Text and Jepg file.
Text
•Tap “10 s / 15 s / 20 s / 25 s / 30 s” (seconds) as you desired. The page will flip as desired time when
auto page is selected during in the text (eBook) reading mode.
Jpeg
•Tap “10 s / 15 s / 20 s / 25 s / 30 s” (seconds) as you desired. The photo will change as desired time
when slide shown is selected during in the photo browsing mode.
e. System menu
In this menu, there are 3 options available, which are Language, Product Information and Touch Screen
Calibration.
Language
•Tap “Language” to select your desired language for OSD display. Multi languages are available for
chose.
About
•Tap “About” to view the system information, such as Capacity, Residual Capacity and Software
Version, the information will display on screen to view for few seconds and it for read only.
Calibration
•You can calibrate the allocation accuracy of the touch screen.
•Tap “+” cross mark which will appears in three places and the display will return to previous menu
after the calibration procedure is done.
f. Power off menu
•Tap “OFF / 10 Minutes / 15 Minutes / 30 Minutes / 60 Minutes / 120 Minutes”as you desired time for
automatically turn off the player if you did not use any functions or access any controls.
g. Default Set
•Tap “Default Set” to set back to factory default setting if you want. A dialogue box wills popup to
prompt you to confirm.
•Tap “ YES / NO” to confirm or cancel the action.

MP1045
7
4. Play Music
•Tap “Music” icon to enter the music mode and the Music Playing Interface will appear and a music
file will play automatically.
Music Playing Interface
Play / Pause Music
•Tap icon to pause playing music.
•Tap icon to play music if music in pause.
Play Previous / Next Music
•Tap icon to play next music.
•Tap icon to play previous music.
Adjust Volume Level
•Tap or tap and hold icon to increase volume level.
•Tap or tap and hold icon to increase volume levels.
Play Fast Forward
•Tap and hold icon to fast forward the music track.
Play Fast Backward
•Tap and hold icon to fast backward the music track.
Change Setting in Music Mode
•Tap icon to enter music settings menu. The setting method is same as “Settings menu” which
described above mentioned. (Repeat Mode / Play Mode / EQ Select / User EQ Set)
Use Repeat A-B
•Tap icon to set A-B repeat function, the starting point of track is set and “A” will be displayed and
flashing in Music Playing Interface.
•Tap icon again to set the ending point of track “B”. Once ending point is selected then the
repeat function A-B will be started and the letter “A-B” will be displayed in Music Playing Interface at
the same time.
•To exit / cancel from repeat A-B circulation, tap icon.
•Tap icon to return to previous menu. Or tap icon to return to Main Menu Interface.
Note: “Repeat A-B” function is un-usable in music pause state.
Return to Previous Menu / Main Interface Menu

MP1045
8
5. Browse Photo
•Tap “Photo” icon to enter the explorer interface or file list screen.
•Tap “Flash Memory” to enter files and / or folders list, then tap a file to start the browse photo function.
Explorer Interface
•Tap icon to return previous menu. Or,
•Tap icon to return to main interface menu.
•A Browse Photo with tool bars screen will appear when file is selected, and the tool bars will disappear
in few seconds if not do any control of them.
•Tap icon to browse next file.
•Tap icon to browse previous file.
•Tap icon to enter slide shown play function
•Tap icon to stop slide shown play function
•Tap icon to return to previous menu.
•Tap icon to exit this tool bars. Or you can wait for few seconds.
•Tap icon to return to main interface menu.
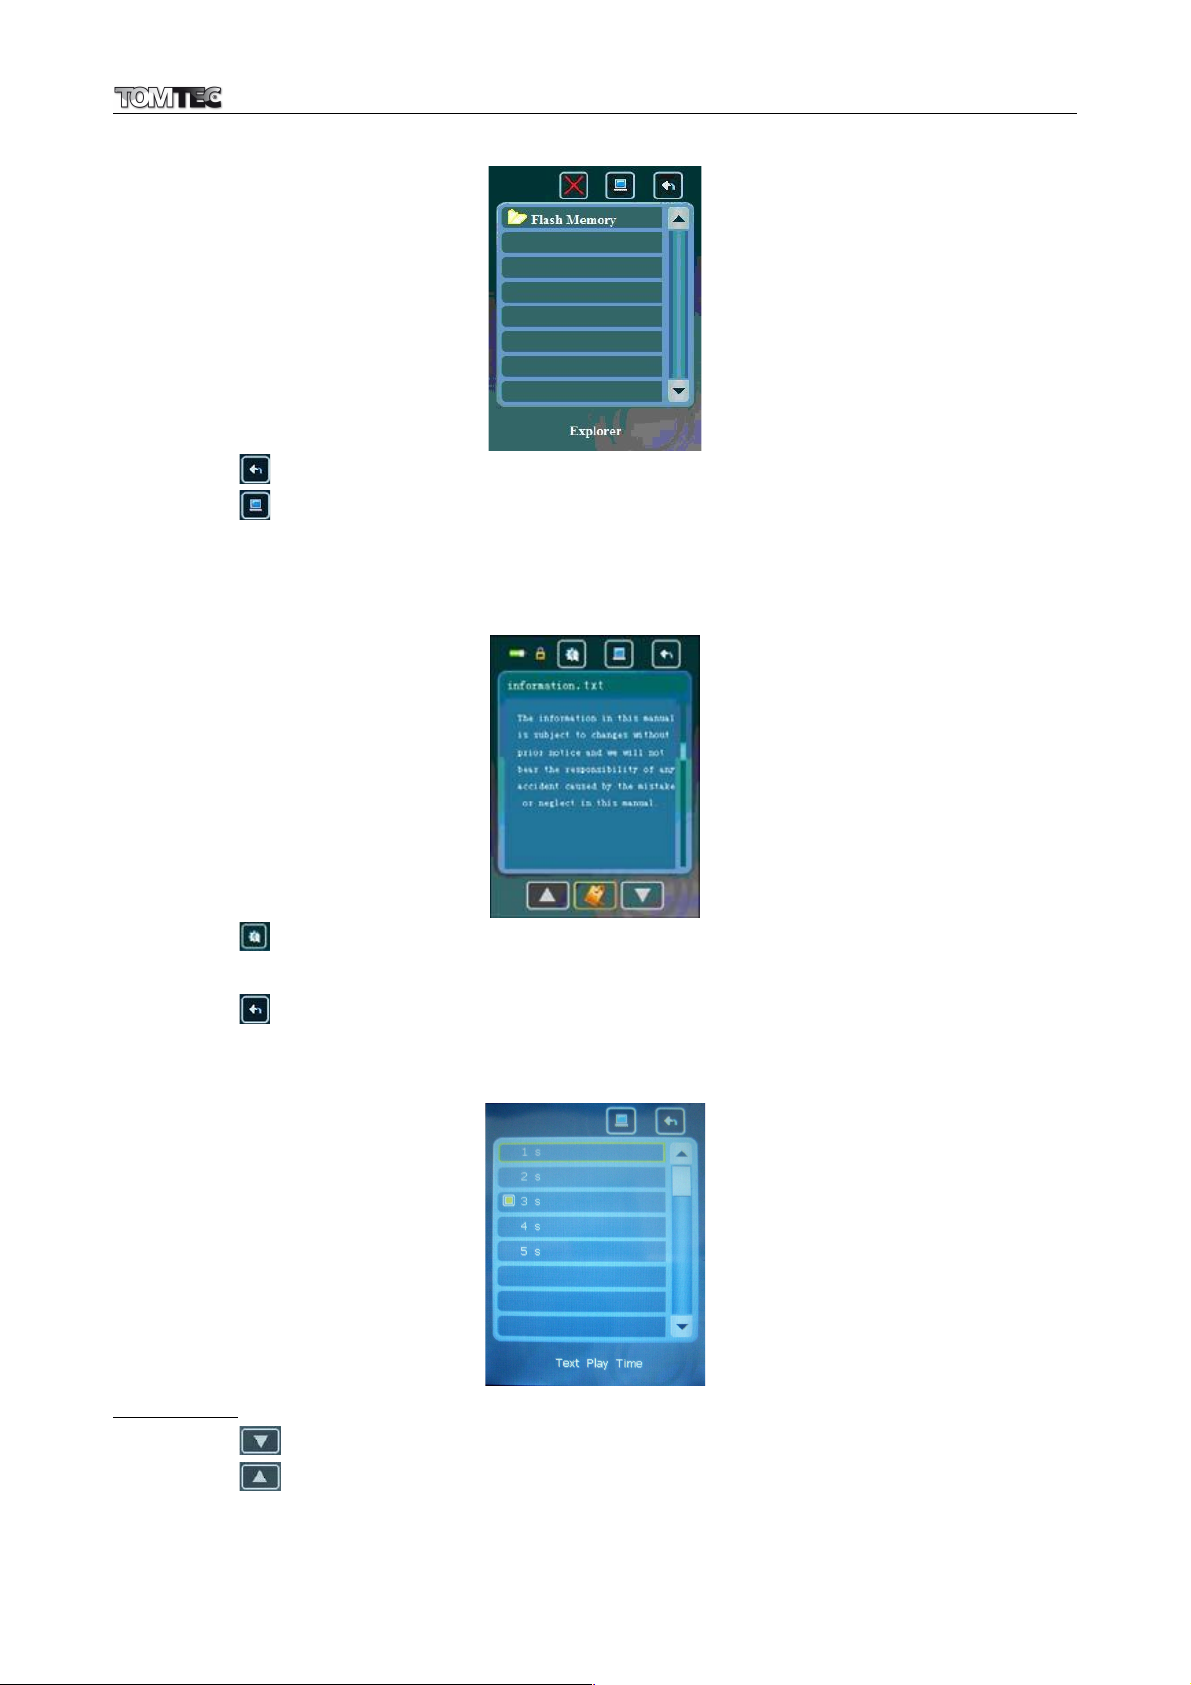
6. Text Reading
•Tap “Text” icon to enter the explorer directory / file list screen.
•Tap “Flash Memory” to enter files and / or folders list, then tap a file to start the text reading function.
MP1045
9
Explorer Interface
•Tap icon to return previous menu. Or,
•Tap icon to return to main interface menu.
•A text reading screen with tools icon appear to view and use when a file is selected.
Text Reading Screen
•Tap icon to set the text play time for auto flip function and a Text Play Time screen appear to use.
Tap “1 s / 2 s / 3 s / 4 s / 5 s ” (seconds) as you desired.
•Tap icon to return to previous menu.
Text Play Time Screen
Change Page
•Tap icon to view next page.
•Tap icon to view previous page.

MP1045
10
Use Auto Page Flip
•Slide once the power switch to “Power” position to enter the auto page flip function, then the reading
text file will flip page by page automatically in you desired time.
•Slide once power switch to “Power” again to stop the auto flip page function.
Use Bookmark Function
•In text reading screen tap or icon to select from page which you want to mark. Then tap
icon to enter bookmark management interface. Then,
•Tap or icon to a locate where you want save a bookmark in “Save BooMark” area , and
then tap icon to bookmark the selected page. The marked page information will display in
item list screen.
•Tap icon to return to text reading screen or previous menu. Repeating steps above mentioned if
you want to bookmark for other page.
Recall Bookmark
•Open a text file, then tap icon to enter bookmark management interface.
•Choose a bookmark in “Load BookMark” area by tap or icon, tap icon once you
desired bookmark is selected. The reading screen will jump to page which you want to recall for text
reading.
•Tap icon to return to main interface menu.
7. Record
Tap “Record” icon to enter MIC REC interface.
MIC REC Interface
•Tap icon to start recording.
•Tap icon to pause recording. Tap icon again to continue recording.
•Tap icon to stop / exit the recording mode and the record file will save into player memory
automatically.
•Tap icon to return to main interface menu or previous menu.

MP1045
11
8. Explorer Function
•Tap “Explorer” icon to enter explorer interface and all the files and / or folders will be listed.
•Now you can manage the file and folder in this explorer interface, such as choose file/folder and
delete file/folder.
Explorer Interface
Choose File
•Tap a “File” can enter the corresponding playing interface, such as music, photo, text
interface…etc. If the file cannot be recognized, the file selected would not be responded.
Delete file
•Tap a “File”that you want to delete, then tap icon to enter “Delete File?” interface menu.
Then tap “OK” or “No” icon to confirm or cancel the file deletion.
Play Game
•Tap “GAME”icon to enter this option.
Game Control
•Slide once power switch to “Power” position, the game will pause, slide it once again the game
play continue.
•Different of game will have different control’s icon have displayed for use. (To Be Confirmed)
9. Use Memory Card
This player allows you to play those support media files from your memory card (T-Flash). Also it will increase the
mobile hard disk memory capacity of the player if you use this option.
To Play Media Files:
•Turn Off the player by the power switch. Now insert your T-Flash memory card into card slot on the
side of player.
•Turn On the player by the power switch and now the memory card, T-Flash, is ready to use.
•In main interface menu, tap “Explorer” icon to enter explorer interface, a list with item Flash Memory
and TF Card appears to choose.
•Tap “TF Card” to enter root directory of T-Flash card. Then tap a “File” you want to play. It can enter
the corresponding playing interface, such as music, photo, text interface…etc. If the file cannot be
recognized, the selected file would not be responded.
Important: Before you want to take out the memory card, please turn Off the player by the power switch.

MP1045
12
10. Troubleshooting:
Play cannot turn ON
•Check battery is it charged with enough energy.
No sound is heard from headphone.
•Check whether Volume is set“0”and connect the headphone
plugs firmly.
•Check whether the headphone plug is dirty.
•Corrupted MP3 may make a static noise and the sound may
cut off. Make sure that the music files are not corrupted.
Key or touch function does not work
•Check whether key lock switch is in lock position.
Characters in LCD are corrupted
•Check whether the right language has been selected.
Download of music files fails.
•Check whether USB cable is damaged and is connected
properly.
•Check whether driver is installed correctly.
•Check whether the player’s memory is in full.
11. Specifications:
Display
2.8 inches TFT,resolution 320 x 240
Dimension
100mm (L) x 60mm (W) x 14mm (H)
Weight
68g
PC Connection
USB1.0 / 1.1 / 2.0 (HIGH SPEED)
Earphone Impedance
32 Ohm
Mono Speaker Impedance
8 Ohm
Internal Memory
1GB / 2GB / 4GB / 8GB
External Memory
Micro SD T-Flash (up to 8G)
Rechargeable Battery
Lithium: 3.7V, 600mAh
Music playing time: > 7 hours (shutdown screen to save power, 2/3 earphone
output)
Voice Recording format
WAV
32kbps / 64kbps
Music Format
MP3
32kbps - 320kbps
WMA
32kbps - 320kbps
Photo Format
JPEG, BMP
eBook Format
TXT
Audio
Max. Earphone Output Power
L: 150mVrms + R: 150mV (at 32Ohm)
Frequency response
20Hz – 20,000Hz
SNR
> 60dB
Operation Temperature
0℃- 40℃
OSD Languages
Multi Languages
Operation Systems
Windows 2000 / XP / Vista, Mac OS 9.2 or above

MP1045
13
12. DISCLAIMER
Updates to Firmware and/or hardware components are made regularly. Therefore some of the instruction,
specifications and pictures in this documentation may differ slightly from your particular situation. All items
described in this guide for illustration purposes only and may not apply to particular situation. No legal right or
entitlements may be obtained from the description made in this manual
13. RECYCLING
If at any time in the future you should need to dispose of this product, please note that: Waste
electrical products should not be disposed of with household waste. Please recycle where
facilities exist. Check with your Local Authority or Retailer for recycling advice. (Waste Electrical
and Electronic Equipment Directive)


