Tonon Forty VTP Parts list manual

INSTRUCTIONS FOR INSTALLATION, USE AND MAINTANCE
VTP/ VTS/ VTI
CA’ D’ORO fan coil heaters
ITALIANO
ENGLISH
DEUTSCH
INSTALLATORE / INSTALLATION / INSTALLACIÓN
FRANÇAISEESPAÑOL
ITALIANO
ENGLISH
DEUTSCH
UTENTE / CUSTOMER / KUNDENBERATER / USAGER / UTENTE
FRANÇAISEESPAÑOL

1.0 CARATTERISTICHE DELL’APPARECCHIATURA p. 5
1.1 DESCRIZIONE DELL’ ”UNITÀ” p. 5
1.2 DESCRIZIONE DEI COMPONENTI STRUTTURA PORTANTE p. 5
1.3 VERSIONI DISPONIBILI p. 5
2.0 NORME PER UNA CORRETTA INSTALLAZIONE p. 5
2.1 IMBALLO E TRASPORTO p. 5
2.2 INSTALLAZIONE DEI VARI MODELLI p. 5
3.0 COLLEGAMENTI IDRAULICI p. 6
4.0 COLLEGAMENTI ELETTRICI p. 6
5.0 INVERSIONE ATTACCHI BATTERIA p. 7
1.0 AVVIAMENTO p. 28
2.0 ACCESSORI DI REGOLAZIONE p. 28
3.0 USO DEL VENTILCONVETTORE p. 28
4.0 MANUTENZIONE p. 28
5.0 INDIVIDUAZIONE DEI GUASTI p. 28
1.0 FEATURES OF THE HEATER p. 8
1.1 DESCRIPTION OF THE HEATER p. 8
1.2 DESCRIPTION OF THE COMPONENTS p. 8
1.3 AVAILABLE TYPES p. 8
2.0 INSTRUCTIONS FOR CORRECT INSTALLATION p. 8
2.1 PACKAGING AND TRANSPORT p. 8
2.2 INSTALLING THE VARIOUS MODELS p. 8
3.0 HYDRAULIC CONNECTIONS p. 9
4.0 ELECTRIC CONNECTIONS p. 9
5.0 INVERTING THE BATTERY ATTACHMENTS p. 10
1.0 START VP p. 29
2.0 REGULATION ACCESSORIES p. 29
3.0 USING THE FAN-COIL HEATER p. 29
4.0 MAINTENANCE p. 29
5.0 FAULT FINDING p. 29
1.0 GERÄTEEIGENSCHAFTEN p. 11
1.1 BESCHREIBUNG DER EINHEIT p. 11
1.2 BESCHREIBUNG DER BESTANDTEILE p. 11
1.3 VERFÜGBARE VERSIONEN p. 11
2.0 NORMEN FÜR EINE KORREKTE INSTALLATION p. 11
2.1 VERPACKUNG UND TRANSPORT p. 11
2.2 INSTALLATION DER VERSCHIEDENEN MODELLE p. 11
3.0 WASSERANSCHLUSSE p. 12
4.0 STROMANSCHLUSSE p. 12
5.0 UMKEHRUNG AGGREGATANSCHLUSSE p. 13
1.0 INBETRIEBNAIIME p. 30
2.0 ZUSATZGERÄTE DER REGELUNG p. 30
3.0 GEBRAUCH DES GEBL SEKONVEKTORS p. 30
4.0 INSTANDHALTUNG
p. 14
1.1 DESCRIPTION DE L’UNITE p. 14
1.2
DESCRIPTION DES COMPOSANTES STRUCTURE PORTANTE
p. 14
1.3 MODELES DISPONIBLES p. 14
2.0 NORMES POUR UNE INSTALLATION CORRECTE p. 14
2.1 EMBALLAGE E TRANSPORT p. 14
2.2 INSTALLATION DES DIFFERENTS MODELES p. 14
3.0 BRANCHEMENTS HYDRAULIQUES p. 15
4.0 BRANCHEMENTS ÉLECTRIQUES p. 15
5.0 INVERSION EMBOUTS BATTERI p. 16
1.0 DEMARBAGE p. 31
2.0 ACCESSOIRES DE RÉGULATION p. 31
3.0 EMPLOI DU VENTILO-CONVECTEUR p. 31
4.0 ENTRETIENT p. 31
5.0 LOCAUSATIONDESANOMAUES p. 31
1.0 CARACTERISTICAS DELAPARATO p. 17
1.1 DESCRIPCIÓN DE LA UNIDAD
p. 17
1.3 VERSIONES DISPONIBLES p. 17
2.0 NORMAS PARA UNA CORRECTAINSTALACIÓN p. 17
2.1 EMBALAJE Y TRANSPORTE p. 17
2.2 INSTALACIÓN DE LOS VARIOS MODELOS p. 17
3.0 CONEXIONES HIDRÀULICAS p. 18
4.0 CONEXIONES ELÉCTRICAS p. 18
5.0 INVERSIÓN CONEXIONES BATERíA p. 19
1.0 PUESTAENMARCHA p. 32
2.0 ACCESORIOS DE REGULACIÓN p. 32
3.0 USO DEL VENTILCONVECTOR p. 32
4.0 MANTENIMIENTO p. 32
5.0 DETECCIÓNDELAS AVERIAS p. 32
INDEX_TABLE

ENGLISH
INSTALLATION
ATTENTION:
Every intervention must be done by qualied staff and following
the safety norms in force. Before every intervention on the fan coils,
please, read carefully this manual. The present manual must be kept
for all the machine life for future information. Tonon Forty Spa declines
every responsibility for any installation or for using not listed into this
manual.
1.0 FEATURES OF THE HEATER
1.1 DESCRIPTION OF THE HEATER
The “CA’ D’ORO” fan coil heater is a terminal unitfor room air
conditioning, ventilation, heating in the winter and cooling in the
summer.
1.2 DESCRIPTION OF THE COMPONENTS
BEARING STRUCTURE: made from adequately thick galvanised steel
piate, sound and heat insulated.
HEAT EXCHANGE BATTERY: made with copper tubes mechanically
expanded into aluminium ns, 1/2” F bronze manifolds for water
attachments with air valve (maximum working pressure 10 bar).
FAN UNIT: doublé intake centrifugai fans with 1-2-3 fan wheels, single
phase three-speed eiectric motor with heat protection and condenser
permanently activated.
F1LTER UNIT: made from a micro-perforated propylene panel tted on
a hearing fraine with a protection grid, tted to the intake side, it can be
easily removed for cleaning or washing.
COVER: made from moulded and painted steel piate, resistant to
chemical agents and insulated with anti-condensation materia!, the
delivery grid directions can be changed and the access aps to the
electric and hydraulic controls are made in heat resistant ABS. Colours
are RAL 9010 series, with other colours available on request.
1.3 AVAILABLE TYPES
The following types are available:
VTP = wall tted version
VTS = ceiling tted version
VTI = built-in version for the wall or ceiling
Ali the fan coil heaters have a consent thermostat tted standard
(the motor turns only if the water in the exchanger has reached a
temperature of 35°C).
2.0 INSTRUCTIONS FOR CORRECT INSTALLATION
2.1 PACKAGING AND TRANSPORT
Each single unit is packed in a strong cardboard box protected by polythene
and polystyrol shock buffers.
The unit must be handled with care during transport and movement. No more
than three units must be stored on top of each other in the vertical position
and no more than ve in a horizontal position. Check the packaging is not
damaged and do not use any sharp or cutting instruments to open it. When
the unit has been removed from the box, check that it is not damaged and
corresponds to the model effectively ordered with the relative accessories.
Any sort of problem should be immediately communicated to the constructor.
2.2 INSTALLING THE VARIOUS MODELS
Installation must be done by a qualied technician, before beginning
check that the power supply corresponds to the requirements printed
on the plaque attached to each single unit, which also gives the serial
and model number. If the unit is supplied with feet, these should be tted
internally and externally and the supplementary tray if supplied (VEV -
VEO). Drill the wall for the VTP and VTP/ZC models, drill the ceiling for
the VTS and VTS/ZC models, following the measurements given in the
“dimensions” page. Mount the fan coil heater using the expansion nogs
and through screws in the slots on the edge of the unit, the screws must
have a minimum diameter of 6 mm with a washer under the screw head.
The same procedures are used for xing the VTI and VTI/F models to
the wall or ceiling. The air conditioning ceiling versions mounted on the
ceiling must be installed with special attention paid to the inclination, to
ensure the condensation water is emptied into the horizontal tray, the
outlet pipe must be a 16 mm diameter exible tube and smooth inside. If
the unit is installed in the bathroom, it must be placed in a position where
the switches and controls cannot be touched by anyone in the bath or
shower. The power le ad must have a normal PVC sheath (designation
227 EIC 53) type N07V-K or FROR, measuring 3x1.5 mm (for versions
with heating element, use a lead with the section adequate to the power
intake).The heater must not be placed beneath a power socket.
WARNING!
FOR THE BUILT-IN VERSIONS, THE TEMPLATE IS PREPARED
ON SITE, AND THE DIMENSIONS OF THE AIR INTAKE AND
DELIVERY SECTIONS MUST BE RESPECTED AND ATTENTION
MUST BE PAID THAT THERE IS NO CONTACT BETWEEN THE
MOVING PARTS AND THE POWERED ELECTRIC PARTS.
For the ceiling mounted versions, it is advisable not to mount the
fan-coil heater at more than 2.5-2.8 meters from the oor, to avoid air
recycling during the heating phase.
VTP-VTS MODELS
Remove the cover (1), by unscrewing the two screws (2) on the bottoni
edge and lift it in the direction shown by the arrows, to completely
extract it from the positioning pins (3). During these operations it is
advisable to replace the unit and lter in its packaging.
3
1
2
2

ENGLISH
INSTALLATION
2.3 CONFIGURATIONS
VTI/F
VERTICAL BUILT-IN VERSION WITH FRONTINTAKE
VTI/F
HORIZONTAL BUILT-IN VERSION WITH FRONTINTAKE
VTP
VERTICAL WALL VERSION
VTS
HORIZONTAL CEILING VERSION
VTI
VERTICAL BUILTIN VERSION
VTI
HORIZONTAL BUILTIN VERSION
3.0 HYDRAULIC CONNECTIONS
Connect the heat exchanger using a 1/2” GF attachment to the water
supply, using a spanner and counter-spanner to avoid damage to
the battery connections. The pipes can come from the oor, wall or
ceiling. To bleed any air in the circuit, use a at screwdriver to open the
valve on the top at the side of the attachments. If the fan-coil heater is
also used for air conditioning, connect the condensation outlet to the
collection circuit; if the additional external tray has not been requested,
the cooling water pipes must be insulated against condensation. It is
advisable to make a water trap on the condensation outlet pipe to avoid
intake of evil-smelling air. When the connections are terminated, check
there are no water leaks from the exchanger or tray. The exchangers
are supplied to work with a maximum pressure of 10 bar. The battery
attachments on the tandard unit are on the left but if needed they can be
moved to the tight (refer to the inverting battery attachments chapter). To
instali the valves on the two or four pipe versions, follow the instruetions
given in the technical manual or included in the valve kit.
- IN COOLING FUNCTION (TO AVOID WATER CONDENSING) WE
SUGGEST EV2, EV4.
4.0 ELECTRIC CONNECTIONS
Turn the power of at the mains before beginning the electric connections.
The connections must be made in conformity with current standards in
force following the enclosed wiring diagram with each fan-coil heater. Ali
the fan-coil heaters are supplied with a connection box (standard tting on
the right), which contains ali the regulation components and the grounding
terminal. To reach the components, unscrew the two screws in the cover
next to the lead outlets. Each fan-coil heater must be power ed with single
phase 230 volts (tolerance of-51+10) 50 Hzfrequency. A bipolar motor-ci
cuit switch must be installed upstream from the fan-coil heater.

ENGLISH
INSTALLATION
5.0 - INVERTING THE BATTERY ATTACHMENTS
VTP / AB
VTP / CRE
THE CONNECTION BOX CONTAINS:
Standard wall mounted models with cover
VTP/VB version
- VB controls complete with summer/winter - off selection switch and
3 speed selection switch.
- Consent thermostat (for heating)
- Power terminal board
VTP/AB version
- AB control complete with summer/winter - off selection switch,
3 speed selection switch and room temperature regulation
thermostat.
- Consent thermostat (for heating).
- Power terminal board
VTP/CRE version
- Onboard electronic control
- OFF, E/I and 3 fan speeds
- Automatic/manual speed modes
- Ambient temperature thermostat
- Valve control
- Fan consent sensor
Standard models without cover or ceiling mounted (VTI/VTS)
The box just contains a terminal board for connecting the motor
(simple or three speed), the consent thermostat and the grounding
terminal. Ali the settings for speed, temperature, etc, are done by the
installer. On request TONON S.p.A., can supply the following controls
which can be mounted on the wall: CVM: three speed regulator
and summer/winter selection switch. TAM: electronic thermostat
and summer/winter selection switch. CEM: three speed regulator,
electronic thermostat, summer/winter selection switch and solenoid
valve control CEM/D: electronic thermostat, three speed regulator,
summer/winter heating element and solenoid valve control selection
switch. CRE: Electronic thermostat with manual and automatic speed
switch, manual and automatic summer/winter switch, valve control and
electric heating element. These controls are mounted on the wall using
screws and expansion nogs as described in the instruetions contained
with the controls. If the heating element is installed, it must be powered
separately paying special attention to the absorbed current (refer to the
technical feature plaque on the heater). The heater must always be
grounded.
5.0 INVERTING THE BATTERY ATTACHMENTS
A Dismantle the electric control panel.
BDisconnect the motor lead connector - POS. 9.
C Dismantle the consent thermostat POS. 4 pulling ìt outfrom the
battery ns.
D Loosen the motor base xing screws POS. 10, remove the battery
xing screws POS. 6; hold the battery at both ends and pulì ìt out in
the direction ofthe arrow (taking care not to damage the insulation),
rotate the battery by 180°, replace the attachments on the opposite
side and tighten the screws POS. 10.
EInvert the position of the condensation outlet plug POS. 7 and the
position of the condensation tray POS. 8, if tted.
F Dismantle the motor connection leadfrom the right side andt it to
the housing on the left side.
GReassemble the electric control panel on the opposite side, connect
the electric leads (follow the wiring diagram).
H Piace the consent thermostat (or probe) between the battery ns, in
the opposite position from before; if the room air thermostat istted,
position the bulb (or probe) with the special xings POS. 3.
VTP / VB

MODELLO - MODEL – MUSTER - MODÉLE - MODELO 10 20 30 40 50-60 70-80
Dimensioni d’ingombro, Overall Size, Befestigungslocher, Dimemiom d’enconibrement, Dimensiones
A 660 810 960 1100 1410 1710
B 220 220 220 220 230 230
C 480 480 480 480 525 525
Fori di ssaggio, Fijing holes, AussenmaBe, Trous de mecordement mur, Agujeros de sujecion
D 415 565 715 865 1165 1465
E 200 200 200 200 225 225
F 70 70 70 70 95 95
Attacchi standard, Standard attachments, Standardanschliisseanschluss, attaches standard, Conexiones estandares
G 42 42 42 42 42 42
H 130 130 130 130 155 155
I 238 238 238 238 249 249
L 389 389 389 389 444 444
Attacchi batteria supplementare, Additional battery attachments, Zusatzbatterieabuss, Attaches batt. suppl, Conexiones bat. sup
M 112 112 112 112 112 112
N 149 149 149 149 174 174
O 307 307 307 307 318 318
P 372 372 372 372 427 427
Scarico condensa, Condensation outlet, Kondenswasser, Decìargement condensation, Descarga condensado
Q96 96 96 96 100 100
231 231 231 231 231 243 243
S 202 202 202 202 212 212
Distanza, Dist., Abst., Dist., Dist.
120 120 120 120 130 130
DATI DIMENSIONALI, MEASUREMENTS, BESCHAFFENHEIT UND AUSSENMABE, DONNEES CONCERNANT LES DIMENSIONS,
DIMENSIONES
144
100
A
R
S
B
Ø 16
VTS
VTP
VTS/ZC
VTS/ZC
ATTACCHI 1/2”
ATTACHMENTS 1/2” F
ANSCHLUSS 1/2” F
ATTACHES 1/2” F
CONEXIONES 1/2” F
ATTACCHI 1/2”
ATTACHMENTS 1/2” F
ANSCHLUSS 1/2” F
ATTACHES 1/2” F
CONEXIONES 1/2” F
70
100
EF
C
A
B
D
Q
O
G
P
H
M
N
I
L
157.5
87.5
Ø 20
60
144
T
B
R
S
A
Ø 16
EF
T
C
A
B
N
H
M
G
L
I
D
O
P
Q
87.5
157.5
Ø 20
70

MODELLO - MODEL – MUSTER - MODÉLE - MODELO 10 20 30 40 50-60 70-80
Dimensioni d’ingombro, Overall Size, Befestigungslocher, Dimemiom d’enconibrement, Dimensiones
A 562 712 862 1012 1312 1612
B 216 216 216 216 226 226
C 445 445 445 445 490 490
Fori di ssaggio, Fijing holes, AussenmaBe, Trous de mecordement mur, Agujeros de sujecion
D 415 565 715 865 1165 1465
E 200 200 200 200 225 225
F 70 70 70 70 95 95
Attacchi standard, Standard attachments, Standardanschliisseanschluss, attaches standard, Conexiones estandares
G 42 42 42 42 42 42
H 130 130 130 130 155 155
I 238 238 238 238 249 249
L 389 389 389 389 444 444
Attacchi batteria supplementare, Additional battery attachments, Zusatzbatterieabuss, Attaches batt. suppl, Conexiones bat. sup
M 112 112 112 112 112 112
N 149 149 149 149 174 174
O 307 307 307 307 318 318
P 372 372 372 372 427 427
Scarico condensa, Condensation outlet, Kondenswasser, Decìargement condensation, Descarga condensado
Q96 96 96 96 100 100
231 231 231 231 231 243 243
S 202 202 202 202 212 212
ATTACCHI 1/2”
ATTACHMENTS 1/2” F
ANSCHLUSS 1/2” F
ATTACHES 1/2” F
CONEXIONES 1/2” F
ATTACCHI 1/2”
ATTACHMENTS 1/2” F
ANSCHLUSS 1/2” F
ATTACHES 1/2” F
CONEXIONES 1/2” F
DATI DIMENSIONALI, MEASUREMENTS, BESCHAFFENHEIT UND AUSSENMABE, DONNEES CONCERNANT LES DIMENSIONS,
DIMENSIONES
A
B
114 R
S
100
EF
D
68.5 78.5
A
70
60
N
H
M
G
L
I
B
C
O
P
Q
100
Ø 16
Ø 20
VTI
VTI/F
A
B
114
R
S
A
D
68.5 78.5
FE
70
60
B
O
N
H
M
G
L
I
P
C
15
Q
Ø 20
Ø 16
1
2
3
4
5
TM TM
M
123456789
NL
OFF
EST
INV
TDC
230V 50 Hz
FUNZIONAMENTO IN CONDIZIONAMENTO
CONDITIONING
KÙHLEN
FONCTIONNEMENT EN CONDITIONNEMENT
FUNCIONAMIENTO EN LA FASE DE
ACONDICIONAMIENTO
FUNZIONAMENTO IN RISCALDAMENTO
HEATING
HEEEN
FONCTIONNEMENT EN CHAUFFAGE
FUNCIONAMIENTO EN LA FASE DECALEFACCIÓN
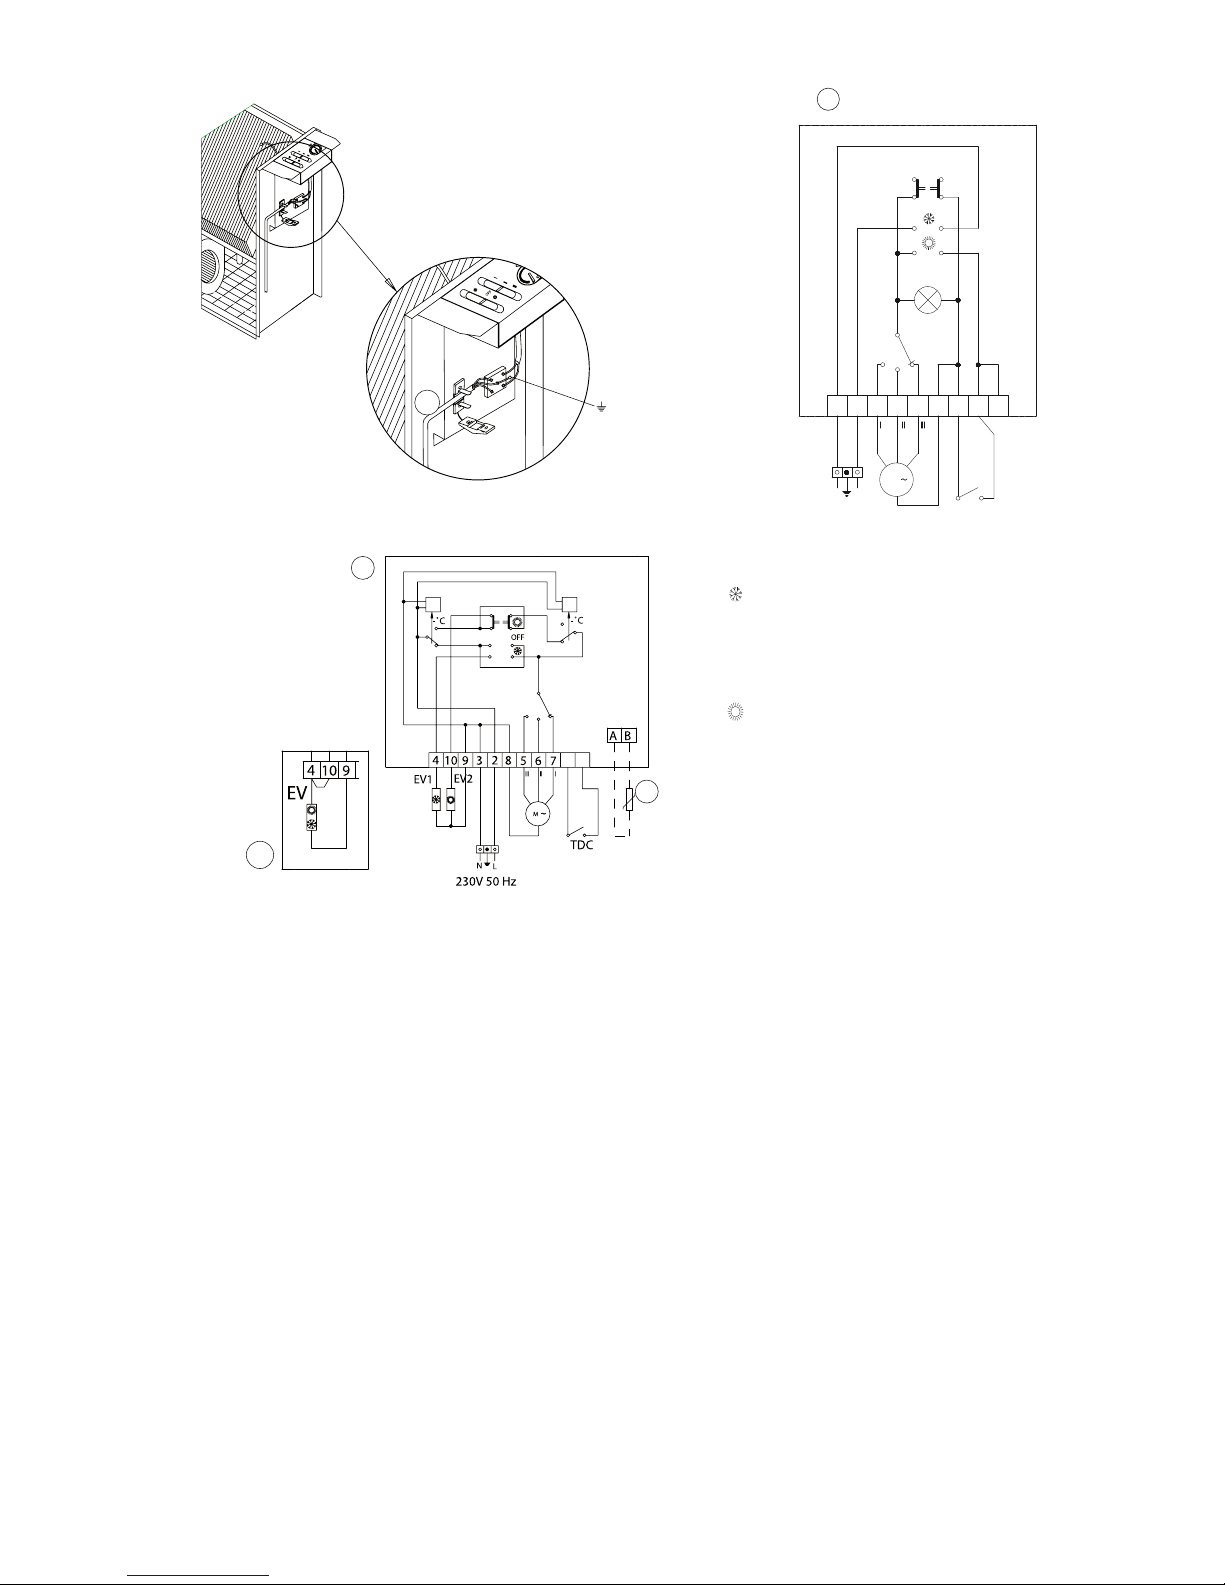
Allacciamento elettrico Mod.
VTP/VB - VTP/AB
1 cavo d’alimentazione (min.3x1.5 mmq)
2 SCHEMA ELETRICO VTP/VB
3 SCHEMA ELETRICO VTP/AB
4 Sonda ambiente
5 Valv. per 2 tubi
EV 1 = ELETTROVALVOLA
“RAFFREDDAMENTO”
EV 2 = ELETTROVALVOLA
“RISCALDAMENTO”
Conexión eléctrica Mod.
VTP/VB - VTP-P/AB
1 Camble de alimentación (min.3x1.5)
2 ESQUEMA ELECTRICO VTP/VB
3 ESQUEMA ELECTRICO VTP/AB
4 Sonda ambiente
5 Valv. para 2 tubos
EV 1 = ELECTROVALVULA
“REFRIGERACION”
EV 2 = ELECTROVALVULA
“CALEFACCIÓN”
Electric wiring types VTP/VB-VTP/AB
1 supply lead (min. 3x1.5 mm2)
2 WIRING DIAGRAM VTP/VB
3 WIRING DIAGRAM VTP/AB
4 Roomprobe
5 Valve for 2 pipes
EVI = “COOLING” SOLENOID
EV2 = “HEATING” SOLENOID
SCHEMI ELETTRICI, WIRING DIAGRAMS, SCHALTPPLANE, SCHEMAS ELECTRIQUES, ESQUEMAS ELECTRICOS
Branchement électrique Mod.
VTP/VB-VTP/AB
1 Cable d’alimentation (min. 3 x 1.5 mm2)
2 SCHEMA ÉLECTRIQUE VTP/VB
3 SCHEMA ÉLECTRIQUE VTP/AB
4 Sonde environnement
5 Soupape pour 2 tubes
EVI = ELECTROVANNE
“REFROIDISSEMENT”
EV2 = ELE CTROVANNE
“CHAUFFAGE “
Elektrische Anschiusse Mod.
VTP/VB - VTP/AB
1 Stromkabel (min. 3 x 1.5 mm2)
2 SCHALTPLAN VTP/VB
3SCHALTPLAN VTP/AB
4 Raumsondc
5 Vendi ir 2 rohre
EV1=ELEKTROVENTIL “KUHLUNG”
EV2=ELEKTROVENTIL “HEIZUNG”
MOD. VTP/AB
MOD. VTP/VB

2
1
34
d a
M
1
C3V RES
C
2
1
TAA
L
N
2
1
3
DEI
5
4
6
REL
TDC
C
I
II
III
2
3
5
6
IRE
NL
DTS
e
e
f
x
2
1
34
ad
M
1
C3V
RES
C
2
1
TAA
L
N
2
1
3
DEI
5
4
6
TDC
C
I
II
III
2
3
5
6
IRE
DTSR
e
e
f
Allacciamento elettrico 230V 50Hz
1 cavo d’alimentazione (min. 3 x 1.5 mmq)
Electric wiring types 230V 50Hz
1 supply lead (min. 3 x 1.5 mm2)
Elektrische Anschliisse 230V 50Hz
1 Stromkabel (min. 3 x 1.5 mm2)
Branchement électrique 230V 50Hz
1 Cable d’ alimentation (min. 3 x 1.5 mm1)
Conexión eléctrica 230V 50Hz
1 Cable de alimentación (min. 3 x 1.5 mm2)
SCHEMI ELETTRICI, WIRING DIAGRAMS, SCHALTPPLANE, SCHEMAS ELECTRIQUES, ESQUEMAS ELECTRICOS
CVM + TDC
MOD VTS 10 - 80
MOD VTI 10 - 80
TAM + TDC
MOD VTS 10 - 80
MOD VTI 10 - 80
1
OFF
OFF
C
I
II
M
1
L
N
III
1
2 3 4 5
6
e
230V 50HZ 230V 50HZ
C3V + TAA + TDC + DEI + RES
MOD VTP 10-30
C3V + TAA + TDC + DEI + RES
MOD VTP 40-80
230V 50HZ 230V 50HZ
230V 50HZ
TDC
Collegamento effettuato alla velocità media
Wiredfor medium speed
Bei mittlerer Geschwindigkeit durchgeihrte Verbindung
Branchement effectué à vitesse moyenne
Conexión efe tuada a la media velocidad
C
I
II
M
1
III
1
2 3 4 5
6
TDC
1
2 3 4 5
6
6
8
10
12
14
16 18
20
22
24
26
28
30
NL
e
I
1
2 3 4 5
6
7
8
9
II
III
OFF
C
I
II
M
1
III
1
2 3 4
NL
5
6
TDC
e

SCHEMI ELETTRICI, WIRING DIAGRAMS, SCHALTPPLANE, SCHEMAS ELECTRIQUES, ESQUEMAS ELECTRICOS
CEM
TDC + RES + EV
MOD. VTS 10 - 80
MOD. VTI 10 - 80
CEM + EV + TDC
MOD. VTS 10 - 80
MOD. VTI 10 - 80
230V 50HZ230V 50HZ 230V 50HZ 230V 50HZ
230V 50HZ
CEM CEM/D
CEM/D+TDC
MOD. VTS 10 - 80
MOD. VTI 10 - 80
CEM+TDC+EV1+EV2
MOD. VTS 10 - 80
MOD. VTI 10 - 80
230V 50HZ 230V 50HZ
CEM/D
CEM/D
230V 50HZ 230V 50HZ
Parametri manuale, Parameters of the manual, Parametern des Handbuchs,
Parametres manuel, Parámetros del manual CEM/D:
P02= Selezionare, select, auswählen, sélectionner, seleccionar
P07= 2
Parametri manuale, Parameters of the manual, Parametern des Handbuchs,
Parametres manuel, Parámetros del manual CEM/D:
PO1= 1
PO2= Selezionare, select, auswählen, sélectionner, seleccionar
PO7= 2
Parametri manuale, Parameters of the manual, Parametern des Handbuchs,
Parametres manuel, Parámetros del manual CEM/D:
P02= Selezionare, select, auswählen, sélectionner, seleccionar
P07= 2
CEM/D+TDC+EV1+EV2
MOD. VTS 10 - 80
MOD. VTI 10 - 80
CEM+TDC+EV1
MOD. VTS 10 - 80
MOD. VTI 10 - 80

230V 50HZ
CDM/D
DTSR
RES
REL
230V 50HZ FUNZIONAMENTO IN CONDIZIONAMENTO
CONDITIONING
KÙHLEN
FONCTIONNEMENT
EN CONDITIONNEMENT
FUNCIONAMIENTO EN LA FASE DE
ACONDICIONAMIENTO
FUNZIONAMENTO IN RISCALDAMENTO
HEATING
HEEEN
FONCTIONNEMENT
EN CHAUFFAGE
FUNCIONAMIENTO EN LA
FASE DECALEFACCIÓN
Vericare i parametri, Verify the parameters, Kontrollieren die Parameter, Verier
les paramètres, Comprobar los parámetros:
PO1= 2
PO2= Selezionare, select, auswählen, sélectionner, seleccionar
PO7= 2
P21= 60
CEM/D+TDC+EV1+RES
MOD. VTS 10 - 80
MOD. VTI 10 - 80
C
I
II
III
1
2 3 4 5
6
H O
2
M
1
e
L
N
4
5
6
7
10
11 14
15
16 1817 19 20
auto
auto
CRE
CRE + H2O
MOD. VTS/I 10-80
230V 50Hz
EV
H O
2
C
I
II
III
1
2 3 4 5
6
v1 v1
M
1
e
L
N
4
5
6
7
10
11 14
15
16 1817 19 20
auto
auto
CRE
CRE+H2O+EV
MOD. VTS/I 10-80
230V 50Hz
H O
2EV1
EV2
C
I
II
III
1
2 3 4 5
6
v1 cv2
M
1
e
L
N
4
5
6
7
10
11 14
15
16 1817 19 20
auto
auto
CRE
CRE+H2O+EV1+EV2
MOD. VTS/I 10-80
230V 50Hz
SCHEMI ELETTRICI, WIRING DIAGRAMS, SCHALTPPLANE, SCHEMAS ELECTRIQUES, ESQUEMAS ELECTRICOS

C3V= commutatore 3 velocità
TDC= termostato di consenso
TAA= termostato aria ambiente
DEI= deviatore estate - inverno
TAM= termostato amb. a muro
CVM= commutatore a vel. a
muro
CEM= Comando remoto
Estate/Inverno
- Termostato ambiente
- Commutatore tre velocità
- Comando valvole
CEM/D= Estate/Inverno
commutatore manuale e
automatica
- Termostato ambiente
- Comando valvole
- Commutatore tre velocità
manuale e automatica
DTSR= doppio termostato di
sicurezza resistenza elettrica
RES= resistenza elettrica
IRE= interruttore res. elettrica
REL= relé resistenza per mod.
40 - 80
EV1= elettrovalvola
“raffreddamento”
EV2= elettrovalvola
“riscaldamento”
L= linea
N= neutro
= terra
e= condizionamento
c= bianco (comune motore)
I= rosso (min)
II= blu (med)
III= nero
e= giallo - verde (terra)
f= alimentazione
---= limite cablaggio interno
SOLO PER GRANDEZZE 60-80
C= bianco (comune)
I= blu (min)
II= nero (med)
III= marrone (max)
Air = sonda ambiente remota
H2O = sonda acqua
EV = Elettrovalvola
raffrescamento -
riscaldamento per impianto a
2 tubi
EV1= Elettrovalvola
raffrescamento
per impianto a 4 tubi
EV2 = Elettrovalvola
riscaldamento
per impianto a 4 tubi
C3V= 3 Geschwindigksiten-
regler
TDC= Zustimmungsthermostat
TAA= Raumluftthermostat
DEI= Umleiter Sommer- Winter
TAM= RaumthennostatWand-
montiert
CVM= 3 Geschwindigkeitenregler
Wandmontiert
Raumregler Mod. CEM .
Sommer/Winter
- Raumthermostat
- 3-Stufen-Wahlschalter
- Ventilsteuerung.
Raumregler Mod. CEM-D.
Sommer/Winter manuelle und
automatische Umschaltung
- Raumthermostat
- Ventilsteuerung
- manueller und
automatischer 3-Stufen-
Wahlschalter
- Steuerung elektr. Widerstand.
DTSR= Doppelter Siche-
rheitsthermostat elektrischer
Widerstand
RES = elektrischer Widerstand
IRE = Schalter elektrischer
Widerstand
REL= Widerstandsrelais far
Mod. 40-80
EVI= Elektroventil “Kuhlung”
EV2= Elektroventil “Heizung”
L= Linie
N= Neutral
= Erde
e= Klimatisierung
e= weiB (einfacher Motor)
I= rat (min)
II= blau (med)
FU= schwarz (max)
e= gelb-griin (Erde)
f= Stromversorgung
--- = Grenze innere Verkablung
NUR FUR DIE GROSSEN
60-80
C= weiB (einfadi)
I= blau (min)
ll= schwarz (med)
lll= brami (max)
Air = Raumsonde
H2O = Zustimmungssonde
EV = Electroventil “Kuhlung
Heizung”
EV1= Electroventil “Kuhlung”
EV2 = Electroventil “Heizung”
C3V= 3 speed selection switch
TDC= coment thermostat
TAA= room air thermostat
DEI= summer-winter selection
switch
TAM= walltted room
thermostat
CVM= walltted 3 speed
selection switch
CEM= model remote control
Summer/Winter
- Room thermostat
- Three-speed switch
- Valve controls
CEM/D= Comando Res.
Elettrica o manual and auto
Summer/Winter switching
- Room thermostat
- Valve control
- manual and auto three-speed
switch
- Heating element Controls
DTSR= doublé thermostat far
heating element safety
RES= heating element
IRE= heating element switch
REL= heating element relayfar
types 40-80
EVI= “cooling” solenoidi
EV2= “heating” solenoid
L= power line
N= neutra!
= earth
e= cooling
e= white (common motor)
I = red (min.)
II= blue(med)
III = biade (max.)
e= yellow-green (earth)
f= power
---= limitfor internai wiringù
JUSTFOR THE 60-80 SIZES
C= white (common)
I = blue (min.)
II = black(med.)
Ill= brown (max.)
Air = Remote air probe
H2O = Water probe
EV = Cooling and Heating
solenoid
(2 pipes system)
EV1 = cooling solenoid (4 pipes
system)
EV2 = Heating solenoid (4
pipes system)
C3V= commutateur 3 vitesses
TDC= thermostat de
consentement
TAA= thermostat air ambiati!
DEI= déviateur été-hiver
TAM= thermostat ambiarti àxer
sur le mur
CVM= commutateur 3 vitesses
àxer sur le mur
CEM= Commandes remotés
Eté / Hiver
- Thermostat d’ambiance
- Commutateur trois vitesses
- Commande soupapes
CEM/D= Été / Hiver
commutation manuelle et
automatique
- Thermostat d’ambiance
- Commande soupapes
commutateur trois vitesses
manuelle et automatique
- Commande Rés. électrque
DTSR= doublé thermostat de
sécurité
résistance électrique
RES= résistance électrique
IRE= interrupteur rés. électrique
REL= relais résistance pour
mod. 40-80
EVI= électrovanne
«refroidissement»
EVI= électrovanne «chauffage»
L= tigne
N= neutre
= terre
e= conditionnement
e= blanc (moteur commuti)
I = rouge (min.)
II = bleu (moy.)
Ill= noir (max.)
e= ialine - vert (terre)
f= alvmentation
--- = limite càblage interne
SEULEMENTPOURLES
MODELES 60-80
C= blanc (commun)
I = bleu (min.)
II = noir (moy.)
Ill= marron (max.)
Air = Sonde environnement
H2O = Sonde consentement
EV = Electrovanne
“Refroidissement
Chauffage”
EV1 = Electrovanne
“Refroidissement”
EV2 = Electrovanne
“Chauffage”
C3V= conmutador 3
velocidades
TDC= termostato de asenso
TAA= termostato aire ambiente
DEI= desviador verano
- invierno
TAM= termostato amb. murai
CVM= conmutador 3 vel. murai
mandos a distancia CEM.
Estate/Inverno
- Termostato ambiente
- Conmutador de tres
velocidades
- Mando valvulas
Mandos a distancia CEM-D.
Verano/Invierno . conmutacion
manual y automatica
- Termostato ambiente
- Mando valvulas
Conmutador de tres
velocidades manual y
automatica
- Mando Res. Electrica
DTSR= doble termostato de
seguridad resistencia eléctrica
RES= resistencia eléctrica
IRE= interruptor res. eléctrica
REL= relè resistencia para
mod. 40-80
EV1= electrovàlvula
“refrigeración”
EV2= electrovàlvula
“calefacción”
L= linea
N= neutro
= ticrra
e= acondicionamiento
e= bianco (comùn motor)
I= rojo (min)
II= azul (med)
HI= negro (max)
e= amarillo - verde (tierra)
f= alimcntación
--- = limite cableado interior
SOLO PARA DIM. 60-80
C= bianco (comùn)
l= azul (min)
II= negro (med)
lll= marron (max)
Air = Sonda ambiente
H2O = Sonda asenso
EV = Electrovalvula
“Refrigeracion
calefaccion”
EV1= Electrovalvula
“Refrigeracion”
EV2 = Electrovalvula
“Calefaccion”
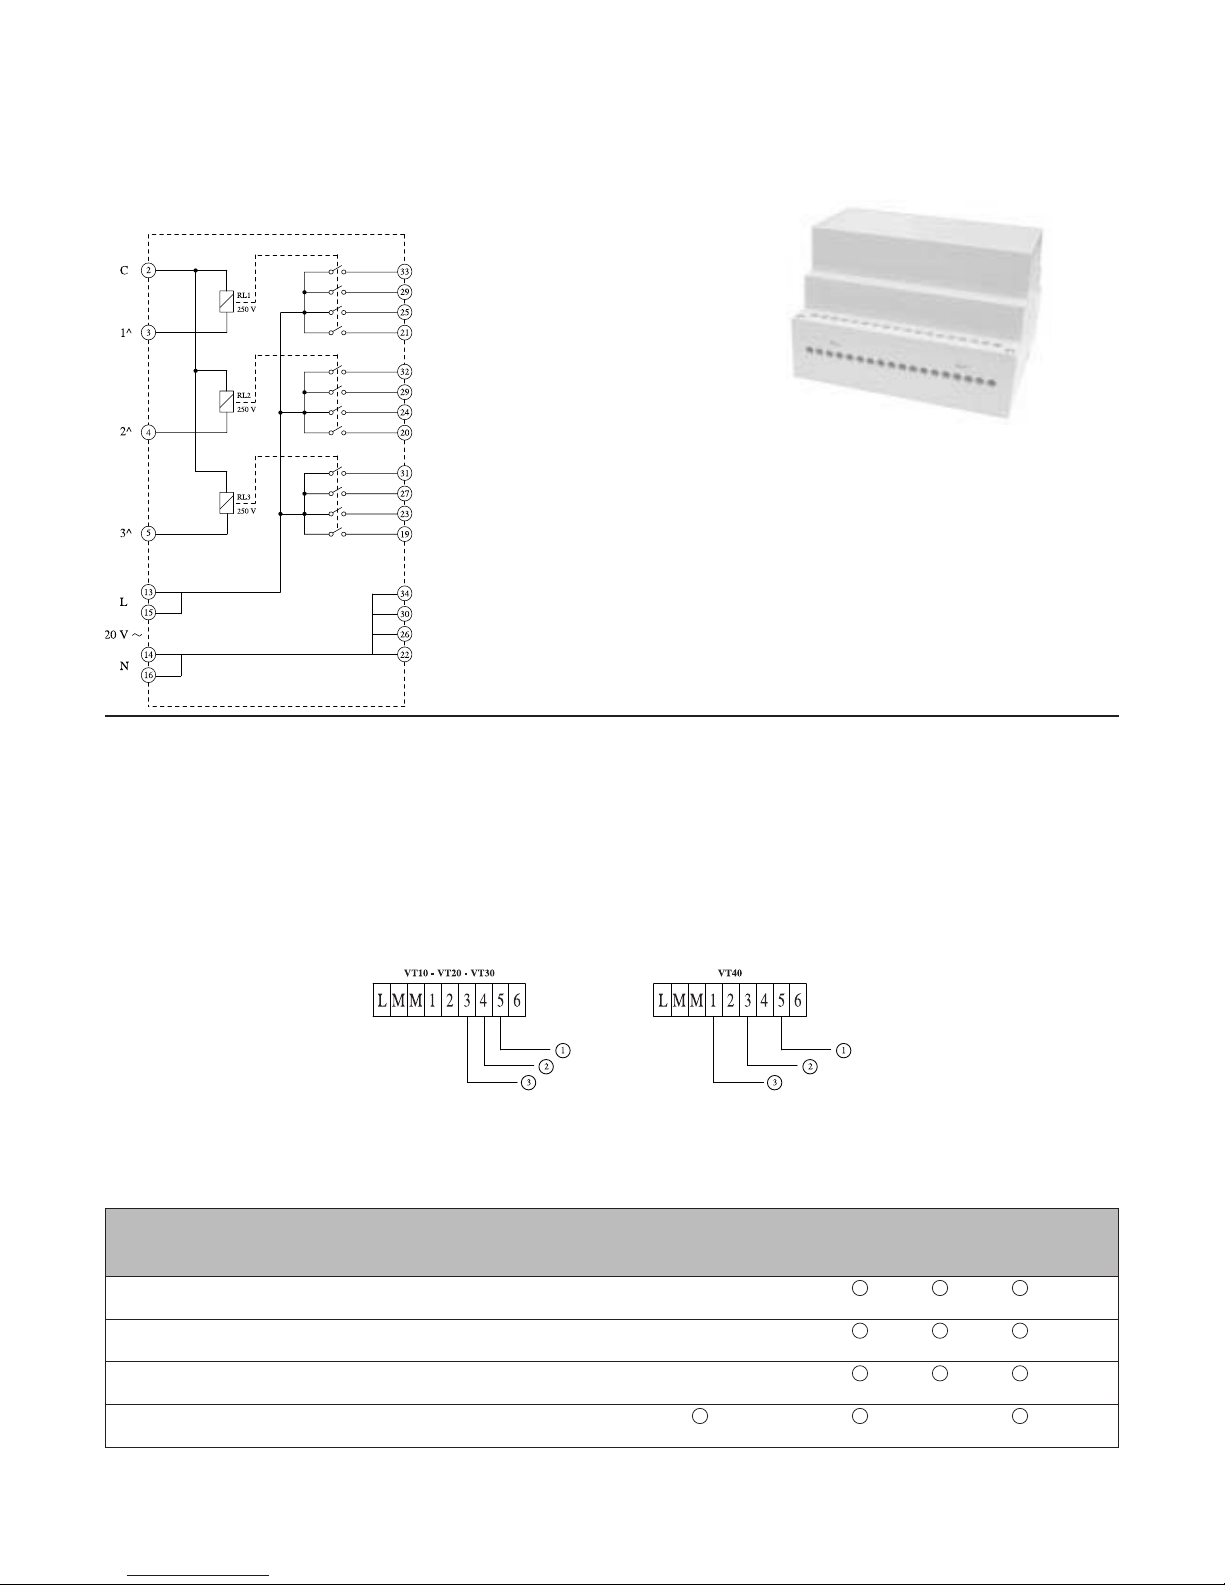
INTERFACCIA DI POTENZA - POWER INTERFACE - LEISTUNGSANSCHLUSS - INTERFACE DE PUISSANCE - ESTERFAZ DE POTENCIA
Attenzione, Attention, Achtung, Attention, Attención:
Utilizzare sempre l’interfaccia di potenza per collegare più ventilconvettori ad un solo comando remoto. Always use the power interface to connect more
fan coils to single remote control. Leistungsanschluss immer zu benutzen um mehre Klimakonvektoren zu ein einzigen Fernbedienung zu verbinden. Il
faut utiliser toujours l’interface de puissance pour commander plusieurs (jusqu’à 4) ventilo-convecteurs avec un seule commande a distance.
Utilizar siempre la interfaz de potencia para conectar varios fan coils a un solo mando a distancia.
Schema elettrico - Wiring diagram
Elcktrischcr Schaltplan - Schèma électrìque
Esquema elettrico
1^ VELOCITÀ
1st SPEED
1. GESCHWINDIGKEIT
1AVTTESSE
1AVELOCIDAD
2^ VELOCITÀ
2st SPEED
2. GESCHWINDIGKEIT
2^ VITESSE
2^ VELOCIDAD
3^ VELOCITÀ
3st SPEED
3. GESCHWINDIGKEIT
3^ VITESSE
3^ VELOCIDAD
COMUNE
COMMON
GEMEINSAM
COMMUNE
COMÚN
Descrizione:
- Possibilità di collegare no a
4 Ventilconvettore con un solo
comando remoto.
- Potenza max assorbita di ogni
Ventilconvettore 1/10 hp
Description:
- Up to 4 fan-coils can be connecte
withjusta single remote control.
- Max. Absorbed power by each fan
coil is1/10 hp
bcschrcibung:
- Moglicher anschluss von bis zu
4 klimakonvektoren mit nur einer
einzigen fernbedienung.
- max. Aufgenommene leistung von
jedem klimakonvektoren 1/10 hp
Description:
- Possibilite de brancher jusqu’a 4
Ventilo-convecteurs avec une seule
commandea distance.
- Puissance maxi absorbee de chaque
Ventilo-convecteurs 1/10 hp
Descripción:
- Posibilidad de conectar hasta 4
Ventilconvectores con un ùnico
mando remoto.
- Potencia max. Absorbida por cada
Ventilconvectores 1/10 hp
I ventilconvettori modello
VT 10-20-30-40 , sono dotati di
variazione della ventilazione,
mediante auto-
trasformatore a 6 posizioni.
Le posizioni certicate
EUROVENT sono:
VT10 - VT20 - VT30 - VT40
Morsettiera autotrasformatore
(vedi g.)
© - Min. (rosso)
© - Med. (blu)
© - Max. (nero)
The VT 10-20-30-40 version
fan-coil heaters have a fan
regulator using a 6 position
auto-transformer.
The certied
EUROVENTpositions are:
VT10 - VT20 - VT30 - VT40
Auto-transformer terminal
board
(follow thè pict.)
© - Min. (red)
© - Med. (blue)
© - Max. (black)
Die Geblasekonvektormodelle
VT 10-20-30-40 sind mit einer
Lüftungsregelung durch
Spartransformator mit 6
Stellungen ausgestattet.
Die von EUROVENT
zertizierten
Positionen sind:
VT10 - VT20 - VT30 - VT40
KlemmleisteSpartransformator
(siehe g.)
© - Min. (rot)
© - Mitt. (blau)
© - Max. (schwarz)
Les ventilo-convecteurs
VT 10-20-30-40 sont pourvus
de variation de la ventilation,
grâce à l’autotransformateur
à 6 positions.
Les positions certiées sont
les suivantes:
VT10 - YT20 - VT30 - VT40
Plaque à bornes
autotransformateur (voir le g.)
© - Min. (rouge)
© - May. (bleu)
© - Maxi (noir)
Los ventilconvectores modelo
VT 10-20-30-40 estan dotados
de variación de la ventilación,
mediante auto-transformador
de 6 posiciones.
Las posiciones certicadas
EUROVENT son:
VT10 - VT20 - VT30 - VT40
Tablero de bornes
autotransformador (ver g.)
© - Min. (rojo)
© - Med. (azul)
© - Max. (negro)
PORTATA ARIA RIFERITA ALLE VARIE POSIZIONI DEI COLLEGAMENTI ALL’AUTOTRASFORMATORE (mc/h) - AIRFLOW REFERRED
TO THE VARIOUS CONNECTION POSITIONS TO THE AUTO-TRANSFORMER (mjh) - LUFTDURCHSATZ FÜR DIE VERSCHIEDENEN
POSITIONEN DER ANSCHLÜSSE AN DEN SPARTRANSFORMATOR (m3/h) - DEBIT AIR SE RAPPORTANT AUX DIVERSES POSITIONS DES
BRANCHEMENTSA L’AUTOTRANSFORMATEUR (mc/h) - CAUDAL DE AIRE REFERIDO A LAS VARIAS POSICIONES DE LAS CONEXIONES AL
AUTOTRANSFORMADOR (m3/h)
AUTOTRASFORMATORE - AUTO-TRANSFORMER
AUTO-TRANSFORMER AUTOTRANSFORMATEUR
AUTOTRANSFORMADOR
Pos. 1 Pos. 2 Pos. 3 Pos. 4 Pos. 5 Pos. 6
Mod. VT 10 333 296 252 200 147 128
Mod. VT 20 388 348 304 254 194 184
Mod. VT 30 584 505 430 353 254 232
Mod. VT 40 716 570 490 423 300 283
3 2 1
3 2 1
3 2 1
2 13
ENGLISH
CUSTOMER
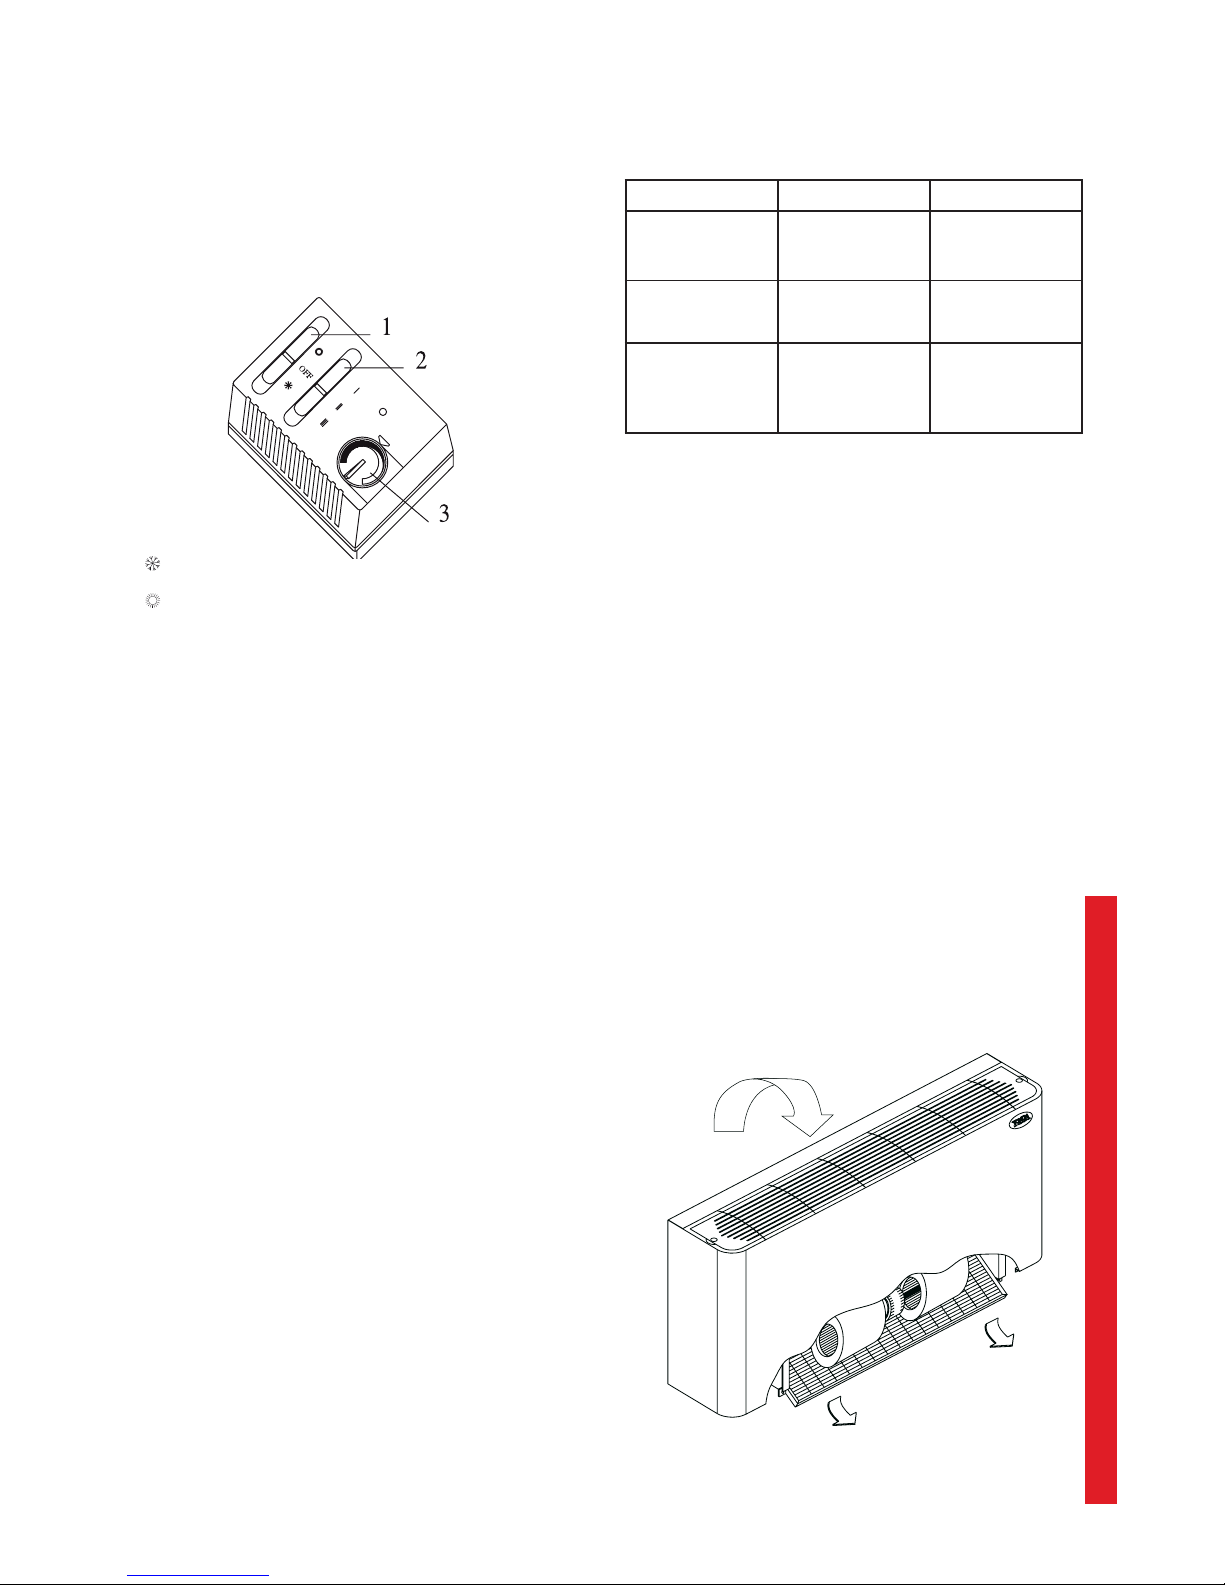
1.0 START UP
Control that the cover andlter are correctly assemblea and that the
electric connectìons have been mode in conformity with the enclosed
diagrams. Turn the heater on and check the controis to ensure the
fan-coil heater and accessories work properly.
1 - Summer-winter-off selection switch.
2 - Fan regulation.
3 - Room temperature regulation
(VTP/AB versions).
AIR CONDITIONING
HEATING
2.0 REGULATION ACCESSORIES
Ensure that the accessories have been correctly assemblea and that
the electric conectìons have been mode as given in the instructions
included with the kit.
* READ THE INSTRUCTION MANU AL CAREFULLY BEFORE
MAKING ANY SETTINGS OR C A R R Y I N G O U T THE
MAINTENANCE WORK.
*IF THE FAN-COILHEATER ISDISSEMBLEDAND REASSEMBLED
THE INSTRUCTION MANU AL MUST BE SCRUPULOUSLY
FOLLOWED.
* PAY SPECIAL ATTENTION TO HOW THE HEATER IS USED
WHERE “ATTENTION” OR “DANGER” ARE WRITTEN, TO
AVOID DAMAGE TO THE HEATER, PEOPLE AND PROPERTY.
* TONON S.P.A. DECLINES ALLRESPONSIBILITY FOR DAMAGED
CAUSED BYINCORRECT USE OF THE FAN-COIL HEATER AND
BY FAILURE TO FOLLOW THE INSTRUCTIONS GIVEN IN THIS
MANUAL.
3.0 USING THE FAN-COIL HEATER
Ensure that the air-intake zone isfree and there is nothing covering
the delivery grid (do not use it to dry washing, or piace anything on top
ot) otherwise the heater will not work correctly.
4.0 MAINTENANCE
Correct periodic maintenance means safe top quality performance.
Before beginning any sort of maintenance:
- Turn the power offto the fan-coil heater
- Ensure that the solenoid or holder do not allow water to circuiate in
the exchanger.
- Use protective gloves
Once a month or after heavy use, clean the lter using a vacuum
cleaner or wash it with neutral detergent. If the lter is stili not clean
request a new one from our service centre. How to remove the lter
(see the gure):
- Unscrew the xing screws.
- Pulì the lter downwards towards the oor (or the wall in horizontal
versions).
Once a year or after a long time without being used, clean the battery
with a compressed airjet and check that the condensation outlets are
not blocked.
Do notpour water onto the heater. The electric motor does not require
maintenance.
If the heater is not used and the outside temperature falls below
0°C, empty the exchanger by opening the screws below the bottom
attachment and add mono ethylene glycol to the water to lower the
freezing temperature to the required level.
5.0 FAULT FINDING
FAULT CAUSE REMEDY
No air comes out The motor does not turn
The consent thermostat
does not dose
Check the power supply
Increase the intake
water temperature
Little air comes out Blocked lter or battery
Airow blocked
Clean the lter and
battery Unblock the
airow
Poor heating/cooling Air in the hydraulic circuit
Little water in the circuit
Intake water temperature
low/high
Bleed the hydraulic
circuit Check the boiler
or cooler Check the
boiler or cooler
* FOR ANY PROBLEMS THAT ARE NOTCOVERED BY THE
INSTRUCTION MANUAL, CONTACT THE TONON S.P.A. SERVICE
CENTRE.
ATTENTION
In case ofre water must not be used - only powder or COi
extinguishers.
SPARE PARTS
Use only originai spare parts.
WARRANTY
The warranty is valid for 3 years (except the electric parts which are
coveredfor 1 year). The warranty is valid from the date the heater is
installed. The warranty is no longer valid if repairs or alterations are
mode by unauthorised persons, or due to faults that are not caused
by originai faults of the components or its construction.
DO NOT COVER

CARATTERISTICHE TECNICHE VENTILCOVETTORE CA’ D’ORO - TECHNICAL FEATURES OF CA’ D’ORO FAN COIL HEATES - TECHNISCHE
EIGENSCHAFTEN KLIMAKONVEKTOR CA’ D’ORO - CARACTERISTIQUES TECHNIQUES VENTILO-CONVECTEUR CA’ D’ORO - DATOS
TECNICOS VENTILCONVECTOR CA’ D’ORO
Modello - Type - Modell - Modéle - Modelo 10 20 30 40 50 60 70 80
Potenza termica - Heating capacity - Heizleistung - Puissance termique - Potencia calorica (1) E
Acqua ingresso 70°C, ∆T 10K - Intake water temperature 70°C, ∆T 10K - Temp. Wasservorlauf
70°C, ∆T 10K - Temp. entrée eau 70°C, ∆T 10K - Temp. entrada agua 70°C, ∆T 10K
W max
W med
W min
2910
2430
1900
3770
3260
2640
5250
4490
3460
8870
6540
4330
12100
9870
8190
14300
12100
9870
17100
15300
13000
19200
17100
15300
Portata acqua max - Water ow - Wassermenge - Debit d’eau - Caudal agua
l/h
254 329 459 776 1056 1246 1498 1677
Perdite di carico acqua - Pressuredrop - Druckverlust - Perte de charge - Perdita de carga
Kpa
3.08 6.92 4.34 13.1 6.9 7.08 12.2 14.9
Potenza termica - Heating capacity - Heizleistung - Puissance termique - Potencia calorica (2) E
Acqua ingresso 50°C - Intake water temperature 50°C - Temp.
Wasservorlauf 50°C - Temp. entrée
eau 50°CK - Temp. entrada agua 50°C
W max
W med
W min
1690
1420
1120
2030
1770
1470
2930
2530
1960
5240
3880
2600
6590
5430
4480
7500
5880
4840
9860
8800
7770
10700
9580
8550
Perdite di carico acqua - Pressuredrop - Druckverlust - Perte de charge - Perdita de carga
Kpa
2.47 5.04 4.59 12.3 6.02 8.9 15.4 19.4
Potenza termica IR - Heating capacity - Heizleistung - Puissance termique - Petencia calorica (4) E
Batteria di scambio aggiuntiva an un rango - Additional one rank exchange battery - Leiter
ZusatzAustascherBatterie d’échange addìtionelle à un rang-1 - Battería de intercambio adjunta de un rango
Acqua ingresso 70°C, ∆T 10K - Intake water temperature 70°C, ∆T 10K - Temp. Wasservorlauf 70°C, ∆T 10K
Temp. entrée eau 70°C, ∆T 10K - Temp. entrada agua 70°C, ∆T 10K
W max
W med
W min
1420
1210
980
1910
1680
1390
2700
2350
1600
4080
3210
2260
5580
4570
3890
6070
5580
4570
7440
6920
6050
8150
7440
6920
Portata acqua max - Water ow - Wassermenge - Debit d’eau - Caudal agua
l/h
124 167 236 357 476 530 651 713
Perdite di carico acqua - Pressuredrop - Druckverlust - Perte de charge - Perdita de carga E
Kpa
3.00 6.07 12.3 27.8 21 23.3 42.1 46.7
Potenza frigorifera totale - Total cooling capacity - Kühlleistung Total (3) E
Puissance frigorique totale - Potencia frigorica total
W max
W med
W min
1110
960
780
1560
1380
1130
2200
1880
1470
4210
3240
2250
4690
3570
2910
5790
4030
3030
7940
7210
6650
8500
7710
7000
Potenza frigorifera sensibile - Sensible cooling capacity - Kühlleistung Sensibel (3) E
Puissance frigorique sensible - Potencia frigorica sensible
W max
W med
W min
960
810
640
1120
1070
860
1820
1520
1160
3040
2270
1520
3870
3080
2390
4860
3870
3080
5950
5340
4570
6620
5950
5340
Portata acqua max - Water ow - Wassermenge - Debit d’eau - Caudal agua
l/h
191 268 378 723 797 996 1365 1440
Perdite di carico acqua - Pressuredrop - Druckverlust - Perte de charge - Perdita de carga E
Kpa
1.59 5.93 5.41 14.7 9.60 10.3 17.9 21.5
Portata aria - Air ow - Luftmenge - Debit d’air - Caudal aire
mc/h max
mc/h med
mc/h min
252
200
147
304
254
194
430
353
254
716
490
300
920
720
573
1130
920
720
1320
1150
946
1520
1320
1150
Pressione sonora - Sound pressure level - Geräuschpegel - Pression sonore - Nivel sonoro
dB (A) max
dB (A) med
dB (A) min
38.5
34.5
28.5
38.5
34.5
27.5
41.5
35.5
27.85
45.5
37.5
26.5
48.5
40.5
34.5
54.5
48.5
41.5
52.5
48.5
43.5
57.5
53.5
49.5
Potenza sonora - Sound output - Schalleistung - Puissance sonore - Potencia sonora E
dB (A) max
dB (A) med
dB (A) min
47
43
37
47
43
36
50
45
36
56
46
35
57
49
43
63
57
50
61
57
52
66
62
58
Alimentazione elettrica - Power supply - Stromversorgung - Alimentation életrique - Alimentacion elèctrica
230V/1/50 Hz
Potenza max ventilatore - Max fan capacity - Max Ventilatorleistung E
Puissance maximale ventilateur - Potencia max ventilador
W
49 32 65 90 108 143 172 217
Corrente max assorbita - Max absorbed current - Max aufgenommener Storm - Puissance
maximum absorbée - Corriente max absorbida
A
0.21 0.14 0.28 0.39 0.47 00.63 0.75 0.94
Resistenza elettrica (a richiesta) - Heating element (on request) - Elektrischer Winderstand (auf
Anfrage) - Rèsistance électrique (en option) - Resistencia elèctrica (bajo pedido)
W
750 1000 1500 2000 2500 2500 3000 3000
Contenuto acqua batteria 3R (di serire) - 3 row water content - Wasserinhalt Austauscher 3R
(serie) - Contenance en eau batterie 3R - Contenido de agua de la batería 3R
1
0.6 0.9 1.3 1.9 2.8 2.8 3.6 3.6
Contenuto acqua batteria IR (supplementare) - I row water - Wasserinhalt Austauscher IR
(optionelle) - Contenance en eau batterie IR - Contenido de agua de la baterfa IR
1
0.2 0.3 0.4 0.5 0.9 0.9 1.2 1.2
Peso - Weight - Gewicht - Poids - Peso
Kg
14 17 20 23 35 35 47 47
“E”: Prestazioni certicate
EUROVENT
(1) - Riscaldamento:
Temperatura ambiente 20°C
- Temperatura ingresso acqua
70°C - ∆T acqua 10°C
(2) - Riscaldamento “E”:
Temperatura ambiente 20°C
- Temperatura ingresso acqua
50°C - Portata acqua come in
raffreddamento alla vel. Max.
(3) - Raffreddamento:
Temperatura aria esterna
27°C b.s. - 19°C b.u.
Temperatura acqua ingresso
7°C - Uscita 12°C
(4) - Valori riferiti alla batteria
aggiuntiva “IR” per impianti
a “4 Tubi”, tutti gli altri valori
sono riferiti alla versione base
con batteria “3R” per impianti
a “2 Tubi”
“E”: EUROVENT
Performance certicate
(1) - Heating: room
temperature 20°C, untake
water temperature 70°C. ∆T
water 10°C
(2) - Heating (E): room temp.
20°C, intake water temp.
50°C, water ow the same as
cooling, all max. speed.
(3) - Cooling: room temp.
27°C dry bulb. 19°C damp
bulb. water Temp. intake 7°C
- outlet 12°C.
(4) - The values refer to the
extra “IR” battery for the “4
tube” systems, all the other
values refer to the basic
version whit the “3R” battery
for “2 tube” systems.
“E”: zertizierte Leistungen
EUROVENT
(1) - Heizung:
Raumtemp.20°C - Temp.
Wasservorlauf 70°C - ∆T
Wasser 10°C
(2) - Heizung “E”: Raumtemp.
20°C - Temp. Wasservorlauf
50°C - Wasserdchuss wie
beim Kühlen auf max. 2
Geschw.
(3) - Kühlung: Temp.
Raumluft 27°C mit feuchter
Thermometerkugel, 19°C mit
troknen Thermometerkugel,
Wassertemp. Vorlauf 7°C
- Ablauf 12°C
(4) - Die Werte beziehen sich
auf den Zusatzaustauscher
“IR” für “4-Leiter-Systeme”,
alle anderen Werte beziehen
sich auf die basisversion mit
Austauscher “3R” für “2-Leiter-
Systeme”
“E”: Prestations certifées
EUROVENT
(1) - Réchauffement: temp.
ambiante 20°C, temp. entrée
eau 70°C. ∆T eau 10°C
(2) - Réchauffement (E): temp.
ambiante
20°C , temp. entrée eau 50°C,
débit eau comme dans la
phase de refroidissement
vitesse max.
(3) - Refroidissement: temp.
air ambiant 27°C bulbe sec.
19°C bulbe humide, temp. eau
entrée 7°C - sortie 12°C
(4) - Valeurs référées à
la batteriesupplémentaire
“IR” pour installations à “4
TUBES”, toules les autres
valeurs se rèfèrent à la
version base batterie “3R”
pour installation à “2 TUBES”.
“E”: Rendimientos
certicados EUROVENT
(1) - Calefacción: Temp:
ambiente 20°C - Temp.
entrada agua 70°C - ∆T agua
10°C
(2) - Calefacción “E”: Temp:
ambiente 20°C - Temp.
entrada agua 50°C - Caudal
agua corno eln refrigeración la
vel. max
(3) - Refrigeración: Temp. aire
ambiente
27°C b.s. - 19°C b.h., Temp.
agua entrada 7°C - salida
12°C
(4) - Valores referidos a la
baterfa adicional “IR” para
installaciones a “4 TUBOS”,
todos los otros valores se
referien a la version base
con baterfa “3R” para
installaciones a “2 TUBOS”

UNITA BASE - BASIC UNIT - BASISEINHEIT - UNITE BASE - UNIDAD BASE
COMPONENTI PRINCIPAL
1 Batteria di scambio
2 Batteria supplementare IR
(a richiesta)
3 Struttura portante
4 Gruppo ventilante
5 Pannello comandi
6 Mobile di copertura
7 Sezione ltrante
8 Sportello sx
9 Sportello dx
10 Griglia diffusore
11 Vaschetta esterna (a richie-
sta)
12 Termostato di consenso
13 Targhetta caratteristiche
MAIN COMPONENTS
1 Exchange battery
2 Single rara, additional
battery (on request)
3 Bearìng structure
4 Fan unii
5 Control panel
6 Cover
7 Filterunit
8 Uhap
9 R/hap
10 Diffuser grid
11 Outside tray (on request)
12 Consent thermostat
13 Technical feature plaque
COMPONENTES PRINCIPALES
1 Bateria de intercambio
2 Bateria suplementaria IR (a
petición)
3 Estructura portante
4 Grupo ventilador
5 Panel de mandos
6 Mueble de copertura
7 Sección ltrante
8 Puerta izquierda
9 Puerta derecha
10 Rejilla de difusión
11 Bandeja externa (a petición)
12 Termostato de asenso
13 Placa de caracteristicas
HAUPTBESTANDTEILE
1 Warmeaustauscher
2 Zusatzaustauscher IR
(auf Anfrage)
3 Tragende Struktur
4 Geblase
5 Bedienblende
6 Abdeckgehause
7 Filter
8 Klappe links
9 Klappe rechts
10 Verteilergitter
11 ÀuBere Wanne (auf Anfrage)
12 Freigabe-Thermostat
13 Typenschild
COMPOSANTES PRINCIPALES
1 Batterie d’échange
2 Batterie supplémentaire R
(en option)
3 tructure portante
4 Groupe de ventilation
5 Panneau de commande
6 Meublé de couverture
7 Groupe deltration
8 Porte gche
9 Porte dte
10 Grille diffuseur
11 Cuve externe (en option)
12
Thermostat de consentement
13 Plaquette caractéristiques
--/VB
--/AB
--/CRE
This manual suits for next models
2
Table of contents
Other Tonon Forty Heater manuals


