Sunhouse SPH050 User manual

Installation and Operating Instructions
Sunhouse Compact Heater
300003988 Issue 3
THESE INSTRUCTIONS SHOULD BE READ CAREFULLY AND RETAINED FOR FUTURE REFERENCE
Model(s) Watt A B C
SPH050 500 425mm 400mm 115mm
SPH100 1000 525mm 400mm 115mm
SPH150 1500 625mm 400mm 115mm
SPH200 2000 925mm 400mm 115mm
Dimensions
IMPORTANT SAFETY ADVICE
When using electrical appliances, basic
precautions should always be followed to
reduce the risk of re, electrical shock, and
injury to persons, including the following:
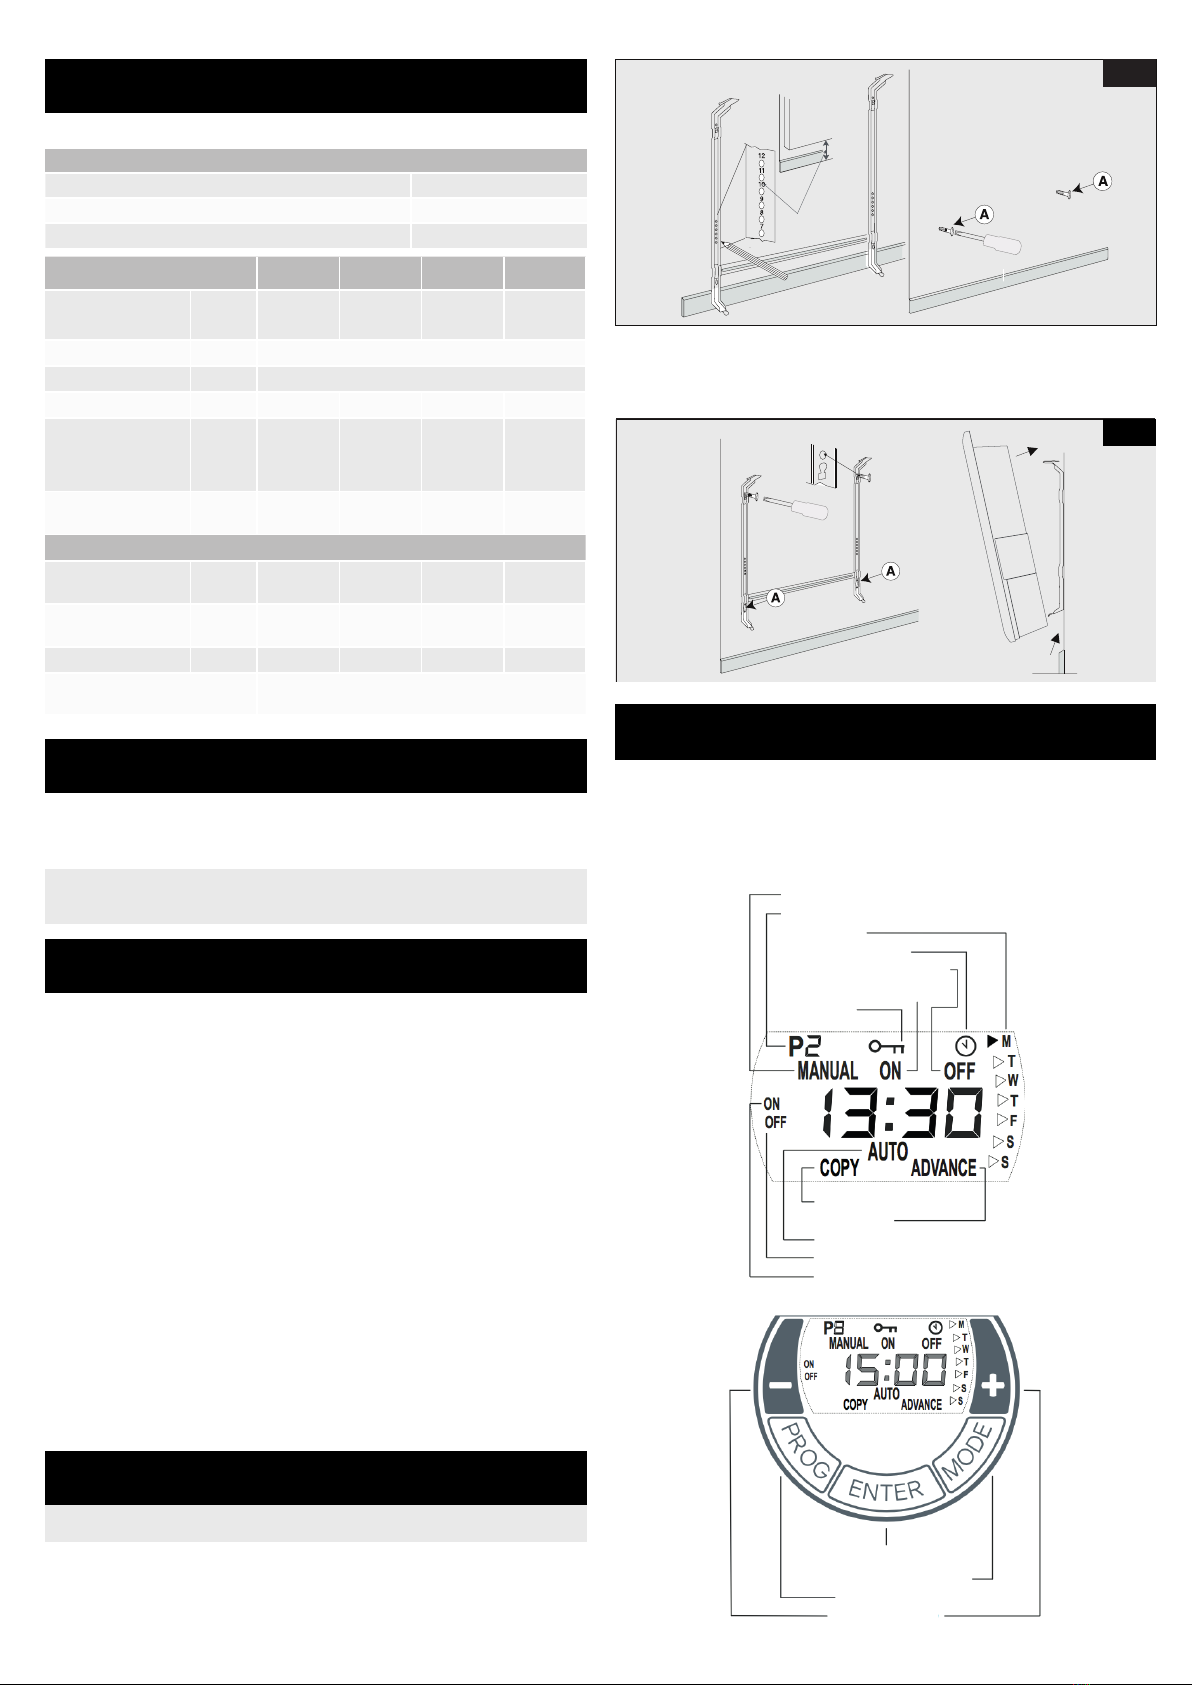
IMPORTANT - The wall bracket supplied with
the appliance must be used.
DO NOT use this heater in the immediate
surroundings of a bath, a shower or a swimming
pool.
IMPORTANT - If the heater is installed in a
room containing a bath or shower, it must be
so installed that switches and other controls
cannot be touched by a person using a bath
or shower.
WARNING - In order to avoid overheating, do
not cover the heater. Do not place material
or garments on the heater, or obstruct the
air circulation around the heater, for instance
by curtains or furniture, as this could cause
overheating and a re risk.
This heater carries the warning symbol
indicating that it must not be covered.
NEVER cover or obstruct in any way the heat
outlet slots at the top of the heater or the air
inlet slots in the base of the heater.
CAUTION - Some parts of this product can
become very hot and cause burns. Particular
attention has to be given where children and
vulnerable people are present.
This appliance can be used by children aged
from 8 years and above and persons with
reducedphysical,sensoryor mentalcapabilities
or lack of experience or knowledge if they
have been given supervision or instruction
concerning the use of the appliance in a safe
way and understand the hazards involved.
Children shall not play with the appliance.
Cleaning and user maintenance shall not be
carried out by children without supervision.
Children aged from 3 years and less than 8
years shall only switch on/off the appliance
provided that it has been placed or installed
in its intended normal operating position and
they have been given supervision or instruction
concerning the use of the appliance in a safe
way and understand the hazards involved.
Children aged from 3 years and less than 8
years shall not plug in, regulate and clean the
appliance or perform user maintenance.
If the supply cord is damaged it must be
replaced by the manufacturer or service agent
or a similarly qualied person in order to avoid
a hazard.
WARNING: Servicing and product
repairs should only be undertaken by the
manufacturer’s approved service agent or
a similarly qualied person, using only exact
manufacturer approved spare parts.
IMPORTANT: The supply circuit to the heater
must incorporate a double pole isolating
switch having a contact separation of at least
3mm.
WARNING: Packaging should be disposed
of responsibly as the EPS used could be a
potential choking hazard for children.
WARNING: Do not locate the heater
immediately below a xed socket outlet or
connection box.
CAUTION: In order to avoid a hazard due to
inadvertent resetting of the thermal cut-out,
this appliance must not be supplied through
an external switching device, such as a timer,
or connected to a circuit that is regularly
switched on and off by the utility.
50mm (min)
‘A’
‘B’
30mm
(min)
30mm
(min)
300mm
(min)
Shelf
Minimum
front
clearance
Fig. 1
50mm
(min)
‘C’

Energy Related Product Directive
Type of heat output/ room temperature control
With electronic room temperature control Yes
Electronic room temperature control plus week timer
Yes
With open window detection No
Model Identifi er(s):
SPH050 SPH100 SPH150 SPH200
Nominal heat
output Pnom 0.5 kW 1 kW 1.5 kW 2 kW
Height (mm)
400
Depth (mm)
115
Width (mm)
425 525 625 925
Minimum heat
output (indica-
tive)
Pmin 0.5 kW 1 kW 1.5 kW 2 kW
Maximum continu-
ous heat output Pmax,c 0.5 kW 1 kW 1.5 kW 2 kW
Auxiliary electricity Consumption
At nominal heat
output elmax 0.00 0.00 0.00 0.00
At minimum heat
output elmin 0.00 0.00 0.00 0.00
In standby mode elSB
<0.0005 <0.0005 <0.0005 <0.0005
With open window detec-
tion Yes
This product complies with Lot20 of the Energy Effi ciency Directive (2015/1188)
General Information
This heater must be used wall-mounted. The necessary wall mounting brackets
are provided with the product as a standard. It should only be operated when
in the upright position as shown - see Fig.1. Before connecting the heater check
that the supply voltage is the same as that stated on the heater.
WARNING: THIS APPLIANCE MUST BE EARTHED
WARNING:- The electrical installation of this heater must be carried out by
a suitably qualifi ed or trained electrician, and be in strict accordance with
the current wiring Regulations BS 7671. The supply must be connected via a
switched fused spur with a fuse rated suitably for the appliances fl ex. Failure
to follow these instructions will mean that the manufacturer’s instructions have
not been adhered to. THERE ARE NO EXCEPTIONS.
Mains lead are coloured in accordance with the following code:
GREEN AND YELLOW: EARTH
BLUE: NEUTRAL
BROWN: LIVE
The heater is fi tted with a length of fl exible cable type H05VV-F size 3 x 1.5mm2
models for connection to the fi xed wiring of the premises through a suitable
connection box positioned adjacent to the heater. A means for disconnection
must be incorporated in the fi xed wiring of the premises in accordance with
the current wiring regulations. Products that are supplied without a plug are
for installation into the fi xed wiring of the property, via a suitable double pole
switched fused spur with a fuse rated suitably for the appliances fl ex.
WARNING: This heater must not be connected to the electricity supply via an
external switching device.
Electrical Connection
STEP 1: The wall bracket can be used as a measuring device for placing the
heater on the wall. Mark the location for the two bottom screws (A-A)
and fasten the two screws in the wall - see Fig. 2.
STEP 2: screws (A-A). Then fasten the wall bracket with the top screws. Place
the heater on the wall bracket (1) and click the heater onto the top
catches (2).
10
10 cm
Fig. 2
Control Unit
Copy
Advance
Automatic Operation
Time block off
Time block on
Manual Operation
Program no. (1-4)
Weekday
Setting the time
Heating operation off
Heating operation on
Key lock
The heater is supplied with a con gurable electronic control, consisting
of a display, a LED screen and ve membrane buttons. The control unit
is located on the right hand side of the panel.
The set functions and values are shown on the display.
The LED lights up red when heating ON
Wall Mounting
IMPORTANT - The radiator must only be mounted using the kit supplied
Value down/up
Set program
Select Operating Mode
Save Entry
IMPORTANT - Pull out the battery isolator strap before connecting the
product. Please dispose of careful as this may be a choking hazard.
Fig. 3
1
2

MODE
• Automatic mode (week program)
• Manual operation ON
• Manual operation OFF
ENTER
• Save entry
PROG
• Week program, set clock
KEYS +/-
•
Used to navigate through the menu and to change the setting values
Key Functions
Operating Modes
Automatic Operation
Up to four heating program (ON/OFF) can be set for each weekday. A
room temperature can be speci ed for each heating program. AUTO
appears on the display.
Manual Operation
Manual speci cation of the room temperature. MANUAL ON or MANUAL
OFF appears on the display
Advance
Switch to the next program item in automatic mode. ADVANCE appears
on the display
NOTE: In manual operation (MANUAL ON), the room temperature
can be speci ed with the +/- keys. In automatic mode, the
room temperature setting is only carried out for the current
time program
Selecting the Operating Mode
Pressing the MODE key switches the operating mode between MANUAL
ON, MANUAL OFF and AUTO.
MANUAL ON
• Manual heating operation switched on
• Display alternates between room temperature setting and current
time
• Room temperature is set with +/-.
NOTE: In MANUAL OFF operating mode, frost protection takes
place. If the room temperature is 5°C or less, the heating
device is switched on automatically
AUTO
• Automatic mode (week program) activated
• Display alternates between room temperature setting and current
time
• Heating operation takes place in the speci ed time blocks for ON
and OFF
• Room temperature is set with +/-.
Setting the Time and Week Day
The time and day are set with the following steps:
• Press and hold the PROG key for three seconds. The clock symbol
appears. The hours and display fl ashes.
•
Use the +/- keys to set the hours. Press the ENTER key. The minutes
display fl ashes
•
Use the +/- keys to set the minutes. Press the ENTER key. The
weekday fl ashes.
• Use the +/- keys to set the day of the week. Press the ENTER key.
The CLOCK symbol disappears. Setting is complete
NOTE: In time block OFF, frost protection is set at the factory. If
the room temperature is 5C or less the heating device is
switched on automatically
NOTE: For extended operation, it is advisable to use the AUTO
operating mode to reduce the operating costs
Four time blocks are available per day. These can be adapted for each
day of the week.
• Select AUTO operating mode by pressing the MODE button
• Press the PROG key. WEEKDAY display fl ashes.
Use the +/- keys to set the weekday
Setting time block ON
•
press the ENTER key. P1 (period 1) and ON appears. The hours
display fl ashes
•
Use the +/- keys to set the hours. Press the ENTER key. The
minutes display fl ashes.
• Use the +/- to set minutes (in 10 minute increments)
Setting time block OFF
• Press the ENTER key. P1 (program 1) and OFF appears. The hours
display fl ashes.
•
Use the +/- keys to set the hours. Press the ENTER key. The
minutes display fl ashes.
• Use the +/- keys to set the minutes.
Temperature setting
• Press the ENTER key. Temperature setting appears
• Use the +/- keys to set the temperature. Press the ENTER key. P2
(program 2) and ON appears. The hours display fl ashes.
The programs P2, P3 and P4 can be set in the same way.
NOTE: To exit the program early, press the PROG key
Copying Programs
To copy the newly set programs P1 - P4 to other days, proceed as follows.
•
After carrying out the Temperature Setting, press and hold the
ENTER key until COPY appears.
• Press + to select more weekdays.
•
The selected weekdays are marked with a triangle displayed
permanently. The days Monday to Friday are selected on the screen
at the top. Deselect day of the week with the - key.
• Press the ENTER key. The settings are saved. COPY fl ashes three
times. Setting is complete.
Frost Protection
In MANUAL OFF operating mode and Auto operating mode (time block
OFF), frost protection takes place. If the room temperature is 5° C or
less, the heating device is switched on automatically.
Adaptive Start
This function guarantees that, in automatic mode (week program), the
set room temperature is achieved exactly at the start of the switch-
on time.
No time blocks are speci ed at the factory. These must be de ned by
the user as required.
MANUAL OFF
• Heating operation switched off
• The current time is displayed
• Room temperature cannot be set
The room heating device can be adjusted inbetween 5°C to 30°C.

• Use the MODE key to select the operating mode AUTO
• Press and hold the + and - keys for three seconds
• ECO appears
• Activate / deactivate the function with the +/- keys:
• ON = Adaptive start activated
• OFF = Adaptive start deactivated
• Press the ENTER key. Setting is saved.
Example:
In the timer menu, a set room temperature of 22°C is speci ed. The
current room temperature is 17° C. The heating device switches on early
so that the speci ed room temperature of 22° C is reached by 07:00.
Glen Dimplex Heating and Ventilation,
Milbrook House, Grange Drive, Hedge End, Southampton, SO30 2DF
© Glen Dimplex UK Limited. All rights reserved. Material contained in this publication may not be reproduced in whole or in part, without
prior permission in writing of Glen Dimplex.
Options
Key Lock
This function can be used to lock the operating elements
• Press and hold the ENTER key and MODE key for one second
• The LOCKED key symbol appears in the display.
• To unlock, press and hold the ENTER key and the MODE key at
the same time again
NOTE: No settings can be made if the key lock is activated
Your Guarantee
Your Sunhouse product is manufactured by Glen Dimplex UK operating
as Glen Dimplex Heating & Ventilation. GDHV designs and manufactures
products to ensure they deliver reliable service for normal use in domestic
dwellings and, where speci ed by us, in light commercial premises.
GDHV products are individually tested before leaving the factory. Your
product comes with a 2 years parts and labour guarantee for repair or
replacement of faulty goods and/or partial refund in the event that a
repair or replacement is not available.
Your guarantee is provided by Glen Dimplex UK Ltd operating as Glen
Dimplex Heating & Ventilation Ltd, Millbrook House, Grange Drive,
Southampton SO30 2DF. Terms and conditions apply.
The GDHV guarantee does not in any way diminish or affect your
statutory or consumer rights in connection with your product.
Error Codes
Product will display following error codes in case of fault
Fault Code Description
If the current temperature is below 5°C, the antifreeze
protection is activated and the product will heat the
room.
--:-- Temperature sensor failure
Factory Reset
Return all settings & time pro les to factory pre-sets
• Turn off the product.
•
Press and hold the PROG & ENTER key and switch on the product.
• Follow the key sequence as ‘-’ Key, ‘+’ key, PROG key, MODE key,
ENTER key and ‘-’ key again.
•
The successful key sequence will end with blinking of led/indicator
light twice and programme will clear all settings and timer pro les.
To view the full guarantee terms and conditions scan
this QR code using your smartphone or go to
https://www.gdhv.co.uk/guarantee-terms-and-
conditions.
If you experience a problem with your product during or
after the guarantee period, visit our online help centre:
help.gdhv.co.uk/support/home
Important: For electrical products sold within the European Community. At the end of the electrical products useful life
it should not be disposed of with household waste. Please recycle where facilities exist. Check with a Local Authority
or retailer for recycling advice in your country. Batteries should be disposed of or recycled in accordance with WEEE
Directive 2012/19/EU. Packaging should be recycled where possible.
This manual suits for next models
3
Other Sunhouse Heater manuals
Popular Heater manuals by other brands

Sunbeam
Sunbeam Smartheat HE6100 Instruction booklet

EdenPURE
EdenPURE A5986 owner's manual

Winterwarm
Winterwarm EH instruction manual

Charnwood
Charnwood Roomheater Operating and installation instructions

Webasto
Webasto Thermo Top V Operating and servicing manual

STIEBEL ELTRON
STIEBEL ELTRON CAES 500 Instructions for installation and use

Harry Taylor
Harry Taylor HT2000 Installation, service and user manual

Mars
Mars BD14 Series manual

Bionaire
Bionaire BFH6616 instruction manual

Climer
Climer ECOHEAT TD EH500TD Installation and user manual

flowair
flowair AGRO ST Technical documentation operation manual

Vent-Axia
Vent-Axia VAPL2TC-S Installation and wiring instructions