Toolots JLH-33 User manual

BAND SAW
JLH-33
NSTRUCTION MANUAL

`
Thank you for your choice of our products and it is our honor that you become our user.
Before you start to use your new machine please read the instruction manual carefully to
Enjoy safe using and a longer life service.
The complete instruction manual consists of the following parts.
□Safety Guidance
□Machine Overview
□Instruction Manual
Due to the continuous improvements,there will be difference between the product descriptions
In the manual and the actual details of the delivered machine.Please kindly understand and
The correct specification is subject to the delivered goods without further notice.
1、Safety Guidance
1
Please do not perform any installation、maintenance or adjustment of the machine without
reading
The Instruction Manual carefully and accepting complete training.
Please use the band sawing machine only after when you are familiar with the
characteristics of the machine,safety information and all related guidelines.
1.1 Unpacking\Lifting
⚫Wrongdoing in lifting may result in personal injury.
⚫Pay attention to the barycenter to avoid incline,otherwise dangers or death may occur.
⚫Do not move or stand under the machine when lifting.
⚫Take care of the box board and nails or other things to avoid to occurring dangers.
⚫Avoid to overturn the machine,otherwise dangers may occur.

1、Safety Guidance
2
1.2 Installation
⚫Improper level of the packing block under the machine could cause personal injury.
⚫Always have good grounding installation to ensure personal safety.
⚫Never operate the machine before adjusting process is completed.
⚫Do not clean the machine with gasoline and other flammable liquids.
⚫User must follow power parameter indicated in the instruction book in fear of damage
the machine.
⚫User must set the fuse in the power switch as pre-insurance unit.
1.3 Testing
⚫Must read guidance carefully and understood well before testing and prohibit improper
operation,otherwise occur dangers.
⚫Must fix workpiece on the working platform tightly, otherwise occur dangers.
⚫Never to operate machine without training.
⚫Must stop machine immediately when these is abnormal sound,and identify the reason and
rule out it.
⚫Operator must be in good health condition when operating the machine.
1.4 Operation
1、Safety Guidance
3
⚫Do not touch the blade、workpiece and chips when the machine is running.
⚫Do not check and/or repair the machine when the machine is running.
⚫Must fix the workpiece on the work platform tightly.
⚫Do not wear gloves when operating.
⚫Do not work in excess of the machine cutting conditions(Max.Torque.Max.Cutting
Resisance.Large Power).
⚫Prohibition of non-operator in the workplace.
⚫Do not move,install and measuring the workpiece if it is not in security state when the
machine stopped.
⚫Do not change the speed when the machine is running.
⚫Must to turn off the power switch when a sudden power failure,otherwise there are
dangers
when the machine running suddenly in which case the power supply suddenly again.
1.5 Maintenance
⚫Prohibition of disassembling and/or assembling on the impact of machine performance and
safety.
⚫Non-professional can not carry out related maintenance.
⚫Maintenance should be carried out under power off,otherwise occur dangers.
⚫Please read the chapter of maintenance in the Instruction Manual.

3、Installation and Adjustment
4
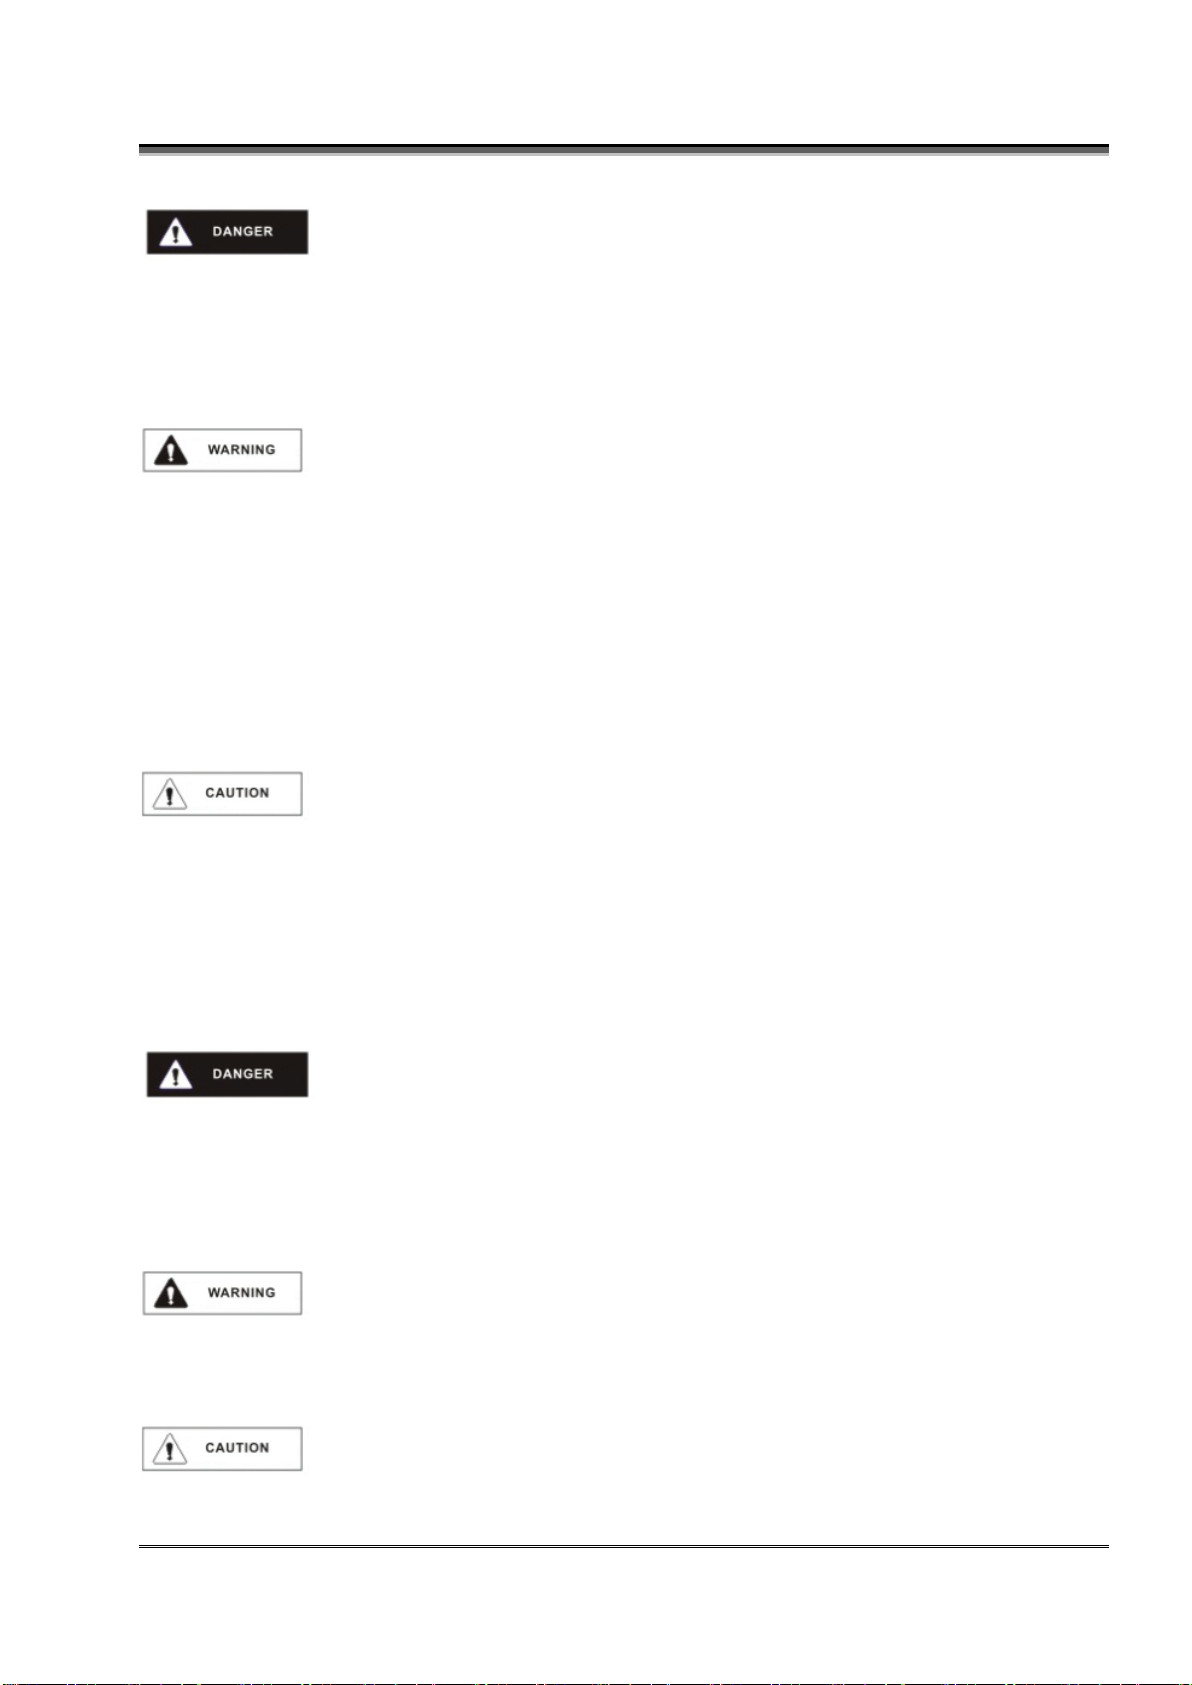
2.1 Front View
1Tungsten steel holder block
2Passive Wheel Cover
3Active Wheel Cover
4Fixed Guide Arm
5Guide Arm
6Belt Wheel Cover
7Activities Clamp
8Upper Clamp
3、Installation and Adjustment
5
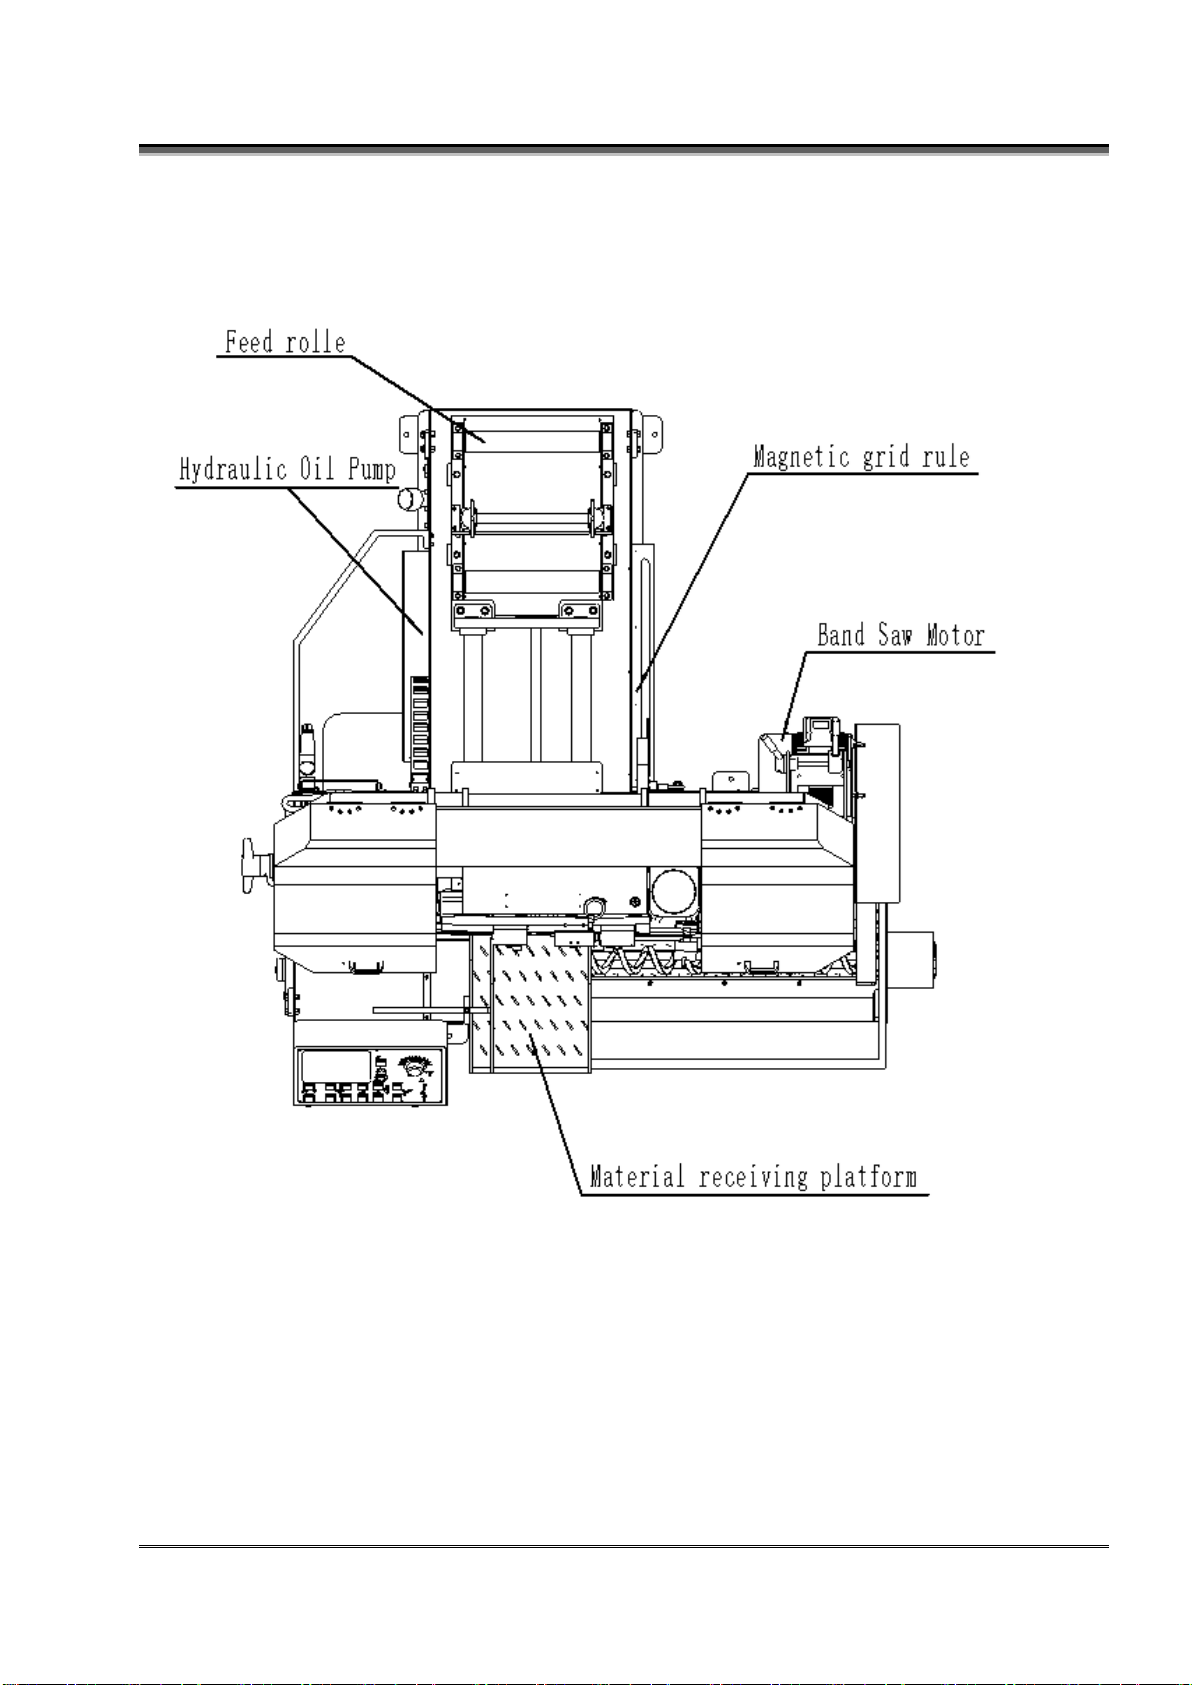
2.2 Left View
3、Installation and Adjustment
6
2.3 Up View

3、Installation and Adjustment
7
2.4 Specification
Model
B33
Single Capacity(in/mm)
Φ13 ▆13(W)ⅹ13(H)
Φ330 ▆300(W)ⅹ300(H)
bundle cutting (in/mm)
13(W)ⅹ4-3/4(H)
300(W)ⅹ120(H)
Single material Header Length(in/mm)
140(10mm 时)
5-1/2(25/64in,10mm 时)
Band Saw Speed (ft/min)
(m/min)
20~140
65~460
One Sending Length(in/mm)
500
19-5/8
Repeat positioning accuracy(mm)
±0.1
Band Saw Size(in/mm)
162(L)ⅹ1-1/2(W)ⅹ0.0042(T)
4115(L)ⅹ34(W)ⅹ1.1(T)
Band Saw Tension
hydraulic
(hp/kw)
Motor
Band Saw Motor
5/4
Hydraulic Motor
1/0.75
Cooling Motor
0.16/0.12
Tank Capacity
Hydraulic Oil(L)
72
Cutting liquid(L)
120
Weight(LB/KG)
3520
2.5Pressure Set and Data
Model
Pressure Category
B33
Pressure of Hydraulic(bar)
38±2
Band Saw Tension(100bar)
22±2

3、Installation and Adjustment
8
5T
3.1 Transit and Lifting
3.1.1 Forklift handling
2000KG
1600G
3.1.2 Lifting
2000KG
⚫Sling must can bear twice weight of machine.Must focus lifting balance and around safe.
⚫Place the soft cushion between the machine and sling to protecting damage paint of
machine.

3、Installation and Adjustment
9
3.2 Cleaning
Paint anti-rust oil on the surface of the machine,must clean it with kerosene or other
Cleaning agent after placing the machine.
⚫No use gasoline or other corrosive cleaning agent to cleaning the machine,to preventing
fire.
3.3 Placing
There should be enough space to move workpiece.
;
When doing maintenance, make sure all the protection gate and/or the distributor will not
intervene when opened.
Fixer of machine to protect the saw frame and to facilitate the transport,so please
keep it carefully or use of moving machine.

3、Installation and Adjustment
10
3.4 Horizontal Adjustment
Adjust the level with the spirit level along the guide of work table according to the
Instruction manual after placing the machine,and then fix the foot bolt.
⚫When vertical movement of the spirit level,the permissible error must less than
0.1/1000.
⚫When lateral movement of the spirit level,the permissible error must less than
0.1/1000.
⚫It is very important for cutting precision to adjusting level of the machine.
⚫Please select and use the spirit level which the precision is 0.02mm/m.
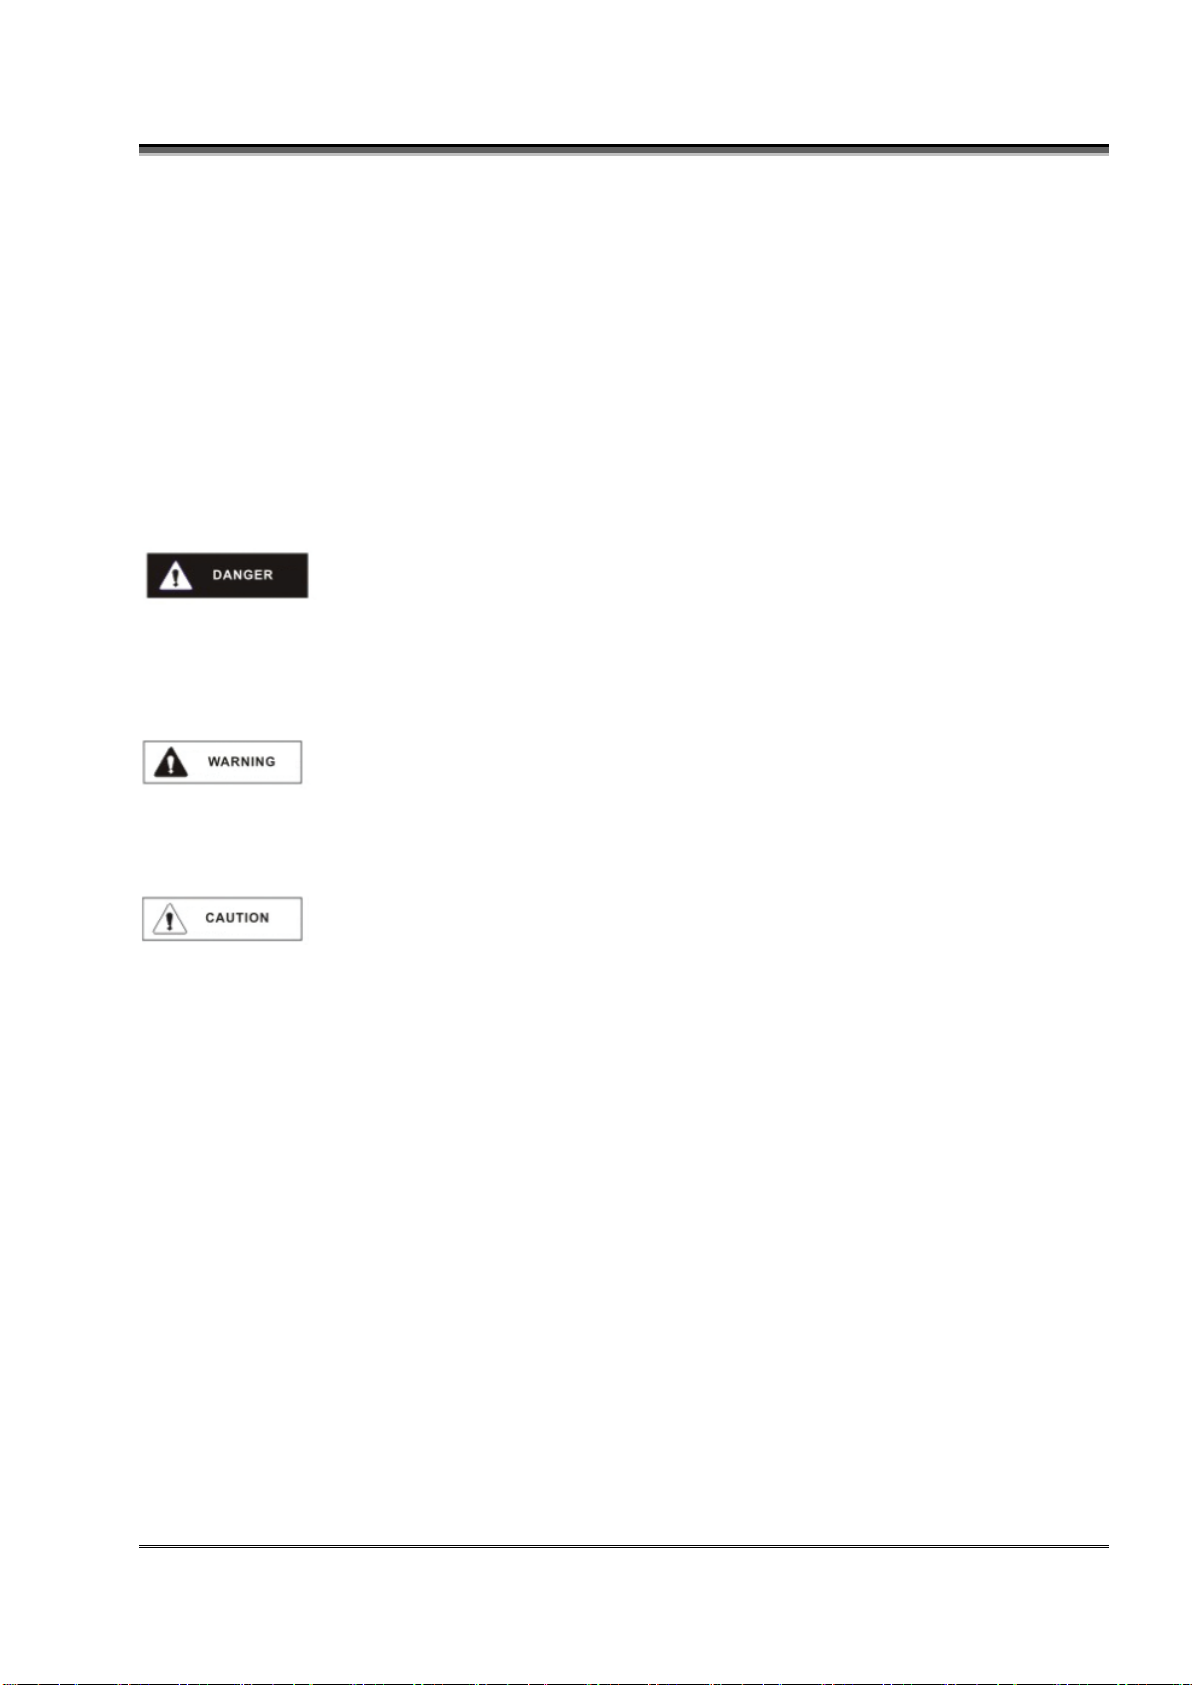
3.5 Hydraulic Oil
Check the indicator of hydraulic oil as shown in figure.

3、Installation and Adjustment
11
OK
too little
3.6 Coolant Water
Has emptied the coolant water before leave factory,so please add
The coolant water and saponification liquid before using the machine.
⚫Need to cleaning the machine the end of daily work and/or no use for a long time to
protecting rusty the machine.
⚫It is possible to damage the water pump that the pump work without cooling water.
⚫In the winter,it is necessary to add warm water to thaw out frozen cooling water.

3、Installation and Adjustment
12
3.7 Power
60Hz 230V or 60Hz 460V 3P
⚫Electrical operation must complete by professional electrician.
⚫Power off all of relay.
⚫Wire must be fitted in with standard voltage parameters.
Trail running of machine
To rotate right and pull the power switch,the green indicator light means power on.
The saw frame will lift when to press the saw frame up button,otherwise it indicate
The wrong of power connection,please re-connecting power as follower.
①turn off the power switch
②power off all of relay
③transpose the power phase
④trail running of machine again

4、Instruction Manual
13
4.1 Operation Panel
1 2 3 4
`
5 6 7 9 14 13 16 17 18
8 10 12 11 15 19
symbol
Description
Function
1
HMI
machine control\data setting\condition
monitor,details refer to instruction
2
emergency button
press to emergency stop machine,loosen to reset
3
power indicator
light on indicate power on

4、Instruction Manual
14
4
feeding adjust valve
Turn left or right to adjust the feeding
speed,speed higher when value higher.
5
oil pump on-off
button
Press this button to start pump when pump is off,
press this button to stop pump when pump is on.
6
auto/manual transfer
switch
Turn right to manual work mode, turn left to auto
work mode.
7
Work start button
Press it saw wheel will work and work feeding when
in”manual mode”.press it machine will go
circulation work if has be back to original when in
“auto”mode.
8
Work stop button
Press it machine saw wheel will stop machine stop
work feeding when in “manual mode”, press it
machine will auto pause when in”auto mode”
9
saw frame up button
Press it saw wheel will stop working and frame rise
up when in “manual mode”, press it machine will go
back to original when in “auto mode”
10
saw frame down
button
Press it saw frame will go down rapidly, magnetic
valve on, loosen stop.
11
main vice clamp
button
Press this button, the magnetic valve on,keep
clamping.
12
main vice loosen
button
Press it main vice will loosen, magnetic valve on,
loosen stop.
13
material vice clamp
button
Press it material vice will clamp, magnetic valve
on, keep loosen.
14
material vice loosen
button
Press it material vice will loosen, magnetic valve
on, loosen stop.
15
feeding button
Press it roller will feeding material, magnetic
valve on, loosen stop.
16
material return button
Press it roller will return material, magnetic
valve on, loosen stop.
17
Feeding/return
material speed switch
行。Press it the light will on, buffer magnetic
valve off,feeding/return material switch to slow
running.
18
work light
Turn up to open, turn down to off.
19
water pump switch
Turn up to start water pump,turn down to switch off
water pump

4、Instruction Manual
15
4.2 Human-computer interface
4.2.1 Preface
This instruction is only about the human-computer interface operation instruction. Reading this manual should
be based on a certain understanding of the working principle, structure and related cutting process of the machine
tool, so before this should carefully read the random "machine tool manual", combined with the relevant chapters to
understand this description. This instruction has not done, please forgive more, if has not understood please
consult with the manufacturer service personnel .
4.2.2 开机画面 Boot screen
Boot into the manufacturer's promotional
screen, the lower left corner is the buttong
for English user. Click to enter the English
interface. In the lower right corner is the
button for Chinese users to enter the
Chinese interface.
4.2.3
4.2.3 Manual working screen

4、Instruction Manual
16
※To enable manual function, you must first switch the external button to manual shift, otherwise other buttons will
be invalid
The upper part of the screen is the functional area Shared by all interfaces. The following description is
applicable to the functional interface. It will not be repeated in the future.
Clock display: display time, date and other information. If there is any deviation from the local actual clock, the
clock information can be calibrated in the human-machine setting interface.
Current system status: it shows whether the current system is in manual mode 、auto mode、back original
mode, so that the operator can be clear at a glance.
Cutting mode:Display whether the current machining is constant speed cutting or variable
speed cutting.
Communication connection: it is used to indicate whether the communication connection between the human-
computer interface and the PLC is normal. The indicator light flashes when it is normal. Otherwise, the
communication connection line with PLC should be checked.

4、Instruction Manual
17
System status prompt bar: it indicates whether the current system is normal or abnormal.
Saw
blade linear speed: the machine tool is equipped with a saw wheel rotation induction device.
When the main machine is running, the system will detect the state of the high-speed signal
device.
For the operator to determine whether the speed of the saw blade meets the requirements
of the production cutting process.
Note: this function can only be used normally when the parameter "setting diameter of saw
wheel" is set in the "advanced parameters" interface.
Cutting speed:Display the current working speed value.
Current sawing force:Display the current sawing force.
Return position of material tongs:The machine is equipped a magnetic grid linear displacement
sensor,where the current position of the material table can be dynamically displayed in real time when the material
table moves back and forth.This function enables the operator to observe the dimension positioning of the material
rack at any time,and is conducive to the rapid troubleshooting of the feeding positioning fault of the machine.
This screen can complete the operation of machine all independent actions.
The work start is driven by motor, and other actions are all driven by hydraulic . Note that some actions has
their interlocks, limit protection and other functions, listed as follows:
1. Only when the main clamp solenoid valve works, "work start" can be self-locking operation, otherwise for inching
operation.
2.“work start", "main clamp clamping", "material clamp clamping", "rise" with self-locking function, other are inching.

4、Instruction Manual
18
3. "main clamp clamping t" and "main clamp loosen", "material clamp clamping" and "material clamp loosen", "fast down"
and "up", "feeding" and "return" are all interlocks.
4. When the work is started (cutting material), the "main clamp loosen" cannot be executed.
5. When the main clamp and the material clamp are both clamped, "feeding" and "returning"
cannot be executed.
6. When the saw frame reaches the lowest position, the lower limit switch action, the saw
frame will automatically turn into retractor.
7. When the frame reaches the upper limit switch position, the upper limit switch action, the
saw frame stops
Reset position: under manual mode, the
system allows the machine operator to manually reset the position of the current rack. Press "reset position" to
pop up the interface (as shown in the right picture), press "confirm" to reset, and press "close" to return.
Table of contents
Other Toolots Saw manuals


