ToolPRO CMT18WD.9 User manual

TOOLPRO
18V Multi- Function Tool
Important - Please read these instructions fully before operating or maintaining your Oscillation Tool
These instructions contain important information that will help you get the best from your
Oscillation Tool, ensuring it remains safe to operate.
If you need help or have damaged or missing parts, call the Customer Helpline on 1300889028
CMT18WD.9
Instruction Manual
After Sales Support
FREE CALL 1300 889 028
EMAIL:salesau@positecgroup.com

Customer Helpline 1300 889 028
2
Contents
Safety Information...................................................................................................03
InTheBox..................................................................................................................08
Accessories.............................................................................................................08
Operating Instructions............................................................................................. 09
Working hints for your Sander................................................................................14
Maintenance.............................................................................................................14
Technical Data..........................................................................................................15

Customer Helpline 1300 889 028
3
Safety Information
Important - Please read these instructions fully before starting assembly
Warning Symbols
To reduce the risk of injury, Please read the instruction manual
Warning
Wear ear protection Wear eye protection
Wear dust mask Indoor use only
Batteries may enter water cycle if disposed improperly, which can be hazardous for
ecosystem. Do not dispose of waste batteries as unsorted municipal waste.
Do not burn
Waste electrical products must not be disposed of with household waste. Please recycle
where facilities exist. Check with your local authorities or retailer for recycling advice.
Li-ion battery. This product has been marked with a symbol relating to ‘separate
collection’ for all battery packs and battery pack. It will then be recycled or
dismantled in order to reduce the impact on the environment. Battery packs can be
hazardous for the environment and for human health since they contain hazardous
substances.
Fuse
Positive terminal
Negative terminal
RCM marking
Read the operator’s manual
ABN: Australian Business Number. By this number, business information such as entity
type, status, business location etc. can be found at website http://abr.business.gov.au.
ABN of Positec Australia Pty Limited is 14 101 682 357
Li-I on Li-Ion

Customer Helpline 1300 889 028
4
Safety Information
Important - Please read these instructions fully before starting assembly
General Power Tool Safety Warnings
WARNING! Read all safety warnings and all instructions. Failure to follow the
warnings and instructions may result in electric shock, fire and/or serious injury.
Save all warnings and instructions for future reference.
The term “power tool” in the warnings refers to your mains-operated (corded) power tool
or battery-operated (cordless) power tool.
1) Work area safety
a) Keep work area clean and well lit. Cluttered or dark areas invite accidents.
b) Do not operate power tools in explosive atmospheres, such as in the presence of
flammable liquids, gases or dust. Power tools create sparks which may ignite the
dust or fumes.
c) Keep children and bystanders away while operating a power tool. Distractions can
cause you to lose control.
2) Electrical safety
a) Power tool plugs must match the outlet. Never modify the plug in any way. Do not
use any adapter plugs with earthed (grounded) power tools. Unmodified plugs and
matching outlets will reduce risk of electric shock.
b) Avoid body contact with earthed or grounded surfaces, such as pipes, radiators, and
refrigerators. There is an increased risk of electric shock if your body is earthed or
grounded.
c) Do not expose power tools to rain or wet conditions. Water entering a power tool will
increase the risk of electric shock.
d) Do not abuse the cord. Never use the cord for carrying, pulling or unplugging the
power tool. Keep cord away from heat, oil, sharp edges or moving parts. Damaged or
entangled cords increase the risk of electric shock.
e) When operating a power tool outdoors, use an extension cord suitable for outdoor
use. Use of a cord suitable for outdoor use reduces the risk of electric shock.
f) If operating a power tool in a damp location is unavoidable, use a residual
current device (RCD) protected supply. Use of an RCD reduces the risk of electric
shock.
3) Personal safety
a) Stay alert, watch what you are doing and use common sense when operating a
power tool. Do not use a power tool while you are tired or under the influence of
drugs, alcohol or medication. A moment of inattention while operating power tools
may result in serious personal injury.
b) Use personal protective equipment. Always wear eye protection. Protective
equipment such as dust mask, non-skid safety shoes, or hearing protection used for
appropriate conditions will reduce personal injuries.
c) Prevent unintentional starting. Ensure the switch is in the off-position before
connecting to power source and/or battery pack, picking up or carrying the tool.
Carrying power tools with your finger on the switch or energising power tools that
have the switch on invites accidents.
Original Instructions

Customer Helpline 1300 889 028
5
Safety Information
Important - Please read these instructions fully before starting assembly
General Power Tool Safety Warnings
d) Remove any adjusting key or wrench before turning the power tool on. A wrench or
a key left attached to a rotating part of the power tool may result in personal injury.
e) Do not overreach. Keep proper footing and balance at all times. This enables better
control of the power tool in unexpected situations.
f) Dress properly. Do not wear loose clothing or jewellery. Keep your hair, clothing
and gloves away from moving parts. Loose clothes, jewellery or long hair can be
caught in moving parts.
g) If devices are provided for the connection of dust extraction and collection facilities,
ensure these are connected and properly used. Use of dust collection can reduce
dust-related hazards.
4) Power tool use and care
a) Do not force the power tool. Use the correct power tool for your application.
The correct power tool will do the job better and safer at the rate for which it was
designed.
b) Do not use the power tool if the switch does not turn it on and off. Any power tool
that cannot be controlled with the switch is dangerous and must be repaired.
c) Disconnect the plug from the power source and/or the battery pack from the power
tool before making any adjustments, changing accessories, or storing power
tools. Such preventive safety measures reduce the risk of starting the power tool
accidentally.
d) Store idle power tools out of the reach of children and do not allow persons
unfamiliar with the power tool or these instructions to operate the power tool.
Power tools are dangerous in the hands of untrained users.
e) Maintain power tools. Check for misalignment or binding of moving parts, breakage
of parts and any other condition that may affect the power tool’s operation. If
damaged, have the power tool repaired before use. Many accidents are caused by
poorly maintained power tools.
f) Keep cutting tools sharp and clean. Properly maintained cutting tools with sharp
cutting edges are less likely to bind and are easier to control.
g) Use the power tool, accessories and tool bits etc. in accordance with these
instructions, taking into account the working conditions and the work to be
performed. Use of the power tool for operations different from those intended could
result in a hazardous situation.
5) Battery tool use and care
a) Recharge only with the charger specified by the manufacturer. A charger that is
suitable for one type of battery pack may create a risk of fire when used with another
battery pack.
b) Use power tools only with specifically designated battery packs. Use of any other
battery packs may create a risk of injury and fire.
c) When battery pack is not in use, keep it away from other metal objects, like paper
clips, coins, keys, nails, screws or other small metal objects, that can make a
connection from one terminal to another. Shorting the battery terminals together
may cause burns or a fire.
Customer Helpline 1300 889 028
6
Safety Information
Important - Please read these instructions fully before starting assembly
Safety instruction for cutting
General Safety Warnings for your Battery Charger
Hold power tool by insulated gripping surfaces, when performing an operation where
the cutting accessory may contact hidden wiring. Cutting accessory contacting a “live”
wire may make exposed metal parts of the power tool “live” and could give the operator
an electric shock.
WARNING:Read all safety warnings and all instructions. Failure to follow the
warnings and instructions may result in electric shock, fire and/or serious injury.
Save all warnings and instructions for future reference.
- This appliance is not intended for use by persons (including children) with reduced
physical, sensory or mental capabilities, or lack of experience and knowledge, unless
they have been given supervision or instruction concerning use of the appliance by a
person responsible for their safety.
- Children should be supervised to ensure that they do not play with the appliance.
If the supply cord is damaged, it must be replaced by the manufacturer, its service
agent or similarly qualified persons in order to avoid a hazard.
Additional safety instructions for your Battery Charger
1. Before charging, read the instructions.
2. For charge 1.5Ah/2.0Ah/4.0Ah battery pack only.
3. Do not charge a leaking battery.
4. Do not use chargers for works other than those for which they are designed.
5. Before charging, ensure your charger is matching the local AC supply.
6. The charging device must be protected from moisture.
7. Do not use the charging device in the open.
8. Do not short out the contacts of battery or charger.
9. Respect the polarity “+/-“ when charging.
10.Do not open the unit and keep out of the reach of children.
11.Do not charge the batteries of other manufactures or ill-suited models.
12.Ensure that the connection between the battery charger and battery is correctly
positioned and is not obstructed by foreign bodies.
13.Keep battery charger’s slots are free of foreign objects and protect against dirt and
humidity. Store in a dry and frost-free place.
14.When charging batteries, ensure that the battery charger is in a well-ventilated area
d) Under abusive conditions, liquid may be ejected from the battery; avoid contact. If
contact accidentally occurs, flush with water. If liquid contacts eyes, additionally seek
medical help. Liquid ejected from the battery may cause irritation or burns.
6) Service
Have your power tool serviced by a qualified repair person using only identical
replacement parts. This will ensure that the safety of the power tool is maintained.
General Power Tool Safety Warnings

Customer Helpline 1300 889 028
7
Safety Information
Important - Please read these instructions fully before starting assembly
Safety Warnings for battery pack
and away from inflammable materials. Batteries can get hot during charging. Do not
overcharge any batteries. Ensure that batteries and chargers are not left unsupervised
during charging.
15.Do not recharge non-rechargeable batteries, as they can overheat and break.
16.Longer life and better performance can be obtained if the battery pack is charged when
the air temperature is between 18oC and 24oC. Do not charge the battery pack in air
temperatures below 4.5oC, or above 40.5oC. This is important as it can prevent serious
damage to the battery pack.
17.Charge only battery pack of the same model provided by POSITEC and of models
recommended by POSITEC
a) Do not dismantle, open or shred cells or battery pack.
b) Do not short-circuit a battery pack. Do not store battery packs haphazardly in a
box or drawer where they may short-circuit each other or be short-circuited by
conductive materials. When battery pack is not in use, keep it away from other metal
objects, like paper clips, coins, keys, nails, screws or other small metal objects, that
can make a connection from one terminal to another. Shorting the battery terminals
together may cause burns or a fire.
c) Do not expose battery pack to heat or fire. Avoid storage in direct sunlight.
d) Do not subject battery pack to mechanical shock.
e) In the event of battery leaking, do not allow the liquid to come into contact with the
skin or eyes. If contact has been made, wash the affected area with copious amounts
of water and seek medical advice.
f) Seek medical advice immediately if a cell or battery pack has been swallowed.
g) Keep battery pack clean and dry.
h) Wipe the battery pack terminals with a clean dry cloth if they become dirty.
i) Battery pack needs to be charged before use. Always refer to this instruction and use
the correct charging procedure.
j) Do not maintain battery pack on charge when not in use.
k) After extended periods of storage, it may be necessary to charge and discharge the
battery pack several times to obtain maximum performance.
l) Battery pack gives its best performance when it is operated at normal room
temperature (20 °C ± 5 °C).
m) When disposing of battery packs, keep battery packs of different electrochemical
systems separate from each other.
n) Recharge only with the charger specified by manufacturer. Do not use any charger
other than that specifically provided for use with the equipment. A charger that is
suitable for one type of battery pack may create a risk of fire when used with another
battery pack.
o) Do not use any battery pack which is not designed for use with the equipment.
p) Keep battery pack out of the reach of children.
q) Retain the original product literature for future reference.
r) Remove the battery from the equipment when not in use.
s) Dispose of properly.
General Safety Warnings
Customer Helpline 1300 889 028
8
In The Box
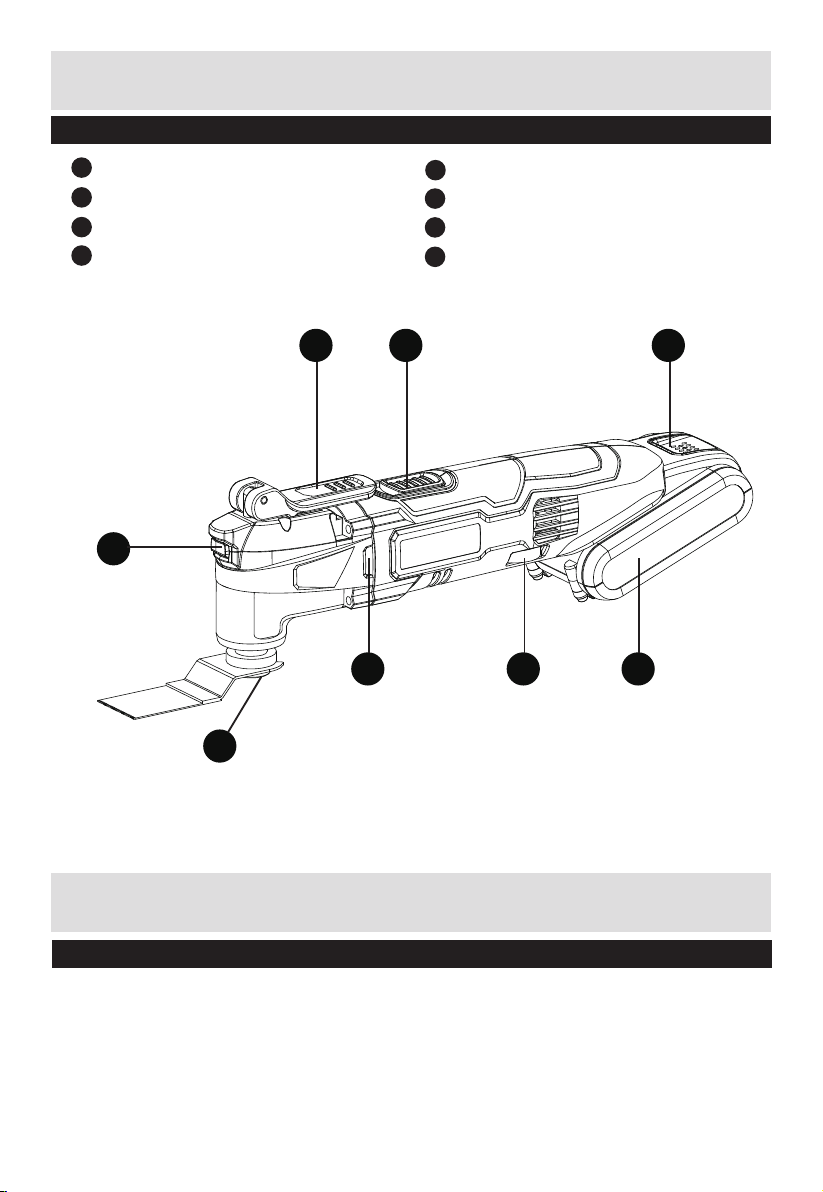
Parts
1
2
3
4
5
6
7
8
Tool-less accessory clamping lever
On/Off switch
Battery pack release button *
Battery pack *
Variable speed control
Venting slot
LED light
Flange
Accessories
1-1/8’’ 28mm standard end cut blade 1
1-3/8’’ 35mm standard end cut blade 1
Rigid scraping blade 1
Sanding pad 1
Sanding sheet (60#/80#/120#) 3
7
8
6 5 4
321

Customer Helpline 1300 889 028
9
NOTE: Before using the tool, read the instruction book carefully.
Intended Use
The machine is intended for dry sanding of wood, plastic, filler and coated surfaces.
BEFORE PUTTING INTO OPERATION
Charging the battery
NOTE:
a) Do not use any charger other than that specifically provided for use with the
equipment.
b) If the battery pack is very hot you must remove your battery pack from the charger
and allow time for the battery to cool down before recharging.
c) The battery in your new tool is not charged when it leaves the plant. Therefore it must
be full charged before using the first time.
d) Please charge the battery to reach full or no less than half charge before storage. If
the tool will not be used for long periods of time, charge the battery every 3-6 months.
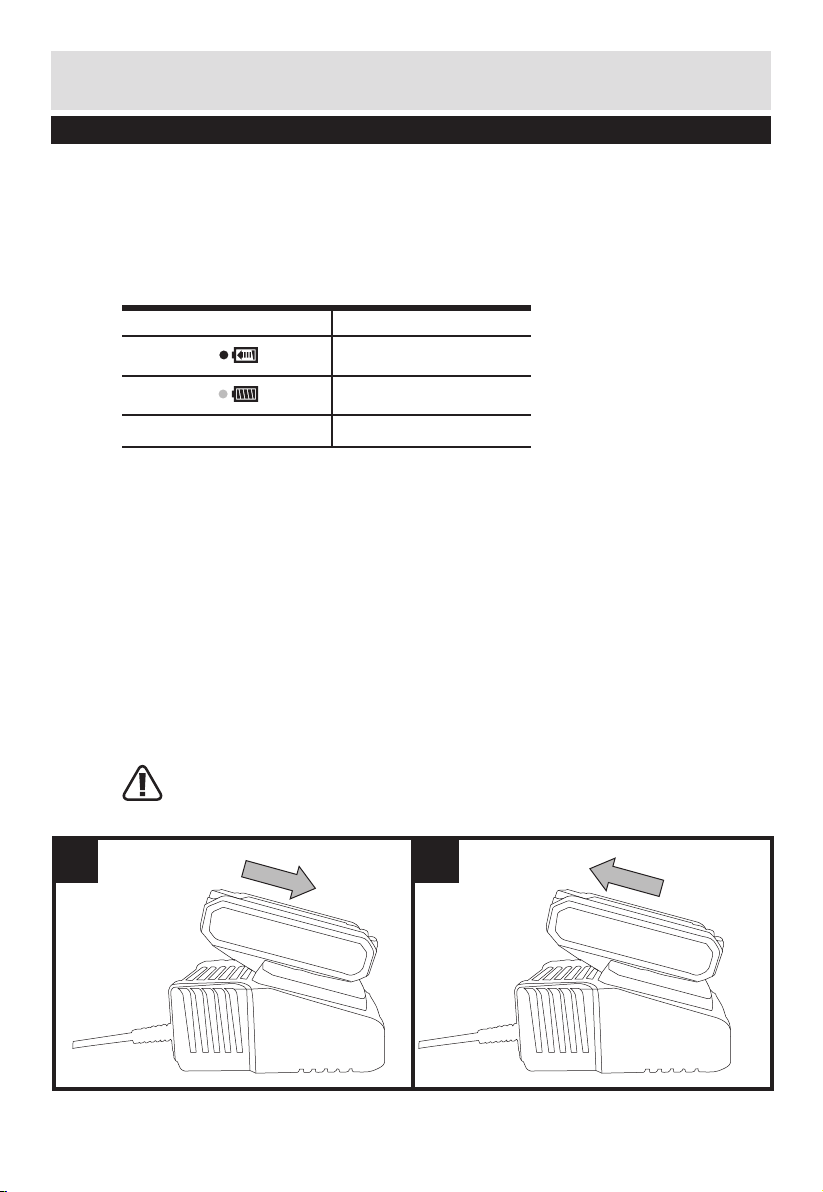
Charging procedure (See Fig. A1)
1) Plug the charger into an appropriate outlet. The light will be green.
2) Slide the battery pack into the charger, the light will turn to red to indicate the
charging process has started.
3) When charging is completed, the light will turn to green. The pack is now fully
charged, unplug the charger and remove the battery pack.
WARNING: When battery charge runs out after continuously use or exposure to
direct sunlight or heat, allow time for the tool to cool down before re-charging to
achieve the full charge.
Operating Instructions
A1
Customer Helpline 1300 889 028
10
Operating Instructions
Charging indicator
This charger is designed to detect some problems that can arise with battery packs.
Indicator lights indicate problems (see table below). If this occurs, insert a new battery
pack to determine if the charger is OK. If the new battery charges correctly, then
the original pack is defective and should be returned to a service center or recycling
service center. If the new battery pack displays the same problem as the original
Battery Pack, have the charger tested at an authorized service center.
Light Status
Red on Charging
Green on Fully Charged
Light off Defective Battery
Charging the battery (for ACG18LD/ACG18LD3)
Do not use any charger other than that specifically provided for use with the
equipment.
If the battery pack is very hot you must remove your battery pack from the charger and
allow time for the battery to cool down before recharging.
Please charge the battery to reach full before storage. If the tool will not be used for
long periods of time, charge the battery every 3 months.
CHARGING PROCEDURE (See Fig. A2, A3, A4)
1) Plug the charger into an appropriate outlet. The light will be green.
2) Slide the battery pack into the charger, make sure the battery is in the correct charge
position firmly. the light will turn to red to indicate the charging process has started.
3) When charging is completed, the light will turn to green.
4) After fully charged, unplug the charger and remove the battery pack.
NOTE: If the battery pack is locked in the charger, press the battery pack release
button and remove it.
WARNING: When battery charge runs out after continuously use or exposure to
direct sunlight or heat, allow time for the tool to cool down before re-charging to
achieve the full charge.
A2 A3
Customer Helpline 1300 889 028
11
Operating Instructions
Charging indicator
This charger is designed to detect some problems that can arise with battery packs.
Indicator lights indicate problems (see table below). If this occurs, insert a new battery
pack to determine if the charger is OK. If the new battery charges correctly, then the
original pack is defective and should be returned to a service center or recycling service
center. If the new battery pack displays the same problem as the original Battery Pack,
have the charger tested at an authorized service center.
Light ON/OFF flash Status
Red on Charging
Red flash Defective battery
Green on Fully charged
Green flash Battery too Hot/cold
Charging the battery (for ACG218Z2)
NOTE:
a) Do not use any charger other than that specifically provided for use with the
equipment.
b) If the battery pack is very hot you must remove your battery pack from the charger
and allow time for the battery to cool down before recharging.
c) The battery in your new tool is not charged when it leaves the plant. Therefore it must
be full charged before using the first time.
d) Please charge the battery to reach full or no less than half charge before storage. If
the tool will not be used for long periods of time, charge the battery every 3-6 months.
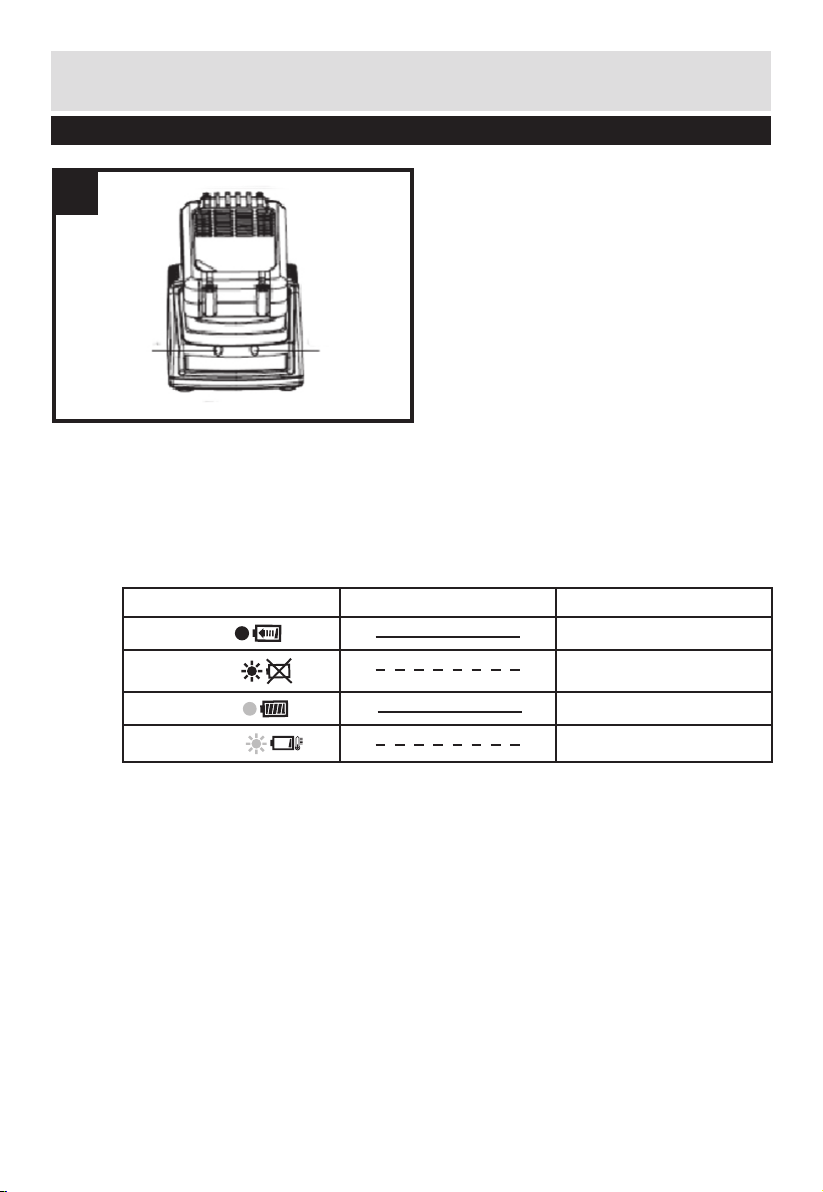
CHARGING PROCEDURE (See Fig. A5)
1) Plug the charger into an appropriate outlet. The light will be green.
2) Slide the battery pack into the charger, the light will turn to red to indicate the
charging process has started.
Red light
Green light
A4

Customer Helpline 1300 889 028
12
Operating Instructions
3) When charging is completed, the light will turn to green. The pack is now fully
charged, unplug the charger and remove the battery pack.
WARNING: When battery charge runs out after continuous use or exposure
to direct sunlight or heat, allow time for the battery to cool down before re-
charging to achieve the full charge.
CHARGING INDICATOR
This charger is designed to detect some problems that can arise with battery packs.
Indicator lights indicate problems (see table below). If this occurs, insert a new battery
pack to determine if the charger is OK. If the new battery charges correctly, then
the original pack is defective and should be returned to a service center or recycling
service center. If the new battery pack displays the same problem as the original
Battery Pack, have the charger tested at an authorized service center.
Light ON/OFF flash Status
Red on Charging
Red flash Defective battery
Green on Fully charged
Green flash Battery too Hot/cold
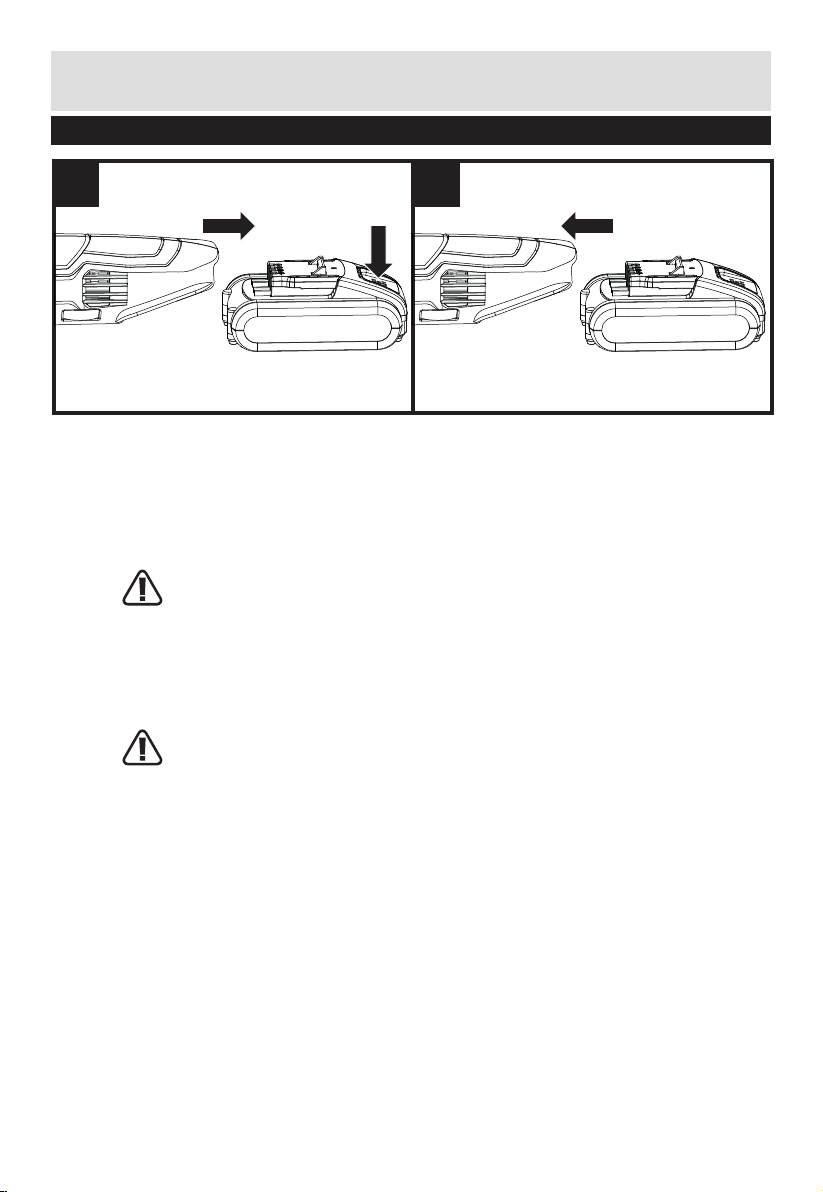
TO REMOVE THE BATTERY PACK (See Fig. B1)
Depress the Battery Pack Release Button (2) firmly first and then slide the Battery
Pack out from your tool.
TO INSTALL THE BATTERY PACK (See Fig. B2)
Slide the fully charged Battery Pack onto the tool with sufficient force until it clicks
into position.
NOTE: The accessories of battery charger and battery pack illustrated or described
are not included in delivery.
A5
Customer Helpline 1300 889 028
13
Operating Instructions
OPERATION
Intended Use
The power tool is intended for sawing and separating wooden materials, plastic, plaster,
non-ferrous metals and fasteners (e.g. nails and clamps) as well as for working on soft
wall tiles and for dry grinding of small surfaces. It is especially suitable for working close
to edges and for flush cutting.
WARNING: Do not touch the gear box after long working time, because it could
be hot.
1. MOUNTING ACCESSORIES (See Fig. C1-C3)
Caution: For all work or when changing accessories, always wear protective gloves. Avoid
danger of injury from the sharp edges of the accessories. Accessories can become very
hot while working, presenting danger of burns! Make sure the tool is unplugged prior to
changing accessories.
WARNING:To reduce the risk of injury, do not let the sharp side of the accessory
face back toward the user’s hand.
The tool free system makes you change the accessories without using an Allen key.
1) Flip the tool-less accessory clamping lever forward to the open position.
2) Rotate the lever counterclockwise to loosen the flange.
3) Insert the accessory onto the Accessory Interface, then press down the flange with
finger to keep blade temporarily secure.
4) Rotate the lever clockwise until accessory is tightened securely.
5) Flip lever back down.
6) Return lever to seated position.
B1 B2

Customer Helpline 1300 889 028
14
Operating Instructions
2. MOUNTING/CHANGING THE SANDING SHEET (See Fig. D)
Align the sanding sheet and press it onto the sanding pad by hand.
Firmly press the power tool with the sanding sheet against a flat surface and briefly
switch the power tool on. This provides for good adhesion and prevents premature
wear.
If one point has become worn, pull off the sanding sheet, turn it 120° and place it on
again.
3. OPERATING THE ON/OFF SWITCH (See Fig. E)
To start the machine, push the On/Off switch forward so that the “1” mark is indicated
on the switch.
To switch off the machine, push the On/Off switch toward the rear so that the “O” mark
is indicated on the switch.
2
2
1
1
C1
C3
C2

Customer Helpline 1300 889 028
15
Operating Instructions
D E
4. USING THE VARIABLE SPEED CONTROL (See Fig. F)
Select oscillation frequency (speed) while the motor is running.
The variable speed control can be used to set the optimum oscillating frequency
according to the accessories used and the respective application.
High oscillation frequency: Sanding, sawing, rasping and polishing stone and metal.
Low oscillation frequency: Polishing varnishes.
5. LED LIGHT
The sight light allows you to keep a clear view under less illuminated circumstances. To
turn on the light simply press the on/off switch. When you release the on/off switch, the
light will be off.
F

Customer Helpline 1300 889 028
16
Working Hints For Your Tool
If your power tool becomes too hot, especially when used at low speed, set the speed
to maximum and run it with no load for 2-3 minutes to cool the motor. Avoid prolonged
usage at very low speeds. Always keep the blade sharp.
Always ensure the workpiece is firmly held or clamped to prevent movement.
Any movement of the material may affect the quality of the cutting or sanding finish.
Start your tool before working and turn it off only after you stop working.
Do not start sanding without having the sandpaper fitted.
Do not allow the sandpaper to wear away , it will damage the sanding pad. The guarantee
does not cover sanding pad wear and tear.
Use coarse grit paper to sand rough surfaces, medium grit for smooth surfaces and fine
grit for finishing surfaces. If necessary, first make a test run on scrap material.
Excessive force will reduce the working efficiency and cause motor overload. Replacing
the accessory regularly will maintain optimum working efficiency.
Maintenance
Remove the battery pack from the tool before carrying out any adjustment, servicing
or maintenance.
Your power tool requires no additional lubrication or maintenance.
There are no user serviceable parts in your power tool. Never use water or chemical
cleaners to clean your power tool. Wipe clean with a dry cloth. Always store your power
tool in a dry place. Keep the motor ventilation slots clean. Keep all working controls free
of dust. Occasionally you may see sparks through the ventilation slots. This is normal
and will not damage your power tool.
For Battery tools
The ambient temperature range for the use and storage of tool and battery is 0oC-45oC.
The recommended ambient temperature range for the charging system during charging is
0oC-40oC.
Customer Helpline 1300 889 028
17
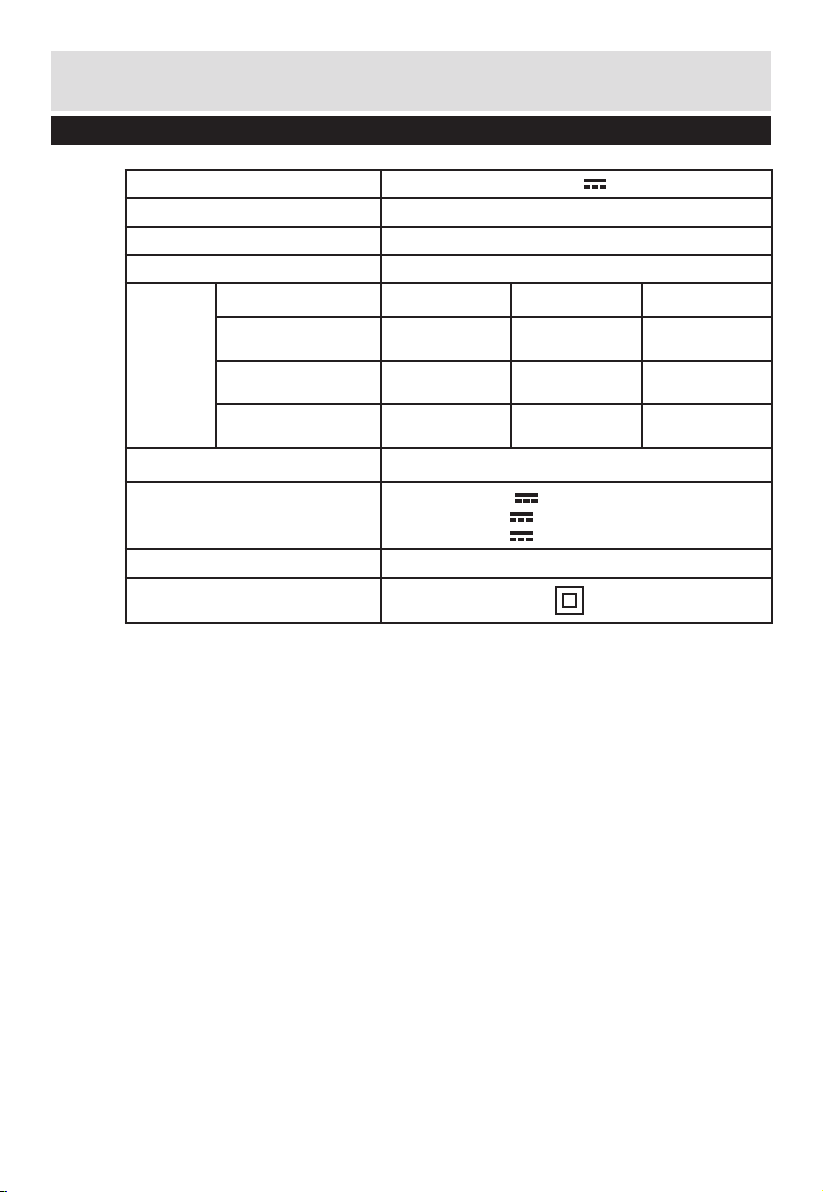
Technical Data
Technical Data Table
Staple your purchase receipt here
Before returning this product for
warranty or any other reason, please call.
POSITEC AUSTRALIA PTY LIMITED
ABN 14 101 682 357
Unit 15, 23 Narabang Way Belrose 2085 NSW Australia
FREE CALL 1300 889 028
EMAIL:sales[email protected]
Voltage 18 V
No load speed 5000-20000/min
Oscillations angle 3.0°
Machine weight 0.84kg
Charging
time
1.5Ah battery 2.0Ah battery 4.0Ah battery
400mA charger
(HYCH0102000400S) 3-5hrs 5-7hrs 10-12hrs
1.5A Charger
(ACG18LD) 60min 80min 160min
3.0A Charger
(ACG18LD3) 40min 60min 120min
Charger Input 100-240V~50/60Hz
Charger Output
10.8--20V 400mA by slow charger
10.8--20V 1.5A by 1.5A fast charger
14.4--20V 3.0A by 3.0A fast charger
Applicable battery 1.5/2.0/4.0Ah Li-ion battery
Charger Protection class /II


Table of contents
Other ToolPRO Power Tools manuals


