Top Dawg Electronics TDEE1440CAM User manual

1440P Dash Camera Manual
1.Product Introduction
This 1440P Dash Camera is a high resolution, WDR (Wide Dynamic Range) camera with True
H.264 Compression. This camera offers awide 140° viewing angle and 2304 x1440p high
resolution camera for stunning, top of the line, HD dash camera video, and can use up to a
256GB SD Card!
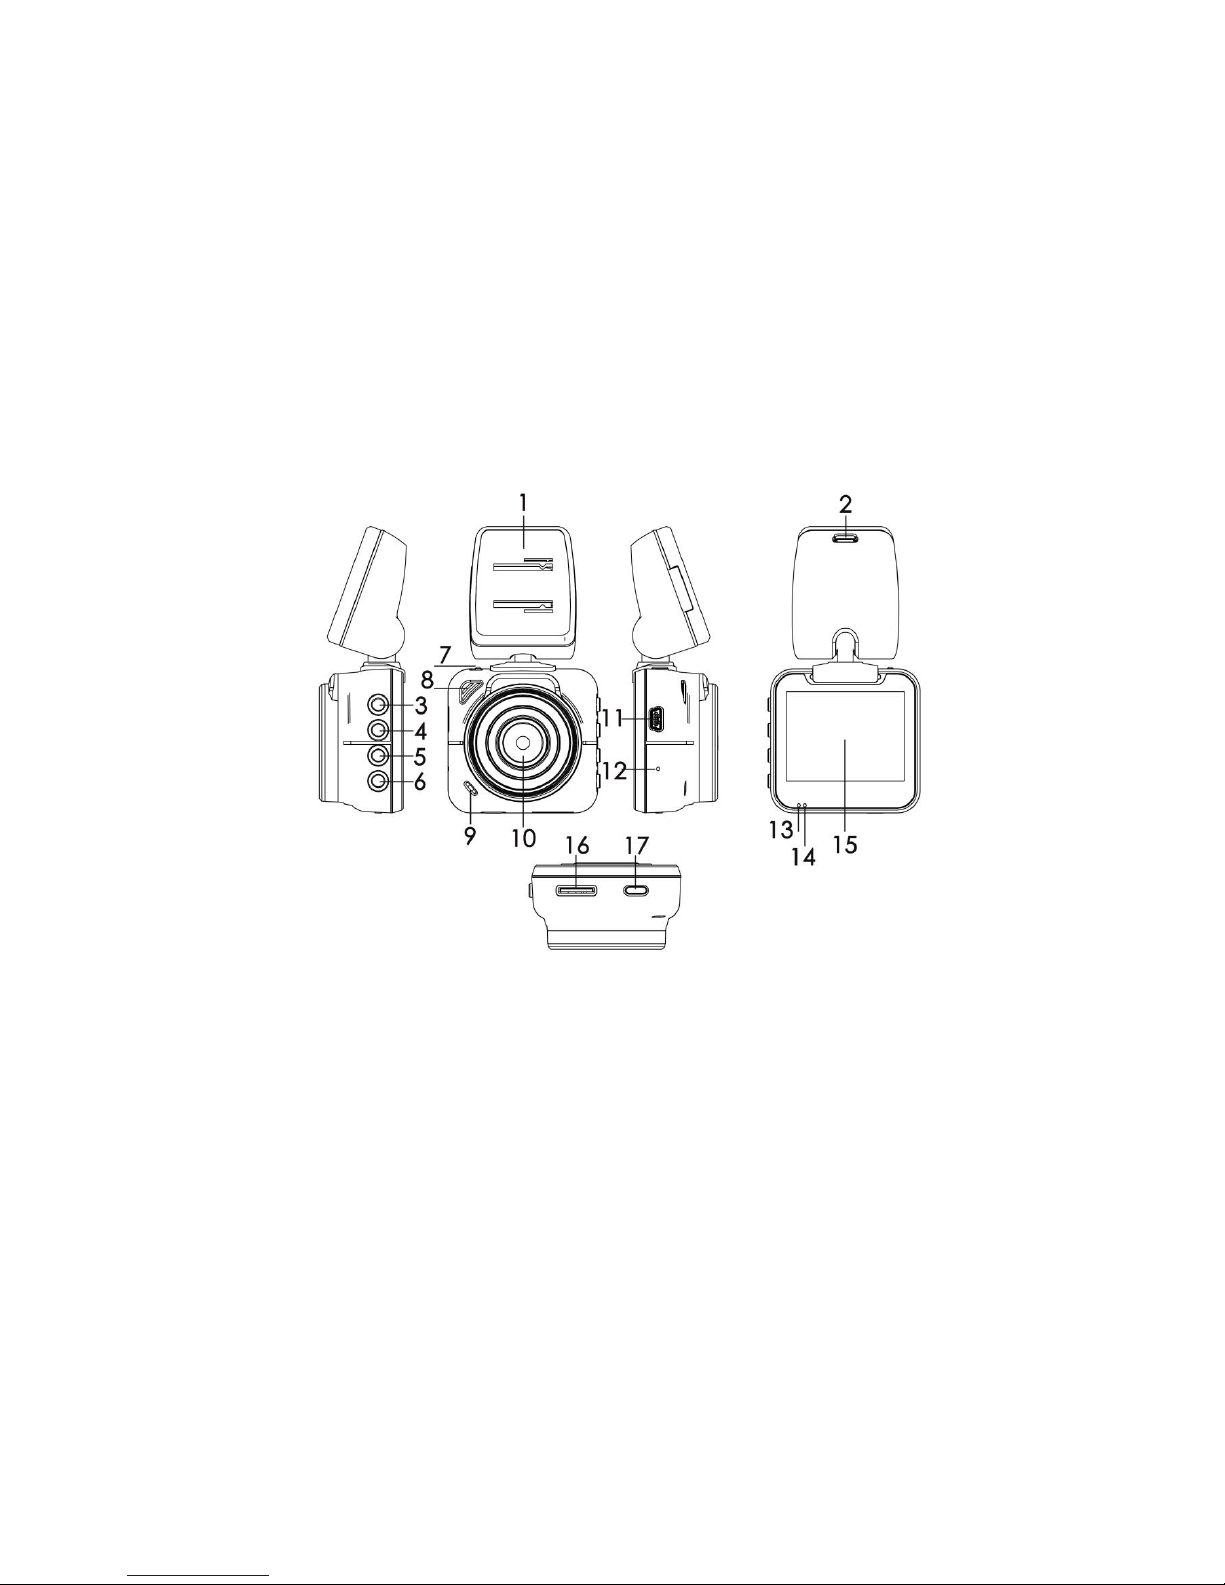
Product Diagram with Description of Buttons
1.Bracket
2.Car charger port
3.Menu
4.Up
5.Down
6.OK
7.Bracket lock
8.Speaker
9.Mic
10.Camera
11.USB
12.Reset
13.Blue light
14.Red Light
15.Display
16.SD card hole
17.On/Off

1440P Initial Setup Instructions
•It is recommended that you FORMART SD card.
•Press bottom left “OK” button, make sure camera is not recording.
•Once camera is not, press top left, menu button
•On menu screen, using middle down arrow button, press 2x or until you
highlight “Menu”
•Press bottom left “OK” button- press middle top left arrow button to highlight
“FORMAT”. Press Ok- Press down arrow to highlight “Yes”, Press bottom left
“Ok” button. SD card is now formatted. If you format SD card in the future, it
will erase everything that is currently on card.
•We recommend formatting card once a month.
Setup instructions to keep dash camera from freezing:
•Press bottom left “OK” button, make sure camera is not recording.
•Once camera is not recording, press top left, MENU button
•On menu screen, using middle down arrow button, press 2x or until you have
“Menu” highlighted, Press Ok
•Press the bottom left down arrow button until “G-Sensor” ishighlighted, Press
Ok and set to “LOW”, Press OK
•Press the bottom left down arrow button until “Park Monitor” ishighlighted
•Press bottom left “OK” button to make sure Parking Monitor is OFF
You are now done with initial setup.
•Press top left Menu button to get back to your main video mode.
•Press bottom left “OK” button to start recording
Master Reset “hole button” is located on right side of camera-Using a safety pin,
thumbtack, toothpick, etc. Press inside hole for a master reset of 1440P dash
camera.

Car charger interface
Connect Dash camera to the car charger. Car charge requirement: Mini USB
port,5V,1A. You can choose either power port, on dash mount or on dash camera.
Power On/off Button, Bottom Right Long press 【on/off】button 3 second to power
on, long press 【on/off】button 3 second again to power off;
In power on mode, short press【on/off】button to go into standby mode. (it will still
record)
OK Button
Short press【OK 】button to begin, short press it again to stop recordings.
Menu Screen Settings
Press bottom left Ok button to stop recording, short press【menu】button, top left, to
enter menu settings. Menu settings cannot be accessed if in recording mode.
To view recordings in playback mode- Once in menu settings, Press left down arrow
3x or until “video” is highlighted-Press OK button- Press OK button to play video
Press down arrow button to scroll through all videos- Press up arrow to view all video
files. Press Menu button for 3-4 seconds to choose to delete or lock videos.
Short press【menu】button to return to previous setting.
UP Button
Navigate through menu settings, system options, settings and video selecting, short
press【up】button to choose above.
Short press【up】button to turn audio recording OFF/ON. Icon will be on bottom left
of screen. This can be done while in record mode and when not in record mode.
Down Button
Navigate through menu settings, system options, settings and video selecting, short
press【Down】button to choose below.
Short press【down】button to lock video recordings while in record mode. Press OK to
stop locking recordings.

USB
Use mini USB cable to connect dash camera to computer.
Reset Button
If the camera freezes due to improper operation, take pin or toothpick insert【reset】
button, hole on right side of camera below charging port.
2.Dash Camera Startup
Insert SD card, located on bottom of dash camera, and connect the camera with
power cord, it will turn on and start automatically, the red dot indicator light on top
left of screen will flash when, short press【OK】button to stop, indicator light will
disappear.
Taking Pictures Only available when not in video mode, short press menu button to
enter menu screen. Highlight CAPTURE, short press【OK】button to take picture and
save.
To view Pictures- Menu screen and highlight/select Photo. Press down arrow to scroll
through pictures taken. Press Menu button for 3-4 seconds for options: Delete or lock
pictures.
Short press【menu】button to return to previous setting.
Video Playback
When video is not recording, short press menu button to enter menu screen.
Highlight VIDEO. press【up】【 down】button to choose video, and press【OK】button
to play.
In video playback mode, short press【OK】button to pause display, short press【up】
【down】button to fast forward and fast backward. Press Menu button for 3-4
seconds for options: Delete, or lock/save video recordings.
SOS Lock Feature While in recording mode, short press【down】arrow button to lock
current video, and current video will not be overwritten, you can see lock icon on the
middle top of the screen. Press OK to stop locked, and then OK to start

USB Connect When you connect USB to computer, it will show 3 options:
1.Storage: you can playback file, copy file and delete file in computer.
2.Camera: you can use Dash camera as a web camera, video chat on computer.
3.Video/File: you will enter normal video mode.
Video resolution You can set different video resolution, 1440P,1080P,720P can be
chosen, the higher resolution you set, the bigger file capacity is.
Loop Settings This camera loops and will not disrupt full recordings if in 1-3-5-minute
loop increments. EX: When in 2-minute loop increment setting, every video will
record for 2 min, and will oldest video will be overwritten once SD card is full.
Audio Record User can turn audio record OFF/ON while video is recording or when
dash camera is not recording by pressing UP ARROW. Icon is on bottom left of screen.
G-Sensor This Dash camera has a built in G-Sensor, if vehicle is in a collision, or hard
braking occurs, or unexpected impact is detected, the current video will be locked
and saved automatically. You will see a lock icon on the middle top of the screen, the
locked video will not be overwritten when dash camera starts to loop.
Packing monitoring-When in parking monitor mode dvr will turn on and record when
there is motion detected. Screen will go into standby mode. Do NOT have ON while
driving or it may freeze dash camera and/or not video record.
Screen Saver Mode OFF/ON When recording is ON/OFF you can select screen to
automatically go into standby mode. In system menu, it has four mode options
“off/30s/3m/5m” to choose. If “3m” is selected, the screen will automatically go into
standby mode in 3 minutes. If camera is in recording mode, it will continue to record.
Battery charge Connect dash camera with external power supply. Dash camera is not
meant to stay powered on without direct power connected.
3.Installation Instruction
4.1 Vehicle can be turned on or off
4.2 Insert SD card into the camera.
Note: Please use high speed SD Card (Class10 or above) with a minimum capacity or
8GB and a maximum of 256GB. This unit includes a 32GB microSD Card

4.3 Clean windshield first before you install mount on windshield.
4.4 Mount Dash camera to car wind shield with Dash camera bracket.
Insert car charger to cigarette light.
4.5 Connect car charger power cord to dash camera power sockets, either on mount
itself or on side of camera power socket. It is based on your preference.
Note: Cable can extend along the edge of the car windshield to hide.
4.6 Adjust lens position, make sure the lens has the same level as ground.
4.7 Start engine to power dash camera if CLA does not have constant power.
Dash Camera will automatically start.
Note: If the Dash camera is installed correctly, red dot indicator light will be flashing
on top left corner of dash camera screen.
4.Specification
Chip set
Novatek NT96655
Display
2.0 inch, 960x240
Video Resolution
2560x1440P 30fps /1920x1080P 30fps
Video format
MOV
Picture Resolution
12 million pixels CMOS
Picture format
JPG
Storage card type
SD card, includes 32GB microSD
Storage card capacity
Up to 256GB
USB Interface
USB2.0
Power code
USB2.0 DC5V 1A
Frequency
50HZ/60HZ
Battery
200mAh 3.7V polymer battery
Working Current
300mA
Mic/Speaker
Support
Languages
English / German / French / Spanish / Portuguese
/Simplified Chinese /Traditional Chinese / Japanese /
Russian
Note: The specification may different due to update software or other changes

5.Notes
6.1 Please use company cigarette lighter adapter that was with dash camera
packaging, use unqualified adapter may cause freezing or harm to dash camera.
6.2 Do not use this product in wet or extremely high temperature environment.
6.3 Keep lens clean for optimal and viewing.
6.4 To protect your legitimate rights and interests, please do not disassemble this
product.
6.5 User takes his own responsibility. Please obey laws, do not use this product for
illegal use.
6.Warranty Info
If failure or freezing occurs, go through initial setup process that is listed on page 3.
Dash camera is under warranty for 12 months from the date of your purchase.
All returns must be accompanied by proof of purchase.
Manufacturer warrants to original purchaser that the product finished hereunder shall be free from defects in
material and workmanship under normal use and service. In the event of any defect in material or workmanship,
the Manufacturer will for twelve (12) months from the date of delivery of product to purchaser, F.O.B. point of
origin replace any defective parts in respect to the product or replace the product with new or like new product
at Manufacturers option. In the event of a defect, return the product in tact to the Manufacturer (shipping to
Manufacturer will be paid by purchaser) with evidence of purchase date within last 12 months for proper
handling of the warranty claim.
What is Not Covered:
Defects or damage resulting from use of products in other than it normal and customary manner
Defective or damage from misuse, accident, water or neglect
Scratches or cosmetic damage that does not affect operation of the product
Product damage or bodily injury
General Provisions: This warranty is given in lieu of all other express warranties, implied warranties, including
without limitation, implied warranties or merchantability and fitness for a purpose, are limited to the duration of
this limited warranty, in no event shall the Manufacturer or seller be liable for damages more than the purchase
price of the product
This device may not be used to violate the privacy rights of others. In no way will manufacturer or retailer or its
subsidiaries or partners be held responsible for inappropriate use of this product. It is the sole responsibility of the
buyer to consult legal counsel for the interpretation of any laws applicable to the area of intended use of these
products.
Table of contents
Other Top Dawg Electronics Dashcam manuals

Top Dawg Electronics
Top Dawg Electronics TDGPSCAM-01 User manual

Top Dawg Electronics
Top Dawg Electronics TDDCAM-01 User manual

Top Dawg Electronics
Top Dawg Electronics EagleEye User manual

Top Dawg Electronics
Top Dawg Electronics Platinum TDHDCAM02 User manual

Top Dawg Electronics
Top Dawg Electronics AC-301W User manual

Top Dawg Electronics
Top Dawg Electronics TDLE4GCAM1 User manual


