Top Gun Mobility ROYALE FLUSH User manual

ROYALE FLUSH
Toilet Auxiliary Lift
USER MANUAL
AUTHORISED TOP GUN MOBILITY AFTER SALES SERVICE
We have ensured that your new Top Gun Mobility Toilet Lift Seat is ready to
deliver! Every member of our Team is dedicated to Customer Satisfaction. By
making contact with the following personnel, you will be assured of Prompt and
Efficient After Sales Service.
Sales : __________________________________
Service : __________________________________
Spare Parts : __________________________________
WARNING
Please read the Owner’s Manual carefully before operation. If you do not fully
understand any part of the Manual, please contact your dealer as soon as
possible to avoid any injury or damage from misuse.
PLEASE NOTE : All details contained within this owner’s manual are correct as
at time of print. Specifications/Recommendations are subject to change without
prior notice, should you have any queries please do not hesitate to contact an
authorised Top Gun Mobility dealer

CONTENTS
PACKAGING AND COMPONENTS ................................................................................................................................ 1
INSTALLATION .................................................................................................................................................................. 2
Handrail Installation ................................................................................................................................................... 2
Remote Control Box installation ............................................................................................................................ 2
Adjustment of Supporting feet ................................................................................................................................ 3
Positioning Seat Lift with the Toilet ...................................................................................................................... 3
How to use the lifting button ................................................................................................................................... 6
Water Pipe installation ............................................................................................................................................... 6
HOW TO USE MANUAL BUTTON/SIDE CONTROL PANEL ............................................................................... 7
PREPARATION ................................................................................................................................................................... 8
REMOTE CONTROL INSTRUCTIONS OF USE ......................................................................................................... 8
Stop/Power switch ...................................................................................................................................................... 8
Rear Wash/Oscillating................................................................................................................................................ 8
Front Wash/Oscillating .............................................................................................................................................. 8
Nozzle position adjustment, nozzle cleaning .................................................................................................... 8
Drying ............................................................................................................................................................................... 8
Water pressure/Air temperature adjustment .................................................................................................. 8
Water temperature adjustment .............................................................................................................................. 8
Seat temperature adjustment .................................................................................................................................. 9
Night lighting.................................................................................................................................................................. 9
Child Wash ...................................................................................................................................................................... 9
Power Saving .................................................................................................................................................................. 9
Lady Care ......................................................................................................................................................................... 9
One Solution ................................................................................................................................................................... 9
Strong Wash ................................................................................................................................................................... 9
CONTROL PANEL .............................................................................................................................................................. 9
CLEANING AND MAINTENANCE .............................................................................................................................. 10
Equipment cleaning .................................................................................................................................................. 10
Cleaning the nozzle ................................................................................................................................................... 10
Cleaning the filter net .............................................................................................................................................. 10
Replacing the water filter ....................................................................................................................................... 10
Replace activated carbon block ........................................................................................................................... 10
SPECIFICATIONS ............................................................................................................................................................ 11
WARRANTY ...................................................................................................................................................................... 11
ADDITIONAL IMPORTANT NOTES .......................................................................................................................... 12

Page | 1
PACKAGING AND COMPONENTS
Open the package, check whether all parts are complete, and determine whether there is any
damage. If any parts are missing or damaged, please contact the supplier.
The package contains:
A. Toilet auxiliary lift chair body
B. Handrail (with lift switch)
C. Handrail (without switch)
D. Remote control and remote-control hanging box
E. Water inlet hose
F. Water pipe tee joint
G. Filter
Installation
tool kit (with 4 screws for fixing the armrests and an Allen wrench)
B C
D E
G
F
A

Page | 2
INSTALLATION
Handrail Installation
Connect the armrest to the column of the main unit, and then use the screws provided in the
installation tool bag to put it into the rear armrest screw hole and lock it. (When installing armrest B,
pay attention to align the waterproof plug with the socket in the column for installation)
Connect the handrail to the column of the main body
Use the screws provided in the installation tool bag to put it into the rear armrest screw holes and
lock it.
Remote Control Box installation
For the remote control box, tear off the double-sided adhesive on the back of the box seat and stick it
in a convenient location.
Page | 3
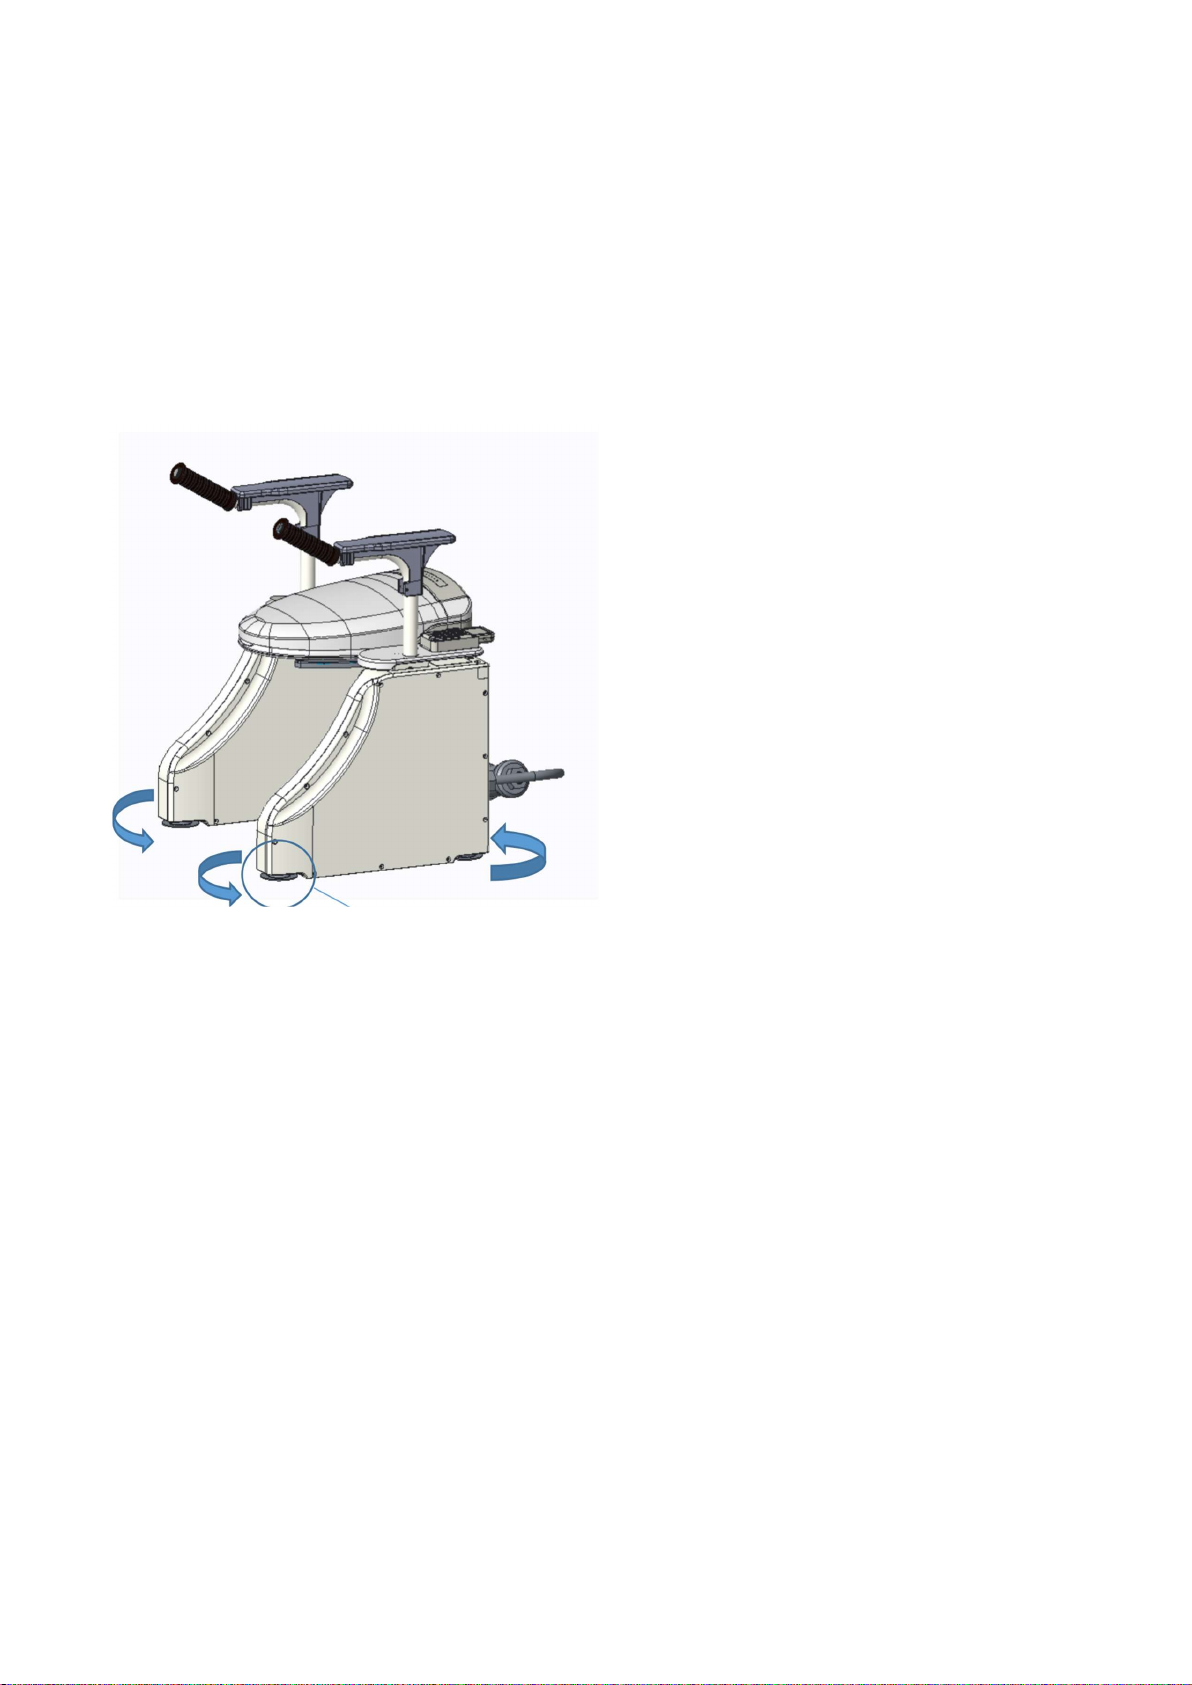
Adjustment of Supporting feet
When the device leaves the factory, all 4 supporting feet have been adjusted to the lowest height.
The installer uses the soft ruler in the installation tool bag to measure the height from the ground on
the edge of the ceramic base of the toilet, and then adjusts the height of the rear beam of the device
to be about 1cm higher than the edge of the ceramic base of the toilet by rotating the equipment
support feet to avoid The device is in contact with the toilet.
There are 4 supporting feet, and the height of the supporting feet can be adjusted by rotating to
adjust the overall height of the equipment.
*Warning: The device is stabilized by adjusting the 4 supporting feet to ensure that the seat is in a
horizontal position. At the same time, make sure that the height of the lower edge of the outermost
side of the device seat is higher than the upper edge of the ceramic base of the toilet, otherwise it
may cause the device to work abnormally.
Positioning Seat Lift with the Toilet
Remove the toilet cover and its fixing screws, and only keep the ceramic base of the toilet
Lift the device (the seat ring to the lowest state) and move it to the top of the toilet, then slowly lower
it to ensure that the device seat ring does not touch the toilet.
Regularly check whether the position of the equipment on the toilet is correct to avoid collision or
jamming of the equipment with the toilet during use.
For users with poor body balance and self-control ability, the fixed beam of the main body A of the
device and the seat ring installation hole of the toilet must be fixed with fixing bolts to prevent the
user from falling sideways.

Page | 4
Fixing method 1: (bolt directly fixed)

Page | 5
Fixing method 2: (For the special situation of the toilet hole position, first use the extension piece to
adjust the distance and then fix it)

Page | 6
How to use the lifting button
The lifting control switch of the device is located at the front end of the armrest. The user controls the
lifting and lowering of the device by continuously pressing the left and right control keys. Release the
switch to stop the device.
Water Pipe installation
Install the filter G on the top of the three-way valve F and tighten it, as shown in the figure below.
We recommend this installation is completed by a licenced plumber to connect water and licenced
electrician should you need a power point installed.
Connect one end of the water pipe to the filter and tighten the water pipe nut.
Connect the other end of the water pipe to the interface of the main body and tight it.

Page | 7
One end is connected to the water pipe, and the other end is connected to the main body
HOW TO USE MANUAL BUTTON/SIDE CONTROL PANEL
The design of this product is mainly controlled by remote control, and the side control panel.

Page | 8
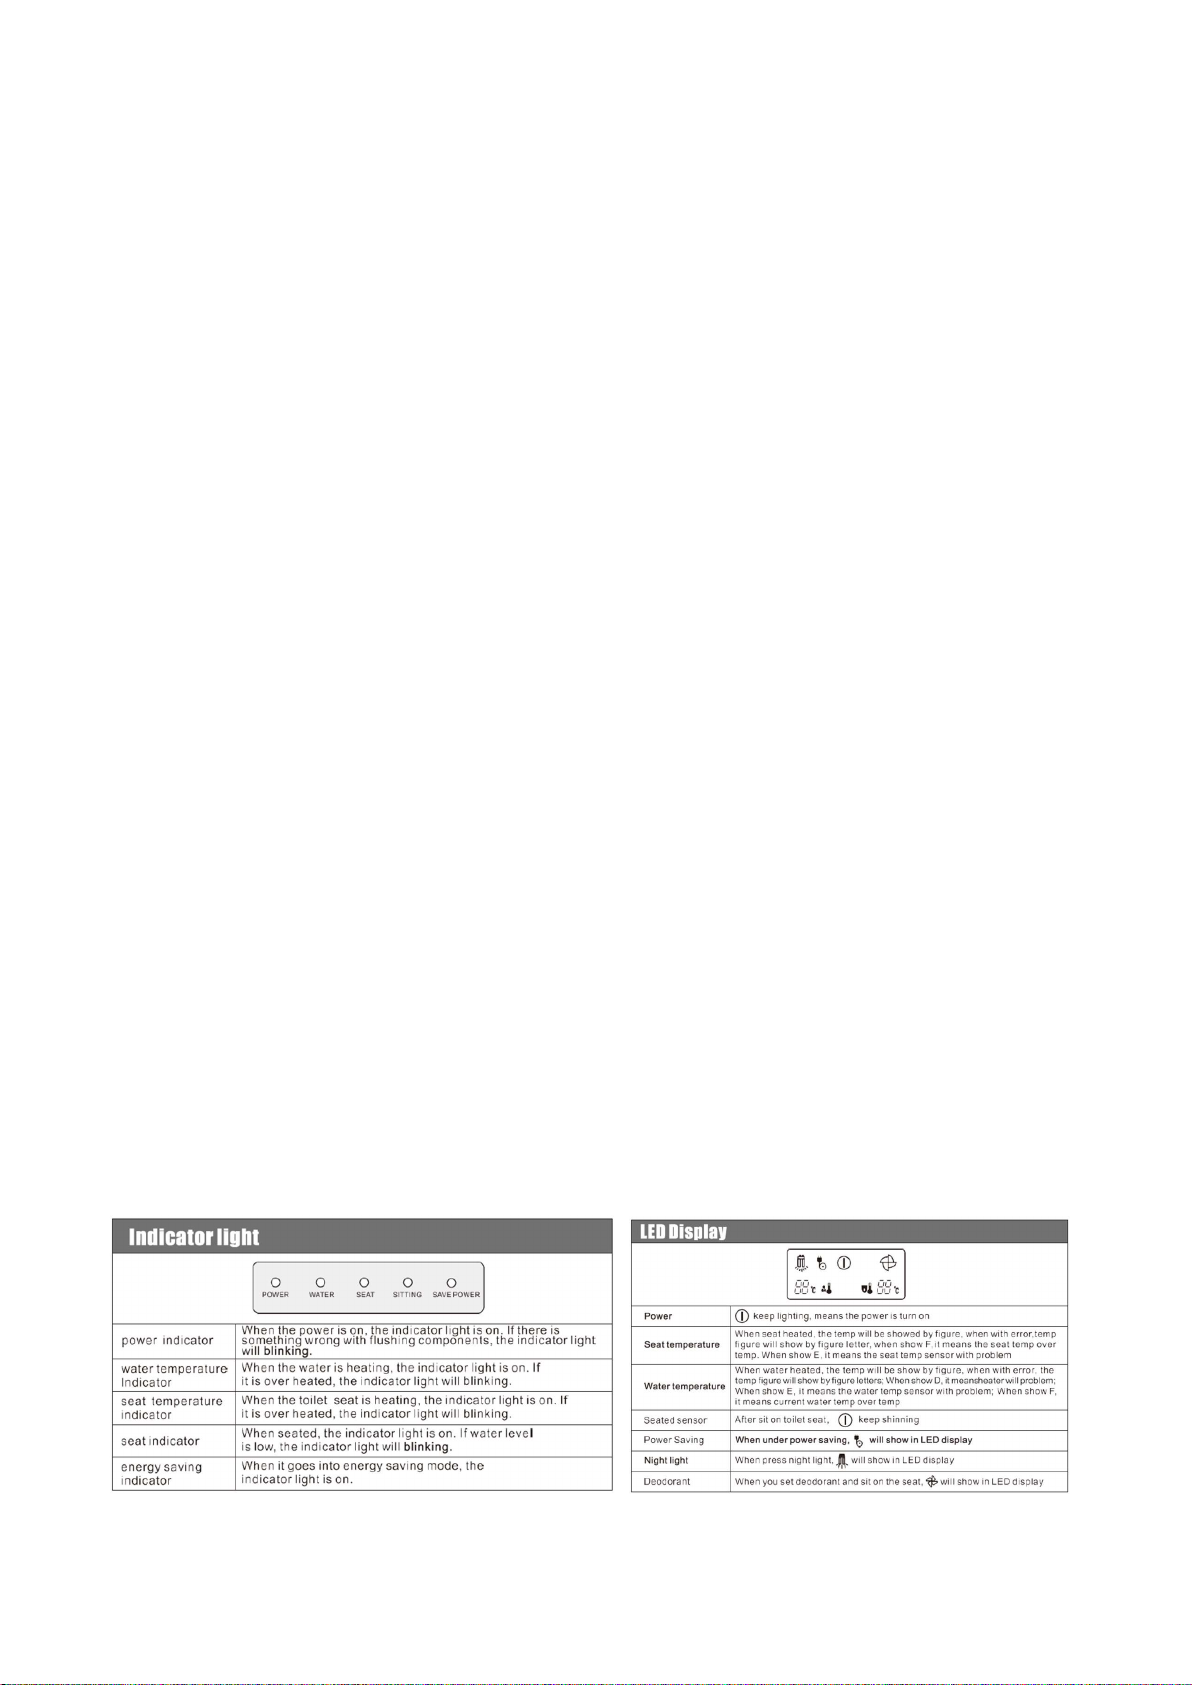
PREPARATION
1. Open the water inlet valve
2. Ensure the power plug is inserted into the socket and the indicator light is on
3. Confirm the power icon in LED display is on
4. If the power light on the product indictor panel is not lit, all functions will be unavailable,
please press the power button on the operation button panel
REMOTE CONTROL INSTRUCTIONS OF USE
Stop/Power switch
Press the "Stop" button to stop the ongoing water washing (including rear
washing, front washing), wash will automatically stop after 2 minutes if not
manually turned off.
Press the stop button for 3 seconds to shut down
Rear Wash/Oscillating
Press the "Rear Wash/Oscillating" button to enter the rear wash function.
Press again to change between the fixed position and the moving position of
the nozzle. The indicator #1 will blink on the remote control in is oscillation
mode.
Front Wash/Oscillating
Press the "Front Wash/Oscillating" button to enter the front wash function.
Press again to change between the fixed position and the moving position of
the nozzle. The indicator #1 will blink on the remote control in is oscillation
mode.
Nozzle position adjustment, nozzle cleaning
During the washing process, lightly press the "△" or "▽" button to adjust the nozzle position. Note in
oscillating cleansing mode, the position of the nozzle cannot be adjusted.
Drying
Press the "Dryer" button to start warm air drying. To stop the drying process press the “Stop” button.
If the stop button is not pressed within 4 minutes, the drying function will automatically shut down.
Water pressure/Air temperature adjustment
Whilst using the Front or Rear washing mode, lightly press the "+" or "-" on the remote to adjust the
nozzle water pressure. There are 4 available levels.
Whilst using the drying mode, lightly press the "+" or "-" button to adjust the drying air temperature
Water temperature adjustment
Press the "Water Temperature" button to set the nozzle water temperature (each press of the button
changes the temperature). Temperatures are approx.. Low Grade 33°C, Mid Grade 36°C and High
Grade 39°C

Page | 9
Seat temperature adjustment
Press the "seat temperature" button to set the seat ring temperature to switch between Low, Mid,
High Grade and off. Indicator lights #4, 5 & 6 correspond to the status.
Night lighting
Press this button to turn on (or turn off) the night light below the seat ring. The night light turns off
automatically after 10 minutes. The indicator light #4 on the display of the remote control pad means
the night light is on.
Child Wash
wash" button to enter the child wash function. During the child washing process, press the stop
button to terminate the child wash, or press the drying button to terminate the child wash and
directly enter the drying process.
When washing children, the water temperature is fixed at mid grade (approx.. 36°C), the water
pressure is fixed at low, and the drying air temperature is fixed at mid-range. These 3 parameters are
not adjustable at this time, in order to prevent children from adjusting these parameters at will, their
delicate skin may be damaged.
The remote control shows that the corresponding child wash icon lights up to indicate the child wash
status.
Power Saving
Press the down arrow to enter automatic power save mode. The indicator light at #3 will blink on the
remote control. Press again to close this mode
When automatic power saving mode is turned on, it will enter the power saving mode 1.5 minutes
after leaving the toilet seat
Lady Care
Press the “Lady Care” button, the nozzle reaches out to work and water temperature is set to the
highest level (refer above for approx.. temperature), water pressure is set to level 2 and the cleaning
position is the default position. Water temperature/pressure is unable to be adjusted in this mode.
This mode will automatically end after 2minute. Press the stop button to end Lady Care mode.
One Solution
Press the “One Solution” button to start. This is an automatic cycle of Rear Wash for 40 seconds,
oscillate wash for 20 seconds, warm air dryer for 2 minutes and then stop. During this process you can
press the stop button at any time to end ‘one solution’ mode.
Strong Wash
Press the ‘Strong Wash’ button to commence. The nozzle reaches out and water pressure is at it’s
highest grade. After washing for 2mintues the cycle till automatically shut down. Alternatively, press
the stop button to end.
CONTROL PANEL
This product is designed to be controlled mainly by the remote. Manually operation from the control
panel is possible, however only has basic functionality as per diagram above (pg 7)

Page | 10
CLEANING AND MAINTENANCE
Equipment cleaning
Pull out the power plug first, and then clean the equipment with a mild, non-abrasive sanitary ware
cleaner. If multiple people use the equipment, it is recommended to disinfect the equipment after
each use;
The equipment waterproof is IPX4, Do not rinse or immerse the equipment in liquid.
Cleaning the nozzle
Press the "△" key on the nozzle position for 3 seconds, the nozzle will automatically extend for
manual cleaning by the user. You can use a toothbrush to remove dirt or clogged impurities in the
nozzle hole.
Cleaning the filter net
Turn off the water tap and pull out the power plug.
Loosen the connection between the inlet hose and the collective.
Use tweezers or needle-nose pliers to remove the filter from the water inlet of the body.
Use a soft brush to clean the front and back sides of the filter.
Push the cleaned filter back into the water inlet of the body. Be careful not to press the metal mesh
with sharp objects to avoid puncturing the metal mesh. You can use a blunt object to push the plastic
part of the edge.
Turn on the water inlet and plug in the power plug.
Replacing the water filter
Turn off the water tap and pull out the power plug.
Unscrew the connecting nuts at both ends of the filter and take out the old filter. Put the new filter
back in place of the old filter.
Turn on the water inlet and plug in the power plug.
Replace activated carbon block
After someone sits on the seat, the product automatically turns on the deodorizing function. After the
human body leaves the seat, about 15 seconds later, the deodorizing function is automatically turned
off. After a period of use, if the deodorizing effect becomes poor, the activated carbon for deodorizing
should be replaced.
Cut off the power before replacing the activated carbon.
Pull out the activated carbon box, replace the old, activated carbon particles in the box with new
activated carbon particles in the same amount.
Push the carbon box back to its original position, and then turn on the power.

Page | 11
SPECIFICATIONS
Dimensions of the unit (LxWxH) : 607*616*706mm
Weight of the Unit : 22 KG
Max Loading Weight (Weight Capacity) : 200 KG
Distance between handrails : 504mm
Support times for battery full charge : Plug power
Working Voltage : 220V. USA CANADA Special 110V
Minimum height of seat ring: 390mm
WARRANTY
This is to certify that your Top Gun Mobility product offers a 12 month Warranty from the date of
original purchase. Should a defect or operating fault arise within this period the Dealer, from where
the product was originally purchased, should be notified immediately. Failure to register the fault may
invalidate the warranty.
The Dealer from where the product was purchased is responsible for any warranty repairs. Top Gun
Mobility warrants that if a fault occurs within this period due to faulty workmanship or materials that
the product will be repaired (or replaced at the Company’s discretion) free of charge. Any
unauthorised modifications will invalidate the warranty.
Your Top Gun Mobility product is fully guaranteed for 12 months from the date of purchase against
faults arising due to defects in manufacture or materials. This warranty does not detract from but is in
addition to your legal rights.
All electronic parts, including controllers and battery chargers, have a one (1) year warranty. Servicing
to any controllers or battery chargers must be carried out by your authorised Top Gun Mobility
Provider. Any attempt to open or dismantle these items renders the guarantee void on that item.
Not Covered Under Warranty
The guarantee does not extend to those items which may need replacement due to normal wear and
tear (upholstery, plastic shrouds, motor brushes, fuses, and batteries), or damage to the product
caused by misuse or accident for which Top Gun Mobility or its agent cannot be held responsible. This
warranty does not include service calls.
Commercial Use
Any TopGun Mobility products used in a commercial application will only be covered by a 6 month
warranty from the purchase date. All other conditions in this warranty will apply.
The Product images shown are for illustration purposes only and may not be an exact representation of the product
Page | 12
ADDITIONAL IMPORTANT NOTES
This product is only suitable for AC 220V / 50Hz power supply.
The socket used should be firmly installed inside, at least 20cm away from the ground, and have
grounding measures that meet the requirements.
It cannot be installed in a place that is easily wetted by water/other conductive liquids to avoid
electric shock accidents caused by water ingress.
The power cord should not be squeezed by heavy objects or sharp objects to avoid damage and
electric shock.
Do not use wet objects to touch the plug/socket, and do not use liquid to flush the socket, otherwise
there is a danger of electric shock. Wipe the plug with a dry cloth before inserting the plug, and insert
the plug completely into the socket to avoid electric shock and poor contact.
Pull out the power plug when thunder strikes to avoid damage to the product due to lightning strikes.
The ambient temperature of this product should not be lower than 3°C and not higher than 40°C,
otherwise the product will be damaged due to freezing of water or too high temperature.
Try not to splash urine and feces on the nozzle, which will easily lead to the growth of bacteria on the
nozzle and cause skin inflammation.
The installation/disassembly/repair of this product should be done by authorized agents or
professional maintenance personnel.
The water inlet hose must not be bent/twisted to ensure that the waterway is unblocked. Otherwise,
the performance of this product will decrease.
Do not allow children or persons with mental disabilities to stay alone in the room where this product
is installed, and do not let them play with this product. If they want to use this product, they should
be supervised by a normal person. Because of the delicate skin of children, when using this product,
other personnel should help them adjust the temperature of the seat ring of this product and the
temperature of the water outlet to avoid burning their skin.
Do not use this product when there are spray nozzles in use nearby and water may splash on this
product.
This product can only be used for the purposes specified in this manual.

Page | 13


Copyright Top Gun Mobility
Owner’s Manual & Warranty Booklet 2022
Table of contents
Other Top Gun Mobility Mobility Aid manuals


