Tuffcare 456E User manual

ADULT TILT-IN SPACE CHAIRS
456E/457E
O
Ow
wn
ne
er
r’
’s
s
M
Ma
an
nu
ua
al
l

Limited Warranty
The warranty below has been draft to comply with Federal Law
applicable to products manufactured after July 4, 1975. This
warranty is extended only to the original purchaser/consumer
(or dealer non-consumer who does not buy for resale).
Tuffcare warrants the main frame of its tile-in space chairs will
be free from defective workmanship and materials for a period
of three years from the date of purchase, 6 months on parts.
The warranty period commences on the original manufacture
date. If within such warranty period any such product proven to
Tuffcare satisfaction to be defective, such product will be
repaired or replaced at Tuffcare option.
Tuffcare sole obligation and your exclusive remedy under this
warranty shall be limited to such repair and /or replacement.
The warranty does not include any labor charges incurred in
replacement parts instillation. Freight charges to factory are at
the expense of the consumer or seller. Return freight charges
will be prepaid by Tuffcare. For warranty service, please contact
the authorized dealer from whom you purchase your Tuffcare
products. In the event that you do not receive satisfactory war-
ranty service, please write directly to Tuffcare.
DO NOT RETURN PRODUCTS WITHOUT PRIOR AUTHORIZATION.
LIMITATIONS AND EXCLUSIONS: The foregoing warranty
shall not apply to products subjected to negligence, abuse, mis-
use, improper operation, improper maintenance, improper stor-
age or damages beyond Tuffcare control. The evaluation will
be solely determined by Tuffcare. The warranty shall not
apply to problems arising from normal wear, or failure to follow
instructions, or if parts are not manufactured by Tuffcare, or not
comply with original equipment specifications that add to
Tuffcare product.
THE FOREGOING WARRANTY IS EXCLUSIVE AND IN LIEU OF ALL
OTHER WARRANTIES, INCLUDING BUT NOT LIMITED TO THE IMPLIED
WARRANTIES AND FINESS FOR A PARTICULAR PURPOSE AND SHALL-
NOT EXTEND THE DURATION OF THE EXPRESS WARRANTY PROVIDED
HEREIN. TUFFCARE SHALL NOT BE LIABLE FOR ANY CONSEQUENTIAL
OR INCIDENTAL DAMAGES WHATSOEVER.
This warranty gives you specific rights and you may also have
other legal rights which very from state to state. Some states do
not allow the exclusion or limitations or consequential damage,
or limitation on how long an implied warranty lasts, therefore,
the above exclusion and limitation may not apply to you.

-8- -1-
Table of Contents
Table of Contents
Table of Contents ..................................................
Product Features ..................................................
Wheelchair Diagram ..............................................
Safety Precautions ..............................................
Adjustment Instruction..........................................
Maintenance ..........................................................
Limited Warranty............................................
1
2
4-5
6-7
8
3
Maintenance
Maintenance
• Suggested Maintenance
Keep the wheelchair in its best condition, please proceed with the following
maintenance:
1. Before using the wheelchair and during the first month of use, check all the
screws if they are tightened. If any loose srews appear, please tighten
immediately to assure the safety of the user. Under normal use, please proceed
with routine inspection every 3 months to assure that all the parts are in good
condition, and to check all the screws and nuts to make sure they are tightened
(specially the fixing nuts of rear wheels and the brake system). If any screws
become loose, please adjust and tightened in time.
2. The wheelchair must be dried after using if it gets wet in rainy days. Under normal
use, the
wheelchair must be cleaned often with soft cloth and apply a anti-rust wax to
maintain good condition of this product.
3. Maintain the frame clean and dry under dry and ventilated place to avoid any
rust on the parts.
4. Check often the agility of rotating parts and add a little lubricants regularly.
5. Avoid any oil or acid contacts with the wheels to prevent any deterioration.
6. The elastic vinyl used on seat, backrest, shoulder stopper, hip stopper, armrest
side boards and headrest can all be removed for cleaning and sterilized pur-
poses
back cover

-2- -7-
4. Installation and adjustment of footplate height:
Align and mount the arc plate hole of the leg support into the pin. Rotate gently
the leg support from outside to inside until the spring is fixed. If it is necessary to
remove the leg support, push the spring lock from the inner side of the leg
support, twist it outwards until you obtain a certain angle and elevate it to pull it out
from the frame pin.
5. Installation and adjustment of skirt guards and armrests:
Loosen the armrest fixing triangle bolts, plug the square tube of the armrest into
the square hole of the wheelchair frame, then tighten clockwise the armrest fixing
triangle bolts.
Plug the armrest tubes into the armrest fixing square tubes, adjust to the suitable
height and tighten clockwise the triangle bolts.
Adjust the side boards to the suitable height and tighten clockwise the triangle
bolts to secure the skirt guards.
6. Installation and adjustment of headrest:
Take out the headrest set from the box. Plug the square tube of the headrest into
the wheelchair frame's square tube located at the back of the backrest. Adjust to
the suitable height and tighten clockwise the triangle screw bolts to fix the
headrest set.
Loosen the wrench bolts from the headrest folding blocks. Adjust forward or
backwards the headrest to the suitable position. Tighten clockwise the wrench
bolts to fix the headrest.
The user may adjust the movable blocks of the headrest according to his/her
preferences. Adjust the movable blocks to the suitable position and tighten the
wrench bolts to fix the headrest.
7. Installation and adjustment of shoulder stoppers:
The shoulder stoppers can maintain and protect the body posture. The height of
the shoulder stoppers and the distance between them can be adjusted according
to the body of the user. Adjust to the suitable position and tighten clockwise the
triangle wrench bolts.
Product Features
Product Features
Frame Material: Steel / Aluminum
Finish: Powder Coated
Cross Brace: Fixed
Seat/Backrest Cushion: Fire retardant elestic vinyl
Armrest Mode: Height adjustable, position adjustable, detachable
Armrest Equipment: PU armrest pad
Footrest Mode: Detachable elevating legrest
Front Castor Mode: 8” x2” PU tire
Front Castor Equipment: Plastic rim, aluminum front fork
Rear Wheel Mode: 24” PU tire
Rear Wheel Equipment: 24” x 1 3/8” high impact molded wheel with 8
spokes or , 12” x 1 3/8” high impact molded wheel with 6 spokes,
quick-release center axle.
Other Accessories: Reclinable backrest, adjustable seat, seat depth
adjustable, 3-pieces headrest, shoulder stopper, hip stopper, alu-
minum lightweight hand brake, luxurious anti-tippers
-6- -3-
Adjustment Instructions
Adjustment Instructions
Tuffcare’ s Compact series tilt-in space Wheelchair is a modern, practical, stable,
durable, product with good heavy resistance, multifunctional and very comfortable.
It is suitable for people with disabilities and for the elderly people with nursing and
transport purposes.
These wheelchairs are basically fully assembled in the box and only minor
adjustments are needed for simple installation of accessories that are needed
before using the wheelchair.
1. Open the box and take out the wheelchair from the box. Place the wheelchair on
the ground. Push down both left and right side boards from to position them for
their normal use position.
2. Check the contents of the box to see whether all of the accessories, user
manuals, etc, are complete. If not, please contact your seller or the manufacturer.
3. Installation of adjusting cylinder:
There are two adjusting cylinders, one is for adjusting the reclining angle of the
backrest and the other is for adjusting the reclining angle of the seat. The angles
can be adjusted according to every user for his/her comfort.
3.1 Installation of backrest adjusting cylinder:
The backrest adjusting cylinder is located at the back of the wheelchair.
Align the positioning hole of the adjusting cylinder to set to the proper
position slot hole and place the bolt through the hole.
Note: after placing the bolt through the hole, assure that the two handles from the
front of the bolt are extended out to prevent the bolt from falling out.
3.2 Installation of seat adjusting cylinder:
The seat adjusting cylinder is located at the back of the wheelchair. Align
the positioning hole of the adjusting cylinder to the proper position slot hole
and place the bolt through the hole.
Note: after placing the bolt through the hole, assure that the two handles from the
front of the bolt are extended out to prevent the bolt from falling out.
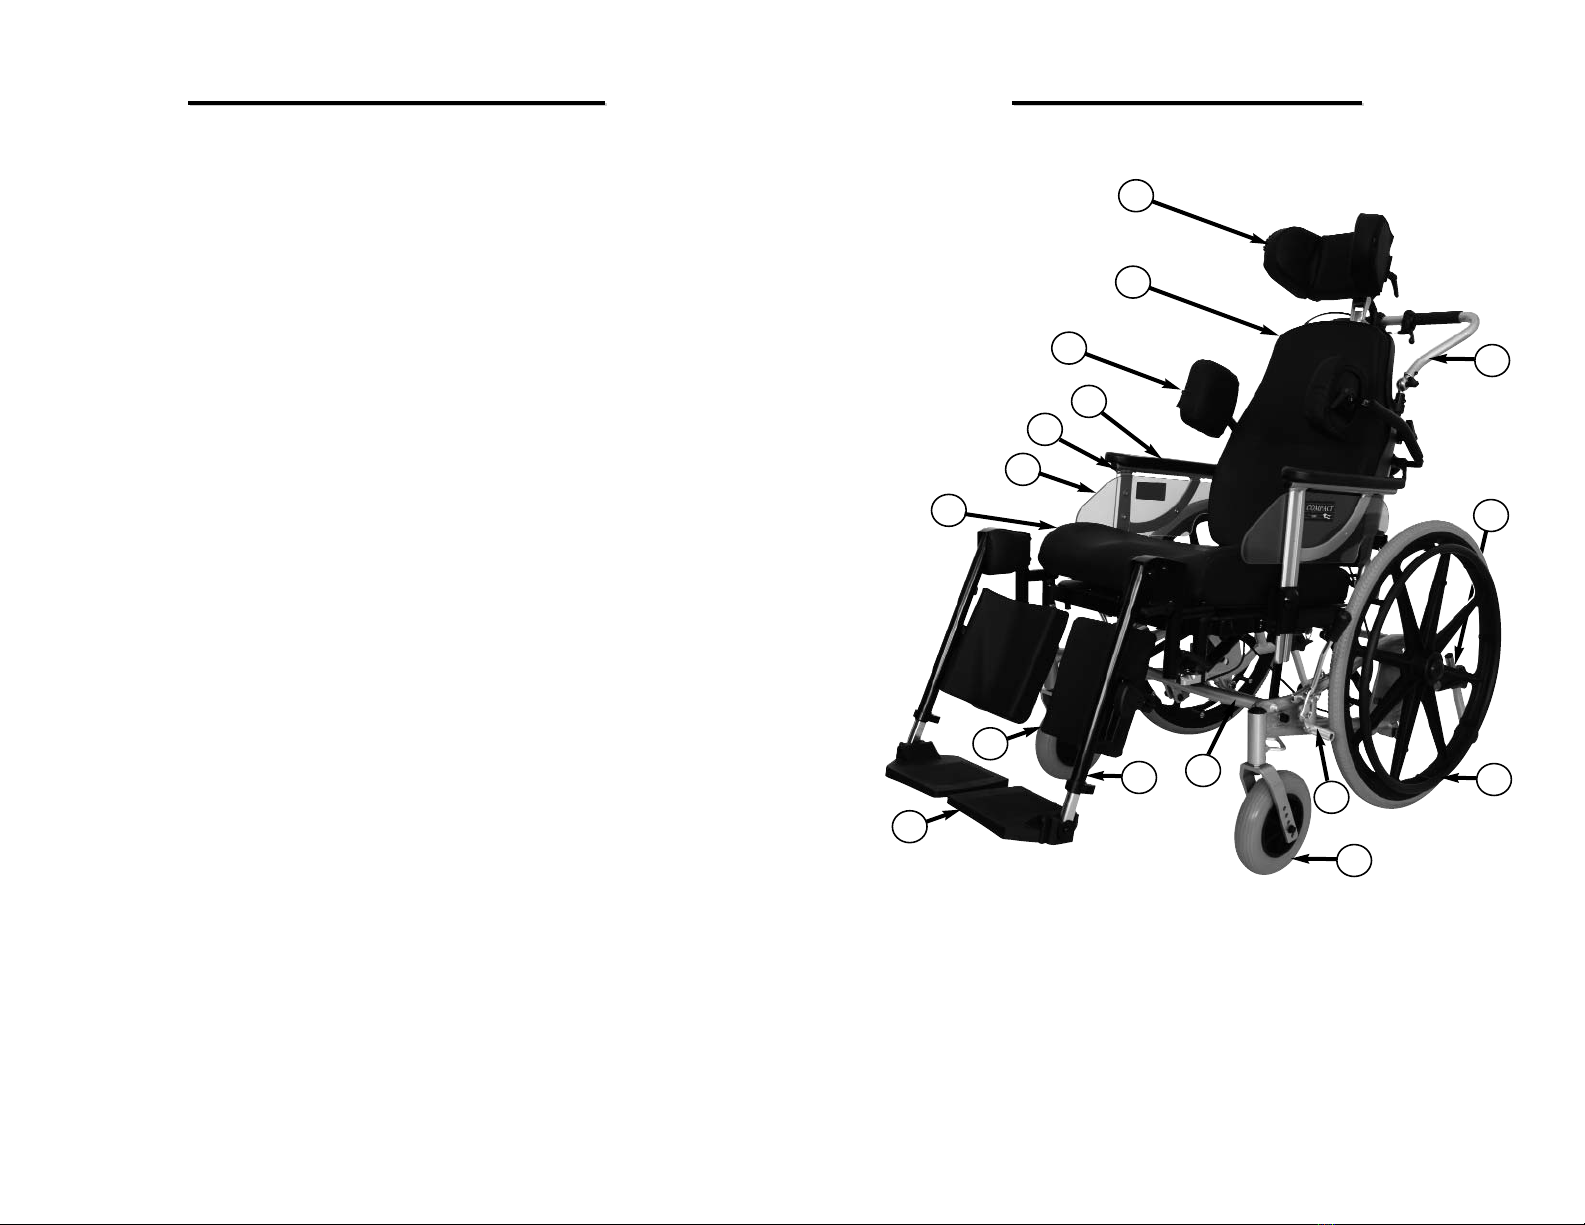
9. ARMREST PAD
10. ARMREST SKIRT GUARD
11. BACKREST
12. SHOULDER STOP
13. HEADREST
14. HANDLE BAR
15. HAND BRAKE
16. ANTI-TIPPER
1. FOOTPLATE
2. LEGREST
3. CALF PAD
4. FRONT CASTER
5. REAR WHEEL
6. MAIN FRAME
7. SEAT
8. ARMREST ASSEMBLY
13
1
Wheelchair Diagram
Wheelchair Diagram
3
2
4
5
16
11
12 14
6
15
8
10
9
7

-4- -5-
Wheelchair seat and backrest angle adjusting precautions:
This wheelchair provides the option of adjusting the angle of the seat and
backrest according to every user's needs. The option of adjusting the angle of the
seat and backrest bring more comfort to the user on the wheelchair. The
adjustment of seat and backrest angle will need the assistance of an attendant.
The attendant must hold the pushing handgrip and push the cylinder with the
thumb (as shown in the picture, left side: backrest cylinder handgrip; right side:
seat adjusting cylinder handgrip. Both can be used independently or
simultaneously). Elevate or push gently the handgrips with both hands and adjust
to the suitable position, then release the hands to adjust the angle of the seat and
backrest.
Safety recommendations
1. The maximum capacity for this wheelchair is 280lbs for 18” wide, 330lbs for 20”
wide. Users over the weight limit, please contact the manufacturer to purchase a
customized product.
2. For self propel wheelchairs, the user should maintain a uniform speed. The
recommended max. speed for self propel use is at 3mph.
3. The wheelchair is recommended to be used on flat ground. If any obstacle
appears, please veer away to avoid any danger of wheelchair tipping and falling.
4. While using the wheelchair, the user should not stand on the footplate as this act
will cause danger of tipping and falling.
5. The user must assure to have good seating positioning before using the
wheelchair on sloping ground. The angle of the sloping ground should be no
more than 10 degrees for safety considerations. If the angle of the sloping ground
is over than 10 degrees, there must be an attendant to assist the user to push the
wheelchair at the back.
6. Do not tilt or swerve while the wheelchair is being used on sloping ground. Using
brakes abruptly when going downhill is not recommended as this will
cause danger of tipping and falling to the front.
Precautions
Precautions
Using the brakes
The wheel locks (on model No. 456E & 457E) or brakes ((on model No. 456E &
457E) should be engaged against both rear wheels or casters before sitting down
or getting up from the chair.
Self Propel Wheels (Handrims)
The user must first sit steadily on the wheelchair, grab the handrims with his/her
hands and push the handrims forward with the same force on both hands to make
the wheelchair move forward, then release both hands off the handrims. When
the wheelchair has slowed down its speed after moving on certain distance of
movement, please repeat the above procedure.
Way to go upstairs
When the wheelchair is going upstairs, the user must have an attendant who will
be assisting at the back of the wheelchair. The attendant must step hard on the
pedal located besides the rear wheels, so the wheelchair may incline backwards
and tilt the front wheels to achieve the height of the next step of the stairs. Push
the wheelchair forward a little and loosen the feet from the pedal so the front
wheels may touch the step. The attendant must push the wheelchair hard so the
rear wheels may move forward to the next step. Repeat the procedure until the
wheelchair achieves its destination.
Way to go downstairs
When the wheelchair is going downstairs, the user will need two attendants for
assistance, one at the front and the other at the back of the wheelchair. To be able
to go downstairs, the attendant at the back must hold the handgrips tight to assure
the wheelchair will not fall off the stairs. The attendant at the front must step down
first and elevate the front frame of the wheelchair, then slowly and carefully pull
the wheelchair down from the stairs. Repeat the above procedure until the
wheelchair achieves its destination. Finally, the front attendant must put down the
front frame of the wheelchair so the front wheels can touch the ground.
This manual suits for next models
1
Table of contents
Other Tuffcare Mobility Aid manuals


Popular Mobility Aid manuals by other brands


Rhythm Healthcare
Rhythm Healthcare B3800F manual

AMF-BRUNS
AMF-BRUNS PROTEKTOR installation manual

Drive DeVilbiss Healthcare
Drive DeVilbiss Healthcare OTTER Instructions for use

Rhythm Healthcare
Rhythm Healthcare C500U Assembly and Fitting Instructions

Lumex
Lumex RJ4200A manual

Rebotec
Rebotec Jumbo user manual