Topfloor TF130R-TRS User manual
Operator manual
TF130R-TRS vacuum sweeper


Table of Content
TF130R-TRS I
Table of Content
1Introduction.......................................................................................................................................3
1.1 Usage conformant with intended purpose..........................................................................3
2Safety information............................................................................................................................4
2.1 Safety Devices....................................................................................................................6
3Description of the unit .....................................................................................................................7
3.1 Control elements.................................................................................................................8
3.2 The Operator Panel ............................................................................................................8
3.3 Charging status indication...................................................................................................9
3.4 Commissioning ...................................................................................................................9
4Operation.........................................................................................................................................10
4.1 Drive operation..................................................................................................................10
4.2 Sweeping Operation .........................................................................................................11
4.2.1 Sweeping wet trash ...........................................................................................11
4.3 Shutting Down the Vacuum Sweeper...............................................................................11
4.4 Filter cleaning....................................................................................................................12
4.5 Emptying the dust box ......................................................................................................12
5Maintenance....................................................................................................................................13
5.1 Safety Information.............................................................................................................13
5.2 Cleaning............................................................................................................................13
5.3 Charging the batteries.......................................................................................................14
5.4 Changing the filter.............................................................................................................15
5.4.1 Removing the filter.............................................................................................15
5.4.2 Attaching the filter..............................................................................................16
5.5 Changing the main brooms...............................................................................................16
5.5.1 Removing the main brooms...............................................................................16
5.5.2 Assembly of the main brooms...........................................................................17
5.6 Side brooms......................................................................................................................17
5.6.1 Attaching the side brooms.................................................................................17
5.6.2 Detaching the side brooms................................................................................18
5.7 Tipper mechanism ............................................................................................................18
5.8 Maintenance Table ...........................................................................................................19
5.8.1 Maintenance daily..............................................................................................19

Table of Content
II TF130R-TRS
5.8.2 in addition, every 50 operating hours ................................................................19
5.8.3 in addition, every 100 operating hours..............................................................19
5.9 Faults, fault indications and remedies ..............................................................................20
5.10 Technical data...................................................................................................................21
5.11 Product designation ..........................................................................................................21
5.12 Disposal ............................................................................................................................21
5.13 Accessories and spare parts ............................................................................................22
5.14 Service..............................................................................................................................22
5.15 Transport...........................................................................................................................22
6EC Declaration of conformity........................................................................................................23

TF130R-TRS 3
1 Introduction
This operating manual contains instructions for using the TF130R-TRS
sweeper.
Our products are subject to continuous improvement. Therefore, design
changes that were made after this manual went to print may not be in-
corporated. If you have any questions, please contact our Service de-
partment: 0845 33 77 695.
The operating manual must be read and applied by all persons who
operate the sweeper.
Apart from the operating manual and the regulations for accident pre-
vention applicable in the country of use and the location of use, the
common, recognised rules for safe and technically correct working must
also be followed.
1.1 Usage conformant with intended purpose
The TF130R-TRS is intended exclusively for sweeping on solid surfaces
(for example: parking areas, walkways, shop floors). The area to be
swept should not be wet.
The sweeper may only be used by reliable and instructed personnel.
Prevent children, juveniles and other unauthorised persons from using
the machine (e.g. by pulling out the key after use).
Any other use, or any use over and above that, will be considered to be
non-conformant with intended purpose. The manufacturer rejects any
and all liability for damage resulting from such use. The risk is that of the
user alone.
Usage conformant with intended purpose also includes compliance with
the operating manual and the inspection and maintenance specifica-
tions. Drive the sweeper only along expressly marked routes and spac-
es.

4 TF130R-TRS
2 Safety information
1. The machine should only be used in a flawless state, as
well as in keeping with its intended purpose, in a safety-
conscious and risk-conscious manner and in compliance
with these operating instructions.
2. In addition to the operating manual, please heed general le-
gal and other binding regulations for accident prevention
and environmental protection.
3. Sweeping and picking up of flammable, toxic or explosive
substances, along with flammable gases or diluted acids
and solvents, burning or smouldering objects is prohibited!
4. The appliance is not suitable for picking up fluids, cables,
cords, wires or the like.
5. The machine should only be used with the dust box fitted to
prevent injuries caused by parts being slung out.
6. Transporting loads with the sweeper is not allowed.
7. Faults should be eliminated immediately, particularly those
that could impair safety.
8. Do not make any changes, modifications or additions to the
sweeper without the approval of the manufacturer.
9. Replacement parts must meet manufacturer specifications.
This is always ensured by using original replacement parts.
10. Ensure that operating media, auxiliary media and replace-
ment parts are disposed of in a safe and environmentally-
friendly manner, particularly batteries!
11. Suitable non-slip footwear should be worn to avoid acci-
dents.
12. If you have any questions, please contact our Service de-
partment: 0845 33 77 695
13. Persons (including children) who are not able to use this
machine safely due to their physical, sensory or mental ca-
pabilities or their inexperience or lack of knowledge may not
use this machine without the supervision or instruction by a
responsible person! Children should be supervised to en-
sure that they do not play with the appliance.
14. Caution: loose clothing can be caught and drawn in on rotat-
ing parts.
15. The operating instructions provided by the battery manufac-
turer relating to their product and legal specifications for the
handling of accumulator batteries should be heeded!

TF130R-TRS 5
16. Charge flat batteries directly after use and only in well-
ventilated rooms.
17. Keep naked flames and electrical sparks away from the
charging area, since a highly-explosive electrolytic gas mix-
ture is generated when batteries are being charged.
18. Note that the accumulator batteries are filled with battery ac-
id.
19. Batteries should always be kept clean and dry to avoid
leakage currents! Never short-circuit battery poles!
20. Smoking, eating and drinking should be avoided in the vicin-
ity of the battery charging station to avoid risks to health.
21. Batteries should only be charged with the hood opened and
secured with the holder.
22. Warning: risk of crushing. Maintain a safety clearance of 2
metres to other people during emptying through high dump-
ing.
23. Maintenance and repair work on the hydraulics and high
dumping mechanism should only be entrusted to a special-
ist firm.
24. Observe the maximum climbing capability and maximum
permissible slant specified in the technical data when driv-
ing transversely to an incline. The unit can topple over if the
steering is turned too sharply, particularly on inclines. Adjust
your driving style and speed to suit conditions.
25. The machine is not approved for use on roads or streets.

6 TF130R-TRS
2.1 Safety Devices
The vacuum sweeper only starts if:
the starting key is in the ON position (1)
the driver's seat is in a horizontal position
The side covers are correctly closed.
the EMERGENCY STOP button has not been pressed
all the loads are switched off
The direction of movement switch is at Neutral.
The power supply to the engine is interrupted when:
the driver's seat is unfolded to an upright position
the side cover is opened
the key switch is turned to OFF (0)
The EMERGENCY STOP button is pressed.
Yellow rotating warning beacon on the highest point of the machine.
If the direction of movement is set to reverse movement, an acous-
tic signal is sounded.
If the gas pedal is pressed during the starting process, the electrical
supply to the drive engine is interrupted.

TF130R-TRS 7
3 Description of the unit
The vacuum sweeper is driven by an electric engine.
The sweeping process is carried out by two side brooms, which move
the sweepings to the two main brooms that are mounted at a 90-degree
angle to the direction of movement.
These main brooms throw the sweepings into the rear dust box.
The dust that is collected by the main brooms is held by the dust suction
system in a lamellar filter.
The lamellar filter can be cleaned by means of a filter cleaning mecha-
nism.
1
Front wheel
6
Dust box
2
Rear wheel
7
Fuse box
3
Side broom
8
Battery box with charging plug
4
Cover for the main brooms
9
opened side cover
5
Tipper mechanism
8 TF130R-TRS
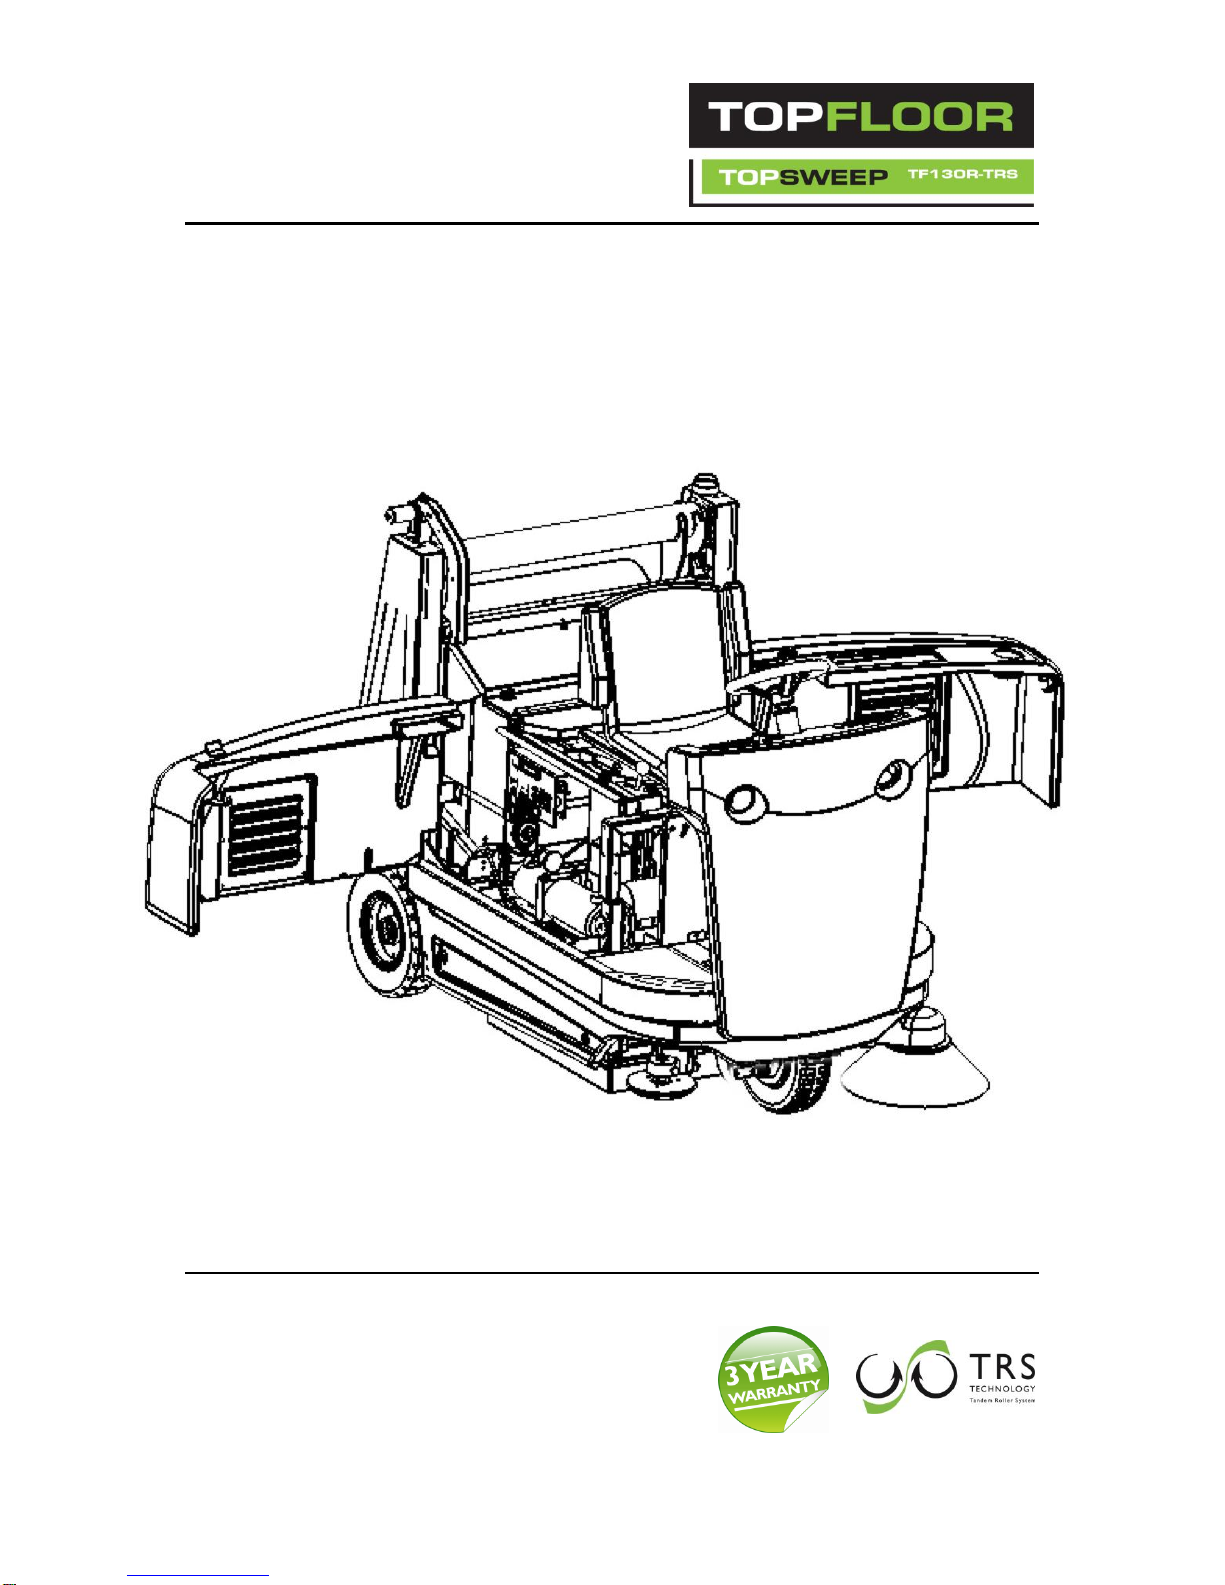
3.1 Control elements
1 Steering wheel
6 Brake pedal
2 Operator panel
7 Lowering lever, main brooms
3 Lowering lever, right side broom
8 EMERGENCY STOP
4 Lowering lever, left side broom
9 Parking brake
5 Accelerator pedal
3.2 The Operator Panel
1
Switch, right side broom
7
Switch, suction and filter
cleaning
2
Rocker for forward/reverse
movement
8
Switch for the headlamps
(optional)
3
Switch for swivelling the dust
container
9
Charging status indication
with operating hours counter
4
Switch for lowering and rais-
ing the dust container
10
Key switch
5
Switch, left side broom
11
Speed control, side broom
(optional)
6
Switch, main brooms
12
Horn

TF130R-TRS 9
3.3 Charging status indication
Meaning of the indications:
3.4 Commissioning
Ensure that the machine was supplied complete and free of faults.
If that is not the case, please contact the concerned dealer or our
service department.
Open the transportation packing and move the machine carefully off
the pallet. Please use suitable aids.
Unfold the seat laterally and fix it.
Open the side cover.
Fix the side broom arms in the highest position and then fix the side
brooms. (also see: Fixing the side brooms)
Connect the plus pole of the battery.
Close the side cover.
Fold the seat back into the original position.
The vacuum sweeper machine is ready for use.
charging condition of batterylit LED
Red
Yellow
Green
Green
Green
condition fully charged
operating/charging condition uncritical
operating/only for a short time longer
operating/soon critical
operating/critical

10 TF130R-TRS
4 Operation
4.1 Drive operation
To start the engine:
•Set all loads to OFF.
•Operate the brake pedal or put on the parking brake.
•Insert the key in the key switch and turn it clockwise till the engine
starts.
Do not step on the accelerator while doing so.
The forward or reverse movement of the machine is pre-selected with a
switch on the operator panel.
•Set the switch to the required direction of travel.
•Release the brake.
•Use the accelerator pedal to start movement.
The machine moves in the selected direction of travel.
Caution!
If you wish to change the direction of travel, you must first press the
brake pedal or set the parking brake to prevent the machine from mov-
ing.
Operate the switch for direction of movement only when the machine is
at standstill.
To stop the engine:
•Rotate the key anti-clockwise till the engine goes off.
•Operate the parking brake.
•Pull out the key.

TF130R-TRS 11
4.2 Sweeping Operation
•Start the movement.
The main brooms and the individual side brooms can be switched ON
and OFF individually.
You can start operation of the side brooms and rollers by actuating the
corresponding switch.
Height adjustment
•The height of the side brooms is adjusted by means of levers on the
steering column. Each of the side brooms can be made operational
separately.
•The height of the main brooms is adjusted by means of a lever on
the right next to the operator seat. To lower the main brooms, the
lever must be disengaged.
4.2.1 Sweeping wet trash
Caution!
When sweeping wet trash, it is recommended that the fan should not be
switched on, to avoid damage and blocking of the filter.
The fan can be put on or turned off by using a switch.
4.3 Shutting Down the Vacuum Sweeper
Drive the machine to an area provided for (assigned to) it.
Turn the key anti-clockwise to switch off the engine and pull out the
key.
Pull the hand brake.
Set the side brooms and the main brooms in the top position.
Caution!
If the sweeping brushes are not put in the top position, the bristles are
constantly under load at the state of rest and therefore get worn prema-
turely during use.
Thoroughly empty the dust box upon completion of the sweeping.

12 TF130R-TRS
4.4 Filter cleaning
Switch off the fan and let it come to a stop.
Ensure that the dust filter has been attached.
Press the button for cleaning the filter for approx 30 seconds
After the filter cleaning, you should wait for a couple of seconds for the
fine dust to settle.
4.5 Emptying the dust box
In order not to reduce the sweeping capacity, the dust box must be
emptied at regular intervals.
Switch off the side broom and main brooms.
Set the side brooms and the main brooms in the top position.
Ensure that the dust box is not swung.
Move back to a suitable container or unloading station.
By pressing the switch for raising/lowering, move the dust con-
tainer upwards till it has reached the required height for empty-
ing (limit switch).
Operate the switch for swinging the dust box for emptying.
Swinging is only possible from a minimum height of 1 m.
Swing back the dust box by pressing the corresponding switch
on the operator panel.
Operate the switch for lowering the dust box to move the dust
box back into the machine. Lowering is only possible with the
dust box swung back into the starting position.
Danger
When emptying the dust box, pay attention to keeping a sufficient safe
distance to other persons.
When operating the lifting hydraulics and during emptying of the dust
box, all persons must keep a distance of approx. 2 m from the machine.

TF130R-TRS 13
5 Maintenance
5.1 Safety Information
Only complete the type of maintenance work described in the following
chapter. All other maintenance and upkeep work may only be carried
out by the manufacturer or by companies and persons authorised by the
manufacturer, who are familiar with the relevant safety specifications,
because portable devices in industrial use are subject to the safety test
according to VDE 0701.
Closely follow the steps listed in the maintenance instructions. The im-
proper completion of maintenance tasks may result in malfunctions
when using the sweeper and may possibly render the warranty granted
null and void.
When working on the electrical system, the battery should be discon-
nected.
Maintenance work/ troubleshooting at the electric motor must not be
done while the electric motor is running.
Use only flawless and appropriate tools to complete maintenance work.
Note the requirements for spare parts.
If covers and/or safety devices were removed during maintenance
work/repairs, they will have to be reattached prior to starting the sweep-
er.
For carrying out any work on the sweeper, it must be switched off and
secured from rolling away by accident.
5.2 Cleaning
The suction sweeper may only be cleaned in the off state, when it is dry.
The suction sweeper is a machine with electrical components.
Note: Moisture damages the electronics of the device. Moisture
can result in leakage currents and short-circuits!
Do not use any high-pressure cleaners

14 TF130R-TRS
5.3 Charging the batteries
Switch off the vacuum sweeper.
To do so, unfold the driver's seat laterally and fix it.
Connect the charger to the charging socket 1 of the vacuum
sweeper.
Connect the mains plug of the charger to the mains supply.
Note
If the battery is fully discharged, the charging process takes about 10
hours (with the original charger accessory from the manufacturer).
Operate the vacuum sweeper only if there is sufficient voltage at the
batteries. The machine switches off automatically when the batteries are
discharged to such an extent that they could get damaged.
In such a case, switch off all loads for about 2 minutes.
Next, drive to the charging station only in driving mode and immediately
charge the batteries.
TF130R-TRS 15
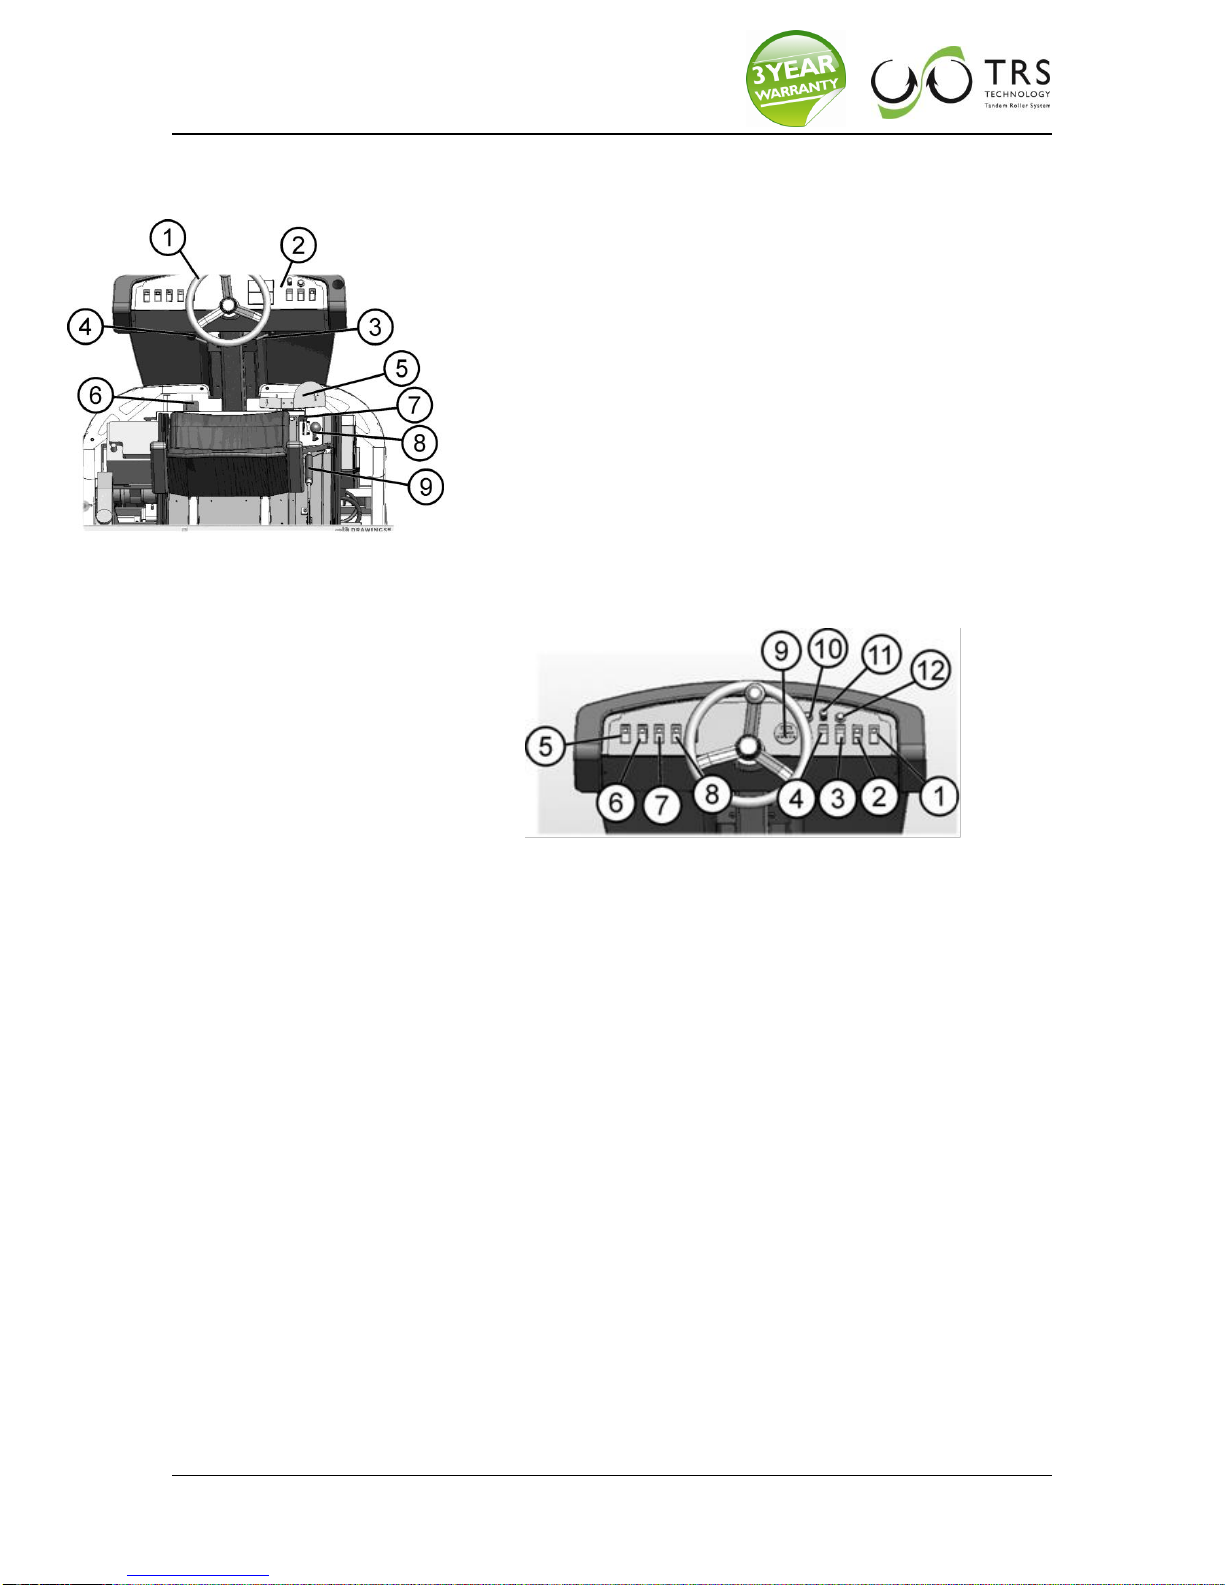
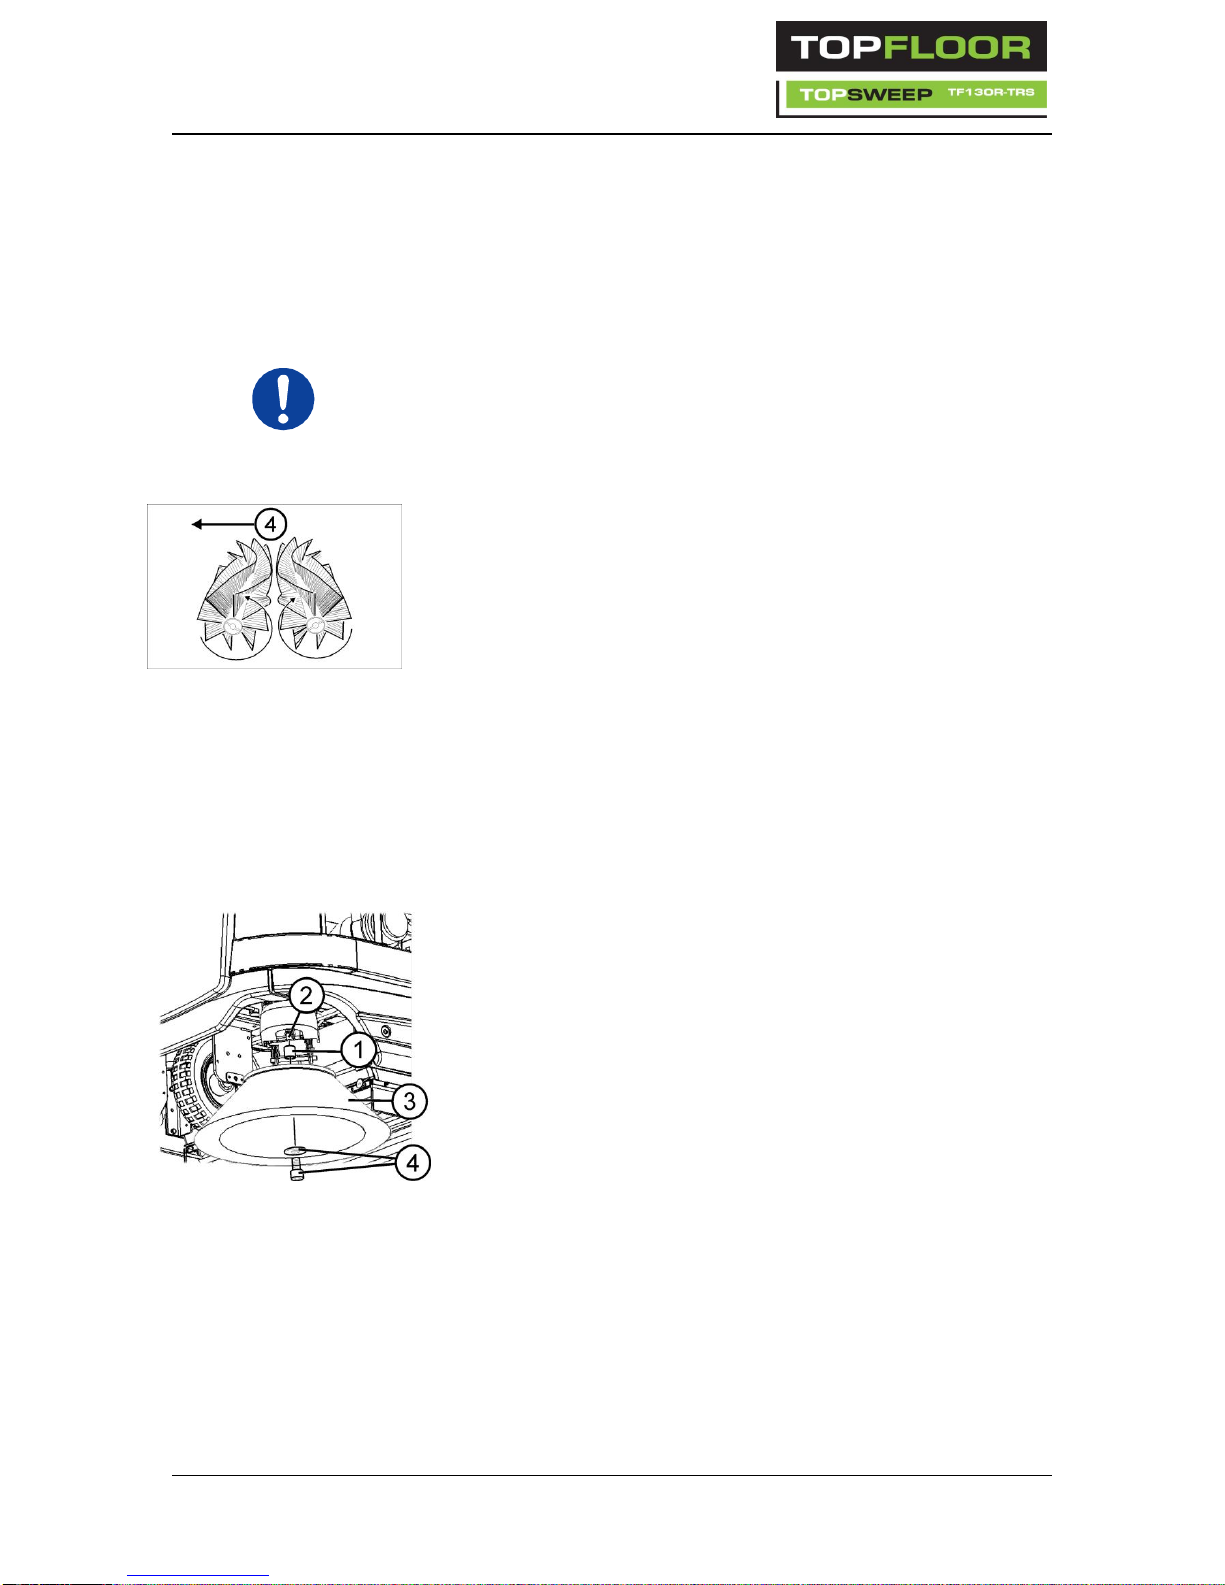
5.4 Changing the filter
5.4.1 Removing the filter
Open the caps 1and lift the filter cover 2.
Thread the hook through the eyelet 3.
Lift the filter cleaning mechanism 4.
Remove the old filter 5.
5.4.2 Attaching the filter
Place the filter 5in the frame.
Lower the filter cleaning mechanism 4.
Loosen the hook from the eyelet 3.
Close the filter cover 2.
Close the caps 1.
16 TF130R-TRS
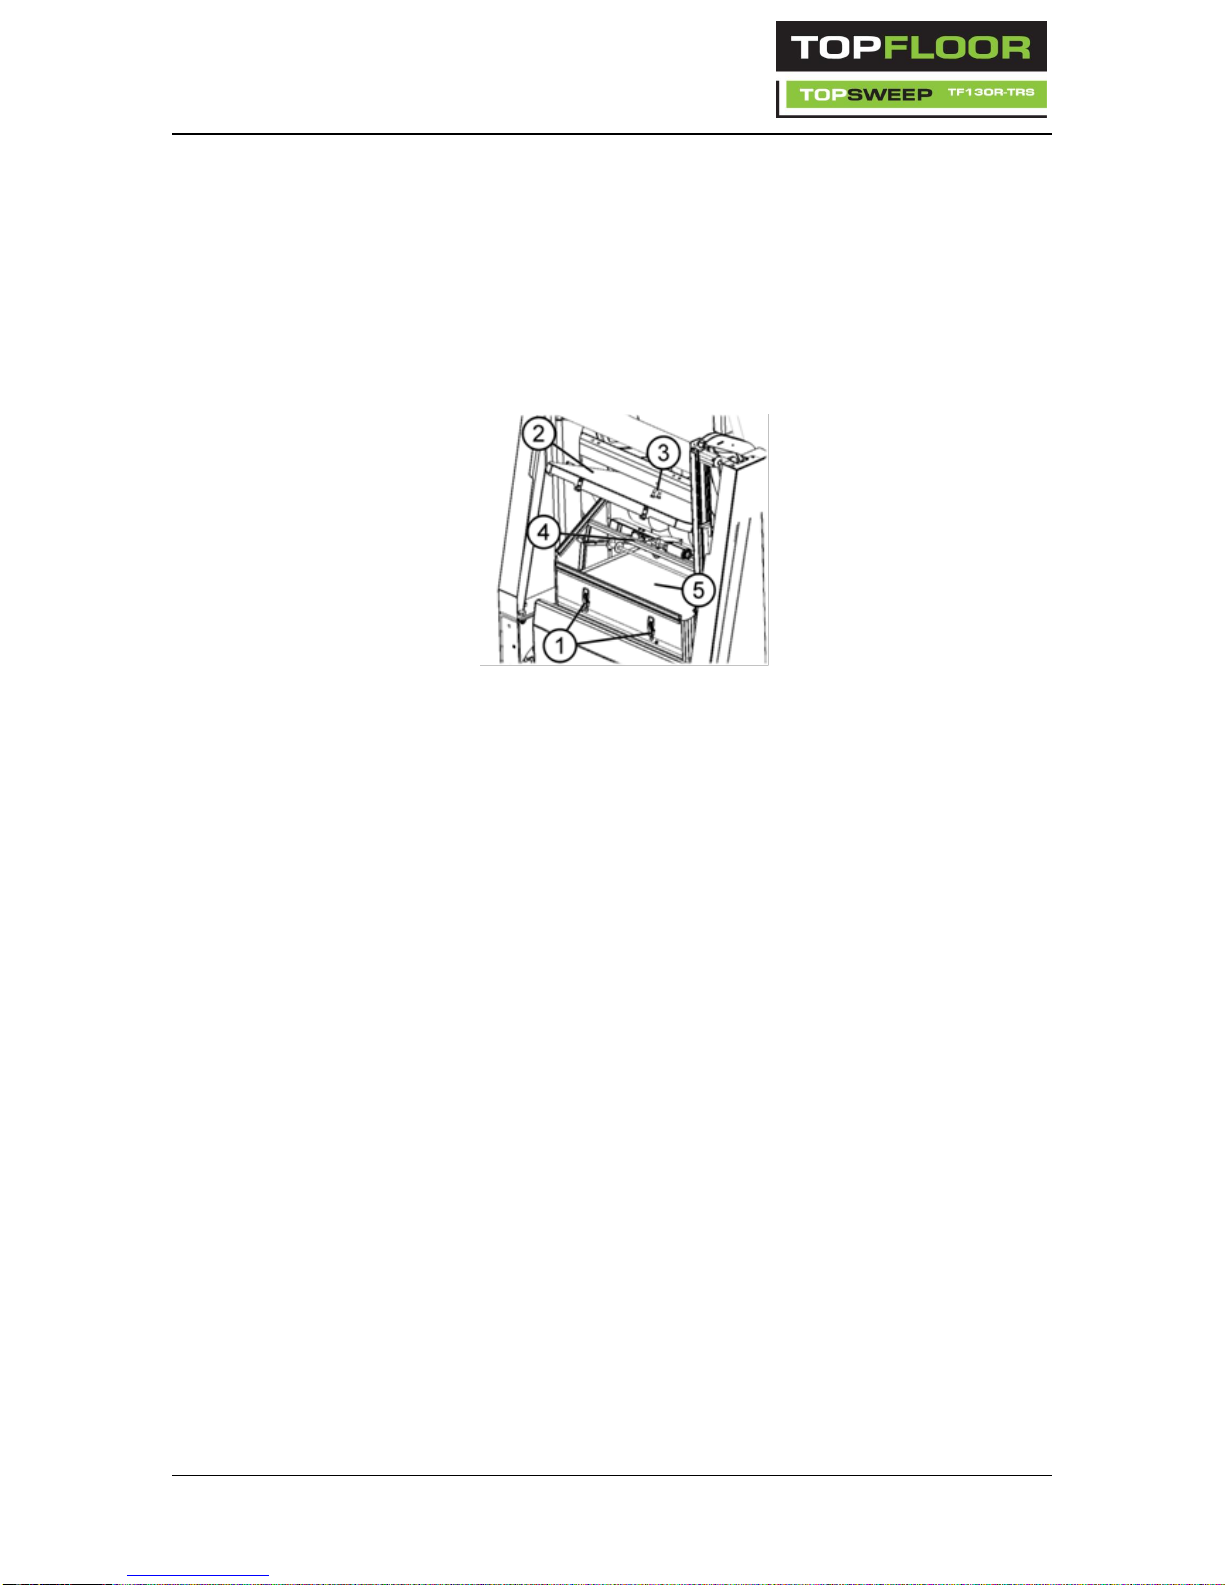
5.5 Changing the main brooms
Switch off the machine and pull out the ignition key.
Apply the hand brake
5.5.1 Removing the main brooms
To take off the main brooms, follow the instructions below:
Open the lower left side panelling as viewed in the direction of
travel.
Loosen the three star knobs 1.
Lower the main brooms.
Open the swinging plate 2and remove the cover plate 3.
Loosen the roller height adjusting device.
The rollers can be pulled out to the side.
Remove any sweepings present in the roller box.
TF130R-TRS 17
5.5.2 Assembly of the main brooms
To assemble the main brooms, follow the instructions below:
Push the new roller from the side into the roller box.
Attention!
Pay attention to the direction of rotation 4of
the main brooms.
Ensure that the roller fits correctly on the
roller carrier.
Put on the cover plate again and close the
swinging plate.
Join the swinging plate with the roller height adjusting device.
Fix the swinging plate and cover plate with the 3 star knobs.
Close and lock the side panelling.
Correct the roller height
5.6 Side broom
Switch off the machine and pull out the ignition key.
Apply the hand brake.
5.6.1 Attaching the side broom
Push the sleeve 1onto the engine axis 2.
Hold the side broom 3 below the side broom arm and rotate the side
broom in such a way that the groove and the key are in alignment
Press the side broom upwards and fix it with the washer and the
screw 4.

18 TF130R-TRS
5.6.2 Detaching the side brooms
Loosen screw 4below the side broom and remove the broom from
its mounting.
5.7 Tipper mechanism
Danger
When working with the tipper, the dust box with the tipping arms must
be secured against sudden loss of pressure in the hydraulic system
(e.g. cracking of a pipe).
Therefore, do the following:
Move the tipper completely to the top.
Pull the spring pin at the assembly securing angle.
Remove the bolts between the assembly securing angle and the
lifting arm.
Move the assembly securing arm downwards till it is parallel to the
cylinder.
Secure the assembly securing angle again with the bolts and spring
pin.
Attention!
The tipper system may not be moved in this state.
Table of contents
Other Topfloor Blower manuals


Popular Blower manuals by other brands


Homelite
Homelite UT08947 Operator's manual

Toro
Toro Groundsmaster 5900 Series installation instructions

Coopers of Stortford
Coopers of Stortford F916 Instructions for use

Southland
Southland Walk Behind Blower Operator's manual

Echo
Echo PB-2400 Operator's manual

Craftsman
Craftsman 358.794650 Operator's manual