TOPPOINT LT91176 User manual
LT91176 360° Action Cam
NL
Afbeelding apparaat
Lees deze gebruiksaanwijzing zorgvuldig door voor het gebruik van de 360 graden actiecamera.
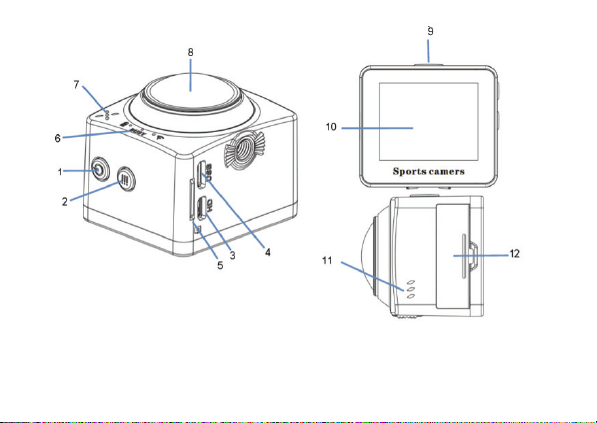
1. Power toets/Menu toets
2. Omlaag toets/WIFI toets
3. Micro HDMI Poort
4. Micro USB Poort
5. MicroSD Card uitsparing
6. Power indicatielampje (blauw)
Oplaad indicatielampje (rood)
WIFI indicatielampje (geel)
7. Geluid
8. Led
9. Sluiter toets
10. LCD
11. Speaker
12. Batterijklep
Beeldsensor: 8.0 mega-pixel CMOS beeldsensor
Functieselectie: Opnemen, foto, afspelen
LCD scherm: 1.5’’ HD LCD scherm
Afbeelding resolutie: M (1728 x 1728), 5M (2240×2240), 8M (2816 x 2832), 12M (3472 x 3472)
Video resolutie: 1920*1080P 30FPS,1920*960 30FPS,1280*960 30FPS,2048*416FPS 30FPS
Opslag medium: TF kaart (Maximum ondersteuning 32GB)
Bestandsformaat: JPEG, MP4(H.264)
Besturingstand: 3 sec./5 sec./10 sec.
USB poort: USB 2.0/3.0
Batterij voorziening: Extern 3.8V oplaadbare lithium batterij
Menu taal: Engels
Aan/ uit/ opslaan: 1 min. / 3 min./5 min./ OFF
Benodigde besturingssysteem: Windows XP/Vista/7/8, Mac 10.8
Afmetingen: 61x41x30mm
Aan de slag:
1. Batterij
Batterij opladen: Sluit de camera op de computer aan. Het oplaad
indicatielampje geeft aan dat de batterij oplaadt en sluit af wanneer
de batterij volledig is opgeladen. De batterij kan in 4 uur compleet
opgeladen zijn.
Verwijder de batterij: Zet je duim op het uitsteeksel van de
batterijklep
totdat de klep eruit springt. Trek aan het lipje en verwijder
de batterij van de camera.
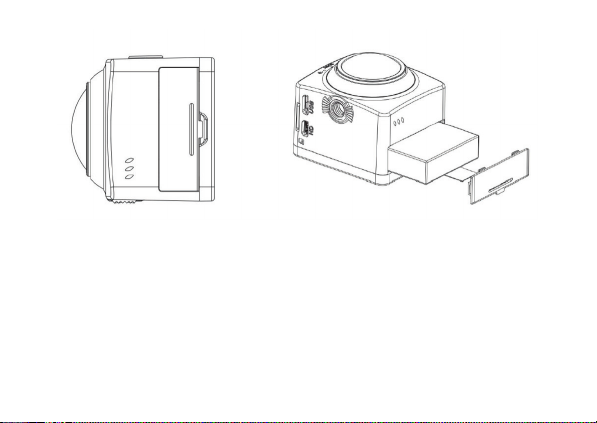
2. Geheugenkaart
Geheugenkaart plaatsen: Plaats de TF kaart juist in de kaarthouder zoals aangegeven naast de kaarthouder.
Geheugenkaart verwijderen: Verwijder de TF kaart door voorzichtig op achterkant van de geheugenkaart te drukken, de
kaart wordt uitgeworpen.
Let op: De camera is niet voorzien van een interne geheugenkaart. Plaats een geheugenkaart voor gebruik. De
geheugenkaart dient eerst te worden geformatteerd voordat de camera in gebruik wordt genomen.
3. Opstarten en afsluiten
Opstarten: druk 3 seconden op de POWER toets, de camera geeft een opstartscherm weer en de POWER ON wordt in
werking gesteld;
Afsluiten: druk 3 seconden op de POWER toets wanneer de camera in neutrale modus is om af te sluiten.;
Automatisch afsluiten: de camera zal automatisch afsluiten wanneer de camera voor een bepaalde tijd in de neutrale
modus staat om energie te besparen. De standaardtijd voor automatisch afsluiten is 5 minuten.
Afsluiten bij lage batterij: wanneer de batterij bijna leeg is, zal dit op het LCD scherm een lege batterij te zien zijn. Laad de
batterij op tijd op. Wanneer het scherm ‘’lage batterij’’ weergeeft, zal de camera automatisch afsluiten.

4. Indicators
Bezig indicator: Als de camera bezig is (bv. Opnemen, foto’s maken etc.), zal de indicator oplichten.
Oplaadindicator: Wanneer de camera is afgesloten, betekent het indicatorlampje dat de camera aan het opladen is.
WIFI indicator: Wanneer u WIFI aan zet, zal de WIFI indicator aan staan.
5. Opnemen/foto/afspeelmodus
De camera heeft 3 standen: opnemen stand, foto stand en afspeel stand. Druk op de sluiter toets wanneer het apparaat is
opgestart, om tussen de standen te wisselen.
Schermweergave in opnamestand: Nadat de power op aan staat, zal de camera meteen op de videostand staan. Druk
kort op de sluiter toets om een opname te starten; druk de sluiter toets weer kort in om de opname te stoppen.
Voor wijzigingen in de video opname stand instellingen, volg onderstaande instructies:
Druk kort op de power toets om naar de video stand instellingen te gaan. Druk kort op de omlaag toets om het volgende
icoontje te selecteren. Druk kort op de sluiter toets om dit te bevestigen en druk op de power toets om terug te gaan of
de menustand te verlaten.
Video stand: Fish eye/panorama180/panorama360/4-in-1/3-in-1/2-in-1/YouTube 360 stand/Afsluiten
Opname videoloop: UIT/1min/3min/5min/Afsluiten
Ingestelde tijd: UIT/1S/2S/5S/10S/30S/60S/Afsluiten
Groot dynamisch bereik: UIT/AAN/Afsluiten
Bewegingsdetectie: UIT/AAN/Afsluiten
Tijdsaanduiding: UIT/AAN/Afsluiten
Microfoon: UIT/AAN/Afsluiten

Schermweergave in fotostand:
Nadat de power op aan staat, zal de camera meteen op de videostand staan. Druk kort op de sluiter toets om de fotostand
te selecteren en druk kort op de sluiter toets om een foto te maken.
Om wijzigingen in de fotostand instellingen te maken, volg de instructies hieronder:
Druk op de power toets om naar de fotostand instellingen te gaan, druk kort op de omlaag toets om de volgende
te selecteren. Druk kort op de sluiter toets om te bevestigen en druk op de power toets om terug te gaan of om de
menustand te verlaten.
Momentopnamestand: Fish eye/panorama180/panorama360/4-in-1/3-in-1/2-in-1/Afsluiten
Resolutie: 12M/8M/5M/3M/Afsluiten
Foto kwaliteit: Uitmuntend/Goed/Normaal/Afsluiten
EV waarde:-2/-1.7/-1.3/-1/-0.7/-0.3/0/0.3/0.7/1/1.3/1.7/2/Afsluiten
Zelfontspanner: UIT/3 seconden/5 seconden/10 seconden/Afsluiten
Foto continu: UIT/3 afbeeldingen/ 5 afbeeldingen/ 10 afbeeldingen/Afsluiten
Tijdsaanduiding: UIT/AAN /Afsluiten
Schermweergave in afspeelstand
Nadat de power op aan staat, zal de camera meteen op de videostand staan. Druk kort op de sluiter toets om naar de
afspeelstand te gaan. Druk op de sluiter toets om het afspelen van de video te starten/ pauzeren, druk op de omlaag toets
om de volgende video te selecteren. In het menu kunt u de folder selecteren om een videobestand te selecteren.

Om wijzigingen in de afspeelstand instellingen te maken, druk kort op de power toets om naar de afspeelstand instellingen
te gaan en druk kort op de omlaag toets om het volgende icoontje te selecteren. Druk kort op de sluiter toets om te
bevestigen en druk op de power toets om terug te gaan of om de menustand te verlaten.
Folder Selecteren: Normaal/Momentopname/Beweging/Afsluiten
Verwijder Bestand: Normaal/ Momentopname/Beweging/Afsluiten
Verwijder Folder: Normaal/ Momentopname/Beweging/Afsluiten
6. Systeem stand menu-instelling
Nadat het menu is geopend door op de power toets te drukken, druk op de power toets om naar het hoofdmenu te gaan, druk
op de omlaag toets om een icoon te selecteren en druk op de sluiter toets om het te bevestigen. U komt nu in het submenu. In
het submenu, drukt u op de omlaag toets om een icoon te selecteren en druk op de sluiter toets om het te bevestigen. Nadat u
in het hoofdmenu bent teruggekeerd, druk op de power toets om het menu te verlaten.
Datum & Tijd: datum en tijd van de camera instellen.
Power Opslaan: Selecteer UIT/1 min/3 min/5 min/Aflsluiten. Om batterij te besparen, zal de camera afsluiten als
er binnen de geselecteerde tijd geen toetsen worden ingedrukt.
Geluid toets: UIT/AAN/Afsluiten.
Scherminstellingen: Scherm Opslaan (UIT/ 1 min/3 min/5 min), Draai het scherm (UIT/AAN).
Licht Frequentie: 50Hz/60Hz/Afsluiten.
Formaat: Verwijder alle gegevens van de SD kaart.
Standaard instellingen: Reset de instellingen van de camera naar de standaard fabrieksinstellingen.
Systeem Informatie: Over de FW versie/ Totale ruimte SD kaart/ Beschikbare ruimte SD kaart

7. Verbinden met HDTV
Als u een afbeelding en geluid op een HDTV wilt afspelen, plaats dan het kleine uiteinde van de HDMI kabel in de 360
graden camera en de andere kant van de kabel (uitgang) aan de HD ingang van de HDTV zoals weergegeven in de
onderstaande figuur.
Let op: Voordat u de HDMI kabel aansluit of verwijdert,
zorg er eerst voor dat de video opname is gestopt en Wi-Fi niet is verbonden.
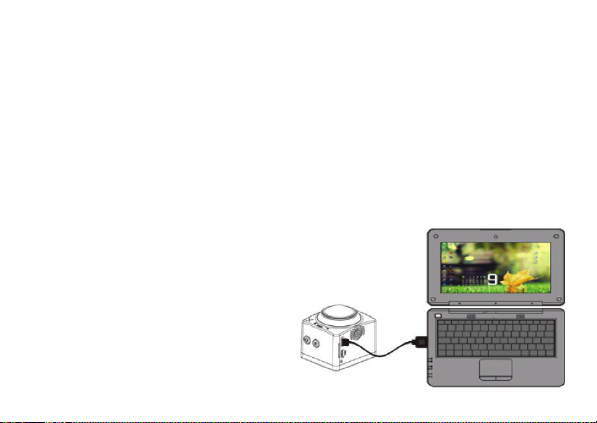
8. Aansluiten aan de PC
Wanneer de camera aan de computer wordt aangesloten zal de verwijderbare schijf modus meteen geopend worden.
Een verwijderbare schijf wordt toegevoegd in ‘’Mijn computer’’. De video’s zullen worden opgeslagen in de hoofdmap van
de SD kaart. De foto’s van de fotostand zullen worden opgeslagen in de momentopname map.
Let op: Verbreek de USB verbinding tijdens het downloaden niet en haal ook niet de geheugenkaart eruit om het
verlies van gegevens te vermijden.
9. Snelstart handleiding
Waterdichte behuizing editie
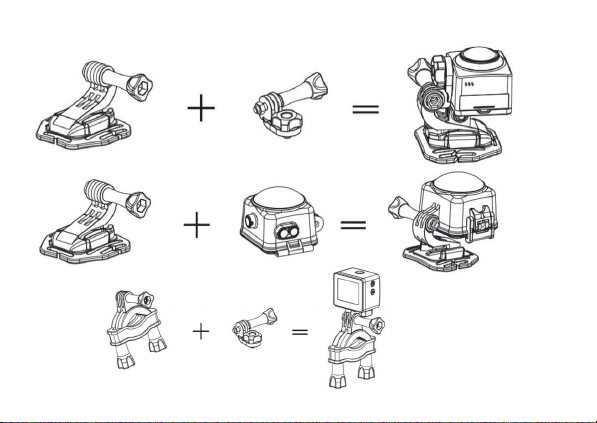
MOTO/Fiets sport editie
Helmet Editie
MOTO/Fiets sport editie

10. APP (Ondersteund Android en IOS)
De APP installeren: Zoek in Google Play (for Android OS) naar ‘’OTCam’’ om de APP te vinden en installeer het volgens de
instructie.Zoek in de APP Store (for iOS) naar ‘’OTCam’’ om de APP te vinden en installeer het volgens de instructie.
- Installeer de ‘’OTCam’’ APP (verstrekt door een dealer of via internet) op uw smartphone of tablet en start de applicatie.
- Plaats de TF kaart en doe de 360 graden camera aan. Wanneer u Wi-Fi wilt activeren, druk dan 3 seconden op de
omlaag toets, het LCD scherm en het Wi-Fi indicatielampje zullen knipperen. Na ± 3 seconden zal het Wi-FI icoontje
op het scherm verschijnen.
- Voor Wi-Fi op uw smartphone of tablet, zoek voor het draadloze AP signaal ‘’OT6166’’ en verbind dit vervolgens
met de 360 graden camera. Nadat het succesvol is verbonden, druk lang op de omlaag toets om Wi-Fi af te sluiten.
Let op: Wanneer u het voor de eerste keer met de 360 graden camera verbindt, dient u dit wachtwoord in te toetsen:
‘’ 87654321”.
- Open de APP op uw smartphone of tablet. U ziet nu een voorbeeld op uw smartphone of tablet, verzonden door
de 360 graden camera en het is klaar voor gebruik. De bedieningsinterface van het apparaat is weergegeven op de
onderstaande figuren (links IOS, rechts Android).
1. Camera voorbeeld
2. TF kaart bestand
3. Download bestand
4. Batterij icoon
5. Sluiter toets
6. Camera mode (video mode)
Let op: TP is niet verantwoordelijk voor schade veroorzaakt door foutief gebruik van producten of
onoplettendheid.

LT91176 360° Action Cam
Image of product
Read these instructions carefully before using the 360° camera
EN
1. Camera voorbeeld
2. TF kaart bestand
3. Download bestand
4. Batterij icoon
5. Sluiter toets
6. Camera mode (video mode)

1. Power key/Menu key
2. Down key/WIFI key
3. Micro HDMI Port
4. Micro USB Port
5. MicroSD Card Slot
6. Power indicator light (blue)
Charge indicator light (red)
WIFI indicator light (yellow)
7. Audio
8. LED
9. Shutter key
10. LCD
11. Speaker
12. Battery cover

Image sensor: 8.0 mega-pixel CMOS image sensor
Function mode: Recording, ,photo, playback
LCD screen: 1.5’’ HD LCD Screen
Picture resolution: M (1728 x 1728), 5M (2240×2240), 8M (2816 x 2832), 12M (3472 x 3472)
Video resolution: 1920*1080P 30FPS,1920*960 30FPS,1280*960 30FPS,2048*416FPS 30FPS
Storage medium: TF card (Maximum supporting 32GB)
File format: JPEG, MP4(H.264)
Driver Mode: 3 sec./5 sec./10 sec.
USB port: USB 2.0/3.0
Power supply: External 3.8V rechargeable lithium battery
Menu language: English
Power Save: 1 min. / 3 min./5 min./ OFF
Operating system requirement: Windows XP/Vista/7/8, Mac 10.8
Dimensions: 61x41x30mm
Getting started:
1.Battery
Charging the battery: Connect the camera to the computer. The
charging indicator will indicate that it is charging and will shut o
when the battery is fully charged. The battery can be fully charged
within 4 hours
Remove the battery: place your thumb on little extension
Allow the door to pop out. You are now able to pull-tab and
remove the battery from the camera.

2. Memory card
Insert memory card: Insert the SD card correctly into the card holder as indicated near the card holder.
Remove memory card: Remove the SD card by pressing gently on the end of the memory card, the card will be ejected
Note: The camera is not equipped with built-in memory. Please insert a pre-formatted memory card before use.
3. Start-up and shutdown
Start-up: Press & Hold the POWER key for 3 seconds, the camera will show a start-up screen and will POWER ON
Shut down: Press & Hold the POWER key for 3 seconds when the camera is in neutral mode to shut it down;
Auto shut down: The camera will be shut down automatically when the camera is in neutral mode for a certain time to
save power. The default time for auto shut down is 5 min
Shut down with low power: When the battery power is low, the LCD will show an empty battery. Please charge the
battery. When the Screen displays “low battery”, the camera will shut down automatically.

4. Indicators
BUSY indicator: When the camera is working (e.g. recording, photographing, etc.), the indicator will light up
Charging indicator: In shutdown status, the light indicator means the camera is charging
WIFI indicator:When you turn on the WIFI, the WIFI indicator will be on.
5. Recording/photo/playback mode
The camera has 3 modes: recording mode, photo mode and playback mode. Hold the Shutter key to switch within the
modes after starting up.
Screen display in recording mode: After the power is on, the video camera will enter video recording mode directly,
short-press the shutter key to start video recording; short-press it again to stop recording.
To make changes to the video mode settings, follow the instructions below: Press the power key to go the video mode
settings. Please press the down key to select the next icon. Press the shutter key to confirm and press the power key to
return or exit from the menu mode.
Video mode: Fish eye / Panorama 180 / Panorama 360 / 4-in-1 / 3-in-1 / 2-in-1 / YouTube 360 Mode / Exit
Loop Recording: OFF / 1 min / 3 min / 5 min / Exit
Time lapse: OFF / 1S / 2S / 5S / 10S / 30S / 60S / Exit
Wide Dynamic Range: OFF / ON / Exit
Motion detection: OFF / ON / Exit
Time Stamp: OFF / ON / Exit
Microphone: OFF / ON / Exit

Screen display in photo mode
After the power is on, the video camera will enter video recording mode directly. hold the shutter key for a short time to
enter photo mode and press the shutter key to take a photo.
To make changes to the photo mode settings, follow the instructions below: Press the power key to go to the photo
mode settings, please press the down key to select the next one. Press the shutter key to confirm and press the power key
to return or exit from the menu mode.
Snapshot Mode: round mode / panorama 180 / panorama 360 / 4-in-1 / 3-in-1 / 2-in-1 / Exit
Resolution: 12M / 8M / 5M / 3M / Exit
Picture quality: Excellent / Good / Normal / Exit
EV value: -2 / -1.7 / -1.3 / -1 / -0.7 / -0.3 / 0 / 0.3 / 0.7 / 1 / 1.3 / 1.7 / 2 / Exit
Timer: OFF / 3 seconds / 5 seconds / 10 seconds / Exit
Photo Burst: OFF / 3 images / 5 images / 10 images / Exit
Time Stamp: OFF / ON / Exit
Screen display in playback mode
After the power is on, the video camera will enter video recording mode directly. Press down the shutter key for a short
time to go to playback mode. You can press the shutter key to start/pause play video, press the down key to select the
next video file. You can enter folder select in the menu to select a video file.

To make changes to the playback mode settings, press the power key to go to the playback mode settings and please
press the down key to select the next icon. Press the shutter key to confirm and press the power key to return or exit from
the menu mode.
Folder Select: Normal / Snapshot / Motion / Exit
Delete File: Normal / Snapshot / Motion / Exit
Delete Folder: Normal / Snapshot / Motion / Exit
6. System mode menu setting
After opening the menu by pressing the power key, press the power key to switch to the main menu, press the down key to
select a tile, and press the shutter key for confirmation. You now enter the submenu. In the submenu, press the down key to
select a tile, and press shutter to confirm. After returning to the main menu, press the Power key to exit from the menu.
Date & Time: setting the date & time of the camera
Power Save: Select OFF/1 min/3 min/5 min/Exit To conserve battery power, the camera will shut down if no keys
are pressed within the selected time.
Key sound: OFF/ON/Exit
Screen Settings: Screen Save (OFF/1 min/3 min/5 min), Rotate The Screen (OFF/ON),
Light Frequency: 50Hz/60Hz/Exit
Format: Erase all data on the SD Card
Default Setting: Reset settings of the camera to factory default
System Information: About FW Version/SD Card Total/ SD Card Avail

7. Connecting to HDTV
If you need to transfer image and audio to an HDTV for playback, insert the small end of the HDMI
cable to the 360 DEGREE CAM, and the other end (output) to the HD input of the HDTV, as shown in the following figure:
Note: Before connecting or removing the HDMI cable, please stop
recording and disconnect Wi-Fi first.
8. Connect to PC
When the camera is connected with the computer it enters directly to removable disk mode. A removable disk will be
added in “My computer”. The videos will be saved to the root directory of SD card. The photos of the photo mode will be
saved to the snapshots file.
Note: During downloading do not disconnect USB connection, and do not remove the memory card to avoid loss of
data.
9. Quick User Guide
Waterproof case edition

MOTO/Bike sport edition
Helmet Edition
MOTO/Bike sport edition

10. APP (Supports Android and ISO)
How to install the APP: Search for “OTCam” in Google Play (for Android OS) to find the APP and install it following the
instructions.Search for “OTCam” in the APP Store (for iOS) to find the APP and install it according to the instruction
- Install “OTCam” APP (provided by a dealer or via internet) on your smartphone or tablet and start the application.
- Insert the SD card and turn on the 360 DEGREE CAM, When you want to turn on the Wi-Fi, you can press & hold for 3
seconds, the LCD display and the Wi-Fi indicator will flash. About 3 seconds later, the LCD will show a Wi-Fi icon.
- Enable Wi-Fi on your smartphone or tablet and search for wireless AP signal “OT6166”, then connect it to the 360
DEGREE CAM, After it is successfully connected, you press & hold the key to turn o the Wi-Fi. Note:
The first time connecting to the 360 DEGREE CAM, you need to enter password “87654321”.
- Open the app on your smartphone or tablet. Now you can see a preview sent by the 360 DEGREE CAM on the phone
or tablet and start some operating. The operation interface on terminal is shown in the following figures (left IOS, right
Android).
1. Camera preview
2. SD card file
3. Download file
4. Battery icon
5. Shutter button
6. Camera mode (video mode)
Note: TP is not responsible for damage caused by improper use of products or inattention.
Table of contents
Languages:


