TopXGun 3WWDZ-25.1 User manual
3WWDZ-25.1
Agriculture drone
User Manual V1.0
TopXGun (Nanjng) Robotic Ltd,.Co
2020.11

Usage Reccomendation
TopXGun provides user with the following documents:
1. "Packing List"
2. "Quick Start Guide of Plant Protection UAV TG26"
3. "User Manual of Plant Protection UAV TG26"
4. "Usage Guidelines of Agriculture Assistant APP"
Users are advised to use the packing list for item verification. Refer to "Quick Start Guide for
Plant Protection UAV TG26" to understand its operation. For detailed usage and functions, please
refer to "User Manual of Plant Protection UAV TG26" and "Usage Guidelines of Agriculture
Assistant APP".

User Manual of Plant Protection
UAV 3WWDZ-25.1
Quick Start Guide for Plant
Protection UAV TG26
Usage Guidelines of Agriculture
Assistant APP
Agriculture Assistant APP

©2020 TopXGun (Nanjing) Robotic Ltd,.Co Copyright owner 1
Preface
The plant protection UAV 3WWDZ-25.1is a mature multi-rotor aircraft, leading the industry in
terms of function, appearance, control, safety and other aspects. There are certain usage
risks of multi-rotor drone due to the mechanism and structure. Please strictly follow the
safety tips and user manual during the operation. Violation of regulations when using this
drone may result in direct or indirect loss and damage.
Disclaimer
Please read the manual carefully before using the aircraft. Once the drone is used, it is
deemed to be an acknowledgement and acceptance of all the content of this user manual.
This drone is suitable for people with 18 years of age and older. TopXGun is not
responsible for the loss of personal or property due to the following problems:
1. The user does not assemble and use the drone as required by this manual.
2. The user operates the drone in poor physical or mental conditions such as drinking,
drug abuse, fatigue, etc.
3. The user actively or intentionally operates the drone to create damage.
4. The user modifies the drone without using accessories from TopXGun, which is
resulted in it could not work properly.
5. Injury caused by the user's misoperation or subjective misjudgment.
6. Damage caused by natural cause, such as aging of circuit and so on that affects the
aircraft.
7. Damage caused by the user’s operation of the drone while knowing that it is in an
abnormal working condition.
8. The user still operates the drone under severe weather conditions such as typhoon, hail
and fog.
9. The user operates the drone in the magnetic interference area, radio interference area
and government no-fly area.
10. The user operates the drone in case of poor visibility and occlusion of the line of sight.
11. The user operates the drone to cause the infringements by obtaining any data, image
data and other infringement behaviors.
12. Other losses that are not within the scope of the company's liability.

©2020 TopXGun (Nanjing) Robotic Ltd,.Co Copyright owner 2
Safety operation instructions
1. Pesticide Usage
Wear protective clothing to prevent direct body contact with the pesticide
while operating.
Avoid the use of powder pesticides as much as possible or else they may
reduce the service life of the spraying system.
Use clean water to prepare the pesticide to avoid blocking the strainer. Do
not remove any filter and clear any blockages before using the equipment.
After using the pesticide, please clean up the residual liquid in time. It is
strictly forbidden to pollute the river and drinking water source, and ensure
that it will not cause harm or impact on people, animals and the
environment in the surroundings.
The effect of the pesticide is closely related to the concentration of the
pesticide, the spraying rate, the altitude of the drone from crops, the wind
direction, the wind speed, etc. The above factors should be taken into
account comprehensively when using the pesticide in order to achieve the
best effect.
Strictly follow the safety instructions of pesticide production company.
Particular working fluids are prohibited.
2. Usage Environment
Always fly in an open space, away from the crowd.
It is recommended to fly below 2000 meters.
It should fly in the environment with the temperature between 0℃and
40℃.
It is recommended to fly in an environment with the wind speed below level
4.
It is strictly forbidden to fly in rain, fog, snow or other extreme weather.
It is strictly forbidden to fly indoors.
It must fly in a legal area. Before flying in the legal area, please consult
your local flight management department to comply with local laws and
regulations.
3. Pre-flight Inspection
Make sure that every device is fully charged.
Make sure that all parts are in good condition. If there are some parts that
are worn or damaged, please replace them before flight. Make sure that
the landing gear and the tank are tightly mounted and all the screws are
firmly tightened.
Make sure that the propellers are not broken and firmly mounted, the
propellers paddle and arm are fully extended, and the screws are
tightened. Make sure the motors are clean and free of damage.
Make sure the spraying system is free of blockage and works properly.
Please calibrate the compass before flight.
4. Operation

©2020 TopXGun (Nanjing) Robotic Ltd,.Co Copyright owner 3
Keep away from the rotating propellers and motors.
When folding, be sure to pay attention to the crushing danger.
Be sure to fly under the take-off weight of 58.90KG to avoid danger.
Operators must be professionally trained and pass the assessment, and
the untrained personnel must not fly the aircraft.
Make sure that the propellers are removed before calibrating the drone
and upgrading the firmware.
When the drone and the remote controller are in frequency-connecting
process, make sure that the propellers are removed and that human and
animals are far away from the motor.
A pilot should not operate this product in poor condition such as after
drinking, fatigue, illness, etc.
If the operating environment does not meet the working condition of the
radar module, the drone will not avoid obstacles when it returns
automatically. If the remote-control signal is normal, the flight speed and
altitude can be controlled by the remote controller.
When working, be sure to turn on the remote controller first, and then turn
on the power supply. After landing, turn off the power supply first and then
turn off the remote controller.
Please maintain the control of the drone throughout the process, and do
not rely entirely on the information provided by the hand-held ground
station.
Obstacle avoidance and terrain following functions will not be available in
the specific flight mode or flight environment. Please observe the attitude
of the drone at all times and judge the flight condition reasonably to avoid
obstacles in time.
5. Flight Restrictions and Local Laws
Browse the official website of the Aviation Authority of your location for the
latest list of restricted flight areas.
The maximum control flight altitude is below 20 meters. Please consult the
local flight management department before taking off, to comply with local
laws and regulations.
Special precautions: Safety operating instruction notes includes but not
limited to above items.
Intellectual property rights
The intellectual property rights of this product and its manual belong to
TopXGun Robotics Co., Ltd. Without written permission, any organization or
individual may not copy, reproduce and distribute them in any form. If quotation
is required, the source should be indicated and the manual should not be
modified, deleted or quoted contrary to its original intention.
About this manual
This manual is used as user’s guidance. Photos, graphics, charts and

©2020 TopXGun (Nanjing) Robotic Ltd,.Co Copyright owner 4
illustrations provided in the manual are only for explanatory and illustrative
purposes, and may differ from the physical product. Please refer to the
physical product.
Due to product upgrade or other reasons, the content of this document will be
updated from time to time. Unless otherwise agreed, it is without further notice.
Before using this product, please read this manual carefully.
Execution standard of this product: Q/TG 001-2018
Copyright. All rights reserved by TopXGun Robotics Co., Ltd.

©2020 TopXGun (Nanjing) Robotic Ltd,.Co Copyright owner 5
Content
1. Product overview.......................................................................................................................... 7
1.1. Remote Control................................................................................................................. 7
1.2. Charger Introduction...................................................................................................... 15
1.3. Smart Battery Introduction............................................................................................ 22
1.4. Drone Introduction.......................................................................................................... 26
2. Flight.............................................................................................................................................31
2.1. Flight Instructions............................................................................................................31
2.2. Altitude and Distance Restriction.................................................................................31
2.3. Indicator Description...................................................................................................... 33
2.4. Operation Description.................................................................................................... 34
2.5. Function Introduction..................................................................................................... 40
3. Maintenance and Common Troubleshooting........................................................................ 49
3.1. Remote Control Maintenance & Precaution.............................................................. 49
3.2. Drone Maintenance & Precaution................................................................................49
3.3. Motor Maintenance & Precaution................................................................................ 49
3.4. Propeller Maintenance & Precaution...........................................................................49
3.5. Battery Maintenance & Precaution..............................................................................50
3.6. Plug Maintenance & Considerations...........................................................................52
3.7. Spray System Maintenance & Considerations..........................................................52
4. Transportation Instructions.......................................................................................................52
5. Hazards and safety checklist and countermeasures........................................................... 53

©2020 TopXGun (Nanjing) Robotic Ltd,.Co Copyright owner 6
6. Manufacturer Information..........................................................................................................54
7. Appendix......................................................................................................................................54
7.1. Specification Parameters.............................................................................................. 54

©2020 TopXGun (Nanjing) Robotic Ltd,.Co Copyright owner 7
1. Product overview
The agricultural drone 3WWDZ-25.1 Agricultural plant protection UAV has
undergone several iterations of upgrade, and now reaches the leading level in
practicability, reliability and safety. The protection level of the whole machine is
IP56, full body waterproof, dust-proof and anti-corrosion.Some key modules,
such as spray system, radar system and power system, reach IP67 for easy
cleaning and maintenance. GNSS+RTK positioning system can achieve
centimeter-level high precision positioning, and also supports dual antenna
anti-magnetic interference direction finding technology. Equipped with
wide-angle FPV camera and high-definition digital image transmission
system.Users can observe the work environment in front of them in real time.
1.1. Remote Control
1.1.1. Component Definition

©2020 TopXGun (Nanjing) Robotic Ltd,.Co Copyright owner 8
The main control buttons of the remote control (American hand)
Serial
number
Correspondin
g name
Corresponding
function
Function Description
Y1
Throttle
Left stick -- up
and down
The drone moves vertically (goes up and
down)
X1
Yaw
Left stick -- left
and right
Turn left and right. The drone rotates.
Y2
roll
Right joystick --
left and right
Fly left and right
X2
Pitch
Right joystick --
up and down
Fly forward and backward
3
Remote
control
antenna
Primary and
auxiliary antenna
Transit the control signal, telemetry
signal, telegraphic signal
4
Fine-tuning
button
Left and right
fine adjustment
buttons--up and
down
auto-piloting mode, for adjusting the
flight speed and altitude (not available in
this version of the firmware)
5
Fine-tuning
button
Left and right
fine adjustment
buttons--up and
down
auto-piloting mode, for adjusting the
flight speed and altitude (not available in
this version of the firmware)
6
Status
Indicator
Remote control
status indication
Refer to the “Indicator Status” chapter
7
Light intensity
sensor
Automatic
photo-sensitivity
Automatically adjust the screen
brightness according to the ambient light
intensity
8
HD touch
display
For interface display and touch selection
9
AB point
button
Short press
Turn on/off AB point operation mode
when the drone is flying.
10
Landing Light
button
Short press
Turn on/off the landing light
11
Power button
Long press for 3
seconds to turn
on/off
Long press to turn the remote control
on/off. When the remote control is on, a
short press can be used to turn the
screen on/off .
12
Radar button
Short press
Switch radar on/off
©2020 TopXGun (Nanjing) Robotic Ltd,.Co Copyright owner 9
13
Pump button
Short press
Switch pump radar on/off
14
RTH
(return-to-ho
me) button
Long press for 2
seconds, the
drone will return
home
Long press the RTH button to activate
the smart return mode.
15
Button A
Short press
Click to record A point
16
Button B
Short press
Click to record B point
17
Air outlet
Do not cover the air outlet of the remote
control when using.
18
Microphone
Record audio (currently not available).
19
Switch mode
button
Toggle the switch
Switch between GPS mode and
operation mode.
20
Wheel
Toggle
Spin the wheel to adjust the
corresponding signal output, which is
only supported in industry applications.
The function is not defined when the RC
works with F10.
21
Remote
control
handle
Convenient for users to hold and carry.
22
Speaker
Output audio
23
Air inlet
Do not cover the air inlet of the remote
control when using.
24
Wireless
network card
slot
For install an external wireless network
card
25
Wireless
network card
port
For connect to wireless network card
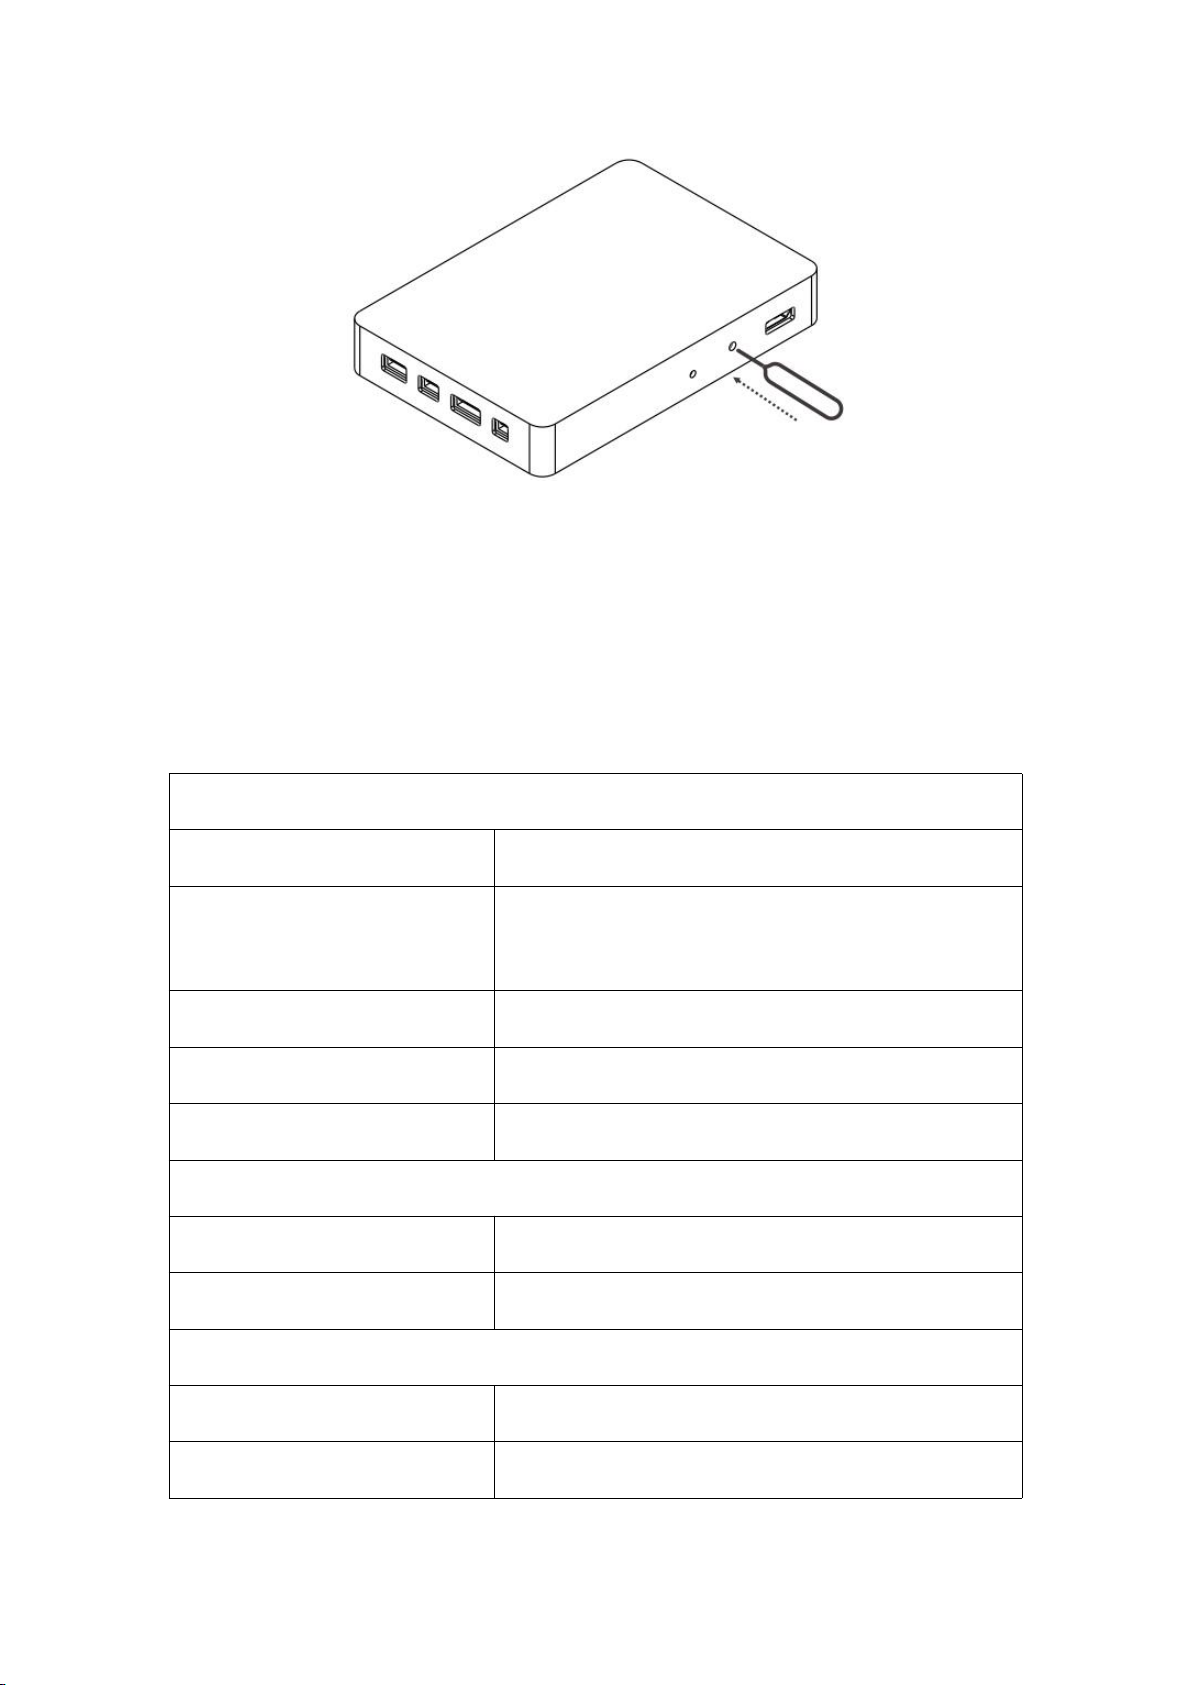
26
MicroSD card
slot
MicroSD card can be inserted
27
Rocker
storage hole
The remote control rocker storage hole
28
Charger
interface
Remote control charging interface, or
connect to PC to update the firmware of
the remote control
1.1.2. Antenna placement
The antenna of the RC adopts a foldable design, and the signal strength varies with the
positions of the antenna. It is recommended to keep the antenna vertical to the ground
when you control the drone. In this case, the signal is the strongest. The position or
distance between the RC and the drone is adjusted in time to ensure that the drone is
always in the optimal communication range. Therefore, the antenna of the RC should not
point to the drone during the flight. The recommended operation is shown in Figure 1-1-3.

©2020 TopXGun (Nanjing) Robotic Ltd,.Co Copyright owner 10
1. Weak signal 2. Strong signal 3. Weak signal 4. Strong signal
Figure 1-1-3 Signal strength of the remote controller
Notes:
1. Do not fold the antenna during the flight to avoid obstruction between the remote
controller and the drone, otherwise the quality of signal will be seriously reduced.
1.1.3. Indicator Status
1. Indicator status
The RC status indicator shows the status of the RC.
Details are shown in the table below:
Indicator status
Remote control status
On/off status
Solid Red
RC is not connected to the aircraft
ON

©2020 TopXGun (Nanjing) Robotic Ltd,.Co Copyright owner 11
Solid Green
RC is connected to the drone
properly
ON
Light Green Flash
RC is pairing
ON
Green Flash
RC temperature is too high
ON
Red Flash
RC is in low battery
ON
Blue Flash
The control stick is not in the
middle position
ON
Solid Red
Charging and the battery level is
less than 10%
OFF
Solid Yellow
Charging and the battery level is
between 10% and 90%
OFF
Solid Green
Charging and the battery level is
over 90%
OFF
1.1.4. 充电示意
1. AC power supply 100-240V 2. USB charger 3. USB-C cable
Attention please:
1. Please use the Type-C interface to charge the remote control.
2. Fully charged for about 3.5 hours with the designated quick charger.
3. Please use the official charger when charging the remote control. If not , it is
recommended to use an FCC/CE-compliant, 5V 2A charger or a 9V 2A fast charger
that complies with the QC2.0 protocol.
4. To ensure the best condition of the battery of the remote control, please make sure to
fully charge the remote control every 3 months.
5. If the remote control is found to have peculiar smell, smoke or liquid leakage, etc.,
stop charging and send the remote control back for testing and identification in time.
6. Do not charge the remote controller when the ambient temperature exceeds 60℃.
7. Keep away from areas that babies and toddlers can touch while charging. It is
recommended not to leave it unattended.

©2020 TopXGun (Nanjing) Robotic Ltd,.Co Copyright owner 12
1.1.5. Frequency-matching Instruction
When the complete set of drone is purchased, the remote control transmitter and the
drone have been frequency-matched before dispatching, and can be used directly after
power-on. In other cases, use the following methods to match the frequency:
1. Turn on the remote control parameter adjustment assistant, as shown below
2. Click the "Start Frequency Matching" button, the indicator light of the remote control
will be light green flashing. APP shows a pop-up of “frequency matching” and there is
a 30s time limit to turn on the remote control. The receiver turns from green flashing
to solid green, and the remote control quickly beeps for 4 times to show frequency
matching is successful.
3. Use a sharp tool (e.g. a pen, etc.) to press the receiver's Frequency Matching button
for 3s and release it to complete the frequency matching. After successful
matching , the remote control indicator indicator will be solid green. If the frequency
button is not pressed within 30 seconds, “Frequency Matching failed”will be
displayed.
©2020 TopXGun (Nanjing) Robotic Ltd,.Co Copyright owner 13
Notes:
1. Keep the distance between the remote control and the receiver within 1 m when
you are matching frequency.
2. Ensure the propeller of the drone is removed during the frequency matching, and
keep livestock and human away from drone motors.
1.1.6. Specification Parameters
Remote control number chain
Frequency range
2.4000GHz - 2.4830GHz
Signal effective distance
(outdoor, no obstruction, no
interference)
Maximum communication distance 10km
3km image transmission (plant protection scenario)
Image Latency
less than 70ms
Interference recovery
<1s
Antenna type
Omnidirectional antenna (2.5dBi)
Wi-Fi
Protocol
IEEE 802.11a/n/ac, Wi-Fi compliant
Operating frequency
4.900 GHz ~ 5.845 GHz (5.0 GHz ISM Band)
Bluetooth
Protocol standard
Bluetooth 4.2
Working frequency range
2.400-2.4835GHz
©2020 TopXGun (Nanjing) Robotic Ltd,.Co Copyright owner 14
FPV Camera
Pixel
4 million
View angle
102 ° horizontally, 57 ° vertically
Video resolution
1080p
FPV auxiliary light
15lux @5m direct light
Display
Screen size
5.5 inch
Touching mode
Capacitive
Screen color
16 million colors
Screen resolution
1920x1080
Screen Brightness
1000cd/2
Other parameters
Operating System
Android OS
Operating Temperature
-15℃to 40℃
Storage Temperature
-25℃to 60℃
Charging Temperature
5℃to 40℃
Battery Type
12000mAh @3.7V lithium battery
Rated power
About 6W
Charging time
About 3.5 hours (using official fast charger)
Continuous working hours
More than 6 hours
FPV camera
DC 12V, less than 0.5A
Receiver
DC 5V 1A
Weight
About 750g
©2020 TopXGun (Nanjing) Robotic Ltd,.Co Copyright owner 15
1.2. Charger Introduction
TC2604 charger is a two-channel lithium-polymer battery charger with a maximum charging
current of 50A. It supports two modes,which are charging and maintenance.。
1.2.1. Instruction
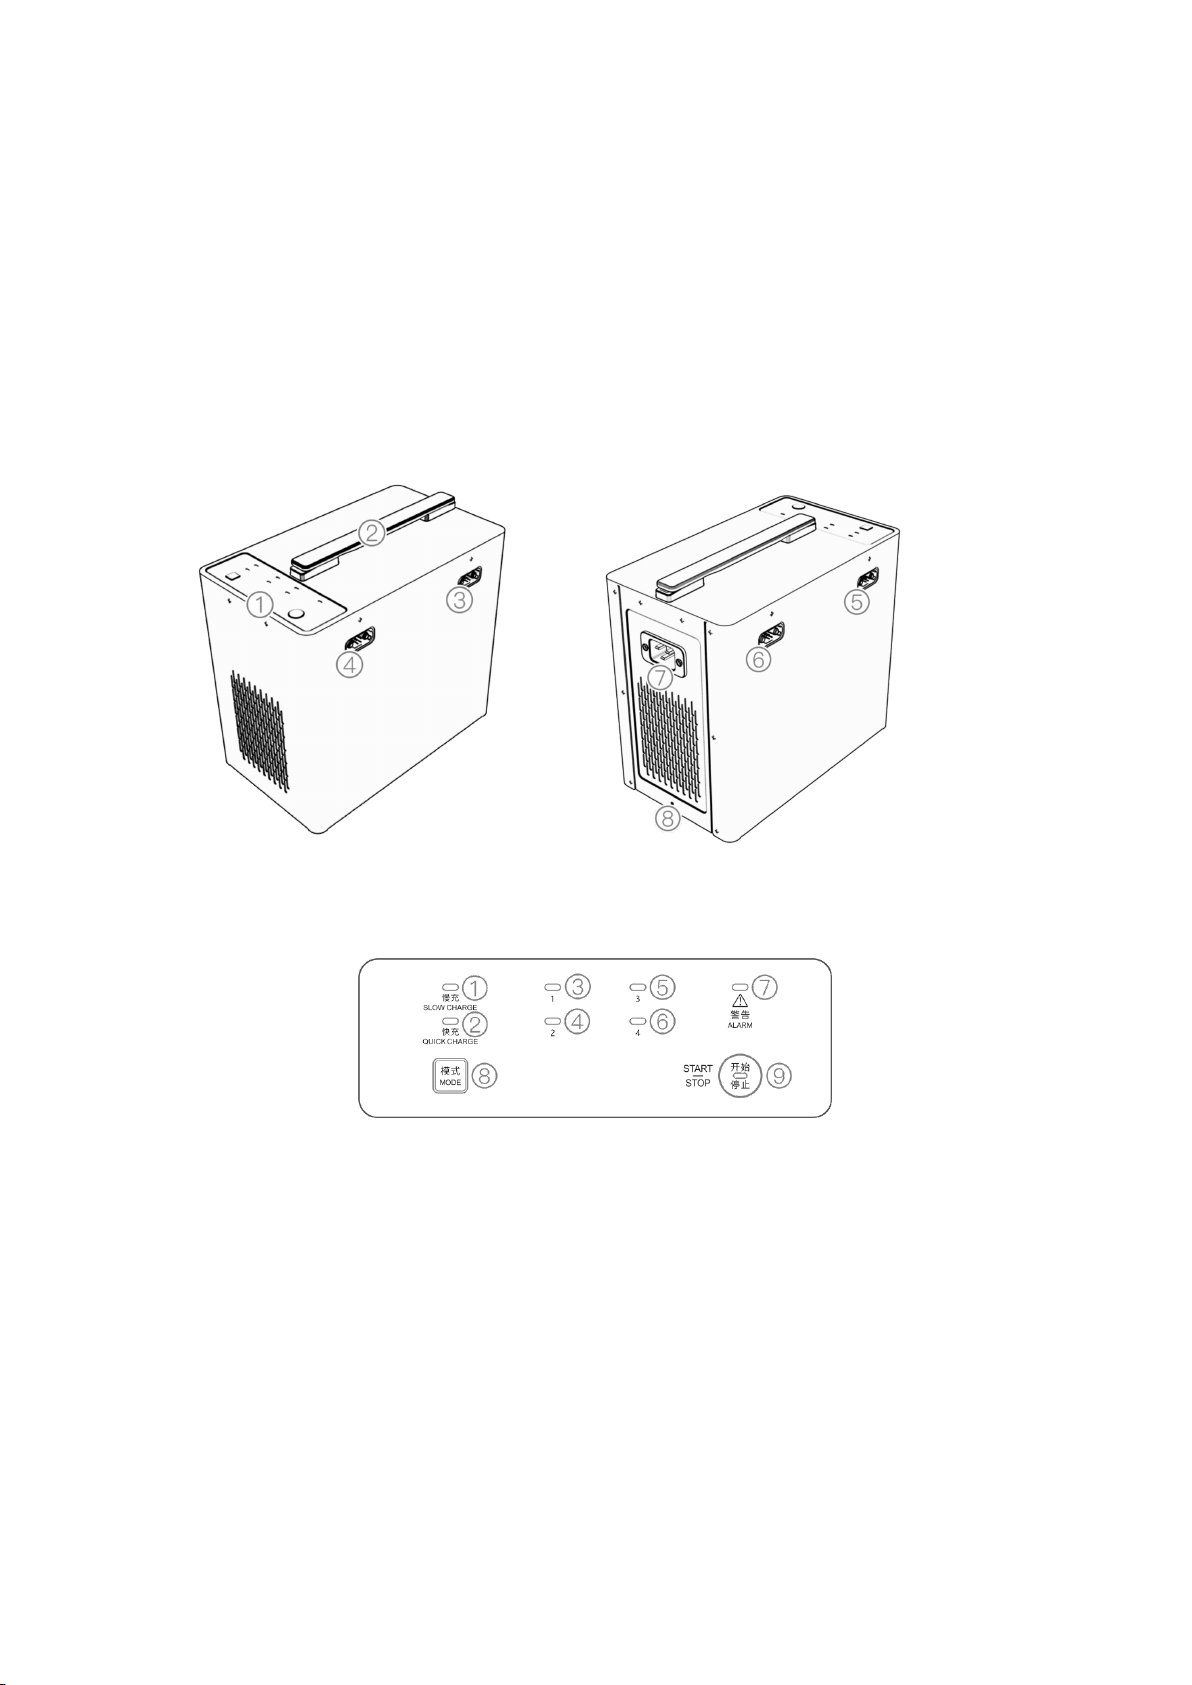
The definition of the charger component is shown in Figure 1-2-1.
Figure 1-2-1 Charger Component
1. Operation interface 2. Handle 3. Battery charging port 3 4. Battery charging port 4 5. Battery
charging port 2 6. Battery charging port 1 7. AC input port 8. Ground terminal
Figure 1-2-2 The Operation Panel
1. Slow Charge indicator 2. fast Charge indicator 3. Charge indicator 1 4. Charge indicator 2 5.
Charge indicator 3 6. Charging indicator 4 7. Operating indicator 8. Charging mode button 9.
Power on/off button
1.2.2. Function Description
1.2.2.1. Status indicator LED Descriptions
Start and self-check: First check whether all the terminals are correctly connected, then

©2020 TopXGun (Nanjing) Robotic Ltd,.Co Copyright owner 16
press “start/stop”button on the operational panel. The battery charge LED, Quick/Slow
charge LED will be turn into green, and the charger status LED will flashes red, green and
blue alternatively. The product complete normal start and self-check along with the end of
one beep.
1) Charging logic
Charging
Mode
Battery capacity>12000mAH
Battery capacity<=12000mAH
Fast charge
The charger will charge one
battery at a time, according to
the remaining capacity from
high to low.
The charger will sort the batteries
according to the remaining
capacity from high to low, and
can charge two batteries with
higher power at the same time.
Slow charge
The charger automatically divides the batteries into two groups, and
each group will be sorted according to the remaining capacity. The
charger will charge the batteries with low remaining capacity first,
when the battery has the same remaining capacity as the ones in
another group, then two groups will be charged simultaneously
until the end of charging.
2) Description of the battery charging status indicator (the quick or slow
charging indicator LED will remain on according to the selected mode)
LED flash rules
warning
Description
off
/
No battery access to the corresponding
©2020 TopXGun (Nanjing) Robotic Ltd,.Co Copyright owner 17
numbered socket
Yellow Light Solid
On
/
The battery accessed to the corresponding
numbered socket, wait for charging
Green Light
Breathing
/
The corresponding numbered socket is in slow
charge mode.
Green Light Fast
Flash
/
The corresponding numbered socket is in
quick charge mode.
Green Light Solid
On
/
The corresponding numbered socket is fully
charged.
Yellow Light
Continuous
Single Flash
/
Battery temperature is too low, the charging
current is limited.
Yellow Light
Continuous
Double Flash
/
Battery temperature is too low, charging is
prohibited.
Yellow Light
Continuous Triple
Flash
/
Battery temperature is too high, charging is
prohibited.
Yellow Light
Continuous Flash
for 4 times
/
Large difference between output voltage and
battery voltage.
Red single flash
D.D.D…
Batteries not plugged in/unofficial
Table of contents
Other TopXGun Drone manuals


