tormek T-2 Setup guide


3
EN
Machine Measurement: Width 240 mm, Depth 210 mm, Height 285 mm.
Machine Weight: 6.3 kg Grinding Wheel: Tormek Diamond Wheel Fine DWF-200,
∅200×40 mm, 120 rpm, torque 8.4 Nm. Honing Wheel: ∅160×30 mm
Housing: Zinc cast top, Impact resistant ABS plastic Motor: Industrial single phase,
120 W (input) 230V, 50Hz or 115V, 60 Hz, duty 30 min/hour, maintenance free, silent
running 54 dB, 10,000 hour life. Warranty: 8-year warranty, 5 years + 3 years, upon
registration at tormek.com. 2-year warranty if the product is used by a professional
sharpening service.
Getting Started
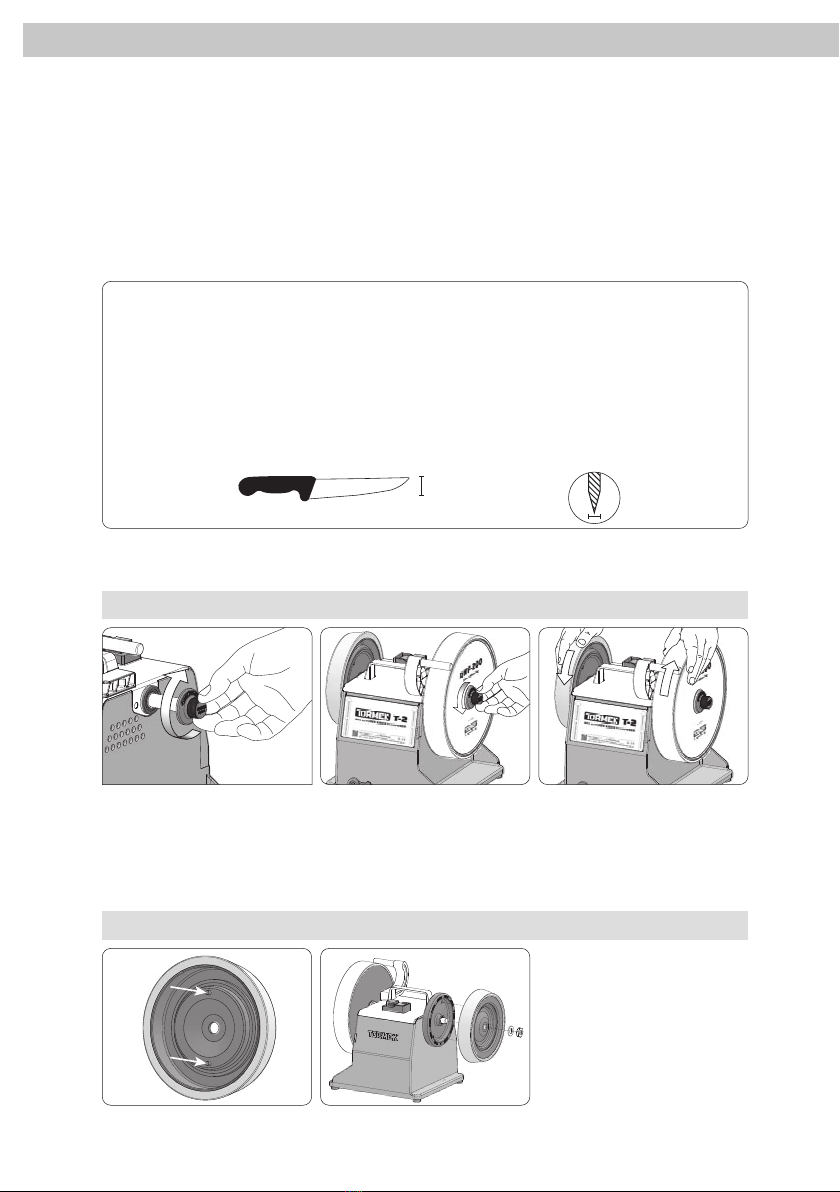
Unscrew the left-handed thread
EzyLock nut by hand.
Make sure the pins on the
honing wheel locate into the
holes on the drive wheel.
Mounting: Put the wheel onto
the shaft and turn the EzyLock
anticlockwise by hand. When
sharpening, the grinding wheel
will automatically tighten to the
correct torque.
Dismounting: Turn the wheel
clockwise by hand whilst
holding the honing wheel still,
and the EzyLock washer nut will
automatically become loose.
1. Mounting the diamond wheel
2. Mounting the honing wheel
Knife Sharpening for
the Professional Kitchen
The Tormek T-2 Knife Sharpener has been made to meet the professional kitchen’s need for
an efcient workow and effective sharpening. The concept is a further development of the
diamond bench stone, which in combination with the control of the edge angle makes it
possible to easily achieve a professional sharpening, right when and where needed.
Height
14–60 mm
(⁄"–2 ")
Handle
knife sizes:
Thickness
Max 3.5 mm
(⁄")
Translation of the original instructions
4
EN
Important Information Regarding
the Diamond Wheel
Always clean the knife before sharpening, otherwise the function of the grinding wheel can
be altered.
At rst usage, the diamond surface will seem aggressive but after a short break-in period,
the diamond crystals will stabilise to a uniform level to give a ner surface. This normally
takes 2–5 sharpenings.
If necessary clean your sharpener with water, washing-up liquid and a nylon brush.
Store the machine in a dry area.
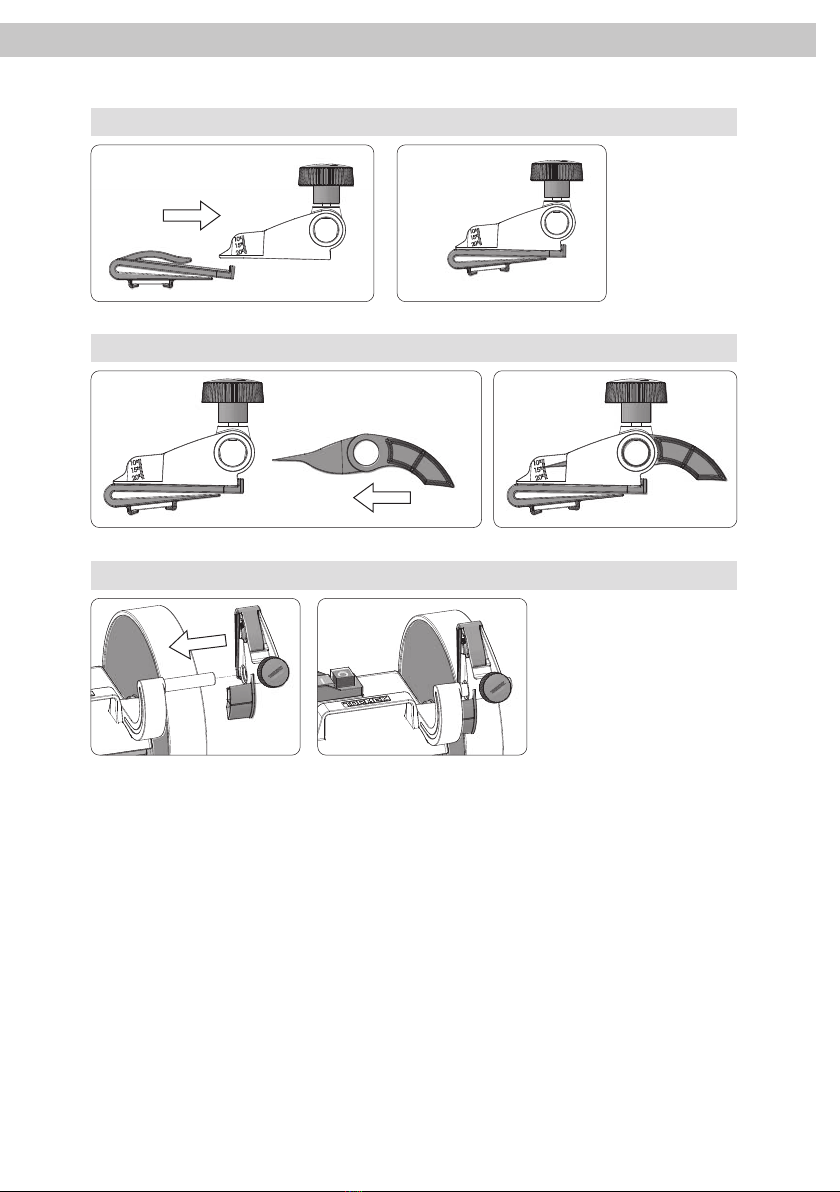
3. Mounting the clamp
4. Mounting the pointer
5. Positioning the jig on the axis
5
EN
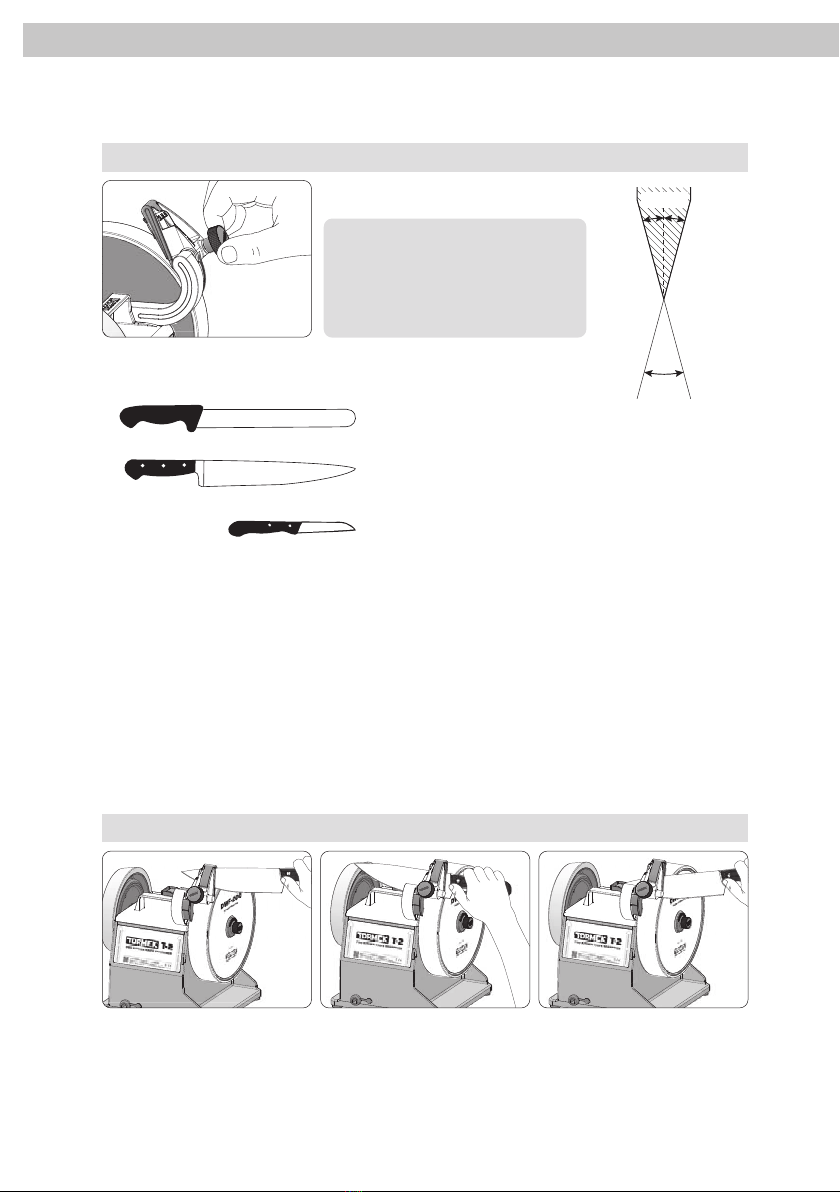
First, make sure the knife is clean. Start the machine. Position the knife in the jig and move it
down towards the grinding surface. Slide the knife evenly over the grinding wheel applying a light
pressure. Ensure that the knife is in contact with the full width of the wheel. Follow the shape of
the knife. Let the jig guide determine the angle. 2–3 sweeps are normally enough if you sharpen
atthe same angle as previously.
2. Position the knife and start sharpening
15° 15°
30°
Example edge angle and result.
A common angle for a kitchen
knife is 30°, so set the pointer
at a 15° sharpening angle on
each side which will give you
a30° result on your knife.
25–30°
30–40°
25–30°
Suggested edge angles
Sharpening Instructions
15° setting will give
a 30° cutting angle.
1. Set the desired edge angle
Which edge angle?
Generally, a smaller edge angle gives a sharper edge whilst a larger edge angle is stronger
and longer lasting. For example, a knife that will be used for meat should have a larger edge
angle than a thinner llet or vegetable knife. The composition of the steel will also affect
which angle is most suitable. A high quality knife blade generally maintains sharpness at a
smaller edge angle compared to a knife blade of low quality steel.
Japanese knives are sharpened with a slightly smaller angle compared to European knives.
If the knife is only sharpened on one side, a suitable edge angle for that side can be 20–25°.
Tip You will save time and prolong
the life of your knives by repeating
the same edge angle. Then you
will only need to remove a minimal
amount of steel each time.

6
EN
After sharpening, a “burr” is
created. It needs to be honed
away in order to get a sharp
edge that will not break in use.
Before you start honing, make sure that the honing wheel
rotates away from the edge, otherwise the knife will cut
into the wheel.
Move the knife sideways with a light pressure. Pay close attention
so you do not apply an angle too steep or you will dull the edge.
A couple of strokes on each side is usually enough.
Now you have a sharp knife!
3. Hone to final finish
To help keep the diamond
wheel clean, a magnet is
attached to the back side
of the jig. It collects steel
particles during sharpening.
If you feel that the magnet
interferes your sharpening
(some knives tend to stick to it)
you can easily remove it.
If the knife handle is in the way – loosen and move the jig a
little so the knife blade can run effortlessly towards the wheel.
Sharpen the other side
in the same way.
The burr can sometimes
(depending on the quality
of the steel) bend to one
side and then the other,
therefore it is sometimes
better to hone alternately
between the sides.
If the burr is not honed
away, the knife can feel
dull, even though it is
“freshly sharpened”.
Note Sharpening dust
can sometime result in
small scratches on the
knife blade. You can use
the included protective
papers to avoid this, see
p. 62 for instruction.

7
EN
Grinding and Sharpening
• Tormek T-2 is designed for knife sharpening. Only use the machine
for the purpose it is designed for. Follow the instructions.
• Only use Tormek original accessories. Use of other accessories
than which are recommended can be a danger for the user.
• The Tormek jigs and accessories are especially designed for Tormek
machines and must not be used on any other grinder.
• Do not force the machine. It will do the job better and
safer at the rate for which it was designed.
• Make sure your hands are dry and clean from grease and oil.
• Do not wear loose clothing, gloves, neckties, rings, bracelets
etc., which can get caught in the moving parts.
• Keep long hair covered or tied back. Non slip footwear is recommended.
• Keep a secure footing and balance when working with the machine.
• Avoid body contact with earthed objects
(e.g. pipes, radiators, refrigerators, stoves etc.).
• Keep your hands and ngers away from the area
between the jig and the grinding wheel.
• Ensure that you have full control of your work. Use common
sense and do not use the machine when you are tired.
Condition of the Machine
• Before using the machine it should be checked to determine that
it will operate properly and perform its intended function. Do not
use the machine if the switch does not turn it on and off.
• Inspect the cord set periodically. If damaged, have it exchanged by
qualied personnel. This is also valid for an extension cable if used.
• Disconnect the machine from the power supply before servicing
and when changing the grinding wheel or the honing wheel.
• Only use Tormek original grinding wheels intended for model T-2.
Max. diameter 200 mm and max. width 40 mm. Hole diameter 12 mm.
• Do not snatch the cable when pulling it out from the socket.
Ensure that the cable is kept away from sharp edges, oil or heaters.
Place of Work
• Connect the machine to an earthed power supply with the
voltage and Hz, which is written on the machine shield.
• If you use the machine outdoors and if you use an extension cable,
the extension cable must be approved for outdoor use.
• Do not use the machine close to inammable gases or liquids or in a
dangerous environment, e.g. wet locations and do not expose it to rain.
• Ensure that any tools (e.g. spanners or adjustable wrenches)
are removed from the grinding machine before turning it on.
Safety

8
EN
• The machine should be operated on a at, stable surface. Keep work area
clean. Cluttered areas and benches invite accidents. Keep work area well lit.
• All children or visitors should be kept at a safe distance from the work area.
• Make workshop kid proof with padlocks or master switches.
Grounding Instructions
• In the event of a malfunction or breakdown, grounding provides a path of least
resistance for electric current to reduce the risk of electric shock. This tool is
equipped with an electric cord having an equipment-grounding conductor and a
grounding plug. The plug must be plugged into a matching outlet that is properly
installed and grounded in accordance with all local codes and ordinances.
• Do not modify the plug provided – if it will not t the outlet,
have the proper outlet installed by a qualied electrician.
• Improper connection of the equipment-grounding conductor can result in a
risk of electric shock. The conductor with insulation having an outer surface
that is green with or without yellow stripes is the equipment-grounding
conductor. If repair or replacement of the electric cord or plug is necessary,
do not connect the equipment-grounding conductor to a live terminal.
• Check with a qualied electrician or service personnel if the grounding instructions are
not completely understood, or if in doubt as to whether the tool is properly grounded.
• Use only 3-wire extension cords that have 3-prong grounding
plugs and 3-pole receptacles that accept the tool’s plug.
• Repair or replace damaged or worn cord immediately.
• This machine is intended for use on a circuit that has an outlet that looks like
the one illustrated in Sketch A in Figure 82.1. The tool has a grounding plug that
looks like the plug illustrated in Sketch A in Figure 82.1. A temporary adapter,
which looks like the adapter illustrated in Sketches Band C, may be used to
connect this plug to a 2-pole receptacle as shown in Sketch B if a properly
grounded outlet is not available. The temporary adapter should be used only
until a properly grounded outlet can be installed by a qualied electrician. The
green-colored rigid ear, lug, and the like, extending from the adapter must be
connected to a permanent ground such as a properly grounded outlet box.

9
EN
Tormek T-2 Machine Label 230 V
Warning: Do not expose the machine to rain and do not use in damp places.
Tormek T-2 Machine Label 115 V
After the Work
• Never leave the machine running unattended.
• Store the machine in a locked room and out of reach
of children and unauthorized persons.
Sound Level
• Idling (no load): 54 dB(A)
• Grinding: 62.5 dB(A)
• Honing and polishing: 61 dB(A)
Please read the instructions before operating the machine.
Always hone away
from the edge.
220-240 V, 50-60 Hz. 120 W (input),
120 rpm. Duty 30 min/hour.
Max wheel diameter 200 mm.
Made in Sweden by
Tormek AB, 711 34 Lindesberg
www.tormek.com
ARTICLE NO: T-2 PRO II/GB
SERIAL NO:
DATE:
ARTICLE NO/NUMÉRO D’ARTICLE:
T-2 PRO II/US
SERIAL NO/NUMÉRO DE SÉRIE:
DATE/DATE:
100-115V, 50-60 Hz.
120 W (input/entrée), 120 rpm.
Duty 30 min/hour./Utilisation 30 min/h.
Max diameter stone/de la meule 200 mm.
Always hone
away from the edge
Toujours
démorler dans le
sens de rotation
CONFORMS
TO UL STD 987
CERTIFIED
TO CSA STD
C22.2 NO 71.2
3196221
Made in Sweden/Fabriqué en Suède: Tormek AB, 711 34 Lindesberg

10
EN
Tormek Warranty
The Tormek warranty covers all parts in your Tormek T-2 against material and/or manufac-
turing defects. The Tormek warranty guaranties the function of your machine but does not
cover normal wear and tear, incorrect use or neglect. The warranty does not include freight
costs. Valid together with the purchase receipt.
In the event that your Tormek T-2 needs service – contact us, see below. In many cases
the problem can be solved over the phone or by sending a spare part. Do not return the
machine without an agreement with your Tormek dealer.
Tormek AB, Torphyttevägen 40, SE-711 34 Lindesberg
Spare Parts and Repairs
The machine complies with the relevant safety rules. Repairs should only be carried out
by qualied persons using original spare parts, otherwise this may result in considerable
danger for the user.
Spare part list
See page 63.
Other manuals for T-2
1
Table of contents
Languages:
Other tormek Accessories manuals


