Toro 04861 User manual

FormNo.3445-357RevC
Greensmaster®eFlex®1021
Greensmower
ModelNo.04861—SerialNo.400000000andUp
Registeratwww.Toro.com.
OriginalInstructions(EN)*3445-357*

ThisproductcomplieswithallrelevantEuropean
directives;fordetails,pleaseseetheseparateproduct
specicDeclarationofConformity(DOC)sheet.
WARNING
CALIFORNIA
Proposition65Warning
Thepowercordonthisproductcontains
lead,achemicalknowntotheState
ofCaliforniatocausebirthdefects
orotherreproductiveharm.Wash
handsafterhandling.
Batteryposts,terminals,andrelated
accessoriescontainleadandlead
compounds,chemicalsknownto
theStateofCaliforniatocause
cancerandreproductiveharm.Wash
handsafterhandling.
Useofthisproductmaycauseexposure
tochemicalsknowntotheStateof
Californiatocausecancer,birthdefects,
orotherreproductiveharm.
Introduction
Thismachineisawalk-behind,reel-bladelawnmower
intendedtobeusedbyprofessional,hiredoperators
incommercialapplications.Itisprimarilydesigned
forcuttinggrassonwell-maintainedturf.Usingthis
productforpurposesotherthanitsintendedusecould
provedangeroustoyouandbystanders.
Readthisinformationcarefullytolearnhowtooperate
andmaintainyourproductproperlyandtoavoid
injuryandproductdamage.Youareresponsiblefor
operatingtheproductproperlyandsafely.
Visitwww.Toro.comforproductsafetyandoperation
trainingmaterials,accessoryinformation,helpnding
adealer,ortoregisteryourproduct.
Wheneveryouneedservice,genuineT oroparts,or
additionalinformation,contactanAuthorizedService
DealerorT oroCustomerServiceandhavethemodel
andserialnumbersofyourproductready.Figure1
identiesthelocationofthemodelandserialnumbers
ontheproduct.Writethenumbersinthespace
provided.
Important:Withyourmobiledevice,youcan
scantheQRcode(ifequipped)ontheserial
numberdecaltoaccesswarranty,parts,andother
productinformation.
g271512
Figure1
1.Modelandserialnumberlocation
ModelNo.
SerialNo.
Thismanualidentiespotentialhazardsandhas
safetymessagesidentiedbythesafety-alertsymbol
(Figure2),whichsignalsahazardthatmaycause
seriousinjuryordeathifyoudonotfollowthe
recommendedprecautions.
g000502
Figure2
Safety-alertsymbol
Thismanualuses2wordstohighlightinformation.
Importantcallsattentiontospecialmechanical
informationandNoteemphasizesgeneralinformation
worthyofspecialattention.
©2021—TheToro®Company
8111LyndaleAvenueSouth
Bloomington,MN554202
Contactusatwww.Toro.com.
PrintedintheUSA
AllRightsReserved

Contents
Safety.......................................................................4
GeneralSafety...................................................4
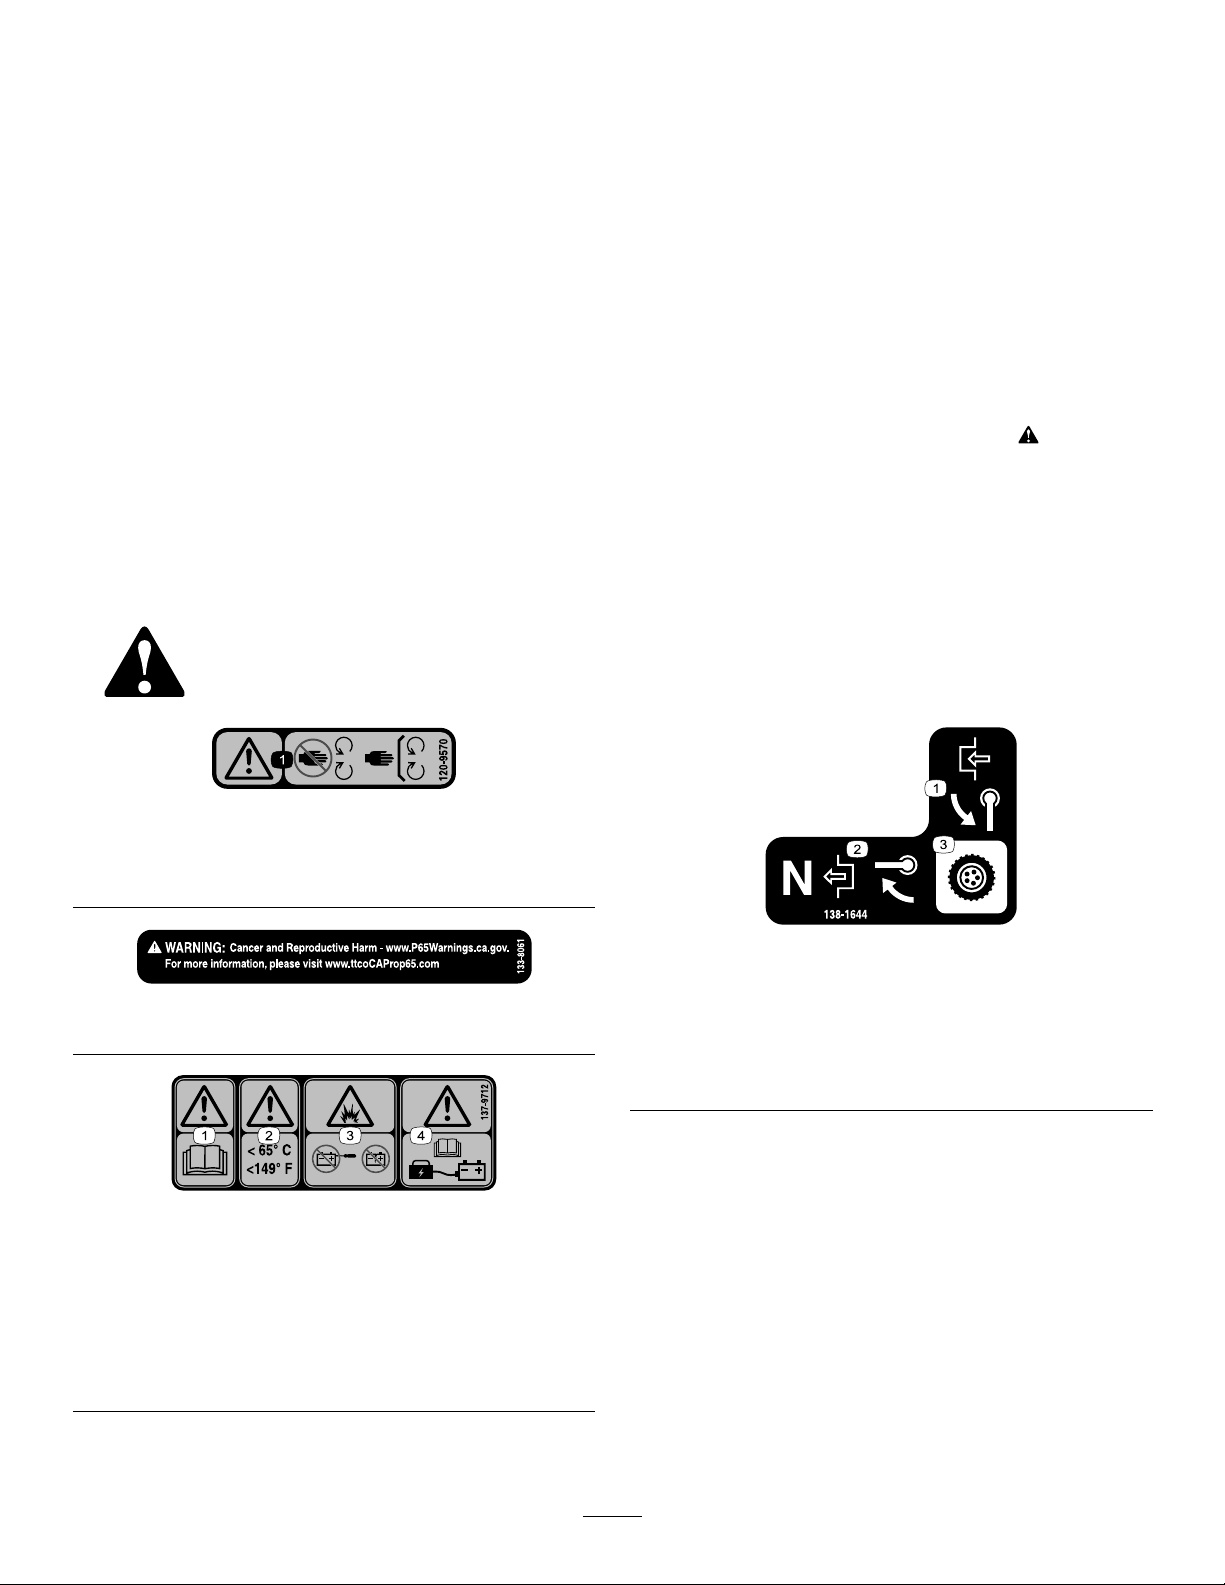
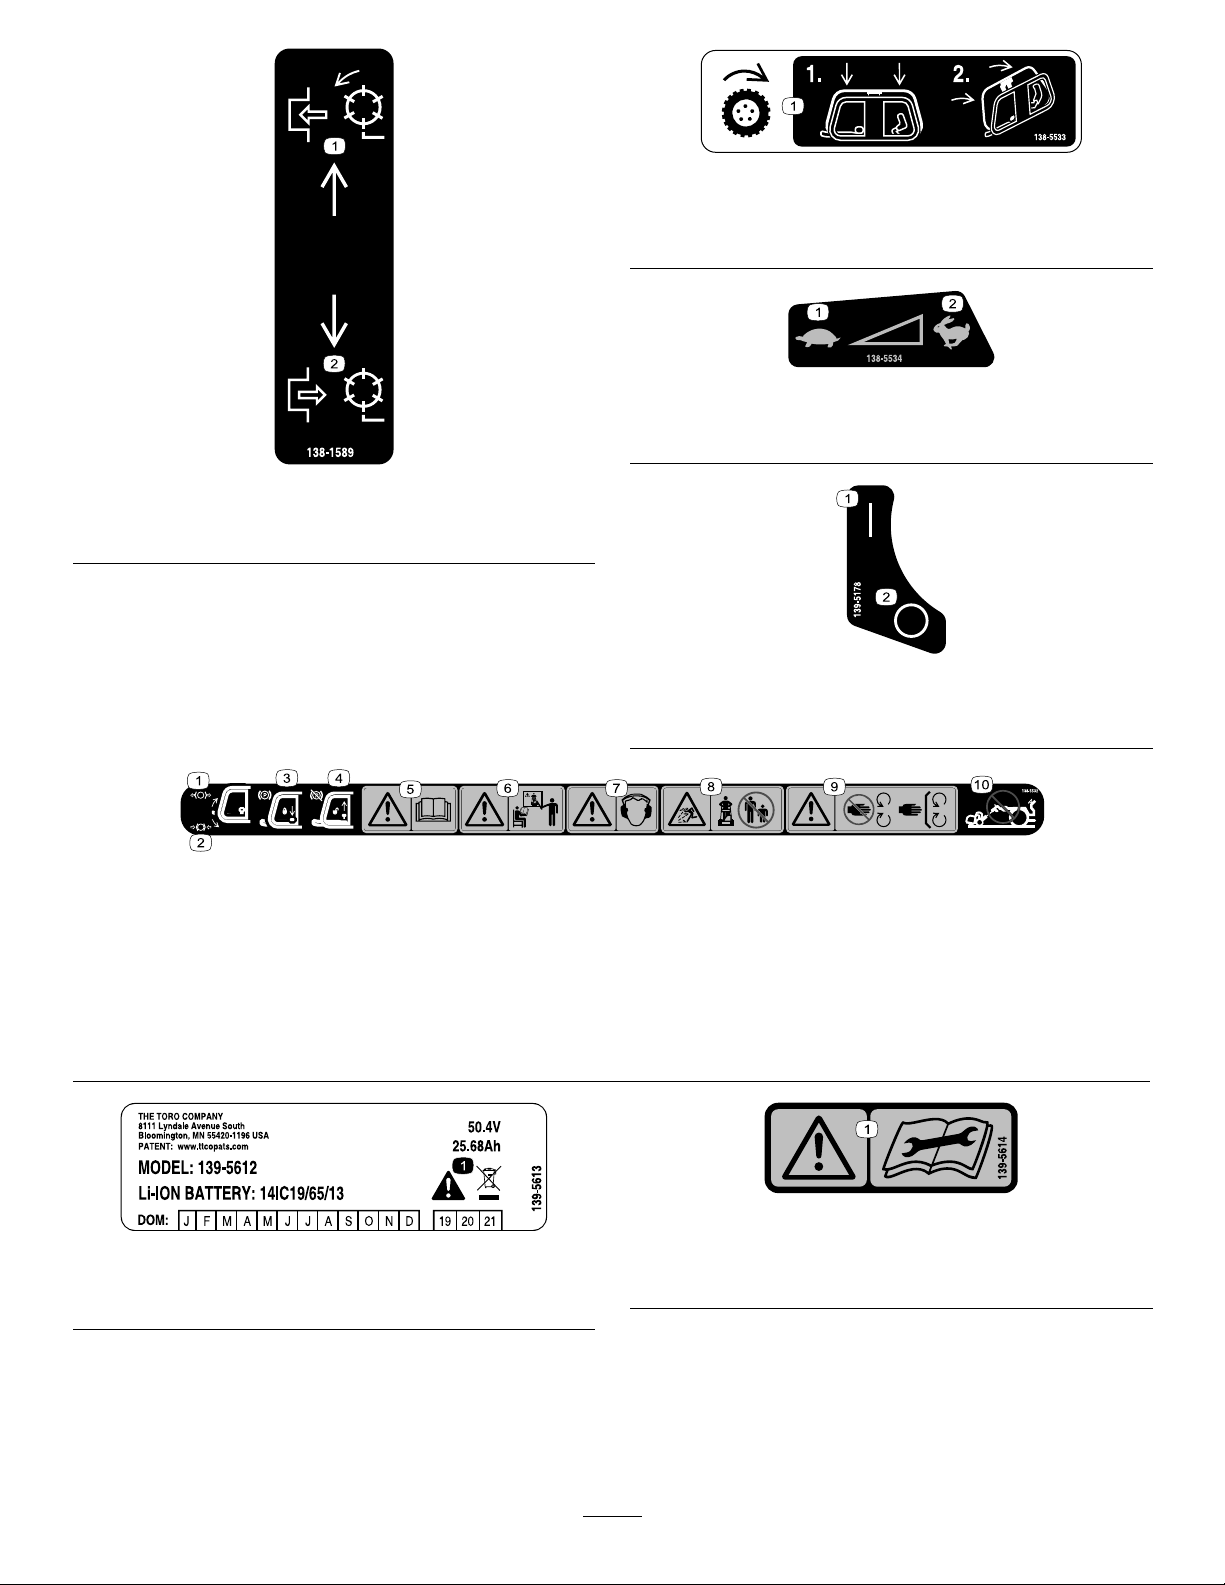
SafetyandInstructionalDecals..........................4
Setup........................................................................6
1AdjustingandInstallingtheCutting
Unit.................................................................6
2InstallingtheTransportWheels........................6
3InstallingtheGrassBasket..............................7
4MountingtheBatteryChargerona
Wall.................................................................7
ProductOverview.....................................................8
Controls.............................................................9
Specications...................................................11
Attachments/Accessories..................................11
BeforeOperation.................................................12
BeforeOperationSafety...................................12
PerformingDailyMaintenance..........................12
AdjustingtheClipRate.....................................12
AdjustingtheReelSpeed.................................12
AdjustingtheHandleHeight.............................13
TransportingtheMachinetoaJob
Site................................................................13
RemovingtheTransportWheels.......................13
DuringOperation.................................................14
DuringOperationSafety...................................14
StartingtheMachine.........................................15
UsingtheInfoCenterLCDDisplay....................15
OperatingTips..................................................17
ShuttingOfftheMachine..................................18
AfterOperation....................................................18
AfterOperationSafety......................................18
OperatingtheControlsafterMowing.................19
TransportingtheMachine.................................19
InstallingtheTransportWheels.........................20
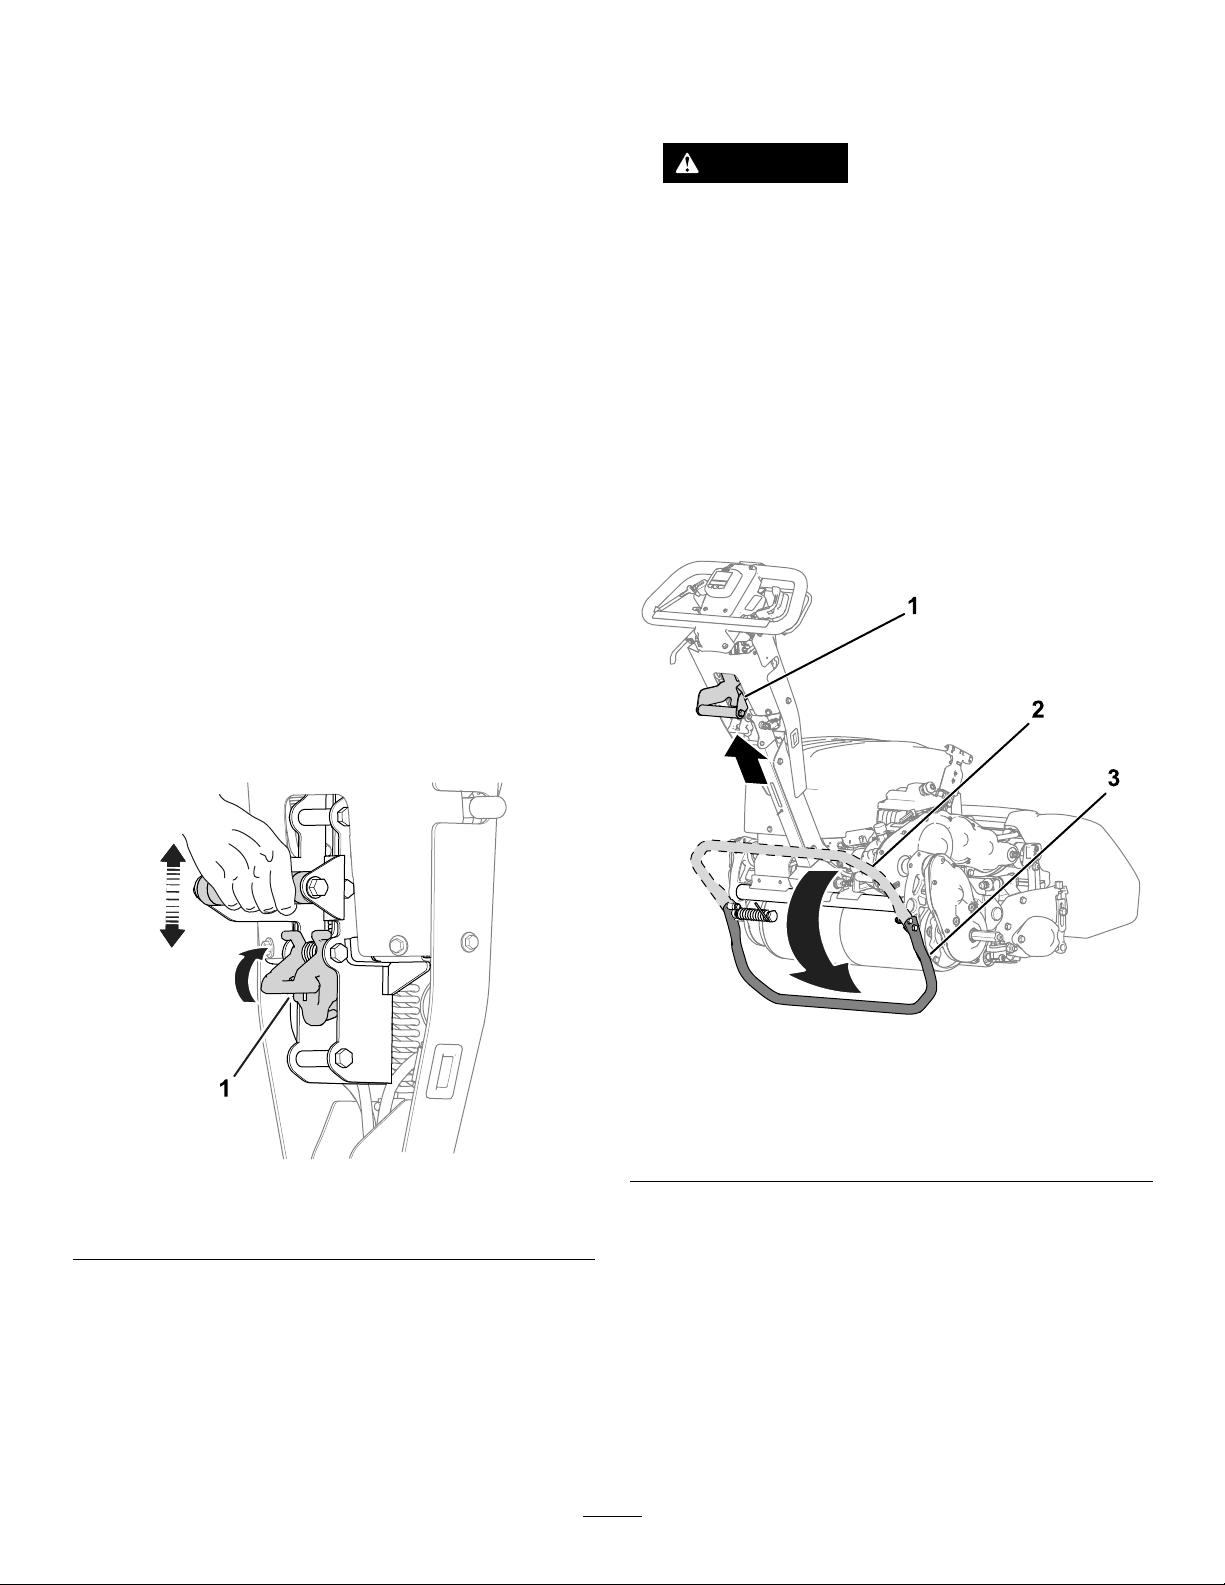
EngagingorDisengagingthe
Transmission................................................20
MaintainingtheLithium-IonBattery
Pack..............................................................21
CaringfortheBatteryPack...............................21
UnderstandingtheBatteryCharger..................22
Maintenance...........................................................24
MaintenanceSafety..........................................24
RecommendedMaintenanceSchedule(s)...........24
DailyMaintenanceChecklist.............................25
Pre-MaintenanceProcedures..............................25
PreparingtheMachineforMaintenance............25
ElectricalSystemMaintenance...........................26
ElectricalSystemSafety..................................26
ServicingtheBatteryPack................................26
DisposingoftheBattery....................................26
MaintainingtheBatteryCharger.......................26
ReplacingFuses...............................................27
DriveSystemMaintenance..................................28
ChangingtheTransmissionFluid......................28
ControlsSystemMaintenance.............................28
AdjustingtheService/ParkingBrake.................28
TighteningtheHandle-Isolation
Hardware......................................................29
CuttingUnitMaintenance.....................................30
BladeSafety.....................................................30
InstallingtheCuttingUnit..................................30
RemovingtheCuttingUnit................................31
BacklappingtheCuttingUnit.............................31
Cleaning..............................................................32
CleaningtheMachine.......................................32
Storage...................................................................32
StorageSafety..................................................32
StoringtheMachine..........................................32
BatteryStorageRequirements.........................32
StoringtheCharger..........................................33
Troubleshooting......................................................34
3

Safety
Thismachinehasbeendesignedinaccordance
withANSIB71.4-2017,IEC60335-1:2012,andIEC
60335-2-29:2016andmeetsthesestandardswhen
youcompletethesetupinstructions.
GeneralSafety
Thisproductiscapableofamputatinghandsandfeet
andofthrowingobjects.
•Readandunderstandthecontentsofthis
Operator’sManualbeforestartingthemachine.
•Useyourfullattentionwhileoperatingthe
machine.Donotengageinanyactivitythat
causesdistractions;otherwise,injuryorproperty
damagemayoccur.
•Donotputyourhandsorfeetnearmoving
componentsofthemachine.
•Donotoperatethemachinewithoutallguards
andothersafetyprotectivedevicesinplaceand
functioningproperlyonthemachine.
•Keepbystandersandchildrenoutoftheoperating
area.Neverallowchildrentooperatethemachine.
•Shutoffthemachine,removethekey(ifequipped),
andwaitforallmovementtostopbeforeyouleave
theoperator’sposition.Allowthemachinetocool
beforeadjusting,servicing,cleaning,orstoringit.
Improperlyusingormaintainingthismachinecan
resultininjury.T oreducethepotentialforinjury,
complywiththesesafetyinstructionsandalways
payattentiontothesafety-alertsymbol,which
meansCaution,Warning,orDanger—personalsafety
instruction.Failuretocomplywiththeseinstructions
mayresultinpersonalinjuryordeath.
SafetyandInstructionalDecals
Safetydecalsandinstructionsareeasilyvisibletotheoperatorandarelocatednearanyarea
ofpotentialdanger.Replaceanydecalthatisdamagedormissing.
decal120-9570
120-9570
1.Warning—stayawayfrommovingparts,keepallguards
andshieldsinplace.
decal133-8061
133-8061
decal137-9712
137-9712
1.Warning—readthe
Operator’sManual.
3.Explosionhazard—donot
openthebattery;donot
useadamagedbattery.
2.Warning—keepat
temperaturesbelow65°C
(149°F).
4.Warning—readthe
Operator’sManual
forbatterycharging
information.
decal138-1644
138-1644
1.Rotatethehandleto
engage.
3.Transmissioncontrol
2.Withthemachineinthe
Neutralposition,rotatethe
handletodisengage.
4

decal138-1589
138-1589
1.Engagethereels.2.Disengagethereels.
decal138-5533
138-5533
1.Tractioncontrol—pressthetractioncontroldownthenpull
ittothehandle.
decal138-5534
138-5534
1.Slow2.Fast
decal139-5178
139-5178
1.On2.Off
decal138-5532
138-5532
1.Pulluptoreleasethebrake.6.Warning—donotoperatethismachineunlessyouaretrained.
2.Pulldowntoapplythebrake.7.Warning—wearhearingprotection.
3.Parkingbrake—locked8.Thrownobjecthazard—keepbystandersaway.
4.Parkingbrake—unlocked9.Warning—stayawayfrommovingparts;keepallguardsand
shieldsinplace.
5.Warning—readtheOperator’sManual.10.Donottowthemachine.
decal139-5613
139-5613
1.Warning—donotdiscard.
decal139-5614
139-5614
1.Warning—readtheOperator’sManualbeforeperforming
maintenance.
5

Setup
LooseParts
Usethechartbelowtoverifythatallpartshavebeenshipped.
ProcedureDescriptionQty.Use
Cuttingunit(orderseparately;contact
yourauthorizedTorodistributor)1
Hextube1
Spring1
1
Collar1
Adjustandinstallthecuttingunittothe
machine.
2TransportWheelKit(orderseparately;
contactyourauthorizedTorodistributor)1Installthetransportwheels(optional).
3Grassbasket1Installthegrassbasket.
4Nopartsrequired–Mountthebatterychargeronawall
(optional).
MediaandAdditionalParts
DescriptionQty.Use
Operator'sManual1
CerticateofCompliance1Readorviewtheitemsbeforeoperatingthemachine.
Note:Determinetheleftandrightsidesofthemachinefromthenormaloperatingposition.
1
AdjustingandInstallingthe
CuttingUnit
Partsneededforthisprocedure:
1Cuttingunit(orderseparately;contactyourauthorized
Torodistributor)
1Hextube
1Spring
1Collar
Procedure
1.Adjustthecuttingunittoyourdesiredsettings;
refertothecuttingunitOperator’sManual.
2.Installthespring,collar,andhextubetothe
transmissioncouplershaft(Figure3).
g307641
Figure3
1.Spring3.Hextube
2.Collar
3.Installthecuttingunittothemachine;referto
InstallingtheCuttingUnit(page30).
6

2
InstallingtheTransport
Wheels
Optional
Partsneededforthisprocedure:
1TransportWheelKit(orderseparately;contactyour
authorizedT orodistributor)
Procedure
Toinstallthetransportwheels,youmustrstacquire
theTransportWheelKit(Model04123).Contactyour
authorizedTorodistributorforthiskit.
1.Installthetransportwheels;refertoInstalling
theTransportWheels(page20).
2.Ensurethatthetiresareinatedto83to103
kPa(12to15psi).
3
InstallingtheGrassBasket
Partsneededforthisprocedure:
1Grassbasket
Procedure
1.Graspthebasketbythehandle.
2.Guidethebasketlipbetweenthecuttingunit
sideplatesandoverthefrontroller(Figure4).
g308471
Figure4
1.Baskethooks
3.Installthebaskethooksovertheframeloop
(Figure4).
Important:Ifyoudropthebasket,examinethe
pitch-armcontactpointsnearthelowerlipofthe
basketfordamage(Figure5).Straightenthem
beforeusingthebasket.
Usingthebasketwithbentpitch-armcontact
pointsmaycausecontactbetweenthebasket
andcuttingunit,causingundesirednoiseand/or
damagetothebasketandcuttingunit.
g032408
Figure5
1.Pitch-armcontactpoint
7

4
MountingtheBattery
ChargeronaWall
Optional
NoPartsRequired
Procedure
Youcanmountthechargeronawallusingthe
wall-mountkeyholescutintothebackoftheunit.Use
screwsthathavea6mm(1/4inch)diametershaft
andaheaddiameterof11mm(0.45inch).
Important:Surveyyourworkareaanddetermine
alocationthatbestmeetsthecriteriaforsafeand
effectiveoperationofthecharger.
ProductOverview
g308085
Figure6
1.Grassbasket4.Batterypack
2.Kickstand5.Transport-wheelaxle
3.Handle6.Cuttingunit
8

Controls
g308000
Figure7
1.Clutchbail6.Hourmeter
2.Cutting-unit-drivelever7.Lift-assisthandle
3.Parking-brakelatch8.InfoCenter
4.Service-brakelever9.Keyswitch
5.Speedcontrol
ClutchBail
Usetheclutchbail(Figure7)toengageordisengage
thetractiondrive.
•Engagethetractiondrive:Pullupandholdthe
bailtothehandle.
Tractionspeedcanvarybyhowfaryoupullup
thebail.Pullingthebaruptohandlewillmove
themachineatthemaximumsetspeed;pulling
itslightlyupwillmovethemachineataslower
speed.
•Disengagethetractiondrive:Releasethebail.
SpeedControl
Usethespeedcontrol(Figure7)toadjustthemachine
speed.
•Increasethemachinespeed:Rotatethelever
down.
•Decreasethemachinespeed:Rotatethelever
up.
KeySwitch
Theswitch(Figure7)allowsyoutostartorshutoff
themachine.
•Startthemachine:MovethekeytotheON
position.
•Shutoffthemachine:MovethekeytotheOFF
position.
Service-BrakeLever
Usetheservicebrake(Figure7)tosloworstopthe
machine.Pullthelevertowardthehandletoengage
theservicebrake.
Parking-BrakeLatch
Usetheparking-brakelatch(Figure7)toengagethe
parkingbrakewhileyouareawayfromthemachine.
•Engagetheparkingbrake:Engageandholdthe
service-brakeleverandrotatetheparking-brake
latchtowardyou.
•Disengagetheparkingbrake:Pullthe
service-brakelevertowardthehandle.
Cutting-Unit-DriveLever
Usethecutting-unit-drivelever(Figure7)toengage
ordisengagethecuttingunit.
•Engagethecuttingunit:Withtheclutchbailin
theneutral(disengaged)position,movethelever
down.
•Disengagethecuttingunit:Movetheleverup.
9

HourMeter
Thehourmeter(Figure7)recordsthetotalnumber
ofhoursthatthekeyswitchhasbeenintheON
position.Refertothemeterforschedulingregular
maintenance.
InfoCenterLCDDisplay
TheInfoCenterLCDdisplayshowsinformationabout
yourmachineandbatterypack,suchasthecurrent
batterycharge,speed,diagnosticsinformation,and
more(Figure7).
Formoreinformation,refertoUsingtheInfoCenter
LCDDisplay(page15).
Lift-AssistHandle
Usethelift-assisthandle(Figure7)tohelpwith
adjustingthehandleheightortoraiseandlowerthe
kickstand.
Handle-HeightAdjuster
Usethehandle-heightadjuster(Figure8)tomovethe
handleheighttoacomfortableoperatingposition.Pull
upontheadjusterandusethelift-assisthandleto
raiseorlowerthehandleheight.
g271081
Figure8
1.Handle-heightadjuster
Kickstand
Thekickstand(Figure9)ismountedtotherearof
themachine.Usethekickstandwhenyouinstallor
removethetransportwheelsorthecuttingunit.
•TRANSPORT-WHEEL-SERVICEposition:
Tousethekickstandtoinstallthetransportwheels,
putyourfootonthekickstandwhilepullingupand
backonthelift-assisthandle(Figure9).
CAUTION
Themachineisheavyandcancauseback
strainifliftedimproperly.
Putyourfootpressuredownonthe
kickstandanduseonlythelift-assist
handletoraisethemachine.Attemptingto
raisethemachineontothekickstandany
otherwaycancauseinjury.
•CUTTING-UNIT-SERVICEposition:
Topreventthemachinefromtippingbackward
whenremovingthecuttingunit,lowerthekickstand
andpushoutthespringpinsothatitkeepsthe
kickstandinthepositionshowninFigure10.
g342960
Figure9
1.Lift-assisthandle3.Kickstand—TRANSPORT-WHEEL
SERVICEposition
2.Kickstand—STORAGE
position
10

g341757
Figure10
1.Kickstand—CUTTING-UNIT
SERVICEposition
2.Springpin
Specications
Model04861
Width91cm(36inches)
Dryweight*97kg(207lb)
Widthofcut53cm(21inches)
HeightofcutRefertoyourcuttingunitOperator’sManual.
Clip
Dependentonreelspeedandreel-drive-pulley
position;refertoAdjustingtheClip
Rate(page12).
Mowing
speed3.2km/h(2mph)to5.6km/h(3.5mph)
Transport
speed8.5km/h(5.3mph)
*Tractionunitonly.RefertothecuttingunitOperator’s
Manualfortheweightofeachcuttingunit.
ElectricalSpecications
Voltage48V
CurrentDC()
AmpHours25.6AH
IPRatingIP65
Attachments/Accessories
AselectionofToroapprovedattachmentsand
accessoriesisavailableforusewiththemachine
toenhanceandexpanditscapabilities.Contact
yourAuthorizedServiceDealerorauthorizedToro
distributororgotowww.T oro.comforalistofall
approvedattachmentsandaccessories.
Toensureoptimumperformanceandcontinuedsafety
certicationofthemachine,useonlygenuineT oro
replacementpartsandaccessories.Replacement
partsandaccessoriesmadebyothermanufacturers
couldbedangerous,andsuchusecouldvoidthe
productwarranty.
11

Operation
Note:Determinetheleftandrightsidesofthe
machinefromthenormaloperatingposition.
BeforeOperation
BeforeOperationSafety
GeneralSafety
•Neverallowchildrenoruntrainedpeopleto
operateorservicethemachine.Localregulations
mayrestricttheageoftheoperator.Theowner
isresponsiblefortrainingalloperatorsand
mechanics.
•Becomefamiliarwiththesafeoperationofthe
equipment,operatorcontrols,andsafetysigns.
•Shutoffthemachine,removethekey(ifequipped),
andwaitforallmovementtostopbeforeyouleave
theoperator’sposition.Allowthemachinetocool
beforeadjusting,servicing,cleaning,orstoringit.
•Knowhowtostopthemachineandshutoffthe
machinequickly.
•Checkthatoperator-presencecontrols,safety
switches,andsafetyprotectivedevicesare
attachedandfunctioningproperly.Donotoperate
themachineunlesstheyarefunctioningproperly.
•Inspecttheareawhereyouwillusethemachine
andremoveallobjectsthatthemachinecould
throw.
PerformingDaily
Maintenance
Performthedailymaintenanceprocedures;referto
DailyMaintenanceChecklist(page25).
AdjustingtheClipRate
Thecliprateisdeterminedbythefollowingmachine
settings:
•Reelspeed:Youcanadjustthereelspeedtoa
highorlowsetting;refertoAdjustingtheReel
Speed(page12).
•Reel-drive-pulleyposition:Youcansetthe
reel-drivepulleysin2positions;refertoyour
cuttingunitOperator’sManual.
Todeterminethereelspeedandreel-drive-pulley
positionfortheappropriateclip,refertothefollowing
table:
ClipRate
CuttingUnit
Reel
Speed
Belt
Position8-blade11-blade14-blade
LowLow7.3mm
(0.286inch)
5.3mm
(0.208inch)
4.2mm
(0.164inch)
LowHigh8.7mm
(0.241inch)
4.4mm
(0.175inch)
3.5mm
(0.137inch)
HighLow5.9mm
(0.233inch)
4.3mm
(0.169inch)
3.4mm
(0.133inch)
HighHigh5.0mm
(0.196inch)
3.6mm
(0.142inch)
2.8mm
(0.112inch)
AdjustingtheReelSpeed
Usethereel-speed-controlknob(Figure11)toadjust
thereelspeed.
•Highreelspeed:Rotatetheknobsothatthe“H”
ontheknobisdirectedtowardthefrontofthe
machine.
•Lowreelspeed:Rotatetheknobsothatthe“L”
ontheknobisdirectedtowardthefrontofthe
machine.
12

g342959
Figure11
1.Reel-speed-controlknob(showninthehigh-reel-speed
position)
AdjustingtheHandle
Height
Usethehandle-heightadjustertoadjustthehandle
heighttoacomfortableoperatingposition;referto
Handle-HeightAdjuster(page10).
TransportingtheMachine
toaJobSite
TransportingtheMachineUsing
TransportWheels
Usethetransportwheelstotransportthemachinea
shorterdistance.
1.Installthetransportwheels;refertoInstalling
theTransportWheels(page20).
2.Ensurethatthetractionandreel-drivecontrols
areintheNEUTRALposition.
3.Startthemachine;refertoStartingtheMachine
(page15).
4.SetthespeedcontroltoSLOW,tipthefrontof
themachineup,graduallyengagethetraction
drive,andslowlyincreasethemachinespeed.
5.Adjustthespeedcontroltooperatethemower
atthedesiredgroundspeedandtransportthe
machinetothedesireddestination.
TransportingtheMachineUsinga
Trailer
Useatrailertotransportthemachineaconsiderable
distance.Usecautionwhileloadingandunloadingthe
machineontothetrailer.
1.Carefullydrivethemachineontothetrailer.
2.Shutoffthemachineandengagetheparking
brake.
3.Useafull-widthrampforloadingthemachine
intoatrailerortruck.
4.Securelyfastenthemachinetothetrailer.
Note:YoucanusetheToroTransProtrailerto
transportthemachine.Forinstructionsonloadingthe
trailer,refertoyourtrailerOperator’sManual.
RemovingtheTransport
Wheels
1.Releasetheclutchbail,usethespeedcontrol
tolowerthemachinespeed,andshutoffthe
machine.
2.Movethekickstandtothe
TRANSPORT-WHEEL-SERVICEposition;referto
Kickstand(page10).
3.Removethetransportwheelsbypushingthe
wheel-lockingclipsoutoftheaxles(Figure12).
13

g307660
Figure12
1.Axle2.Wheel-lockingclip
4.Carefullylowerthemachineoffofthekickstand
bypushingforwardslowlyorbyliftingthelower
handlesupport,allowingthekickstandtospring
backtotheSTORAGEposition;refertoKickstand
(page10).
DuringOperation
DuringOperationSafety
GeneralSafety
•Theowner/operatorcanpreventandisresponsible
foraccidentsthatmaycausepersonalinjuryor
propertydamage.
•Wearappropriateclothing,includingeye
protection;longpants;substantial,slip-resistant
footwear;andhearingprotection.Tiebacklong
hairanddonotwearlooseclothingorloose
jewelry.
•Donotoperatethemachinewhileill,tired,or
undertheinuenceofalcoholordrugs.
•Useyourfullattentionwhileoperatingthe
machine.Donotengageinanyactivitythat
causesdistractions;otherwise,injuryorproperty
damagemayoccur.
•Beforeyouturnonthemachine,ensurethatall
drivesareinneutral,theparkingbrakeisengaged,
andyouareintheoperatingposition.
•Keepbystandersandchildrenoutoftheoperating
area.Ifco-workersmustbepresent,usecaution
andensurethatthegrassbasketisinstalledon
themachine.
•Operatethemachineonlyingoodvisibilitytoavoid
holesorhiddenhazards.
•Donotoperatethemachinewhenthereistherisk
oflightning.
•Usecarewhenmowingonwetgrass.Poorfooting
couldcauseaslip-and-fallaccident.
•Keepyourhandsandfeetawayfromthecutting
unit.
•Lookbehindanddownbeforebackinguptobe
sureofaclearpath.
•Useextremecautionwhenreversingorpullingthe
machinetowardyou.
•Usecarewhenapproachingblindcorners,shrubs,
trees,orotherobjectsthatmayobscureyour
vision.
•Stopthecuttingunitwheneveryouarenotmowing.
•Disengagethedrivetothecuttingunitandshutoff
themachinebeforeadjustingtheheightofcut.
•Neverleavearunningmachineunattended.
•Beforeyouleavetheoperator’sposition,dothe
following:
–Parkthemachineonalevelsurface.
–Disengagethecuttingunit(s).
–Engagetheparkingbrake.
–Shutoffthemachineandremovethekey(if
equipped).
–Waitforallmovementtostop.
•Shutoffthemachinebeforeemptyingthebasket.
•Shutoffthemachineanddisengagethedriveto
thecuttingunitinthefollowingsituations:
–Beforecharging
–Beforeclearingblockages
–Beforeremovingthegrassbasket
–Beforechecking,cleaning,ormaintainingthe
cuttingunit
–Afterstrikingaforeignobjectorifanabnormal
vibrationoccurs.Inspectthecuttingunitfor
damageandmakerepairsbeforestartingand
operatingthemachine
–Beforeleavingtheoperatingposition
•Useonlyaccessoriesandattachmentsapproved
byTheToro®Company.
SlopeSafety
•Slopesareamajorfactorrelatedtolossofcontrol
androlloveraccidents,whichcanresultinsevere
injuryordeath.Youareresponsibleforsafeslope
operation.Operatingthemachineonanyslope
14

requiresextracaution.Beforeusingthemachine
onaslope,dothefollowing:
–Reviewandunderstandtheslopeinstructions
inthemanualandonthemachine.
–Evaluatethesiteconditionsofthedayto
determineiftheslopeissafeformachine
operation.Usecommonsenseandgood
judgmentwhenperformingthisevaluation.
Changesintheterrain,suchasmoisture,can
quicklyaffecttheoperationofthemachineon
aslope.
•Operateacrossslopes,neverupanddown.Avoid
operationonexcessivelysteeporwetslopes.
Poorfootingcouldcauseaslip-and-fallaccident.
•Identifyhazardsatthebaseoftheslope.Do
notoperatethemachineneardrop-offs,ditches,
embankments,water,orotherhazards.The
machinecouldsuddenlyrolloverifawheelgoes
overtheedgeortheedgecollapses.Keepasafe
distancebetweenthemachineandanyhazard.
Useahandheldtooltooperateintheseareas.
•Avoidstarting,stopping,orturningthemachineon
slopes.Avoidmakingsuddenchangesinspeedor
direction;turnslowlyandgradually.
•Donotoperateamachineunderanyconditions
wheretraction,steering,orstabilityisinquestion.
Beawarethatoperatingthemachineonwetgrass,
acrossslopes,ordownhillmaycausethemachine
tolosetraction.Lossoftractiontothedrivemay
resultinslidingandalossofbrakingandsteering.
Themachinecanslideevenifyoustopthedrive.
•Removeormarkobstaclessuchasditches,holes,
ruts,bumps,rocks,orotherhiddenhazards.T all
grasscanhideobstacles.Uneventerraincould
overturnthemachine.
•Ifyoulosecontrolofthemachine,stepawayfrom
thedirectionoftravelofthemachine.
•Alwayskeepthemachineingearwhengoing
downslopes.Donotcoastdownhill(applicable
onlytogear-driveunits).
StartingtheMachine
Note:Forillustrationsanddescriptionsofthecontrols
referencedinthissection,refertoControls(page9).
1.EnsurethattheT-handleconnectoronthemain
wireharnessisconnectedtothemainpower
supplyconnector
2.Ensurethattheclutchbailisdisengaged.
3.MovethekeyswitchtotheONposition.
UsingtheInfoCenterLCD
Display
TheInfoCenterLCDdisplayshowsinformationabout
yourmachinesuchasthecurrentbatterycharge,the
speed,variousdiagnostics,andotherinformation
aboutthemachineandthebatterypack.Figure13
illustratestheInfoCenterandthemaininformation
screen.
g017282
Figure13
1.Powerlight/faultindicator5.Menuaccess/backbutton
2.Batterychargeindicator6.Downbutton
3.Faultlogindicator7.Rightbutton
4.Speedcontrolsetting
•Powerlight/faultindicator—illuminateswhenyou
turnthemachineon.Thislightalsoblinkswhen
thereisamachinefault.
•Batterychargeindicator—whenthebatteryhas
afullcharge,alloftheboxesintheindicatorwill
belledinwithblack.Aspowerisused,boxes
willbelledwithwhitestartingfromtheright
andproceedingtotheleftasthebatterydrains.
Whenonly1boxisstillblackthebatterypackis
almostoutofpower;themachineentersapower
reductionmodewhichlimitsthethrottlespeedby
25%.Youshouldimmediatelyproceedtocharge
thebattery.
•Faultlogindicator—thisiconindicatesthatthereis
acurrentfaultlogtoreview.
•Speedcontrolsetting—thebarsturnblackfrom
lefttorightthefasteryousetthespeedcontrol.
Whenallbarsarelledwithwhite,themachineis
atzerospeed.
•Menuaccess/backbutton—pressthisbuttonto
accesstheInfoCentermenus.Youcanalsouseit
tobackoutofanymenuyouarecurrentlyusing.
15

•Downbutton—usethisbuttontoscrolldown
menus.
•Rightbutton—usethisbuttontoopenamenu
wherearightarrowindicatedadditionalcontent.
Note:Thepurposeofeachbuttonmaychange
dependingonwhatisrequiredatthetime.Each
buttonhasalabelwithanicondisplayingitscurrent
function.
UsingtheMenus
ToaccesstheInfoCentermenusystem,pressthe
menuaccessbuttonwhileatthemainscreen.This
willbringyoutothemainmenu.Refertothefollowing
tablesforasynopsisoftheoptionsavailablefrom
themenus:
MainMenu
MenuItemDescription
FaultsTheFaultsmenucontainsalistoftherecent
machinefaults.RefertotheServiceManual
oryourauthorizedT orodistributorformore
informationontheFaultsmenu.
ServiceTheServicemenucontainsinformationon
themachinesuchashoursofuseandbattery
usageandstatus.
DiagnosticsTheDiagnosticsmenulistsvariousstates
thatthemachinecurrentlyhas.Youcanuse
thistotroubleshootcertainissuesasitwill
quicklytellyouwhichmachinecontrolsare
onandwhichareoff.
SettingsTheSettingsmenuallowsyoutocustomize
theInfoCenterdisplay.
AboutTheAboutmenuliststhemodelnumber,
serialnumber,andsoftwareversionofyour
machine.
ServiceMenu
MenuItemDescription
HoursListsthetotalnumberofhoursthatthe
machinehasbeenturnedon.
MowTimeListsthetotalnumberofhoursthatthereel
hasbeenturnedon.
PowerUseListstheinstantaneouspowerdeliveredby
thebatteryinWatts.
BatteryChargeListsthecurrentbatterychargeasapercent
ofcapacity.
BatteryCurrentListstheinstantaneouscurrentdeliveredby
thebatteryinAmps.
BatteryVoltsListsthebatterypotentialinvolts.
TotalUsageListsthetotalamountofbatteryusagein
amphours.
CapacityListthecurrentbatterycapacityinamphours.
ChargeCyclesListsthetotalamountofbatterycharge
cycles.Achargecycleisdenedbythe
processofconnectinganddisconnectingthe
charger.
BatteryHoursListsthetotalamountofhoursthatthebattery
hasbeenactive.
BacklapSetsthemachineinBacklapMode.
EnergyListsthetotalenergydeliveredbythebattery
overitsentirelifeinwatt-hours.
DiagnosticsMenu
MenuItemDescription
KeyOnIndicateswhethertheignitionkeyisonoroff.
PBrakeLatchIndicateswhethertheparking-brakelatchis
onoroff.
EZTurnIndicateswhethertheEZ-Turncircuitisopen
orclosed.
TractionIndicateswhetherthetractionleverisonor
off.
ReelEnableIndicateswhetherthereelisengagedornot.
ThrottleIndicatesthethrottlecontrolsettinginVolts
(usedtocalculatethetargetrpm).
TargetrpmListsthedesiredmotorrpmasindicatedby
thespeedcontrolsetting.
MotorrpmListstheactualmotorrpm.
12VSupplyListsthesensorsupplyvoltage#1ofthe
controller.
5VSupplyListsthesensorsupplyvoltage#2ofthe
controller.
CANBusListsthemachinecommunicationbusstatus.
16

SettingsMenu
MenuItemDescription
LanguageUsethissettingtochangethelanguageused
ontheInfoCenter.
UnitsUsethissettingtochangetheunitsused
bytheInfoCenter.Themenuchoicesare
EnglishandMetric.
LCDBacklightUsethissettingtoincreaseordecreasethe
brightnessoftheLCDdisplay.
LCDContrastUsethissettingtochangethecontrast
betweenthedarkandlightareasoftheLCD
display.
AboutMenu
MenuItemDescription
ModelListsthemodelnumberofthemachine.
SNListstheserialnumberofthemachine.
S/WRevListstherevisionnumberofthemachine
software.
Note:Ifyouinadvertentlychangethelanguage
orcontrasttoasettingwhereyoucannolonger
understandorviewthedisplay,contactyour
authorizedTorodistributorforassistanceinresetting
thedisplay.
OperatingTips
Important:Grassclippingsactasalubricant
whenmowing.Operatingthecuttingunit
excessivelywithoutgrassclippingscandamage
thecuttingunit.
•Mowthegreensinastraightback-and-forth
directionacrossthegreen.
•Avoidcircularmowingorturningthemachineon
thegreensareastopreventscufng.
•Turnthemachineoffthegreenbyraisingthe
cuttingreel(pushingthehandledown)and
performingatear-shapedturnonthetractiondrum
(Figure14).
g271799
Figure14
•Mowatanormalwalkingpace.Fastspeedssaves
littletimeandresultsinaninferiormowingjob.
•Toassistinmaintainingastraightlineacross
thegreenandtokeepthemachineanequal
distancefromtheedgeofthepreviouscut,usethe
alignmentstripesonthebasket(Figure15).
17

g339014
Figure15
1.Alignmentstripes
OperatingtheMachineinLow
LightConditions
UsetheLEDLightKitwhenyouoperatethemachine
inlowlightconditions.ContactyourauthorizedToro
distributorforthiskit.
Important:Donotuseotherlightsystemswith
thismachine;theymaydamagethebatterypack
orelectricalsystem.
OperatingtheControlswhile
Mowing
1.Startthemachine,setthespeedcontroltoa
reducedspeed,pushdownonthehandleto
raisethecuttingunit,andengagethetraction
drivetotransportthemachineontothecollaror
approachofthegreen.
2.Stopthemachineonthecollarorapproach.
3.Usethespeedcontroltoincreasethemachine
speed,engagethecuttingunit,engagethe
tractiondrivetomovethemachineontothe
green,lowerthecuttingunittotheground,and
beginmowing.
ShuttingOfftheMachine
1.Releasetheclutchbail.
2.MovethespeedcontroltotheSLOWposition.
3.MovethekeyswitchtotheOFFpositionand
removethekey.
AfterOperation
AfterOperationSafety
GeneralSafety
•Shutoffthemachine,removethekey(ifequipped),
andwaitforallmovementtostopbeforeyouleave
theoperator’sposition.Allowthemachinetocool
beforeadjusting,servicing,cleaning,orstoringit.
•Cleangrassanddebrisfromthemachinetohelp
preventres.
•Allowthemachinetocoolbeforestoringthe
machineinanyenclosure.
•Donotstorethemachinewherethereisanopen
ame,spark,orpilotlight,suchasonawater
heateroronotherappliances.
BatteryandChargerSafety
General
•Improperlyusingormaintainingthebattery
chargercouldresultininjury.Toreducethis
potential,complywiththeallsafetyinstructions.
•Useonlythesuppliedchargerforbatterycharging.
•Conrmthevoltagethatisavailableinyour
countrybeforeusingthecharger.
•ForconnectiontoasupplynotintheUS,
useanattachmentplugadapteroftheproper
congurationforthepoweroutlet,ifneeded.
•Donotgetthechargerwet;keepitprotectedfrom
rainandsnow.
•Ariskofre,electricshock,orinjurymayresult
fromusinganaccessorynotrecommendedor
soldbyToro.
•Toreduceriskofabatteryexplosion,followthese
instructionsandtheinstructionsforanyequipment
thatyouintendtousenearthecharger.
•Batteriescouldemitexplosivegassesiftheyare
signicantlyovercharged.
Training
•Neverallowchildrenoruntrainedpeopleto
operateorservicethecharger.Localregulations
mayrestricttheageoftheoperator.Theowner
18

isresponsiblefortrainingalloperatorsand
mechanics.
•Read,understand,andfollowallinstructionson
thechargerandinthemanualbeforeoperating
thecharger.Befamiliarwiththeproperuseofthe
charger.
Preparation
•Keepbystandersandchildrenawaywhile
charging.
•Wearappropriateclothingwhilecharging,
includingeyeprotection;longpants;and
substantial,slip-resistantfootwear.
•Shutoffthemachineandwait5secondsuntilthe
machinehascompletelypowereddownbefore
charging.Failuretodothismaycausearcing.
•Ensurethattheareaiswellventilatedwhile
charging.
•Readandfollowallprecautionsforcharging.
•Thechargerisforuseonlyonnominal120and
240VACcircuits,andisequippedwithagrounding
plugfor120VACoperation.Forusewith240V
circuits,contactyourauthorizedT orodistributorfor
thecorrectpowercord.
Operation
•Donotchargeafrozenbattery.
•Donotabusethecord.Donotcarrythecharger
bythecordoryankonthepowersupplycordto
disconnectthechargerfromthereceptacle.Keep
thecordfromheat,oil,andsharpedges.
•Connectthechargerdirectlytoagrounding
receptacle.Donotusethechargeronan
ungroundedoutlet,evenwithanadaptor.
•Donotaltertheprovidedpowercordorplug.
•Avoiddroppingametaltoolnearorontoabattery;
itmightcauseasparkorshort-circuitanelectrical
partthatcouldleadtoanexplosion.
•Removemetalitemssuchasrings,bracelets,
necklaces,andwatcheswhenworkingwitha
lithium-ionbattery.Alithium-ionbatterycan
produceenoughcurrenttocauseasevereburn.
•Neveroperatethechargerwithoutgoodvisibility
orlight.
•Useanappropriateextensioncord.
•Ifthepowersupplycordisdamagedwhileit
ispluggedin,disconnectthecordfromthe
wallreceptacleandcontactanauthorizedT oro
distributorforareplacement.
•Unplugthechargerfromtheelectricaloutletwhen
notinuse,beforemovingittoanotherlocation,or
priortoservicingit.
MaintenanceandStorage
•Storethechargerindoorsinadry,secureplace
thatisoutofthereachofunauthorizedusers.
•Donotdisassemblethecharger.Takethecharger
toanauthorizedT orodistributorwhenserviceor
repairisrequired.
•Unplugthepowercordfromtheoutletbefore
startinganymaintenanceorcleaningtoreduce
riskofelectricshock.
•Maintainorreplacesafetyandinstructionlabels
asneeded.
•Donotoperatethechargerwithadamaged
cordorplug.Replaceadamagedcordorplug
immediately.
•Ifthechargerhasreceivedanimpact,been
dropped,orotherwisedamaged,donotuseit;
takeittoanauthorizedT orodistributor.
OperatingtheControls
afterMowing
1.Drivethemachineoffofthegreen,pushdown
onthehandletoraisethecuttingunit,release
theclutchbail,disengagethecuttingunit,and
shutoffthemachine.
2.Removethegrassbasketandemptythebasket
ofclippings.
3.Installthegrassbasketonthemachineand
transportthemachinetostorage.
TransportingtheMachine
Aftermowing,transportthemachineawayfromthe
jobsite;refertoTransportingtheMachineUsing
TransportWheels(page13)orTransportingthe
MachineUsingaTrailer(page13).
19

InstallingtheTransport
Wheels
1.Movethekickstandtothe
TRANSPORT-WHEEL-SERVICEposition;referto
Kickstand(page10)
2.Slideawheelontoanaxle(Figure16).
g307661
Figure16
1.Axle2.Wheel-lockingclip
3.Pivotthewheel-lockingclip(Figure16)away
fromcenterofthewheel,allowingittoslide
fartherontotheaxle.
4.Rotatethewheelbackandforthuntilitslides
completelyontotheaxleandthelockingclipis
securedinthegrooveontheaxleshaft.
5.Repeattheprocedureontheoppositesideof
themachine.
6.Carefullylowerthemachineoffthekickstand.
EngagingorDisengaging
theTransmission
Youcandisengagethedrumfromthetransmissionto
allowthemachinetobemaneuvered.Disengagethe
transmissionwhenyouneedtomovethemachine
withoutstartingthemachine(e.g.,performing
maintenanceinanenclosedarea).
Beforeyouoperatethemachine,ensurethatyou
engagethetransmission.
1.Locatethetraction-engagementleveronthe
transmissiongearbox(Figure14).
g342962
Figure17
1.Traction-engagement
lever—DISENGAGED
position
3.Traction-engagement
lever—ENGAGEDposition
2.Transmissiongearbox
2.Performthefollowingsteptoengageor
disengagethetransmission:
•Disengagethetransmission:Rotatethe
levertotheDISENGAGEDposition.
•Engagethetransmission:Rotatethelever
totheENGAGEDposition.
20
This manual suits for next models
1
Table of contents
Other Toro Lawn Mower manuals

Toro
Toro 22162 User manual

Toro
Toro Z Master Commercial 2000 74141TE User manual

Toro
Toro 75967 User manual

Toro
Toro 30243 Groundsmaster 223D User manual

Toro
Toro 400XT Series User manual

Toro
Toro 03530 User manual

Toro
Toro TimeCutter SS 5060 User manual

Toro
Toro Groundsmaster 4100-D User manual

Toro
Toro 30695 User manual

Toro
Toro 72098 User manual
Popular Lawn Mower manuals by other brands

Exmark
Exmark METRO Operator's manual

Bosch
Bosch Rotak 32 Original instructions

Allis-Chalmers
Allis-Chalmers AC23460AWS Operator's manual

Craftsman
Craftsman 247.370340 Operator's manual

Grizzly
Grizzly BRM 46-140 BSA Q-360 InStart Translation of the original instructions for use

Makita
Makita DLM460 instruction manual