Toro 20943 User manual

FormNo.3414-182RevB
46cmLawnMower
ModelNo.20943—SerialNo.317000001andUp
Operator'sManual
Introduction
Thisrotary-blade,walk-behindlawnmowerisintended
tobeusedbyresidentialhomeowners.Itisdesigned
primarilyforcuttinggrassonwell-maintainedlawns
onresidentialproperties.Itisnotdesignedforcutting
brushorforagriculturaluses.
Readthisinformationcarefullytolearnhowtooperate
andmaintainyourproductproperlyandtoavoid
injuryandproductdamage.Youareresponsiblefor
operatingtheproductproperlyandsafely.
YoumaycontactT orodirectlyatwww.Toro.comfor
productandaccessoryinformation,helpndinga
dealer,ortoregisteryourproduct.
Wheneveryouneedservice,genuineToroparts,or
additionalinformation,contactanAuthorizedService
DealerorToroCustomerServiceandhavethemodel
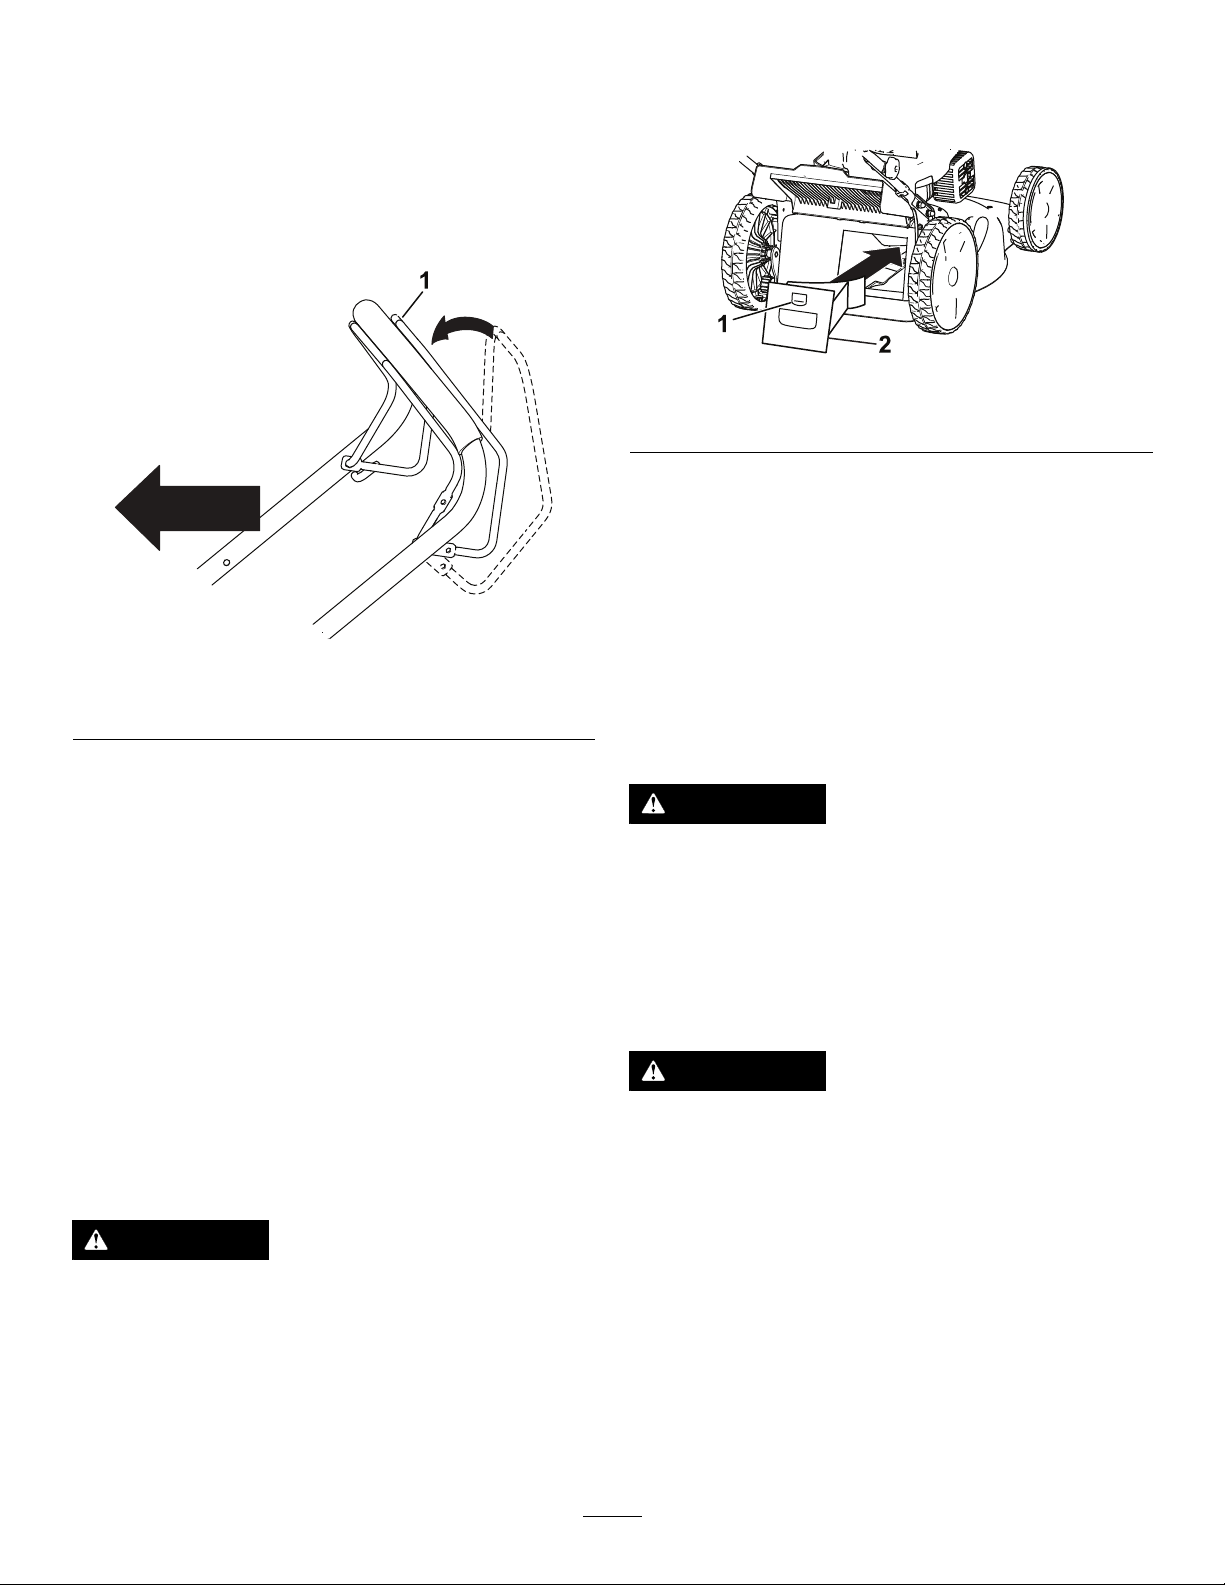
andserialnumbersofyourproductready.Figure1
identiesthelocationofthemodelandserialnumbers
ontheproduct.
g189079
Figure1
1.Modelandserialnumberplate
Writetheproductmodelandserialnumbersinthe
spacebelow:
ModelNo.
SerialNo.
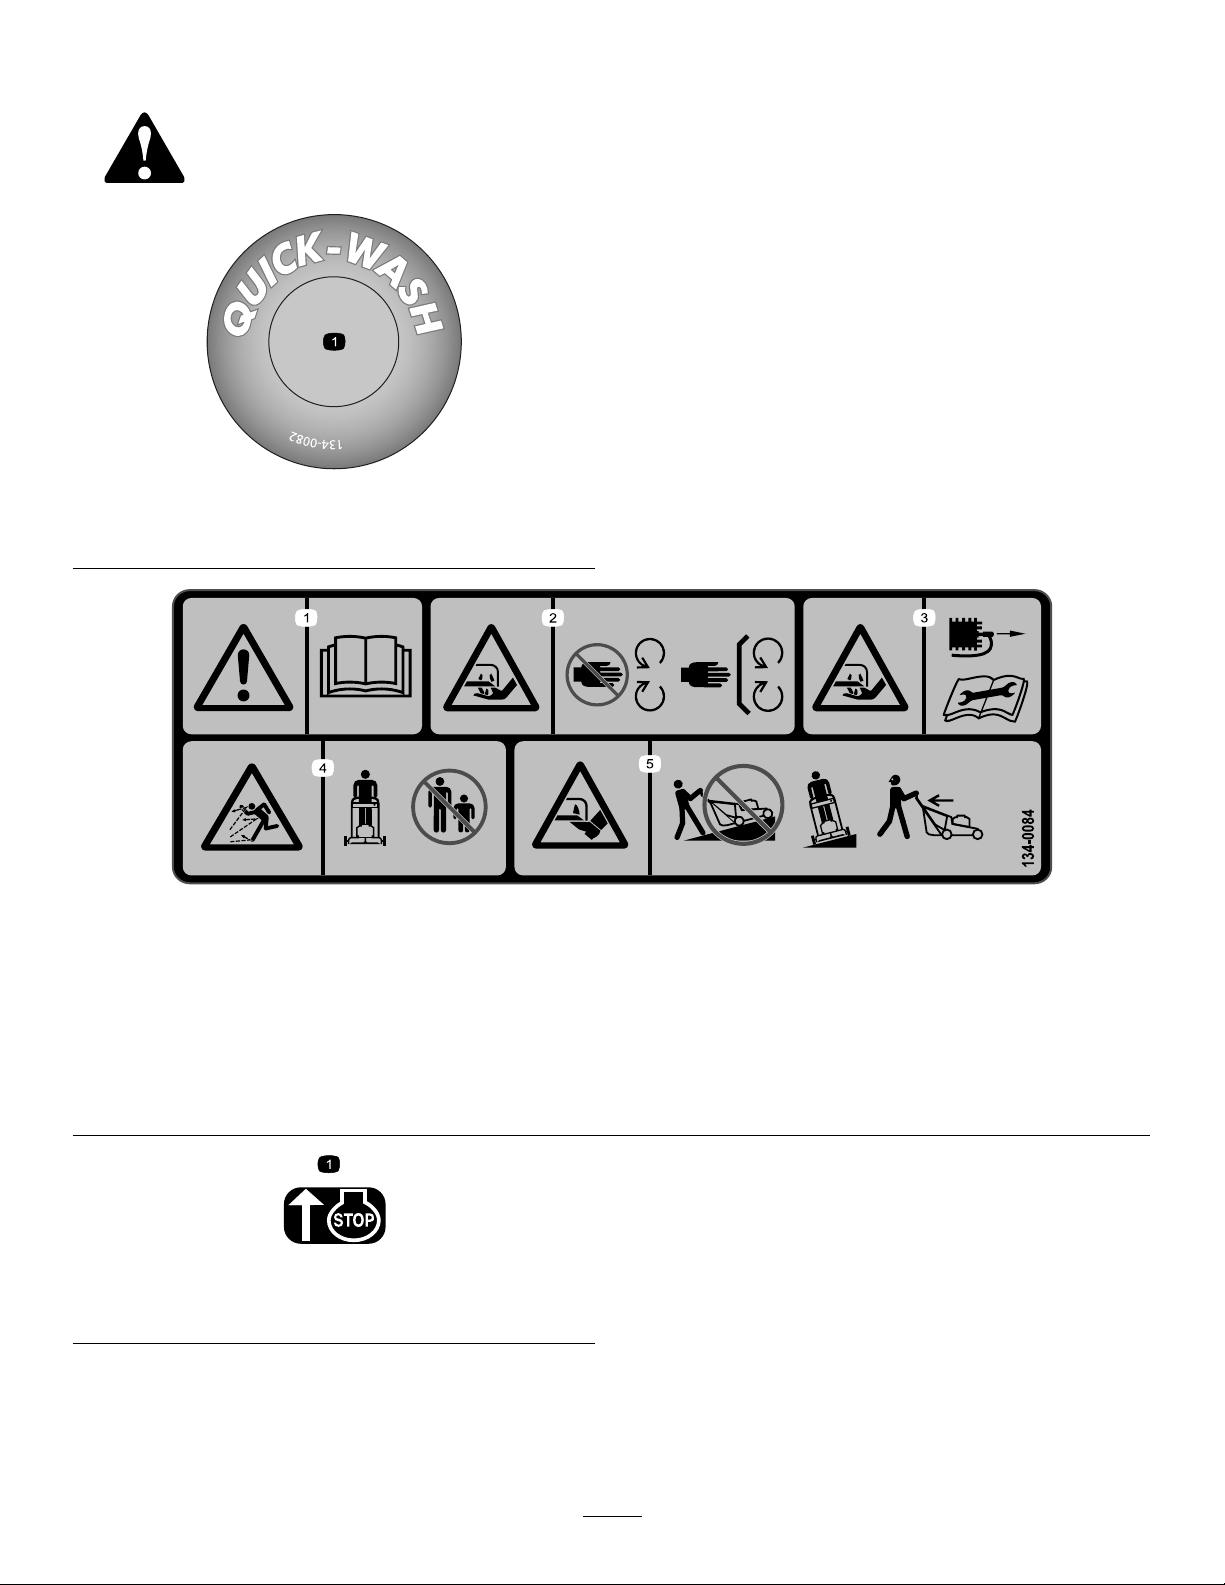
Thismanualidentiespotentialhazardsandhas
safetymessagesidentiedbythesafety-alertsymbol
(Figure2),whichsignalsahazardthatmaycause
seriousinjuryordeathifyoudonotfollowthe
recommendedprecautions.
g000502
Figure2
1.Safety-alertsymbol
Thismanualuses2wordstohighlightinformation.
Importantcallsattentiontospecialmechanical
informationandNoteemphasizesgeneralinformation
worthyofspecialattention.
NetTorque:Thegrossornettorqueofthisengine
waslaboratoryratedbytheenginemanufacturerin
accordancewiththeSocietyofAutomotiveEngineers
(SAE)J1940.Asconguredtomeetsafety,emission,
andoperatingrequirements,theactualenginetorque
onthisclassofmowerwillbesignicantlylower.Goto
www.Toro.comtoviewspecicationsonyourmower
model.
Contents
Introduction...............................................................1
Safety.......................................................................2
GeneralSafety...................................................2
SafetyandInstructionalDecals..........................3
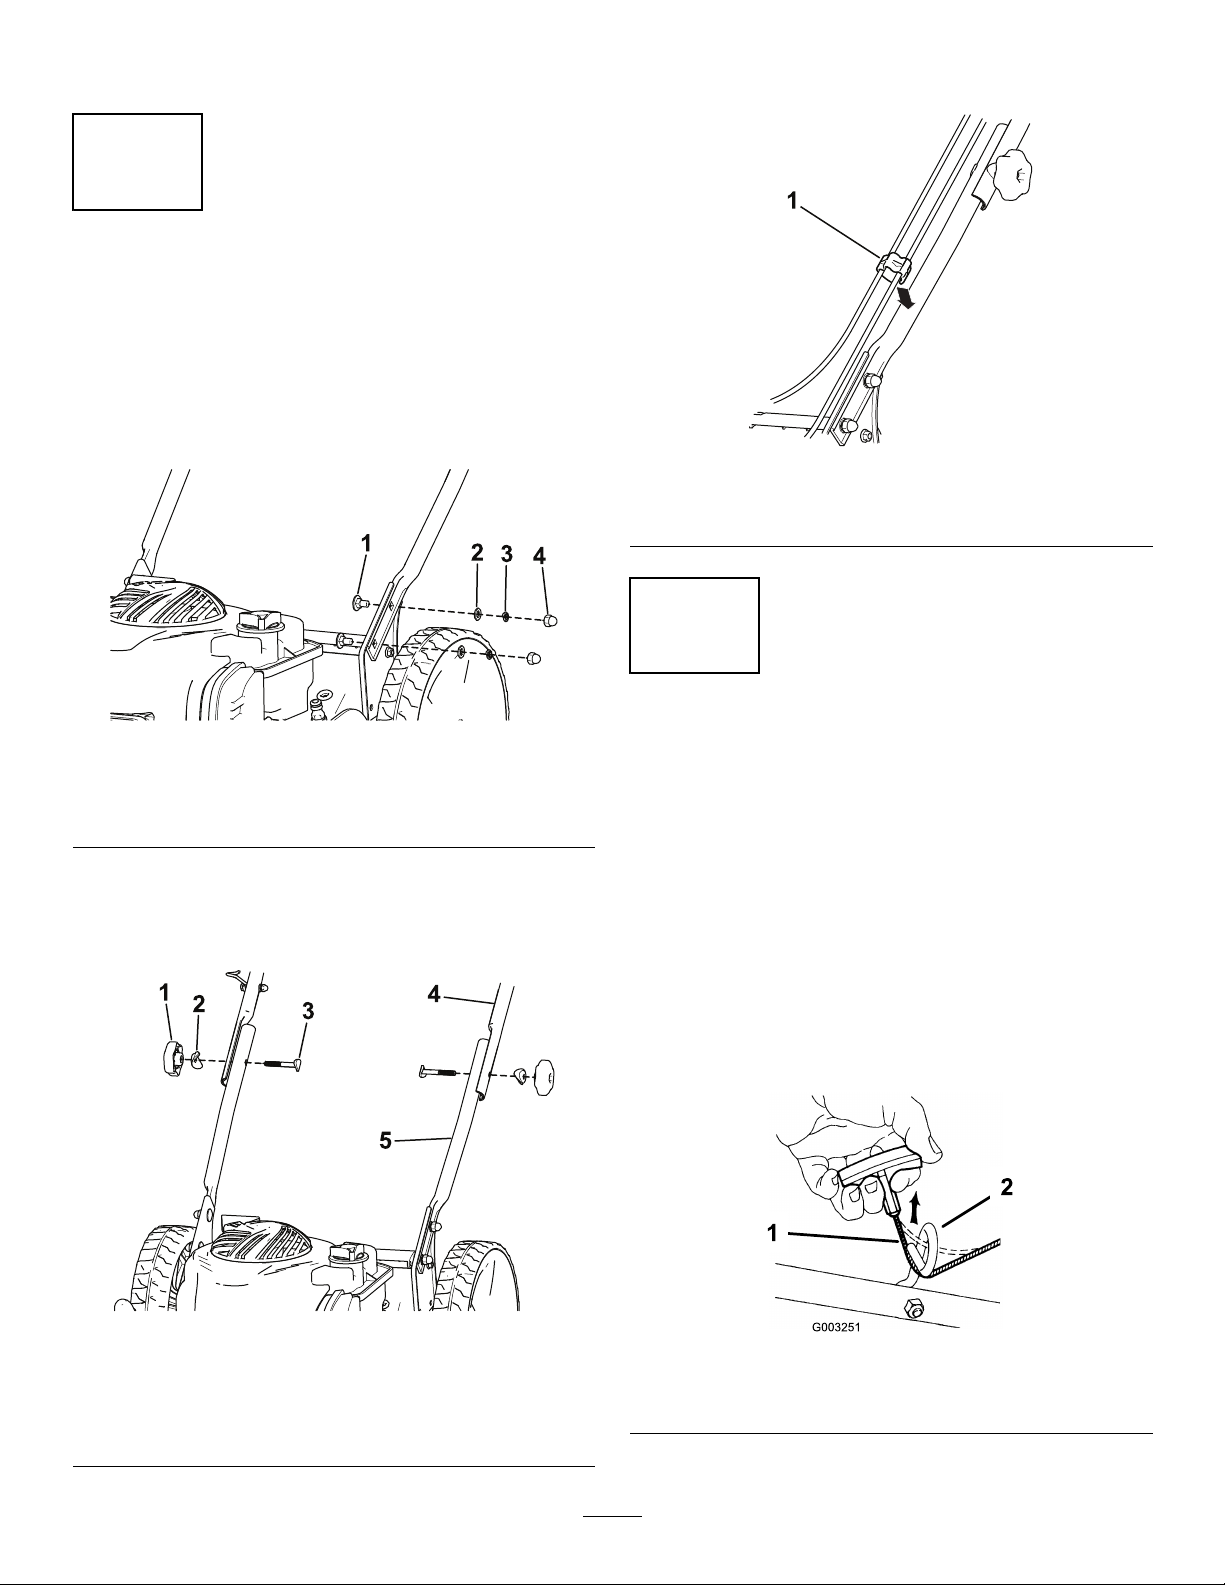
Setup........................................................................4
1AssemblingtheHandle....................................4
2InstallingtheRecoil-StarterRopeinthe
RopeGuide.....................................................4
3FillingtheEnginewithOil.................................4
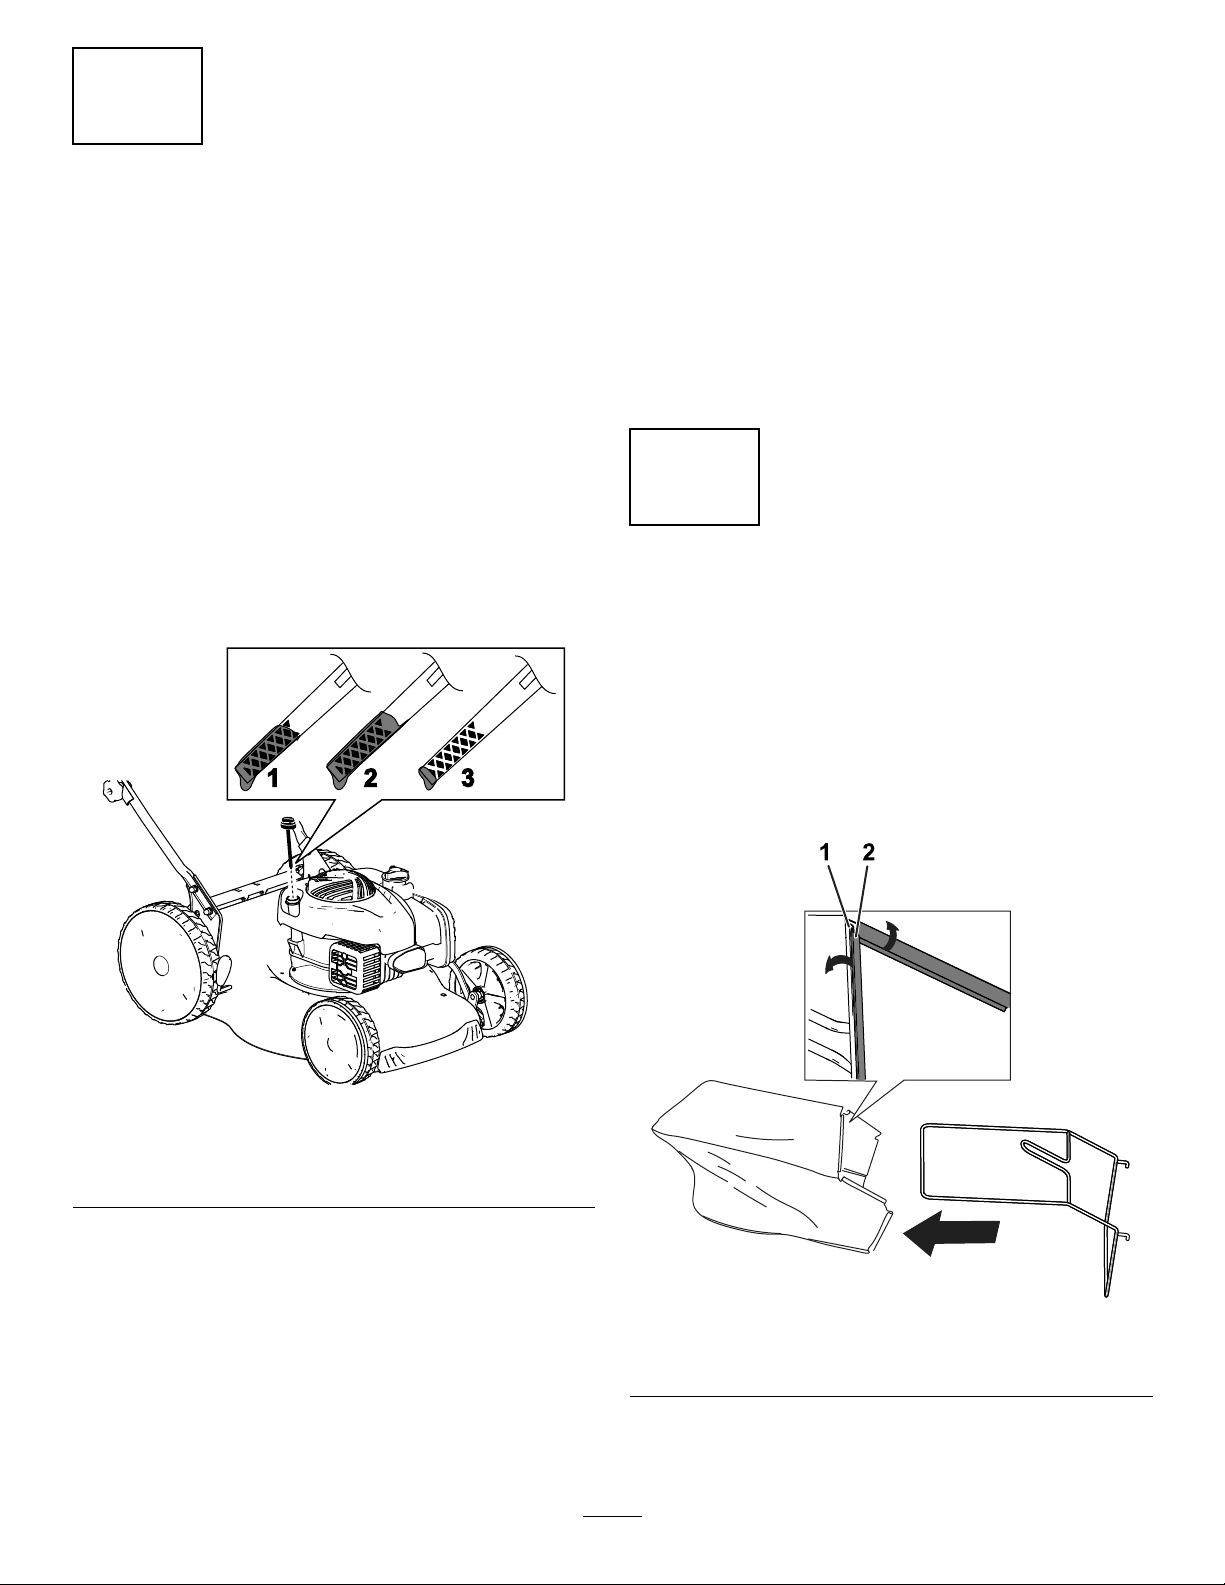
4AssemblingtheGrassBag...............................5
ProductOverview.....................................................6
Specications....................................................6
Operation..................................................................6
BeforeOperation...................................................6
BeforeOperationSafety.....................................6
FillingtheFuelT ank............................................7
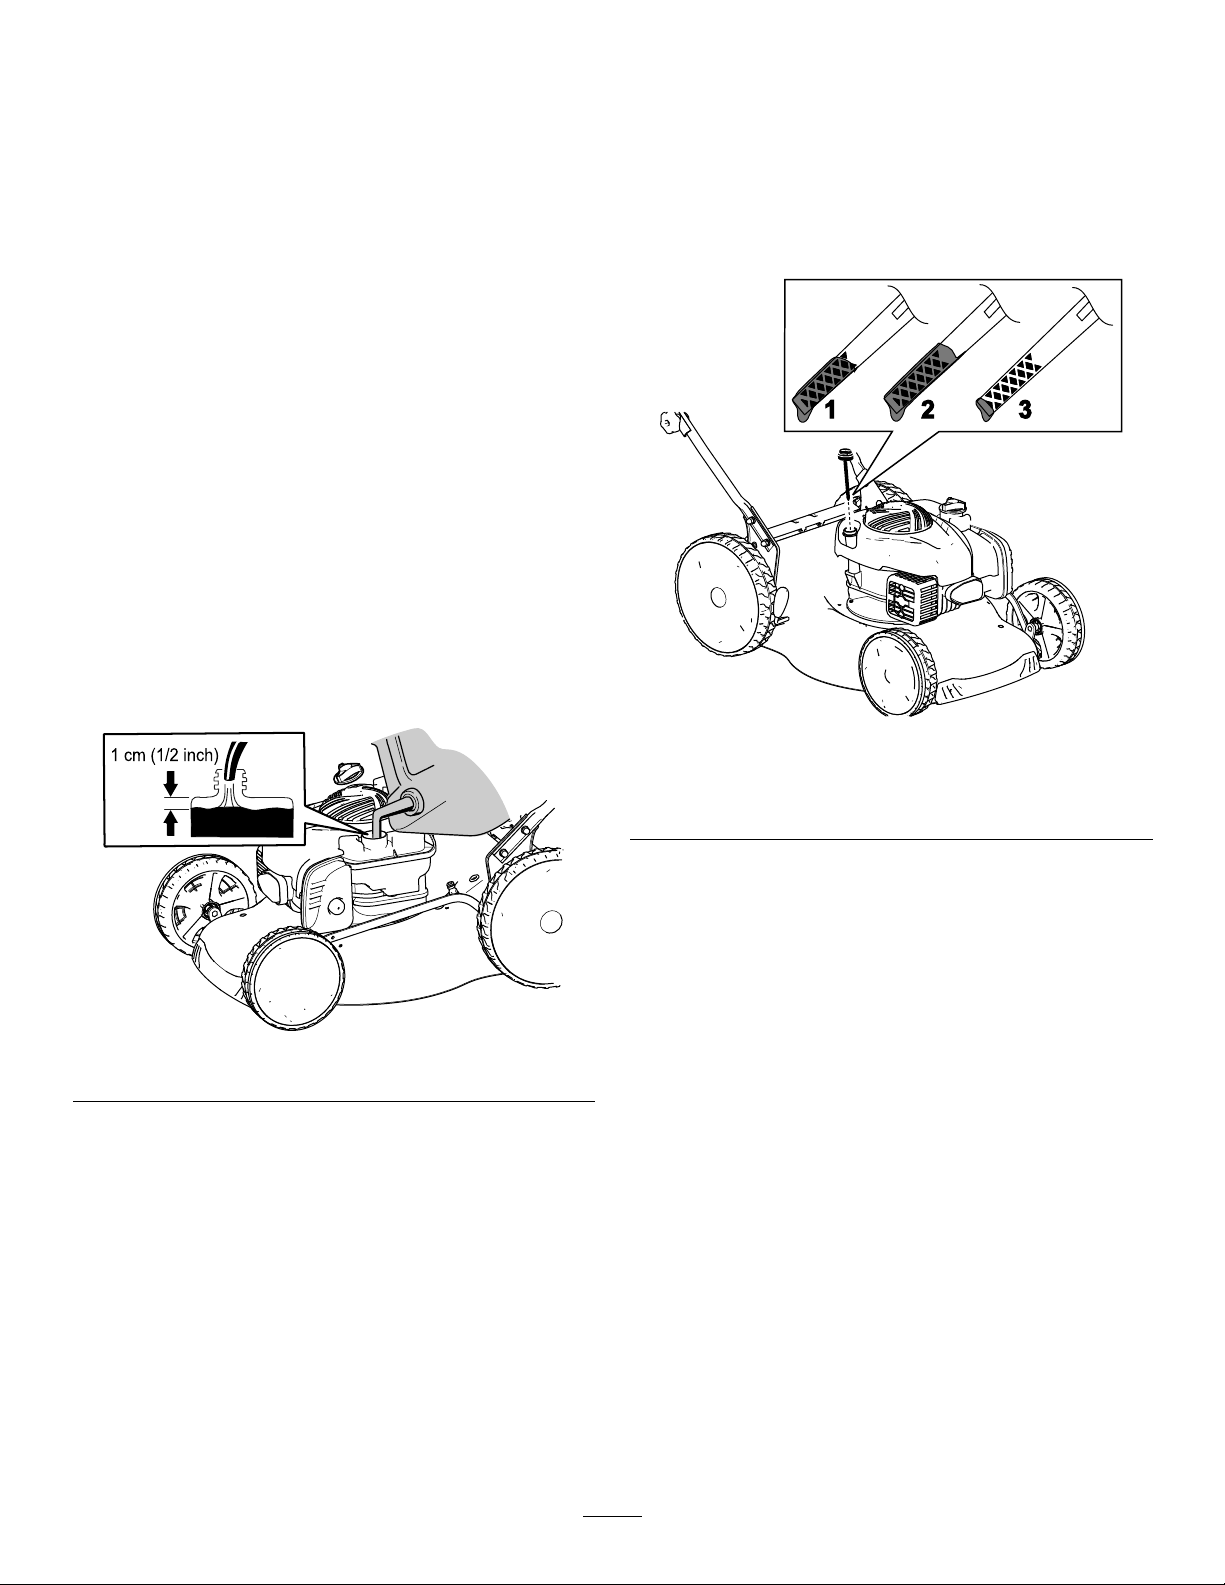
CheckingtheEngine-OilLevel............................7
AdjustingtheCuttingHeight...............................8
DuringOperation...................................................9
DuringOperatingSafety.....................................9
StartingtheEngine.............................................9
UsingtheSelf-PropelDrive...............................10
©2017—TheToro®Company
8111LyndaleAvenueSouth
Bloomington,MN55420
Registeratwww.T oro.com.OriginalInstructions(EN)
PrintedinChina
AllRightsReserved*3414-182*B

ShuttingOfftheEngine.....................................10
MulchingtheGrassClippings...........................10
BaggingtheGrassClippings............................10
Rear-DischargingtheGrassClippings...............11
OperatingTips..................................................11
AfterOperation....................................................12
AfterOperatingSafety......................................12
CleaningundertheMachine.............................12
FoldingtheHandle...........................................13
Maintenance...........................................................14
RecommendedMaintenanceSchedule(s)...........14
MaintenanceSafety..........................................14
PreparingforMaintenance...............................14
ReplacingtheSparkPlug.................................15
ServicingtheAirFilter.......................................15
ChangingtheEngineOil...................................15
ReplacingtheBlade..........................................16
LubricatingtheWheels.....................................17
Storage...................................................................18
PreparingtheMachineforStorage...................18
RemovingtheMachinefromStorage................18
Safety
Thismachinehasbeendesignedinaccordancewith
ENISO5395:2013.
GeneralSafety
Thisproductiscapableofamputatinghandsand
feetandofthrowingobjects.Alwaysfollowallsafety
instructionstoavoidseriouspersonalinjury.
Usingthisproductforpurposesotherthanitsintended
usecouldprovedangeroustoyouandbystanders.
•Readandunderstandthecontentsofthis
Operator’sManualbeforestartingtheengine.
•Donotputyourhandsorfeetnearmoving
componentsofthemachine.
•Donotoperatethemachinewithoutallguards
andothersafetyprotectivedevicesinplaceand
workingonthemachine.
•Keepclearofanydischargeopening.Keep
bystandersasafedistanceawayfromthe
machine.
•Keepchildrenoutoftheoperatingarea.Never
allowchildrentooperatethemachine.
•Stopthemachineandshutofftheenginebefore
servicing,fueling,oruncloggingthemachine.
Improperlyusingormaintainingthismachinecan
resultininjury.Toreducethepotentialforinjury,
complywiththesesafetyinstructionsandalwayspay
attentiontothesafety-alertsymbol,whichmeans
Caution,Warning,orDanger—personalsafety
instruction.Failuretocomplywiththeseinstructions
mayresultinpersonalinjuryordeath.
Youcanndadditionalitemsofsafetyinformationin
theirrespectivesectionsthroughoutthismanual.
2

SafetyandInstructionalDecals
Safetydecalsandinstructionsareeasilyvisibletotheoperatorandarelocatednearanyarea
ofpotentialdanger.Replaceanydecalthatisdamagedormissing.
decal134-0082
134-0082
1.Quick-washport
decal134-0084
134-0084
1.Warning—readtheOperator'sManual.4.Thrownobjecthazard—keepbystandersawayfromthe
machine.
2.Cuttinghazard—keepawayfrommovingparts;keepall
guardsandshieldsinplace.
5.Cuttinghazard—donotmowupaslope;alwaysmowfrom
sidetoside;ensurethatthebladeisstoppedandtheengine
isshutoffbeforepickingupnearbydebris;alwayslookbehind
youwhenbackingupwiththemachine.
3.Cuttinghazard—disconnectthesparkplugandreadthe
Operator'sManualbeforeperformingmaintenance.
decalh295159
H295159
1.Enginestop
3

Setup
1
AssemblingtheHandle
NoPartsRequired
Procedure
1.Attachthelowerhandletothemowerhousing
with4bolts,4atwashers,4splitwashers,and
4nuts(Figure3).
g189072
Figure3
1.Bolt(4)3.Splitwasher(4)
2.Flatwasher(4)4.Nut(4)
2.Attachtheupperhandletothelowerhandle
using2handleknobs,2curvedwashers,and
2bolts.Tightenthehandleknobssecurelyby
hand(Figure4).
g189074
Figure4
1.Handleknob(2)4.Upperhandle
2.Curvedwasher(2)5.Lowerhandle
3.Bolt(2)
3.Insertthecablesintothecableclampandattach
thecablecliptothehandleasshowninFigure5.
g189081
Figure5
1.Cableclip
2
InstallingtheRecoil-Starter
RopeintheRopeGuide
NoPartsRequired
Procedure
Important:Tostarttheenginesafelyandeasily
wheneveryouusethemachine,installthe
recoil-starterropeintheropeguide.
Holdtheblade-controlbartotheupperhandle(Figure
9)andpulltherecoil-starterropethroughtherope
guideonthehandle(Figure6).
g003251
Figure6
1.Recoil-starterrope2.Ropeguide
4

3
FillingtheEnginewithOil
NoPartsRequired
Procedure
Important:Yourmachinedoesnotcomewithoil
intheengine.Beforestartingtheengine,llthe
enginewithoil.
Engineoilcapacity:0.47L
Oilviscosity:SAE30orSAE10W-30detergentoil
APIserviceclassication:SJorhigher
1.Movethemachinetoalevelsurface.
2.Removethedipstickbyrotatingthecap
counterclockwiseandpullingitout(Figure7).
g193542
Figure7
1.Full3.Low
2.High
3.Carefullypourabout3/4oftheenginecapacity
ofoilintotheoil-lltube.
4.Waitabout3minutesfortheoiltosettleinthe
engine.
5.Wipethedipstickcleanwithacleancloth.
6.Insertthedipstickintotheoil-lltube,then
removethedipstick.
7.Readtheoillevelonthedipstick(Figure7).
•Iftheoillevelonthedipstickistoolow,
carefullypourasmallamountofoilintothe
oil-lltube,wait3minutes,andrepeatsteps
3through5untiltheoilonthedipstickisat
thecorrectlevel.
•Iftheoillevelonthedipstickistoohigh,drain
theexcessoiluntiltheoilonthedipstickis
atthecorrectlevel;refertoChangingthe
EngineOil(page15).
Important:Iftheoillevelintheengineistoo
lowortoohighandyouruntheengine,you
maydamagetheengine.
8.Installthedipsticksecurely.
4
AssemblingtheGrassBag
NoPartsRequired
Procedure
1.Slidethegrass-bagframeintothegrassbag
(Figure8).
2.Positionall6grass-bagclipsoverthegrass-bag
frame(Figure8).
g209825
Figure8
1.Grass-bagframe2.Grass-bagclip
5

ProductOverview
g189077
Figure9
1.Self-propelbar6.Sparkplug
2.Handle7.Cutting-heightlever
3.Blade-controlbar8.Grassbag
4.Handleknob9.Recoil-starthandle
5.Airlter
Specications
ModelWeightLengthWidthCutting
Width
Height
2094330kg148cm55cm46cm105cm
Operation
BeforeOperation
BeforeOperationSafety
GeneralSafety
•Becomefamiliarwiththesafeoperationofthe
equipment,operatorcontrols,andsafetysigns.
•Checkthatallguardsandsafetydevices,such
asdoorsand/orgrasscatchers,areinplaceand
workingproperly.
•Alwaysinspectthemachinetoensurethatthe
blade,bladebolts,andcuttingassemblyarenot
wornordamaged.
•Inspecttheareawhereyouwillusethemachine
andremoveallobjectsthatthemachinecould
throw.
•Adjustingthecuttingheightmaybringyouinto
contactwiththemovingblade,causingserious
injury.
–Shutofftheengineandwaitforallmoving
partstostop.
–Donotputyourngersunderthehousing
whenadjustingthecuttingheight.
FuelSafety
DANGER
Fuelisextremelyammableandhighly
explosive.Areorexplosionfromfuel
canburnyouandothersandcandamage
property.
•Topreventastaticchargefromignitingthe
fuel,placethecontainerand/ormachine
directlyonthegroundbeforelling,notin
avehicleoronanobject.
•Fillthefueltankoutdoors,inanopenarea,
whentheengineiscold.Wipeupanyfuel
thatspills.
•Donothandlefuelwhensmokingor
aroundanopenameorsparks.
•Storefuelinanapprovedcontainerand
keepitoutofthereachofchildren.
WARNING
Fuelisharmfulorfatalifswallowed.
Long-termexposuretovaporscancause
seriousinjuryandillness.
•Avoidprolongedbreathingofvapors.
•Keepyourhandsandfaceawayfromthe
nozzleandthefuel-tankopening.
•Keepfuelawayfromyoureyesandskin.
6

FillingtheFuelTank
•Forbestresults,useonlyclean,fresh,unleaded
gasolinewithanoctaneratingof87orhigher
((R+M)/2ratingmethod).
•ETHANOL:Gasolinewithupto10%ethanol
(gasohol)or15%MTBE(methyltertiarybutyl
ether)byvolumeisacceptable.Ethanoland
MTBEarenotthesame.Gasolinewith15%
ethanol(E15)byvolumeisnotapprovedforuse.
Neverusegasolinethatcontainsmorethan10%
ethanolbyvolume,suchasE15(contains15%
ethanol),E20(contains20%ethanol),orE85
(containsupto85%ethanol).Usingunapproved
gasolinemaycauseperformanceproblemsand/or
enginedamage.Usingunapprovedgasolineisnot
coveredundertheproductwarranty.
•Donotusegasolinecontainingmethanol.
•Donotstorefueleitherinthefueltankorinfuel
containersoverthewinterunlessfuelstabilizer
hasbeenaddedtothefuel.
•Donotaddoiltogasoline.
Important:Toreducestartingproblems,addfuel
stabilizertothefuelallseason,mixingitwith
gasolinelessthan30daysold.
g189067
Figure10
CheckingtheEngine-Oil
Level
ServiceInterval:Beforeeachuseordaily
1.Movethemachinetoalevelsurface.
2.Removethedipstickbyrotatingthecap
counterclockwiseandpullingitout(Figure11).
g193542
Figure11
1.Full3.Low
2.High
3.Wipethedipstickcleanwithacleancloth.
4.Insertthedipstickintotheoil-lltube,then
removethedipstick.
5.Readtheoillevelonthedipstick(Figure11).
•Iftheoillevelonthedipstickistoolow,
slowlypourasmallamountofoilintothe
oil-lltube,wait3minutes,andthenrepeat
steps3through5untiltheoilonthedipstick
isatthecorrectlevel.
•Iftheoillevelonthedipstickistoohigh,drain
theexcessoiluntiltheoilonthedipstickis
atthecorrectlevel.Todraintheexcessoil,
refertoChangingtheEngineOil(page15).
Important:Iftheoillevelinthecrankcase
istoolowortoohighandyourunthe
engine,youmaydamagetheengine.
6.Installthedipstickintotheoil-lltubesecurely.
7

AdjustingtheCutting
Height
WARNING
Adjustingthecuttingheightmaybringyou
intocontactwiththemovingblade,causing
seriousinjury.
•Shutofftheengineandwaitforallmoving
partstostop.
•Donotputyourngersunderthehousing
whenadjustingthecuttingheight.
Thereare7cutting-heightsettingsfrom25to70mm.
Adjustthecuttingheightasdesired.Setthefront
wheelstothesameheightastherearwheels.
Toadjustthecuttingheight,disengagethelever
(Figure12),raiseorlowerthemachine,andthen
engagethelever.
g189069
Figure12
ThecuttingheightpositionsareshowninFigure13.
g208642
Figure13
1.70.0mm5.40.0mm
2.62.5mm6.32.5mm
3.55.0mm7.25.0mm
4.47.5mm
8

DuringOperation
DuringOperatingSafety
GeneralSafety
•Wearappropriateclothing,includingeye
protection;slip-resistant,substantialfootwear;and
hearingprotection.Tiebacklonghair,secure
looseclothing,anddonotwearjewelry.
•Donotoperatethemachinewhileill,tired,or
undertheinuenceofalcoholordrugs.
•Thebladeissharp;contactingthebladecanresult
inseriouspersonalinjury.Shutofftheengineand
waitforallmovingpartstostopbeforeleavingthe
operatingposition.
•Whenyoureleasetheblade-controlbar,the
engineshouldshutoffandthebladeshouldstop
within3seconds.Ifnot,stopusingyourmachine
immediatelyandcontactanAuthorizedService
Dealer.
•Operatethemachineonlyingoodvisibilityand
appropriateweatherconditions.Donotoperate
themachinewhenthereistheriskoflightning.
•Wetgrassorleavescancauseseriousinjuryif
youslipandcontacttheblade.Avoidmowingin
wetconditions.
•Useextremecarewhenapproachingblind
corners,shrubs,trees,orotherobjectsthatmay
blockyourview.
•Watchforholes,ruts,bumps,rocks,orother
hiddenobjects.Uneventerraincouldcausea
slip-and-fallaccident.
•Stopthemachineandinspectthebladeafter
strikinganobjectorifthereisanabnormal
vibrationinthemachine.Makeallnecessary
repairsbeforeresumingoperation.
•Beforeleavingtheoperatingposition,shutoffthe
engine,andwaitforallmovingpartstostop.
•Iftheenginehasbeenrunningthemuferwillbe
hotandcanseverelyburnyou.Keepawayfrom
thehotmufer.
•Checkthegrasscatchercomponentsandthe
dischargeguardfrequentlyandreplacethemwith
themanufacturer’srecommendedpartswhen
necessary.
SlopeSafety
•Mowacrossthefaceofslopes;neverupand
down.Useextremecautionwhenchanging
directiononslopes.
•Donotmowonexcessivelysteepslopes.Poor
footingcouldcauseaslip-and-fallaccident.
•Mowwithcautionneardrop-offs,ditches,or
embankments.
StartingtheEngine
Important:Thismachinecomeswitharubber
bootovertheendofthesparkplug.Ensurethat
themetalloopontheendofthespark-plugwire
(insidetherubberboot)isfastenedsecurelyon
themetaltiponthesparkplug.
1.Presstheprimerbulb3to5times(Figure14).
g189076
Figure14
2.Holdtheblade-controlbaragainstthehandle
(Figure15A).
g188344
Figure15
1.Blade-controlbar
3.Pulltherecoil-starthandlelightlyuntilyoufeel
resistance,thenpullitsharply(Figure15B).
9

Whentheenginestarts,allowtheropetoreturn
tothehandleslowly.
UsingtheSelf-PropelDrive
Tooperatetheself-propeldrive,squeezethe
self-propel-drivebar(Figure16)towardthehandle
andholdit.
g188340
Figure16
1.Self-propel-drivebar
Note:Themachinehasaxedmaximumspeedof
approximately3.0km/h.
Todisengagetheself-propeldrive,releasethe
self-propel-drivebar.
ShuttingOfftheEngine
Toshutofftheengine,releasetheblade-controlbar.
Note:Disconnectandgroundthespark-plugwire
beforeyouleavethemachinetopreventsomeone
fromaccidentlystartingtheengine.
MulchingtheGrass
Clippings
WARNING
Thebladeissharp;contactingthebladecan
resultinseriouspersonalinjury.
•Ensurethatthemulchingplugisinplace
beforeyoumulchtheclippings.
•Neverengagethebladewithoutthe
mulchingpluginplace,thegrassbag
installed,orthereardoordown.
Ifthegrassbagisonthemachine,removeit;referto
RemovingtheGrassBag(page11).
1.Raiseandholdupthereardoor(Figure17).
g189073
Figure17
1.Latch2.Mulchingplug
2.Installthemulchingplugintothehousingand
locktheplugintotheopeninginthehousing
(Figure17).
3.Lowerthereardoor.
BaggingtheGrass
Clippings
Usethegrassbagwhenyouwanttocollectgrassand
leafclippingsfromthelawn.
WARNING
Aworngrassbagcouldallowsmallstones
andothersimilardebristobethrowntoward
youorbystanders,resultinginserious
personalinjuryordeath.
Checkthegrassbagfrequently.Ifitis
damaged,installanewTororeplacementbag.
WARNING
Thebladeissharp;contactingthebladecan
resultinseriouspersonalinjury.
•Ensurethatthegrassbagisinplacebefore
youbagtheclippings.
•Neverengagethebladewithoutthe
mulchingpluginplace,thegrassbag
installed,orthereardoordown.
10

WARNING
Themachinecanthrowgrassclippingsand
otherobjectsthroughanopendischarge
tunnel.Objectsthrownwithenoughforce
couldcauseseriouspersonalinjuryordeath
totheyouorabystander.
Neveropenthedooronthedischargetunnel
whentheengineisrunning.
Ifthemulchingwedgeisinstalledonthemachine,
raisethereardoor,removethemulchingwedge,and
lowerthereardoor.
InstallingtheGrassBag
1.Ifnecessary,assemblethegrassbag;referto4
AssemblingtheGrassBag(page5).
2.Raiseandholdupthereardoor.
g189071
Figure18
3.Installthegrassbag,ensuringthatthepinson
thebagrestinthenotchesonthehandle(Figure
18).
4.Lowerthereardoor.
RemovingtheGrassBag
1.Raiseandholdupthereardoor(Figure18).
2.Removethebag.
3.Lowerthereardoor.
Rear-DischargingtheGrass
Clippings
1.Ifthegrassbagisonthemachine,removeit
beforerear-dischargingtheclippings;referto
RemovingtheGrassBag(page11)
2.Ifthemulchingwedgeisinstalledonthe
machine,raisethereardoor,removethe
mulchingwedge,andlowerthereardoor.
WARNING
Thebladeissharp;contactingthebladecan
resultinseriouspersonalinjury.
•Ensurethatthereardoorisdownbefore
rear-dischargingthegrassclippings.
•Neverengagethebladewithoutthe
mulchingpluginplace,thegrassbag
installed,orthereardoordown.
OperatingTips
GeneralMowingTips
•Inspecttheareawhereyouwillusethemachine
andremoveallobjectsthatthemachinecould
throw.
•Avoidstrikingsolidobjectswiththeblade.Never
deliberatelymowoveranyobject.
•Ifthemachinestrikesanobjectorstartstovibrate,
immediatelyshutofftheengine,disconnect
thewirefromthesparkplug,andexaminethe
machinefordamage.
•Forbestperformance,installanewbladebefore
thecuttingseasonbegins.
•ReplacethebladewhennecessarywithaT oro
replacementblade.
CuttingGrass
•Cutonlyaboutathirdofthegrassbladeatatime.
Donotcutbelow51mm(2inches)unlessthe
grassissparseoritislatefallwhengrassgrowth
beginstoslowdown.
•Whencuttinggrassover15cm(6inches)tall,
mowatthehighestcuttingheightsettingandwalk
slower;thenmowagainatalowersettingforthe
bestlawnappearance.Ifthegrassistoolong,the
machinemayplugandcausetheenginetostall.
•Wetgrassandleavestendtoclumpontheyard
andcancausethemachinetoplugortheengine
tostall.Avoidmowinginwetconditions.
•Beawareofapotentialrehazardinverydry
conditions,followalllocalrewarnings,andkeep
themachinefreeofdrygrassandleafdebris.
•Alternatethemowingdirection.Thishelps
dispersetheclippingsoverthelawnforeven
fertilization.
•Ifthenishedlawnappearanceisunsatisfactory,
try1ormoreofthefollowing:
–Replacethebladeorhaveitsharpened.
–Walkataslowerpacewhilemowing.
–Raisethecuttingheightonyourmachine.
11

–Cutthegrassmorefrequently.
–Overlapcuttingswathsinsteadofcuttingafull
swathwitheachpass.
CuttingLeaves
•Aftercuttingthelawn,ensurethathalfofthelawn
showsthroughthecutleafcover.Youmayneed
tomakemorethanasinglepassovertheleaves.
•Iftherearemorethan13cmofleavesonthelawn,
mowatahighercuttingheightandthenagainat
thedesiredcuttingheight.
•Slowdownyourmowingspeedifthemachine
doesnotcuttheleavesnelyenough.
AfterOperation
AfterOperatingSafety
GeneralSafety
•Cleangrassanddebrisfromthemachinetohelp
preventres.Cleanupoilorfuelspills.
•Allowtheenginetocoolbeforestoringthemachine
inanyenclosure.
•Neverstorethemachineorfuelcontainerwhere
thereisanopename,spark,orpilotlight,such
asonawaterheateroronotherappliances.
HaulingSafety
•Usecarewhenloadingorunloadingthemachine.
•Securethemachinefromrolling.
CleaningundertheMachine
ServiceInterval:Beforeeachuseordaily
WARNING
Themachinemaydislodgematerialfrom
underthemachine.
•Weareyeprotection.
•Stayintheoperatingposition(behindthe
handle)whentheengineisrunning.
•Donotallowbystandersinthearea.
Forbestresults,cleanthemachinesoonafteryou
havecompletedmowing.
1.Movethemachineontoaatpavedsurface.
2.Shutofftheengineandwaitforallmovingparts
tostopbeforeleavingtheoperatingposition.
3.Lowerthemachinetoitslowestcutting-height
setting;refertoAdjustingtheCuttingHeight
(page8).
4.Washouttheareaunderthereardoorwherethe
clippingsgofromthehousingtothegrassbag.
Note:Washouttheareawiththe
bag-on-demandinboththefullyforwardand
fullyrearwardpositions.
5.Attachagardenhosethatisconnectedtoa
watersupplytothewashoutport(Figure19).
g189078
Figure19
1.Washoutport
6.Turnthewateron.
7.Starttheengineandrunituntiltherearenomore
clippingsthatcomeoutfromunderthemachine.
8.Shutofftheengine.
9.Shutoffthewateranddisconnectthegarden
hosefromthemachine.
10.Starttheengineandrunitforafewminutesto
drytheundersideofthemachinetopreventit
fromrusting.
11.Allowtheenginetocoolbeforestoringthe
machineinanenclosedarea.
12

FoldingtheHandle
WARNING
Foldingorunfoldingthehandleimproperly
candamagethecables,causinganunsafe
operatingcondition.
•Donotdamagethecableswhenfoldingor
unfoldingthehandle.
•Ifacableisdamaged,contactan
AuthorizedServiceDealer.
1.Loosenthe2handleknobs(Figure20A).
g189068
Figure20
2.Foldthehandlebyrotatingitforward(Figure
20B).
13

Maintenance
Note:Determinetheleftandrightsidesofthemachinefromthenormaloperatingposition.
RecommendedMaintenanceSchedule(s)
MaintenanceService
IntervalMaintenanceProcedure
Beforeeachuseordaily•Checktheengine-oillevel.
•Cleangrassclippingsanddirtfromunderthemachine.
Every25hours•Replacetheairlter;replaceitmorefrequentlyindustyoperatingconditions.
Every100hours•Replacethesparkplug.
Yearly
•Replacethebladeorhaveitsharpened(morefrequentlyiftheedgedullsquickly).
•Cleantheair-coolingsystem;cleanitmorefrequentlyindustyoperatingconditions.
Refertoyourenginemanual.
Yearlyorbeforestorage•Lubricatethewheels.
•Emptythefueltankbeforerepairsasdirectedandbeforeyearlystorage.
MaintenanceSafety
•Disconnectthespark-plugwirefromthesparkplug
beforeperforminganymaintenanceprocedure.
•Wearglovesandeyeprotectionwhenservicing
themachine.
•Thebladeissharp;contactingthebladecanresult
inseriouspersonalinjury.Weargloveswhen
servicingtheblade.
•Nevertamperwithsafetydevices.Checktheir
properoperationregularly.
•Tippingthemachinemaycausethefueltoleak.
Fuelisammableandexplosive,andcancause
personalinjury.Runtheenginedrytoremovethe
fuelwithahandpump;neversiphonthefuel.
PreparingforMaintenance
1.Shutofftheengineandwaitforallmovingparts
tostop.
2.Disconnectthespark-plugwirefromthespark
plug(Figure21).
g189080
Figure21
3.Afterperformingthemaintenanceprocedure(s),
connectthespark-plugwiretothesparkplug.
Important:Beforetippingthemachineto
changetheoilorreplacetheblade,allowthe
fueltanktorundrythroughnormalusage.If
youmusttipthemachinepriortorunning
outoffuel,useahandfuelpumptoremove
thefuel.Alwaystipthemachineontoits
side,withthedipstickdown.
WARNING
Tippingthemachinemaycausethefuelto
leak.Fuelisammableandexplosiveandcan
causepersonalinjury.
Runtheenginedryorremovethefuelwitha
handpump;neversiphon.
14

ReplacingtheSparkPlug
ServiceInterval:Every100hours
UseaChampionQC12YCsparkplugorequivalent.
1.Shutofftheengineandwaitforallmovingparts
tostop.
2.Disconnectthewirefromthesparkplug.
3.Cleanaroundthesparkplug.
4.Removethesparkplugfromtheengine.
Important:Replaceacracked,fouled,or
dirtysparkplug.Donotcleantheelectrodes
becausegritenteringtheenginecandamage
theengine.
5.Setthegaponthenewplugto0.51mmas
showninFigure22.
g189939
Figure22
1.Centerelectrode3.Airgap(nottoscale)
2.Sideelectrode
6.Installthesparkplug
7.Tightentheplugto20N∙m.
8.Connectthewiretothesparkplug.
ServicingtheAirFilter
ServiceInterval:Every25hours
1.Unclipthetopoftheair-ltercover(Figure23).
g189064
Figure23
1.Airlter3.Air-lterelement(foam)
2.Air-ltercover
2.Removetheair-ltercover(Figure23).
3.Removetheair-lterelement.
4.Washtheair-lterelementinsoapywater.
Important:Donotusegasolinetocleanthe
air-lterelement.
5.Airdrytheair-lterelement.
6.Addafewdropsofengineoilontheair-lter
elementandsqueezeittightlytoremoveany
excessoil.
7.Installtheair-lterelementandair-ltercover.
ChangingtheEngineOil
Changingtheengineoilisnotrequired,butif
youdesiretochangetheoil,usethefollowing
procedure.
Engineoilcapacity:0.47L
Oilviscosity:SAE30orSAE10W-30detergentoil
APIserviceclassication:SJorhigher
Note:Runtheengineafewminutesbeforechanging
theoiltowarmit.Warmoilowsbetterandcarries
morecontaminants.
1.Movethemachinetoalevelsurface.
2.RefertoPreparingforMaintenance(page14).
3.Removethedipstickbyrotatingthecap
counterclockwiseandpullingitout(Figure24).
15

g193542
Figure24
1.Full3.Low
2.High
4.Tipthemachineontoitsside(sothattheair
lterisup)todraintheusedoilfromtheoil-ll
tube(Figure25).
g189065
Figure25
5.Afterdrainingtheusedoil,returnthemachineto
theoperatingposition.
6.Carefullypourabout3/4oftheenginecapacity
ofoilintotheoil-lltube.
7.Waitabout3minutesfortheoiltosettleinthe
engine.
8.Wipethedipstickcleanwithacleancloth.
9.Insertthedipstickintotheoil-lltube,then
removethedipstick.
10.Readtheoillevelonthedipstick(Figure25).
•Iftheoillevelonthedipstickistoolow,
carefullypourasmallamountofoilintothe
oil-lltube,wait3minutes,andrepeatsteps
8through10untiltheoilonthedipstickisat
thecorrectlevel.
•Iftheoillevelonthedipstickistoohigh,drain
theexcessoiluntiltheoilonthedipstickisat
thecorrectlevel.
Important:Iftheoillevelintheengineistoo
lowortoohighandyouruntheengine,you
maydamagetheengine.
11.Installthedipsticksecurely.
12.Recycletheusedoilproperly.
ReplacingtheBlade
ServiceInterval:Yearly
Important:Youwillneedatorquewrenchto
installthebladeproperly.Ifyoudonothavea
torquewrenchorareuncomfortableperforming
thisprocedure,contactanAuthorizedService
Dealer.
Examinethebladewheneveryourunoutoffuel.Ifthe
bladeisdamagedorcracked,replaceitimmediately.
Ifthebladeedgeisdullornicked,haveitsharpened
andbalanced,orreplaceit.
WARNING
Thebladeissharp;contactingthebladecan
resultinseriouspersonalinjury.
Weargloveswhenservicingtheblade.
1.RefertoPreparingforMaintenance(page14).
2.Tipthemachineontoitssidewiththedipstick
down.
3.Useablockofwoodtoholdthebladesteady
(Figure26).
g188339
Figure26
16

4.Removetheblade,savingallmountinghardware
(Figure26).
5.Installthenewbladeandallmountinghardware
(Figure27).
g188330
Figure27
Important:Positionthecurvedendsofthe
bladetopointtowardthemowerhousing.
6.Useatorquewrenchtotightenthebladebolt
to45N∙m.
Important:Abolttorquedto45N∙misvery
tight.Whileholdingthebladewithablockof
wood,putyourweightbehindtheratchetor
wrenchandtightentheboltsecurely.This
boltisverydifculttoovertighten.
LubricatingtheWheels
ServiceInterval:Yearlyorbeforestorage
ApplyafewdropsofNo.2lithiumgreasetotheball
bearingsoneachofthewheels(Figure28).
g189817
Figure28
1.Ballbearings
17

Storage
Storethemachineinacool,clean,dryplace.
PreparingtheMachinefor
Storage
1.Onthelastrefuelingoftheyear,addfuel
stabilizer(suchasToroPremiumFuel
Treatment)tothefuel.
2.Disposeofanyunusedfuelproperly.Recycle
itaccordingtolocalcodes,oruseitinyour
automobile.
Note:Oldfuelinthefueltankistheleading
causeofhardstarting.Donotstorefuelwithout
stabilizermorethan30days,anddonotstore
stabilizedfuelmorethan90days.
3.Runthemachineuntiltheengineshutsofffrom
runningoutoffuel.
4.Starttheengineagain.
5.Allowtheenginetorununtilitshutsoff.
Whenyoucannolongerstarttheengine,itis
sufcientlydry.
6.Disconnectthewirefromthesparkplug.
7.Removethesparkplug,add30mlofengine
oilthroughthespark-plughole,andpullthe
starterropeslowlyseveraltimestodistribute
oilthroughoutthecylindertopreventcylinder
corrosionduringtheoff-season.
8.Looselyinstallthesparkplug.
9.Tightenallnuts,bolts,andscrews.
RemovingtheMachine
fromStorage
1.Checkandtightenallfasteners.
2.Removethesparkplugandspintheengine
rapidlybypullingtherecoil-starthandletoblow
theexcessoilfromthecylinder.
3.Installthesparkplugandtightenitwithatorque
wrenchto20N∙m.
4.Performanymaintenanceprocedures;referto
PreparingforMaintenance(page14).
5.Checktheengine-oillevel;refertoCheckingthe
Engine-OilLevel(page7).
6.Fillthefueltankwithfreshfuel;refertoFilling
theFuelT ank(page7).
7.Connectthewiretothesparkplug.
18

EuropeanPrivacyNotice
TheInformationT oroCollects
ToroWarrantyCompany(Toro)respectsyourprivacy.Inordertoprocessyourwarrantyclaimandcontactyouintheeventofaproductrecall,weaskyou
tosharecertainpersonalinformationwithus,eitherdirectlyorthroughyourlocalTorocompanyordealer.
TheT orowarrantysystemishostedonserverslocatedwithintheUnitedStateswhereprivacylawmaynotprovidethesameprotectionasapplies
inyourcountry.
BYSHARINGYOURPERSONALINFORMATIONWITHUS,YOUARECONSENTINGTOTHEPROCESSINGOFYOURPERSONALINFORMATION
ASDESCRIBEDINTHISPRIVACYNOTICE.
TheWayToroUsesInformation
Toromayuseyourpersonalinformationtoprocesswarrantyclaims,tocontactyouintheeventofaproductrecallandforanyotherpurposewhichwetell
youabout.ToromayshareyourinformationwithT oro'safliates,dealersorotherbusinesspartnersinconnectionwithanyoftheseactivities.Wewillnot
sellyourpersonalinformationtoanyothercompany.Wereservetherighttodisclosepersonalinformationinordertocomplywithapplicablelawsand
withrequestsbytheappropriateauthorities,tooperateoursystemsproperlyorforourownprotectionorthatofotherusers.
RetentionofyourPersonalInformation
Wewillkeepyourpersonalinformationaslongasweneeditforthepurposesforwhichitwasoriginallycollectedorforotherlegitimatepurposes
(suchasregulatorycompliance),orasrequiredbyapplicablelaw.
Toro'sCommitmenttoSecurityofYourPersonalInformation
Wetakereasonableprecautionsinordertoprotectthesecurityofyourpersonalinformation.Wealsotakestepstomaintaintheaccuracyandcurrent
statusofpersonalinformation.
AccessandCorrectionofyourPersonalInformation
Ifyouwouldliketorevieworcorrectyourpersonalinformation,pleasecontactusbyemailat[email protected].
AustralianConsumerLaw
AustraliancustomerswillnddetailsrelatingtotheAustralianConsumerLaweitherinsidetheboxoratyourlocalToroDealer.
374-0282RevC

TheToroWarrantyResidentialProducts
and
TheToroGTSStartingGuarantee
ConditionsandProductsCovered
TheT oroCompanyanditsafliate,T oroWarrantyCompany,pursuantto
anagreementbetweenthem,jointlypromisetorepairtheT oroProduct
listedbelowifdefectiveinmaterialsorworkmanshiporiftheT oroGTS
(GuaranteedtoStart)enginewillnotstartontherstorsecondpull,
providedtheroutinemaintenancerequiredintheOperator'sManualhave
beenperformed.
Thefollowingtimeperiodsapplyfromtheoriginaldateofpurchase:
ProductsWarrantyPeriod
WalkPowerMowers
•CastDeck5yearsResidentialUse2
90DaysCommercialUse
—Engine5yearsGTSGuarantee,Residential
Use3
—Battery2years
•SteelDeck2yearsResidentialUse2
30DaysCommercialUse
—Engine2yearsGTSGuarantee,Residential
Use3
TimeMasterMowers3yearsResidentialUse2
90DaysCommercialUse
•Engine3yearsGTSGuarantee,Residential
Use3
•Battery2years
ElectricHandHeldProducts2yearsResidentialUse2
andElectricWalkPowerMowersNoWarrantyforCommercialUse
AllRide-OnUnitsBelow
•EngineSeeenginemanufacturer'swarranty4
•Battery2yearsResidentialUse2
•Attachments2yearsResidentialUse2
DHLawn&GardenTractors2yearsResidentialUse2
30DaysCommercialUse
TimeCutter3yearsResidentialUse2
30DaysCommercialUse
•Engine3yearsResidentialUse2
2yearsor300hoursCommercial
Use5
TimeCutterHD3yearsor300hours5
•Engine3yearsor300hoursCommercial
Use5
1OriginalPurchasermeansthepersonwhooriginallypurchasedtheToroProduct.
2Residentialusemeansuseoftheproductonthesamelotasyourhome.Useatmorethanone
locationisconsideredcommercialuseandthecommercialusewarrantywouldapply.
3TheToroGTSStartingGuaranteedoesnotapplywhentheproductisusedcommercially.
4SomeenginesusedonT oroProductsarewarrantedbytheenginemanufacturer.
5Whicheveroccursrst.
Warrantymaybedeniedifthehourmeterisdisconnected,altered,or
showssignsofbeingtamperedwith.
OwnerResponsibilities
YoumustmaintainyourToroProductbyfollowingthemaintenance
proceduresdescribedintheOperator'sManual.Suchroutinemaintenance,
whetherperformedbyadealerorbyyou,isatyourexpense.
InstructionsforObtainingWarrantyService
IfyouthinkthatyourT oroProductcontainsadefectinmaterialsor
workmanship,followthisprocedure:
1.Contactyoursellertoarrangeserviceoftheproduct.Ifforany
reasonitisimpossibleforyoutocontactyourseller,youmay
contactanyT oroAuthorizedDistributortoarrangeservice.Visit
http://www.toro.com/en-us/locator/pages/default.aspxtolocateaT oro
distributorinyourarea.
2.Bringtheproductandyourproofofpurchase(salesreceipt)tothe
servicingoutlet.Ifforanyreasonyouaredissatisedwiththeservicing
outlet’sanalysisorwiththeassistanceprovided,contactusat:
ToroWarrantyCompany
ToroCustomerCareDepartment,RLCDivision
8111LyndaleAvenueSouth
Bloomington,MN55420-1196
001–952–948–4707
ItemsandConditionsNotCovered
Thereisnootherexpresswarrantyexceptforspecialemissionsystem
coverageandenginewarrantycoverageonsomeproducts.Thisexpress
warrantydoesnotcoverthefollowing:
•Costofregularmaintenanceserviceorparts,suchaslters,fuel,
lubricants,oilchanges,sparkplugs,airlters,bladesharpening
orwornblades,cable/linkageadjustments,orbrakeandclutch
adjustments
•Componentsfailingduetonormalwear
•Anyproductorpartwhichhasbeenaltered,misused,neglected,
requiresreplacement,orrepairduetoaccidentsorlackofproper
maintenance
•Pickupanddeliverycharges
•RepairsorattemptedrepairsbyanyoneotherthananAuthorizedToro
ServiceDealer
•Repairsnecessaryduetofailuretofollowrecommendedfuel
procedure(consultOperator'sManualformoredetails)
–Removingcontaminantsfromthefuelsystemisnotcovered
–Useofoldfuel(morethanonemonthold)orfuelwhichcontains
morethan10%ethanolormorethat15%MTBE
–Failuretodrainthefuelsystempriortoanyperiodofnon-use
overonemonth
•Repairsoradjustmentstocorrectstartingdifcultiesduetothe
following:
–Failuretofollowpropermaintenanceproceduresorrecommended
fuelprocedure
–Rotarymowerbladestrikinganobject
•Specialoperationalconditionswherestartingmayrequiremorethan
twopulls:
–Firsttimestartsafterextendedperiodofnon-useoverthree
monthsorseasonalstorage
–Cooltemperaturestartssuchasthosefoundinearlyspringand
lateautumn
–Improperstartingprocedures-ifyouarehavingdifcultystarting
yourunit,pleasechecktheOperator'sManualtoensurethat
youareusingthecorrectstartingprocedures.Thiscansavean
unnecessaryvisittoanAuthorizedT oroServiceDealer.
GeneralConditions
Thepurchaseriscoveredbythenationallawsofeachcountry.Therights
towhichthepurchaserisentitledwiththesupportoftheselawsarenot
restrictedbythiswarranty.
374-0268RevK
This manual suits for next models
1
Table of contents
Other Toro Lawn Mower manuals

Toro
Toro ProLine 30180 User manual

Toro
Toro 73547 Manual

Toro
Toro Z Master Revolution Series User manual

Toro
Toro Groundsmaster 30344 User manual

Toro
Toro 74661 User manual

Toro
Toro 03530 User manual

Toro
Toro Z580 DFI Z Master User manual

Toro
Toro 74234 User manual

Toro
Toro Groundsmaster 4000 User manual

Toro
Toro 22193 PT21 User manual

Toro
Toro 58620 User manual

Toro
Toro 03691 User manual

Toro
Toro 20040 User manual

Toro
Toro 20833 User manual

Toro
Toro 3318 User manual

Toro
Toro 74204 User manual

Toro
Toro HDX SD 2000 Series User manual

Toro
Toro Super Recycler 20039 User manual

Toro
Toro Groundsmaster 3300 Series User manual

Toro
Toro 22290 User manual