Toro 29732 User manual

FormNo.3419-278RevD
53cmMulching/RearBagging/SideDischargingLawnMower
29732,29734
RasenmähermitMulch-,Heckfangsystem,Seitenauswurf(53cm)
29732,29734
Cortacéspeddemulching/ensacadotrasero/descargalateralde
53cm
29732,29734
Tondeusemulching/àbacarrière/éjectionlatéralede53cm
29732,29734
Gazonmaaiervan53cmmetmulchfunctie/zijafvoer/achtervanger
29732,29734
www.T oro.com.*3419-278*D

FormNo.3419-251RevC
53cmMulching/RearBagging/SideDischarging
LawnMower
ModelNo.29732—SerialNo.402100000andUp
ModelNo.29734—SerialNo.402100000andUp
Operator'sManual
Introduction
Thisrotary-blade,walk-behindlawnmowerisintended
tobeusedbyresidentialhomeowners.Itisdesigned
primarilyforcuttinggrassonwell-maintainedlawns
onresidentialproperties.Itisnotdesignedforcutting
brushorforagriculturaluses.
Readthisinformationcarefullytolearnhowtooperate
andmaintainyourproductproperlyandtoavoid
injuryandproductdamage.Youareresponsiblefor
operatingtheproductproperlyandsafely.
YoumaycontactT orodirectlyatwww.Toro.comfor
productandaccessoryinformation,helpndinga
dealer,ortoregisteryourproduct.
Wheneveryouneedservice,genuineToroparts,or
additionalinformation,contactanAuthorizedService
DealerorToroCustomerServiceandhavethemodel
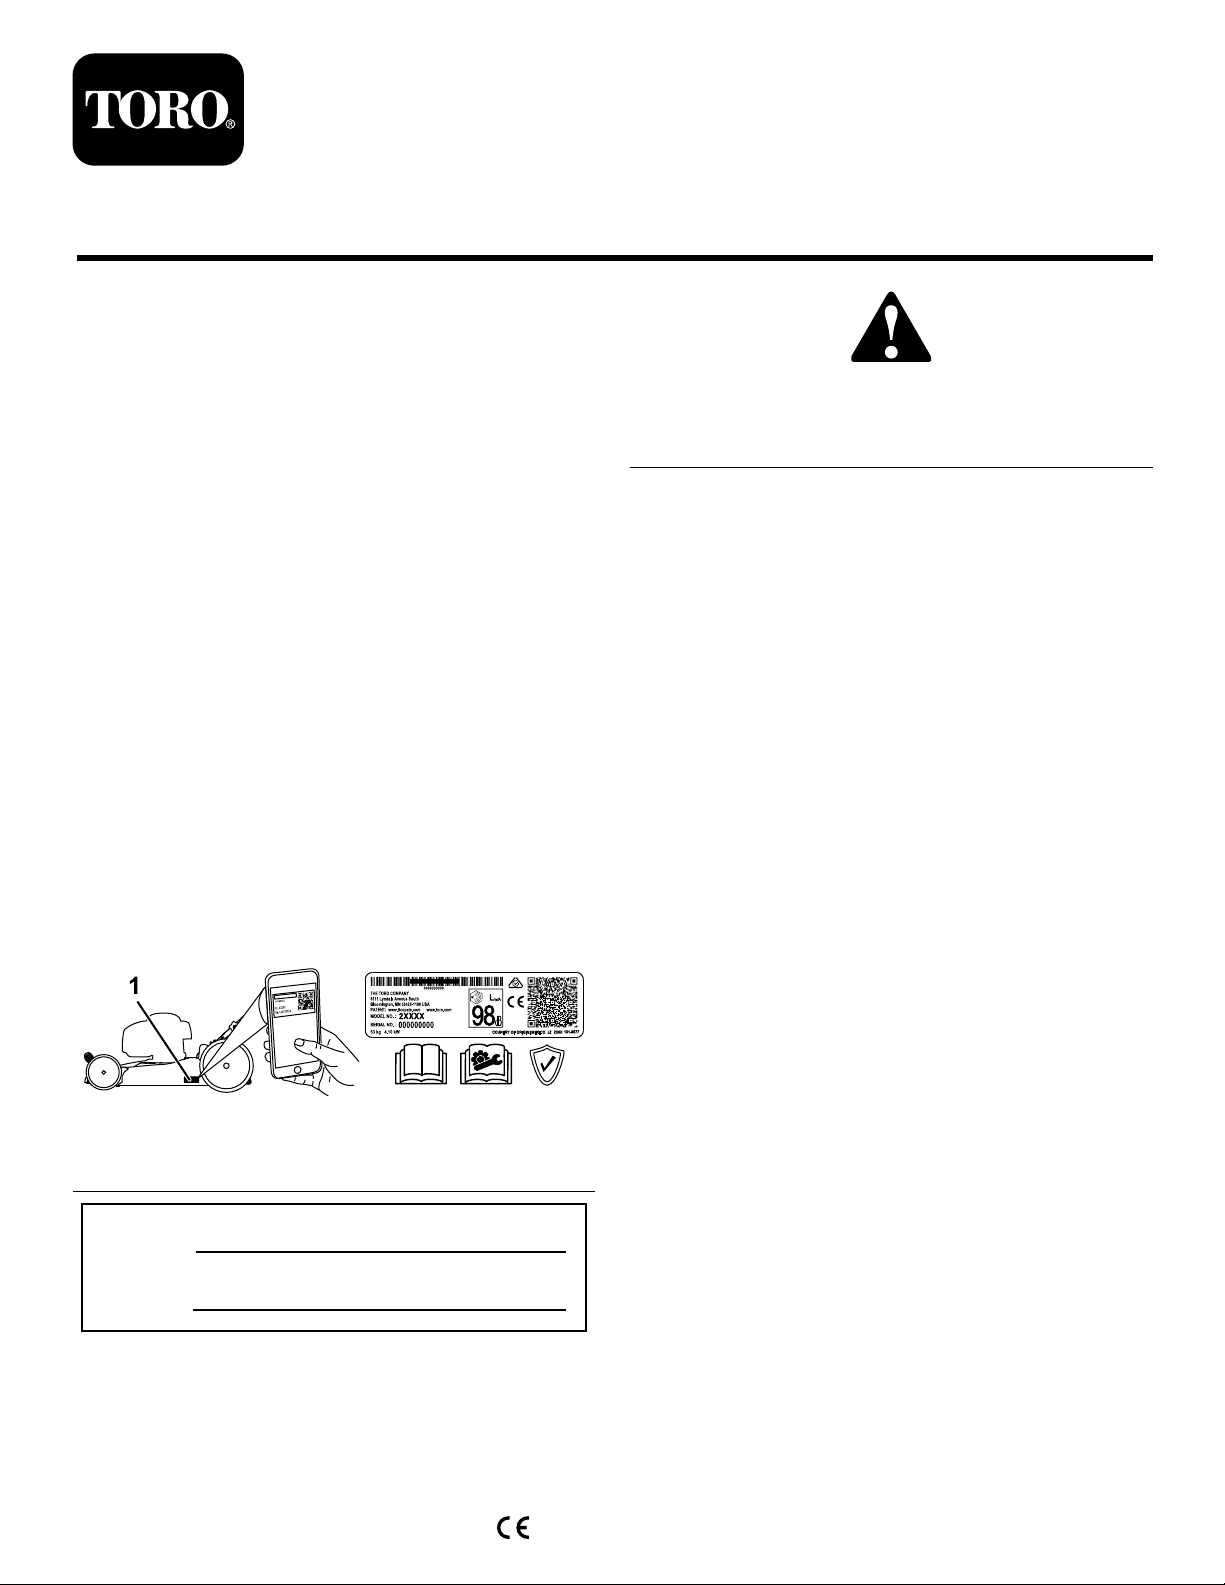
andserialnumbersofyourproductready.Figure1
identiesthelocationofthemodelandserialnumbers
ontheproduct.Writethenumbersinthespace
provided.
Important:Withyoursmartphoneortablet,scan
theQRcodeontheserialnumberdecaltoaccess
warranty,parts,andotherproductinformation.
g226626
Figure1
1.Modelandserialnumberlocation
ModelNo.
SerialNo.
Thismanualidentiespotentialhazardsandhas
safetymessagesidentiedbythesafety-alertsymbol
(Figure2),whichsignalsahazardthatmaycause
seriousinjuryordeathifyoudonotfollowthe
recommendedprecautions.
g000502
Figure2
Safety-alertsymbol
Thismanualuses2wordstohighlightinformation.
Importantcallsattentiontospecialmechanical
informationandNoteemphasizesgeneralinformation
worthyofspecialattention.
ThisproductcomplieswithallrelevantEuropean
directives;fordetails,pleaseseetheseparateproduct
specicDeclarationofConformity(DOC)sheet.
GrossorNetTorque:Thegrossornettorque
ofthisenginewaslaboratoryratedbytheengine
manufacturerinaccordancewiththeSocietyof
AutomotiveEngineers(SAE)J1940orJ2723.As
conguredtomeetsafety,emission,andoperating
requirements,theactualenginetorqueonthisclass
ofmowerwillbesignicantlylower.Pleasereferto
theenginemanufacturer’sinformationincludedwith
themachine.
Donottamperwithordisablesafetydevicesonthe
machine,andchecktheirproperoperationregularly.
Donotattempttoadjustortamperwiththeengine
speedcontrol;doingsomaycreateanunsafe
operatingcondition,resultinginpersonalinjury.
Contents
Introduction...............................................................1
Safety.......................................................................2
GeneralSafety...................................................2
SafetyandInstructionalDecals..........................3
Setup........................................................................4
1UnfoldingtheHandle.......................................4
2InstallingtheRecoil-StarterRopeinthe
RopeGuide.....................................................5
3FillingtheEnginewithOil.................................5
4ChargingtheBattery........................................6
5AssemblingtheGrassBag...............................6
ProductOverview.....................................................7
Specications....................................................8
©2019—TheToro®Company
8111LyndaleAvenueSouth
Bloomington,MN55420
Registeratwww.T oro.com.OriginalInstructions(EN)
PrintedinMexico
AllRightsReserved*3419-251*C

Operation..................................................................8
BeforeOperation...................................................8
BeforeOperationSafety.....................................8
FillingtheFuelT ank............................................9
CheckingtheEngine-OilLevel............................9
AdjustingtheCuttingHeight.............................10
DuringOperation.................................................10
DuringOperationSafety...................................10
StartingtheEngine............................................11
UsingtheSelf-propelDrive................................11
ShuttingOfftheEngine.....................................12
MulchingtheClippings......................................12
BaggingtheClippings.......................................12
Side-DischargingtheClippings.........................13
OperatingTips.................................................13
AfterOperation....................................................14
AfterOperationSafety......................................14
CleaningundertheMachine.............................14
FoldingtheHandle...........................................14
Maintenance...........................................................15
RecommendedMaintenanceSchedule(s)...........15
MaintenanceSafety..........................................15
PreparingforMaintenance...............................15
ServicingtheAirFilter.......................................16
ChangingtheEngineOil...................................16
ChargingtheBattery.........................................17
ReplacingtheFuse...........................................18
ReplacingtheBlade..........................................18
AdjustingtheSelf-PropelDrive.........................19
Storage...................................................................20
PreparingtheMachineforStorage...................20
RemovingtheMachinefromStorage................20
Safety
Thismachinehasbeendesignedinaccordancewith
ENISO5395:2013.
GeneralSafety
Thisproductiscapableofamputatinghandsand
feetandofthrowingobjects.Alwaysfollowallsafety
instructionstoavoidseriouspersonalinjury.
•Read,understand,andfollowtheinstructions
andwarningsinthisOperator’sManualandon
themachineandattachmentsbeforestartingthe
engine.
•Donotputyourhandsorfeetnearmovingpartsof
orunderthemachine.Keepclearofanydischarge
opening.
•Donotoperatethemachinewithoutallguards
andothersafetyprotectivedevicesinplaceand
functioningproperlyonthemachine.
•Keepbystandersandchildrenoutoftheoperating
area.Donotallowchildrentooperatethemachine.
Allowonlypeoplewhoareresponsible,trained,
familiarwiththeinstructions,andphysically
capabletooperatethemachine.
•Stopthemachine,shutofftheengine,remove
theignitionkey(ifequipped),andwaitforall
movingpartstostopbeforeservicing,fueling,or
uncloggingthemachine.
Improperlyusingormaintainingthismachinecan
resultininjury.T oreducethepotentialforinjury,
complywiththesesafetyinstructionsandalways
payattentiontothesafety-alertsymbol,which
meansCaution,Warning,orDanger—personalsafety
instruction.Failuretocomplywiththeseinstructions
mayresultinpersonalinjuryordeath.
2

SafetyandInstructionalDecals
Safetydecalsandinstructionsareeasilyvisibletotheoperatorandarelocatednearanyarea
ofpotentialdanger.Replaceanydecalthatisdamagedormissing.
decal104-7953
104-7953
Electric-StartModelOnly
1.Warning—readtheOperator'sManualforinformationonchargingthebattery;containslead;donotdiscard.
2.ReadtheOperator'sManual.
decaloemmarkt
Manufacturer'sMark
1.Thismarkindicatesthatthebladeisidentiedasapart
fromtheoriginalmachinemanufacturer.
decal112-8760
112-8760
1.Thrownobjecthazard—keepbystandersaway.
2.Cutting/dismembermenthazardofhandorfoot,mower
blade—stayawayfrommovingparts.
decal117-4143
117-4143
1.Warning—readtheOperator'sManual.
2.Thrownobjecthazard—keepbystandersaway.
3.Cutting/dismembermenthazardofhandorfoot,mower
blade—disconnectthespark-plugwireandreadthe
Operator'sManualbeforeperformingmaintenance.
4.Cutting/dismembermenthazardofhandorfoot,mower
blade—stayawayfrommovingparts;keepallguardsand
shieldsinplace.
5.Cutting/dismembermenthazardofhandorfoot,mower
blade—donotoperateupanddownslopes;onlyoperate
acrossslopes;shutofftheengineandwaitforallmoving
partstostopbeforeleavingthemachine;pickupdebris
beforemowing;lookbehindanddownwhenmovingin
reverse.
3

Setup
Important:Removeanddiscardtheprotective
plasticsheetthatcoverstheengineandanyother
plasticorwrappingonthemachine.
Important:Topreventaccidentalstarting,donot
insertthekeyintotheelectric-startignition(if
equipped)untilyouarereadytostarttheengine.
1
UnfoldingtheHandle
NoPartsRequired
Procedure
WARNING
Foldingorunfoldingthehandleimproperly
candamagethecables,causinganunsafe
operatingcondition.
•Donotdamagethecableswhenfoldingor
unfoldingthehandle.
•Ifacableisdamaged,contactan
AuthorizedServiceDealer.
1.Removethehandleknobsandboltsfromthe
machinehousing(Figure3).
2.Attachthehandletothemachinehousing
(Figure3).
g032765
Figure3
1.Bolt2.Knob
3.Movethehandletotheoperatingposition
(Figure4).
g032014
Figure4
1.Handleknob(2)
Important:Routethecablestotheoutside
ofthehandleasyouunfoldthehandle
(Figure5).
g025928
Figure5
Electric-startmodelshown
1.Cables3.Handle
2.Wireharness
(electric-startmodelonly)
4

4.Installthehandleknobsandtightenthemrmly
byhand.
2
InstallingtheRecoil-Starter
RopeintheRopeGuide
NoPartsRequired
Procedure
Important:Tostarttheenginesafelyandeasily
wheneveryouusethemachine,installthe
recoil-starterropeintheropeguide.
Holdtheblade-controlbartotheupperhandleand
pulltherecoil-starterropethroughtheropeguideon
thehandle(Figure6).
g003251
Figure6
1.Recoil-starterrope2.Ropeguide
3
FillingtheEnginewithOil
NoPartsRequired
Procedure
Important:Yourmachinedoesnotcomewithoil
intheengine.Beforestartingtheengine,llthe
enginewithoil.
EngineOilSpecications
Engineoilcapacity0.44L(15oz)
OilviscositySAE30orSAE10W-30
detergentoil
APIserviceclassicationSJorhigher
1.Movethemachinetoalevelsurface.
2.Removethedipstickbyrotatingthecap
counterclockwiseandpullingitout(Figure7).
g197452
Figure7
1.Full3.Add
2.High
3.Carefullypourabout3/4oftheenginecapacity
ofoilintotheoil-lltube.
4.Wait3minutesfortheoiltosettleintheengine.
5.Wipethedipstickcleanwithacleancloth.
6.Insertthedipstickintotheoil-lltube,then
removethedipstick.
5

7.Readtheoillevelonthedipstick(Figure7).
•Iftheoillevelonthedipstickistoolow,
carefullypourasmallamountofoilintothe
oil-lltube,wait3minutes,andrepeatsteps
5through7untiltheoilonthedipstickisat
thecorrectlevel.
•Iftheoillevelonthedipstickistoohigh,drain
theexcessoiluntiltheoilonthedipstickis
atthecorrectlevel;refertoChangingthe
EngineOil(page16).
Important:Iftheoillevelintheengineistoo
lowortoohighandyouruntheengine,you
maydamagetheengine.
8.Installthedipstickintotheoil-lltubesecurely.
4
ChargingtheBattery
NoPartsRequired
Procedure
Electric-StartModelOnly
RefertoChargingtheBattery(page17).
5
AssemblingtheGrassBag
NoPartsRequired
Procedure
1.Slipthegrassbagovertheframeasshownin
Figure8.
g027543
Figure8
1.Handle3.Grassbag
2.Frame
Note:Donotslipthebagoverthehandle
(Figure8).
2.Hookthebottomchannelofthebagontothe
bottomoftheframe(Figure9).
6

g027544
Figure9
3.Hookthetopandsidechannelsofthebagonto
thetopandsidesoftheframe,respectively
(Figure9).
ProductOverview
g197495
Figure10
Electric-startmodelshown
1.Blade-controlbar8.Oilll/dipstick
2.Ignitionkey(electric-start
modelonly)
9.Reardeector
3.Battery(electric-start
modelonly)
10.Rearcutting-heightlever
4.Fuel-tankcap11.Handleknob(2)
5.Airlter12.Recoil-starthandle
6.Sparkplug13.Self-propeldrivebar
7.Frontcutting-heightlever
7

g197496
Figure11
1.Grassbag3.Batterycharger
(electric-startmodelonly)
2.Side-dischargechute
Specications
ModelWeightLengthWidthHeight
29732
34kg
(76lb)
140cm
(55
inches)
56cm
(22
inches)
102cm
(40
inches)
29734
39kg
(85lb)
140cm
(55
inches)
56cm
(22
inches)
102cm
(40
inches)
Operation
Note:Determinetheleftandrightsidesofthe
machinefromthenormaloperatingposition.
BeforeOperation
BeforeOperationSafety
GeneralSafety
•Becomefamiliarwiththesafeoperationofthe
equipment,operatorcontrols,andsafetysigns.
•Checkthatallguardsandsafetydevices,suchas
deectorsand/orgrasscatcher,areinplaceand
workingproperly.
•Alwaysinspectthemachinetoensurethatthe
blades,bladebolts,andcuttingassemblyarenot
wornordamaged.
•Inspecttheareawhereyouwillusethemachine,
andremoveallobjectsthatcouldinterferewith
theoperationofthemachineorthatthemachine
couldthrow.
•Adjustingthecuttingheightmaybringyouinto
contactwiththemovingblade,causingserious
injury.
–Shutofftheengine,removetheignitionkey
(electric-startmodelonly),andwaitforall
movingpartstostop.
–Donotputyourngersunderthehousing
whenadjustingthecuttingheight.
FuelSafety
•Fuelisextremelyammableandhighlyexplosive.
Areorexplosionfromfuelcanburnyouand
othersandcandamageproperty.
–Topreventastaticchargefromignitingthefuel,
placethecontainerand/ormachinedirectlyon
thegroundbeforelling,notinavehicleoron
anobject.
–Fillthefueltankoutdoors,inanopenarea,
whentheengineiscold.Wipeupanyfuelthat
spills.
–Donothandlefuelwhensmokingoraroundan
openameorsparks.
–Donotremovethefuelcaporaddfueltothe
tankwhiletheengineisrunningorhot.
–Ifyouspillfuel,donotattempttostartthe
engine.Avoidcreatingasourceofignitionuntil
thefuelvaporshavedissipated.
8

–Storefuelinanapprovedcontainerandkeep
itoutofthereachofchildren.
•Fuelisharmfulorfatalifswallowed.Long-term
exposuretovaporscancauseseriousinjuryand
illness.
–Avoidprolongedbreathingofvapors.
–Keepyourhandsandfaceawayfromthe
nozzleandthefuel-tankopening.
–Keepfuelawayfromyoureyesandskin.
FillingtheFuelTank
•Forbestresults,useonlyclean,fresh,unleaded
gasolinewithanoctaneratingof87orhigher
((R+M)/2ratingmethod).
•Oxygenatedfuelwithupto10%ethanolor15%
MTBEbyvolumeisacceptable.
•Donotuseethanolblendsofgasoline,such
asE15orE85,withmorethan10%ethanolby
volume.Performanceproblemsand/orengine
damagemayresult,whichmaynotbecovered
underwarranty.
•Donotusegasolinecontainingmethanol.
•Donotstorefueleitherinthefueltankorinfuel
containersoverthewinterunlessfuelstabilizer
hasbeenaddedtothefuel.
•Donotaddoiltogasoline.
Fillthefueltankwithfreshunleadedregulargasoline
fromamajorname-brandservicestation(Figure12).
Important:Toreducestartingproblems,add
fuelstabilizertothegasolineallseason.Mixthe
stabilizerwithgasolinelessthan30daysold.
Refertoyourengineowner’smanualforadditional
information.
g230458
Figure12
CheckingtheEngine-Oil
Level
ServiceInterval:Beforeeachuseordaily
1.Movethemachinetoalevelsurface.
2.Removethedipstickbyrotatingthecap
counterclockwiseandpullingitout(Figure13).
g197452
Figure13
1.Full3.Add
2.High
3.Wipethedipstickcleanwithacleancloth.
4.Insertthedipstickintotheoil-lltube,then
removethedipstick.
5.Readtheoillevelonthedipstick(Figure13).
•Iftheoillevelonthedipstickistoolow
(Figure13),carefullypourasmallamount
ofSAE30orSAE10W-30detergentoilinto
theoil-lltube,wait3minutes,andrepeat
steps3through5untiltheoilonthedipstick
isatthecorrectlevel.Fortheoiltype,refer
toChangingtheEngineOil(page16).
•Iftheoillevelonthedipstickistoohigh
(Figure13),draintheexcessoiluntiltheoil
onthedipstickisatthecorrectlevel;referto
ChangingtheEngineOil(page16).
Important:Iftheoillevelintheengineistoo
lowortoohighandyouruntheengine,you
maydamagetheengine.
6.Installthedipstickintotheoil-lltubesecurely.
9

AdjustingtheCutting
Height
Adjustthecuttingheightasdesired.Setallthe
cutting-heightleverstothesameheight.Toraiseand
lowerthemachine,refertoFigure14.
g032019
Figure14
1.Raisethemachine
2.Lowerthemachine
Important:Thecuttingheightsettingsare32
mm(1-1/4inch);44mm(1-3/4inch);57mm(2-1/4
inches);70mm(2-3/4inches);83mm(3-1/4
inches);95mm(3-3/4inches).
DuringOperation
DuringOperationSafety
GeneralSafety
•Wearappropriateclothing,includingeye
protection;longpants;slip-resistant,substantial
footwear;andhearingprotection.Tiebacklong
hair,securelooseclothing,anddonotwearloose
jewelry.
•Donotoperatethemachinewhileill,tired,or
undertheinuenceofalcoholordrugs.
•Thebladeissharp;contactingthebladecanresult
inseriouspersonalinjury.Shutofftheengine,
removetheignitionkey(electric-startmodelonly),
andwaitforallmovingpartstostopbeforeleaving
theoperatingposition.
•Whenyoureleasetheblade-controlbar,the
engineshouldshutoffandthebladeshouldstop
within3seconds.Ifnot,stopusingyourmachine
immediatelyandcontactanAuthorizedService
Dealer.
•Keepbystanders,especiallysmallchildren,outof
theoperatingarea.Stopthemachineifanyone
entersthearea.
•Alwayslookdownandbehindyoubeforemoving
themachineinreverse.
•Operatethemachineonlyingoodvisibilityand
appropriateweatherconditions.Donotoperate
themachinewhenthereistheriskoflighting.
•Wetgrassorleavescancauseseriousinjuryif
youslipandcontacttheblade.Avoidmowingin
wetconditions.
•Useextremecarewhenapproachingblind
corners,shrubs,trees,orotherobjectsthatmay
blockyourview.
•Watchforholes,ruts,bumps,rocks,orother
hiddenobjects.Uneventerraincouldcausethe
machinetooverturnorcauseyoutoloseyour
balanceorfooting.
•Ifthemachinestrikesanobjectorstartstovibrate,
immediatelyshutofftheengine,removethekey
(ifequipped),waitforallmovingpartstostop,and
disconnectthewirefromthesparkplugbefore
examiningthemachinefordamage.Makeall
necessaryrepairsbeforeresumingoperation.
•Beforeleavingtheoperatingposition,shutoff
theengine,removetheignitionkey(electric-start
modelonly),andwaitforallmovingpartstostop.
•Iftheenginehasbeenrunningthemuferwillbe
hotandcanseverelyburnyou.Keepawayfrom
thehotmufer.
•Checkthegrasscatchercomponentsand
thedischargechutefrequentlyforanywear
ordeteriorationandreplacethemwiththe
manufacturer'srecommendedpartswhen
necessary.
•Useaccessoriesandattachmentsapprovedby
TheToro®Companyonly.
SlopeSafety
•Mowacrossthefaceofslopes;neverupand
down.Useextremecautionwhenchanging
directiononslopes.
•Donotmowonexcessivelysteepslopes.Poor
footingcouldcauseaslip-and-fallaccident.
•Mowwithcautionneardrop-offs,ditches,or
embankments.
10

StartingtheEngine
1.Pulltheblade-controlbar(Figure15)tothe
handleandholdit.
g014712
Figure15
1.Blade-controlbar
2.Insertthekeyintotheelectricstarter(if
equipped)andturnit;refertoFigure16)orpull
therecoil-starthandle(Figure17).
g014717
Figure16
g014718
Figure17
Note:Ifthemachinedoesnotstartafterseveral
attempts,contactanAuthorizedServiceDealer.
UsingtheSelf-propelDrive
Self-PropelModelOnly
Tooperatetheself-propeldrive,squeezethe
self-propel-drivebar(Figure18)tothehandleand
holdit.
g009642
Figure18
1.Self-propel-drivebar
Todisengagetheself-propeldrive,releasethe
self-propel-drivebar.
Note:Themaximumself-propelgroundspeedis
xed.T oreducethegroundspeed,increasethespace
betweentheself-propel-drivebarandthehandle.
11

ShuttingOfftheEngine
ServiceInterval:Beforeeachuseordaily
Toshutofftheengine,releasetheblade-controlbar
(Figure19).
g009643
Figure19
Note:Removethekey(ifequipped)wheneveryou
leavethemachine.
Important:Whenyoureleasetheblade-control
bar,theengineshouldshutoffandtheblade
shouldstopwithin3seconds.Iftheydonot,stop
usingyourmachineimmediatelyandcontactan
AuthorizedServiceDealer.
MulchingtheClippings
Yourmachinecomesfromthefactoryreadytomulch
thegrassandleafclippingsbackintothelawn.
Ifthegrassbagisonthemachine,removeitbefore
mulchingtheclippings.RefertoRemovingtheGrass
Bag(page12).
BaggingtheClippings
Usethegrassbagwhenyouwanttocollectgrassand
leafclippingsfromthelawn.
InstallingtheGrassBag
1.Liftupthereardeector(Figure20).
g032023
Figure20
1.Reardeector3.Rodend(2)
2.Notchinthehandle
bracket(2)
4.Grassbag
2.Inserttherodendsofthegrassbagintothe
notchesinthehandlebrackets(Figure20).
3.Allowthereardeectortorestonthebag.
RemovingtheGrassBag
1.Liftupthereardeector(Figure20).
2.Liftthegrass-baghandleoutfromthenotches
onthehandlebracketsandremovethebagfrom
themachine.
3.Closethereardeector.
12

Side-Dischargingthe
Clippings
InstallingtheSide-Discharge
Chute
1.Liftupthereardeector(Figure21).
g032024
Figure21
1.Reardeector3.Notchinthehandle
bracket(2)
2.Rodend(2)4.Side-dischargechute
Note:Ifthegrassbagisonthemachine,
removeit;refertoRemovingtheGrassBag
(page12).
2.Inserttherodendsoftheside-dischargechute
intothenotchesonthehandlebrackets(Figure
21).
3.Allowthereardeectortorestonthechute.
RemovingtheSide-Discharge
Chute
1.Liftupthereardeector(Figure21).
2.Lifttheside-dischargechuteoutformthe
notchesonthehandlebracketsandremovethe
chutefromthemachine.
3.Closethereardeector.
OperatingTips
GeneralMowingTips
•Inspecttheareawhereyouwillusethemachine
andremoveallobjectsthatthemachinecould
throw.
•Avoidstrikingsolidobjectswiththeblade.Never
deliberatelymowoveranyobject.
•Ifthemachinestrikesanobjectorstartstovibrate,
immediatelyshutofftheengine,removethekey
(ifequipped),disconnectthewirefromthespark
plug,andexaminethemachinefordamage.
•Forbestperformance,installanewbladebefore
thecuttingseasonbegins.
•ReplacethebladewhennecessarywithaT oro
replacementblade.
CuttingGrass
•Cutonlyaboutathirdofthegrassbladeatatime.
Donotcutbelow51mm(2inches)unlessthe
grassissparseoritislatefallwhengrassgrowth
beginstoslowdown.
•Whencuttinggrassover15cm(6inches)tall,
mowatthehighestcuttingheightsettingandwalk
slower;thenmowagainatalowersettingforthe
bestlawnappearance.Ifthegrassistoolong,the
machinemayplugandcausetheenginetostall.
•Wetgrassandleavestendtoclumpontheyard
andcancausethemachinetoplugortheengine
tostall.Avoidmowinginwetconditions.
•Beawareofapotentialrehazardinverydry
conditions,followalllocalrewarnings,andkeep
themachinefreeofdrygrassandleafdebris.
•Alternatethemowingdirection.Thishelps
dispersetheclippingsoverthelawnforeven
fertilization.
•Ifthenishedlawnappearanceisunsatisfactory,
try1ormoreofthefollowing:
–Replacethebladeorhaveitsharpened.
–Walkataslowerpacewhilemowing.
–Raisethecuttingheightonyourmachine.
–Cutthegrassmorefrequently.
–Overlapcuttingswathsinsteadofcuttingafull
swathwitheachpass.
CuttingLeaves
•Aftercuttingthelawn,ensurethathalfofthelawn
showsthroughthecutleafcover.Youmayneed
tomakemorethanasinglepassovertheleaves.
13

•Iftherearemorethan13cm(5inches)ofleaves
onthelawn,mowatahighercuttingheightand
thenagainatthedesiredcuttingheight.
•Slowdownyourmowingspeedifthemachine
doesnotcuttheleavesnelyenough.
AfterOperation
AfterOperationSafety
GeneralSafety
•Cleangrassanddebrisfromthemachinetohelp
preventres.Cleanupoilorfuelspills.
•Allowtheenginetocoolbeforestoringthemachine
inanyenclosure.
•Neverstorethemachineorfuelcontainerwhere
thereisanopename,spark,orpilotlight,such
asonawaterheateroronotherappliances.
HaulingSafety
•Removetheignitionkey(ifequipped)before
loadingthemachineforhauling.
•Usecarewhenloadingorunloadingthemachine.
•Securethemachinefromrolling.
CleaningundertheMachine
ServiceInterval:Aftereachuse
Forbestresults,cleanunderthemachinesoonafter
youhavecompletedmowing.
1.Lowerthemachinetoitslowestcutting-height
setting.
2.Movethemachineontoapavedlevelsurface.
3.Withtheenginerunningandthebladeengaged,
sprayastreamofwaterinfrontoftheright,rear
wheel(Figure22).
Note:Thewaterwillsplashintothepathofthe
blade,cleaningouttheclippings.
g002600
Figure22
4.Whennomoreclippingscomeout,stopthe
waterandmovethemachinetoadryarea.
5.Runtheengineforafewminutestodrythe
undersideofthemachine.
FoldingtheHandle
WARNING
Foldingorunfoldingthehandleimproperly
candamagethecables,causinganunsafe
operatingcondition.
•Donotdamagethecableswhenfoldingor
unfoldingthehandle.
•Ifacableisdamaged,contactan
AuthorizedServiceDealer.
1.Removetheignitionkey(ifequipped).
2.Loosenthehandleknobsuntilyoucanmovethe
handlefreely(Figure23).
g032022
Figure23
1.Handleknob(2)
3.MovethehandleforwardasshowninFigure23.
14

Maintenance
Note:Determinetheleftandrightsidesofthemachinefromthenormaloperatingposition.
RecommendedMaintenanceSchedule(s)
MaintenanceService
IntervalMaintenanceProcedure
Beforeeachuseordaily
•Checktheengine-oillevel.
•Ensurethattheengineshutsoffwithin3secondsafterreleasingtheblade-control
bar.
Aftereachuse•Cleangrassclippingsanddirtfromunderthemachine.
Every25hours•Servicetheairlter;serviceitmorefrequentlyindustyoperatingconditions.
•Chargethebatteryfor24hours(ifequipped).
Yearly
•Changetheengineoil.
•Replacethebladeorhaveitsharpened(morefrequentlyiftheedgedullsquickly).
•Cleantheenginebyremovingdirtanddebrisfromitstopandsides;cleanitmore
frequentlyindustyoperatingconditions.
Yearlyorbeforestorage•Emptythefueltankbeforerepairsasdirectedandbeforeyearlystorage.
Important:Refertoyourenginemanualforadditionalmaintenanceprocedures.
MaintenanceSafety
•Disconnectthespark-plugwirefromthespark
plugandremovetheignitionkey(electric-start
modelonly)beforeperforminganymaintenance
procedure.
•Wearglovesandeyeprotectionwhenservicing
themachine.
•Thebladeissharp;contactingthebladecanresult
inseriouspersonalinjury.Weargloveswhen
servicingtheblade.Donotrepairoralterthe
blade(s).
•Nevertamperwithsafetydevices.Checktheir
properoperationregularly.
•Tippingthemachinemaycausethefueltoleak.
Fuelisammableandexplosive,andcancause
personalinjury.Runtheenginedrytoremovethe
fuelwithahandpump;neversiphonthefuel.
•Toensureoptimumperformanceandcontinued
safetycerticationofthemachine,useonly
genuineT ororeplacementpartsandaccessories.
Replacementpartsandaccessoriesmadeby
othermanufacturerscouldbedangerous,and
suchusecouldvoidtheproductwarranty.
PreparingforMaintenance
1.Shutofftheengine,removetheignitionkey(if
equipped),andwaitforallmovingpartstostop.
2.Disconnectthespark-plugwirefromthespark
plug(Figure24).
g032025
Figure24
1.Spark-plugwire
3.Afterperformingthemaintenanceprocedure(s),
connectthespark-plugwiretothesparkplug.
15

ServicingtheAirFilter
ServiceInterval:Every25hours/Yearly(whichever
comesrst)
1.Pullthetabtoopentheair-ltercover(Figure
25).
g032020
Figure25
1.Tab
2.Replacetheairlter.
3.Closetheair-ltercover.
ChangingtheEngineOil
ServiceInterval:Yearly
Changingtheengineoilisnotrequired,butif
youwanttochangetheoil,usethefollowing
procedure.
Note:Runtheengineafewminutesbeforechanging
theoiltowarmit.Warmoilowsbetterandcarries
morecontaminants.
EngineOilSpecications
Engineoilcapacity0.44L(15oz)
OilviscositySAE30orSAE10W-30
detergentoil
APIserviceclassicationSJorhigher
1.Movethemachinetoalevelsurface.
2.RefertoMaintenanceSafety(page15).
3.Removethedipstickbyrotatingthecap
counterclockwiseandpullingitout(Figure26).
g197452
Figure26
1.Full3.Add
2.High
4.Tipthemachineontoitsside(sothattheair
lterisup)todraintheusedoilfromtheoil-ll
tube(Figure27).
16

g020050
Figure27
5.Afterdrainingtheusedoil,returnthemachineto
theoperatingposition.
6.Carefullypourabout3/4oftheenginecapacity
ofoilintotheoil-lltube.
7.Wait3minutesfortheoiltosettleintheengine.
8.Wipethedipstickcleanwithacleancloth.
9.Insertthedipstickintotheoil-lltube,then
removethedipstick.
10.Readtheoillevelonthedipstick(Figure26).
•Iftheoillevelonthedipstickistoolow,
carefullypourasmallamountofoilintothe
oil-lltube,wait3minutes,andrepeatsteps
8through10untiltheoillevelonthedipstick
iscorrect.
•Iftheoillevelonthedipstickistoohigh,
draintheexcessoiluntiltheoillevelonthe
dipstickiscorrect.
Important:Iftheoillevelintheengineistoo
lowortoohighandyouruntheengine,you
maydamagetheengine.
11.Installthedipstickintotheoil-lltubesecurely.
12.Recycletheusedoilproperly.
ChargingtheBattery
Electric-StartModelOnly
ServiceInterval:Every25hours
Chargethebatteryfor24hoursinitially,thenmonthly
(every25starts)orasneeded.Alwaysusethe
chargerinashelteredareaandchargethebatteryat
roomtemperature(22°Cor70°F)wheneverpossible.
1.Connectthechargertothewireharnesslocated
belowtheignitionkey(Figure28).
g002889
Figure28
2.Plugthechargerintoawalloutlet.
Note:Whenthebatterynolongerholdsa
charge,recycleordisposeofthelead-acid
batteryaccordingtolocalcodes.
Note:Yourbatterychargermayhavea2-colorLED
displaythatindicatesthefollowingstatesofcharging:
•Aredlightindicatesthatthechargerischarging
thebattery.
•Agreenlightindicatesthatthechargerisfully
chargedorthechargerisdisconnectedfromthe
battery.
•Aashinglightthatalternatesbetweenredand
greenindicatesthatthebatteryisnearlyfully
charged.Thisstatelastsonlyafewminutesuntil
thebatteryisfullycharged.
17

ReplacingtheFuse
Electric-StartModelOnly
Ifthebatterydoesnotchargeortheenginedoesnot
runwiththeelectricstarter,thefusemaybeblown.
Replaceitwitha40Aplug-intypefuse.
1.Unclipthebatterycoverandremoveit(Figure
29).
g032021
Figure29
1.Batterycover3.Battery
2.Foam4.Fuseholder
2.Insertthefuseintothefuseholder(Figure30).
g002878
Figure30
3.Installthebatterycover.
ReplacingtheBlade
ServiceInterval:Yearly
Important:Youwillneedatorquewrenchto
installthebladeproperly.Ifyoudonothavea
torquewrenchorareuncomfortableperforming
thisprocedure,contactanAuthorizedService
Dealer.
Examinethebladewheneveryourunoutoffuel.Ifthe
bladeisdamagedorcracked,replaceitimmediately.
Ifthebladeedgeisdullornicked,haveitsharpened
andbalanced,orreplaceit.
WARNING
Thebladeissharp;contactingthebladecan
resultinseriouspersonalinjury.
Weargloveswhenservicingtheblade.
1.RefertoPreparingforMaintenance(page15).
2.Tipthemachineontoitssidewiththeairlterup.
3.Useablockofwoodtoholdthebladesteady
(Figure31).
g231389
Figure31
4.Removetheblade,savingallmountinghardware
(Figure31).
5.Installthenewbladeandallmountinghardware
(Figure32).
18

g231390
Figure32
Important:Positionthecurvedendsofthe
bladetopointtowardthemachinehousing.
6.Useatorquewrenchtotightenthebladebolt
to82N∙m(60ft-lb).
Important:Abolttorquedto82N∙m(60
ft-lb)isverytight.Whileholdingtheblade
withablockofwood,putyourweight
behindtheratchetorwrenchandtightenthe
boltsecurely.Thisboltisverydifcultto
overtighten.
AdjustingtheSelf-Propel
Drive
Wheneveryouinstallanewself-propelcableorif
theself-propeldriveisoutofadjustment,adjustthe
self-propeldrivecable.
1.Loosenthecable-supportnut(Figure33).
g009692
Figure33
1.25to38mm(1to1-1/2
inches)
4.Cable-supportnut
2.Self-propel-drivebar5.Cablesupport
3.Cablejacket
2.Holdtheself-propel-drivebar25to38mm(1to
1-1/2inches)fromthehandle(Figure33).
3.Pulldownthecablejacket(towardthemachine)
untilthereisnoslackinthecable(Figure33).
4.Tightenthenutonthecablesupport.
5.Releasetheself-propel-drivebarandensure
thatthecableisloose.
Note:Thecablemustbeloosewiththe
self-propeldrivebarinthereleasedposition;
otherwise,themachinemaycreepwhenyou
disengagethebar.
19
Other manuals for 29732
2
This manual suits for next models
1
Table of contents
Languages:
Other Toro Lawn Mower manuals

Toro
Toro LX425 User manual

Toro
Toro TimeCutter SW series Manual

Toro
Toro 30555 User manual

Toro
Toro 21136 User manual

Toro
Toro Groundsmaster 4000-D User manual

Toro
Toro 73580 User manual

Toro
Toro Greensmaster Flex 18 User manual

Toro
Toro Super Recycler 21566T User manual

Toro
Toro Z Master 74958 User manual

Toro
Toro 03781 User manual