Torrey AMS-350T User manual

MANUAL DE USUARIO
User’s Manual
AMS-350T / RMS-350
T506855-S
THANKS FOR READING THIS MANUAL. IF YOU HAVE ANY DOUBT REGARDING THE
OPERATION OF THIS SLICER, PLEASE CONTACT TO YOUR TORREY AUTHORIZED DEALER.
GRACIAS POR LEER ESTE MANUAL. SI UD. TIENE ALGUNA DUDA SOBRE LA OPERACIÓN DE
ESTA REBANADORA, POR FAVOR CONTACTE A SU DISTRIBUIDOR TORREY AUTORIZADO
READ THIS MANUAL BEFORE USING THE EQUIPMENT FOR THE FIRST
TIME
LEA LAS INSTRUCCIONES ANTES DE USAR
EL EQUIPO POR PRIMERA VEZ

Manual de Usuario
Owner’s Manual
1 AMS-350T / RMS-350
INSTRUCTIONS FOR OPERATION
I.- INTRODUCTION:
Congratulations!, you have acquired a Meat slicer, which is made of high quality long lasting materials
that should give you years of trouble free operation and durable service. This slicer is made of parts of
anodized aluminum, a material with a type of superficial coat that maximizes the appearance, reduce
the oxidation and it is also the best for the contact with food products.
IMPORTANT!: it is of vital importance that you and any person that will operate this unit thoroughly
read this manual.
CONTENTS: PAGE
I. INTRODUCTION 1
II. UNPACKING 2
III. INSTALLATION 3
IV. OPERATION 3
V. KEY ELEMENTS IN SLICING QUALITY PRODUCT 5
VI. CLEANING, SANITIZING AND INSPECTING INSTRUCT. 6
VII. MAINTENANCE 9
VIII. EQUIPMENT SPECIFICATIONS 10
WARNING!:
This machine is designed to slice food products and is by nature dangerous, if
not used and maintained properly for optimum safety.
The appliance is not be used by persons (including children) with reduced
physical, sensory or mental capabilities, or lack of experience and knowledge,
unless they have given supervision or instruction. Children being supervised
not play with the appliance.
Never perform service, cleaning or maintenance on this unit while
connected to a power source.
Never use hands or fingers to feed products to cut; or introduce hands into
the blade track area, within 4 " ( four inches ) close to the blade, while in
operation.
Do not leave the machine unattended while in operation & turn it off when it is
not being used.
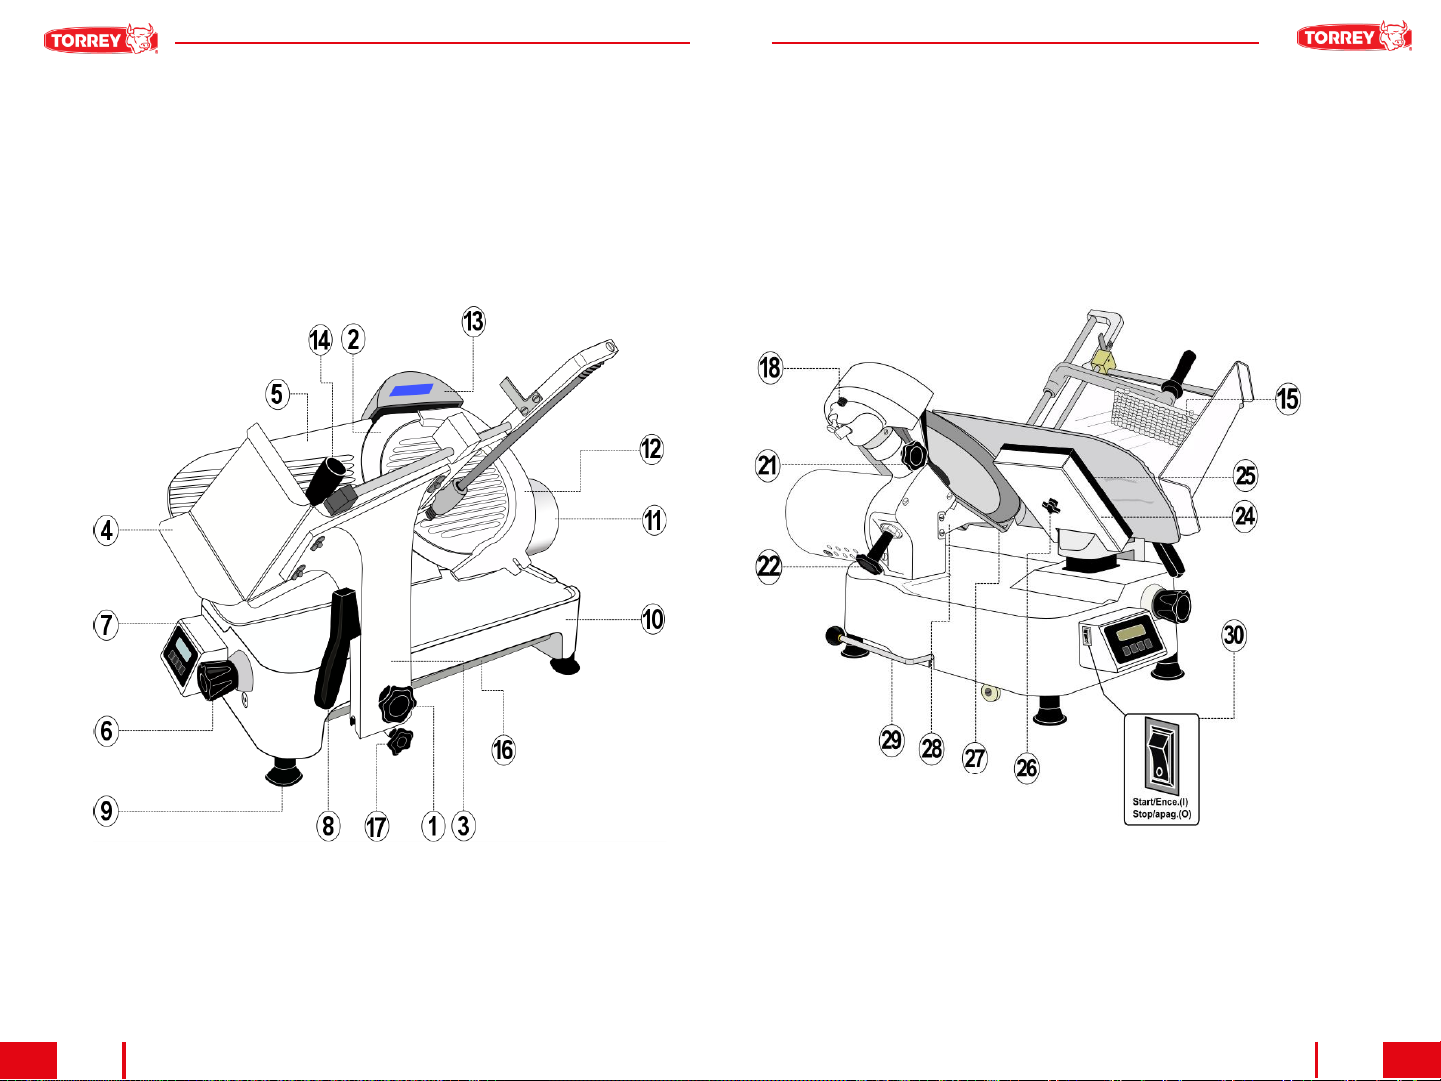
COMPONENTES DE LA REBANADORA DE CARNES (VER PAGINAS CENTRALES)
CÓDIGO DESCRIPCIÓN CANT
1
PERILLA
DE CARRO 1
2
CUCHILLA
1
3
SOPORTE
DE CARRO 1
4
CARRO
1
5
PLANCHA
1
6
PERILLA
DE REGUALDOR 1
7
PANEL
DE CONTROL* 1
8
MANIJA
PARA PORTACARRO 1
9
PATAS
DE NIVELACIÓN 4
10
BASE
1
11
MOTOR 1/2 HP Y CUBRE MOTOR
1
12
PLATO
1
13
AFILADOR
1
14
PERILLA
DE PISÓN 1
15
PISÓN
1
16
BARRA
DE DESLIZAMIENTO 1
17
PERILLA
MANUAL-AUTO* 1
18
PERILLA
EN TAPA DE AFILADOR 1
19
PIEDRA
DE AFILAR 1
20
PIEDRA
DE ASENTAR 1
21
PERILLA
CANDADO DE AFILADOR 1
22
PERILLA
DE PLATO 1
23
OPRESORES
DE AJUSTE DE CARRO (No mostrado) 3
24
CUBIERTA
PORTAPLANCHA 1
25
EMPAQUE PARA PORTAPLANCHA
1
26
PERILLA
PARA PORTAPLANCHA 1
27
PROTECTOR
DE CUCHILLA 1
28
DESVIADOR
DE PRODUCTO 1
29
PALANCA DE ELEVACIÓN
1
30
INTERRUPTOR PRINCIPAL (ON/OFF)*
1
*Aplica solo al modelo KAMS-14
This equipment should be connected to a connection with thermal protection and properly
grounded. The cable tie used is "Y" type, if it is damaged, it must be replaced by authorized and
qualified personnel to avoid any risk.
Manual de Usuario Owner’s Manual
11 2
AMS-350T / RMS-350
II.- UNPACKING
While unpacking the machine take special care in removing these components to be assembled later.
Make sure that all are accounted for *.
*Note: for reference numbers see “Meat slicer diagram for components”(central pages).
A.- Remove the wood packing cover, the cardboard protectors and the plastic bag.
B.- Define the place to set the machine.
C.- Take out the carriage assembly. Do the same with the base unit Assy by lifting from the base (10),
(exercise proper lifting method, preferably do this procedure with two persons).
D.- Once the unit is firmly on the intended place to operation, take out the knife sharpener box
assembly and remove the bag and foam protector.
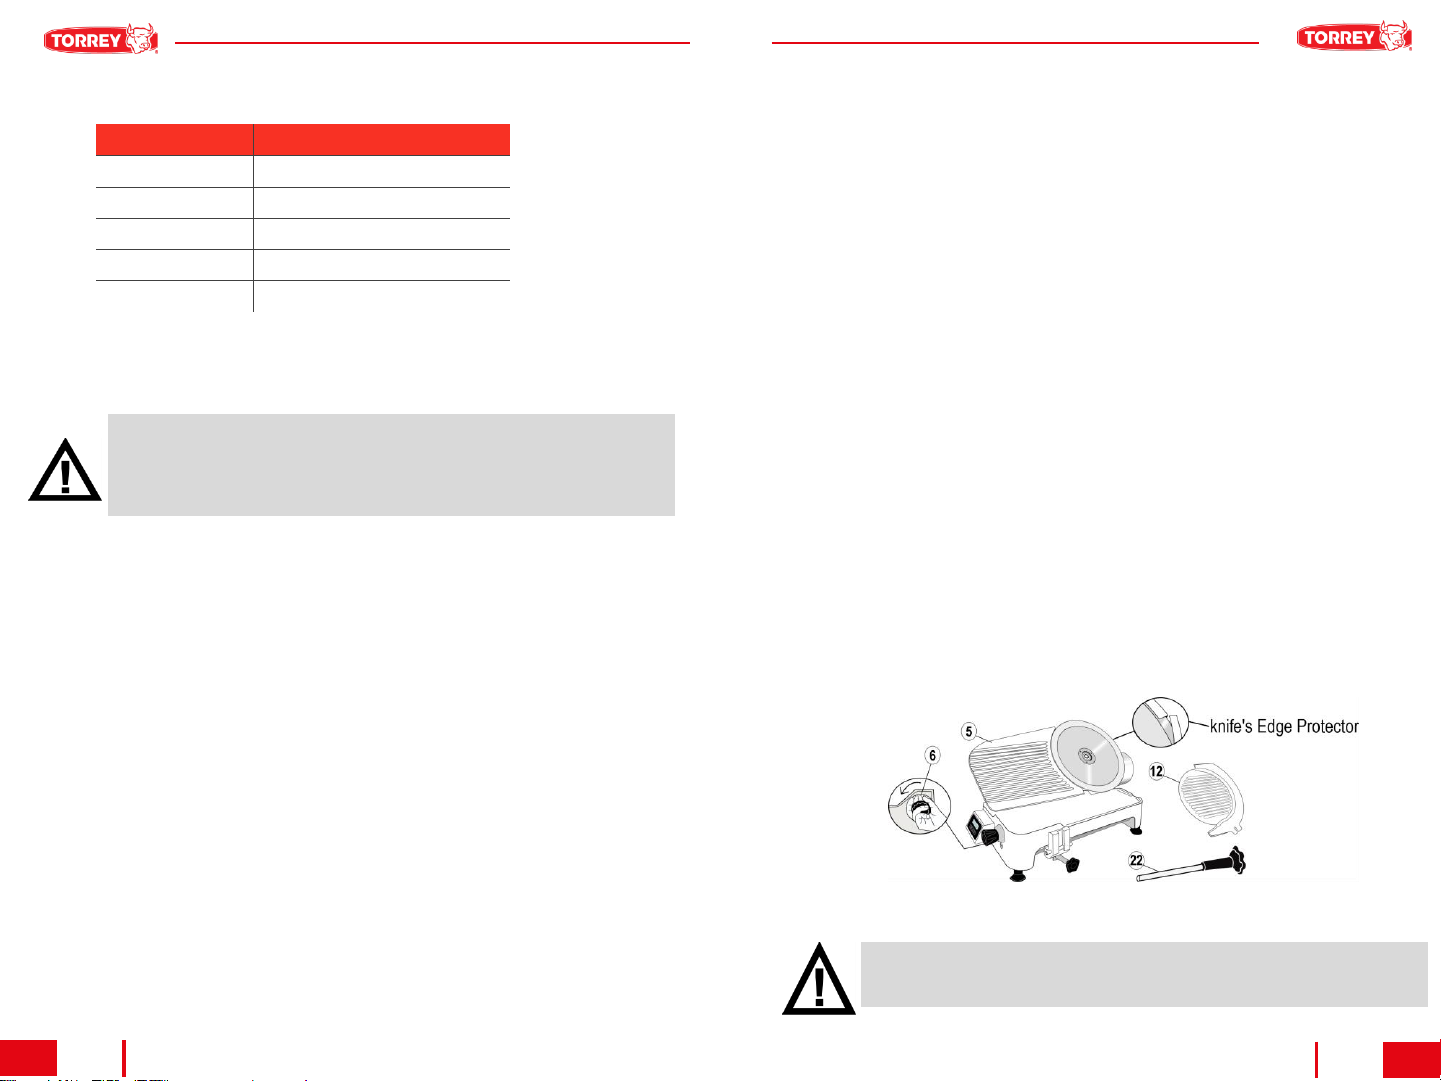
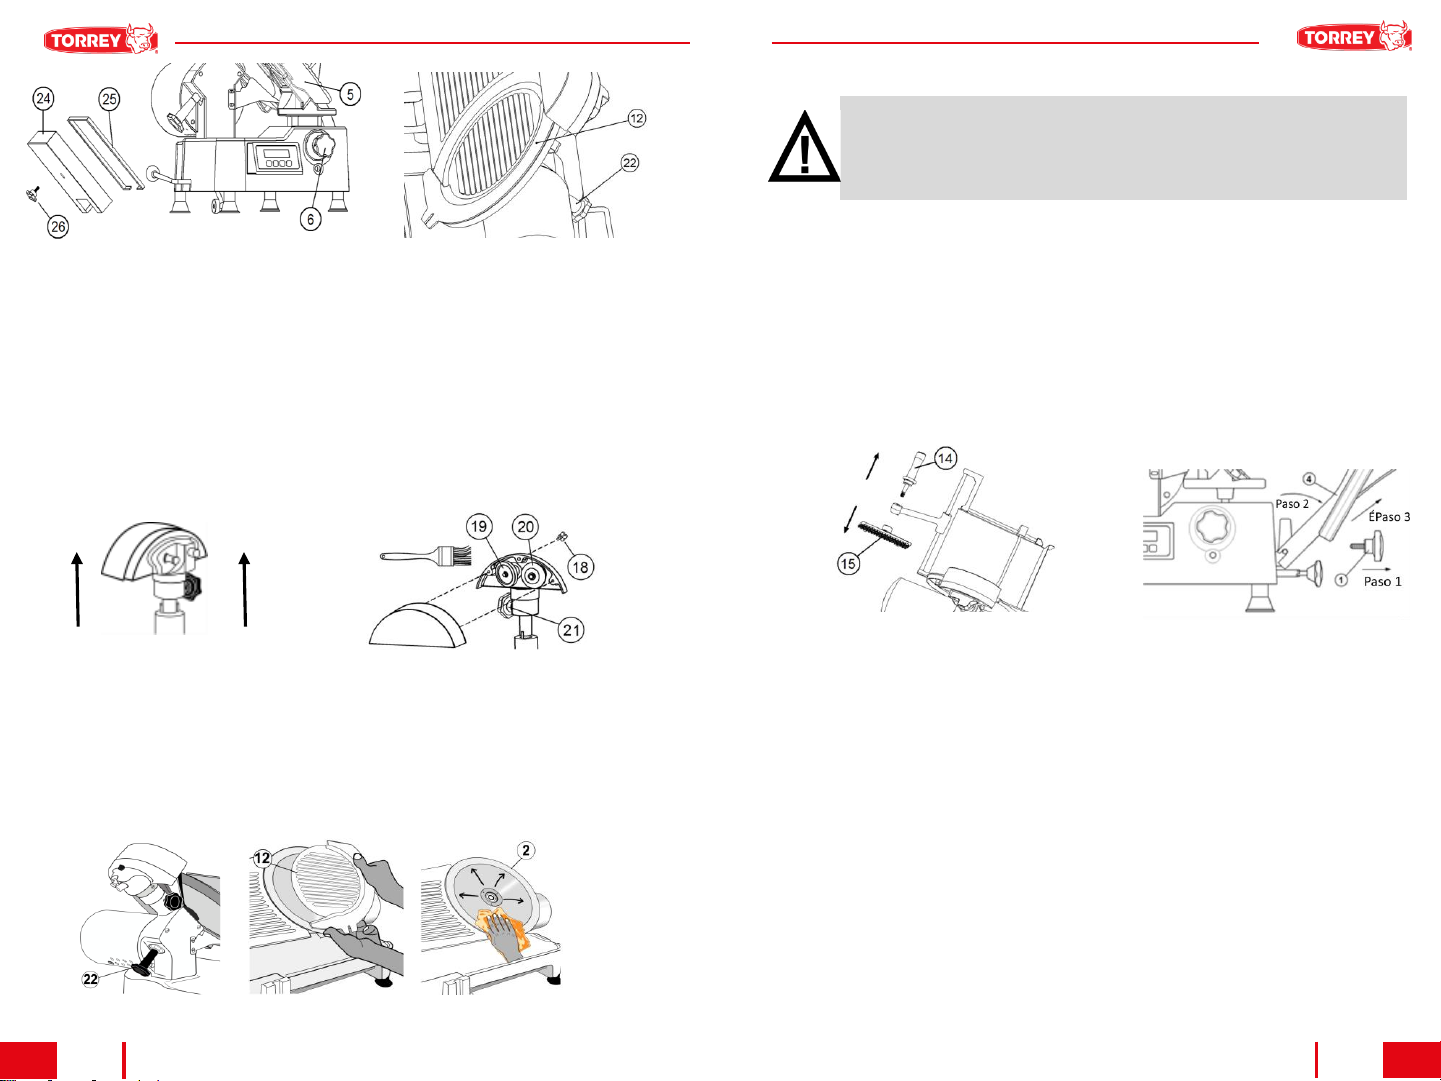
E.- Remove the knife edge protector by following the next instructions (See Fig. 1):
•Rotate the slice adjusting knob (6) counter clockwise until it stops.
•Remove the knife guard plate (12)by loosing the knife guard knob (22).
•Exercise extreme caution to remove the knife edge protector by finding the protector joint and
removing the protector by lifting it from the knife. (Always wear hand and finger protection for this
operation).
•Once the knife edge protector is removed, Assemble again the knife guard plate (12) and assure it
with the knife guard knob (22). Close the thickness gauge plate (5) by rotating the slice adjusting knob
(6) clockwise fully.
Base
Unit Assembly:
Carriage
Assembly
:
Sharpener
Box Assembly
:
1
Knife
(2) 1
Carriage
support (3)
1
Sharpener
box (13)
1
Motor
(11) 1
Carriage
(4)
1
Thickness
gauge plate (5
)
1
Carriage
Handle (8)
1
Blade
guard plate (12) 1
Grip
(15)
WARNING!:
Take special care when you take apart the knife protector. The knife is already
sharp from the factory and without protection serious injury may happen.
FIG 1. HOW TO REMOVE THE KNIFE’S EDGE PROTECTOR
REBANADORA MODELO: AMS-350T, RMS-350
Capacidad del motor 373W (1/2 HP)
Frecuencia 60 Hz
Voltaje 115 V~ 220 V~
RPM 400-420
Fases 1
C) DIAGRAMA ELÉCTRICO
El diagrama eléctrico del equipo se encuentra bajo el marco de base-.
¡ADVERTENCIA!:
El mantenimiento o servicio de este equipo debe ser realizado por personal
calificado únicamente. Para cualquier problema o duda relacionada a las
especificaciones y conexiones eléctricas, por favor contacte a distribuidor
autorizado.
B) ESPECIFICACIONES ELECTRICAS (De acuerdo al modelo Ver placa del equipo)
Manual de Usuario
Owner’s Manual
3 AMS-350T / RMS-350 10
IV.- OPERATION:
A. Manual operation of the slicer:
1.- Place the product to be cut on the carriage tray (4). Choose product temperatures higher than 36°F
(2°C) preferably. This machine was not made to slice meat with ice or bone.
2.- Pull the MANUAL-AUTO Knob (17) out, then turn It clockwise all the way. (Only for AMS-350T)
3.- Unlock the handgrip (15) from under the carriage tray (4) using the handgrip knob (14). To accomplish,
move the handgrip up to the top of the slide rod -DO NOT FORCE THIS OPERATION- then rotate the
handgrip counterclockwise to its position over the carriage tray.
4.- Push down the handgrip (15) using its Knob (14) to fix product. You can use this knob to slide the
carriage back and forth with the same hand or use the carriage support handle (8).
5.- Move the carriage all the way back and select the thickness using the Slice adjusting knob (6).
IMPORTANT: MAXIUM WEIGTH ½”
6.-Plug the slicer and turn on it using the main ON/OFF Switch (30). Push the “INICIO” (Start) key for AMS-
350T key or green botton “ON” for RMS-350, the cutting blade will turn.
NOTE: This machine has been designed with a 45°angle so that minimum effort is required to push
the product through the cutting blade.
IMPORTANT!:
For the first time usage, you must clean the machine and also cut a couple of
slices of scrap product (you can use carrots, potatoes etc.) to be sure that the
knife is clean before cutting edible product.
III.- INSTALLATION:
Before connecting to the power source follow this easy assembly
and preparation steps (Fig. 2).
1.- Assemble the carriage assembly on the slicer base (10):
A.- Remove carriage knob (1) and washer.
B.- Place carriage assembly on the support of the carriage bearing
(16) .
C.- Place washer and tighten carriage knob (1) firmly.
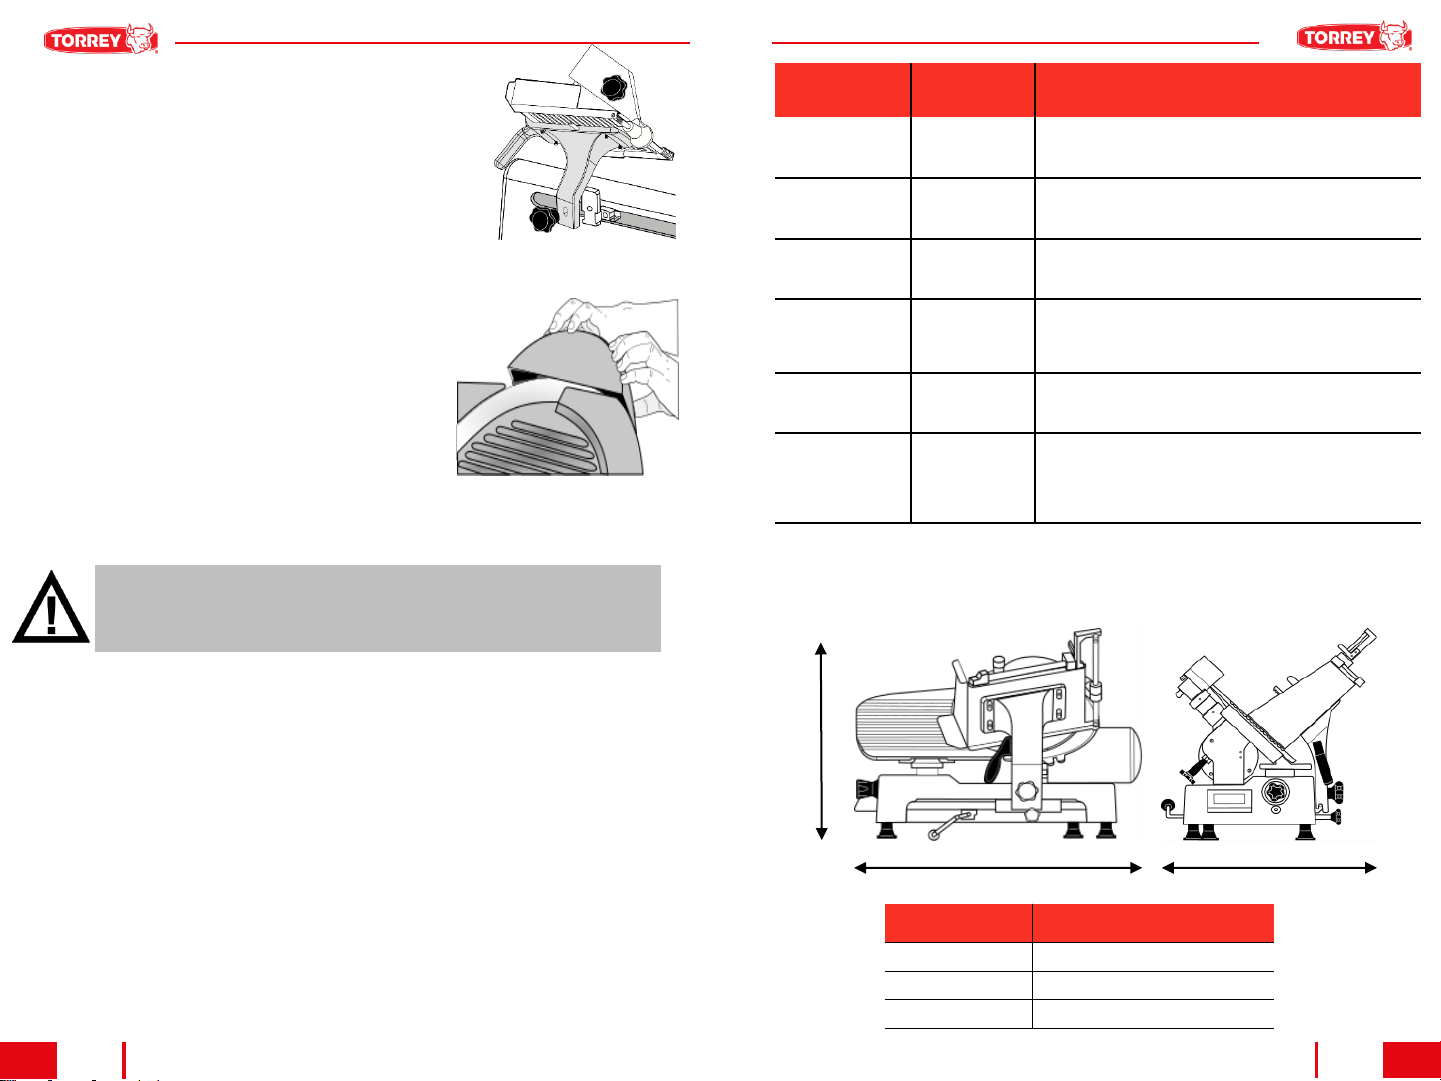
2.- Then install the Knife Sharpener Box Assembly (13) according to
Fig. 3. Screw clockwise the lock knob (21)to fix the complete
assembly.
3.- Set the slicer on a clean and leveled floor.
4.- Rotate the slice adjusting knob (6) to be sure that it works freely
all the way through, and check that the thickness gauge plate (5)
opens and closes simultaneously.
5.- Connect the slicer to the power source. The power source should
be close enough to the machine to provide ease of disconnection for
cleaning and service.
FIG 2. FIXING THE CARRIAGE
ASSY
FIG 3. INSTALLING THE
SHARPENER BOX
REVISION DE
PARTES FRECUENCIA COMENTARIOS
Rodamientos Diario
Limpie diariamente el área de rodamientos para prevenir la
acumulación de líquidos y desechos. También lubrique estas
áreas para extender la vida útil de los rodamientos
Membrana
(ON-OFF)* Diario
Es necesario cambiar inmediatamente la membrana rota o
con falla para prevenir fallas posteriores en el encendido o
apagado del equipo debido a humedad u otros residuos.
Barras de
deslizamiento Semanal
Mantenga limpias y lubricadas las barras de deslizamiento
(del carro principalmente) usando grasa mineral. No utilizar
aceite para cocinar, esta no es un lubricante.
Soporte del Carro Semanal
Mantenga
libre de residuos (polvo, alimentos, etc.) las
barras
de
deslizamiento y así mismo manténgalas lubricadas
con
aceite
mineral. No use aceite de cocina ya que afectara
el
movimiento
.
Afilado de Cuchilla Semanal
Si
nota que el corte de cuchilla es pesado o sí
observa
exceso
de desperdicio. (El corte debe ser suave, fácil
y
limpio
.
Piedras de Afilar y
Asentar Diario
Es
recomendable que las piedras de afilar y
asentar
permanezcan
protegidas contra residuos para extender
la
vida
útil de las piedras. Antes de afilar la cuchilla
asegúrese
que
esté libre de residuos para prevenir que se tapen
los
poros
de las piedras
A
BC
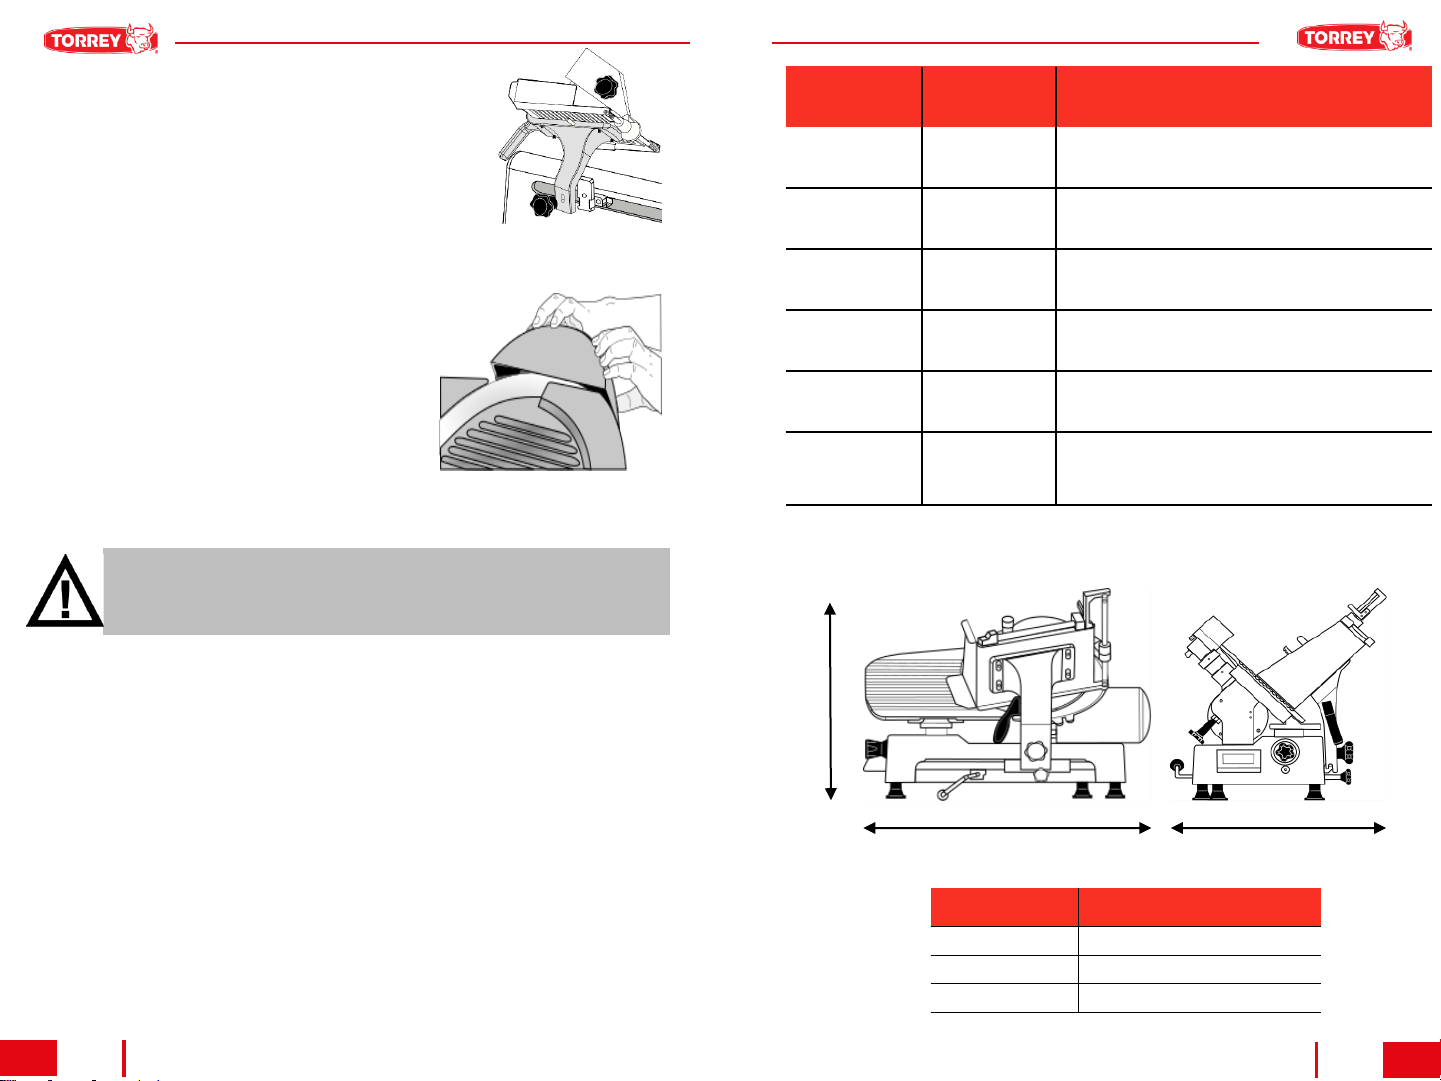
DIMENSIONES MODELOS AMS-350T, RMS-350
A45.7 cm (18 in)
B54.6 cm (21.5 in)
C53.3 cm (21 in)
*Aplica solo al modelo AMS-350T
VIII. ESPECIFICACIONES GENERALES
A) DIMENSIONES GENERALES
Manual de Usuario Owner’s Manual
94
AMS-350T / RMS-350
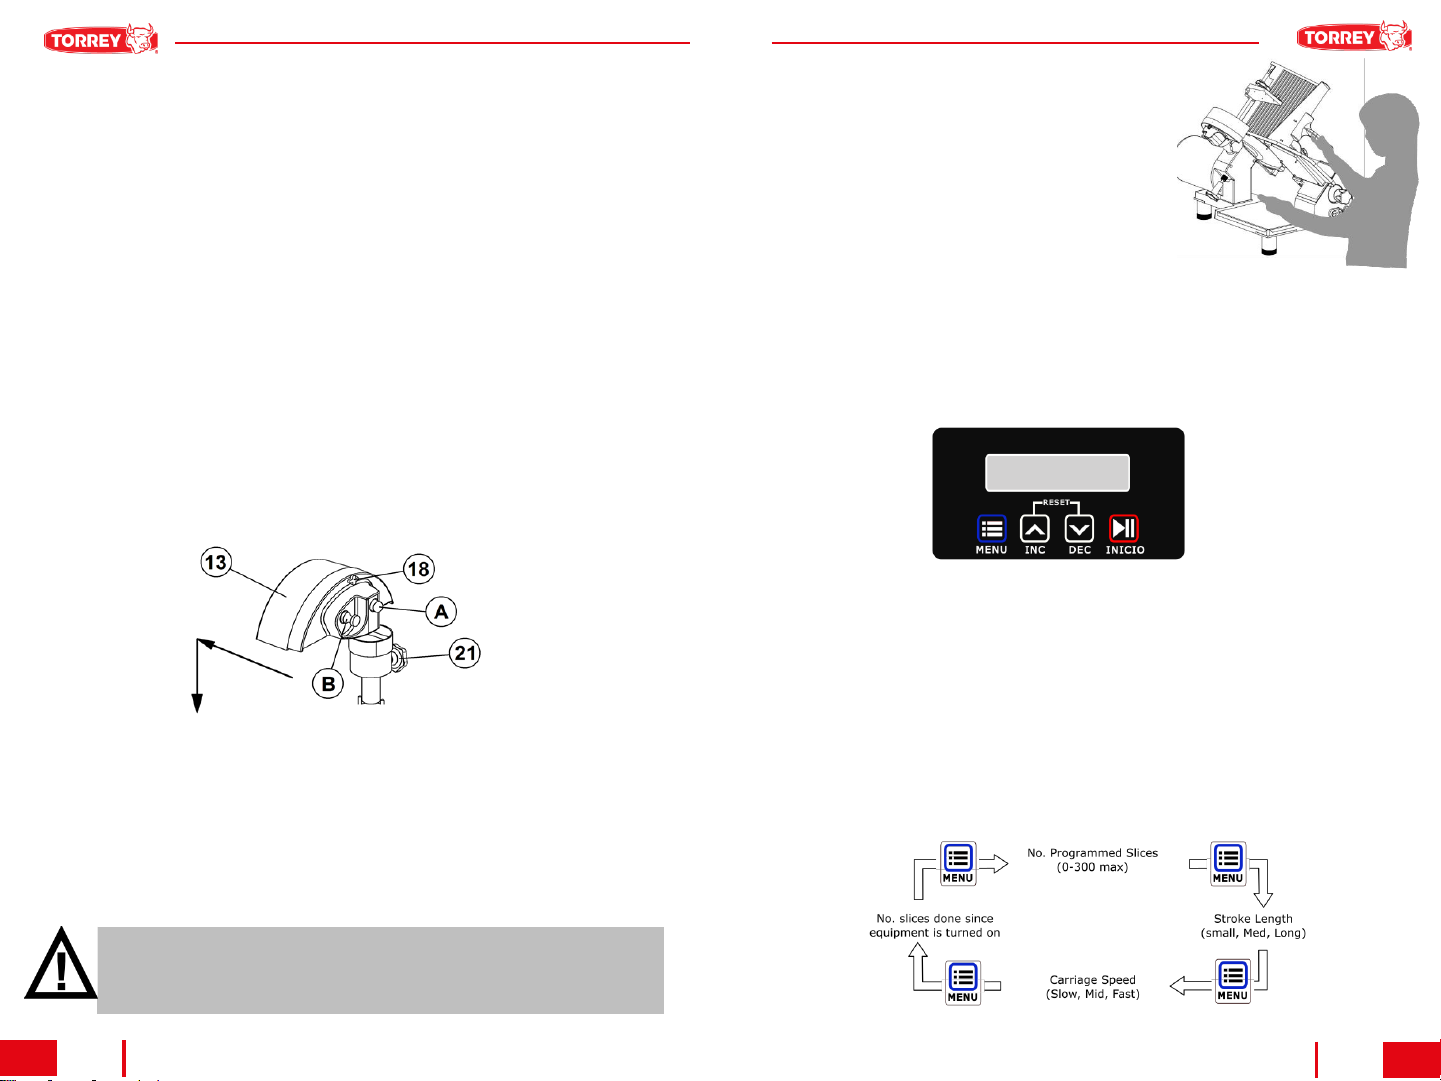
7.- Locate in the correct working position (See Fig. 4), and now
you can start to slice the product. For best results, keep knife (2)
sharp.
8.- When operations are finished, always pause the machine by
pressing the ”INICIO” (Start/Pause) key and turn the thickness
gauge knob (6) clockwise as far as It will go (BE SURE THAT
THE PLATE (12) COVERS THE EDGE OF THE KNIFE TO
PREVENT AN ACCIDENT).
9.- Return the handgrip (15) to its stowed position under the
carriage following the steps 3 of this section.
B. Automatic operation of the slicer: (Only for AMS-350T)
The Automatic Slicer has a friendly control panel to make the operation easier. It is very important you
understand well this control panel before you operate the machine.
- How to start and stop the meat slicer.
Turn the MANUAL/AUTOMATIC (17) knob counterclockwise fully.
Press the switch (30) to the “ON” position, Push “INICIO” (Start) key and the cutting blade will turn and
the carriage will do the stroke to slice product. Press the “INICIO” (Start/Pause) key again and the blade
will stop and the carriage will move up to the left for the next slicing
NOTE!: If the Manual/Automatic knob is in the manual position, the carriage will not do the stroke for
slicing. To switch the system to the automatic mode, just turn off the cutting blade (press the “ON-OFF”
key) and then turn it on again.
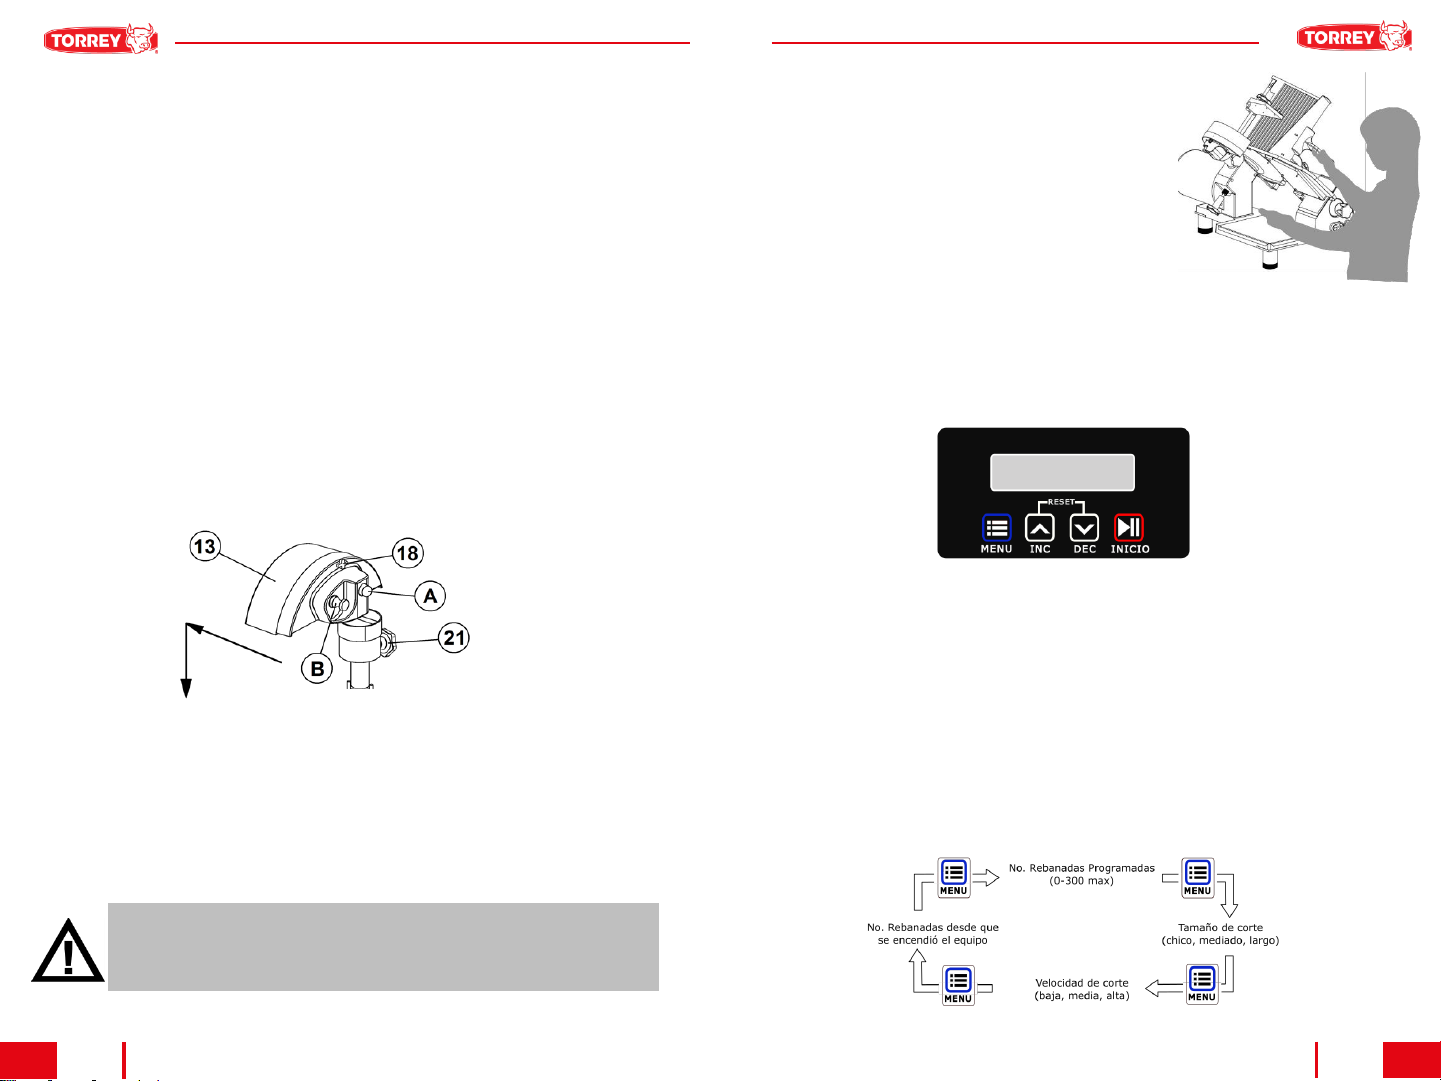
-Function Menu Key: Every time you press the “MENU” key, the parameters are displayed and they can
be changed. They appear as follow:
NOTE: To slice another product, just follow all the previous
steps. Clean all parts before slicing different food to avoid
flavors mixing.
FIG 5. CONTROL PANEL
FIG 6. SECUENCE OF PARAMETRES FROM THE CONTROL PANEL
VII.- MANTENIMIENTO
1. Barras de deslizamiento: se debe lubricar con aceite ligero por lo menos cada 100 horas o cada 3
días de servicio. Los puntos a lubricar son la parte superior e inferior de las barras deslizantes
cuadradas y redondas.
2.Cuchilla: Afilar la cuchilla (6) después de un determinado periodo de uso (1 mes) o si nota que la
calidad de la rebanada no es tan fina como la primera.
A. Asegúrese que la rebanadora este apagada.
B. Afloje la perilla del afilador (21), ubicada debajo del ensamble del afilador, hasta que el resorte
haga que brote el afilador (Ver Fig. 15).
C. Empuje el afilador hacia el filo de la cuchilla, manténgalo en esa posición y presione hacia abajo
hasta que las piedras queden cada una en cada lado de la cuchilla (1/4”sobre la cuchilla.),
después apriete la perilla del afilador (21) nuevamente.
D. Encienda la máquina y presione la barra “A”, permita que la piedra de afilar (19)el lado de la
cuchilla por unos segundos. Esto afila la cuchilla y crea un poco de rebaba en el lado opuesto del
filo. Cuando suelte la barra “A” la piedra regresará a su posición original.
E. Retire la rebaba de la parte superior del filo de la cuchilla jalando la barra “B” aplique solo una
pequeña presión para asentar el filo. Si aplica demasiada presión puede crear un filo con ángulo
inverso y estropear la cuchilla. La barra “B” regresará a su posición original al soltarla.
F. Apague el equipo y espere hasta que la cuchilla se detenga completamente. Afloje la perilla del
afilador (21), levante el afilador y colóquelo en su posición original. Vuelva apretar la perilla del
afilador.
G. Limpie y desinfecte el equipo. (Ver sección de limpieza de equipo)
¡IMPORTANTE!:
El tiempo invertido en afilar y asentar la cuchilla aumentará la vida útil de la
cuchilla y dará eficiencia a la rebanadora de carne. Repita los pasos “D” y“E” si
lo considera necesario.
FIG 15. AJUSTE DEL AFILADOR
FIG 4. WORK POSITION

Manual de Usuario
Owner’s Manual
5 AMS-350T / RMS-350 8
- Language Selection. This options allows you to choose the language of the messages displayed. Use the
“INC” or “DEC” keys to switch between English or Spanish.
- Slice Counting: You can see the slice counting and choose one of these two counting modes:
•Normal Slice Counting: This is an incremental mode. Press the “DEC” and “INC” keys simultaneously
until the display shows “000”(Reset counting). Turn on the Slicer and the counting will increase by one
each. Max number displayed: 999.
•Slice countdown and Auto Stop: This mode permit to program the quantity of slices, after this the slicer
will stop. The slicer is ready to slice THE SAME QUANTITY of slices you programmed before. Press the
“DEC” and “INC” keys simultaneously to set Normal Slice Counting mode.
NOTE: In slice counting, the “INC” and “DEC” keys are disabled when the machine is slicing. Select
the counting mode when the slicer is stopped.
- Stroke Length: Press the “DEC” or “INC” keys to choose the length of the carriage stroke according to the
product: Short (3”), Medium (7”) or Long (11”). The adjustment of carriage stroke can be done when the
machine is slicing or not.
- Carriage Speed: Press the “DEC” or “INC” keys to change the carriage speed: slow, middle and Fast. This
adjustment of the speed can be done while the slicer is slicing or not. The next table shows the slices per
minute for the selected carriage stroke and speed.
V.- KEY ELEMENTS IN SLICING QUALITY PRODUCT
1.- Do not force the cut against the knife (2).
2.- Keep knife (2) edge sharp to assure ease of cutting and enhance product appearance.
Note: the re-sharpening procedure steps are shown in section VII MAINTENANCE.
3.- Keep the thickness gauge plate (12), the carriage tray (4), the knife (2), and the receiving tray free of
scraps and debris.
IMPORTANT!:
A protection is triggered when the machine is trying to slice too hard meat (with
bone or ice). Wait while the controller is resetting the machine or unplug the
equipment and wait 15 seconds and re-reconnect it again.
SLICES PER
MINUTE
SPEED
SLOW MID FAST
STROKE
SHORT 28 36 59
MEDIUM 19 25 43
LONG 14 20 35
¡PRECUACIÓN!:
Por su seguridad, mientras se realiza la limpieza del disco-cuchilla se
recomienda el uso de guantes protectores debido a que el filo pudiese quedar
parcial o totalmente expuesto.
F. DESVIADOR DE PRODUCTO (Ver Fig. 13).
1. Apague el equipo y desconéctelo de la Fuente de corriente.
2.Remueva el desviador de producto (28) aflojando los tornillos.
3. Sumerja las partes en agua tibia con detergente suave. Limpie y seque completamente todas las
partes.
Nota: Cuando ensamble el desviador, deje espacio suficiente entre el desviador y la cuchilla
(1/32”mínimo).
FIG 13. DESENSAMBLAR DESVIADOR DE
PRODUCTO
G. SUPERFICIE BAJO LA REBANADORA
Estire la manija de elevación (29) para inclinar la rebanadora (Ver fig. 14). Limpie todos los
componentes debajo de la maquina con un trapo húmedo.
Estire hacia abajo la manila de elevación (29)para regresar la rebanadora a su posición horizontal
FIG 14. PALANCA DE ELEVACIÓN
Manual de Usuario Owner’s Manual
76
AMS-350T / RMS-350
IMPORTANT!:
CLEAN and SANITIZE this equipment at least once every four hours of operation
in order to prevent the growth of disease-causing bacteria. This procedure must
comply with additional laws from your state and local health departments.
VI.- CLEANING, SANITIZING & INSPECTING INSTRUCTIONS:
Follow the next procedure to disassemble and clean all components of the slicer. Remember to
turn off and disconnect it before cleaning.
Note: Level the thickness gauge plane (5) with the blade guard plate (12) using the thickness
gauge knob (6) to avoid accidents.
A. HANDGRIP AND CARRIAGE TRAY
1.Hold the handgrip (15) and turn the handgrip knob (14) counterclockwise to remove them. (See
figure 7).
2.Turn the carriage knob (1) counterclockwise and remove the carriage (3) from the support. Follow
the steps 1, 2 and 3 shown in the figure (8).
3.- Inspect the contact area between the carriage support (3) and the carriage (4) plate, and the
grip (15) with the serrated sheets. Mating surfaces of joined components shall be with no
hollow spaces between the joined surfaces. Also gasket shall not be broken, missing or
unattached.
4.- Clean completely and remove all food debris specially from the carriage sliding bar and grip
(15). Apply FDA approved mineral oil in all surface of sliding bar after clean (ask to your
authorized dealer).
FIG 8. DISASSEMBLY CARRIAGE TRAY
FIG 7. DISASSEMBLY HANDTRIP
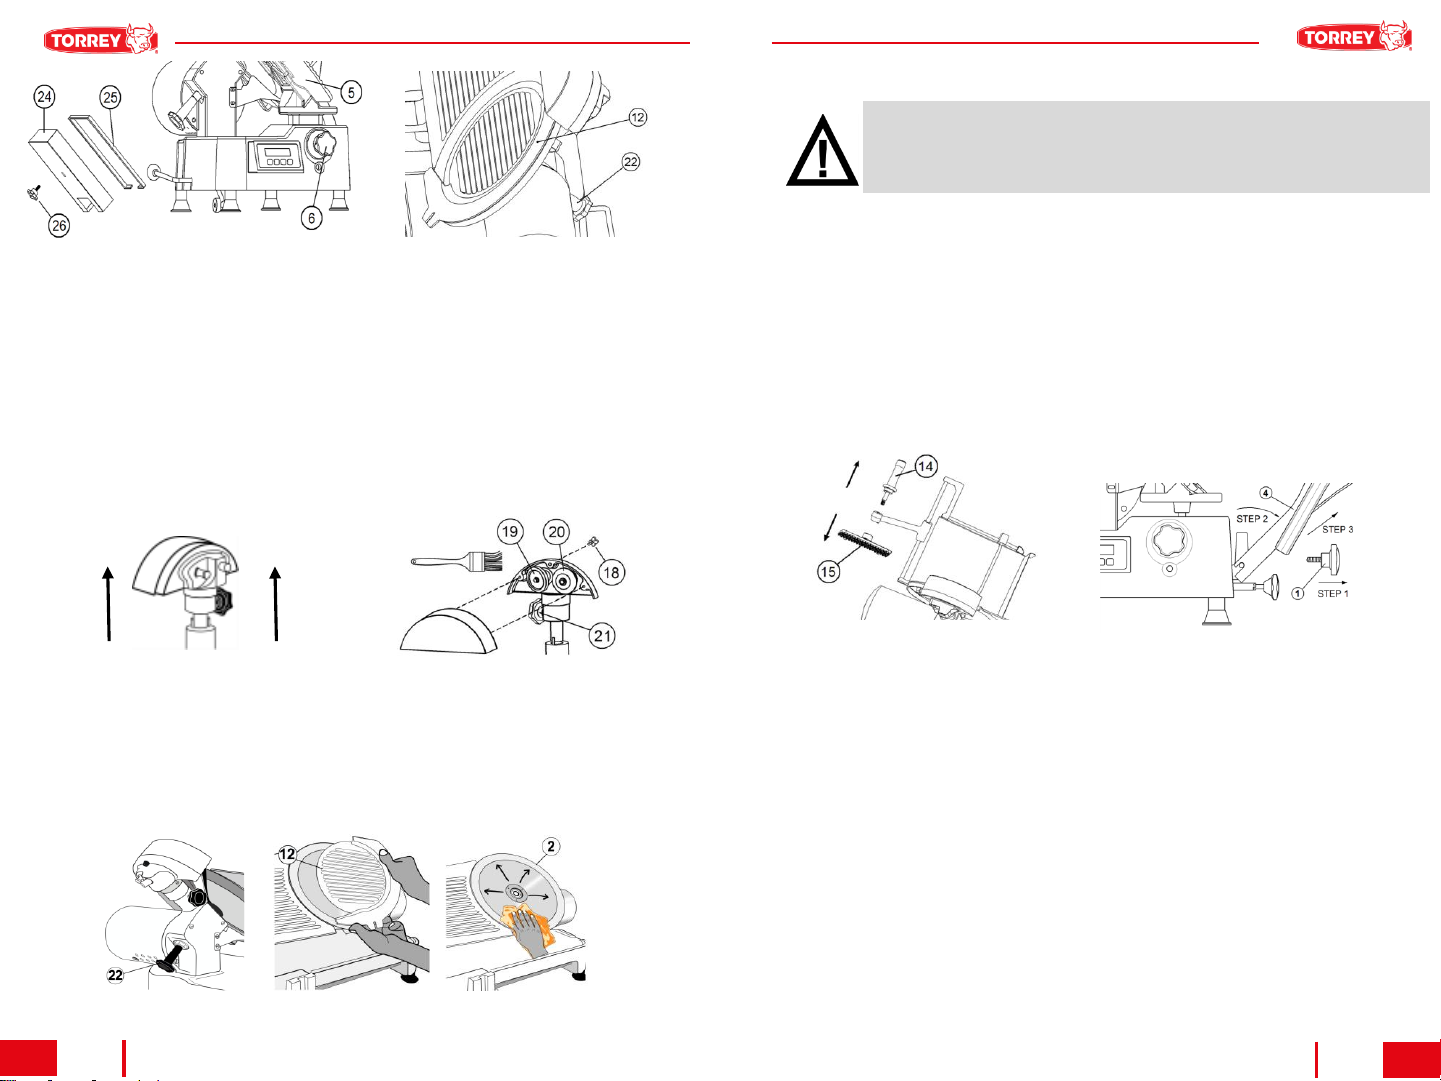
B. THICKNESS GAUGE PLATE
Level the Thickness Gauge Plate (5) with the Blade Guard Plate (12) using the Thickness Gauge
Knob (6). Turn the Knob (26) placed on back side of this plate counterclockwise and take off the
Thickness Gauge Plane Cover (24). Remove the Plane Cover Gasket (25) and wash and dry all
the parts.
C. BLADE GUARD PLATE
Turn the knife guard knob (22) counterclockwise and take off the Blade Guard Plate (12). You can
use this knob to push out the plate. Wash and dry all the parts.
FIG 9. DESENSAMBLE DE LA PLANCHA FIG 10. DESENSAMBLE DEL PLATO
D. AFILADOR.
1.Para remover el sub-ensamble del afilador (13), aflojando la perilla del afilador (21) y jale hacia
arriba el sub-ensamble del afilador.
2. Para limpiar dentro del afilador use un cepillo de cerdas suaves y un trapo suave y húmedo, no lo
lave a chorro de agua. Remueva los desperdicios de comida que se encuentren en los poros de las
piedras de afilar.
3. Seque completamente el afilador.
Nota: Nunca use el sub-ensamble de afilador con las piedras húmedas. Todas la barras del
afilador deben estar lubricadas. Después de afilar la cuchilla todos los componentes como la
chuchilla (2) y las piedras (19&20) deben ser limpiadas y desinfectadas.
FIG 11. PASOS PARA DESENSAMBLAR EL AFILADOR
E. CUCHILLA (Ver Fig. 12).
1. Afloje la perilla del plato (22) girándola en contra de las manecillas del reloj que se encuentra en la
parte posterior de la rebanadora.
2. Remueva el plato (12)de la cuchilla, usando ambas manos para levantarlo.
3. Extremando precauciones, limpie la cuchilla (2) de adentro hacia afuera. Humedezca, limpie y seque
las veces que sea necesario.
FIG 12. LIMPIEZA DE LA CUCHILLA
Manual de Usuario
Owner’s Manual
7 AMS-350T / RMS-350 6
E. KNIFE (See Fig. 12).
1.- Loose the knife guard knob (22)by turning it counter clockwise. Knob´sat the backside of slicer.
2.- Remove the knife guard plate (12) (lifting up using both hands).
3.- With extreme caution, wipe all the knife (2) towards outside (from center). Spray, clean and dry as
necessary.
2.- For cleaning the inside of the sharpener use a small soft brush, and a soft damp cloth, do not use
water hose. Remove all food debris contained in pores of stones.
3.- Dry completely or let air dry.
Note: Never use sharpener box with wet stones. Rods must be lubricated all the time. After knife
sharpening, all components: knife (2) and stones (19&20), should be cleaned and sanitized
again.
D. SHARPENER BOX.
1.- Remove the sharpener box (13)by loosening the sharpener lock knob (21)and pull the assembly
up.
FIG 9. DISASSEMBLY THICKNESS GAUGE
PLATE FIG 10. DISASSEMBLY BLADE GUARD PLATE
FIG 11. STEPS TO CLEAN THE SHARPENER BOX
FIG 12. STEPS FOR KNIFE CLEANIG
VI.- INSTRUCCIONES DE INSPECCIÓN, LIMPIEZA Y DESINFECIÓN DEL EQUIPO
¡IMPORTANT!:
LIMIPIAR y DESINFECTAR el equipo por cada 4 de trabajo continuo con el
propósito de prevenir el crecimiento de bacteria que puedan causar
enfermedades. Este procedimiento debe cumplir con las leyes adicionales de su
estado y departamentos de salud locales.
Siga el siguiente procedimiento para desensamblar y limpiar todos los componentes de la
rebanadora. Recuerde apagar y desconectar el equipo antes de dar servicio y/o limpieza.
Nota: Nivele la plancha (5) con el plato (12) usando la perilla del regulador (6) para prevenir
accidentes.
A. PERILLA DE PISON Y CARRO
1. Sostenga el pisón (15) y gira la perilla del pisón (14)en contra de las manecillas del reloj (Ver
Fig. 6).
2. Gire la perilla del carro (1) en contra de las manecillas del reloj y remueva el carro de su soporte.
Ver figura 7 donde se muestras los pasos 1, 2 y 3.
3. Inspeccione el área de contacto entre el porta-carro (3) y el carro (4) y la parte del pisón con la
superficie dentada. Superficies de contacto de componentes unidos serán unidas y no
tener espacios entre las superficies. Los empaques y uniones no deberán estar
quebrados, ausentes o despegados.
4.Limpie completamente y remueva todos los sobrantes de comida especialmente de la barra de
deslizamiento del carro (16) y del pisón (15). Aplique aceite mineral grado alimenticio (FDA)
sobre toda la superficie de la barra (pregunte a su distribuidor autorizado)
B. PLANCHA
Nivele la plancha (5) con el plato (12) usando la perilla del regulador (6). Gire en contra de las
manecillas del reloj la perilla del porta plancha (26), ubicada en la parte posterior de la plancha, y
retire la cubierta porta plancha (24). Remueva el empaque del porta plancha (25), lave y seque
cada una de las partes.
C. PLATO
Gire la perilla del plato (22)en contra de las manecillas del reloj y retire el plato (12). Puede usar
esta perilla para empujar ligeramente el plato. Lave y seque cada una de las partes.
FIG 7. DESENSAMBLE DE PERILLA
DE PISÓN FIG 8. DESENSAMBLE DEL
PORTACARRO

Manual de Usuario Owner’s Manual
58
AMS-350T / RMS-350
F. SLICE DEFLECTOR (See Fig. 13).
1.- Turn off and unplug the slicer.
2.- Remove the slice deflector by loosening the screw knobs (Counter clockwise).
3.- Sink the part with warm water and a mild detergent solution. Clean and dry completely.
Note: When assemble again, keep enough space between deflector and knife (1/32”min).
G. SURFACE UNDER THE SLICER
Pull up the lifting handle (29)to incline the slicer (See Fig. 14). Clean all the parts under the machine
with a damp cloth.
Pull down the lifting handle to return the slicer to its horizontal position
CAUTION!:
Since the knife edge is partially or totally exposed, it is extremely dangerous. It´s
recommended to wear hand and finger protection for the cleaning steps.
FIG 13. DISASSEMBLY SLICE DEFLECTOR
FIG 14. LIFTING HANDLE SLICER
¡IMPORTANTE!:
Una protección se activa cuando el equipo está tratando de rebanar carne muy dura
(con hueso o hielo). Espere a que el control restablezca el equipo o desconecte la
rebanadora y espera 15 segundos y vuelva a conectarla.
- Contador de Rebanadas: Puede visualizar el contador de rebanadas y seleccionar entre dos modos
de conteo.
•Conteo normal: este es modo incremental. Presione las teclas INC y DEC al mismo tiempo hasta
que en la pantalla aparezca “000”(Resetear contador). Encienda el equipo y el contador
incrementará la cuenta uno ala vez.
•Conteo regresivo: Este conteo le permite programar la cantidad de rebanadas, después del conteo
el equipo se detendrá. La rebanadora esta lista para rebanar LA MISMA CANTIDAD de rebanadas
programadas previamente. Presione las teclas DEC e INC simultáneamente para resetear el
contador.
•Contador diario: El equipo lleva el conteo de rebanadas por día o jornada. El coteo inicio desde que
se encienda el equipo hasta que se apaga.
NOTA: En el modo de conteo normal, las teclas INC y DEC quedan deshabilitadas. Seleccione
el modo de conteo deseado mientras el equipo está en reposo
- Longitud de corte: Presione la tecla DEC o INC para seleccionar la longitud de corte dependiendo del
producto: chico (3”), Medio (7”) o Largo (11”).El ajuste de la longitud de corte se puede hacer cuando
el equipo este en reposo o no.
- Velocidad de corte: Presione la tecla DEC o INC para cambiar la velocidad de corte: baja, media y
alta. El ajuste de velocidad se puede hacer mientras la rebanadora esta rebanando o en reposo. En la
siguiente tabla se muestra el número de rebanadas por minuto de acuerdo velocidad y longitud de
corte.
REBANADAS
POR MIN
VELOCIDAD
BAJA MEDIA ALTA
LONG.
CORTE
CHICO 28 36 59
MEDIO 19 25 43
LARGO 14 20 35
V.- ELEMENTOS CLAVE PARA UN REBANDO DE CALIDAD
1. No aplique demasiada fuerza sobre el producto contra la cuchilla (2)
2. Mantenga afilada la cuchilla para asegurar facilidad en el corte y mejorar la apariencia del producto.
Nota: El procedimiento de afilado de describe en la sección VII MANTENIMIENTO.
3.Mantenga el plato (12), el carro (4) la cuchilla (2) y la bandeja recolectora libres de sobrantes de
comida.
Manual de Usuario
Owner’s Manual
9 AMS-350T / RMS-350 4
F. Turn off the machine and wait until the Cutting Blade stops. Then loosen the sharpener lock knob
(21), pull up the sharpener and reinstall in its stowed position. Tighten the sharpener lock knob again
G. Clean and sanitize the equipment (See CLEANING, SANITIZING AND INSPECTING section).
VII.- MAINTENANCE:
1.- Slide rods: you must lubricate the slicer with light oil at least every 100 hours or 3 days of service.
The points to lubricate are upper and bottom sides of round (16)and square sliding rods.
2.- Knife: after certain period of use or if you notice the quality of the sliced meat is not as fine as the
first time, you will need to re-sharpen the knife (2):
A. Be sure the machine is off.
B. Loosen the sharpener lock knob (21) under the sharpening assembly, until it springs up (See Fig.
15).
C. Push the assembly towards the cutting blade edge, hold It in that position and press down until the
stones are on each side of the knife (Aprox. ¼” under the edge) then tighten the sharpener lock knob
(21) again.
D. Turn on the machine and, push the rod “A“, let the stone (19) grind the under side of the knife for a
few seconds. This will sharpen the edge and create a slight burr on the top side of the edge. When you
release the rod “A" it will return automatically.
E. Then remove the burr from the top side of the knife by pulling down rod “B” only a very slight
pressure is needed to hone the edge. Too much pressure and time may create a reverse angle and
destroy the knife. ROD “B” will return automatically when released.
IMPORTANT!:
The time spent in grinding and truing the knife edge will add to longevity of
the knife and provide optimum efficiency of your meat slicer. Repeat steps
“D” and “E” if it is necessary.
FIG 15. ADJUSTMENT SHARPENER
7.Ubíquese en la posición correcta de trabajo (Ver Fig. 4), ahora
puede comenzar a rebanar producto. Para mejores resultados,
mantenga afilada la cuchilla (2).
8.Una vez rebanado el producto deseado, pause el equipo
presionando la Tecla “INICIO” (AMS-350T) o el botón rojo
“OFF” (RMS-350) y gire la perilla del regulador (6) hasta el
tope (ASEGURESE QUE EL PLATO(12) CUBRA
COMPLETAMENTE EL FILO DE LA CUCHILLA PARA
EVITAR ACCIDENTES).
9. Regrese el pisón a su posición de guardado debajo del carro
siguiendo en orden inverso el paso tres de esta sección.
B. Operación de la Rebanadora en modo Automático (aplica solo al modelo AMS-350T)
La rebanadora automática tiene un panel de control amigable que facilita su operación. Es importante
que entienda muy bien el control antes de operar el equipo.
NOTA: Para rebanar otro producto, siga todos los pasos
descritos previamente. Limpie todas las partes antes de
rebanar diferentes alimentos para evitar la mezcla de sabores FIG 4. POSICIÓN DE
TRABAJO
FIG 5. PANEL DE CONTROL
- Como encender y apagar la Rebanadora
Gire la perilla MANUAL/AUTOMATICA (17) en contra de las manecillas del reloj hasta que tope y
suéltela.
Encienda el equipo desde el interruptor (ON/OFF) (30). Presione “INICIO” Y la cuchilla empezará a
girar y el carro hará la carrera para rebanar el producto. Presione la tecla “INICIO” nuevamente y la
cuchilla se detendrá y el carro se desplazara hasta el extremo izquierdo listo para rebanar otra vez.
NOTA: Si la perilla MANUAL/AUTOMATICO está en la posición manual, el carro no se moverá
automáticamente. Para regresar al modo automático, solo apague la cuchilla (presione la tecla
ON/OFF) y vuelva a encender el equipo.
-“MENU”: Cada vez que presione esta tecla los parámetros son mostrados y pueden ser
cambiados:
FIG 6. SECUENCIA DE PARAMETROS EN PANEL DE CONTROL
Manual de Usuario Owner’s Manual
310
AMS-350T / RMS-350
REVIEW OF PARTS
(SUPPLIES) FREQUENCY
VERIFICATION COMMENTS
Bearing Daily
Do daily clean bearing area to prevent buildup of fluids and
wastes. Also oil (food grade grease) this area for the
purpose of extending the life of bearing.
Membrane (on-
off)* Daily
Required immediately change switch membrane break if
failure to prevent post on or off the introduction of moisture
or other waste.
Sliding Rod Once a week
Keep clean and lubricated the support rods and rod. Use
light mineral grease to do this. Not use edible cooking oil,
this is not a lubricant.
Carriage Support
(bars media) Once a week
Keep
free of waste (powder, food, etc.) bars also
keep
moving
thin oil lubricated, do not use oil or fat thick as
it
affects
the movement.
Knife Once a week
Sharpening
blade heavy cut if you notice, or if you
notice
when
excess scrap slicing. (Cut must be gentle and easy
to
clean)
.
Sharpening stones
and
Seated Daily
It
is recommended that the stones are kept covered
or
protected
from waste to extend the life of these. Make
sure
before
the blade sharpening is free to prevent waste
clogged
pores of stones.
VIII.- EQUIPMENT SPECIFICATION
A) GENERAL DIMENSIONS
DIMENSIONS MODEL AMS-350
A45.7 cm (18 in)
B54.6 cm (21.5 in)
C53.3 cm (21 in)
A
BC
IV.- OPERACIÓN:
A. Operación Manual de la Rebanadora
1.Coloque el productos a cortar sobre el carro (4). Use productos a temperaturas mayores a 2ºC
preferentemente (36°F). Esta máquina no está diseñada para rebanar carne congelada o con hueso.
2.Jale la perilla MANUAL-AUTOMATICA sosténgala y gírela en sentido contrario a las manecillas del
reloj. (Solamente para el modelo AMS-350T)
3.Libere el pisón (15)de la parte inferior de carro (4) usando la perilla del pisón (14). Ahora, mueva el
pisón hacia el lado superior de la barra, –NO FORZAR ESTA OPERACIÓN- después gire el pisón en
sentido anti horario hacia su posición por encima del carro cargador.
4.Presione hacia abajo el pisón (15) utilizando su perilla (14) para fijar el producto. Puede utilizar esta
perilla para deslizar el carro (4) hacia adelante y hacia atrás o usar la manija del porta-carro.
5.Mueva el carro completamente hacia atrás, y seleccione el espesor deseado de rebanada usando la
perilla de regulador (6). IMPORTANTE: ESPESOR MÁXIMO ½”
6.Conecte el equipo y encienda desde el interruptor principal (30). Presionando la tecla “INICIO” (AMS-
350T) oel botón verde “ON” (RMS-350), la cuchilla comenzará a girar.
NOTA: Esta máquina ha sido diseñada con un Angulo de 45º, de manera que se requiere
esfuerzo mínimo para empujar el producto hacia la cuchilla de corte.
III.- INSTALACIÓN
Antes de conectar el equipo siga estos fáciles pasos de ensamble
ypreparación (Fig. 2)
1.Ensamble el porta-carro en la base de la rebanadora (10)
A. Retire la perilla carro (1) y la arandela.
B. Coloque el ensamble del porta-carro en el soporte de la
barra deslizadora (16).
C. Coloque la arandela y apriete el porta-carro firmemente con
la perilla (1) .
2.- Instale la caja del afilador (13) de acuerdo con la Fig. 3.
Atornille la perilla (21) para fijar el ensamble completo.
3.- Verifique que el lugar de trabajo esté limpio y nivelado.
4.- Gire la perilla reguladora de corte (6) y asegúrese que gira
libremente durante todo su recorrido, y revise que la plancha abra
y cierre simultáneamente.
5. Conecte la rebanadora a la corriente eléctrica. La conexión
debe estar lo suficientemente cerca del equipo para proporcionar
facilidad de desconexión para limpieza y servicio.
FIG 2. INSTALACIÓN DE
PORTA-CARRO
FIG 3. INSTALACIÓN DE
AFILADOR
¡IMPORTANTE!:
Al usar el equipo por primera vez, es necesario limpiarlo y cortar un par de
rebanadas de desecho (zanahorias, papas, etc.) para asegurar que el disco-
cuchilla esté limpio antes de cortar producto comestible.
*Only for AMS-350T

Manual de Usuario
Owner’s Manual
11 AMS-350T / RMS-350 2
MEAT SLICER MODELS: AMS-350T, RMS-350
Motor Capacity 373W (1/2 HP)
Frequency 60 Hz
Voltage 115 V~ 220 V~
RPM 400-420
Phases 1
B) ELECTRICAL SPECIFICATIONS (Depends on your model. See ID plate)
C) ELECTRICAL DIAGRAM
The electrical diagram for this unit is located under the base frame.
WARNING!:
The maintenance or service for this equipment must be performed by qualified
personnel only. For any problem or doubt related to electrical specifications and
connections, please call to your authorized dealer.
II.- DESEMPACADO
Mientras desempaque el equipo, preste especial atención en remover estos componentes para ser
ensamblados posteriormente. Asegúrese que estén completos *.
*Nota: Para mejor referencia vea “Diagrama de componentes para rebanadora”(Pág. centrales).
A. Retire el huacal de madera, protectores de cartón y bolsas plásticas del equipo.
B. Defina el lugar donde la rebanadora será instalada.
C. Saque el ensamble de carro. Haga lo mismo con el ensamble de la base levantándola desde la base
(10), ejercer método de elevación adecuado, preferiblemente hacer este procedimiento con dos
personas.
D. Una vez que la unidad está colocada en su área de trabajo definida, tome el ensamble de la caja
afilador y sáquelo de la bolsa de protección.
E. Retire el protector plástico de la orilla de la cuchilla o disco (5) siguiendo las siguientes instrucciones
(Ver Fig. 1):
•Gire la Perilla reguladora de corte (6) en contra de las manecillas del reloj hasta que se detenga.
•Quite el plato de protección (12) aflojando la perilla del plato de protección (22).
•Ahora, con extremo cuidado, retire el protector del disco-cuchilla jalando una de las uniones.
Recuerde siempre usar guantes de protección para evitar lesiones.
•Una vez que haya retirado el protector del disco-cuchilla, vuelva a colocar el plato de protección (12) y
asegúrelo con la perilla (22). Ajuste la plancha (5) con el regulador de corte (6).
Ensamble
de base:
Ensamble
de carro:
Ensamble
de Caja Afilador:
1
Disco
-cuchilla (2)
1
Porta
carro (3)
1
Caja
Afilador (13)
1
Motor
(11)
1
Carro
(4)
1
Plancha
(5)
1
Manivela
(8)
1
Plato
(12)
1
Pisón
(15)
¡ADVERTENCIA!:
Extreme precauciones al quitar el protector del disco-cuchilla ya que éste se
encuentra afilado y sin la debida protección podría causar heridas muy graves.
FIG 1. COMO REMOVER EL PROTECTOR DE CUCHILLA

Manual de Usuario Owner’s Manual
1AMS-350T / RMS-
350
ITEM DESCRIPTION QTY
1
CARRIAGE KNOB
1
2
KNIFE
1
3
CARRIAGE SUPPORT
1
4
CARRIAGE
1
5
THICKNESS GAUGE PLATE
1
6
SLICE
ADJUSTING KNOB 1
7
CONTROL PANEL*
1
8
CARRIAGE SUPPORT
HANDLE 1
9
LEVELING
LEGS 4
10
BASE
1
11
1/2 HP MOTOR
AND CASE 1
12
KNIFE
GUARD PLATE 1
13
SHARPENER
1
14
HANDGRIP KNOB
1
15
GRIP
1
16
SLIDE BAR
1
17
MANUAL
- AUTO KNOB* 1
18
SHARPENER COVER KNOB
1
19
GRINDING
STONE 1
20
TRUINING STONE
1
21
SHARPENER LOCK KNOB
1
22
KNIFE
GUARD KNOB 1
23
CARRIAGE SETCREWS
3
24
THICKNESS GAUGE PLANE
COVER 1
25
PLANE COVER GASKET
1
26
PLANE COVER
KNOB 1
27
CUTTING BLADE REAR
GUARD 1
28
SLICE GUARD
1
29
LIFTING HANDLE
1
30
SWITCH ON/OFF*
1
MEAT SLICER DIAGRAM FOR COMPONENTS (SEE CENTRAL PAGES)
CONTENIDO: PAG
I. INTRODUCCIÓN 1
II. DESEMPACADO 2
III. INSTALACIÓN 3
IV. OPERACIÓN 3
V. ELEMENTOS CLAVA PARA REBANAR CON CALIDAD 5
VI. INSTRUCCIONES DE INSPECCIÓN, LIMPIEZA Y
DESINFECIÓN DEL EQUIPO 6
VII. MANTENIMIENTO 9
VIII. ESPECIFICACIONES GENERALES 10
I.- INTRODUCCIÓN:
Usted ha adquirido una rebanadora de carne la cual está fabricada con los mejores materiales y mano
de obra, lo que le asegurará una larga vida y un excelente servicio. Algunos componentes de ésta
rebanadora están hechos con aluminio anodizado, un material con un tipo de recubrimiento superficial
que maximiza la apariencia, reduce la oxidación y también es de lo mejor que existe en el mercado
para el contacto con productos alimenticios.
¡IMPORTANTE!:Es de vital importancia que Ud. Y cualquier otra persona que operará el equipo, lea
detenidamente el manual.
¡ADVERTENCIA!:
Esta máquina está diseñada para rebanar carne y algunos otros productos
alimenticios, y por su naturaleza es peligrosa si no se utiliza con conocimiento
y precaución.
Esta unidad no se puede usar por personas (incluidos niños) con discapacidades físicas,
sensoriales o mentales, o la falta de experiencia y conocimiento, a menos que hayan
recibido supervisión o instrucción previamente. Los niños, aún bajo supervisión, no deben
jugar con el equipo.
Nunca de servicio, limpieza o mantenimiento a esta unidad mientras esté conectada a la
energía eléctrica.
¡Peligro! no utilice directamente sus manos o cualquier otra extremidad de su
cuerpo para alimentar al equipo con el producto a rebanar. De ser así, mantenga
una distancia mínima de 10 cms con la hoja.
Apague y desconecte el equipo cuando no este en uso .
*Only for AMS-350T
Este equipo debe ser conectado a una conexión con protección térmica y debidamente
aterrizado. El tipo de sujeta-cables empleado es tipo “Y”, si éste es dañado, deberá ser
remplazado por personal autorizado y/ó calificado para evitar cualquier riesgo.
Manual de Usuario
Owner’s Manual
Apéndice Appendix
MEAT SLICER DIAGRAM FOR COMPONENTS
DIAGRAMA DE COMPONENTES DE REBANADORA DE CARNES
This manual suits for next models
1


