Torros MD300 User manual

M1.4.MD300.NLFREN - 15022023 TORROS
HANDLEIDING - MODE D’EMPLOI - MANUAL
MD300 (829700120)
Gemotoriseerde kruiwagen
Brouette motorisée
Powered wheelbarrow
P.02 Gelieve te lezen en voor later gebruik bewaren
P.11 Veuillez lire et conserver pour consultation ultérieure
P.20 Please read and keep for future reference
FR
EN
NL

M1.4.MD300.NLFREN - 15022023
2
NL
TORROS
1 Veiligheid
Symbolen
De naamplaat op uw machine bevat symbolen. Deze kunnen belangrijke informatie over het product geven, of
gebruiksinstructies.
Inhoud
1 Veiligheid..............................................................................................................................................................2
2 Specicaties en omschrijving van de machine ............................................................................................................4
3 Leveringsomvang....................................................................................................................................................6
4 Montage...............................................................................................................................................................6
5 Bediening .............................................................................................................................................................8
6 Onderhoud ...........................................................................................................................................................9
7 Opslag ...............................................................................................................................................................10
8 Problemen oplossen..............................................................................................................................................10
9 Onderdelen.........................................................................................................................................................29
10 EG conformiteitsverklaring ...................................................................................................................................31
Lees deze instructies aandachtig.
Gebruik lichamelijke beschermingen. Draag een veiligheidsbril en gehoorbescherming.
Het is verboden de veiligheidsvoorzieningen te verwijderen of te wijzigen.
Houd uw handen ver van roterende delen.
Raak de hete onderdelen van de machine niet aan.
Rook niet en blootstel de machine niet aan open vuur.
Houd kinderen en andere personen buiten de werkruimte.
TABLE OF CONTENTS
INTRODUCTION
Your new pow ered wheelbarrow will more than
satisfy your expectations. It has been manufactured
under stringent quality standards to meet superior
performance criteria. You will find it easy and safe
to operate, and with proper care, it w ill give you
many years of dependable service.
Carefully read through this entire
operator’s manual before using this
unit. Take special care to heed the
cautions and warnings.
Introduction
Specifications
Sy m b o ls
Saf et y
General Safety Rules
Specific Safety Rules
Contents supplied
A ssem b ly
Know your powered wheelbarrow
Features & Controls
Pow ered W heelb arrow Operation
Maintenance
St o r ag e
Trouble Shooting
Parts Schedule
2
2
2
3
3
5
6
6
8
8
9
10
11
12
13
2
ENVIRONMENTAL
Recycle unwanted materials instead of
d isp osing o f t hem as w ast e. A ll t o ols, ho ses
and packaging should be resorted, taken
to the local recycling center and disposed
of in an environment-friendly safe way.
The rating plate on your machine may show
symbols. These represent import ant information
about the product or instructions on its use.
SYMBOLS
Powered W heelbarrow
Coution! Ignoring the safety signs and
warnings applied on the machine as well
as ignoring the security and operating
instrutions can cause serious injuries and
even lead t o death.
The four-speed gearbox, three forward and one
reverse, lies at the heart of t he unit. It is oversized
so as to manage safely the huge torques generated
by the engine. Thanks to its efficient reduction
gearing, it is capable of moving around in every
situation and bearing any load.
The Engine manufacturer is responsible for all
engine-related issues w ith regards to performance,
pow er rating, specifications, warranty and service.
Please refer t o the Engine Manufacturer’s
ow ner’s/ operat or’s m anual, packed separat ely
with your unit, for more information.
Specifications
Item No.
Engine
Transm ission
Load Capacity
Box Length
Box W idth
Box Depth
09615
196cc, 4.8kW/ 3600/ min
3 F + 1R
300 kg
940 mm
635 mm
330 mm
95 dB(A) k = 2 . 5 1 d B ( A )
100 dB(A)
84 .7 d B( A ) k=3 dB(A)
3.92 m/ s2k = 1. 5 m / s 2
16 0 k g
Vibrating level on handlebar grips:
Weight
Sound power
level ( LwA )
Sound pressure level (LpA )
Measured
Guaranteed
W ear eye protection.
W ear hearing prot ect ion.
Read these instructions for use carefully.
Wear safety footwear.
W ear safety gloves.
3
SA FETY
General Safety Rules
Understand your machine
Read and understand the operator’s manual and
labels affixed t o the machine. Learn its application
and limitations as well as the specific potential
hazards peculiar t o it .
Be thoroughly familiar with the controls and their
proper operation. Know how to stop the machine
and disengage the controls quickly.
Make sure to read and understand all the
instructions and safety precautions as outlined in
the Engine Manufacturer’s Manual, packed
separately with your unit.Do not attempt to operate
the machine until you fully understand how to
properly operate and m aintain t he Engine and
how to avoid accidental injuries and/ or property
damage.
Work area
Never start or run the machine inside a closed
area. The exhaust fumes are dangerous, containing
carbon monoxide, an odorless and deadly gas.
Operate t his unit only in a w ell ventilated outdoor
area.
Never operate the machine without good visibility
or light.
Perso nal safet y
Do not operate the machine while under the
influence of drugs, alcohol, or any medication that
could affect your ability to use it properly.
Dress properly. Wear heavy long pants, boots and
gloves. Do not wear loose clothing, short pants,
and jew elry of any kind. Secure long hair so it is
above shoulder level. Keep your hair, clothing and
gloves away from moving parts. Loose clothes,
jewelry or long hair can be caught in moving parts.
Use safet y equipment. A lways w ear eye protection.
Safety equipment such as a dust mask, hard hat,
or hearing protection used for appropriate
conditions w ill reduce personal injuries.
Check your machine before starting it. Keep guards
in place and in working order. Make sure all nuts,
bolts, etc. are securely tight ened.
Never operate the machine when it is in need of
repair or is in poor mechanical condition. Replace
Keep your hands clear from all rot ating
p art s.
Do not smoke or have open flames.
Thrown objects.
Keep byst anders aw ay.
Powered W heelbarrow
It is forbidden to remove or tamper with
the protection devices and safety devices.
Keep away from hot parts on the machine.
Never start or run the engine inside a
closed area.
The exhaust fumes are dangerous,
containing carbon monoxide. Staying in
the environment can lead to
unconsciousness and death.
Do not operate on slopes with angle over
20 oor tip loading at an inclined position.
Always turn off the engine before starting
maintenance.
Het niet naleven van de veiligheidsbordjes, veiligheidsvoorschriften en gebruiksinstructies van deze handleiding
kan zware letsels of zelfs de dood als gevolg hebben.
Gebruik lichamelijke beschermingen. Draag veiligheidsschoenen.
Gebruik lichamelijke beschermingen. Draag veiligheidshandschoenen.
Geworpen voorwerpen.
Start de machine nooit in een gesloten ruimte.
3
SA FETY
General Safety Rules
Understand your machine
Read and understand the operator’s manual and
labels affixed t o the machine. Learn its application
and limitations as well as the specific potential
hazards peculiar t o it .
Be thoroughly familiar with the controls and their
proper operation. Know how to stop the machine
and disengage the controls quickly.
Make sure to read and understand all the
instructions and safety precautions as outlined in
the Engine Manufacturer’s Manual, packed
separately with your unit.Do not attempt to operate
the machine until you fully understand how to
properly operate and m aintain t he Engine and
how to avoid accidental injuries and/ or property
damage.
Work area
Never start or run the machine inside a closed
area. The exhaust fumes are dangerous, containing
carbon monoxide, an odorless and deadly gas.
Operate t his unit only in a w ell ventilated outdoor
area.
Never operate the machine without good visibility
or light.
Perso nal safet y
Do not operate the machine while under the
influence of drugs, alcohol, or any medication that
could affect your ability to use it properly.
Dress properly. Wear heavy long pants, boots and
gloves. Do not wear loose clothing, short pants,
and jew elry of any kind. Secure long hair so it is
above shoulder level. Keep your hair, clothing and
gloves away from moving parts. Loose clothes,
jewelry or long hair can be caught in moving parts.
Use safet y equipment. A lways w ear eye protection.
Safety equipment such as a dust mask, hard hat,
or hearing protection used for appropriate
conditions w ill reduce personal injuries.
Check your machine before starting it. Keep guards
in place and in working order. Make sure all nuts,
bolts, etc. are securely tight ened.
Never operate the machine when it is in need of
repair or is in poor mechanical condition. Replace
Keep your hands clear from all rot ating
p art s.
Do not smoke or have open flames.
Thrown objects.
Keep byst anders aw ay.
Powered W heelbarrow
It is forbidden to remove or tamper with
the protection devices and safety devices.
Keep away from hot parts on the machine.
Never start or run the engine inside a
closed area.
The exhaust fumes are dangerous,
containing carbon monoxide. Staying in
the environment can lead to
unconsciousness and death.
Do not operate on slopes with angle over
20 oor tip loading at an inclined position.
Always turn off the engine before starting
maintenance.

M1.4.MD300.NLFREN - 15022023
3
NL TORROS
Veiligheidsvoorschriften
• Lees en begrijp de handleiding en de op de machine aangebrachte labels. Leer het toepassingsgebied van de machine,
alsook de grenswaarden en mogelijke risico’s van de machine.
• Verzeker u ervan, dat u de bedieningselementen en hun werking goed kent. Weet hoe de machine snel te stoppen en de
bedieningen uit te schakelen.
• Zorg ervoor, alle instructies en veiligheidsvoorschriften te begrijpen. Gebruik de machine niet zolang u de werking ervan
niet goed kent.
• De uitlaatgassen zijn schadelijk. Als de machine binnenshuis gebruikt wordt, zorg voor een goede ventilatie.
• Gebruik de machine niet in een explosieve of ontvlambare atmosfeer.
• Gebruik de machine niet op een steile helling.
• Blijf waakzaam. Gebruik de machine niet als u onder de invloed bent van alcohol, drugs of geneesmiddelen die uw
concentratievermogen kunnen verminderen.
• Draag gepaste kledij. Draag laarzen en handschoenen. Draag geen loszittende kleren.
• Gebruik lichamelijke beschermingen. Draag steeds een veiligheidsbril en een gehoorbescherming.
• Controleer de machine voor het begin van het werk. Zorg ervoor, dat de beschermingen goed op hun plaats zitten en
bedrijfsklaar zijn. Zorg ervoor dat alle bouten en moeren goed aangedraaid zijn.
• Gebruik de machine niet als er een brandstof lekkage is, of als er een defect onderdeel is. Vervang de defecte of
ontbrekende onderdelen voor het gebruik.
• Controleer altijd dat alle sleutels weg van de machine werden genomen alvorens deze in te schakelen.
• Houd een goede balans. Werk nooit met de machine met blote voeten of met sandalen. Draag veiligheidshandschoenen
om je voeten te beschermen en uitglijden te voorkomen.
• Schakel de machine uit om benzine te tanken of af te tappen. Wacht tot alle onderdelen afgekoeld zijn en maak zeker dat
er geen ontstekingsbronnen zoals vonken of vlammen in de buurt van de machine zijn. Houd de brandstof steeds weg van
ontstekingsbronnen.
• Als tijdens het tanken gemorste brandstof voordoet, gebruik een droog doek om af te vegen en verplaats de machine
tenminste 5 m ver van het verontreinigde gebied.
• Controleer de oliepeil voor het begin van het werk. Schakel de machine niet in als de oliepeil laag is.
• Til de machine en draag deze niet wanneer ze in werking is.
• Verander de instelling van de snelheidscontrole nooit. Een te hoge snelheid is gevaarlijk voor de gebruiker.
• Laat de handgreep nooit los. Het risico neemt toe wanneer de machine niet langer geleid wordt.
• De machine mag uitsluitend door volwassenen gebruikt worden. Houd de machine buiten bereik van kinderen.
• Reparaties, onderhoud en instellingen moeten door gekwaliceerd personeel uitgevoerd worden.
• Wanneer de machine niet meer bruikbaar is, verwijder deze op een milieuvriendelijk wijze. Breng deze naar uw verdeler
terug, deze zal voor een correcte afvalverwerking zorgen.
• Vul nooit te veel brandstof in. Het brandstofniveau mag de markering op de tanklter niet overschrijden.
3
SA FETY
General Safety Rules
Understand your machine
Read and understand the operator’s manual and
labels affixed t o the machine. Learn its application
and limitations as well as the specific potential
hazards peculiar t o it .
Be thoroughly familiar with the controls and their
proper operation. Know how to stop the machine
and disengage the controls quickly.
Make sure to read and understand all the
instructions and safety precautions as outlined in
the Engine Manufacturer’s Manual, packed
separately with your unit.Do not attempt to operate
the machine until you fully understand how to
properly operate and m aintain t he Engine and
how to avoid accidental injuries and/ or property
damage.
Work area
Never start or run the machine inside a closed
area. The exhaust fumes are dangerous, containing
carbon monoxide, an odorless and deadly gas.
Operate t his unit only in a w ell ventilated outdoor
area.
Never operate the machine without good visibility
or light.
Perso nal safet y
Do not operate the machine while under the
influence of drugs, alcohol, or any medication that
could affect your ability to use it properly.
Dress properly. Wear heavy long pants, boots and
gloves. Do not wear loose clothing, short pants,
and jew elry of any kind. Secure long hair so it is
above shoulder level. Keep your hair, clothing and
gloves away from moving parts. Loose clothes,
jewelry or long hair can be caught in moving parts.
Use safet y equipment. A lways w ear eye protection.
Safety equipment such as a dust mask, hard hat,
or hearing protection used for appropriate
conditions w ill reduce personal injuries.
Check your machine before starting it. Keep guards
in place and in working order. Make sure all nuts,
bolts, etc. are securely tight ened.
Never operate the machine when it is in need of
repair or is in poor mechanical condition. Replace
Keep your hands clear from all rot ating
p art s.
Do not smoke or have open flames.
Thrown objects.
Keep byst anders aw ay.
Powered W heelbarrow
It is forbidden to remove or tamper with
the protection devices and safety devices.
Keep away from hot parts on the machine.
Never start or run the engine inside a
closed area.
The exhaust fumes are dangerous,
containing carbon monoxide. Staying in
the environment can lead to
unconsciousness and death.
Do not operate on slopes with angle over
20 oor tip loading at an inclined position.
Always turn off the engine before starting
maintenance.
Uitlaatgassen zijn gevaarlijk, omdat ze koolmonoxide bevatten. In hun omgeving blijven kan tot
bewusteloosheid en de dood leiden.
Gebruik de machine niet op een helling van meer dan 20°.
Zet de machine stil voor elk onderhoud.
AANDACHT!
• De machine wordt geleverd zonder motorolie!
• De machine wordt geleverd zonder hydraulische olie!

M1.4.MD300.NLFREN - 15022023
4
NL
TORROS
2 Specicaties en omschrving van de machine
Model MD300
Motor 6,5 pk / 4 takt
Versnellingen 3 vooruit
+ 1 achteruit
Laadcapaciteit 300 kg
Lengte laadbak 940 mm
Breedte laadbak 635 mm
Diepte laadbak 360 - 420 mm
Trillingsniveau op het handvat 3,92 m/s²
Inhoud olietank 0,6 l
Inhoud benzinetank 3 l
Autonomie 4 h
Geluidsniveau 98 dB(A)
Netto gewicht 210 kg
8
Powered W heelbarrow
KNOW YOUR POW ERED W HEELBA RROW
Features and Controls
Engine Switch
Right Steering Lever
Clutch Control Lever
Left Steering Lever
Gear Selection Lever
Dump Box
Gearbox
Throttle Control
Engine switch
The engine sw itch enables and disables the ignition
syst em .
The engine switch must be in the ON position for
the engine to run.
Turning the engine switch to the OFF position
stops t he engine.
Clutch control lever
Squeeze the control lever, clutch engaged.
Release the lever, clutch disengaged.
Throttle control
It controls engine speed. Put the throttle control
on low speed (L) or high speed (H) or an
intermediary position between L and H to increase
or decrease the speed of engine.
Left steering lever
Operate the lever to t urn left.
Right steering lever
Operate the lever to t urn right.
Gear selection lever
It controls forward or reverse movements of the
machine.
Tipping Handle
W heel
Motorschakelaar
Gashendel
Stuurhendel rechts
Koppelingshendel
Stuurhendel links
Laadbak
Versnellingshendel
Kantelhendel
Wiel
Versnellingsbak

M1.4.MD300.NLFREN - 15022023
5
NL TORROS
Motorschakelaar
De motorschakelaar activeert en deactiveert het ontstekingssysteem.
De schakelaar moet op ON zijn om de motor op te starten.
Zet de schakelaar op OFF om de motor stil te zetten.
Koppelingshendel
Duw de hendel om de koppeling in te schakelen. Laat de hendel los om de koppeling uit te schakelen.
Gashendel
Dient voor de controle van het motorsnelheid. Zet de hendel op lage (L) of hoge (H) snelheid, of in een tussenpositie tussen L en
H, om de motorsnelheid te verhogen of verlagen.
Stuurhendel links
Bedien de hendel om naar links te draaien.
Stuurhendel rechts
Bedien de hendel om naar rechts te draaien.
Versnellingshendel
Dient om de vooruit- of achteruitversnelling in te schakelen.
Kantelhendel
Controleert het kantelen van de laadbak. Draai de hendel A in de richting van de pijl om de begrenzer B van de haak C los te
maken. De laadbak wordt vrijgegeven.
Draai na het lossen van de laadbak de hendel A terug, om de begrenzer B opnieuw in de haak C terug te zetten, zodat de
laadbak opnieuw vergrendelt wordt.
9
Powered W heelbarrow
Tipping handle
It controls tipping of the dump box. Swing tipping
handle A in t he direction of t he arrow to release
limiter B out of hook C. The dum p box w ill be
released.
After tipping the load, swing handle A back to
reset limiter B into hook C, which w ill lock the
dump box.
A
B
C
A
BC
Before you start to use the dumper,
please check the dump box to make
sure it is locked as sho w n in t he
diagram below.
Fill tank to no more than 12.5mm (1/ 2” )
below the bottom of the filler neck to
provide space for expansion.
Powered W heelbarrow Operation
Adding fuel
Fill the fuel tank as instructed in the separate
Engine Manual packed with the machine.
Starting engine
A m ore detailed description of the engine operation
and all related precautions and procedures can be
found in the Engine Manual packed separately
with the pow ered wheelbarrow.
Follow the procedure below for cold starts:
Turn choke lever on the engine to full choke
position.
Set the throt tle lever on the handlebar at half-
way posit ion.
Turn the engine switch on.
Pull the start ing rope slow ly several tim es to
allow the gasoline t o flow into the engine’s
carburetor. Then hold the start handle firmly
and pull rope out a short distance until you
feel some resistance. Then pull the rope
smoothly and briskly, and allow rope to return
gently. Do not let the rope snap back. If
necessary, pull the rope several times until the
eng ine st art s.
Allow the engine to run for several seconds to
warm up. Then, gradually move chock lever to
“OPEN” position.
Restart ing an eng ine t hat is alread y w arm from
previous running does not normally require use of
the choke.
1.
2.
3.
4.
5.
Set the throttle lever on the handlebar at half-
way posit ion.
Hold the start handle firmly and pull rope out
a short distance until you feel some resistance.
Then pull the rope smoothly and briskly, and
allow rope to return gently. Do not let the rope
snap back.
2.
1.
9
Powered W heelbarrow
Tipping handle
It controls tipping of the dump box.Swing tipping
handle A in the direction of the arrow to release
limiter B out of hook C. The dump box will be
released.
After tipping the load, swing handle A back to
reset lim it er B into hook C, w hich will lock the
dump box.
A
B
C
A
BC
Before you start to use the dumper,
please check the dump box to make
sure it is lo cked as sho w n in t he
diagram below.
Fill tank to no more than 12.5mm (1/ 2” )
below the bottom of the filler neck to
provide space for expansion.
Powered W heelbarrow Operation
Adding fuel
Fill the fuel tank as instructed in the separate
Engine Manual packed with the machine.
Starting engine
A more detailed description of t he engine operation
and all related precautions and procedures can be
found in the Engine Manual packed separately
with the powered w heelbarrow .
Follow the procedure below for cold starts:
Turn choke lever on the engine to full choke
position.
Set the t hrottle lever on t he handlebar at half-
way position.
Turn the engine switch on.
Pull the starting rope slowly several times to
allow t he gasoline to flow into the engine’s
carburetor. Then hold the start handle firmly
and pull rope out a short distance until you
feel some resistance. Then pull the rope
smoothly and briskly, and allow rope t o return
gently. Do not let the rope snap back. If
necessary, pull t he rope several times until the
en gine st ar t s.
Allow the engine t o run for several seconds to
warm up. Then, gradually move chock lever to
“OPEN” position.
Restart ing an engine t hat is already w arm from
previous running does not normally require use of
the choke.
1.
2.
3.
4.
5.
Set the throt t le lever on the handlebar at half-
way position.
Hold the start handle firmly and pull rope out
a short distance until you feel some resistance.
Then pull the rope smoothly and briskly, and
allow rope to return gently. Do not let the rope
snap back.
2.
1.
Kantelhendel Kantelhendel
AANDACHT!
Alvorens de kuipwagen op te
starten, controleer dat de laadbak
correct vergrendeld is, zoals op de
afbeelding.
Vergrendelde laakbak
M1.4.MD300.NLFREN - 15022023
6
NL
TORROS
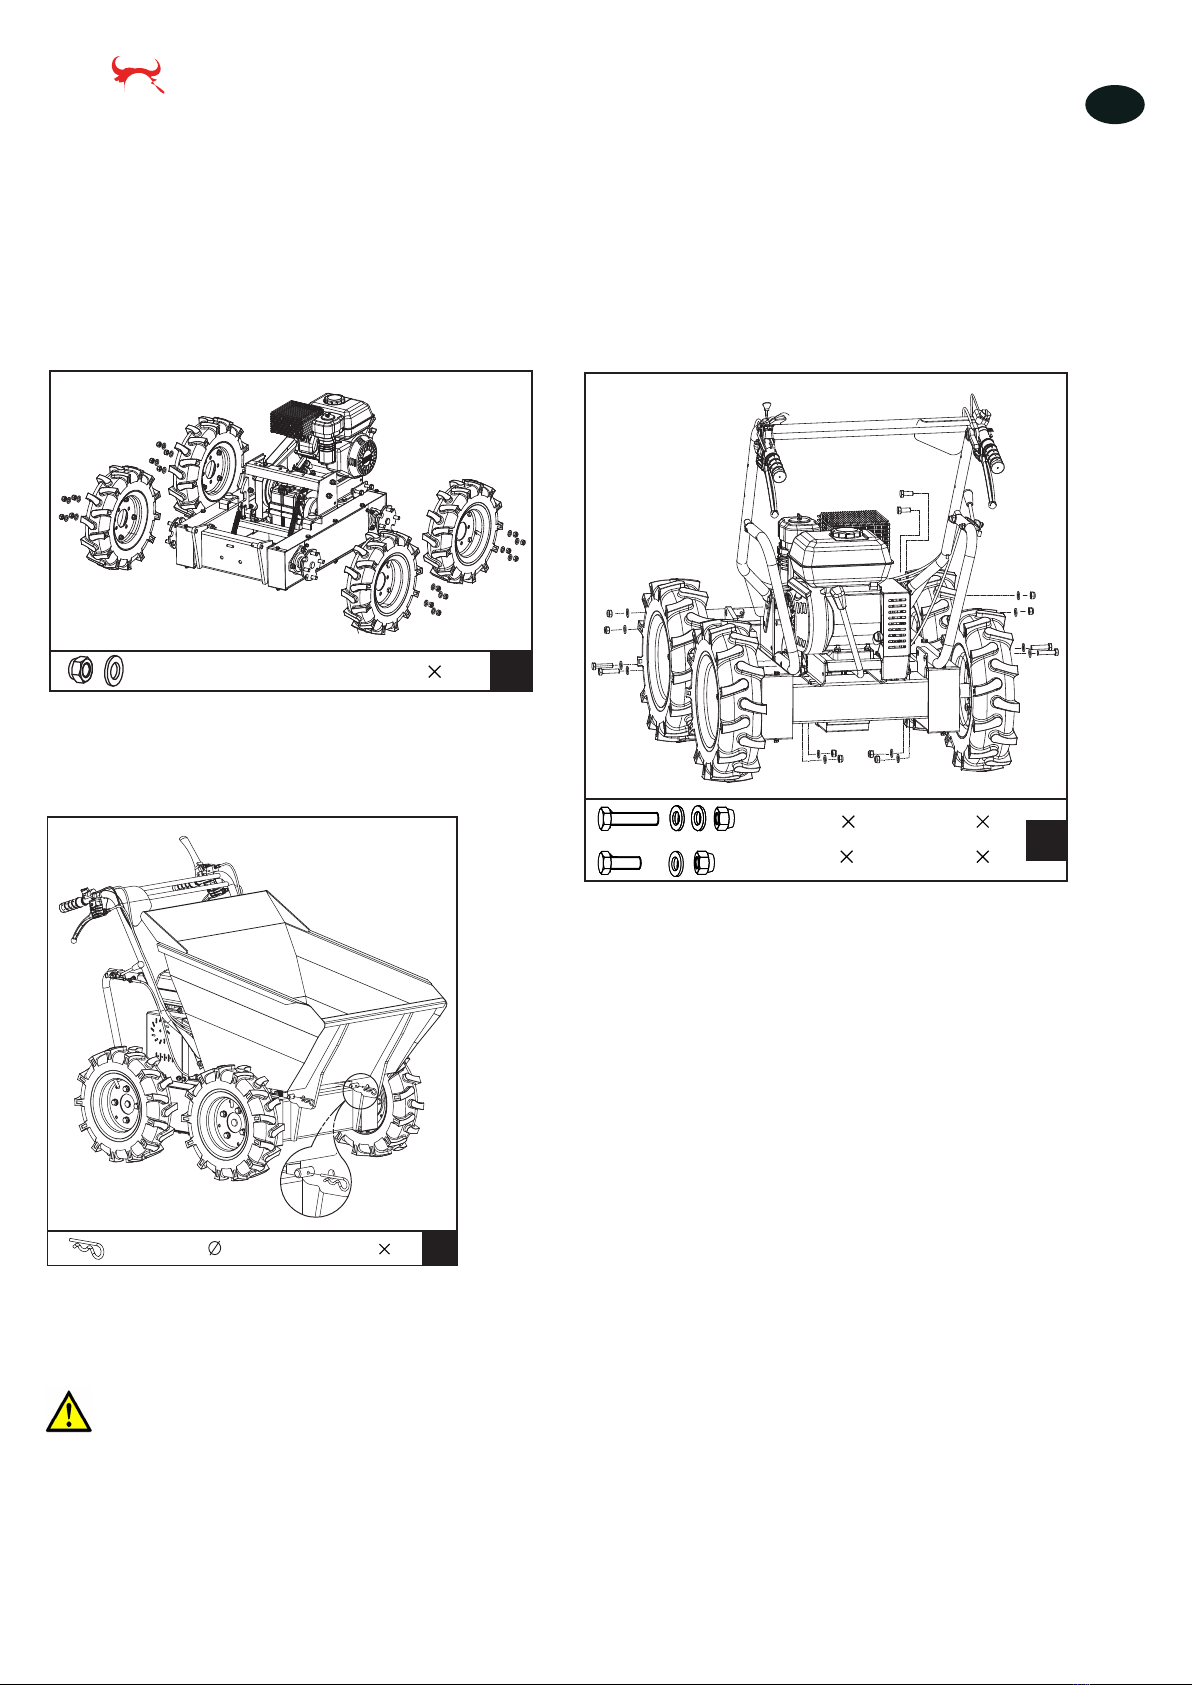
4 Montage
Door onderstaande instructies te volgen, kunt u in enkele minuten de montage van uw kuipwagen voltooien.
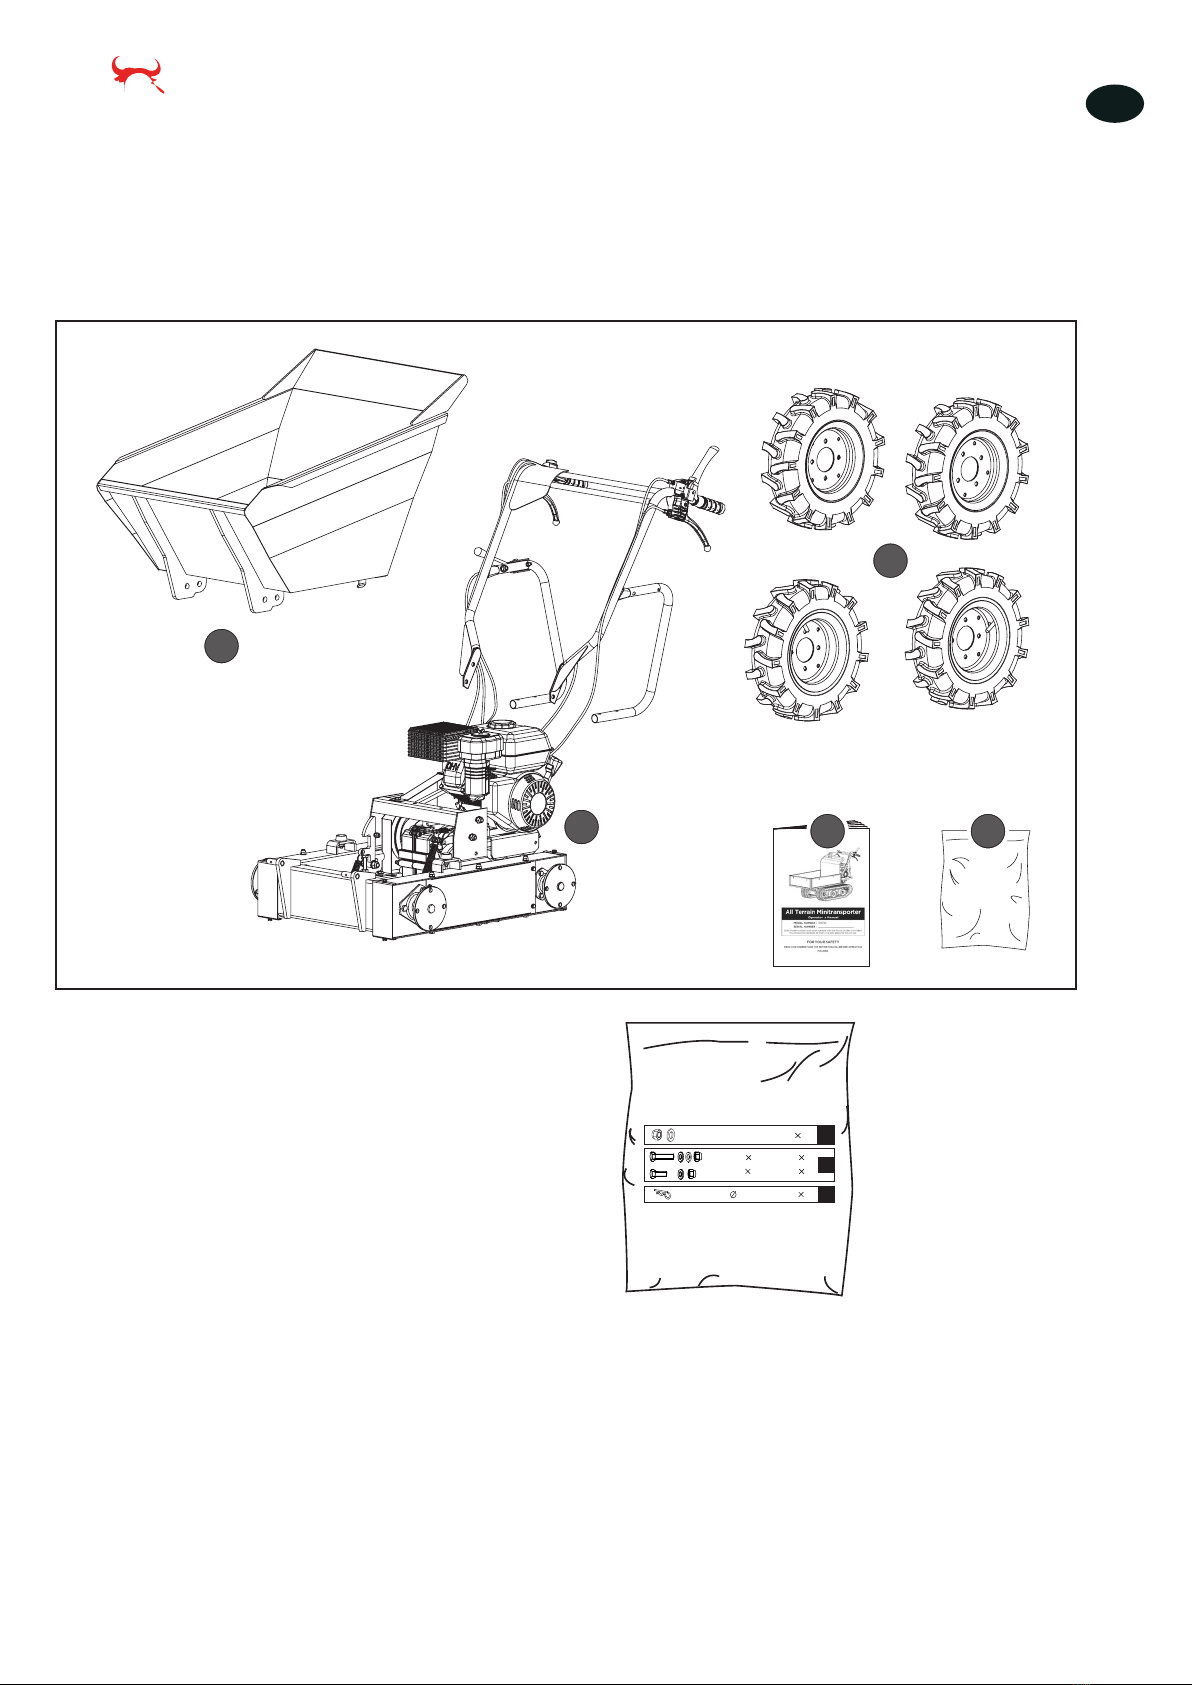
3 Leveringsomvang
De kuipwagen wordt gedeeltelijk geassembleerd geleverd, en zorgvuldig verpakt. Na het uitpakken, controleer dat de inhoud
volledig is:
CONTENTS SUPPLIED
The powered wheelbarrow comes partially assembled and is shipped in carefully packed package. After
all the parts have been removed from the package, you should have:
6
4 5
A SSEMBLY
Following the assembly directions below, you will
assemble the machine in a few minutes.
A
1. D u m p B o x
2. Main Frame
3. W heels
4. Operator’s Manual
5. Hardw are Bag, including
Powered W heelbarrow
M 12 3 0 16
B
M 10 4 5 4
M 10 2 5 4
C
2
4
3
1
2
1. Laadbak
2. Frame
3. Wielen
4. Handleiding
5. Zak met
montagemateriaal:
CONTENTS SUPPLIED
The powered wheelbarrow comes partially assembled and is shipped in carefully packed package. After
all the parts have been removed from the package, you should have:
6
4 5
A SSEMBLY
Following the assembly directions below, you will
assemble the machine in a few minutes.
A
1. D u m p B o x
2. Main Frame
3. W heels
4. Operator’s Manual
5. Hardw are Bag, including
Powered W heelbarrow
M 12 16
B
M 10 4 5 4
M 10 2 5 4
C
2
4
3
1
2
M1.4.MD300.NLFREN - 15022023
7
NL TORROS
Motorolie
Vul olie in door de instructies in de handleiding van de motor te volgen, die apart geleverd wordt.
AANDACHT!
• De olie werd voor het transport afgetapt.
Het oliecarter niet invullen alvorens de motor op te starten zal tot permanente schade aan de
motor leiden, en de garantie op de motor annuleren.
Machine Assembly
7
A
Mount the wheels and fasten them with M12X30
b olt s, w ashers and nut s.
B
Install the dump box and fasten the front with two
4 R-clips.
M 12 3 0 16
M 10 4 5 4
M 10 2 5 4
C
2
Powered W heelbarrow
Mount the handle frame assembly to the chasis
and secur e it w it h M10 X25 b olt s, w ashers and nut s
at the front and M10X45 bolts, washers and nuts
at the rear.
4
Add oil according to Engine
Manual packed
separately with your unit.
Engine oil
Oil has been drained for shipping.
Failure to fill engine sump with oil
before starting engine will result in
permanent damage and will void
engine warranty.
A. Monteer de wielen en bevestig met M12x30 bouten, platte ringen en moeren.
B. Installeer de laadbak en bevistig de voorkant met twee R Ø 4 klemmen.
C. Monteer het frame met de hendels op het chassis en bevestig aan de voorkant met M10x25 bouten, sluitringen en moeren,
en aan de achterkant met M10x45 bouten, sluitringen en moeren.
Machine Assembly
7
A
Mount the wheels and fasten them with M12 nuts.
B
Install the dump box and fasten the front with two
4 R-clips.
M 12 16
M 10 4 5 4
M 10 2 5 4
C
2
Powered W heelbarrow
Mount the handle frame assembly to the chasis
and secure it with M10X25 bolts, washers and nuts
at the front and M10 X45 bolts, washers and nuts
at the rear.
4
Add oil according to Engine
Manual packed
separately with your unit.
Engine oil
Oil has been drained for shipping.
Failure to fill engine sump with oil
before starting engine will result in
permanent damage and will void
engine warranty.

M1.4.MD300.NLFREN - 15022023
8
NL
TORROS
5 Bediening
Brandstof
Vul de brandstoftank met benzine door de instructies in de apart geleverde handleiding van de motor te volgen.
AANDACHT!
Vul de tank in niet meer dan 12,5 mm (1/2’’) onder de kraag, om genoeg ruimte te vr te laten
voor de expansie.
De motor opstarten
en gedetailleerde beschrijving van de werking van de motor en alle noodzakelijke informatie en instructies bevinden zich in de
handleiding van de motor, die apart met de machine geleverd wordt.
Volg de volgende stappen voor het opstarten van de koude motor:
1. Draai de starterhendel op de motor, om deze volledig te activeren.
2. Zet de gashendel tot de helft van het totale vermogen.
3. Bedien de motorschakelaar.
4. Trek meermaals langzaam op het startkoord, om de benzine in de carburator te laten stromen. Houd vervolgens de
starthendel stevig vast, en trek wat op het koord, totdat u een weerstand voelt. Trek daarna snel op het startkoord, en laat
het voorzichtig terugkeren. Laat het startkoord niet bruusk terugkeren. Herhaal deze stap meermaals indien nodig, totdat de
motor start.
5. Laat de motor enkele seconden draaien, om deze op te warmen. Zet vervolgens de starterhendel geleidelijk in OPEN
positie.
Om een warme motor opnieuw te starten, is het gebruik van de starter niet meer noodzakelijk.
1. Zet de gashendel op de helft van het totale vermogen.
2. Houd de starthendel stevig vast, en trek lichtjes op het koord, totdat u een weerstand voelt. Trek vervolgens snel op het
koord, en laat het voorzichtig terugkeren. Laat het koord niet bruusk terugkeren.
Met de machine werken
• Wanneer de motor warm is, trek de gashendel om de motorsnelheid te verhogen.
• Stel de gewenste snelheid in, en laat de koppeling langzaam inschakelen. Als de koppeling niet direct inschakelt, trek
lichtjes op de hendel en probeer opnieuw. De kuipwagen begint te rijden.
• De gemotoriseerde kuipwagen is met handige stuurhendels op de handgrepen uitgerust. Om naar links of naar rechts te
draaien, bedien gewoon de overeenstemmende stuurhendel.
• De gevoeligheid van de sturing verhoogt proportioneel met de snelheid, zodat een lichte druk op de stuurhendel voldoende
is om te draaien met een lege kuipwagen. Meer druk is nodig als de kuipwagen vol is.
• De gemotoriseerde kuipwagen heeft een maximale capaciteit van 300 kg. Echter, is het raadzaam de lading aan de
ondergrond aan te passen.
• Op sommige ondergronden, moet u bij lage snelheid en met extra voorzichtigheid werken.
• Vermijd scherpe bochten en frequente richtingsveranderingen bij het rijden op de weg, vooral op harde en ruwe terreinen,
met ongelijke punten en een hoge wrijvingskracht.
• Wees uiterst voorzichtig wanneer u in moeilijke weeromstandigheden werkt (ijs, regen en sneeuw), of op een type
ondergrond, dat de kuipwagen kan destabiliseren.
• Wanneer de koppelingshendel losgelaten wordt, wordt de machine stilgezet en automatisch geremd.
• Als de machine op een steile helling staat, moet een wig tegen een van de wielen geplaatst worden.
Stationaire stand
Zet de gashendel in de stationaire stand (SLOW), om de spanning op de motor te verminderen, wanneer de kuipwagen
niet rijdt. Het gebruik van de stationaire stand verlengt de levensduur van de motor, vermindert het brandstofverbruik en het
geluidsniveau van de machine.
De motor stilzetten
Om de motor in noodgeval stil te zetten, draai de motorschakelaar op OFF. In normale omstandigheden, volg de volgende
stappen:
1. Om de verplaatsing van de machine te stoppen, zet de gashendel in de stationaire stand.
2. Laat de motor een tot twee minuten in stationaire stand draaien.
3. Zet de motorschakelaar op OFF.
4. Sluit de brandstofkraan.

M1.4.MD300.NLFREN - 15022023
9
NL TORROS
AANDACHT!
Zet de starter niet in gesloten positie (CLOSE) om de motor stil te zetten. Dit kan een terugslag
veroorzaken of de motor beschadigen.
6 Onderhoud
Een regelmatige onderhoud verlengd de levensduur van de machine en van de componenten.
Preventief onderhoud
1. Zet de motor stil en schakel alle bedieningshendels uit. De motor moet koud zijn.
2. Controleer de algemene toestand van de machine. Controleer of er losgedraaide schroeven zijn, niet correct uitgelijnde of
vastzittende bewegende delen, gebarsten of gebroken delen of andere storingen
3. Verwijder al het vuil, dat zich op de machine verzameld heeft. Maak de machine na ieder gebruik schoon. Smeer
vervolgens alle bewegende delen met lichte machineolie.
AANDACHT!
Gebruik nooit een hogedrukreiniger om de machine schoon te maken. Water kan in kleine
ruimtes binnendringen en assen, koppelingen, lagers of de motor beschadigen. Het gebruik van
een hogedrukreiniger vermindert de levensduur en de eciëntie van de machine.
De koppeling instellen
Daar de koppeling verslijt, kan de hendel een bredere opening hebben, waardoor deze moelijker te bedienen wordt.
Het is dan noodzakelijk de kabel in te stellen, om de hendel terug in zijn oorspronkelijke positie te brengen, door op de
verstelinrichting en de tegenmoer in te werken.
De sturing instellen
Als de kruiwagen moeilijk wordt te leiden, moet de stuurhendels ingesteld worden. Draai de tegenmoer en de regelaars los, om
de speling in de kabel te verwijderen, die na het eerste gebruik of door normale slijtage kan ontstaan. Maak de regelaars niet
te veel los, omdat dit een ander probleem zou kunnen veroorzaken: een verlies van tractie. Vergeet niet de tegenmoer opnieuw
aan te draaien na de regeling.
Smering
De versnellingsbak wordt in de fabriek vooraf gesmeerd en afgedicht.
• Controleer het oliepeil alle 50 werkuren. Verwijder de dop en controleer met de machine horizontaal, dat de olie tot beide
inkepingen komt. Vul olie bij indien nodig.
• Gebruik lithiumvet op lig #0, zoals Lubriplate 6300AA , Lubriplate GR-132, of Multifak, bijv. EP-O.
• De olie moet warm verwisseld worden, door de vuldop en de dop met peilstok los te draaien. Wanneer de olietank
helemaal leeg is, zet de vuldop terug en vul de tank met verse olie in.
Bandenspanning
Controleer de bandenspanning regelmatig, om u te verzekeren, dat ze goed opgeblazen zijn. De aanbevolen druk is
30 psi/2 bar voor alle banden.
AANDACHT!
Een scheiding tussen de band en de velg is mogelijk als het wiel niet correct onderhouden wordt.
1. Propeer niet om een band te monteren zonder geschikte apparatuur en zonder ervaring.
2. Blaas de banden niet boven de aanbevolen druk op.
3. Las niet en warm een wiel met band niet op. Het lassen kan het wiel verzwakken of vervormen. De warmte kan de
kruk verhogen en de band doen barsten.
4. Blijf niet voor of boven een band tijdens het opblazen.
Motor onderhoud
Raadpleeg de handleiding van de motor, die apart geleverd wordt.

M1.4.MD300.NLFREN - 15022023
10
NL
TORROS
7 Opslag
Als de kruiwagen langer dan 30 jaar niet gebruikt zal worden, moet deze als volgt voor de opslag voorbereid worden:
1. Maak de brandstoftank volledig leeg. Opgeslagen brandstof met ethanol of MTBE kan beginnen muf te gaan binnen
30 dagen. Verbruikte brandstof heeft een hoog gomgehalte en kan de carburator verstoppen en de brandstoftoevoer
beperken.
2. Start de motor en laat deze draaien totdat hij stopt, om zeker te maken, dat er geen benzine meer in de carburator blijft.
Dit voorkamt afzettingen in de carburator, die daardoor beschadigd kan worden.
3. Terwijl de motor warm is, tap de motorolie af. Vul in met verse olie van het type dat aanbevolen wordt in de handleiding
van de motor.
4. Maak de buitenkant van de machine en de luchtopeningen met een doek schoon.
Gebruik geen sterk reinigingsmiddel of aardolie gebaseerde producten, die de kunststof onderdelen
kunnen beschadigen.
5. Controleer of er geen loszittende of beschadigde onderdelen zijn. Repareer of vervang de beschadigde delen, en draai de
schroeven, moeren en bouten aan indien nodig.
6. Sla de machine op een vlakke ondergrond op, in een schone, droge en goed verluchte ruimte.
AANDACHT!
Sla de machine niet op met benzine in een gesloten ruimte, waarin de brandstofdampen in
contact met open vuur, vonken, waakvlammen of andere ontstekingsbronnen kunnen komen.
8 Problemen oplossen
Storing Oorzaak Oplossing
De motor start niet op De bougiekabel is losgekoppeld. Sluit de bougiekabel correct aan.
Geen brandstof meer of brandstof muf. Vul in met verse brandstof.
De starter in niet geactiveerd. De starter moet geactiveerd zijn voor het
opstarten van een koude motor.
Brandstofslang verstopt. Maak de slang schoon.
De bougie is vuil. Reinig, stel de speling in of vervang de
bougie.
De motor is verzopen. Wacht enkele minuten alvorens opnieuw
te proberen.
De motor draait onregelmatig De bougiekabel is losgekoppeld. Sluit de bougiekabel correct aan.
De machine werkt met de starter. Zet de starter op OFF.
Brandstofslang verstopt of brandstof muf. Maak de slang schoon. Vul de tank in
met verse brandstof.
De luchtopening is verstopt. Maak de luchtopening schoon.
Er is water of vuil in het
brandstofsysteem. Maak de brandstoftank leeg en vul in met
verse brandstof.
De luchtlter is vuil. Reinig of vervang de luchtlter.
Carburator niet correct ingesteld. Raadpleeg de handleiding van de motor.
De motor oververhit. Het oliepeil is te laag. Vul het carter in met geschikte olie.
De luchtlter is vuil. Reinig of vervang de luchtlter.
De luchttoevoer is beperkt. Verwijder de behuizing en maak schoon.
Carburator niet correct ingesteld. Raadpleeg de handleiding van de motor.
De machine rijdt niet terwijl de motor
draait. De versnelling is niet goed geselecteerd. Controleer of de versnellingshendel niet
tussen twee versnellingen staat.
De aandrijfriem is niet genoeg
gespannen. Span de aandrijfriem.

11
M1.4.MD300.NLFREN - 15022023
FR TORROS
1 Sécurité
Symboles
Sur la plaque signalétique de votre machine, vous trouverez des symboles. Ceux-ci peuvent donner des informations importantes
sur le produit et des instructions d’utilisation.
Table des matières
1 Sécurité...............................................................................................................................................................11
2 Spécications et description de la machine..............................................................................................................13
3 Contenu de la livraison .........................................................................................................................................15
4 Montage.............................................................................................................................................................15
5 Utilisation............................................................................................................................................................17
6 Entretien..............................................................................................................................................................18
7 Rangement ..........................................................................................................................................................19
8 Résolution des problèmes ......................................................................................................................................19
9 Pièces détachées.................................................................................................................................................. 29
10 Déclaration de conformité CE .............................................................................................................................. 31
Lisez attentivement ces instructions.
Utilisez les protections individuelles. Portez des lunettes de sécurité et des protections auditives.
Il est interdit d’enlever ou de modier les dispositifs de sécurité.
Gardez les mains éloignées des parties rotatives.
Ne touchez pas les parties chaudes de la machine.
Ne fumez pas ou n’exposez pas la machine à des ammes vives.
Tenez les enfants et les autres personnes à l’écart de l’espace de travail.
TABLE OF CONTENTS
INTRODUCTION
Your new pow ered wheelbarrow will more than
satisfy your expectations. It has been manufactured
under stringent quality standards to meet superior
performance criteria. You w ill find it easy and safe
to operate, and with proper care, it w ill give you
many years of dependable service.
Carefully read through this entire
operator’s manual before using this
unit. Take special care to heed the
cautions and warnings.
Introduction
Specifications
Sy m b o ls
Saf et y
General Safety Rules
Specific Safety Rules
Contents supplied
A ssem b ly
Know your powered wheelbarrow
Features & Controls
Pow ered W heelb arrow Operation
Maintenance
St o r ag e
Trouble Shooting
Parts Schedule
2
2
2
3
3
5
6
6
8
8
9
10
11
12
13
2
ENVIRONMENTAL
Recycle unwanted materials instead of
d isp osing o f t hem as w ast e. A ll t o ols, ho ses
and packaging should be resorted, taken
to the local recycling center and disposed
of in an environment-friendly safe way.
The rating plate on your machine may show
symbols. These represent import ant information
about the product or instructions on its use.
SYMBOLS
Powered W heelbarrow
Coution! Ignoring the safety signs and
warnings applied on the machine as well
as ignoring the security and operating
instrutions can cause serious injuries and
even lead t o death.
The four-speed gearbox, three forward and one
reverse, lies at the heart of t he unit. It is oversized
so as to manage safely the huge torques generated
by the engine. Thanks to its efficient reduction
gearing, it is capable of moving around in every
situation and bearing any load.
The Engine manufacturer is responsible for all
engine-related issues w ith regards to performance,
pow er rating, specifications, warranty and service.
Please refer t o the Engine Manufacturer’s
ow ner’s/ operat or’s m anual, packed separat ely
with your unit, for more information.
Specifications
Item No.
Engine
Transm ission
Load Capacity
Box Length
Box W idth
Box Depth
09615
196cc, 4.8kW/ 3600/ min
3 F + 1R
300 kg
940 mm
635 mm
330 mm
95 dB(A) k = 2 . 5 1 d B ( A )
100 dB(A)
84 .7 d B( A ) k=3 dB(A)
3.92 m/ s2k = 1. 5 m / s 2
16 0 k g
Vibrating level on handlebar grips:
Weight
Sound power
level ( LwA )
Sound pressure level (LpA )
Measured
Guaranteed
W ear eye protection.
W ear hearing prot ect ion.
Read these instructions for use carefully.
Wear safety footwear.
W ear safety gloves.
3
SA FETY
General Safety Rules
Understand your machine
Read and understand the operator’s manual and
labels affixed t o the machine. Learn its application
and limitations as well as the specific potential
hazards peculiar t o it .
Be thoroughly familiar with the controls and their
proper operation. Know how to stop the machine
and disengage the controls quickly.
Make sure to read and understand all the
instructions and safety precautions as outlined in
the Engine Manufacturer’s Manual, packed
separately with your unit.Do not attempt to operate
the machine until you fully understand how to
properly operate and m aintain t he Engine and
how to avoid accidental injuries and/ or property
damage.
Work area
Never start or run the machine inside a closed
area. The exhaust fumes are dangerous, containing
carbon monoxide, an odorless and deadly gas.
Operate t his unit only in a w ell ventilated outdoor
area.
Never operate the machine without good visibility
or light.
Perso nal safet y
Do not operate the machine while under the
influence of drugs, alcohol, or any medication that
could affect your ability to use it properly.
Dress properly. Wear heavy long pants, boots and
gloves. Do not wear loose clothing, short pants,
and jew elry of any kind. Secure long hair so it is
above shoulder level. Keep your hair, clothing and
gloves away from moving parts. Loose clothes,
jewelry or long hair can be caught in moving parts.
Use safet y equipment. A lways w ear eye protection.
Safety equipment such as a dust mask, hard hat,
or hearing protection used for appropriate
conditions w ill reduce personal injuries.
Check your machine before starting it. Keep guards
in place and in working order. Make sure all nuts,
bolts, etc. are securely tight ened.
Never operate the machine when it is in need of
repair or is in poor mechanical condition. Replace
Keep your hands clear from all rot ating
p art s.
Do not smoke or have open flames.
Thrown objects.
Keep byst anders aw ay.
Powered W heelbarrow
It is forbidden to remove or tamper with
the protection devices and safety devices.
Keep away from hot parts on the machine.
Never start or run the engine inside a
closed area.
The exhaust fumes are dangerous,
containing carbon monoxide. Staying in
the environment can lead to
unconsciousness and death.
Do not operate on slopes with angle over
20 oor tip loading at an inclined position.
Always turn off the engine before starting
maintenance.
Ignorer les panneaux de sécurité apposés sur la machine ou les consignes de sécurité et instructions
d’utilisation peut causer de graves blessures, et même entraîner la mort.
Utilisez les protections individuelles. Portez des chaussures de sécurité.
Utilisez les protections individuelles. Portez des gants.
Objets jetés
Ne mettez jamais la machine en marche dans un endroit fermé.
3
SA FETY
General Safety Rules
Understand your machine
Read and understand the operator’s manual and
labels affixed t o the machine. Learn its application
and limitations as well as the specific potential
hazards peculiar t o it .
Be thoroughly familiar with the controls and their
proper operation. Know how to stop the machine
and disengage the controls quickly.
Make sure to read and understand all the
instructions and safety precautions as outlined in
the Engine Manufacturer’s Manual, packed
separately with your unit.Do not attempt to operate
the machine until you fully understand how to
properly operate and m aintain t he Engine and
how to avoid accidental injuries and/ or property
damage.
Work area
Never start or run the machine inside a closed
area. The exhaust fumes are dangerous, containing
carbon monoxide, an odorless and deadly gas.
Operate t his unit only in a w ell ventilated outdoor
area.
Never operate the machine without good visibility
or light.
Perso nal safet y
Do not operate the machine while under the
influence of drugs, alcohol, or any medication that
could affect your ability to use it properly.
Dress properly. Wear heavy long pants, boots and
gloves. Do not wear loose clothing, short pants,
and jew elry of any kind. Secure long hair so it is
above shoulder level. Keep your hair, clothing and
gloves away from moving parts. Loose clothes,
jewelry or long hair can be caught in moving parts.
Use safet y equipment. A lways w ear eye protection.
Safety equipment such as a dust mask, hard hat,
or hearing protection used for appropriate
conditions w ill reduce personal injuries.
Check your machine before starting it. Keep guards
in place and in working order. Make sure all nuts,
bolts, etc. are securely tight ened.
Never operate the machine when it is in need of
repair or is in poor mechanical condition. Replace
Keep your hands clear from all rot ating
p art s.
Do not smoke or have open flames.
Thrown objects.
Keep byst anders aw ay.
Powered W heelbarrow
It is forbidden to remove or tamper with
the protection devices and safety devices.
Keep away from hot parts on the machine.
Never start or run the engine inside a
closed area.
The exhaust fumes are dangerous,
containing carbon monoxide. Staying in
the environment can lead to
unconsciousness and death.
Do not operate on slopes with angle over
20 oor tip loading at an inclined position.
Always turn off the engine before starting
maintenance.

12
M1.4.MD300.NLFREN - 15022023
FR
TORROS
Consignes de sécurité
• Lisez et comprenez le manuel d’utilisation et les étiquettes apposées sur la machine. Apprenez le champ d’application de
la machine, ainsi que ses limites et les risque potentiels liés à son utilisation.
• Assurez-vous que vous connaissez bien les commandes et leur bon fonctionnement. Sachez comment rapidement arrêter la
machine et débrayer les commandes.
• Veillez à lire et comprendre toutes les instructions et consignes de sécurité. N’utilisez pas la machine tant que vous n’avez
pas bien compris son fonctionnement. Suivez toujours les instruction du fabricant pour l’entretien de votre machine.
• Les gaz d’échappement sont nocifs. Si vous utilisez la machine à l’intérieur, une bonne ventilation doit être assurée.
• N’utilisez pas la machine sur une pente raide.
• N’utilisez pas une brouette motorisée dans une atmosphère explosive ou inammable.
• Restez vigilant. N’utilisez pas la machine si vous êtes sous l’inuence d’alcool, de drogue ou de médicaments qui
pourraient diminuer votre capacité de concentration.
• Portez des vêtements adaptés. Portez des bottines et des gants. Ne portez pas de vêtements amples.
• Utilisez des protection individuelles. Portez toujours des lunettes de protection et des protections auditives.
• Contrôlez votre machine avant de commencer à travailler. Veillez à ce que les protections soient bien en place et en bon
état de fonctionnement. Vériez que tous les boulons et écrous sont bien serrés.
• N’utilisez jamais la machine s’il y a des fuites d’huile ou si une pièce est défectueuse. Remplacez les pièces défectueuses
ou manquantes avant utilisation.
• Prenez l’habitude de vérier que les outils de service ont été enlevés de la machine avant de la mettre en marche.
• Ne vous penchez pas trop. Ne travaillez pas avec la machine à pieds nus ou en sandales. Portez des chaussures de
sécurité pour protéger vos pieds et éviter de glisser.
• Arrêtez la machine pour faire le plein ou vidanger l’essence. Attendez que toutes les pièces soient bien refroidies et
assurez-vous qu’il n’y a pas de sources d’inammation telles que des étincelles ou des ammes près de la machine.
Gardez toujours le carburant éloigné des sources d’inammation.
• Si du carburant coule lors du remplissage, utilisez un chiffon sec pour l’essuyer et déplacez la machine à au moins 5
mètres de la zone où le carburant a coulé.
• Vériez le niveau d’huile avant de commencer à travailler. Ne mettez pas la machine en marche si le niveau est bas.
• Ne soulevez pas et ne portez pas la machine lorsqu’elle est en marche.
• Ne modiez jamais le réglage de la commande et le dispositif de limitation de vitesse. Une vitesse trop élevée représente
un risque pour l’utilisateur.
• Ne lâchez jamais la poignée. Le risque augmente si la machine n’est plus guidée.
• La machine ne peut être utilisée que par des adultes. Tenez la machine hors de portée des enfants.
• Les réparation, l’entretien et les réglages doivent être effectués par du personnel qualié.
• Quand la machine est hors d’usage, débarrassez-vous en sans nuire à l’environnement, en la rapportant à votre revendeur
qui veillera à ce qu’elle soit éliminée correctement.
• Ne remplissez jamais trop le réservoir d’essence. Le niveau ne doit pas dépasser la marque sur le ltre du réservoir.
3
SA FETY
General Safety Rules
Understand your machine
Read and understand the operator’s manual and
labels affixed t o the machine. Learn its application
and limitations as well as the specific potential
hazards peculiar t o it .
Be thoroughly familiar with the controls and their
proper operation. Know how to stop the machine
and disengage the controls quickly.
Make sure to read and understand all the
instructions and safety precautions as outlined in
the Engine Manufacturer’s Manual, packed
separately with your unit.Do not attempt to operate
the machine until you fully understand how to
properly operate and m aintain t he Engine and
how to avoid accidental injuries and/ or property
damage.
Work area
Never start or run the machine inside a closed
area. The exhaust fumes are dangerous, containing
carbon monoxide, an odorless and deadly gas.
Operate t his unit only in a w ell ventilated outdoor
area.
Never operate the machine without good visibility
or light.
Perso nal safet y
Do not operate the machine while under the
influence of drugs, alcohol, or any medication that
could affect your ability to use it properly.
Dress properly. Wear heavy long pants, boots and
gloves. Do not wear loose clothing, short pants,
and jew elry of any kind. Secure long hair so it is
above shoulder level. Keep your hair, clothing and
gloves away from moving parts. Loose clothes,
jewelry or long hair can be caught in moving parts.
Use safet y equipment. A lways w ear eye protection.
Safety equipment such as a dust mask, hard hat,
or hearing protection used for appropriate
conditions w ill reduce personal injuries.
Check your machine before starting it. Keep guards
in place and in working order. Make sure all nuts,
bolts, etc. are securely tight ened.
Never operate the machine when it is in need of
repair or is in poor mechanical condition. Replace
Keep your hands clear from all rot ating
p art s.
Do not smoke or have open flames.
Thrown objects.
Keep byst anders aw ay.
Powered W heelbarrow
It is forbidden to remove or tamper with
the protection devices and safety devices.
Keep away from hot parts on the machine.
Never start or run the engine inside a
closed area.
The exhaust fumes are dangerous,
containing carbon monoxide. Staying in
the environment can lead to
unconsciousness and death.
Do not operate on slopes with angle over
20 oor tip loading at an inclined position.
Always turn off the engine before starting
maintenance.
Les fumées d’échappement sont dangereuses car elles contiennent du monoxyde de carbone. Rester dans leur
environnement peut provoquer une perte de connaissance et à la mort.
N’utilisez pas la machine sur une surface inclinée de plus de 20°
Éteignez toujours le moteur avant l’entretien de la machine.
ATTENTION !
• La machine est livrée sans huile de moteur !
• La machine est livrée sans huile hydraulique !
13
M1.4.MD300.NLFREN - 15022023
FR TORROS
2 Spécications et description de la machine
Modèle MD300
Moteur 6,5 cv / 4 temps
Vitesses 3 en marche avant
+ 1 en marche arrière
Capacité de charge 300 kg
Longueur du bac 940 mm
Largeur du bac 635 mm
Profondeur du bac 360 - 420 mm
Niveau de vibrations sur la
poignée 3,92 m/s²
Capacité réservoir d’huile 0,6 l
Capacité réservoir d’essence 3 l
Autonomie 4 h
Niveau sonore 98 dB(A)
Poids net 210 kg
8
Powered W heelbarrow
KNOW YOUR POW ERED W HEELBA RROW
Features and Controls
Engine Switch
Right Steering Lever
Clutch Control Lever
Left Steering Lever
Gear Selection Lever
Dump Box
Gearbox
Throttle Control
Engine switch
The engine sw itch enables and disables the ignition
syst em .
The engine switch must be in the ON position for
the engine to run.
Turning the engine switch to the OFF position
stops t he engine.
Clutch control lever
Squeeze the control lever, clutch engaged.
Release the lever, clutch disengaged.
Throttle control
It controls engine speed. Put the throttle control
on low speed (L) or high speed (H) or an
intermediary position between L and H to increase
or decrease the speed of engine.
Left steering lever
Operate the lever to t urn left.
Right steering lever
Operate the lever to t urn right.
Gear selection lever
It controls forward or reverse movements of the
machine.
Tipping Handle
W heel
Interrupteur moteur
Commande des gaz
Levier de direction droite
Levier d’embrayage
Levier de direction gauche
Bac de chargement
Changement de vitesse
Poignée de basculement
Roue
Boîte de vitesse

14
M1.4.MD300.NLFREN - 15022023
FR
TORROS
Interrupteur du moteur
L’interrupteur du moteur active et désactive le système d’allumage.
L’interrupteur doit être sur ON pour faire fonctionner le moteur.
Mettez l’interrupteur sur OFF pour arrêter le moteur.
Levier d’embrayage
Poussez le levier pour embrayer. Relâchez le levier pour débrayer.
Commande des gaz
Sert à contrôler la vitesse du moteur. Mettez la commande sur vitesse lente (L) ou rapide (H), ou dans une position intermédiaire
entre L et H pour augmenter ou diminuer la vitesse du moteur.
Levier de direction gauche
Actionnez le levier pour tourner à gauche.
Levier de direction droite
Actionnez le levier pour tourner à droite.
Levier de vitesse
Il permet d’enclencher la marche avant ou la marche arrière.
Poignée de basculement
Contrôle le basculement du bac. Tournez la poignée A en direction de la èche pour libérer le limiteur B du crochet C. Le bac
sera ainsi libéré.
Après le déchargement du bac, tournez la poignée A en arrière pour remettre le limiteur B dans le crochet C, pour verrouiller à
nouveau le bac.
9
Powered W heelbarrow
Tipping handle
It controls tipping of the dump box. Swing tipping
handle A in t he direction of t he arrow to release
limiter B out of hook C. The dum p box w ill be
released.
After tipping the load, swing handle A back to
reset limiter B into hook C, which w ill lock the
dump box.
A
B
C
A
BC
Before you start to use the dumper,
please check the dump box to make
sure it is locked as sho w n in t he
diagram below.
Fill tank to no more than 12.5mm (1/ 2” )
below the bottom of the filler neck to
provide space for expansion.
Powered W heelbarrow Operation
Adding fuel
Fill the fuel tank as instructed in the separate
Engine Manual packed with the machine.
Starting engine
A m ore detailed description of the engine operation
and all related precautions and procedures can be
found in the Engine Manual packed separately
with the pow ered wheelbarrow.
Follow the procedure below for cold starts:
Turn choke lever on the engine to full choke
position.
Set the throt tle lever on the handlebar at half-
way posit ion.
Turn the engine switch on.
Pull the start ing rope slow ly several tim es to
allow the gasoline t o flow into the engine’s
carburetor. Then hold the start handle firmly
and pull rope out a short distance until you
feel some resistance. Then pull the rope
smoothly and briskly, and allow rope to return
gently. Do not let the rope snap back. If
necessary, pull the rope several times until the
eng ine st art s.
Allow the engine to run for several seconds to
warm up. Then, gradually move chock lever to
“OPEN” position.
Restart ing an eng ine t hat is alread y w arm from
previous running does not normally require use of
the choke.
1.
2.
3.
4.
5.
Set the throttle lever on the handlebar at half-
way posit ion.
Hold the start handle firmly and pull rope out
a short distance until you feel some resistance.
Then pull the rope smoothly and briskly, and
allow rope to return gently. Do not let the rope
snap back.
2.
1.
9
Powered W heelbarrow
Tipping handle
It controls tipping of the dump box.Swing tipping
handle A in the direction of the arrow to release
limiter B out of hook C. The dump box will be
released.
After tipping the load, swing handle A back to
reset lim it er B into hook C, w hich will lock the
dump box.
A
B
C
A
BC
Before you start to use the dumper,
please check the dump box to make
sure it is lo cked as sho w n in t he
diagram below.
Fill tank to no more than 12.5mm (1/ 2” )
below the bottom of the filler neck to
provide space for expansion.
Powered W heelbarrow Operation
Adding fuel
Fill the fuel tank as instructed in the separate
Engine Manual packed with the machine.
Starting engine
A more detailed description of t he engine operation
and all related precautions and procedures can be
found in the Engine Manual packed separately
with the powered w heelbarrow .
Follow the procedure below for cold starts:
Turn choke lever on the engine to full choke
position.
Set the t hrottle lever on t he handlebar at half-
way position.
Turn the engine switch on.
Pull the starting rope slowly several times to
allow t he gasoline to flow into the engine’s
carburetor. Then hold the start handle firmly
and pull rope out a short distance until you
feel some resistance. Then pull the rope
smoothly and briskly, and allow rope t o return
gently. Do not let the rope snap back. If
necessary, pull t he rope several times until the
en gine st ar t s.
Allow the engine t o run for several seconds to
warm up. Then, gradually move chock lever to
“OPEN” position.
Restart ing an engine t hat is already w arm from
previous running does not normally require use of
the choke.
1.
2.
3.
4.
5.
Set the throt t le lever on the handlebar at half-
way position.
Hold the start handle firmly and pull rope out
a short distance until you feel some resistance.
Then pull the rope smoothly and briskly, and
allow rope to return gently. Do not let the rope
snap back.
2.
1.
Poignée de basculement Poignée de basculement
ATTENTION !
Avant de mettre la brouette en
marche, vériez si le bac est bien
verrouillé comme sur l’illustration.
Bac de chargement verrouillé
15
M1.4.MD300.NLFREN - 15022023
FR TORROS
4 Montage
En suivant les instructions ci-dessous, vous terminerez le montage de votre machine en quelques minutes.
3 Contenu de la livraison
La brouette motorisée est livrée partiellement montée et emballée avec soin. Après déballage, vériez si le contenu est
complet :
CONTENTS SUPPLIED
The powered wheelbarrow comes partially assembled and is shipped in carefully packed package. After
all the parts have been removed from the package, you should have:
6
4 5
A SSEMBLY
Following the assembly directions below, you will
assemble the machine in a few minutes.
A
1. D u m p B o x
2. Main Frame
3. W heels
4. Operator’s Manual
5. Hardw are Bag, including
Powered W heelbarrow
M 12 3 0 16
B
M 10 4 5 4
M 10 2 5 4
C
2
4
3
1
2
1. Bac
2. Châssis
3. Roues
4. Mode d’emploi
5. Sachet de matériel
contenant :
CONTENTS SUPPLIED
The powered wheelbarrow comes partially assembled and is shipped in carefully packed package. After
all the parts have been removed from the package, you should have:
6
4 5
A SSEMBLY
Following the assembly directions below, you will
assemble the machine in a few minutes.
A
1. D u m p B o x
2. Main Frame
3. W heels
4. Operator’s Manual
5. Hardw are Bag, including
Powered W heelbarrow
M 12 16
B
M 10 4 5 4
M 10 2 5 4
C
2
4
3
1
2
16
M1.4.MD300.NLFREN - 15022023
FR
TORROS
Huile de moteur
Mettez de l’huile en suivant les instructions du mode d’emploi du moteur fourni séparément.
ATTENTION !
• L’huile a été enlevée pour le transport.
Ne pas remplir le carter d’huile avant de mettre le moteur en marche entraînera des
dommages permanents et annulera la garantie du moteur.
Machine Assembly
7
A
Mount the wheels and fasten them with M12X30
b olt s, w ashers and nut s.
B
Install the dump box and fasten the front with two
4 R-clips.
M 12 3 0 16
M 10 4 5 4
M 10 2 5 4
C
2
Powered W heelbarrow
Mount the handle frame assembly to the chasis
and secur e it w it h M10 X25 b olt s, w ashers and nut s
at the front and M10X45 bolts, washers and nuts
at the rear.
4
Add oil according to Engine
Manual packed
separately with your unit.
Engine oil
Oil has been drained for shipping.
Failure to fill engine sump with oil
before starting engine will result in
permanent damage and will void
engine warranty.
A. Montez les roues et xez-les avec des boulons M12x30, des rondelles et des écrous.
B. Installez la benne et xez l’avant avec deux attaches R Ø 4.
C. Montez le cadre avec les poignées au châssis et xez avec des boulons M10x25, des rondelles et des écrous à l’avant et
des boulons M10x45, des rondelles et des écrous à l’arrière.
Machine Assembly
7
A
Mount the wheels and fasten them with M12 nuts.
B
Install the dump box and fasten the front with two
4 R-clips.
M 12 16
M 10 4 5 4
M 10 2 5 4
C
2
Powered W heelbarrow
Mount the handle frame assembly to the chasis
and secure it with M10X25 bolts, washers and nuts
at the front and M10 X45 bolts, washers and nuts
at the rear.
4
Add oil according to Engine
Manual packed
separately with your unit.
Engine oil
Oil has been drained for shipping.
Failure to fill engine sump with oil
before starting engine will result in
permanent damage and will void
engine warranty.

17
M1.4.MD300.NLFREN - 15022023
FR TORROS
5 Utilisation
Carburant
Remplissez le réservoir d’essence en suivant les instructions du mode d’emploi du moteur fourni séparément.
ATTENTION !
Ne remplissez pas le réservoir à plus de 12,5 mm (1/2’’) en-dessous du col, pour laisser assez de
place pour l’expansion.
Démarrage du moteur
Une description détaillée du fonctionnement du moteur et toutes les informations et instructions se trouvent dans le mode
d’emploi du moteur fourni séparément avec la machine.
Suivez les étapes suivantes pour un démarrage à froid :
1. Tournez le levier du starter sur le moteur pour l’activer complètement.
2. Mettez la commande des gaz à la moitié de la puissance.
3. Actionnez l’interrupteur du moteur.
4. Tirez plusieurs fois lentement le cordon de démarrage, pour permettre à l’essence de couler dans le carburateur. Tenez
ensuite fermement la poignée de démarrage et tirez un peu sur le cordon, jusqu’à ce que vous sentiez une résistance.
Tirez ensuite rapidement sur le cordon, et laissez-le revenir doucement. Ne laissez pas le cordon revenir brusquement. Si
nécessaire, tirez plusieurs fois jusqu’à ce que le moteur démarre.
5. Laissez tourner le moteur quelques secondes pour le faire chauffer. Mettez ensuite le levier du starter progressivement en
position ouverte (OPEN).
Pour faire redémarrer un moteur déjà chaud, l’utilisation du starter n’est en principe pas nécessaire.
1. Mettez la commande des gaz à la moitié de la puissance.
2. Tenez fermement la poignée de démarrage et tirez un peu sur le cordon, jusqu’à ce que vous sentiez une résistance. Tirez
ensuite rapidement sur le cordon, et laissez-le revenir doucement. Ne laissez pas le cordon revenir brusquement.
Travailler avec la machine
• Quand le moteur est chaud, tirez la commande des gaz pour augmenter la vitesse du moteur.
• Réglez sur la vitesse requise et embrayez lentement. Si l’embrayage ne se fait pas directement, relâchez doucement le
levier et réessayez. La brouette va commencer à rouler.
• La brouette motorisée est équipée de leviers de direction très pratiques sur les poignées. Pour tourner à gauche ou à droite,
il suft d’actionner le levier correspondant.
• La sensibilité de la direction augmente proportionnellement avec la vitesse, ce qui fait qu’avec une brouette vide, une légère
pression sur le levier suft pour tourner. Une pression plus forte est nécessaire si la brouette est remplie.
• La brouette motorisée a une capacité maximale de 300 kg. Toutefois, il est recommandé d’adapter la charge au sol sur
lequel la machine est utilisée.
• Nous vous conseillons également de couvrir certains tronçons à basse vitesse et avec des précautions supplémentaires.
• Évitez les virages serrés et les changement fréquents de direction lors de la conduite sur la route, particulièrement sur des
terrains durs et rugueux, avec des aspérités et un haut degré de frottement.
• Redoublez de prudence quand vous travaillez dans des conditions météo difciles (gel, fortes pluies et neige) ou sur un
type de sol qui peut déstabiliser la brouette.
• Quand l’embrayage est relâché, la machine s’arrête et freine automatiquement.
• Si la machine est arrêtée sur une pente raide, une cale doit être placée contre une des roues.
Ralenti
Mettez la commande des gaz en position lente (SLOW) pour réduire la contrainte sur le moteur pendant que la brouette ne
roule pas. L’utilisation du ralenti permet de prolonger la durée de vie du moteur, d’économiser du carburant et de réduire le
niveau sonore de la machine.
Arrêt du moteur
Pour arrêter le moteur en cas d’urgence, tournez l’interrupteur sur OFF. Dans des conditions normales, suivez la procédure
suivante :
1. Mettez la commande des gaz en position lente (SLOW).
2. Laissez le moteur tourner au ralenti pendant une ou deux minutes.
3. Tournez l’interrupteur du moteur sur OFF.
4. Tournez le robinet d’essence sur OFF.

18
M1.4.MD300.NLFREN - 15022023
FR
TORROS
ATTENTION !
Ne mettez pas le starter en position fermée (CLOSE) pour arrêter le moteur. Cela peut provoquer
un retour de amme ou endommager le moteur.
6 Entretien
Un entretien régulier prolonge la durée de vie de la machine et des composants.
Entretien préventif
1. Arrêtez le moteur et désengagez tous les leviers de commande. Le moteur doit être froid.
2. Inspectez l’état général de la machine. Contrôlez s’il y a des vis desserrées, des parties mobiles mal alignées ou coincées,
des pièces ssurées ou cassées, ou toute autre anomalie.
3. Enlevez toutes les saletés ayant pu s’accumuler sur la machine. Nettoyez-la après chaque utilisation. Lubriez ensuite toutes
les parties mobiles avec une huile légère pour machines.
ATTENTION !
N’utilisez jamais un nettoyeur haute pression pour votre machine. De l’eau peut pénétrer dans
des interstices et endommager les axes, engrenages, roulements, ou le moteur. L’utilisation d’un
nettoyeur haute pression réduit la durée de vie et l’ecacité de la machine.
Régler l’embrayage
Comme l’embrayage s’use, le levier peut avoir une ouverture plus large, ce qui le rend plus difcile à utiliser. Il est alors
nécessaire de régler le câble pour remettre le levier dans sa position initiale, en agissant sur le dispositif de réglage et le
contre-écrou.
Régler la direction
Si vous avez des difcultés à diriger la brouette, vous devez régler les leviers de direction. Desserrez le contre-écrou et dévissez
les dispositifs de réglage pour éliminer le jeu dans le câble, qui peut apparaître après la première utilisation ou à cause d’une
usure normale. Veillez à ne pas trop desserrer les dispositifs de réglage, car cela pourrait créer un autre problème : la perte de
traction. N’oubliez pas de resserrer le contre-écrou quand vous avez terminé.
Lubrication
La boîte de vitesse est pré-lubriée et scellée en usine.
• Vériez le niveau d’huile toutes les 50 heures d’utilisation. Enlevez le bouchon et vériez, avec la machine à l’horizontale,
que l’huile arrive à deux encoches. Faites l’appoint si nécessaire.
• Utilisez une graisse au lithium #0, comme Lubriplate 6300AA , Lubriplate GR-132, ou Multifak, par ex. EP-O.
• L’huile doit être remplacée à chaud, en dévissant le bouchon de remplissage et le bouchon muni d’une jauge. Quand le
réservoir d’huile est complètement vidé, remettez le bouchon de remplissage et remplissez avec de l’huile fraîche.
Pression des pneus
Vériez la pression des pneus régulièrement, pour vous assurer qu’ils sont bien gonés. La pression recommandée est de
30 psi /2 bars pour tous les pneus.
ATTENTION !
Une séparation du pneu et de la jante est possible si la roue n’est pas correctement entretenue.
1. N’essayez pas de monter un pneu sans équipement adéquat et sans expérience.
2. Ne gonez pas les pneus au-delà de la pression recommandée.
3. Ne soudez pas et ne chauffez pas une roue avec un pneu. La soudure peut affaiblir ou déformer la roue. La chaleur
peut augmenter la pression et faire éclater le pneu.
4. Ne restez pas devant ou au-dessus d’un pneu pendant le gonage.
Entretien du moteur
Consultez le mode d’emploi du moteur fourni séparément.

19
M1.4.MD300.NLFREN - 15022023
FR TORROS
7 Rangement
Si la brouette motorisée ne doit pas être utilisée pendant plus de 30 jours, préparez la machine comme suit pour la ranger :
1. Videz complètement le réservoir d’essence. Du carburant stocké contenant de l’éthanol ou du MTBE peut commencer à
s’éventer dans les 30 jours. Du combustible usagé a une teneur élevée en gomme et peut obstruer le carburateur et limiter
le ux de carburant.
2. Faites démarrer le moteur et laissez-le tourner jusqu’à ce qu’il s’arrête, pour vous assurer qu’il ne reste pas d’essence dans
le carburateur. Cela permet d’éviter les dépôts à l’intérieur du carburateur, qui pourrait ainsi être endommagé.
3. Pendant que le moteur est chaud, videz l’huile du moteur. Remplissez avec de la nouvelle huile du type recommandé dans
le mode d’emploi du moteur.
4. Nettoyez l’extérieur de la machine et les bouches d’aération avec un chiffon propre.
N’utilisez pas de détergent puissant ou de produits à base de pétrole, pour ne pas endommager les
parties en plastique.
5. Vériez si aucune pièce n’est desserrée ou endommagée. Réparez ou remplacez les pièces endommagées et resserrez les
vis, écrous et boulons si nécessaire.
6. Rangez la machine sur un sol plat, dans un endroit propre, sec et bien ventilé.
ATTENTION !
Ne rangez pas la machine avec de l’essence dans un endroit non aéré, où les vapeurs d’essence
peuvent entrer en contact avec une amme, des étincelles, une veilleuse ou une autre source
d’inammation.
8 Résolution des problèmes
Problème Cause Solution
Le moteur ne démarre pas Le l de la bougie est débranché. Connectez correctement le l de la
bougie.
Plus de carburant ou carburant éventé. Remplissez avec du carburant propre.
Le starter n’est pas activé. L’accélérateur doit être positionné avec
le starter activé pour un démarrage à
froid.
Tuyau d’essence bouché. Nettoyez le tuyau d’essence.
La bougie est sale. Nettoyez, réglez le jeu ou remplacez la
bougie.
Le moteur est noyé. Attendez quelques minutes avant de
réessayer.
Le moteur tourne de manière irrégulière Le l de la bougie est déconnecté. Reconnectez le l de la bougie.
La machine fonctionne avec le starter. Mettez le starter sur OFF.
Tuyau d’essence bouché ou essence
éventée. Nettoyez le tuyau d’essence. Remplissez
le réservoir avec de l’essence propre.
La bouche d’aération est bouchée. Nettoyez la bouche d’aération.
Il y a de l’eau ou des saleté dans le
circuit de carburant. Videz le réservoir d’essence et
remplissez-le avec de l’essence propre.
Le ltre à air est sale. Nettoyez ou remplacez le ltre à air.
Le carburateur est mal réglé. Consultez le mode d’emploi du moteur.
Le moteur surchauffe Le niveau d’huile est trop bas. Remplissez le carter avec de l’huile
adaptée.
Le ltre à air est sale. Nettoyez ou remplacez le ltre à air.
Le ux d’air est limité. Enlevez le boîtier et nettoyez.
Le carburateur est mal réglé. Consultez le mode d’emploi du moteur.
La machine n’avance pas alors que le
moteur tourne La vitesse n’est pas enclenchée. Vériez si le levier de vitesse n’est pas
entre deux vitesses.
La courroie d’entraînement n’est pas
serrée assez. Resserrez la courroie.

20
M1.4.MD300.NLFREN - 15022023
EN
TORROS
1 Safety
Symbols
The rating plate on your machine may show symbols. These represent important information about the product or instructions on
its use.
Read these instructions for use carefully.
Use safety equipment. Always wear eye and hearing protection.
It is forbidden to remove or tamper with the protection devices and safety devices.
Keep hands away from rotating parts.
Keep away from hot parts on the machine.
Do not smoke or have open ames.
Keep children and bystanders off and away.
Contents
1 Safety................................................................................................................................................................. 20
2 Specications and description................................................................................................................................ 22
3 Contents supplied................................................................................................................................................. 24
4 Assembly ............................................................................................................................................................ 24
5 Operation ........................................................................................................................................................... 26
6 Maintenance ....................................................................................................................................................... 27
7 Storage............................................................................................................................................................... 28
8 Troubleshooting.................................................................................................................................................... 28
9 Spare parts ......................................................................................................................................................... 29
10 EC declaration of conformity................................................................................................................................ 31
TABLE OF CONTENTS
INTRODUCTION
Your new pow ered wheelbarrow will more than
satisfy your expectations. It has been manufactured
under stringent quality standards to meet superior
performance criteria. You w ill find it easy and safe
to operate, and with proper care, it w ill give you
many years of dependable service.
Carefully read through this entire
operator’s manual before using this
unit. Take special care to heed the
cautions and warnings.
Introduction
Specifications
Sy m b o ls
Saf et y
General Safety Rules
Specific Safety Rules
Contents supplied
A ssem b ly
Know your powered wheelbarrow
Features & Controls
Pow ered W heelb arrow Operation
Maintenance
St o r ag e
Trouble Shooting
Parts Schedule
2
2
2
3
3
5
6
6
8
8
9
10
11
12
13
2
ENVIRONMENTAL
Recycle unwanted materials instead of
d isp osing o f t hem as w ast e. A ll t o ols, ho ses
and packaging should be resorted, taken
to the local recycling center and disposed
of in an environment-friendly safe way.
The rating plate on your machine may show
symbols. These represent import ant information
about the product or instructions on its use.
SYMBOLS
Powered W heelbarrow
Coution! Ignoring the safety signs and
warnings applied on the machine as well
as ignoring the security and operating
instrutions can cause serious injuries and
even lead t o death.
The four-speed gearbox, three forward and one
reverse, lies at the heart of t he unit. It is oversized
so as to manage safely the huge torques generated
by the engine. Thanks to its efficient reduction
gearing, it is capable of moving around in every
situation and bearing any load.
The Engine manufacturer is responsible for all
engine-related issues w ith regards to performance,
pow er rating, specifications, warranty and service.
Please refer t o the Engine Manufacturer’s
ow ner’s/ operat or’s m anual, packed separat ely
with your unit, for more information.
Specifications
Item No.
Engine
Transm ission
Load Capacity
Box Length
Box W idth
Box Depth
09615
196cc, 4.8kW/ 3600/ min
3 F + 1R
300 kg
940 mm
635 mm
330 mm
95 dB(A) k = 2 . 5 1 d B ( A )
100 dB(A)
84 .7 d B( A ) k=3 dB(A)
3.92 m/ s2k = 1. 5 m / s 2
16 0 k g
Vibrating level on handlebar grips:
Weight
Sound power
level ( LwA )
Sound pressure level (LpA )
Measured
Guaranteed
W ear eye protection.
W ear hearing prot ect ion.
Read these instructions for use carefully.
Wear safety footwear.
W ear safety gloves.
3
SA FETY
General Safety Rules
Understand your machine
Read and understand the operator’s manual and
labels affixed t o the machine. Learn its application
and limitations as well as the specific potential
hazards peculiar t o it .
Be thoroughly familiar with the controls and their
proper operation. Know how to stop the machine
and disengage the controls quickly.
Make sure to read and understand all the
instructions and safety precautions as outlined in
the Engine Manufacturer’s Manual, packed
separately with your unit.Do not attempt to operate
the machine until you fully understand how to
properly operate and m aintain t he Engine and
how to avoid accidental injuries and/ or property
damage.
Work area
Never start or run the machine inside a closed
area. The exhaust fumes are dangerous, containing
carbon monoxide, an odorless and deadly gas.
Operate t his unit only in a w ell ventilated outdoor
area.
Never operate the machine without good visibility
or light.
Perso nal safet y
Do not operate the machine while under the
influence of drugs, alcohol, or any medication that
could affect your ability to use it properly.
Dress properly. Wear heavy long pants, boots and
gloves. Do not wear loose clothing, short pants,
and jew elry of any kind. Secure long hair so it is
above shoulder level. Keep your hair, clothing and
gloves away from moving parts. Loose clothes,
jewelry or long hair can be caught in moving parts.
Use safet y equipment. A lways w ear eye protection.
Safety equipment such as a dust mask, hard hat,
or hearing protection used for appropriate
conditions w ill reduce personal injuries.
Check your machine before starting it. Keep guards
in place and in working order. Make sure all nuts,
bolts, etc. are securely tight ened.
Never operate the machine when it is in need of
repair or is in poor mechanical condition. Replace
Keep your hands clear from all rot ating
p art s.
Do not smoke or have open flames.
Thrown objects.
Keep byst anders aw ay.
Powered W heelbarrow
It is forbidden to remove or tamper with
the protection devices and safety devices.
Keep away from hot parts on the machine.
Never start or run the engine inside a
closed area.
The exhaust fumes are dangerous,
containing carbon monoxide. Staying in
the environment can lead to
unconsciousness and death.
Do not operate on slopes with angle over
20 oor tip loading at an inclined position.
Always turn off the engine before starting
maintenance.
Ignoring the safety signs and warnings applied on the machine as well as ignoring the security and operating
instructions can cause serious injuries and even lead to death.
Use safety equipment. Always wear safety footwear.
Use safety equipment. Always wear safety gloves.
Thrown objects.
Never start or run the engine inside a closed area.
3
SA FETY
General Safety Rules
Understand your machine
Read and understand the operator’s manual and
labels affixed t o the machine. Learn its application
and limitations as well as the specific potential
hazards peculiar t o it .
Be thoroughly familiar with the controls and their
proper operation. Know how to stop the machine
and disengage the controls quickly.
Make sure to read and understand all the
instructions and safety precautions as outlined in
the Engine Manufacturer’s Manual, packed
separately with your unit.Do not attempt to operate
the machine until you fully understand how to
properly operate and m aintain t he Engine and
how to avoid accidental injuries and/ or property
damage.
Work area
Never start or run the machine inside a closed
area. The exhaust fumes are dangerous, containing
carbon monoxide, an odorless and deadly gas.
Operate t his unit only in a w ell ventilated outdoor
area.
Never operate the machine without good visibility
or light.
Perso nal safet y
Do not operate the machine while under the
influence of drugs, alcohol, or any medication that
could affect your ability to use it properly.
Dress properly. Wear heavy long pants, boots and
gloves. Do not wear loose clothing, short pants,
and jew elry of any kind. Secure long hair so it is
above shoulder level. Keep your hair, clothing and
gloves away from moving parts. Loose clothes,
jewelry or long hair can be caught in moving parts.
Use safet y equipment. A lways w ear eye protection.
Safety equipment such as a dust mask, hard hat,
or hearing protection used for appropriate
conditions w ill reduce personal injuries.
Check your machine before starting it. Keep guards
in place and in working order. Make sure all nuts,
bolts, etc. are securely tight ened.
Never operate the machine when it is in need of
repair or is in poor mechanical condition. Replace
Keep your hands clear from all rot ating
p art s.
Do not smoke or have open flames.
Thrown objects.
Keep byst anders aw ay.
Powered W heelbarrow
It is forbidden to remove or tamper with
the protection devices and safety devices.
Keep away from hot parts on the machine.
Never start or run the engine inside a
closed area.
The exhaust fumes are dangerous,
containing carbon monoxide. Staying in
the environment can lead to
unconsciousness and death.
Do not operate on slopes with angle over
20 oor tip loading at an inclined position.
Always turn off the engine before starting
maintenance.
This manual suits for next models
1
Table of contents


