TourPro Lighting MagicPar QZ-1915 User manual
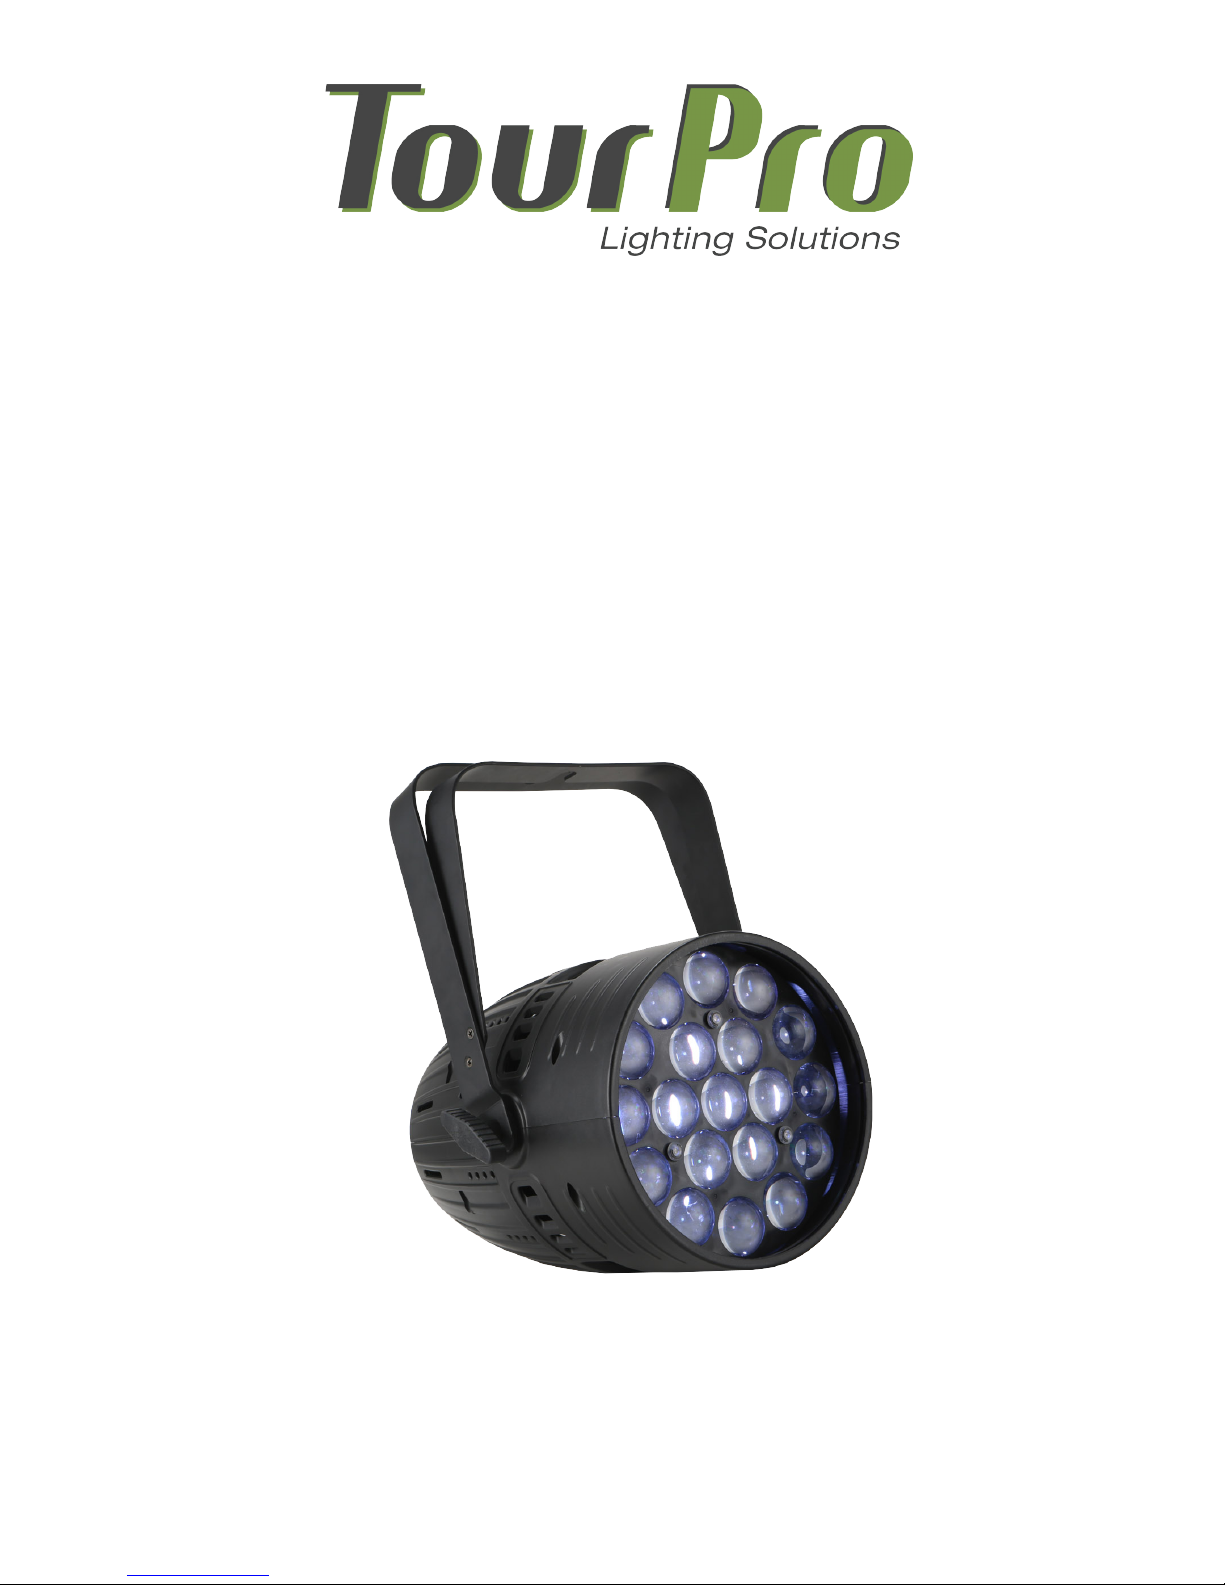
MagicPar QZ-1915 Zoom Par
Instruction Manual
PROFESSIONAL SHOW LIGHT
www.tourprolighting.com

2
------------------------------ 2014Ver05.14-----------------------------------
Unpacking: Thank you for purchasing QZ-1915 Zoom Par. Every unit has been thoroughly tested
and has been shipped in perfect operating condition. Carefully check the shipping carton for
damage that may have occurred during shipping. If the carton appears to be damaged, carefully
inspect your fixture for any damage and be sure all accessories necessary to operate the unit has
arrived intact. In the case damage has been found or parts are missing, please contact the
manufacturer or your dealer for further instructions. Do not return this unit to your dealer without
first contacting.
FOR YOUR OWN SAFETY, PLEASE READ THIS USER MANUAL CAREFULLY BEFORE POWERING OR
INSTALLING QZ-1915 Zoom Par. SAVE IT FOR FUTURE REFERENCE.
Caution! There are no user serviceable parts inside this unit. Do not attempt any repairs yourself;
doing so will void your manufactures warranty. In the unlikely event your unit may require service
please contact the manufacturer or your dealer.
PLEASE recycle the shipping carton when ever possible.
General Instructions: To optimize the performance of this product, please read these
operating instructions carefully to familiarize you with the basic operations of this unit. These
instructions contain important safety information regarding the use and maintenance of this unit.
Features
!Multi-Colors
!Color Strobe
!Electronic Dimming 0-100%
!DMX-512 protocol
!Master/Slave synchronization
!Sound Control
!LCD operation menu with function
buttons
!Daisy Chain Units Together in DMX
Mode
Safety Precautions
!To reduce the risk of electrical shock or fire, do not expose this unit to rain or moisture.
!Do not spill water or other liquids into or on to your unit.
!Be sure that the local power outlet matches that of the required voltage for your unit.
!Do not attempt to operate this unit if the power cord has been frayed or broken. Do not attempt to remove
or break off the ground prong from the electrical cord. This prong is used to reduce the risk of electrical
shock and fire in case of an internal short.
!Disconnect from main power before making any type of connection.
!Do not remove the cover under any conditions. There are no user serviceable parts inside.
!Never operate this unit when it’s cover is removed.
!Never plug this unit in to a dimmer pack.
!Always be sure to mount this unit in an area that will allow proper ventilation. Allow about 6” (15cm)
between this device and a wall.
!Do not attempt to operate this unit, if it becomes damaged.
!This unit is intended for indoor use only; use of this product outdoors voids all warranties.
!During long periods of non-use, disconnect the unit’s main power.
!Always mount this unit in safe and stable matter.
Warning! To prevent or reduce the risk of electrical shock or fire, do not expose this unit to rain
or moisture.
PLEASE consider that damages caused by manual modifications to the device are not subject
to warranty.
www.tourprolighting.com

3
!Power-supply cords should be routed so that they are not likely to be walked on or pinched by items placed
upon or against them, paying particular attention to the point they exit from the unit.
!Cleaning -The fixture should be cleaned only as recommended by the manufacturer. See “Cleaning” for
details.
!Heat -The appliance should be situated away from heat sources such as radiators, heat registers, stoves,
or other appliances (including amplifiers) that produce heat.
!Qualified service personnel should service the fixture when:
A. The power-supply cord or the plug has been damaged.
B. Objects have fallen, or liquid has been spilled into the appliance.
C. The appliance has been exposed to rain or water.
D. The appliance does not appear to operate normally or exhibits a marked change in performance.
Set Up:
Power Supply: Before plugging your unit in, be sure the source voltage in your area matches the required
voltage for your LED Zoom Par19(4in1), The model is Auto power supply, It is workable
90-250V/50~60Hz. Please make sure your unit voltage matches the wall outlet voltage before attempting to
operate you fixture.
Connection to the mains
For protection from electric shock, the fixture must be earthed!
Install a suitable plug on the power cord; note that the cores in the power cord are colored according to the
following table. The earth has to be connected!
If you have any doubts about proper installation, consult a qualified electrician.
Core (EU)
Core (US)
Connection
Plug Terminal Marking
Brown
Light blue
Yellow/Green
Black
White
Green
Live
Neutral
Earth
L
N
DMX512 connection
The fixture is equipped with 3-pin or 5-pin XLR sockets for DMX input and output. The sockets are wired in
parallel.
Only use a shielded twisted-pair cable designed for RS-485 and 3-pin or 5-pin XLR-plugs and connectors in
order to connect the controller with the fixture or one fixture with another.
DMX-output DMX-input
XLR mounting-sockets (rear view): XLR mounting-plugs (rear view):
DMX Linking: To ensure proper DMX data transmissions, when using several DMX fixtures try to use the
shortest cable path possible. The order in which fixtures are connected in a DMX line does not influence the
www.tourprolighting.com

4
DMX addressing. For example; a fixture assigned a DMX address of 1 may be placed anywhere in a DMX line,
at the beginning, at the end, or anywhere in the middle. When a fixture is assigned a DMX address of 1, the
DMX controller knows to send DATA assigned to address 1 to that unit, no matter where it is located in the DMX
chain.
Operating Modes: You can use the QZ1915 Zoom Par19 in 4 ways:
!Auto Mode - The unit will automatically chase through the different colors and built-in programs.
!Slave Mode – The unit will run under slave mode.
!DMX control mode - This function will allow you to control each individual fixtures traits with a standard
DMX 512 controller.
!Sound mode- this function allows you to control fixture via sound.
DMX Mode: Operating through a DMX controller gives the user the freedom to create their own programs
tailored to their own individual needs. This function also allows you to use your fixtures as spotlights.
1. This function will allow you to control each individual fixture’s traits with a standard DMX 512 controller.
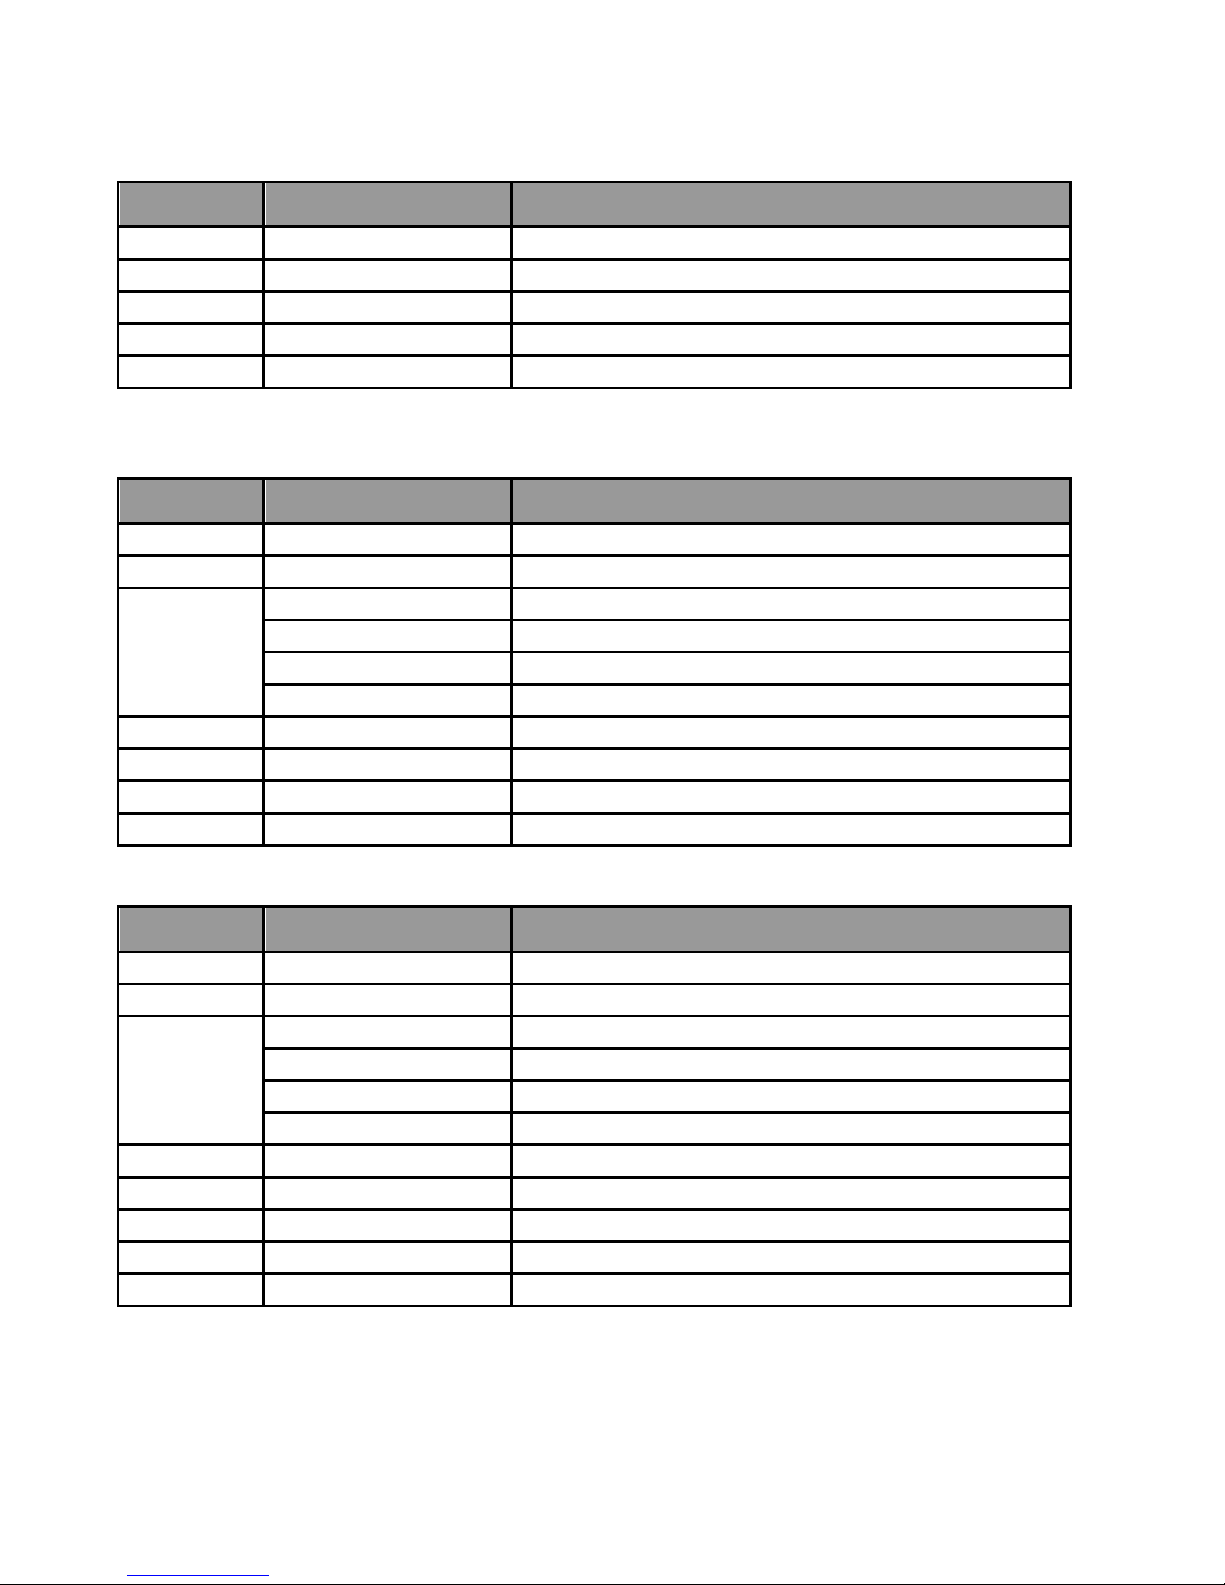
2. The QZ1915 Zoom Par uses 5/7/8 DMX channels (RGBW version) to operate. Please see “DMX Values
and Functions” for the DMX traits.
3. To run your fixture in DMX mode, plug in the fixture via the XLR connections to any standard DMX controller.
Set your desired DMX address following the setup specifications that come with your DMX controller.
4.
Main Control Menu
The control board on the fixture base is your interface to access and control all
functions on the unit, Its digital display gives you a code vide of functions
5Chs Mode 7Chs Mode 8Chs Mode Auto Run Sound Control Manual Control/OFF Manual Control/ON
001-511001-511 001-511
Strobe Red Green Blue White Zoom
000-255 000-255 000-255 000-255 000-255 5°-60°
www.tourprolighting.com
5
DMX Chart:
[d.001] Mode (5 DMX Channels)
CHANNEL
VALUE
FUNCTION
1
0-255
Zoom function 5°-60°
2
0-255
Red intensity
3
0-255
Green intensity
4
0-255
Blue intensity
5
0-255
White intensity
[A.001] Mode ( 7 DMX Channels)
CHANNEL
VALUE
FUNCTION
1
0-255
Zoom function 5°-60°
2
0-255
Dimmer
3
0-3
No function
4-127
Strobe ( Slow-Fast)
128-131
No function
132-255
Random Strobe ( Slow-Fast)
4
0-255
Red intensity
5
0-255
Green intensity
6
0-255
Blue intensity
7
0-255
White intensity
[P.001] Mode (8 DMX Channels)
CHANNEL
VALUE
FUNCTION
1
0-255
Zoom function 5°-60°
2
0-255
Dimmer
3
0-3
No function
4-127
Strobe ( Slow-Fast)
128-131
No function
132-255
Random Strobe ( Slow-Fast)
4
0-255
Macro
5
0-255
Red intensity
6
0-255
Green intensity
7
0-255
Blue intensity
8
0-255
White intensity
www.tourprolighting.com
Table of contents
Other TourPro Lighting Dj Equipment manuals

TourPro Lighting
TourPro Lighting ExtremeBeam 230 User manual

TourPro Lighting
TourPro Lighting NOVA User manual

TourPro Lighting
TourPro Lighting LIGHT SKY F1000 PROFILE-50R Series User manual

TourPro Lighting
TourPro Lighting LED Pin Spot User manual

TourPro Lighting
TourPro Lighting AQUABEAM SERIES User manual


