Tourtecs IK2 User manual
INSTRUCTION MANUAL
IK2 / IK4
Motorcycle communication system

Table of contents
Introduction 4
Scope of delivery 4
Product overview 5
Explanation of buttons 5
Power on/off button 5
Intercom button 5
Volume + 6
Volume - 6
Explanation of the indicator lights 6
Installation methods 7
Permanent installation 7
Temporary installation 7
Installation of the main unit 7
Installation of microphone and speaker 7
Charging process 8
General operating instructions 9
Turning on and off 9
Connection with the Smartphone / GPS device 9
Automated connection to the smartphone 9
Phone calls 9
Accept phone calls 9
Reject phone calls 9
End phone calls 9
Voice dialing 9
Redial 10
Accepting calls from a third party 10
FM-Radio 10
Turning on and off 10
Change radio channel 10
Battery status query 10
Bluetooth communication system 11
Pairing with a Bluetooth headset 11
Connection and communication between two IK2 units 11
Connection setup between two IK2 units 11
Communication between two IK2 units 11
Connection and communication between IK4 units 12
Connection setup between two or more IK4 units 12
Communication between two IK4 units 12
2


Introduction
Thank you for choosing the IK2 / IK4 communication system. With its wireless design, the
communication system is designed for installation in most open face, flip-up or full-face
helmets.
With the IK2 / IK4, you can use your Bluetooth-enabled mobile phone to make hands-free
calls, listen to music or voice instructions from GPS navigation and activate the wireless
communication link from driver to driver or driver to passenger. It has a range of 1200
meters (depending on the environmental conditions).
The IK2 / IK4 complies with Bluetooth specification V3.0 and supports the following profiles:
● Headset Profile (HSP)
● Hands-Free Profile (HFP)
● Advanced Audio Distribution Profile (A2DP)
● Audio Video Remote Control Profile (AVRCP)
● Audio Gateway (AG)
Our helmet speakers achieve a good sound quality. The headset also offers a practical
combination of wind and ambient noise suppression for the microphone.
Please read this manual carefully before using this product.
Scope of delivery
Included in delivery:
● Main unit IK2 / IK4 communication system
● Speaker and microphone (headset)
● USB cable
● Mounting clamp console
4

Product overview
Explanation of buttons
Power on/off button
● Turning the unit on / off
● Pair with Smartphone
● Check battery status
● Ending calls via Bluetooth Intercom
● Play / pause music
● Accepting an initial call
● Accepting a second call
● Reject call
● End call
Intercom button
● Pairing a mobile telephone for Bluetooth intercom calls
● Accepting Bluetooth intercom calls
● Ending Bluetooth intercom calls
5

Volume +
● Increase volume
● Playing the previous piece of music
● Search for previous FM station
● Turning the radio on / off
● Redial
Volume -
● Decrease volume
● Playing the next piece of music
● Search for the next FM station
● Voice dialing
Explanation of the indicator lights
Description
Declaration
Blue light flashes once
No Bluetooth connection established
Blue and red light flash slowly alternately
Device ready for pairing
Blue light flashes quickly
Search for other Bluetooth devices
Blue and red light flash twice quickly and
simultaneously
Bluetooth bridge created
Blue and red light flash quickly and
simultaneously
Connection via Bluetooth is established
Blue light flashes twice
Pairing process completed
Blue light flashes quickly
Connected via Bluetooth
Red light flashes slowly
Charging in progress
Blue light is on
Charging completed
Red light flashes quickly
Low battery warning
6
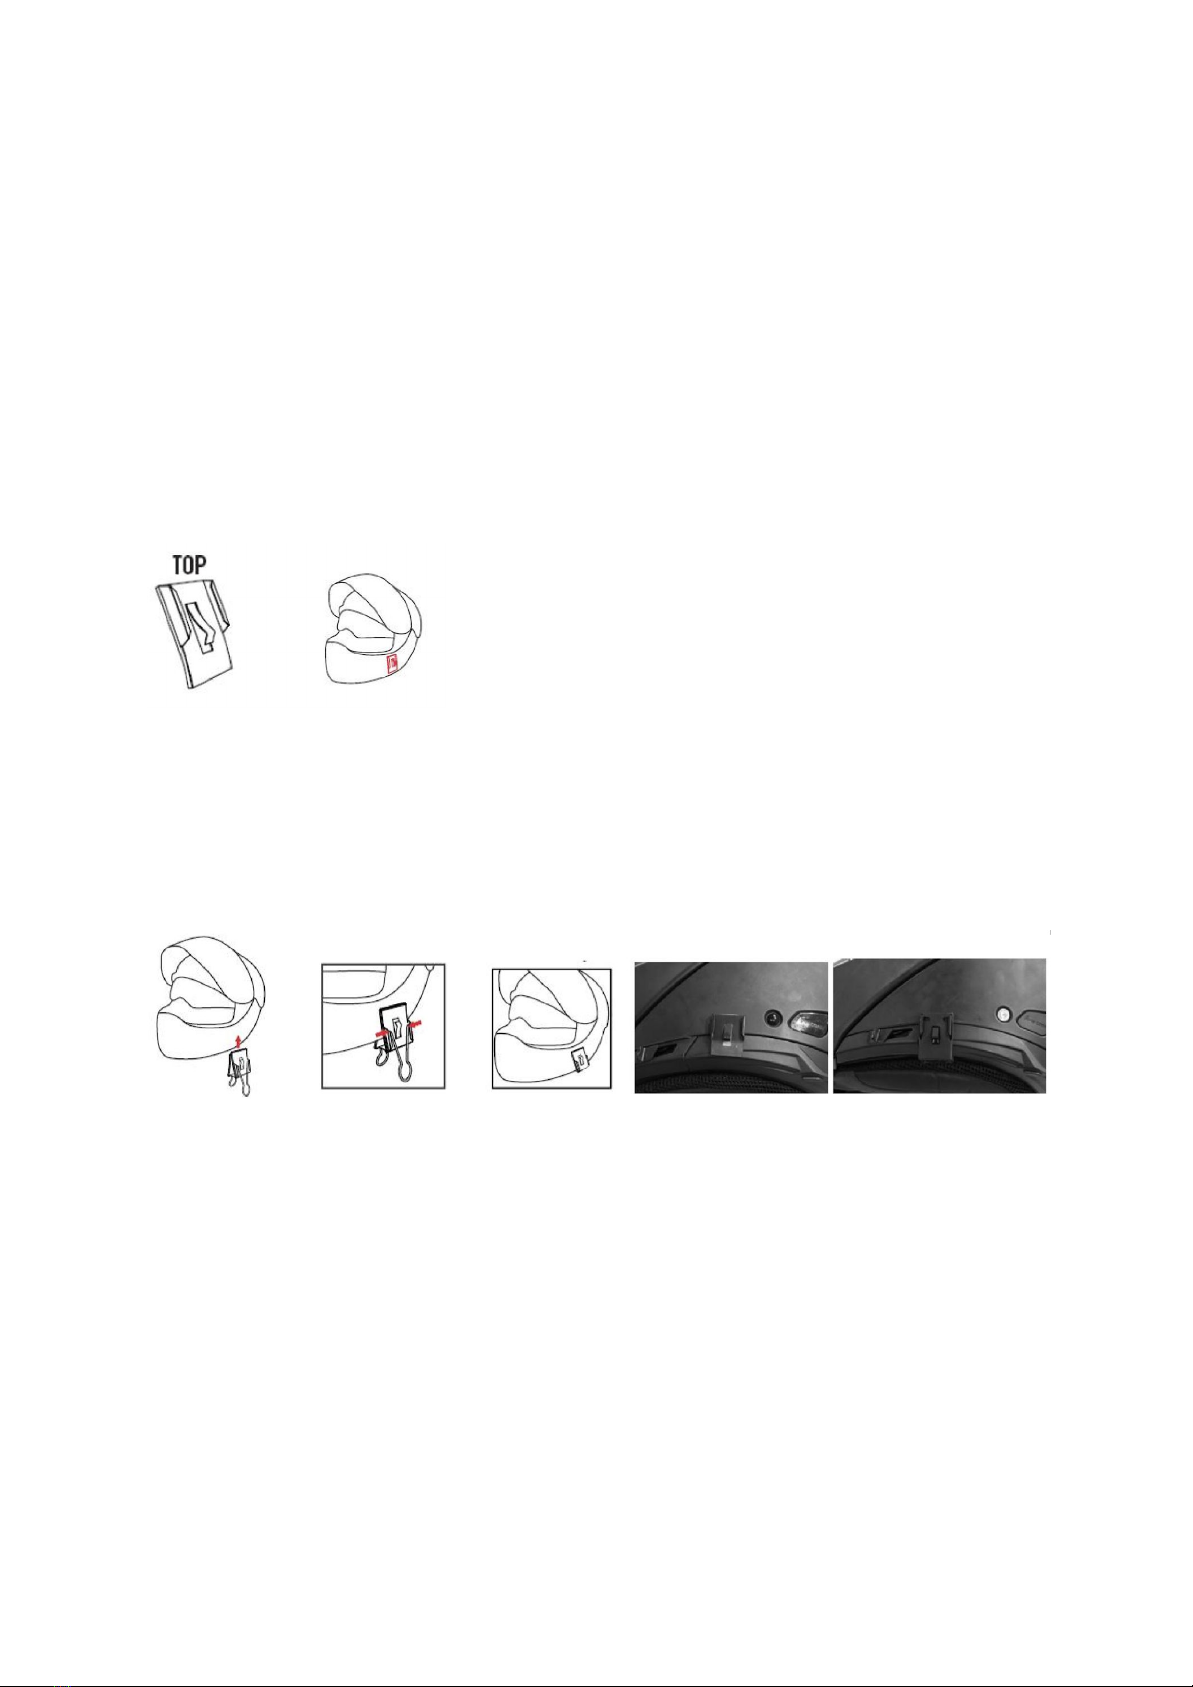
Installation methods
Permanent installation
Step 1: Clean the left side of the helmet, near the lower edge.
Step 2: Remove the adhesive protection of the 3M sticker.
Step 3: Apply pressure to the metal clamp. Make sure that the clamp is securely
fixed.
Note: The 3M adhesive label requires 24 hours to dry.
Temporary installation
Step 1: Attach the clamp on the left side of the helmet, near the lower edge.
Step 2: After fixing the clamp, remove the metal handles.
Step 3: If necessary, use an additional rubber to prevent slipping.
Installation of the main unit
Step 1: Slide the main unit over the top edge of the bracket until you hear a click.
Step 2: Connect the headphones to the 3.5 mm headphone jack.
Installation of microphone and speaker
Step 1: Attach the speaker on the inside of the helmet in the ear area.
Step 2: Attach the microphone on the inside of the helmet, near the mouth.
7

Charging process
You can charge the communication unit with the USB cable that came with the unit. An
adapter for power connection is not included. The active charging process is indicated by the
red light. When charging is complete, the lamp turns off. We recommend charging the
battery fully before each use.
Charging the device takes about 3 hours and it should not be left unused for more than 6
weeks after charging, as this could damage the batteries.
The current charge level can be checked by double pressing the power on/off button and is
communicated via the speakers.
When the battery is low, a warning signal sounds every 5 minutes. In addition, the red
indicator light flashes rapidly three times.
8

General operating instructions
Turning on and off
To turn the unit on, press the on/off button for about 3 seconds until the blue light flashes
and the speaker announces "turned on".
To switch off the unit, press the on/off button for approx. 3 seconds in the activated mode
until the red lamp lights up and the speaker announces " Turned off".
Connection with the Smartphone / GPS device
Step 1: Press the power button in the on mode for about 8 seconds until the red and
blue light flashes alternately. The unit is now ready for pairing and the
speaker
announces "Pairing".
Step 2: Open the Bluetooth settings of your smartphone, search for and select the
"T9S-2 / T9S-4”.
Step 3: When the connection is established, the blue light of the device flashes twice.
Automated connection to the smartphone
If the connection between the device and a smartphone has been set up, it will be restored
automatically after the restart.
Phone calls
Accept phone calls
The unit will automatically answer incoming phone calls after about 12 seconds. Pressing
the on/off key accepts calls in advance.
Reject phone calls
Press the phone button within 5 seconds for about 2 seconds to reject incoming phone calls.
End phone calls
Press the on/off button twice in a row during the call to end the call.
Telephone calls that were answered via Bluetooth headset can be ended by pressing the
Intercom button.
Voice dialing
Press the volume button "-" twice while the phone is in standby mode to activate voice
dialing. The phone must support voice dialing.
9

Redial
Press the volume button "+" twice to redial.
Accepting calls from a third party
If an additional call is received while a call is active, it can be answered by pressing the
on/off key twice. The first call is now on hold. When the second call is finished, the first call
will be resumed.
FM-Radio
Turning on and off
Press one of the volume buttons for about 2 seconds while the radio is on to turn the radio
on or off.
Change radio channel
Press the volume key "+" twice to search for the previous radio channel.
Press the volume key "-" twice to search for the next radio channel.
Battery status query
The current charge status can be queried by double pressing the on/off button and is
announced via the speakers.
10

Bluetooth communication system
The IK2 / IK4 communication system can be connected to up to 1 / 3 additional IK2 / IK4
units. This enables the systems full potential of communication.
Pairing with a Bluetooth headset
Step 1: Press and hold the Intercom button for about 2 seconds until the blue and red
lights flash rapidly alternately.
Step 2: Afterwards press the Intercom button again to initiate the pairing procedure.
While the unit is searching for Bluetooth devices the blue light blinks quickly.
After the connection is established, the blue light flashes slowly., the blue light
blinks slowly.
Note IK2: Already paired Bluetooth headphones can be reconnected to the device in
standby mode by pressing the Intercom button.
Note IK4: Already paired Bluetooth headphones can be reconnected to the device in
standby mode by pressing the volume keys "+" and "-" simultaneously.
Note IK2 / IK4: Phone calls that were answered via Bluetooth headphones can be ended by
pressing the Intercom button.
Connection and communication between two IK2 units
Connection setup between two IK2 units
Step 1: Start with both IK2 units turned on. Hold the Intercom button on both units
until
the blue and red lights flash alternately.
Step 2: Press the Intercom button on both devices again to start the connection
setup.
Successful pairing is confirmed by the flashing blue light and the speaker.
Communication between two IK2 units
Communication between two paired IK2 units can be started by pressing the Intercom
button. The flashing blue and red light indicates that a 2-way intercom call is connected.
Press the Intercom button again to end the call. This is indicated by double flashing of the
blue light.
11
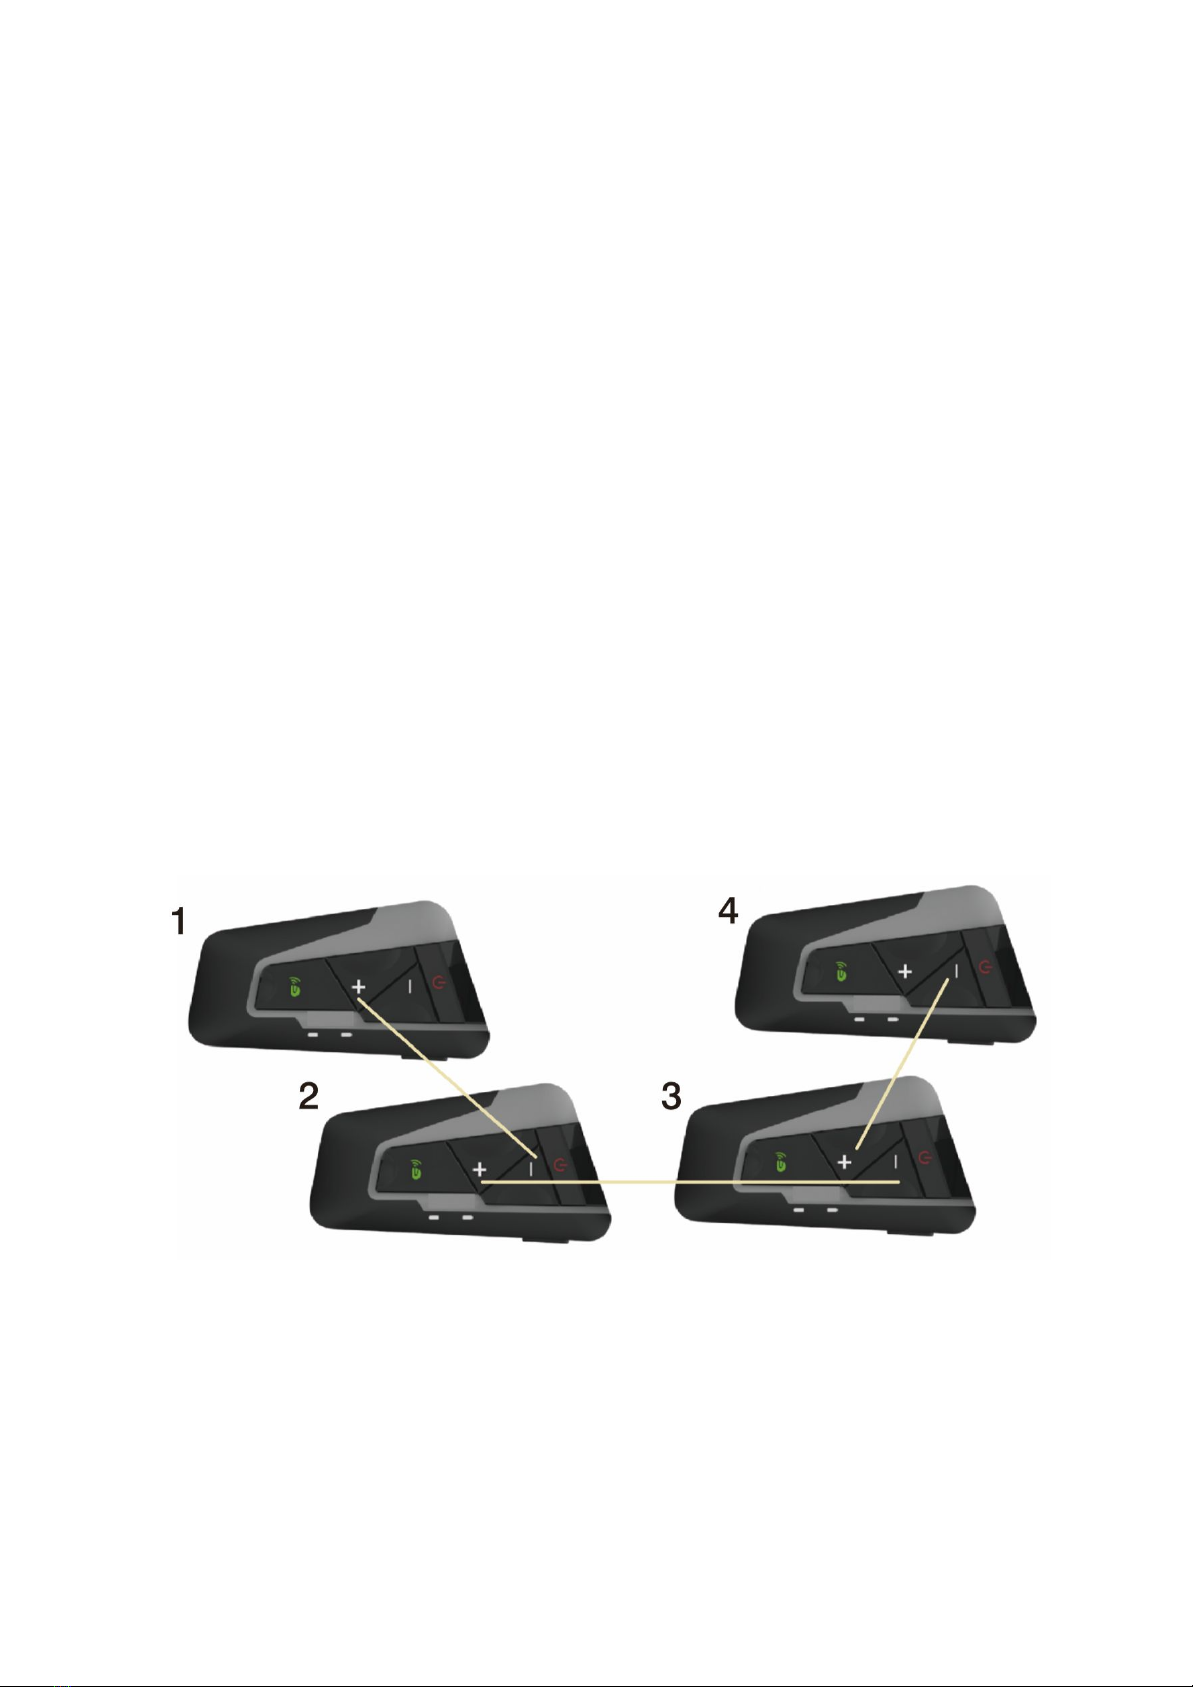
Connection and communication between IK4 units
Connection setup between two or more IK4 units
Step 1: Start with the IK4 units switched on. Press and hold the Intercom button and
the volume button "+" on all units until the blue and red lights flash alternately.
Step 2: Pairing is initiated automatically. Wait until the blue light flashes and the
speaker signals successful pairing.
Step 3: After successful pairing, press the intercom button on unit 1 once and the
intercom button on unit 2 twice. Successful pairing is indicated by the blue
and
red lights flashing twice.
Step 4: After successful pairing, press the intercom button on unit 2 once and the
intercom button on unit 3 twice. Successful pairing is indicated by the blue
and
red lights flashing twice.
Step 5: After successful pairing, press the intercom button on unit 3 once and the
intercom button on unit 4 twice. Successful pairing is indicated by the blue
and
red lights flashing twice.
Communication between two IK4 units
Communication between two paired IK4 units can be started by pressing the Intercom
button. The flashing blue and red light indicates that a 2-way intercom call is connected.
Press the Intercom button again to end the call. This is indicated by double flashing of the
blue light.
12

Walkie-talkie communication system
Step 1: Connect your walkie-talkie to the Bluetooth intercom using the connection
cable of your walkie-talkie. If headphones are already correctly connected to
the intercom, you should hear noise in the headphones. Sound signals from
telephone calls or the FM radio can be intermixed with this channel.
Step 2: Press and hold the push-to-talk button on the connection cable of your
walkie-talkie to start communication via microphone and headphones.
Releasing the button ends the communication. This communication channel
allows several parties to communicate with each other simultaneously.
Step 3: After each time the device is connected to your walkie-talkie, you should
adjust the volume of the walkie-talkie to an appropriate level, as your
headphones could be in a different state each time. This volume adjustment
should be made when no other sound input is present.
Technical data
● Bluetooth 3.0: HSP, HFP, A2DP, AVRCP, AGHSP
● Transmission range: 1200 m
● Smartphone connection range: 10 m
● Frequency range: 2,402 GHz - 2,480 GHz
● Operating temperature: -40°C - 60°C
● Working hours (music / phone calls): 15 hours
● Standby time: 350 hours
● Charging time: 3 hours
● Battery: Rechargeable lithium batteries 800 mA/h, 75mA, 0.1W 3.7 V
● Dimensions: 89mm x 46mm x 20mm
13

Safety Instructions
Warnings
● To prevent traffic accidents, it is prohibited to adjust the settings of this product or
connect to other devices while driving.
● To avoid electric shock, fire and other disturbances, switch off the unit in case of
smoke, heat or odor.
● Do not allow the unit to be exposed to fire as there is a risk of explosion due to the
batteries installed.
● It is also to be avoided that the product is exposed to permanent heat.
● Use of the device outside the operating temperatures of -40°C and 60°C is prohibited
and may cause malfunctions.
● Avoid harmful applications such as impacts or dropping the device, as they may
cause malfunctions.
● Changes or modifications to the equipment not expressly approved by the party
responsible for compliance could void the user's authority to operate the equipment
and could result in product failure, electric shock, fire or other accidents.
Notes on the charging process
● Please use the included USB charging cable for charging to avoid possible
interference such as fire or smoke.
● Charging near hot sources such as fire is prohibited and should be done at room
temperature.
● To avoid damage to the battery, the unit should be charged at least once a year,
even if it has not been used.
● If smoke, heat or odour is produced during charging, stop charging immediately.
14
This manual suits for next models
1
Table of contents


