TownSteel TSE Home User manual

YW2024 1
TownSteel
TSE Home
TS Gateway
YW2024 2
Introduction
The TownSteel TS Gateway works with your series 5000 Wi-Fi lock, which includes e-Elite 5000RF, e-
Smart 5000RF, and e-Genius 5000RF. After setting up the TS Gateway, you can use the TSE Home
app to control your lock from anywhere.
Before you get started
Before setting up the TS Gateway, install your TownSteel Smart lock first. Before programming
anything with the APP it is recommended you change the lock’s Master Code (see- Change Your
Master Code in programming guide) to avoid any unauthorized entry or operation of the lock.
The new Master Code will be your administrator password (do not share).

YW2024 3
GENERAL LOCK INFORMATION FOR THE Wi-Fi FUNCTION
The 5000-RF Series lock is a versatile lock- it can be operated by a 6-10 digit PIN code,
RFID card/FOB or through your smart phone APP via Wi-Fi.
The APP is called TSE Home- it is available for Android and IOS.
The lock is operable without the APP (can use PIN codes and RFID credentials), the APP provides
access to the Wi-Fi features. The lock and APP require a Gateway to be used to interface
between the lock-router-cloud-smartphone.
1. APP- download the TSE Home APP. Create a login. An email with a link will be sent to your
login email. To activate your account, you must click on the link within five minutes. If the
account is not activated the previous steps must be repeated. The link will activate your
account and allow you to login.
Once you have registered and log in successfully you can use the APP to pair with your Smart lock.
2. When you are ready to pair with the Gateway plug the Gateway into a wall socket. It
should be placed within range of your Wi-Fi router and a place not likely to be unplugged.
In order to pair the Gateway with the Smartphone they must be on the same Wi-Fi
connection. You will need your Wi-Fi password. The APP is not compatible with 5G networks.
Click on the upper left corner of the APP to access the menu. Click on “Gateway
Management”> “Add Gateway”> “Wi-Fi Gateway”. Your Gateway is plugged in and the
LED should be flashing- if flashing click “Next Step” on the APP- enter Wi-Fi password> “Next

YW2024 4
Step”- APP will pair with the Gateway. If the Gateway LED is not flashing- Reset the
Gateway- use a small paperclip to press and hold the reset button on the Gateway-
Gateway will beep 5 times- release the reset button and in about 10 seconds the LED will
start flashing indicating the Gateway is in search mode. You can now pair with the
Gateway.
After the Gateway is paired you can now pair with the lock.
3. Pairing with your Smart lock: Only 1 smartphone can be the administrator (paired with the
lock and Gateway), multiple smart phones can be added as users. If someone else has
paired with the Gateway and lock and they wish to turn it over to another administrator
they can unbind (disconnect) the Gateway and lock through their APP or you can reset the
lock (see- Reset Lock to Factory Default Settings) and Gateway (see this section).
Add a lock- click on the upper left on the APP to access the menu. Click on “Add Network
Connected Device”- “Gateway Door Lock”- the screen will come up to “Add Door Lock”-
press the reset button on the back of the battery tray (see page 10)- click “Add Door Lock”-
lock will pair with your Smart Phone and Gateway- name the device in your APP and click
“Completed”. The APP will go back to the home screen.
You can now unlock the lock using the APP.
See the APP for additional features of adding additional Users, codes, etc.
YW2024 5
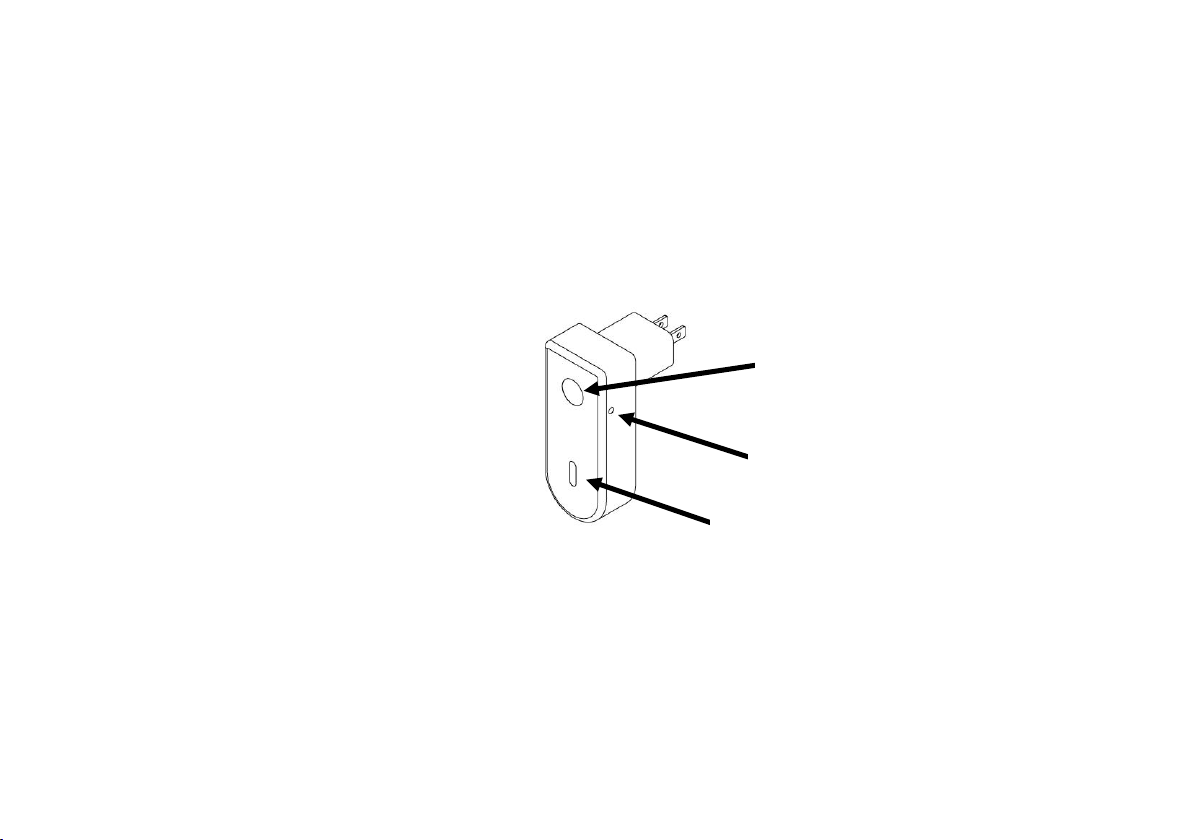
How to reset the TS Gateway
hold the reset button on the Gateway- Gateway will beep 5 times- release the reset button and in
about 10 seconds the LED will start flashing indicating the Gateway has been reset.
Pairing
Button
Reset
Button
LED

YW2024 6
FCC Statement
This device complies with part 15 of the FCC rules. Operation is subject to the following two conditions: (1) this device may not
cause harmful interference, and (2) this device must accept any interference received, including interference that may cause
undesired operation.
Changes or modifications not expressly approved by the party responsible for compliance could void the user's authority to operate
the equipment.
NOTE: This equipment has been tested and found to comply with the limits for a Class B digital device, pursuant to part 15 of the
FCC Rules. These limits are designed to provide reasonable protection against harmful interference in a residential
installation. This equipment generates uses and can radiate radio frequency energy and, if not installed and used in accordance
with the instructions, may cause harmful interference to radio communications. However, there is no guarantee that interference
will not occur in a particular installation. If this equipment does cause harmful interference to radio or television reception, which
can be determined by turning the equipment off and on, the user is encouraged to try to correct the interference by one or
more of the following measures:
1) Reorient or relocate the receiving antenna.
2) Increase the separation between the equipment and receiver.
3) Connect the equipment into an outlet on a circuit different from that to which the receiver is connected.
4) Consult the dealer or an experienced radio/TV technician for help.
This equipment complies with FCC radiation exposure limits set forth for an uncontrolled environment.
This equipment should be installed and operated with minimum distance 20cm between the radiator & your body.
This manual suits for next models
1
Table of contents


