Toyomi AFO 2525RC User manual

Ti=
PowER ninrRYER & ovEN
MODEL: AFO 2525RC
220-240V-50/60H2,
POWER: 1 370-1 650W
CAPACITY: 25L
INSTRUCTION MANUAL
INSTRUCTION MANUAL
Please read carefully and keep the instruction

IMPORTANT SAFEGUARDS
When using an electrical appliance, basic safety precautions should always be followed, including the
following:
1. Read all instructions.
2. UNPLUG FROM OUTLET WHEN NOT IN USE AND BEFORE CLEANING.
Allow to cool before cleaning or handling, putting on or taking off parts.
3. Do not touch hot surfaces. Use handles, or knobs.
4. To protect against electrical shock, do not place any part of the AirFryer
Toaster Oven in water or other liquids. See instructions for cleaning.
5. This appliance should not be used by or near children or individuals with certain disabilities.
6. Do not operate any appliance with a damaged cord or plug, or after the appliance has malfunctioned
or has been dropped or damaged in any way or is not operating properly, Return the AirFryer Toaster
Oven to the store or retailer where purchased for examination or repair, or adjustment.
7. The use of accessory attachmenls not recommended by the appliance manufacturer may cause
hazard or injury.
B. Do not use outdoors.
9. Do not let cord hang over the edge of the table or countertop, where it could be pulled on
inadvertently by children or pets, or touch hot surfaces, which could damage the cord.
10. Do not place AirFryer Toaster Oven on or near a hot gas or electric burner or in a heated oven.
11. DonotusethisAirFryerToasterOvenforanythingotherthanitsintendedpurpose.
12. Extreme caution should be exercised when using containers constructed of
materials other than metal or glass in the oven.
'13. Toavoidburns,useextremecautionwhenremovingAirFryerToasterOvenaccessoriesordisposing
of hot grease.
14. When not in use, always unplug the unit. Do notstore any materials otherthan manufacturer's
recommended oven proof accessories in this AirFryer Toaster Oven.
1 5. Do not place any of the following materials in the AirFryer Toaster Oven: paper, cardboard, plastic and
similar products.
16. DonotcoverCrumbTrayoranypartoftheovenwithmetal foil.Thiswill causeoverheatingofthe
oven.
17, Oversizefoods,metal foil packagesandutensilsmustnotbeinsertedintheAirFryerToasterOven,as
they may involve a risk of fire or electric shock.
18. AfiremayoccuriftheAirFryerToasterOveniscoveredortouchingflammablematerialssuch
as curtains, draperies or walls, when in operation.
Do not store any items on top of the appliance when in operation. Do not operate under wall cabinets,
19. Do not clean with metal scouring pads. Pieces can break off the pad and touch electrical parts,
involving a risk of electric shock.
20. Do not attempt to dislodge food when the AirFryer Toaster Oven is plugged into electrical outlet.
21 . Warning: Toavoidpossibilityoffire,NEVERleaveAirFryerToasterOvenunattendedduringuse.
22. Use recommended temperature settings for all cooking/baking, roasting and AirFrying.
i 23. Do not rest cooking utensils or baking dishes on glass door.
24. Turnthe TimerdialstotheOFFpositiontoturnofftheAirFryerToasterOven.
25. Do not operate your appliance in an appliance garage or under a wall cabinet.
When storing in an appliance garage, always unplug the unit from the electrical outlet. Not doing so
could create a risk of fire, especially if the appliance touches the walls of the garage or the door
touches the unit as it closes.

26. Extreme caution must be used when moving an appliance containing hot oil or other hot liquids.
27. To disconnect, turn Timer Dial to "off', then remove plug from wall outlet.
28. A fire may occur if the AirFryer Toaster Oven is covered or touching flammable material, including
curtains, draperies, walls, and the like, when in operation.
Do not store any item on top of the appliance when'in operation.
FEATURES AND BENEFITS
1 . Power On Light
lndicator light will turn on and remain lit when oven is in use.
2. Timer Dial
Use to set desired time for all functions including to set toast shade from light to dark. Setting the oven timer powers
the unit on and begins the cooking cycle, Wfen the timer runs out, the unit will power off.
3, Two Temperature Dials
Air Fry temperature dial use to set desired temperature while in Air Fry mode, Oven temperature dial use to set
desired temperature while in all functions except Air Fry.
4. Function Dial
Use to select cooking method- Top heater, Top heater with convection, Top & Bottom heater, Top & Bottom heater with
convection, fan, Bottom heater,airfry
5. AirFryerBasket
Use the AirFryer Basket in conjunction with the AirFry function to optimize your cooking results, The AirFryer Basket
should always be used nested in the oven rack.
6. Oven Rack
Can be used in two positions: Position 1 (bottom), Position 2 (top). Position 2 has a 50% stop feature so the rack
stops halfway out of the oven. The oven rack can be removed from Position 2 by lifting the front of the rack and
sliding it out.
7. Baking Pan
A Baking Pan is included for your convenience. Use alone when baking or roasting.
Crumb tray
Rotisserie forks
Rotisserie handle
Kebab rod
Rotisserie Basket
CONTROL PANEL
Air Fry Dial Detail Funqtion Dial Detail
a
o
10.
11.
12.
."0 a '*. clrogomt'e
- , '?' ' t" **!,+
lil
tr..-'\
./.\r=
'( 'o'.)
\'lE
-':__,/
:l

PARTS
Control panel
Door handle
4pcs Top heater
2pcs Bottom
heater
/
!
Rotisserie bar
Rotisserie bar
^ holder
-
Two yotisserie forks
Crumb tray
Rack
otisserie Skewers
Ch i p/BeaniN ut Rotisserie
ts!

\
I
BEFORE FIRST USE
Place your AirFryer Toaster Oven on a flat surface.
Before using your AirFryer Toaster Oven, move it 2 to 4 inches away from the wall or from any objects on the
countertop. Do not use on heatsensitive surfaces. /
OBJECTS SHOULD NOT BE STORED ON THE TOP OF THE OVEN. IF THEYARE, REMOVE ALL
OBJECTS BEFORE YOU TURN ON YOUR OVEN. THE EXTERIOR WALLS GET VERY HOT WHEN IN
USE. KEEP OUT OF REACH OF CHILDREN.
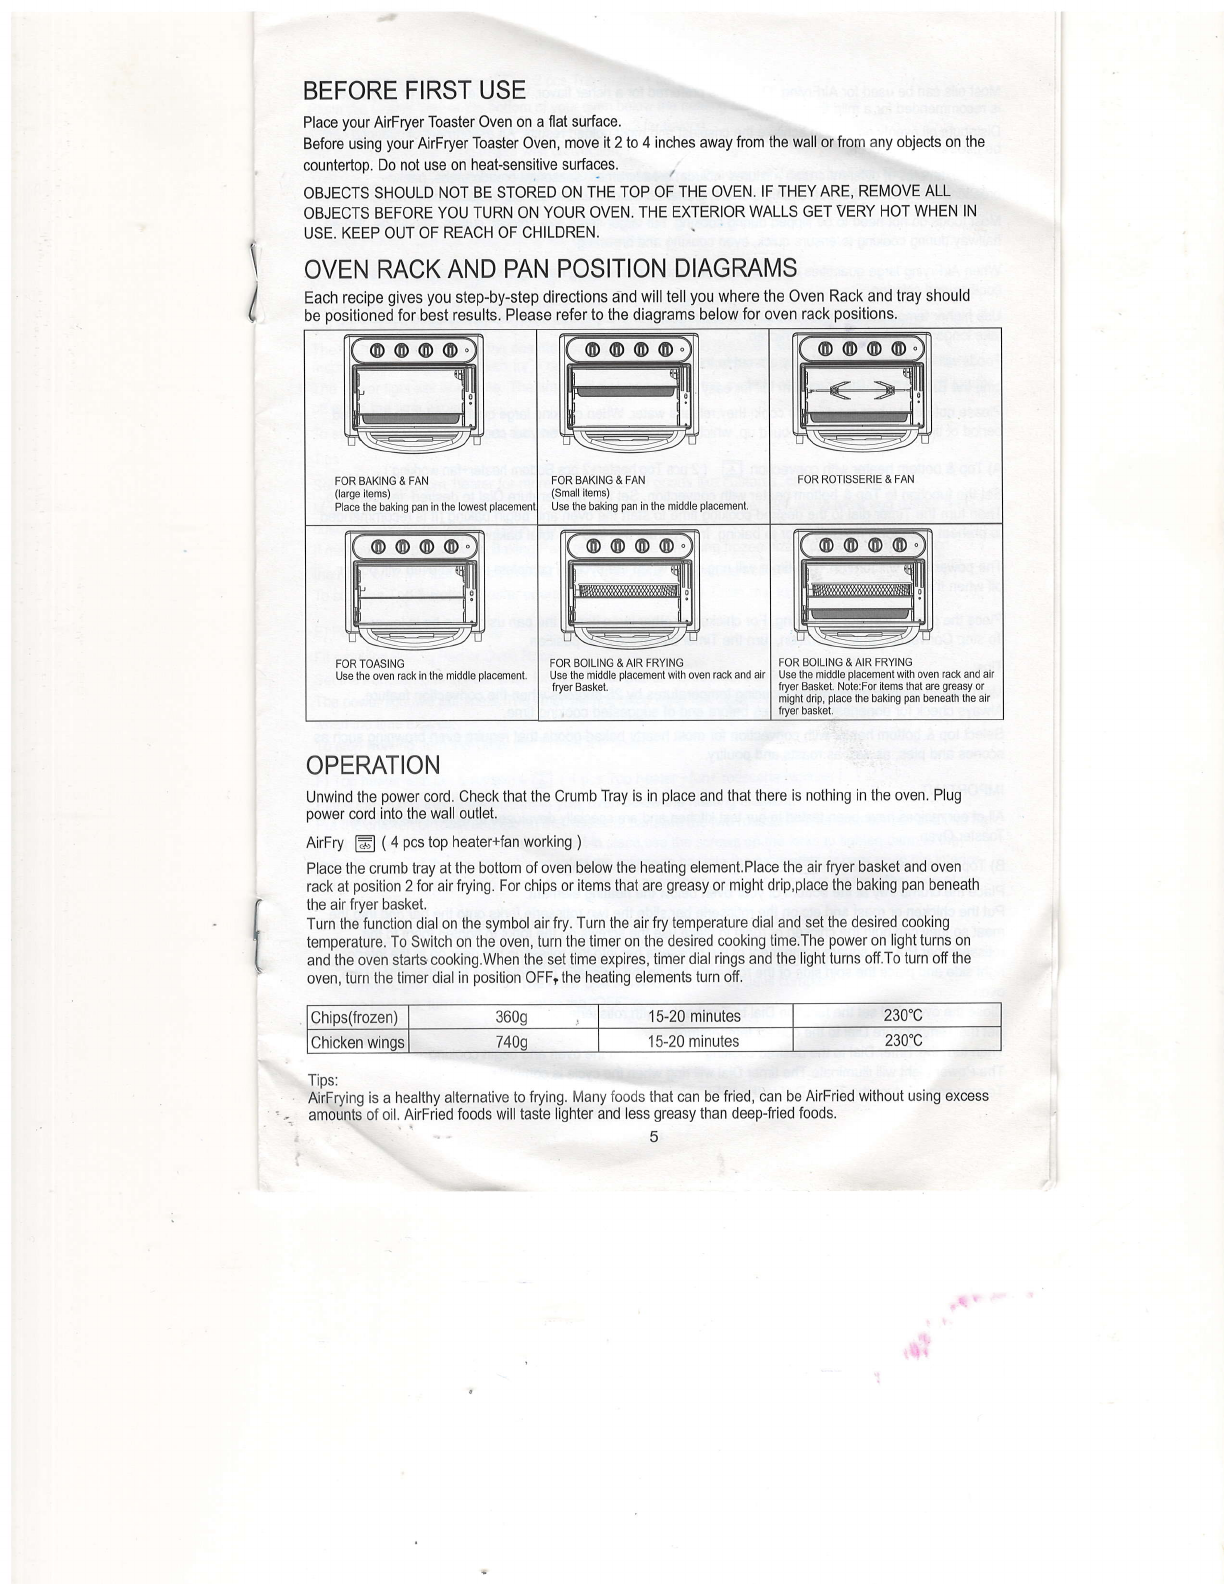
OVEN RACK AND PAN POSITION DIAGRAMS
Each recipe gives you step-by-step directions and will tell you where the Oven Rack and tray should
be positioned for best results. Please refer to the diagrams below for oven rack positions.
OPERATION
Unwind the power cord. Check that the Crumb Tray is in place and that there is nothing in the oven. Plug
power cord into the wall outlet.
AirFry @ ( 4 pcs top heater+fan working )
Place the crumb tray at the bottom of oven below the heating element.Place the air fryer basket and oven
rack at position 2 for air frying. For chips or items that are greasy or might drip,place the baking pan beneath
the air fryer basket.
Turn the function dial on the symbol air fry. Turn the air fry temperature dial and set the desired cooking
temperature. To Switch on the oven, turn the timer on the desired cooking time.The power on light turns on
and the oven starts cooking.When the set time expires, timer dial rings and the light turns off.To turn off the
oven, turn the timer dial in position OFF;the heating elements turn off.
Tips:
AirFrying is a healthy alternative to frying, Many foods that can be fried, can be AirFried without using excess
amounts of oil, AirFried foods will taste lighter and less greasy than deep-fried foods.
q
FOR BAKING & FAN
(large items)
Place the baking pan in the lowest placement
FOR BAKING & FAN
(Small items)
Use the baking pan in the middle placement.
FOR ROTISSERIE & FAN
FOR TOASING
Use the oven rack in the middle placement. FOR BOILING & AIR FRYING
Use the middle placement wilh oven rack and air
fryer Baskel.
FOR BOILING & AIR FRYING
Use lhe middle placement with oven rack and air
fryer Basket. Note:For items that are greasy or
might dilp, place lhe baking pan beneath the air
fryer basket.
Chips(frozen) 3609 15-20 minutes 230'C
Chicken winqs 740s 15-20 minutes 230"C

Most oils can be used for AirFrying. Olive oil is preferred for a richer flavor. Vegetable, canola or grapeseed oil
is recommended for a mild flavor.
Distribute oil evenly on food to achieve the crispiest and most golden results. An assortment of coatings can
be used for AirFry foods.
Some examples of different crumb mixtures include: breadcrumbs, seasoned breadcrumbs, panko
breadcrumbs, corn flakes, potato chip crumbs, graham cracker crumbs, quinoa, various flours, etc.
Most foods do not need to be flipped during cooking, but lqrger items, like chicken cutlets, should be flipped
halfway during cooking to ensure quick, even cooking and browning.
WhenAirFryinglargequantitiesoffoodthatcrowdthepan,tossfoodhalfwaythroughcookingtoensure even
cooking and coloring.
Use higher temperatures for foods that cook quickly, like and chips, and lower temperatures for foods that
take longer to cook like breaded chicken.
Foods will cook more evenly if they are cut to the same size.
Line the Baking Tray with aluminum foil for easy cleanup.
Please note that when most foods cook, they release water. When cooking large quantities for an extended
period of time, condensation may build up, which could leave moisture on your countertop.
A) Top & bottom heater with convection E ( Z pcs Top heater+2 pcs Bottom heater+fan working )
SetthefunctiontoTop&bottomheaterwithconvection.SettheTemperatureDial todesired temperature.
Then turn the Timer dial to the desired cooking time to start the oven and begin baking (lt is recommended
to preheat oven for 5 minutes priorto baking. lncorporate this into the total baking time).
The power light will turn on. The timer will ring once when the cycle is complete and the oven will power
off when the time expires.
Place the pan in high slot for baking. For chicken or other large items, the pan using can be in lower slot.
To stop Convection Bake operation, turn the Timerdial tothe OFF position.
Tips:
Most baking recipes recommend reducing temperatures by 25 degrees when the convection feature.
Always check for doneness 10 minutes before end of suggested cooking time.
Select top & bottom heaterwith convection for most hearty baked goods that require even browning such as
scones and pies, as well as roasts and poultry.
IIVPORTANT
All of our recipes have been tested in our tesl kitchen and are specially developed to work in the AirFryer
Toaster Oven.
B) Top heater with rotisserie Sl( 2 pcs top heater + rotisserie working )
Place the crumb tray at the bottom of your oven below the heating element
Put the chicken or roast and etc on the rotisserie bar,slide the two rotisserie forks onto the bar and into the
meat so they can hold the chicken or roast in place,use the screws on the forks to tighten them to the
rotisserie bar.Put the square component of the rotisserie bar into the rotisserie bar gear on to the interior
right side and place the spin side of.the rotisserie bar on the rotisserie bar holder on the other side of the
oven.
Close the oven and set the function Dial to Top heater with rotisserie.
Set the Temperature Dial to the correct temperature.
Then turn the Timer Dial to the desired cooking time to turn on the oven and begin cooking.
The Power Light will illuminate.The timer Dial will ring when the cycle is complete.
To stop cooking,turn the Timer Dial to the'OFF" position.

C) Up heater with convection[ ( 2 pcs Top heater + fan working )
Place the Crumb Tray at the bottom of your oven below the heating element'
Place the baking pan at either position 1 or position 2 for baking.
Set the Function Dial to up heater with convection.
Then turn the Timer dial to the desired cooking time to turn on the oven and begin broiling. The power light
will illuminate. The timer will ring once when the cycle is complete and the oven will power off when the time
expires.
To stop broiling, turn the Timer dial to the OFF position,
D) Top & Bottom heaterfl( 2 pcs Top heater+2 pcs Bottom heater working )
Fit provided Baking Pan or Oven Rack into either rack position.
Set the Function Dial to Top & Bottom heater. Set the Temperature Dial to desired temperature.
Then turn the Timer dial to the desired cooking time to turn on the oven and begin baking (lt is
recommended to preheat oven for 5 minutes plior to baking. lncorporate this into the total baking time).
The power light will illuminate. The timer will ring once when the cycle is complete and the oven will power
off when the time exPires.
To stop baking, turn the Timer dial to the OFF position.
Tips:
Select Top & Bottom heater for more delicate baked goods like custards, cakes and eggs.
Most baked goods, as well as larger items, are baked in rack on lower slot, while most egg dishes and
custards should be baked in rack on higher slot.
lf making fresh pizza, place Baking Pan on lower slot. If making frozenpizza,placepizza directly on
the rack on lower slot. For chicken or other large items, the pan can be on lower slot.
To stop the Top & Bottom heater operation, turn the ON/Oven Timer dial to the OFF position.
E) Fan lrl (only fan working)
Fit provided Baking Pan or Oven Rack
Set the Function Dial to Fan. Then turn the Timer Dial to the deslred working time to start the oven.
The power light will illuminate. The timer will ring once when the cycle is complete and the oven will power off
when the time expires.
To stop working, turn the Timer dial to the OFF position,
F) Top heater with fan & rotisserie E] ( 4 pcs Top heater +fan+ rotisserie working )
Place the crumb tray at the bottom of your oven below the heating element'
put the chicken or roast and etc on the rotisserie bar,slide the two rotisserie forks onto the bar and into the
meat so they can hold the chicken or roast in place,use the screws on the forks to tighten them to the
rotisserie bar.Put the square component of the rotisserie bar into the rotisserie bar gear on to the interior
right side and place the spin side of the rotisserie bar on the rotisserie bar holder on the other side of the
oven,
Close the oven and set the function Dial to Top heater with fan &rotisserie'
Set the Temperature Dial to the correct temperature.
, Then turn the Timer Dial to the desired cooking time to turn on ihe oven and begin cooking.
The Power Light will illuminate. The tinrer Dial will ring when the cycle is complete.
To stop cooking, turn the Timer Dial to the "OFF" position.

CLEANING AND MAINTENANCE
Always allow thti oven to cool completely before cleaning.
Always unplug the oven from the electrical outlet.
Do not use'abrasive cleaners, as they will damage the finish. Simply wipe the exterior with a clean, damp
cloth and dry thoroughly. Apply the cleansing agent to a cfoth, not direcily onto the toaster oven, before '
cleaning.
To clean interior walls, use a damp cloth and a mild liquid soap solution or a spray solution on a sponge.
Never use harsh abrasives or corrosive products. These couli damage the oven iurface. Never use steel
wool pads, etc., on interior of oven.
oven Rack, Baking Pan, AirFryer Basket,Rotisserie forks and crumb rray should be hand-washed in
hot, sudsy water or use a nylon scouring pad or nylon brush.
After cooking greasy foods and after your oven has cooled, always clean top interior of oven. lf this is done
on a regular basis, your oven will perform like new Removing the grease will help to keep toasting consistent,
cycle after cycle.
To remove crumbs, slide out the Orumb Tray and discard crumbs. Wipe clean and replace. To remove baked-
9n grga:e, soak the tray in hot, sudsy water or use nonabrasive cleaners. Never operate the oven without the
Crumb Tray in place.
Never wrap the cord around the outside of the oven. Use the cord storage cleats on the back of the oven.
Any other servicing should be performed by an authorized service representative.
SERVICE & IMPORTANT NOTICE
olf the supply cord is damaged, it must be replaced by the manufacturer or its
service agent or a similarity qualified person in order to avoid a hazatd.
'WARNING: This appliance is not intended for use by persons (including
children) with reduce phyiical, sensory or mentalcapabilities, or lack of
experience and knowledge, . unless they have been given supervision or
instruction concerning use of the appliance by a person responsible for their
safety.
Table of contents