TP active fun Forest Villa TP363 Quick guide

IMPORTANT
These instructions must be followe for safe assembly an use.
Please retain for future reference.
TOY MUST BE ASSEMBLED BY AN ADULT BEFORE USE.
CHILDREN MUST NOT USE THE EQUIPMENT UNTIL PROPERLY INSTALLED.
THIS PRODUCT CONTAINS SMALL PARTS AND IS NOT SUITABLE FOR CHILDREN UNDER 36
MONTHS UNTIL FULLY ASSEMBLED.
REMOVE ALL PACKAGING BEFORE GIVING TO YOUR CHILDREN.
ONLY FOR DOMESTIC USE. FOR OUTDOOR USE. ADULT SUPERVISION IS REQUIRED.
THIS PRODUCT IS INTENDED FOR USE BY CHILDREN FROM AGES 18 MONTHS TO 6 YEARS.
MAXIMUM COMBINED USER WEIGHT 50KGS
WARNING
INSTRUCTIONS FOR ASSEMBLY MAINTENANCE AND USE
PLEASE RETAIN FOR FUTURE REFERENCE.
TP363
TP Forest Villa
Assembly
Build
Age
18 mths+ - 6 yrs
Single user weight - 30kgs
Maximum combined
user weight - 50kgs
Colours may vary.
Flowers not inclu e .
This pro uct has been
pre-treate so no
treatment is require before
use outsi e.
It is necessary to renew the
treatment annually to maintain
the protective properties.
This pro uct is not
waterproof.
IMPORTANT
WARNING
TP363 Fo est Villa IN0363 Issue B 16.03.17.qxp_TP363 Fo est Villa IN0363 Issue B 16.03.17 16/03/2017 12:11 Page 1
GB
INSTRUCTIONS FOR ASSEMBLY, MAINTENANCE AND USE OF TP TOYS
Please read carefully and keep all enclosed information or future reference.
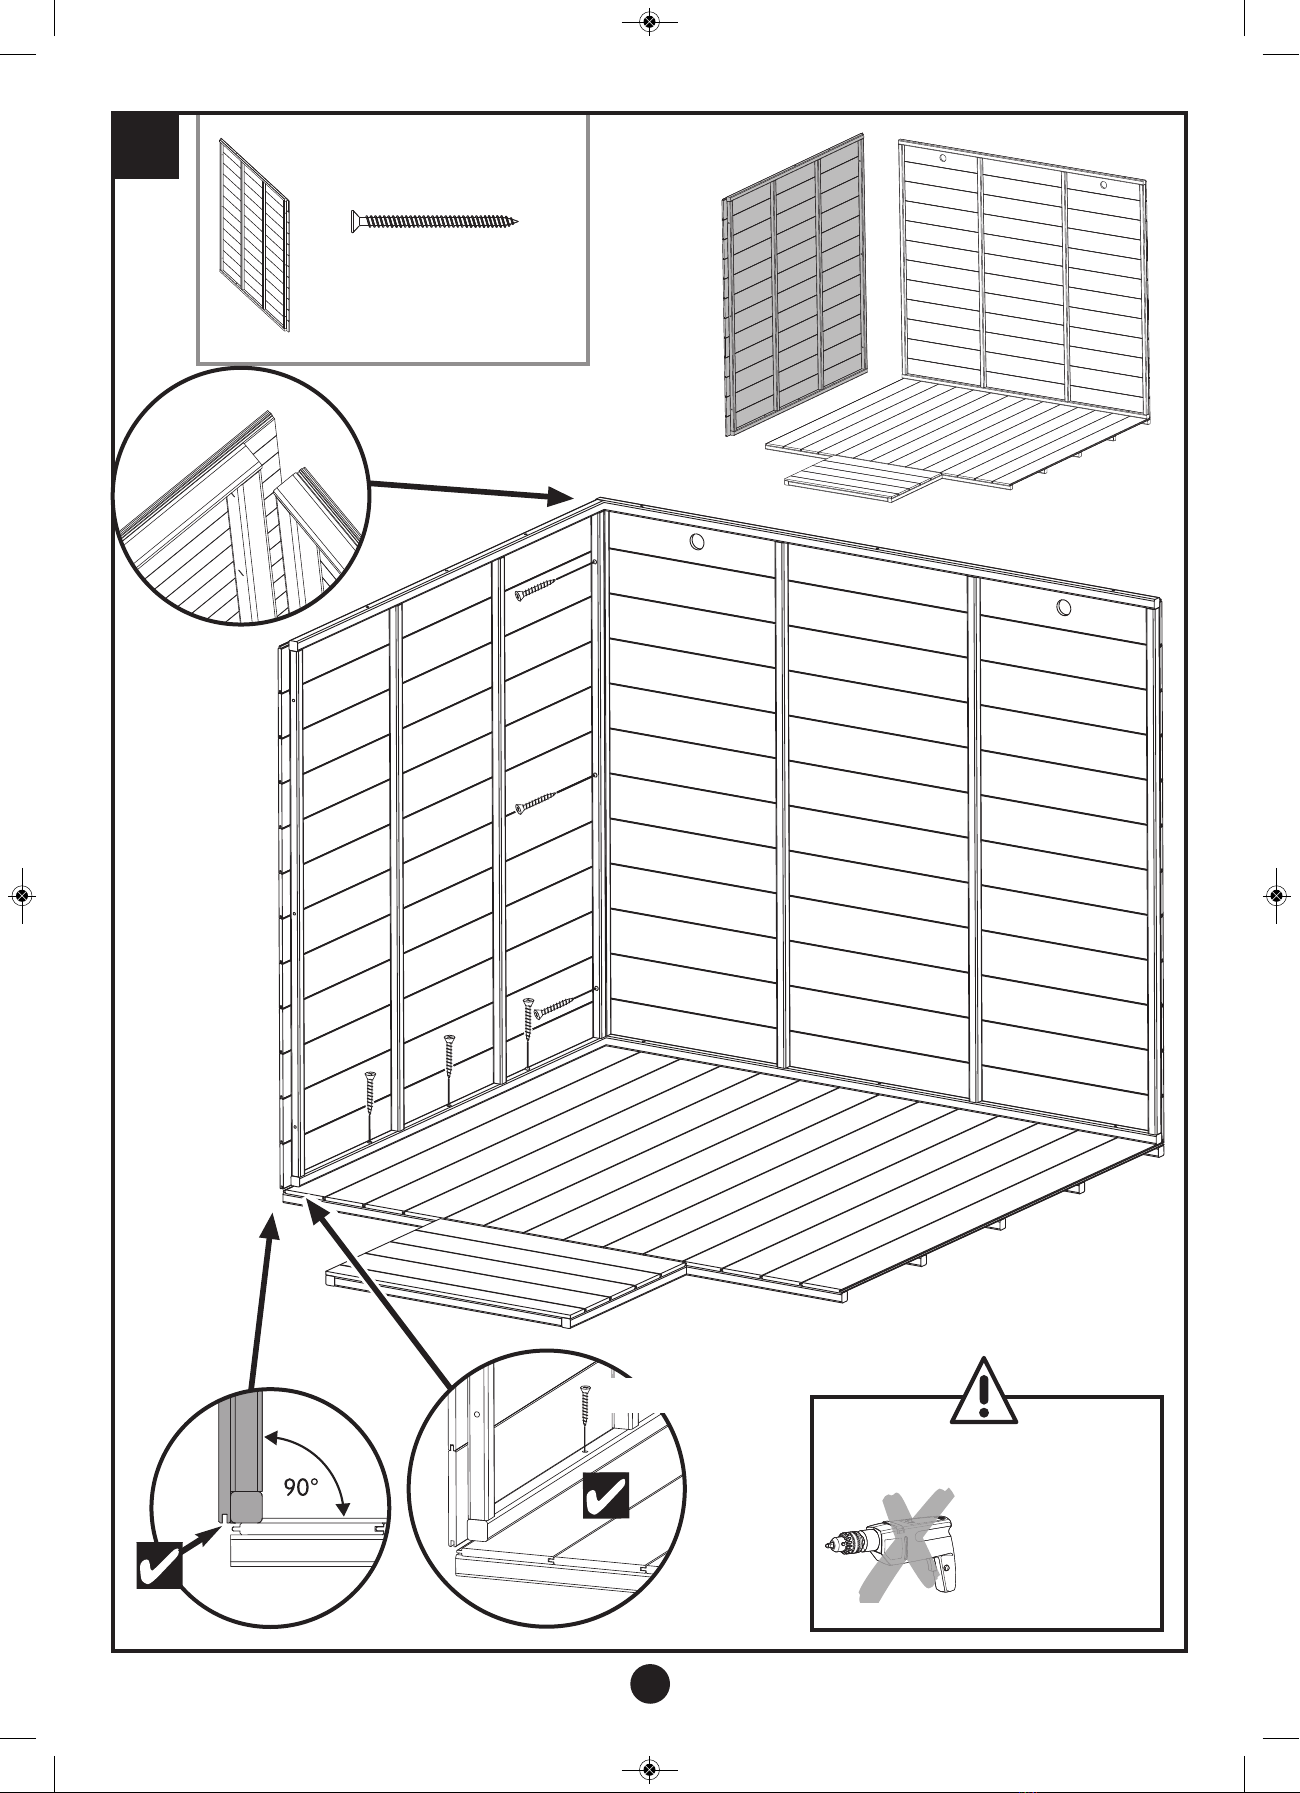
1. ASSEMBLY AND SAFETY INFORMATION
This TP product must be assembled before use by an adult/adults.
This product is made from natural European pinewood that has been pre-treated, so no additional treatment required
before use outside. It is necessary to renew the protective treatment annually.
Woo is a natural pro uct so it will have knots, splits an an imperfections. This is to be anticipate an oes not in icate
the pro uct is faulty. Woo will also change over time with changes in the weather an atmospheric con itions. Splits will
open up an close again. It may warp an twist slightly. Again this is to be expecte an oes not affect the performance of
the pro uct.
The TP pro uct must be erecte exactly in accor ance with the assembly instructions. Enlisting the ai of a helper will make
assembly easier. In or er to ensure the correct tensions an to ease assembly, it is important to assemble the pro uct han
tight to begin with. Only when complete, shoul the fastenings be fully tightene an checke . This pack may contain small
parts an is not suitable for chil ren un er 36 months until fully assemble . We recommen that you place small parts on a
tray, or something similar, to prevent the frustration an isappointment of mislaying them. Please take care uring
assembly as the manufacturing process can sometimes result in the occasional sharp e ge an small pieces of waste
metalwork. Shoul there be any missing parts, the toy must not be use until replacement parts have been fitte - contact
the TP Customer Services: Email: [email protected]
2. SITING
Un er no circumstances shoul this TP pro uct be positione on har surface such as concrete or asphalt, unless the
groun un er the toy plus the recommen e freespace area is covere with a safety surface (please refer to iagram on
page 5). Examples of suitable surfaces are grass, san or a play surface inten e for this use. TP toys shoul be site on
level groun .
3. USAGE
The toy is esigne an ma e for family out oor omestic use only. Misuse can result in injury to the chil or amage to the
pro uct.
4. SUPERVISION
Chil ren shoul always be supervise while they are playing on TP toys an shoul be instructe not to use the toy in an
inappropriate or hazar ous manner. We recommen that they o not wear loose-fitting clothing or jewellery that may catch
or snag uring play. Chil ren shoul not wear cycle helmets while playing on TP toys.
5. WEATHER CONDITIONS
Special care shoul be taken as weather con itions change. In particular, out oor toys can become slippery in wet weather
an tongues an lips can stick to metalwork at subzero temperatures. In warmer an sunnier weather, parts can become
hot, an the temperature shoul be regularly checke uring play, especially metal parts an sli es. If there is any oubt
over safety then the toys shoul not be use . We recommen that you check the pro uct in relationship to the orientation of
the activity toy (e.g. swings) in relation to its exposure to the sun. Pro uct may become hot!
6. MAINTENANCE
With all toys it is vital that the equipment is checke regularly an often by an a ult. The complete toy shoul be checke at
least once a month, an particular attention shoul be pai to connections an fastenings. If any parts exhibit signs of wear
an tear, they may nee to be replace . Check all nuts an bolts an screws for tightness an tighten when require .
Failure to o this may result in the pro uct malfunctioning an causing injury. Chil ren must not be allowe to use the toy
until properly installe an checke .
Please protect your pro uct with a annual application of environmentally frien ly/chil frien ly treatment or as
recommen e in the manufacturer’s instructions.
7. FIRE RISKS AND DISPOSAL
Do not place this pro uct near a fire. When it becomes necessary to ispose of your equipment, remove all bolts/screws
an isassemble. Store out of the reach of chil ren until it can be properly ispose of.
These instructions are issue in the interest of chil safety, an we o ask you to follow our a vice.
2
TP Forest Villa
TP363 Fo est Villa IN0363 Issue B 16.03.17.qxp_TP363 Fo est Villa IN0363 Issue B 16.03.17 16/03/2017 12:11 Page 2

Instruction Guide
10 20 30 40 50 60 70 80 90 100 110 120 130 140 150
Read Instructions Before Starting Hidden Lines
Sort Fixings
Sort Parts
For assembly advice, email [email protected] or call 01525 722769 (office hours).
3
TP Forest Villa
TP363 Fo est Villa IN0363 Issue B 16.03.17.qxp_TP363 Fo est Villa IN0363 Issue B 16.03.17 16/03/2017 12:11 Page 3
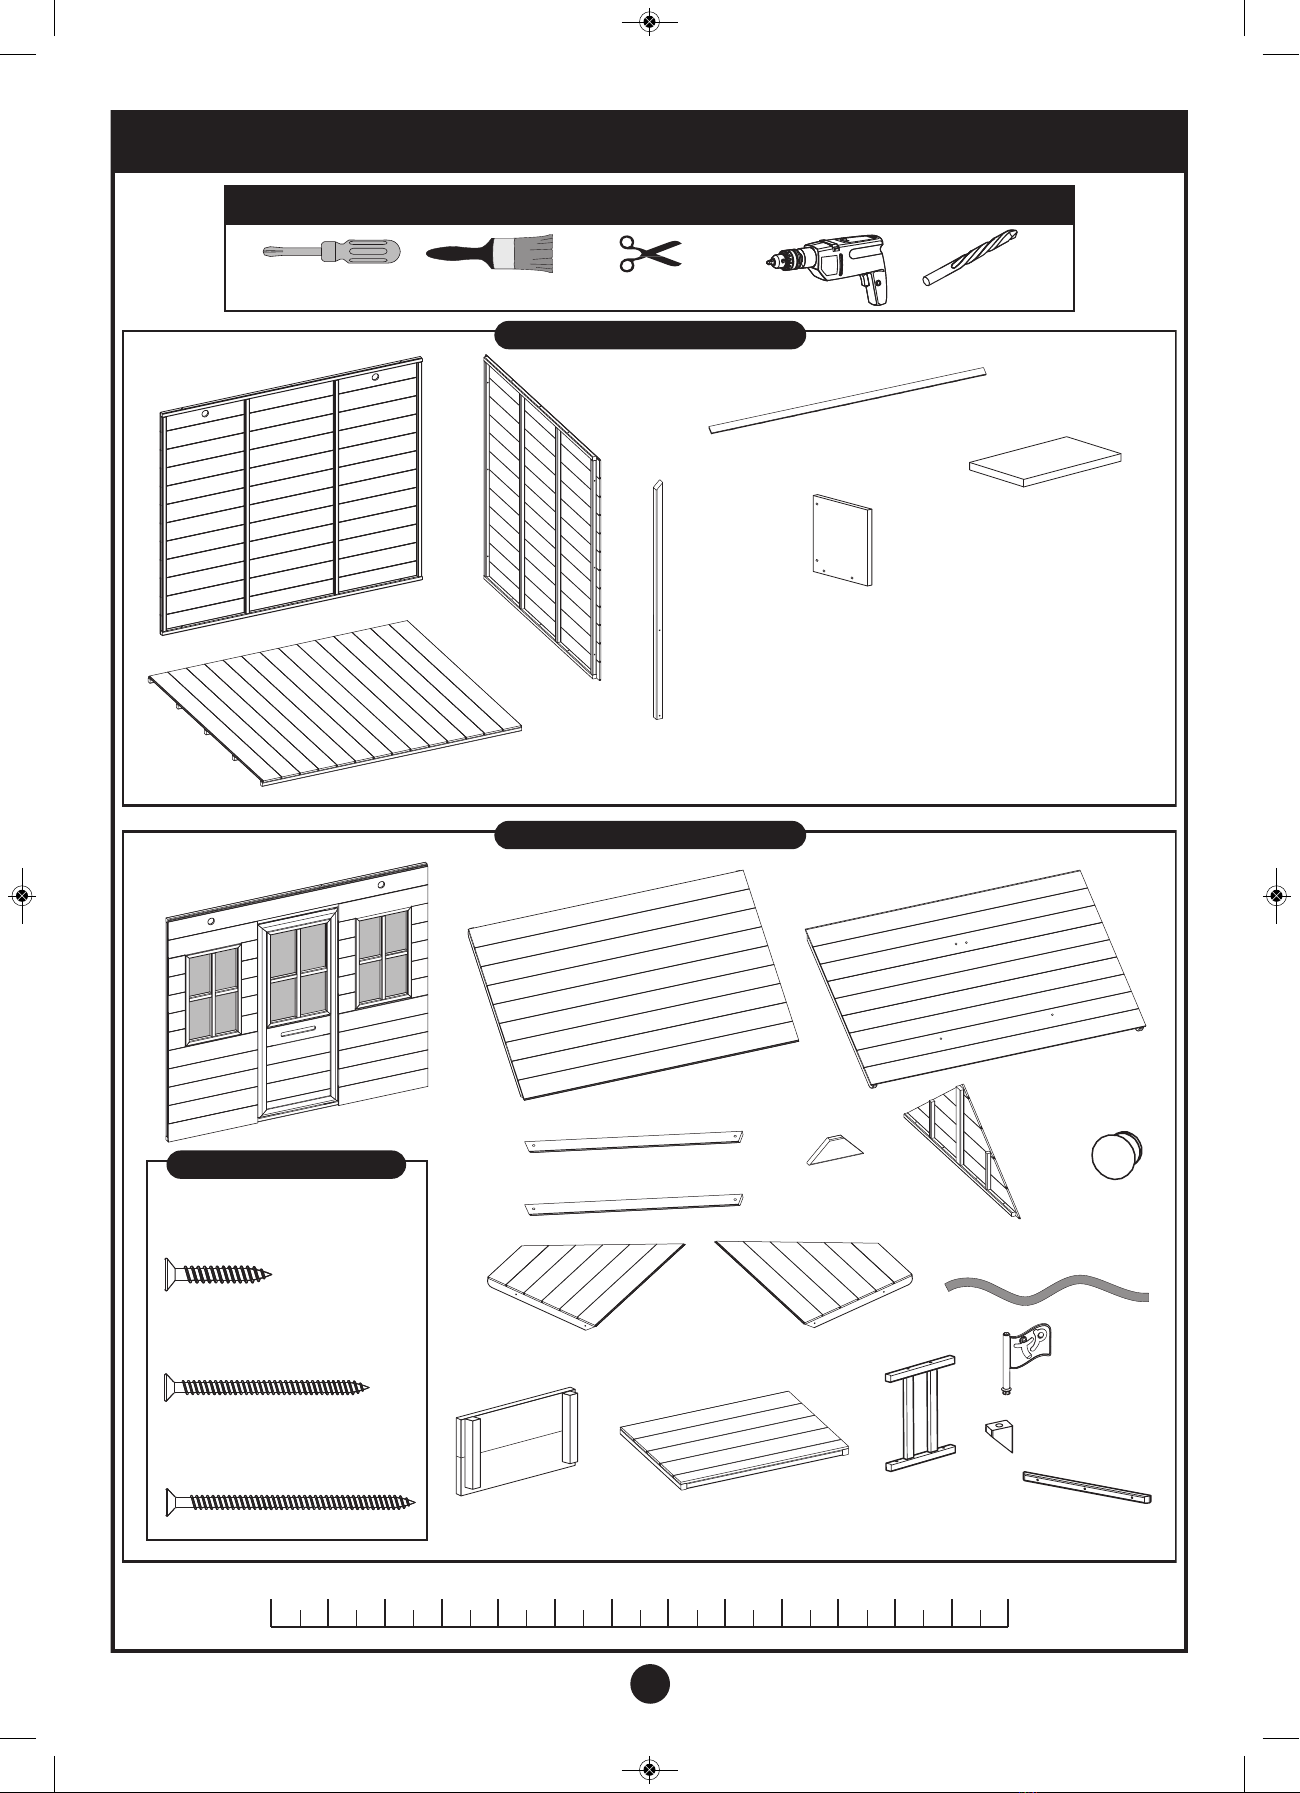
Contents - Please check
Screw river
Tools - You will need:
10 20 30 40 50 60 70 80 90 100 110 120 130mm
Paint Brush
Si e Panel x2
WP1039P
Roof Panel - Porch x1
WP1040P
Ri ge Strip x2
MW1047P
Floor Panel x1
WP1033P
Front Panel x1
WP1037P
Roof Panel x1
WP1036P
Roof Panel x1
WP1035P
Ri ge Strip LH x1
MW1049P
Ri ge Strip RH x1
MW1048P
Chimney Block x1
MW1050P
Flag x1
PM1007
Planter Front x2
WP1043P
Porch Floor x1
WP1042P
Balcony Panel
x2
WP1006P
Planter Si e x4
MW1044P Planter Floor x2
MW1045P
Ri ge Support x1
MW1051P
Back Panel x1
WP1034P
Balcony Support
Upright x2
MW1046P
Gable En x2
WP1002P
Pack 1
Pack 2
Roof Panel - Porch x1
WP1041P
Subpack - SP0444
3.5mm x 40mm Woo screw x63
FA4522
3.5mm x 50mm Woo screw x15
FA4534
Power
Screw river 2mm
Drill Bit
3.5mm x 30mm Woo screw x22
FA4526
Scissors
Plastic Ri ge Strip x2
Door Batton x2
MW2116
Door Knob x1
DK2117P
4
TP Forest Villa
TP363 Fo est Villa IN0363 Issue B 16.03.17.qxp_TP363 Fo est Villa IN0363 Issue B 16.03.17 16/03/2017 12:11 Page 4
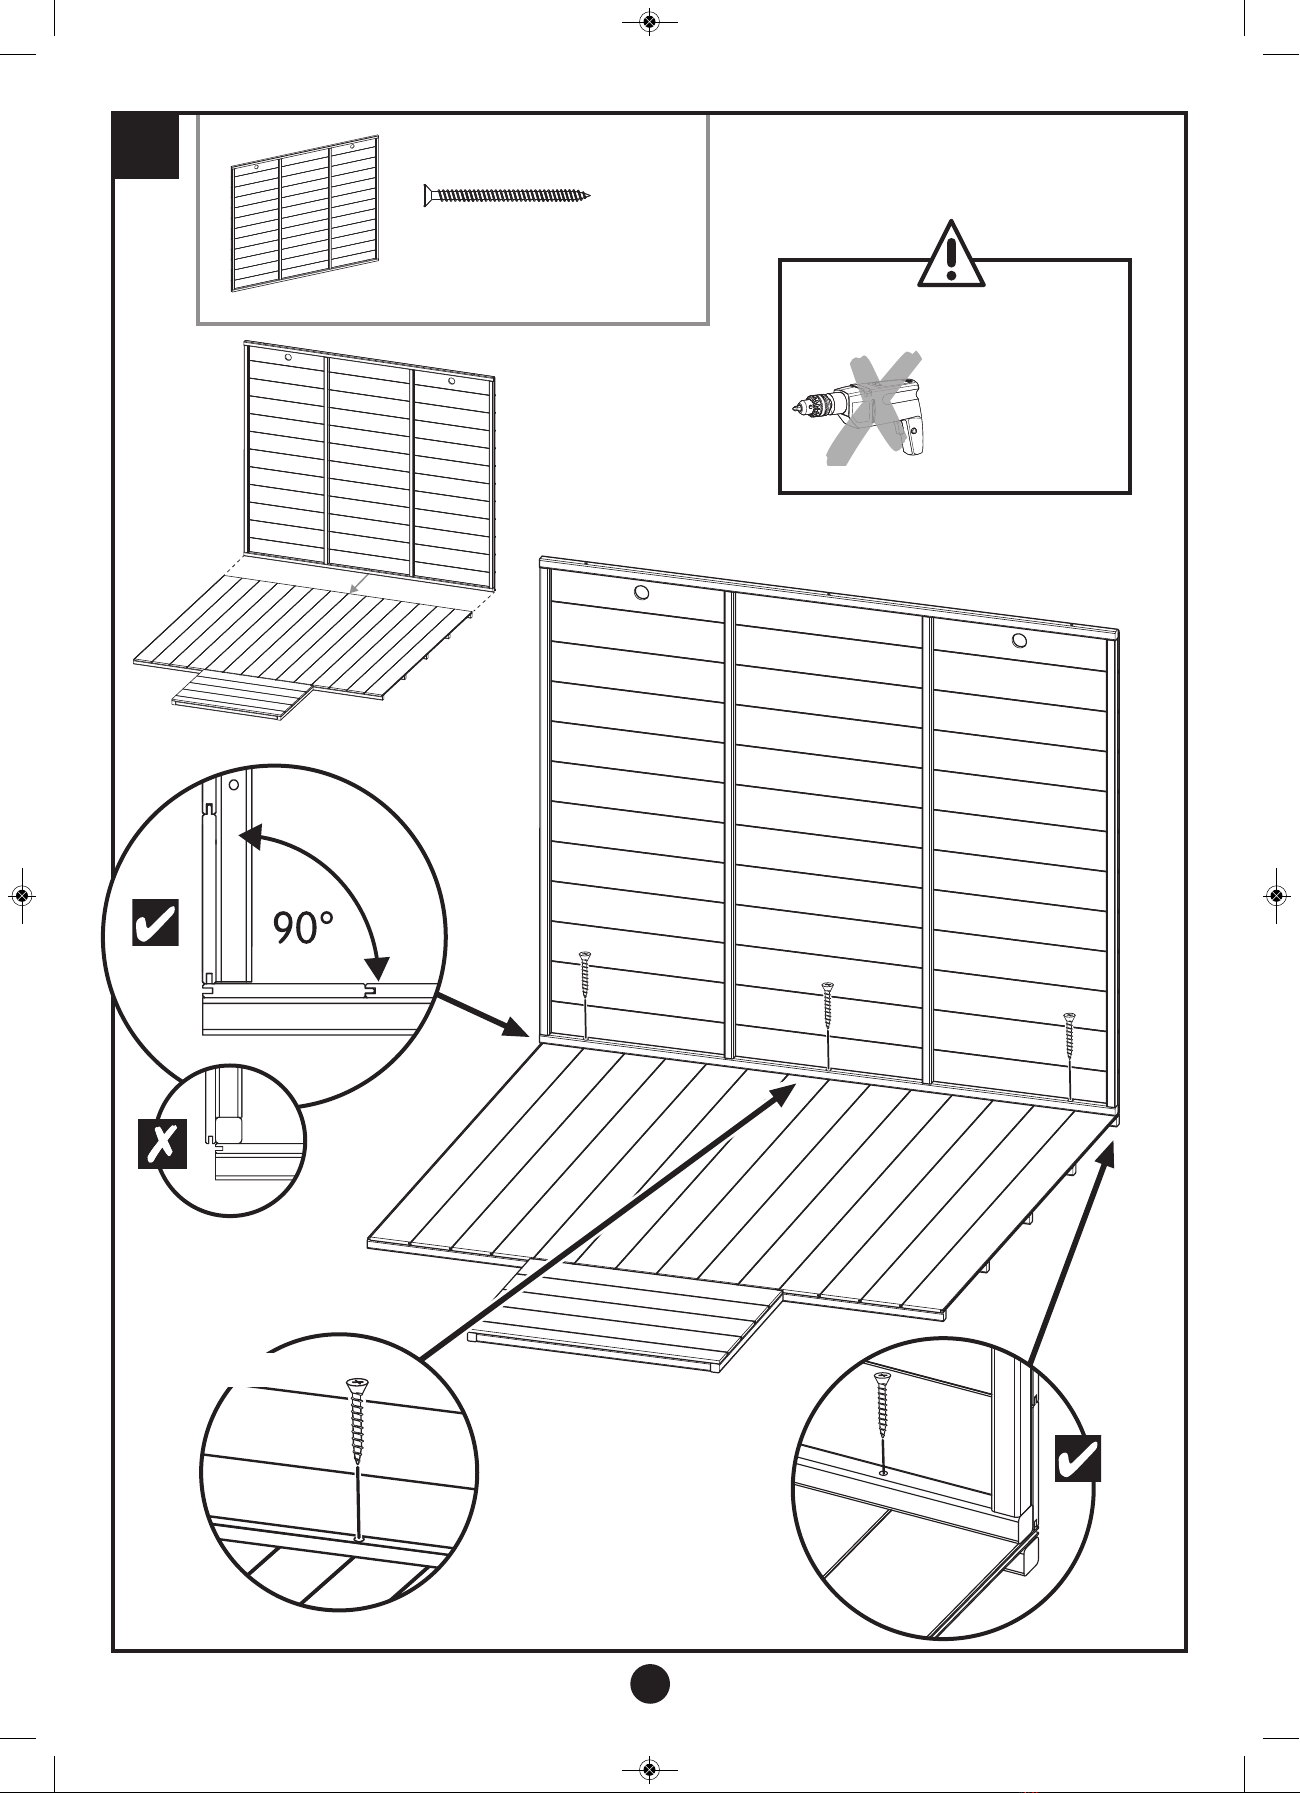
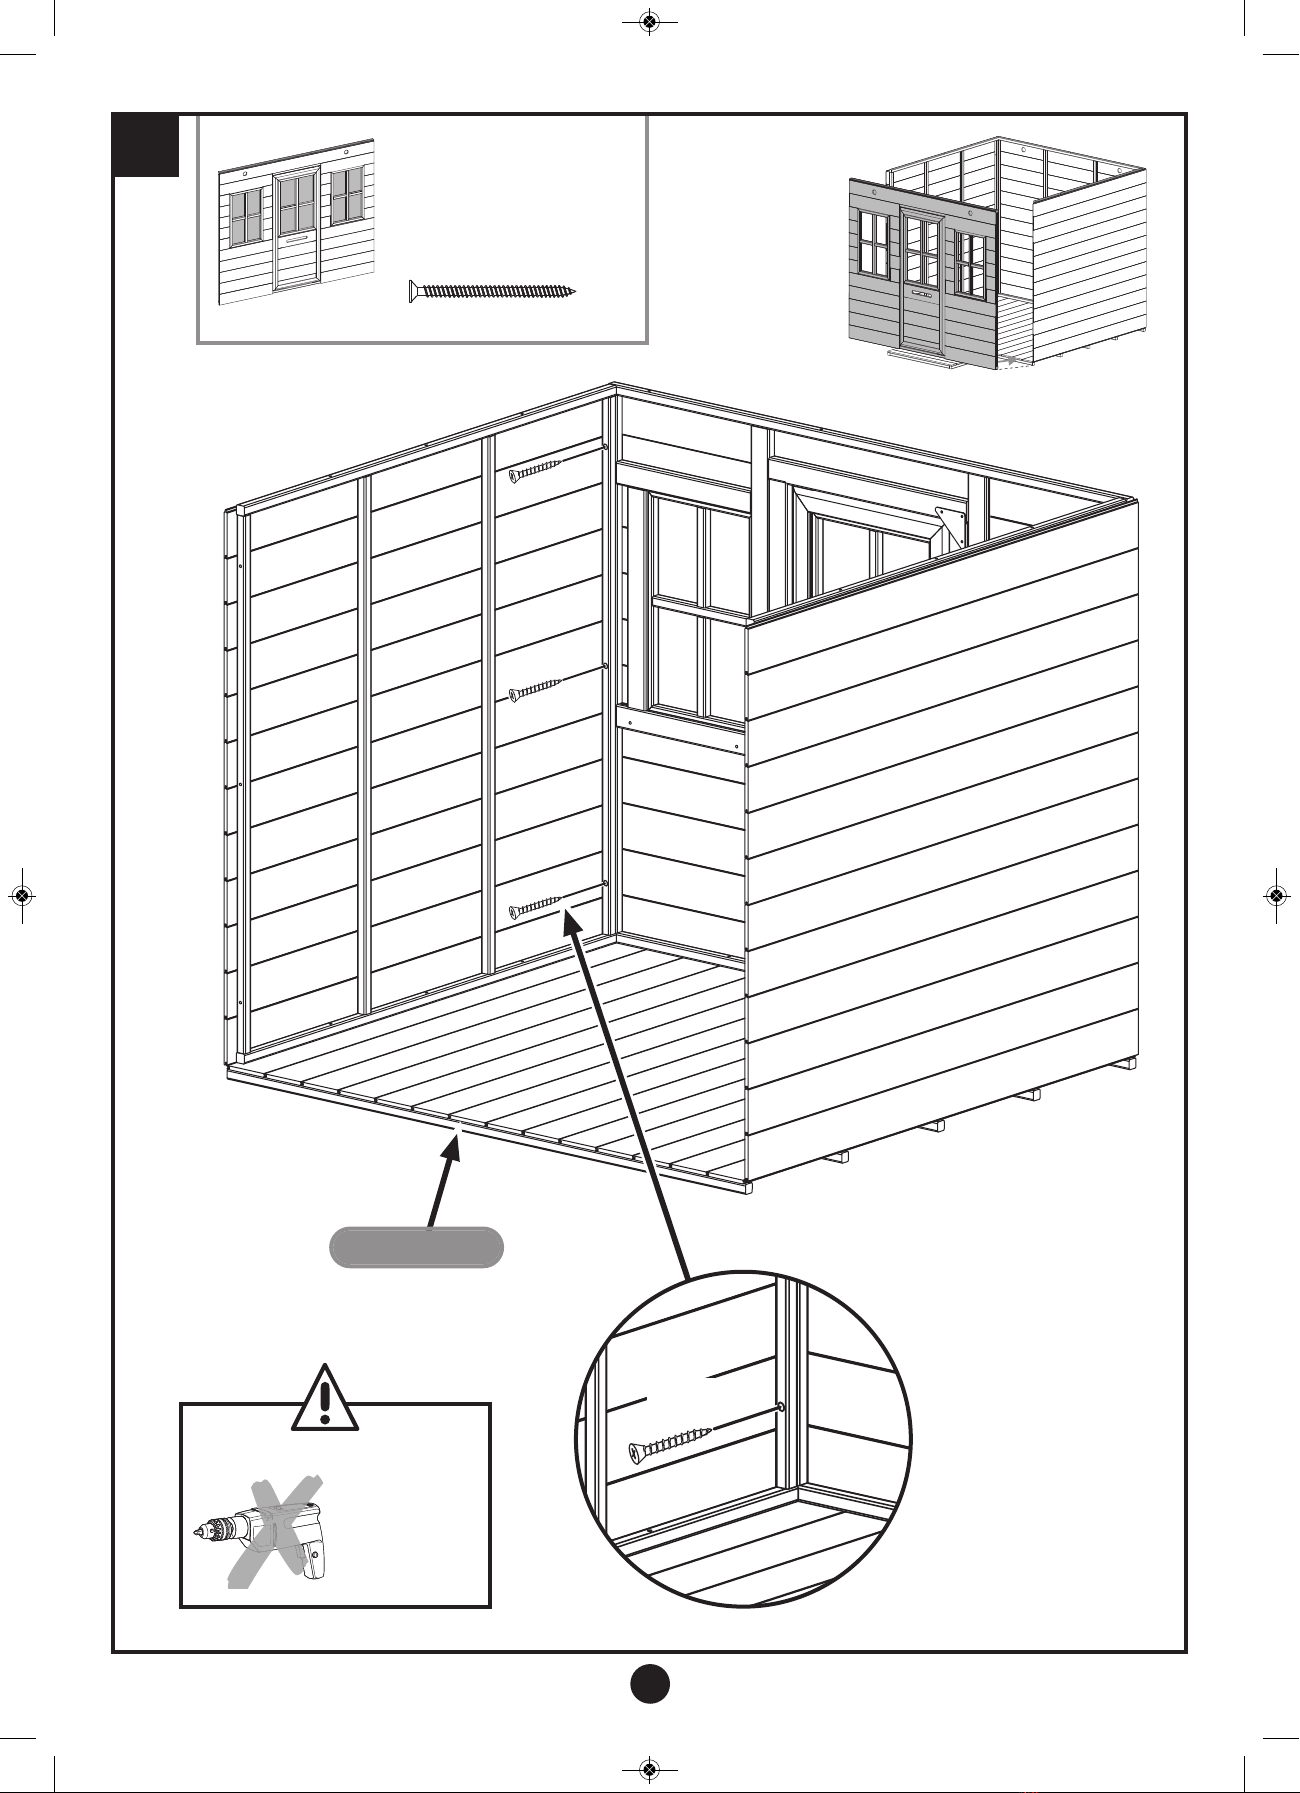
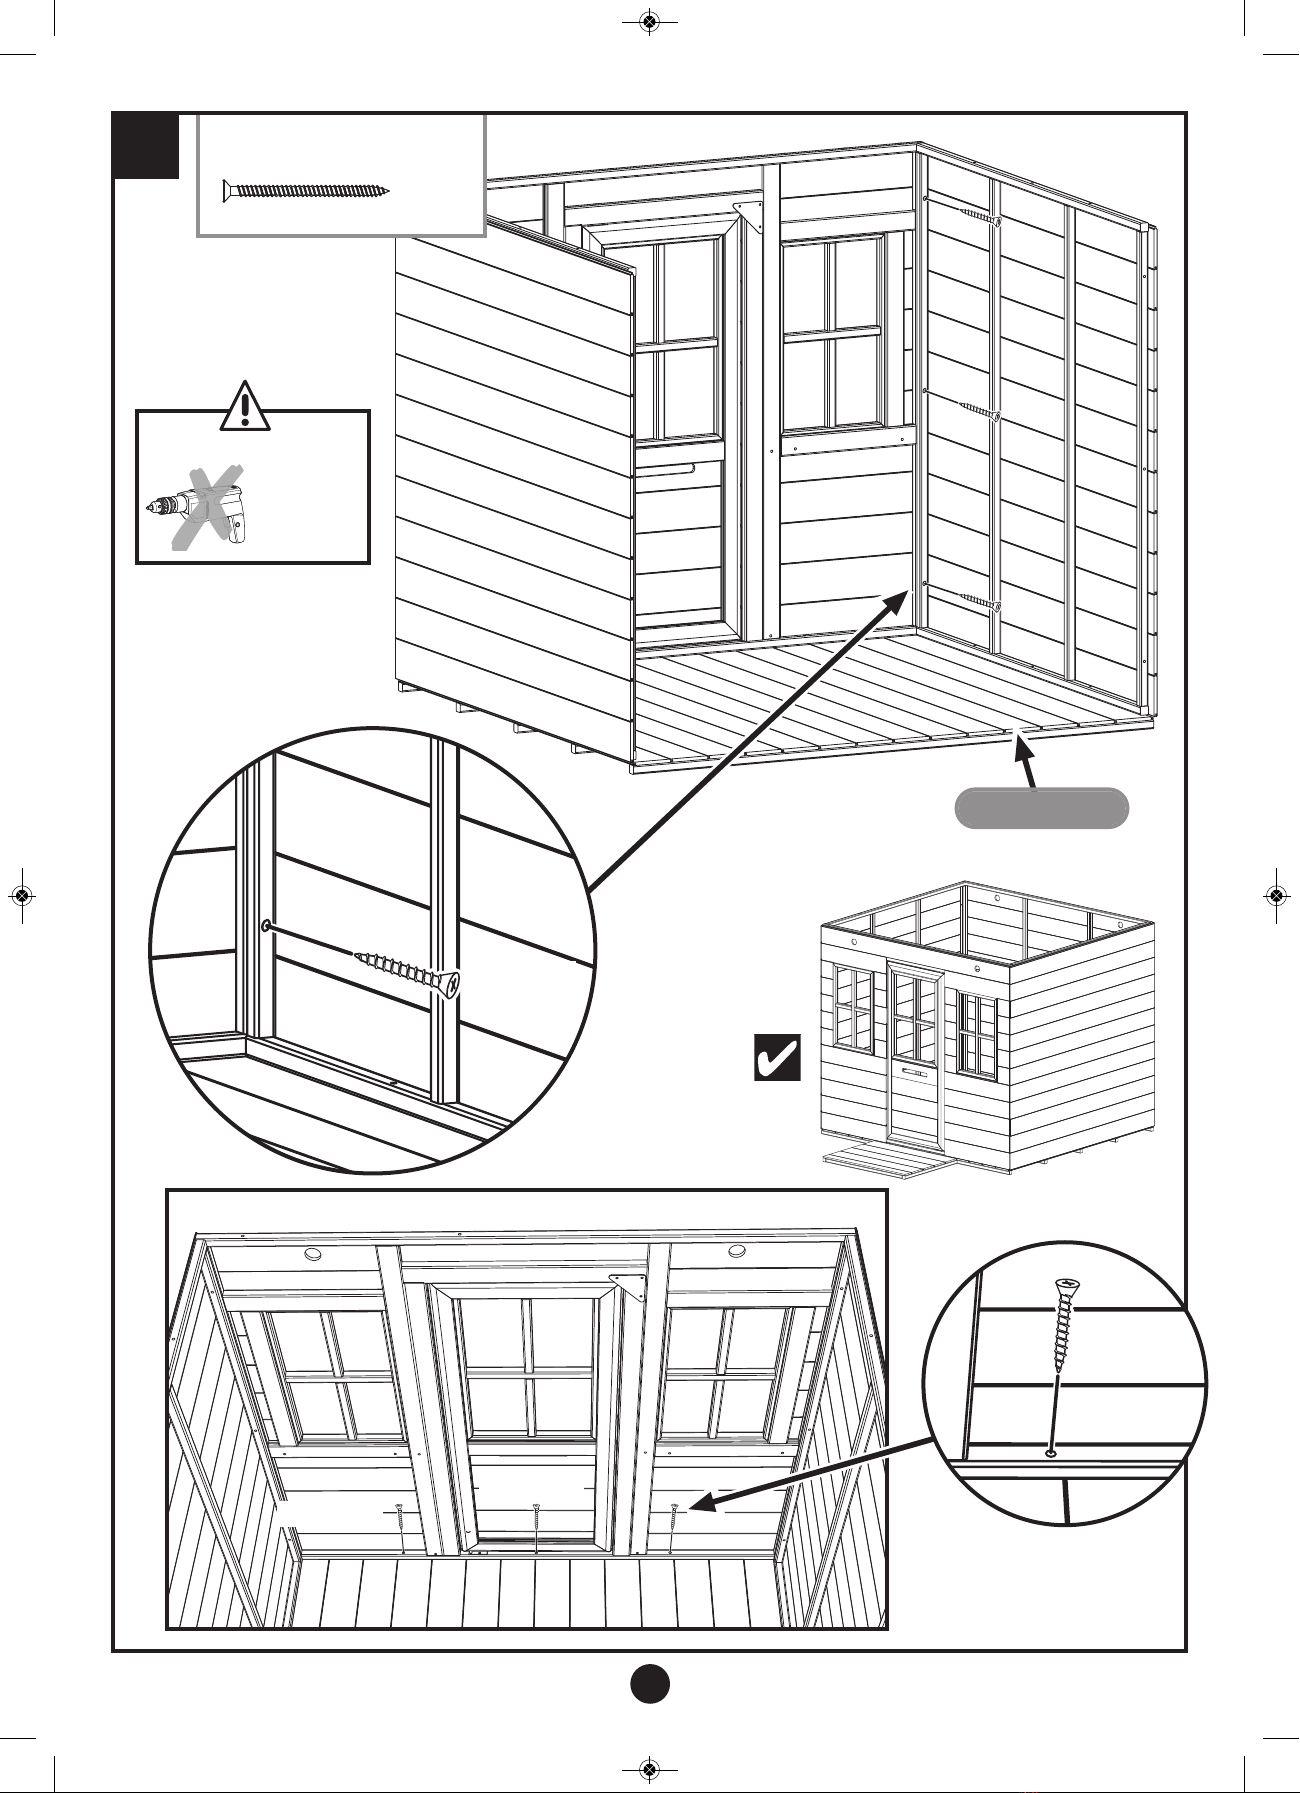
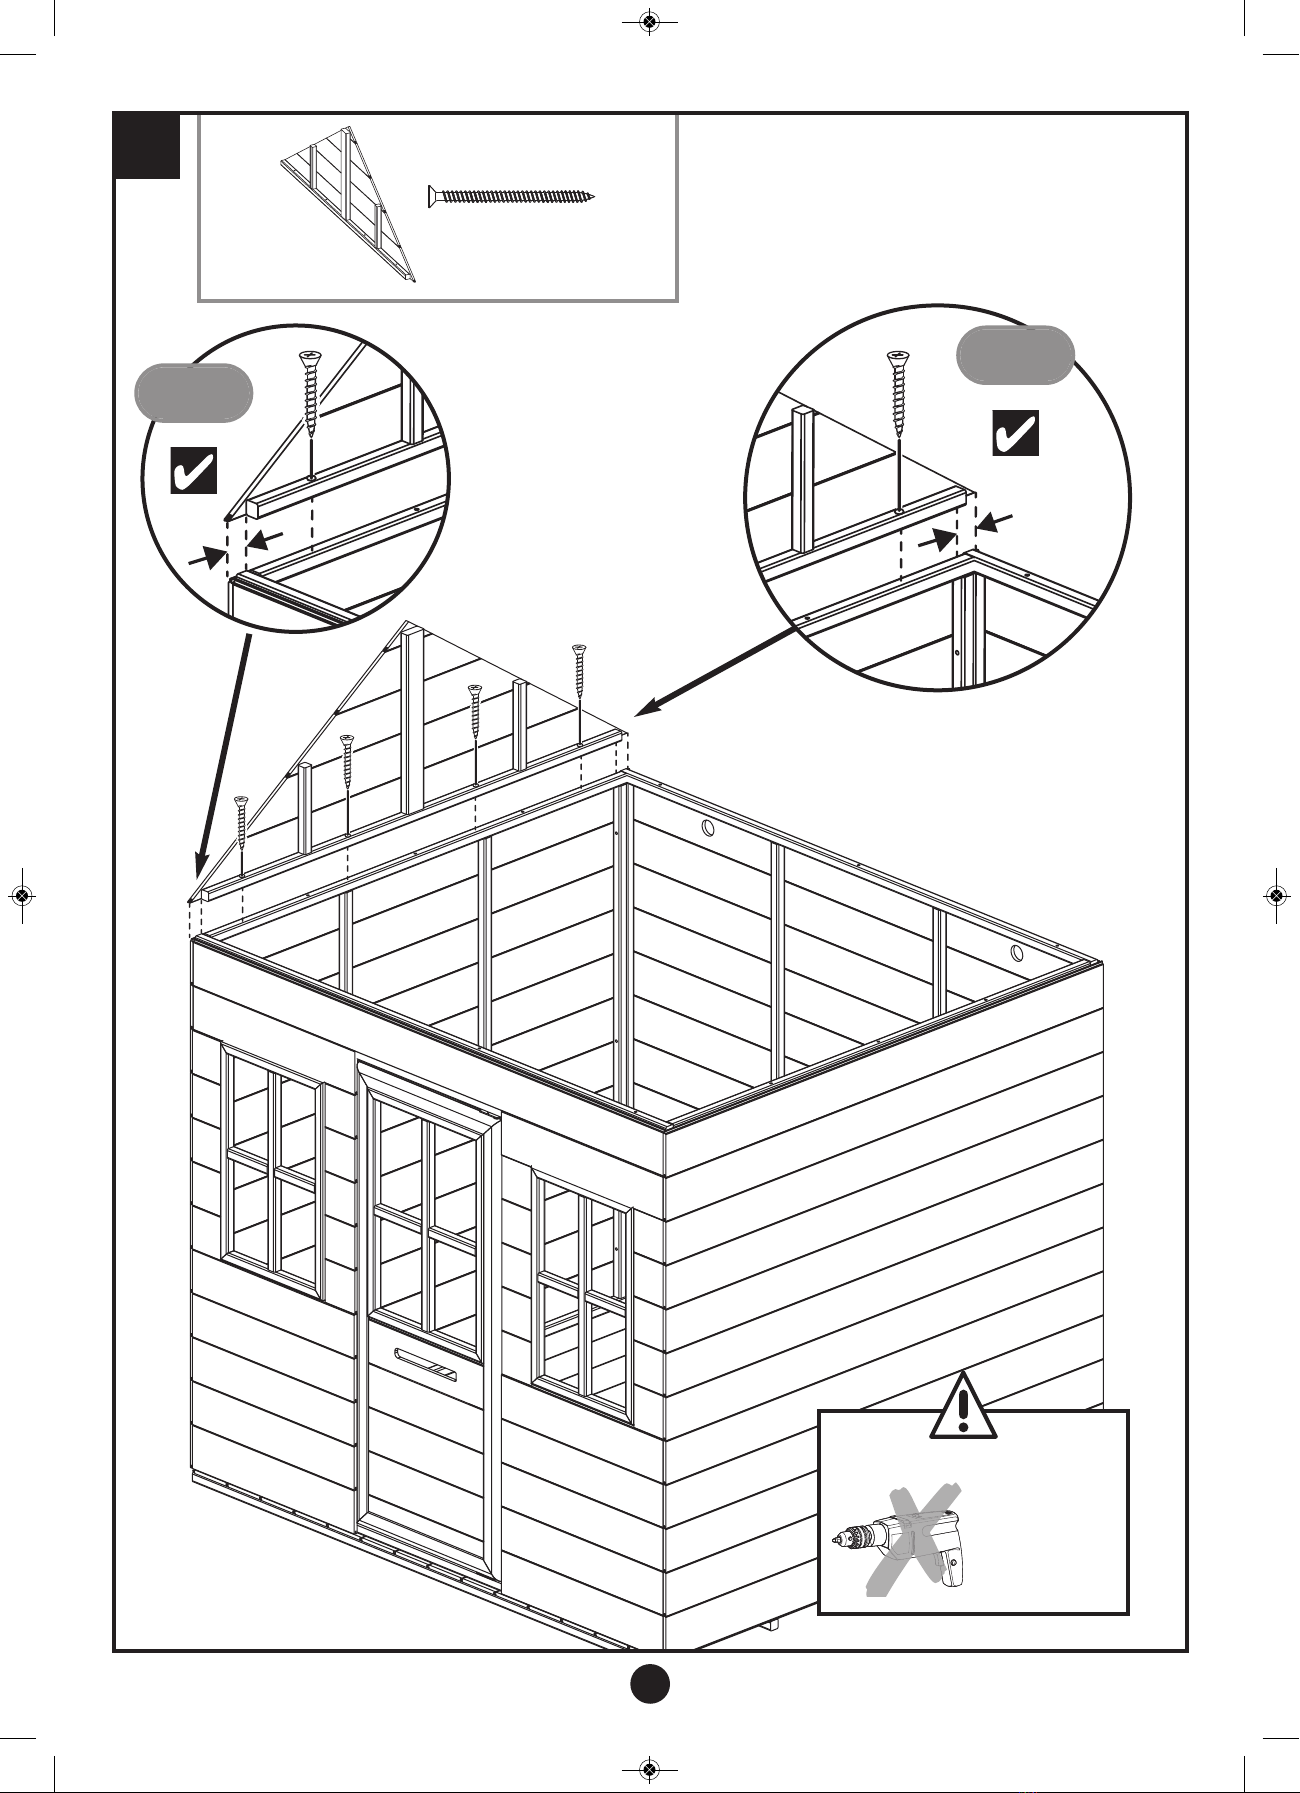
Do not use Power tools with
any screws
Excessive force can
crack/split this product.
Hand tighten only
IMPORTANT - Assembly Tip
1
Stage
IMPORTANT WARNING
Power tools can be used
when drilling Pilot holes only
Excessive force can
crack/split this product.
This pro uct has been pre-treate so no treatment is require
before use outsi e.
It is necessary to renew the treatment annually to maintain the protective properties.
This pro uct is not waterproof.
WARNING - All fixings WARNING - Pilot Holes
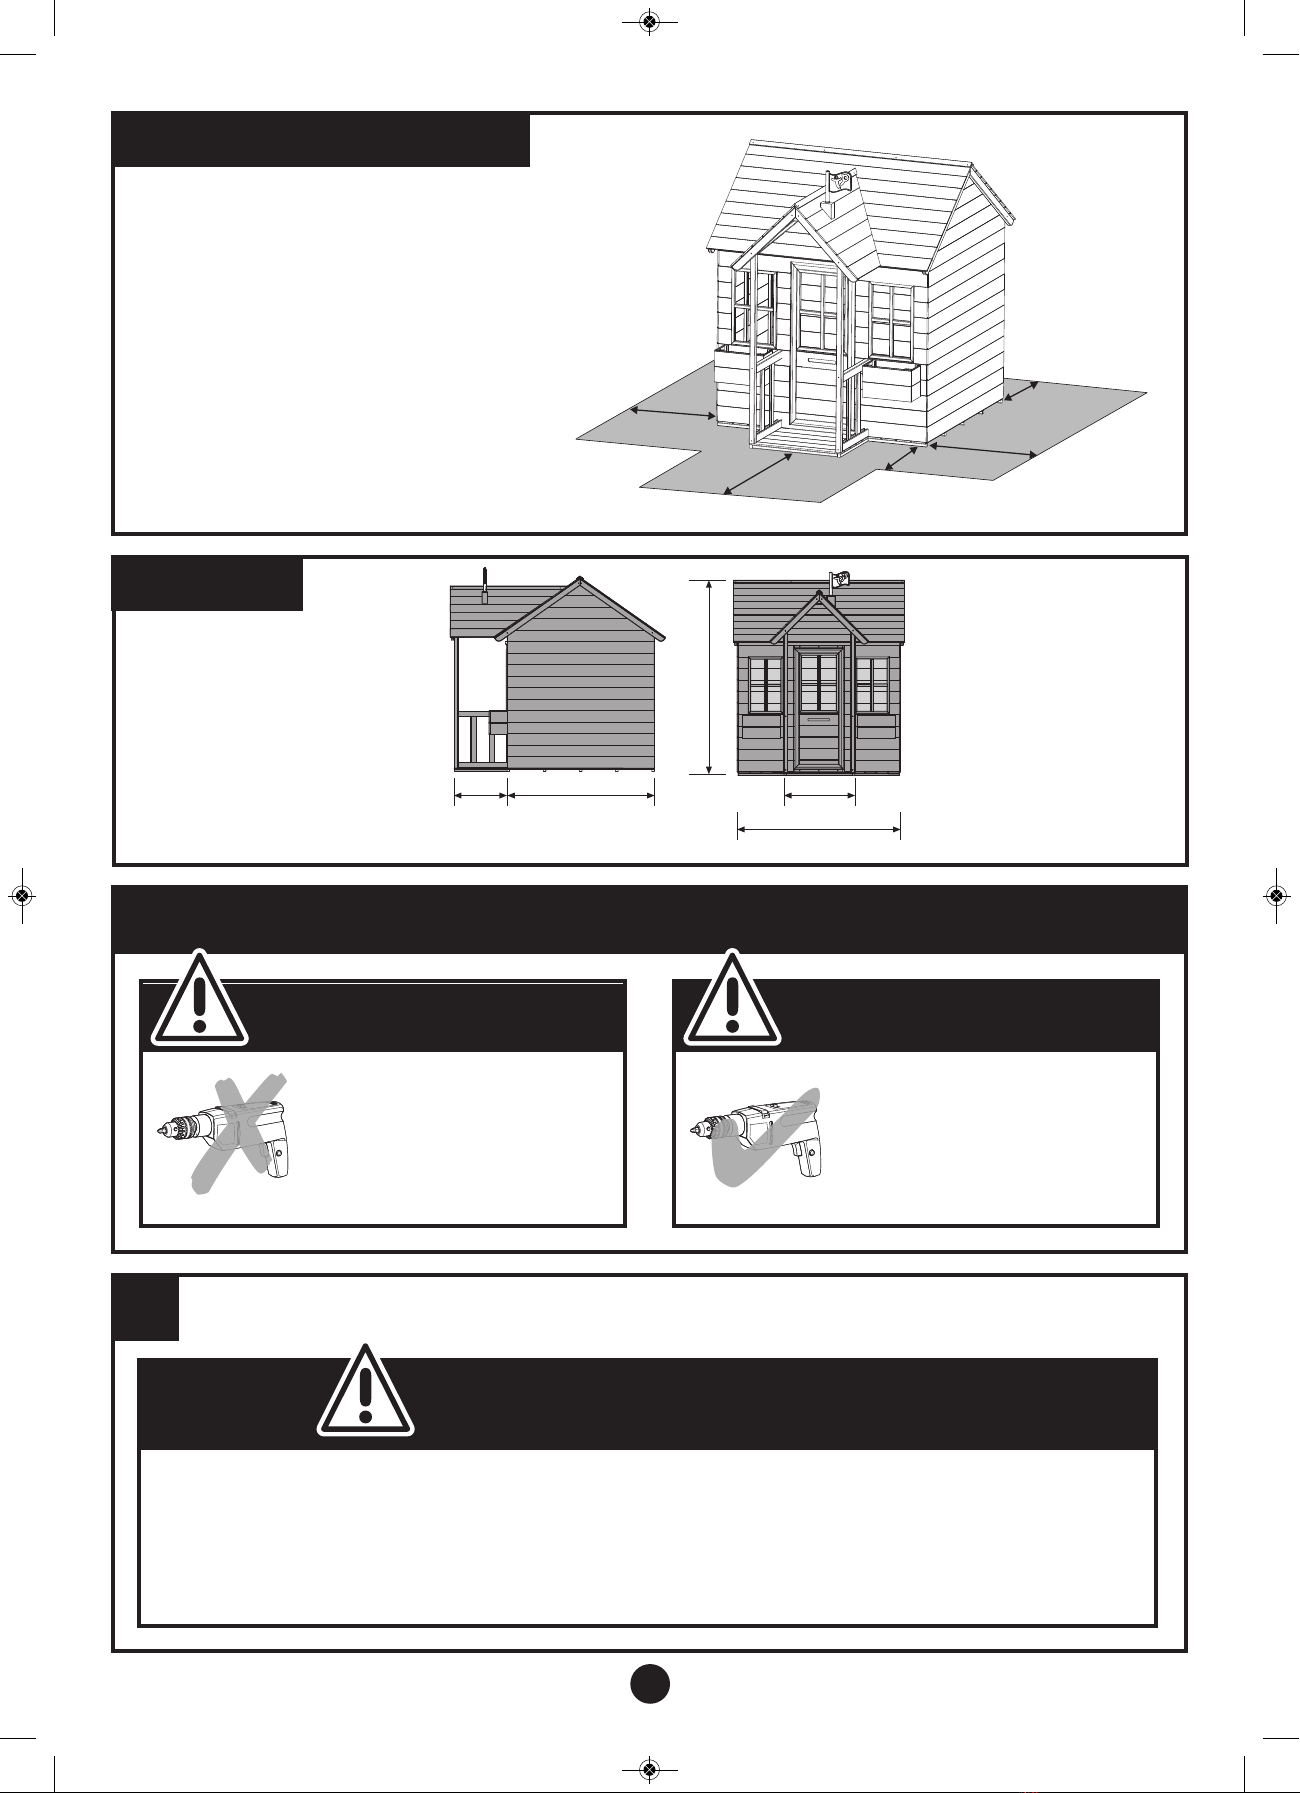
Dimensions
154cm
56cm
162.5cm
116.5cm42cm
2m
2m
2m
2m
Recommended Free Space:
The Safe Play Area refers to the zone
extening 200cm (2 metres) beyon the toy
on all sies an 250cm
(2.5 metres) above the toy. The Safe Play
Area must be free from all structures,
lanscaping, trees an branches, rocks,
wires, sprinkler heas an other similar
obstacles to safe play. Chilren can be
seriously injure running or colliing into
such obstacles.
Freespace/Safe Play Diagram
5
TP Forest Villa
TP363 Fo est Villa IN0363 Issue B 16.03.17.qxp_TP363 Fo est Villa IN0363 Issue B 16.03.17 16/03/2017 12:11 Page 5

Floor Panel x1
WP1033P
3
Stage 3.5 x 40mm Woo screw x2
FA4522
360mm
360mm
Porch Floor x1
WP1042P
2
Stage
Balcony
Panel x2
WP1006
Balcony Support
Upright x2
MW1046P
3.5 x 50mm Woo screw x4
FA4534
X2
X2
WARNING - All fixings
Do not use
Power tools
Excessive force can
crack/split
this product.
Hand tighten only
6
TP Forest Villa
TP363 Fo est Villa IN0363 Issue B 16.03.17.qxp_TP363 Fo est Villa IN0363 Issue B 16.03.17 16/03/2017 12:11 Page 6
4
Stage
WP1034P
3.5 x 40mm Woo screw x3
FA4522
WARNING - All fixings
Do not use
Power tools
Excessive force can
crack/split
this product.
Hand tighten only
WP1033P
3.5 x 40mm
WP1034P
WP1033P
Back Panel x1
WP1034P
7
TP Forest Villa
TP363 Fo est Villa IN0363 Issue B 16.03.17.qxp_TP363 Fo est Villa IN0363 Issue B 16.03.17 16/03/2017 12:11 Page 7
5
Stage
3.5 x 40mm Woo screw x6
FA4522
WP1039P
WARNING - All fixings
Do not use
Power tools
Excessive force can
crack/split
this product.
Hand tighten only
3.5 x 40mm
WP1039P
Si e Panel x1
WP1039P
8
TP Forest Villa
TP363 Fo est Villa IN0363 Issue B 16.03.17.qxp_TP363 Fo est Villa IN0363 Issue B 16.03.17 16/03/2017 12:11 Page 8

6
Stage
3.5 x 40mm Woo screw x6
FA4522
WP1039P
WARNING - All fixings
Do not use
Power tools
Excessive force
can crack/split
this product
WP1039P
3.5 x 40mm
Si e Panel x1
WP1039P
3.5 x 40mm
9
TP Forest Villa
TP363 Fo est Villa IN0363 Issue B 16.03.17.qxp_TP363 Fo est Villa IN0363 Issue B 16.03.17 16/03/2017 12:11 Page 9
7
Stage
3.5 x 40mm Woo screw x3
FA4522
3.5 x 40mm
WARNING - All fixings
Do not use
Power tools
Excessive force
can crack/split
this product
ASSEMBLY TIP
Do not remove
Back panel
WP1037P
WP1037P
Front Panel x1
WP1037P
10
TP Forest Villa
TP363 Fo est Villa IN0363 Issue B 16.03.17.qxp_TP363 Fo est Villa IN0363 Issue B 16.03.17 16/03/2017 12:11 Page 10
8
Stage 3.5 x 40mm Woo screw x6
FA4522
ASSEMBLY TIP
Do not remove
Back panel
3.5 x 40mm
WARNING - All fixings
Do not use
Power tools
Excessive force
can crack/split
this product
3.5 x 40mm
3.5 x 40mm
3.5 x 40mm
11
TP Forest Villa
TP363 Fo est Villa IN0363 Issue B 16.03.17.qxp_TP363 Fo est Villa IN0363 Issue B 16.03.17 16/03/2017 12:11 Page 11
9
Stage
3.5 x 40mm Woo screw x4
FA4522
32mm
ASSEMBLY
TIP
WARNING - All fixings
Do not use
Power tools
Excessive force
can crack/split
this product
32mm
ASSEMBLY
TIP
WP1002P
Gable En x1
WP1002P
12
TP Forest Villa
TP363 Fo est Villa IN0363 Issue B 16.03.17.qxp_TP363 Fo est Villa IN0363 Issue B 16.03.17 16/03/2017 12:11 Page 12

10
Stage 3.5 x 40mm Woo screw x4
FA4522
WARNING - All fixings
Do not use
Power tools
Excessive force
can crack/split
this product
32mm
ASSEMBLY
TIP
32mm
ASSEMBLY
TIP
Gable En x1
WP1002P
WP1002P
13
TP Forest Villa
TP363 Fo est Villa IN0363 Issue B 16.03.17.qxp_TP363 Fo est Villa IN0363 Issue B 16.03.17 16/03/2017 12:11 Page 13

11
Stage
MW2116
3.5 x 30mm Woo screw x6
FA4526
MW2116
Door Batton x2
MW2116
14
TP Forest Villa
TP363 Fo est Villa IN0363 Issue B 16.03.17.qxp_TP363 Fo est Villa IN0363 Issue B 16.03.17 16/03/2017 12:12 Page 14

12
Stage
3.5 x 40mm Woo screw x4
FA4522
Roof Panel x1
WP1036P
3.5 x 40mm
WP1036
3.5 x 40mm
3.5 x 40mm
3.5 x 40mm
WP1036P
15
TP Forest Villa
TP363 Fo est Villa IN0363 Issue B 16.03.17.qxp_TP363 Fo est Villa IN0363 Issue B 16.03.17 16/03/2017 12:12 Page 15

13
Stage
3.5 x 40mm Woo screw x4
FA4522
Roof Panel x1
WP1035P
WP1035P
ASSEMBLY TIP
Must have Porch
fixing holes on this
roof panel.
3.5 x 40mm
3.5 x 40mm
3.5 x 40mm
3.5 x 40mm
WP1035P
16
TP Forest Villa
TP363 Fo est Villa IN0363 Issue B 16.03.17.qxp_TP363 Fo est Villa IN0363 Issue B 16.03.17 16/03/2017 12:12 Page 16

14
Stage
3.5 x 50mm Wooscrew x6
FA4534
3.5 x 50mm
3.5 x 50mm
ASSEMBLY TIP
Screw from
inside house
into balcony
3.5 x 50mm
17
TP Forest Villa
TP363 Fo est Villa IN0363 Issue B 16.03.17.qxp_TP363 Fo est Villa IN0363 Issue B 16.03.17 16/03/2017 12:12 Page 17

15
Stage
3.5 x 40mm Woo screw x2
FA4522
Roof Panel - Porch x1
WP1040P
Roof Panel - Porch x1
WP1041P
Porch roof
fixing holes
3.5 x 40mm
3.5 x 40mm
18
TP Forest Villa
TP363 Fo est Villa IN0363 Issue B 16.03.17.qxp_TP363 Fo est Villa IN0363 Issue B 16.03.17 16/03/2017 12:12 Page 18

WARNING
16
Stage
3.5 x 40mm Woo screw x2
FA4522
Ri ge Support x1
MW1051P
3 x 40mm
Fix screws from
inside house
Porch roof
fixing holes
3.5 x 30mm
3.5 x 30mm
3.5 x 30mm Woo screw x4
FA4526
19
TP Forest Villa
TP363 Fo est Villa IN0363 Issue B 16.03.17.qxp_TP363 Fo est Villa IN0363 Issue B 16.03.17 16/03/2017 12:12 Page 19

2
3.5 x 30mm
3
17
Stage
Ri ge Strip LH x1
MW1049P
Ri ge Strip RH x1
MW1048P 3.5 x 30mm Woo screw x4
FA4526
Plastic Ri ge Strip
x1
Plastic
Ri ge Strip
1
20
TP Forest Villa
TP363 Fo est Villa IN0363 Issue B 16.03.17.qxp_TP363 Fo est Villa IN0363 Issue B 16.03.17 16/03/2017 12:12 Page 20
Table of contents
Popular Indoor Furnishing manuals by other brands

Smith & Noble
Smith & Noble Natural Woven Shades Step by step installation instructions

Mocka
Mocka Henley Teepee Assembly instructions

Birlea
Birlea Ava 5 Drawer Dressing Table & Mirror Assembly instructions

Forte
Forte KLZS831S Assembling Instruction

OSP Home Furnishings
OSP Home Furnishings PHILLIP SB517 Assembly instructions

Coaster
Coaster 200423 Assembly instructions

Global Industrial
Global Industrial B264184 Assembly instructions

UPC
UPC HealthShield BarFly Assembly instructions

kingsley-bate
kingsley-bate CB53 Assembly instructions

URBAN OUTFITTERS
URBAN OUTFITTERS MINIMALIST 68968148 Assembly instructions

Birlea
Birlea SUFFOLK 2 DOORS WARDROBE Assembly instructions

Snow Peak
Snow Peak CK-218 instruction manual


