TP-Link Tapo Smart C720 User manual

*Wire colors vary by region. If you are unfamiliar with basic electrical wiring, please consult a licensed electrician.
WARNING: Risk of Electric Shocks
• Disconnect power at the fuse or circuit breaker before installing.
• Verify that the power supply voltage is correct. Connect xture to a 110-240 VAC
50/60 Hz power source.
• Always follow code standards when installing wired connections.
• Install only on a UL-listed junction box or on a wall with a Neutral wire and a Line wire.
• An all-pole mains switch shall be incorporated in the electrical installation of the
building. And the contact separation of the switch shall not be less than 3 mm.
• You can always nd detailed wiring and mounting instructions in the Tapo app.
If you are unfamiliar with basic electrical wiring, please consult a licensed electrician.
OR
Tapo
Before You Start
NOTICE
• Do not install near combustible or ammable surfaces.
• Do not connect this light xture to a dimmer switch or timer.
4
Connect the Neutral wire (usually white/blue)
and the Line wire (usually black/brown/red) to
the bracket. Secure the wires with a screwdriver.
Note: To identify wire colors, you can refer to
https://www.tp-link.com/support/faq/3474/
L (Line) N (Neutral)
02 / Connect Wires and Install Floodlight Camera
Tapo Smart Floodlight Camera
Quick Start Guide
©2022 TP-Link 7106509785 REV1.0.0
*Images may dier from actual products.
You can mount your Tapo oodlight camera vertically on a wall or overhang under an eave. Make sure the area has a strong Wi-Fi signal.
01 / Mounting Options
Wall Mount
OR
Eave Mount
Take care to avoid electric shocks.
2
Remove the existing oodlight camera and
disconnect wires from the junction box.
3
Route the wires through the bracket.
3
Route the wires through the bracket.
5
Attach the bracket to the junction box with
screws.
1
Turn o the circuit breaker. Make sure the power
is o by turning your light on and o a few times.
The oodlight camera can be mounted on a junction box on a wall or under an eave.
Option 1: Install on an existing junction box
2
Route the wires through the mounting
template and place the template. Drill two
holes where indicated.
5
Use the screws to ax the bracket
over the anchors.
Option 2: Install with existing electrical wires
Install where the Neutral wire and Line wire are available.
UP
OFF OFF
1
Turn o the circuit breaker. Make sure the power
is o by turning your light on and o a few times.
N(Neutral)
UP
N(Neutral)
UP
L(Line)
L(Line)
N(Neutral)
UP
L(Line)
6
Align the mounting posts on the bracket with
the holes on the oodlight camera.
Secure the oodlight camera to the bracket
with screws and insert the screw caps into the
screw holes.
7
Adjust the camera and light position to the
desired angles.
8
Turn on the circuit breaker.
6
Align the mounting posts on the bracket with
the holes on the oodlight camera.
Secure the oodlight camera to the bracket
with screws and insert the screw caps into the
screw holes.
7
Adjust the camera and light position to the
desired angles.
8
Turn on the circuit breaker.
UP
N(Neutral)
UPUP
L(Line)
UP
UP
N(Neutral)
UPUP
L(Line)
UP
N(Neutral)
UP
L(Line)
Wall Anchors ×2 + Self-tapping Screws ×2 Screws ×2 + Screw Caps ×2
Screws ×2 + Screw Caps ×2Screws ×2 (Choose based on your junction box)
Type A Type B Type C
N(Neutral)
UP
L(Line)
N(Neutral)
UP
L(Line)
For Wall Mount
Ensure the UP arrow on the
bracket points up.
*To install horizontally, adjust the bracket to ensure
the air bubble in the level is centered.
Point the UP arrow on the bracket
towards your house.
For Eave Mount
N(Neutral)
UP
L(Line)
N(Neutral)
UP
L(Line)
Take care to avoid electric shocks. Take care to avoid electric shocks.
4
Connect the Neutral wire (usually white/blue)
and the Line wire (usually black/brown/red) to
the bracket. Secure the wires with a screwdriver.
L (Line) N (Neutral)
Note: To identify wire colors, you can refer to
https://www.tp-link.com/support/faq/3474/
Tap the button in the app
and select your model. Follow
the app instructions to set up
your oodlight camera.
03 / Set Up Floodlight Camera
2. SET UP CAMERA
1. DOWNLOAD APP
Get the Tapo app from the
App Store or Google Play.
OR
Tapo
FAQ (Frequently Asked Questions)
Q1: How can I identify the wires?
A: Wire colors vary by region. The Neutral wire is usually
white/blue, while the Line wire is usually black/brown/red.
You can refer to https://www.tp-link.com/support/faq/3474/ for
detailed information.
If you are unfamiliar with basic electrical wiring, please consult a
licensed electrician.
Q2: What can I do if my oodlight camera cannot
power on after wiring?
A1: Make sure you have turned on the circuit breaker.
A2: Check if the System LED is on. If it is o, turn o the circuit
breaker and check the wiring.
A3: Refer to https://www.tp-link.com/support/faq/3475/ for
detailed instructions.
Q3: What if there is no existing junction box or electrical
wires?
A: Floodlight cameras require high power supply and should be
installed in a location with a weatherproof junction box or electrical
wires.
If you do not have a current energy source or are uncomfortable
dealing with electrical wiring, have an expert electrician do the job.
• Keep the device away from re or hot environments. DO NOT immerse in water or any
other liquid.
• Do not disassemble, repair or modify the product.
• Do not use the device where wireless devices are not allowed.
• Do not use the product if the casing has been broken. Danger of electric shock.
• Never touch the product with wet hands.
• It is NOT recommended to expose this product to heavy rain or any type of moisture.
• Do not place near automatically controlled devices such as re alarms. Radio waves
emitted from this product may cause such devices to malfunction resulting in an
accident.
• Observe restrictions on using wireless products in fuel depots, chemical plants or when
blasting operations are in progress.
• Do not use liquid to clean the product. Only use a dry cloth.
• Never put metal objects inside the product. If a metal object enters the product turn o
the circuit breaker and contact an authorised electrician.
• This product is not intended to be used when providing medical care. Consult the
manufacturer of any personal medical devices, such as pacemakers or hearing aids to
determine if they are adequality shielded from external RF (radio frequency) energy.
• Do not use this product in health care facilities. Hospitals or health care facilities may be
using equipment that could be sensitive to external RF energy.
• The product should be kept free from excessive smoke, dust or high temperature and
vibration.
• Avoid direct sunlight for better performance.
• Do not place heavy objects on top of the product.
• This product may interfere with other electronic products such as TV, radios, personal
computers, phones or other wireless devices.
• Operating Temperature: -20 °C ~ 45°C (-4°F ~ 113°F)
Please read and follow the above safety information when operating the device. We cannot
guarantee that no accidents or damage will occur due to improper use of the device.
Please use this product with care and operate at your own risk.
TP-Link hereby declares that the device is in compliance with the essential requirements
and other relevant provisions of directives 2014/53/EU, 2009/125/EC, 2011/65/EU and
(EU) 2015/863.
The original EU declaration of conformity may be found at
https://www.tapo.com/en/support/ce/
TP-Link hereby declares that the device is in compliance with the essential requirements
and other relevant provisions of the Radio Equipment Regulations 2017.
The original UK declaration of conformity may be found at
https://www.tapo.com/support/ukca/
System LED Indication
Blinking red and green
Blinking red slowly
Solid amber
Blinking redquickly
Solidred
Solidgreen
Blinking greenquickly
Starting up
Connected to TP-Link cloud server
Ready for setup
Connecting to Wi-Fi
Connected to Wi-Fi
Camera resetting
Camera updating
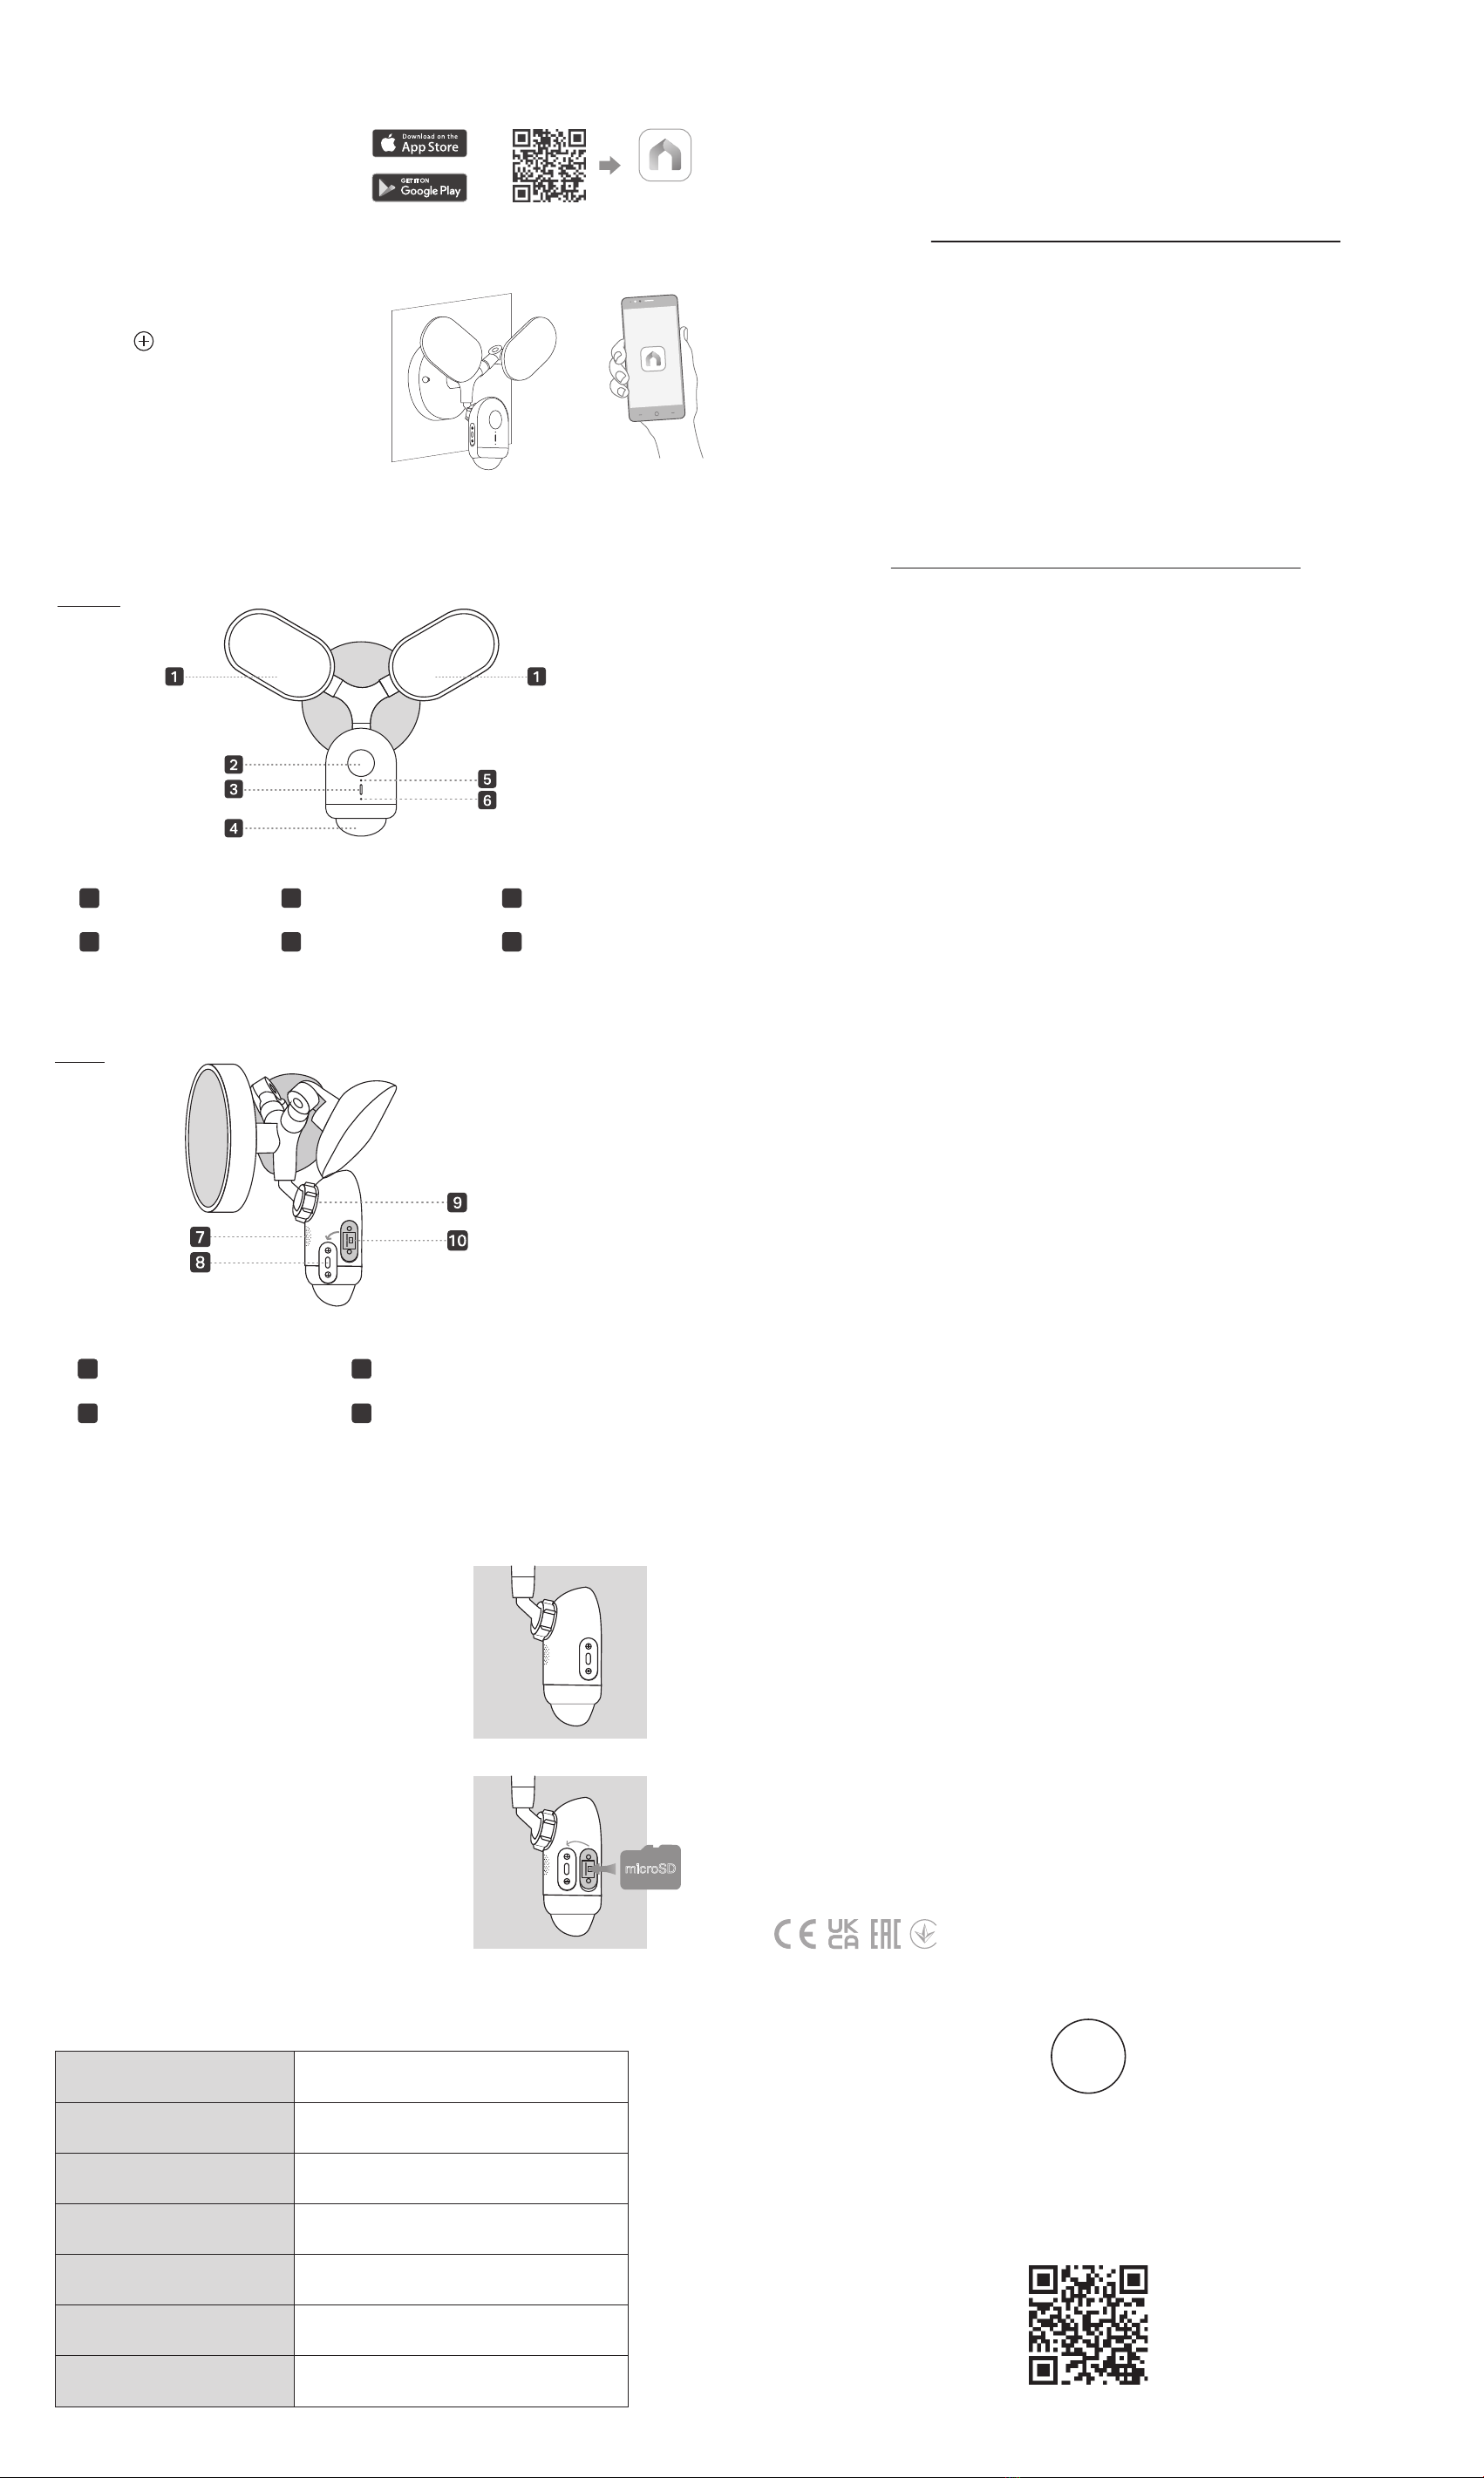
Front
Appearance
System LED
3
4Motion Sensor 6Microphone
5Light Sensor
Floodlights
11
Camera Lens
2
Side
9Camera Adjustment Knob
Speaker
17
10 microSD Card Slot
Reset button
8
Button Explanation
RESET Button
While the camera is powered on, press and
hold the RESET button for at least 5 seconds
until the System LED blinks red. The camera
will reset and reboot.
microSD Card Slot
Loosen the screws and insert a microSD card.
Initialize it on the Tapo app for local recording.
*microSD card not included
RESET
RESET
microSD
Need some help?
Visit https://www.tapo.com/support/
for technical support, the user guide, FAQs,
warranty & more
?
Other TP-Link Digital Camera manuals

TP-Link
TP-Link Cloud Camera Operator's manual

TP-Link
TP-Link Tapo Smart Hub User manual

TP-Link
TP-Link Kasa Cam Outdoor KC200 User manual

TP-Link
TP-Link Tapo Camera User manual

TP-Link
TP-Link Tapo C320WS User manual

TP-Link
TP-Link Kasa Smart KC310S2 User manual

TP-Link
TP-Link KC100 User manual

TP-Link
TP-Link Kasa Spot Pan Tilt KC110 User manual

TP-Link
TP-Link NC200 User manual

TP-Link
TP-Link Tapo C400S2 User manual


