TP-Link Tapo C320WS User manual
User Guide
Outdoor Security Wi-Fi Camera
Tapo C320WS
©2021 TP-Link 1910013079 REV1.1.0

Contents
About This Guide ···········································································1
Introduction ······················································································2
Appearance ······················································································3
Set Up Your Camera·····································································5
Set Up Using Amazon Frustration-Free Setup··············7
Install a microSD Card······························································11
Mount Your Camera··································································· 12
Install Waterproof Items··························································13
Main Camera Controls·····························································14
Camera Detection & Alerts ···················································16
24-hour Recordings··································································21
Manual Recording······································································· 23
Night Vision Mode ·····································································24
Privacy Mode ················································································26
How to Reset Your Camera ··················································· 27
1
About This Guide
This guide provides a brief introduction to the Outdoor Security Wi-Fi Camera and the Tapo app, as well as regulatory information.
Please note that features available in Tapo may vary by model and software version. Tapo availability may also vary by region. All images, steps, and
descriptions in this guide are only examples and may not reect your actual Tapo Camera experience.
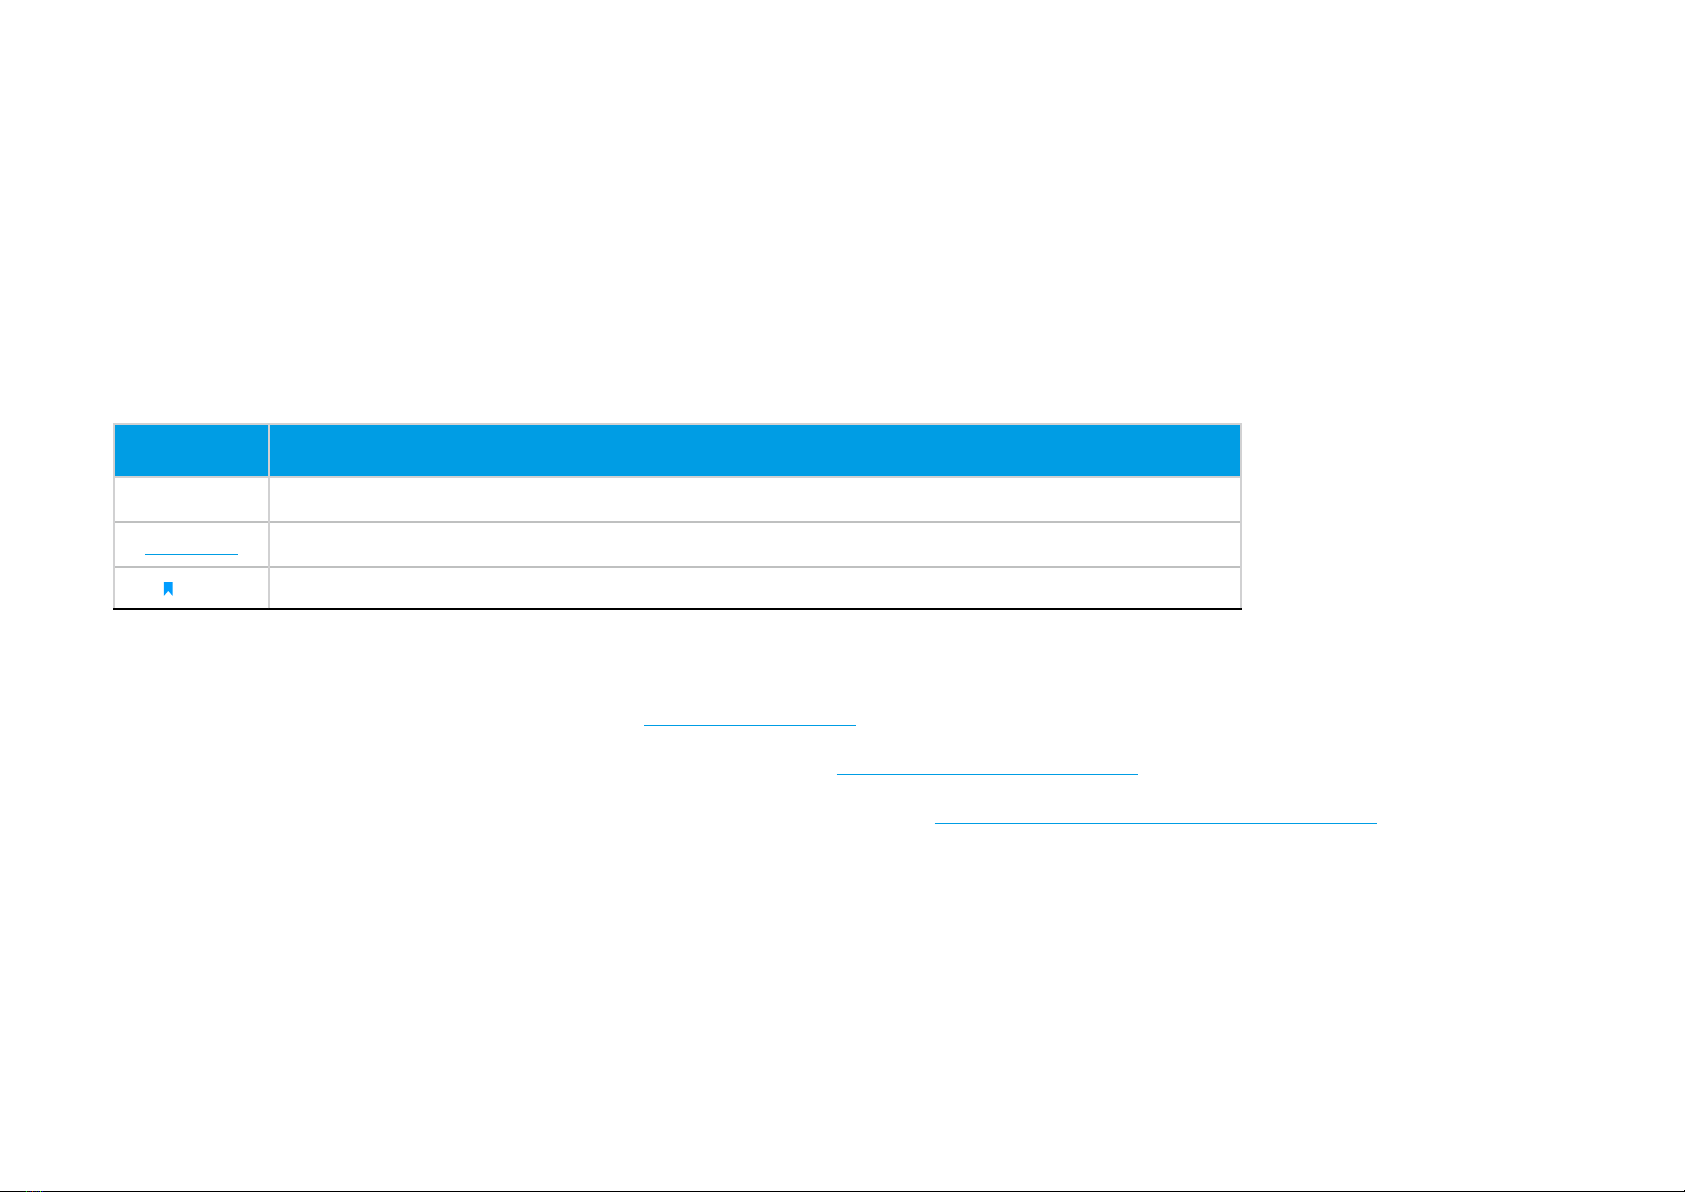
Conventions
In this guide, the following convention is used:
Convention Description
Blue Key information appears in teal, including management page text such as menus, items, buttons and so on.
Underline Hyperlinks are in teal and underlined. You can click to redirect to a website.
Note: Ignoring this type of note might result in a malfunction or damage to the device.
More Info
• Specications can be found on the product page at https://www.tapo.com.
• Our Technical Support and troubleshooting information can be found at https://www.tapo.com/support/.
• The camera setup video and waterproof cable attachments video can be found at https://www.tp-link.com/support/setup-video/.

2
Introduction
Dierent from the black and white view of normal cameras, Tapo C320WS is equipped with the high resolution sensor and the ll light, catching more
colors. The highly-sensitive starlight sensor captures higher-quality images even in low-light conditions. The integrated spotlights help enhance your
security view with vivid colors even at night.
The Tapo camera always protects what you love most. Receive notications and check feeds when someone crosses a boundary, enters an area
you've set, or obstructs the camera. The automatic siren system will trigger sound as alarm to frighten away unwanted visitors.
• 2K High Denition – Sharp and clear 4MP high-resolution video delivers more delicate details.
• Full-Time Color – Enhance your security view with vivid colors even at night with the integrated spotlights.
• Starlight Sensor – The highly-sensitive starlight sensor captures higher-quality images even in low-light conditions.
• Motion Detection – Get instant notications when your camera detects motion.
• Line-Crossing Detection – Set a boundary and receive an alert anytime a person crosses it from either or both directions.
• Area Intrusion Detection – Set customized activity zones around key areas for more focused monitoring.
• Camera Tampering – Receive alerts when someone obstructs the camera.
• Wired or Wireless Networking – Connect the camera to your network through Ethernet or Wi-Fi for more exible installation.
• Weatherproof – Helps Tapo C320WS perform well even in harsh environments with rain and dust.
• Two-Way Audio – Communicate with others with the built-in microphone and speaker.
• Local Storage (up to 256 GB) – Stores 4MP video directly to a local microSD card, oering convenient access to your video footage.
*microSD card needs to be purchased separately.
3
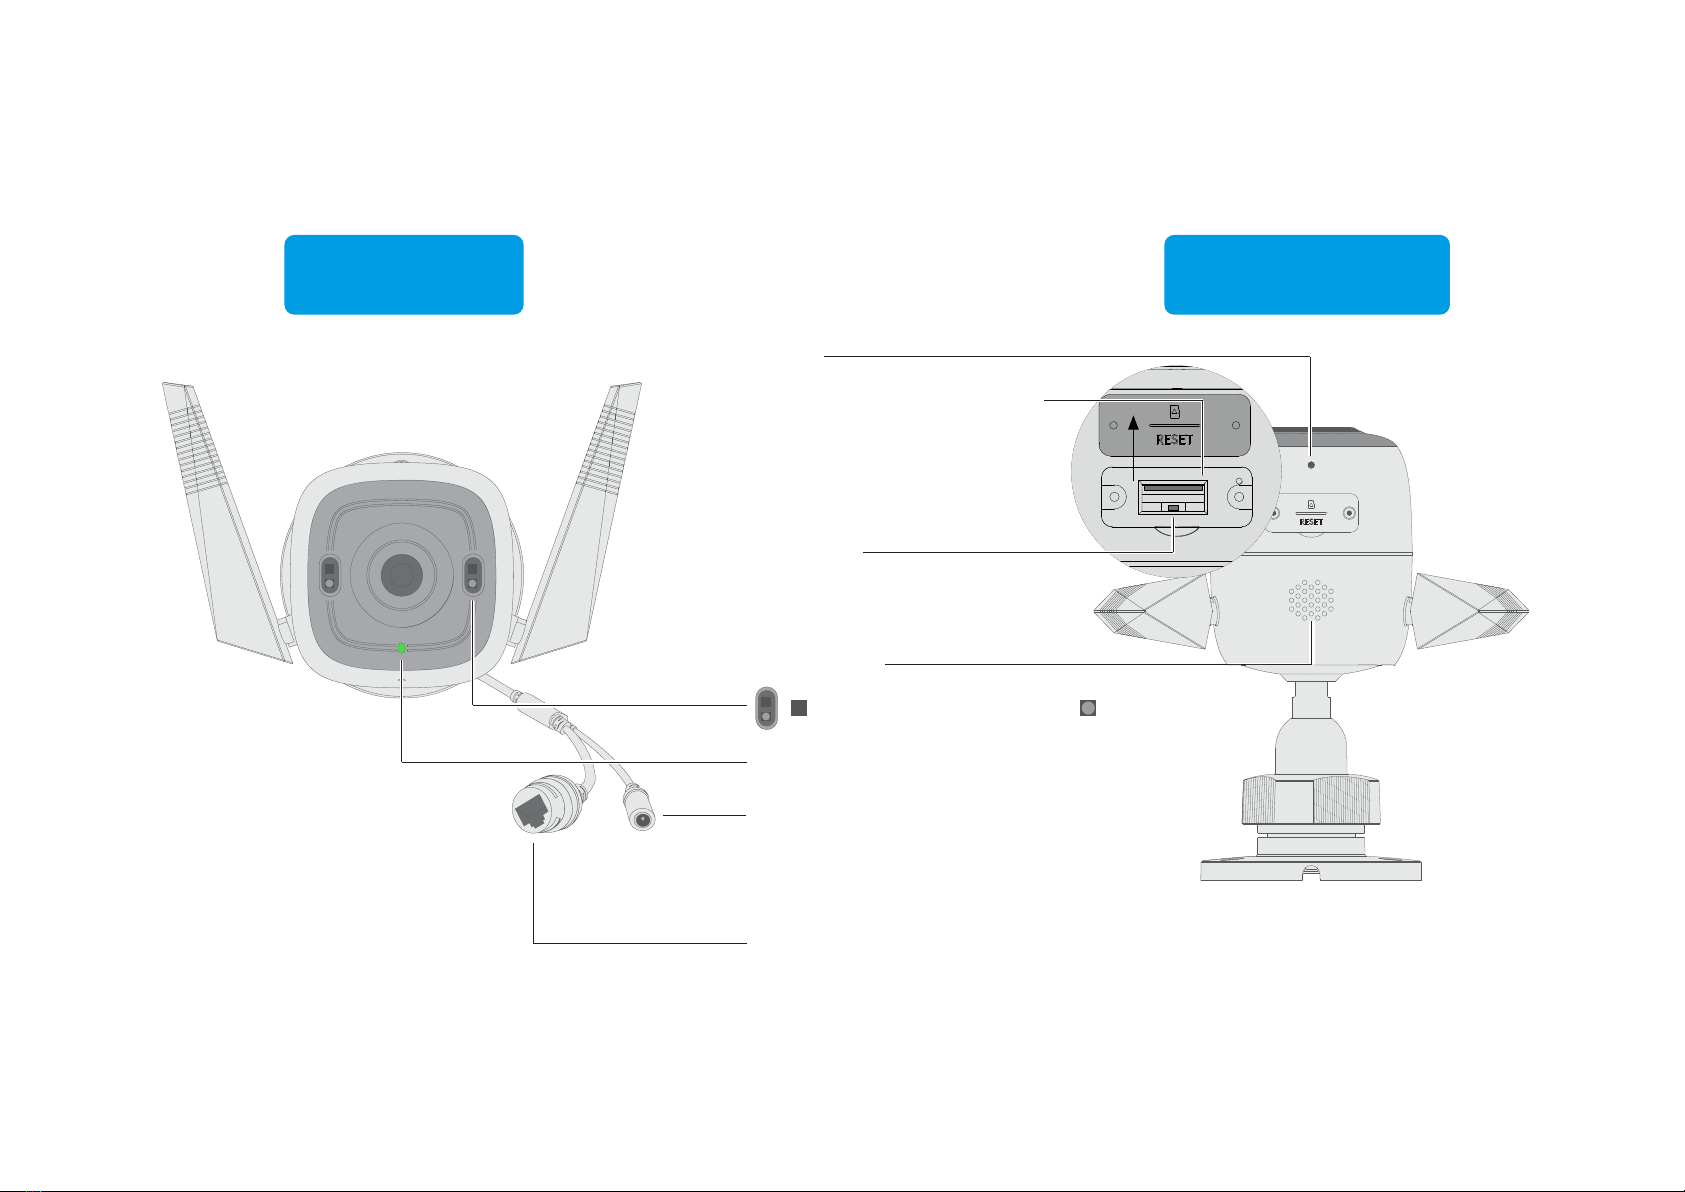
Appearance
MicroSD Card Slot
Hold for 5 seconds to
reset the camera
Speaker
RESET
MIC
DC Power Connector
Used to connect to a 9V DC
power adapter
Ethernet Port
Used to connect to a
network device
System LED
Insert a microSD card
for local recording
IR LED
White Light LED
Front Panel
Bottom Panel

4
System LED Description
Blinking red and green
(for Wi-Fi setup)
Blinking red slowly
(for Wi-Fi setup)
Solid amber
Blinking red quickly
Solid red
Solid green
Blinking green quickly
Starting up
Connected to TP-Link
Cloud server
Ready for setup
Connecting to Wi-Fi
Connected to Wi-Fi or
wired network
Camera resetting
Camera updating
5
Set Up Your Camera
Follow the steps below to get started with your new camera, or you can follow the setup video at https://www.tp-link.com/support/setup-video/.
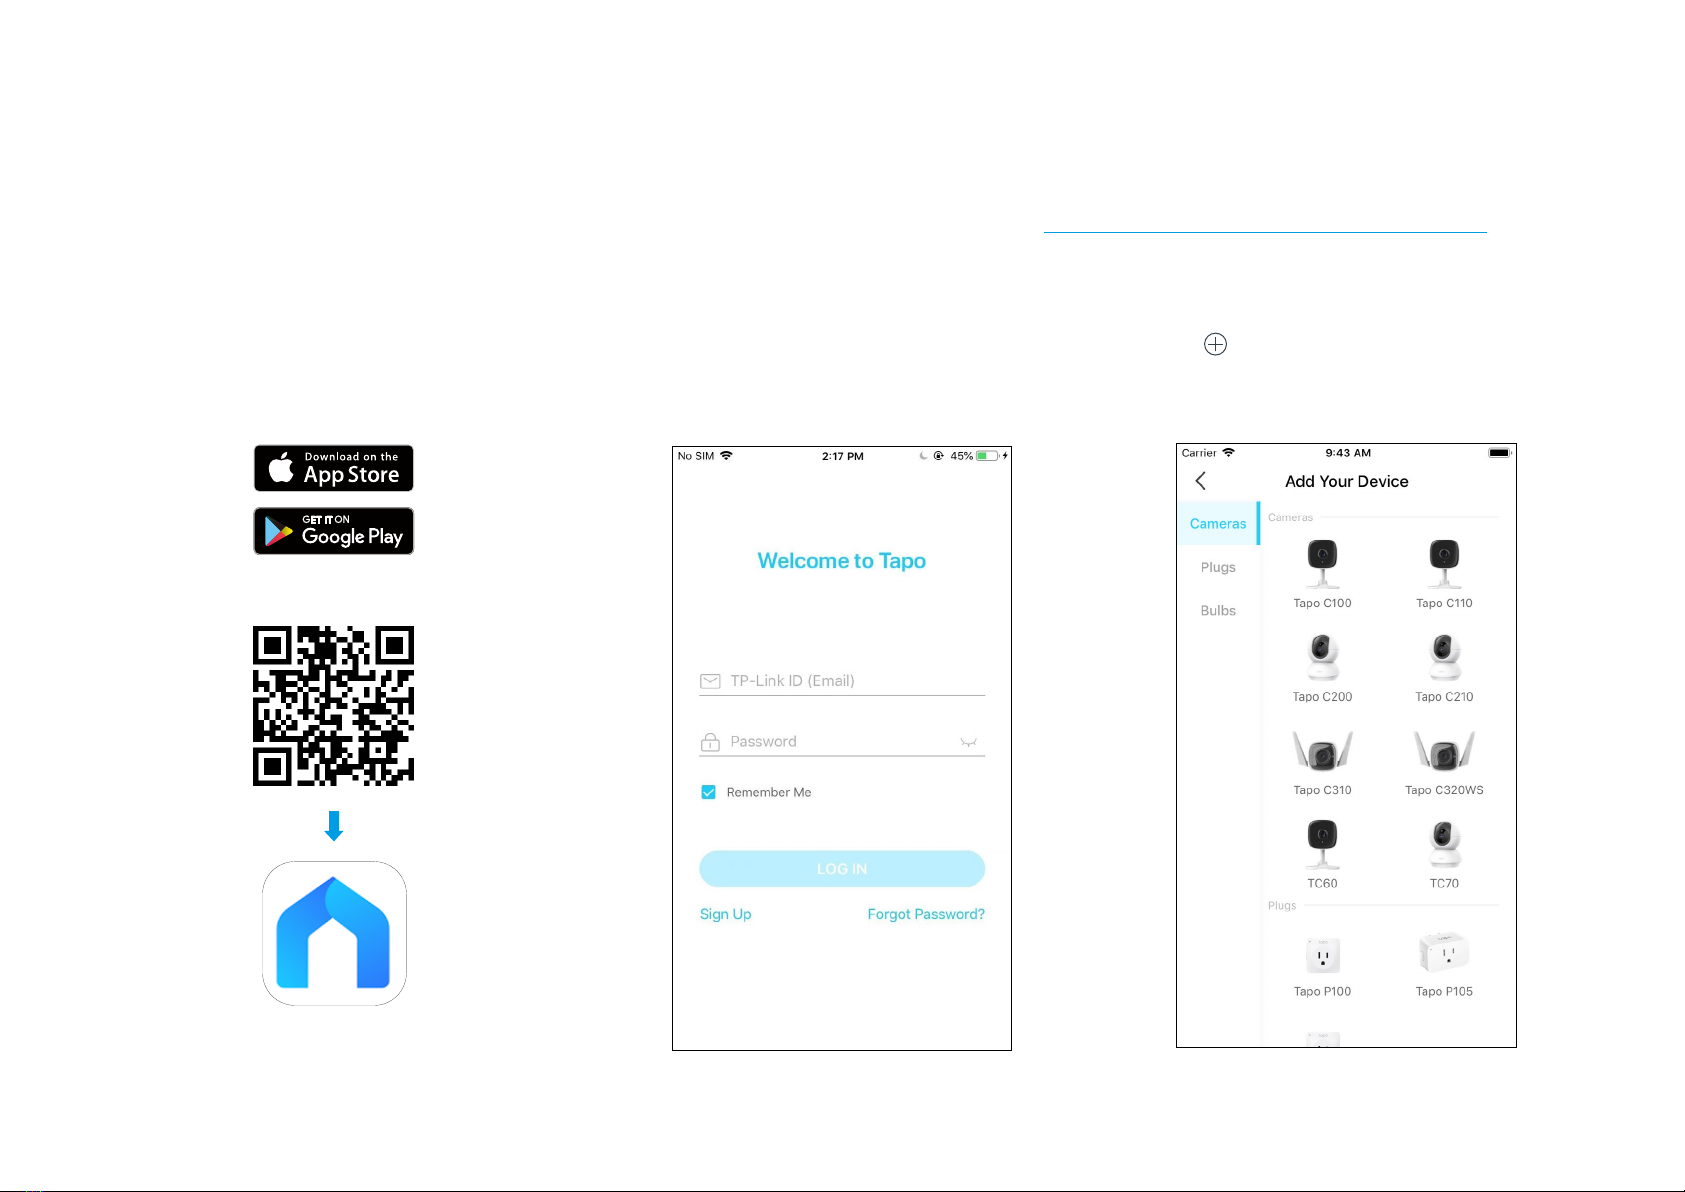
Step 1. Download Tapo App
Get the Tapo app from the App Store or
Google Play, or by scanning the QR code
below.
OR
Step 2. Log In
Open the app, and log in with your TP-Link ID.
If you don't have an account, create one rst.
Step 3. Add Your Camera
Tap the button in the app and select your
model.

6
Step 4. Congure Camera
Follow app instructions to set up your camera via wired or wireless connection (for setup only), and
add it to your home network. After setup, you can use your camera via wired connection or wirelessly.
Note: For Wireless setup, if your camera is connected to your router via an Ethernet cable, please unplug the cable rst.

7
Set Up Using Amazon Frustration-Free Setup
What is Amazon Frustration-Free Setup?
Amazon Frustration-Free Setup can help connect and set up Tapo smart devices in fewer steps, without having to remember and re-enter your Wi-Fi
password on each device.
To use this feature, conrm the following:
● The new Tapo device supports Amazon FFS.
● You have an Amazon FFS enabled Alexa device or router.
● You have saved your Wi-Fi information to Amazon by using Alexa echo.
● Your Tapo device and router are on the same network as your Alexa echo.
LED Indications during Amazon Frustration-Free Setup
LED Status
Blinking amber and green Ready for setup
Blinking amber FFS setup in progress
Solid green Working properly
If the LED does not turn solid green after a long time, you can try to add the Tapo device manually. (Press the Reset button on your Tapo device once.
Then open the Tapo app, tap the + button on the page, select your device model, and follow the app instructions. )
8
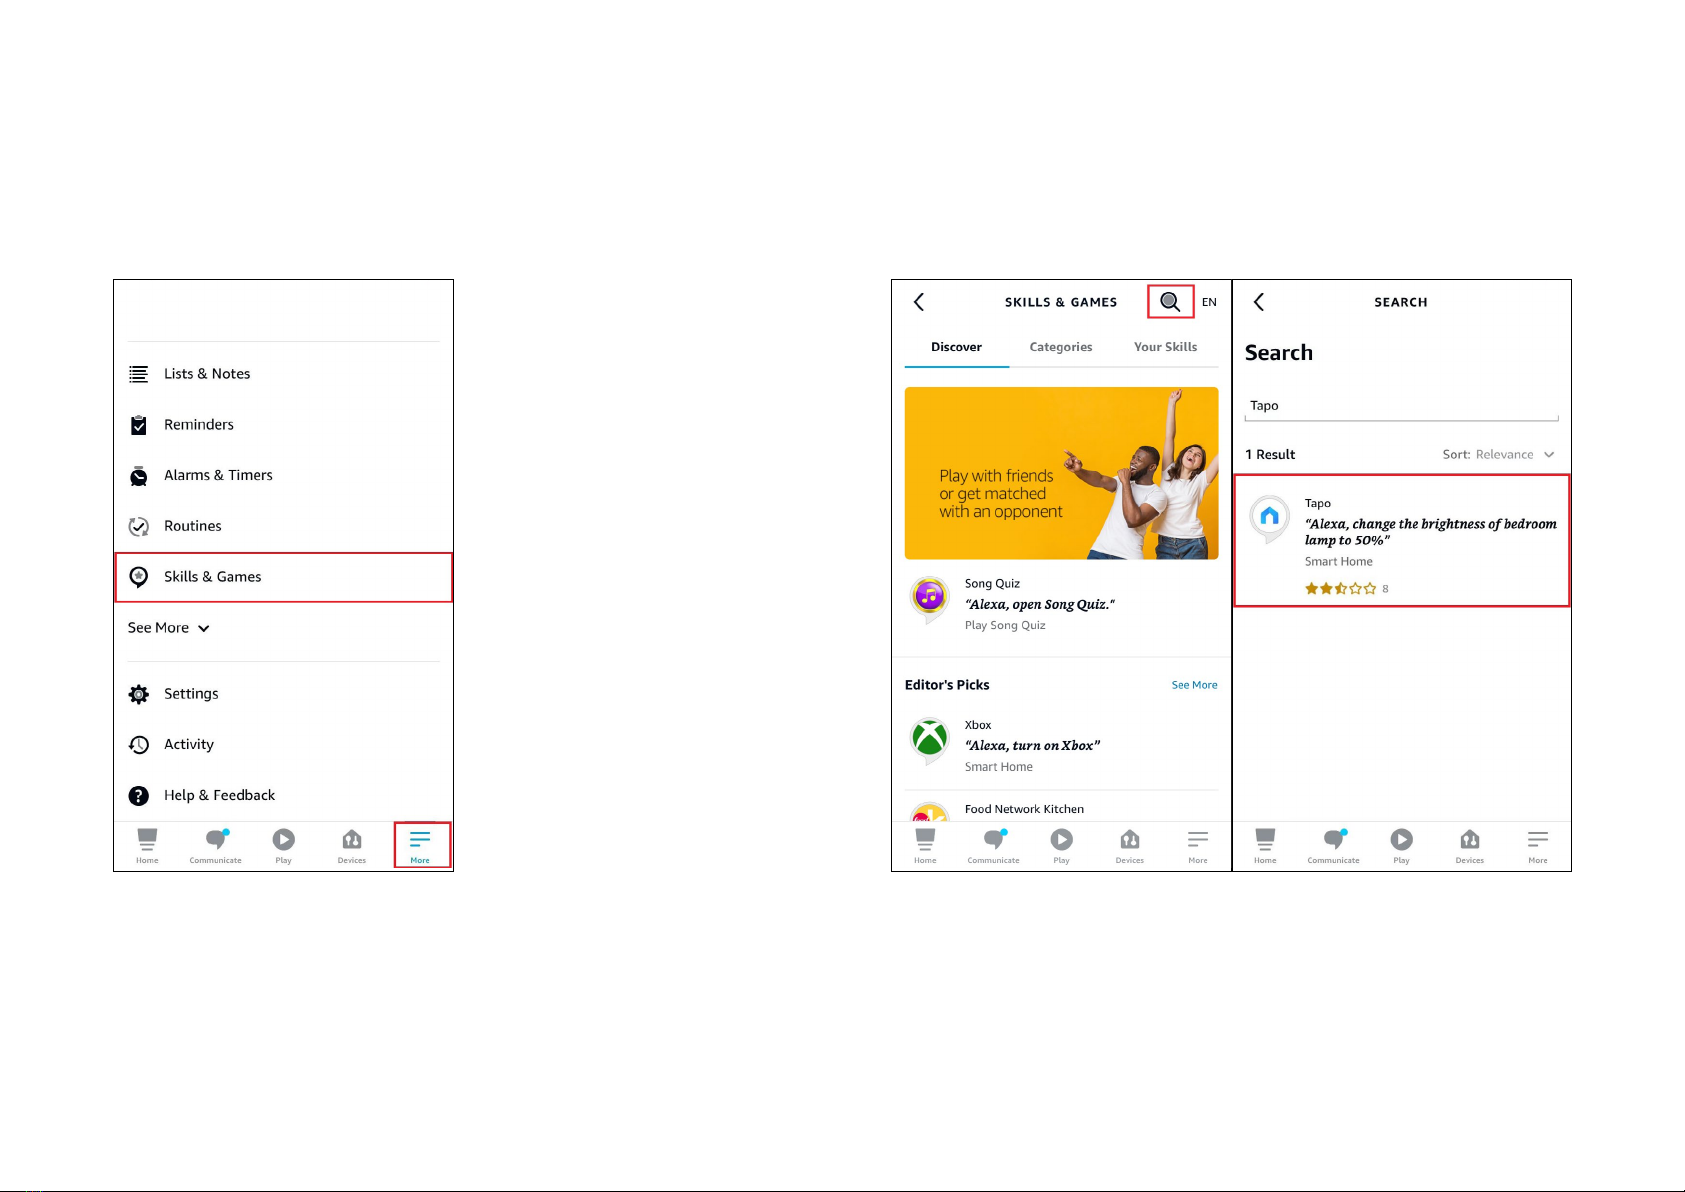
1. Open the Amazon Alexa app. Then tap More and select Skills &
Games.
How to use Amazon Frustration-Free Setup with Tapo devices
2. Enter Tapo in the search bar and choose Tapo.

9
3. Tap the ENABLE TO USE button. 4. Log in with your TP-Link ID that has bound to your Tapo device, and tap Authorize. After authorized
successfully, the message Tapo has been successfully linked will come up.

10
5. Plug in your Tapo device and the setup will complete automatically in two minutes.
For setting up more Tapo devices, just plug in and enjoy!
Done!
If this device displays on the Home page in the Tapo app, it indicates this device has been successfully associated with your Amazon account and
joined your Wi-Fi network automatically.
If this device does not display on the Home page in the Tapo app, try setting it up manually. (Tap the + button on the page, select your device model,
and then follow the app instructions.)
11
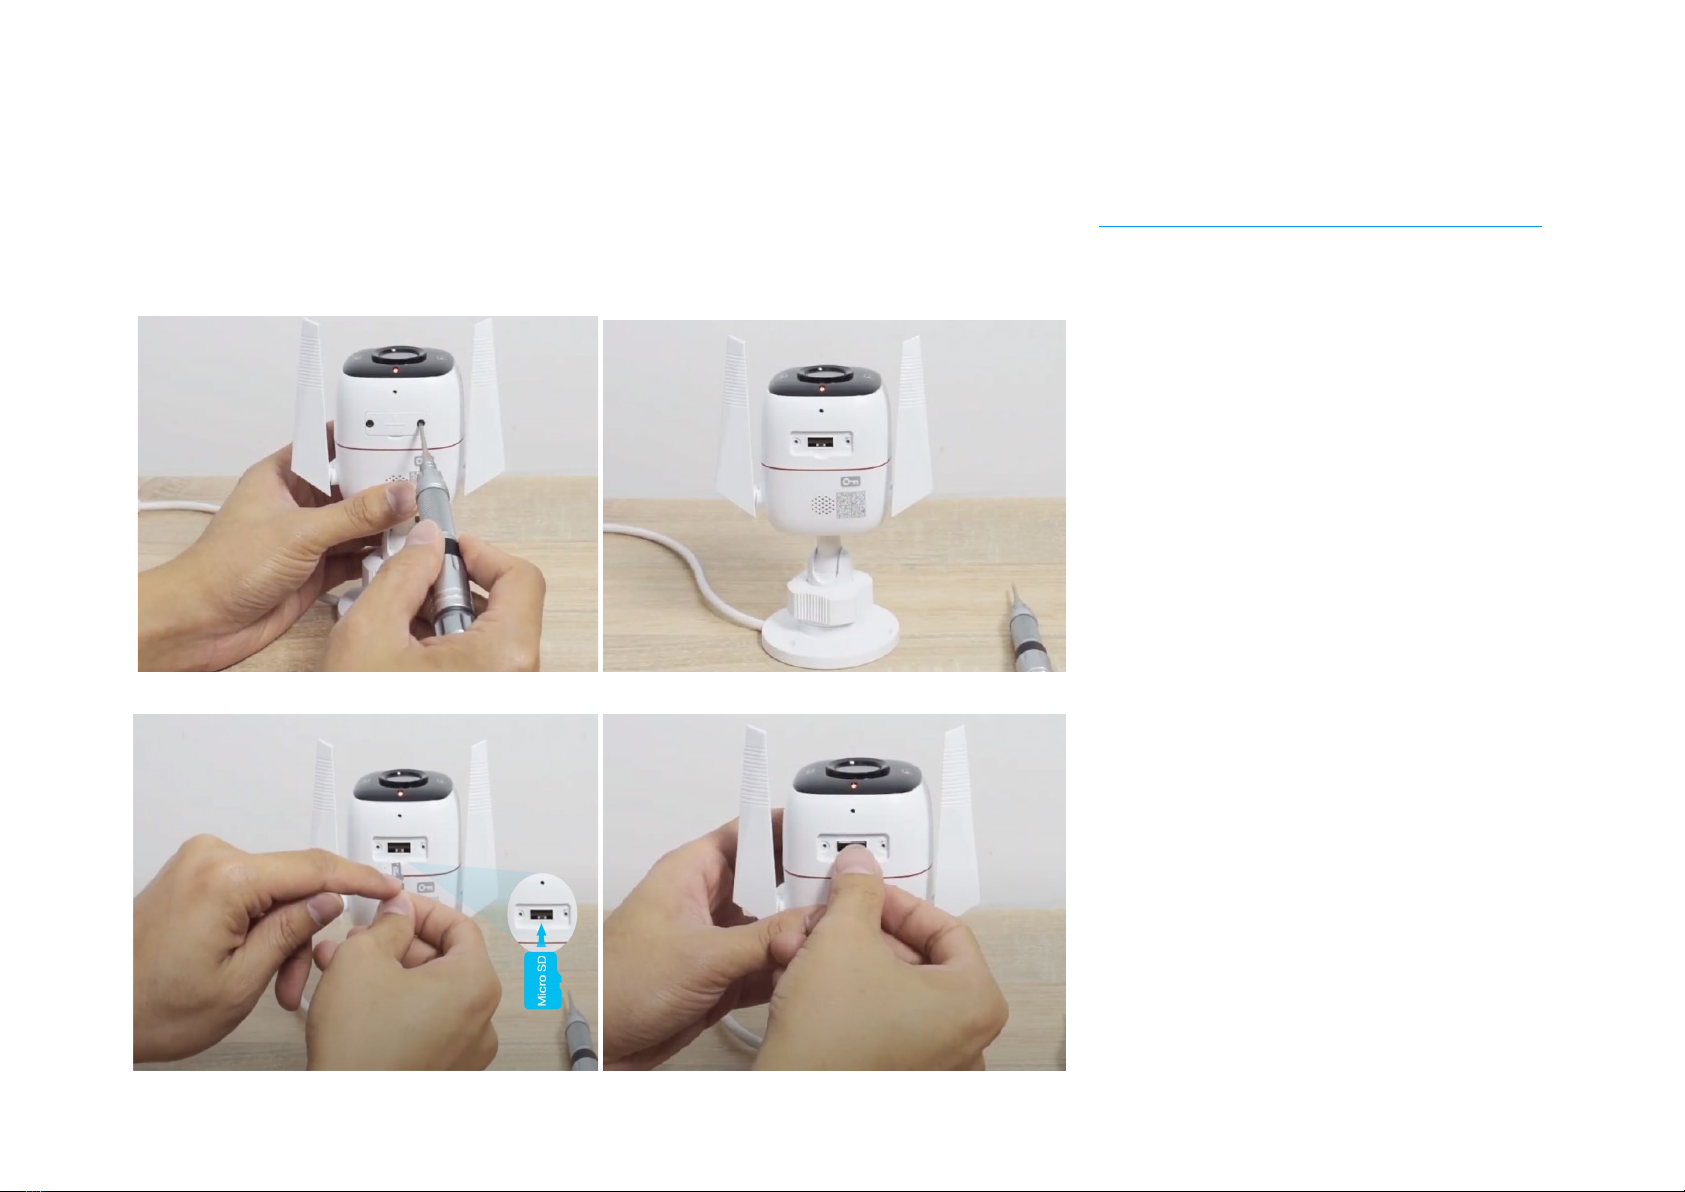
Install a microSD Card
Follow the steps below to install the microSD card for local recording, or follow the installation video at https://www.tp-link.com/support/setup-video/.
You can go to Camera Settings > microSD Card in the Tapo app to check the card status or format your card.
1. Loosen the screws on the back panel and remove the cover.
2. Identify the direction of the microSD card and carefully insert the card into the slot. Push in the card until you hear a clicking sound.
12
Mount Your Camera
When you nish adding your camera in the Tapo app, you can place your camera on a at surface, or mount it on a wall or ceiling with the provided
mounting template and screws.
Follow the steps below to mount your new camera, or follow the setup video at https://www.tp-link.com/support/setup-video/.
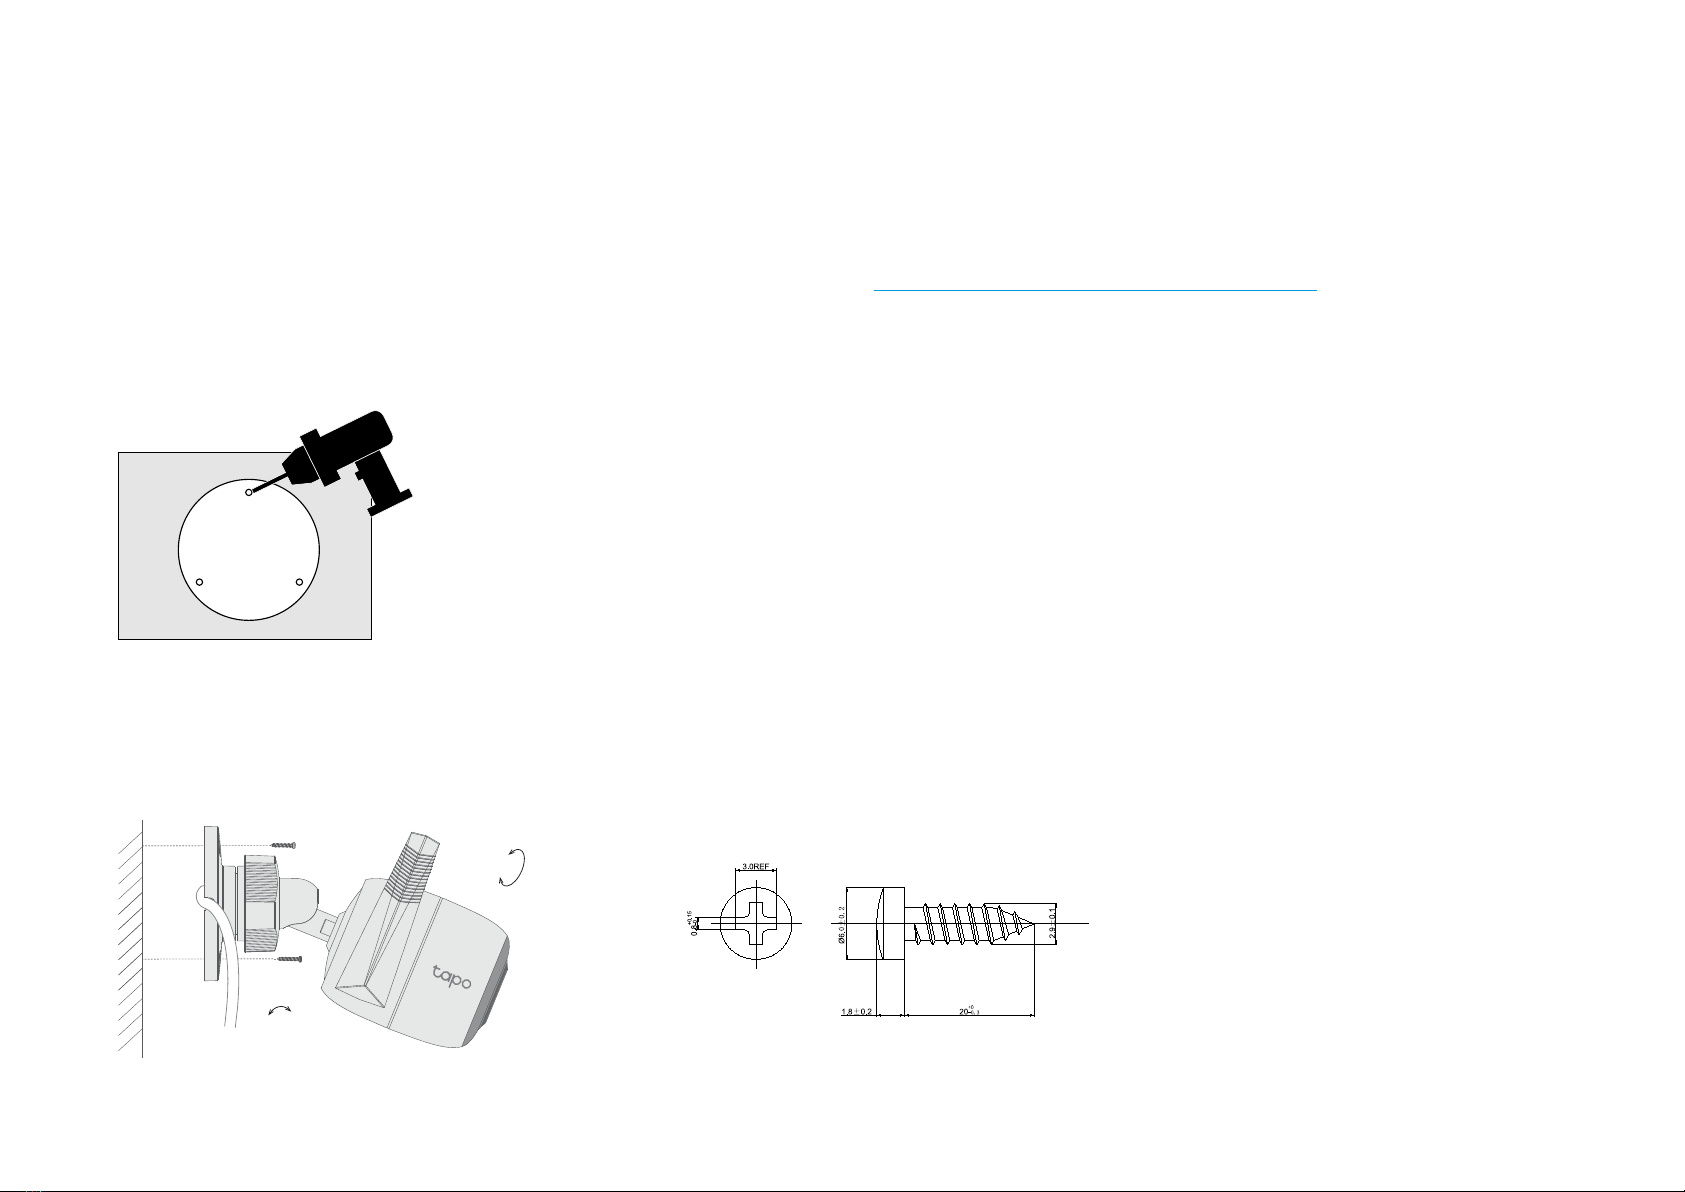
Step 1. Drill Holes
Stick the mounting template to the desired mounting place. Drill 3 screw holes according to the template.
Step 2. Mount Camera
Insert three anchors into the holes and use the screws to ax the camera over the anchors.
0° to 70°
0° to 360°
13
Install Waterproof Items
When the camera is installed outdoors, please install waterproof items to waterproof your camera. Make sure each part is securely attached and the
water-proong rings are ush to keep out water.
Follow the steps below to install waterproof items, or follow the installation video at https://www.tp-link.com/support/setup-video/.
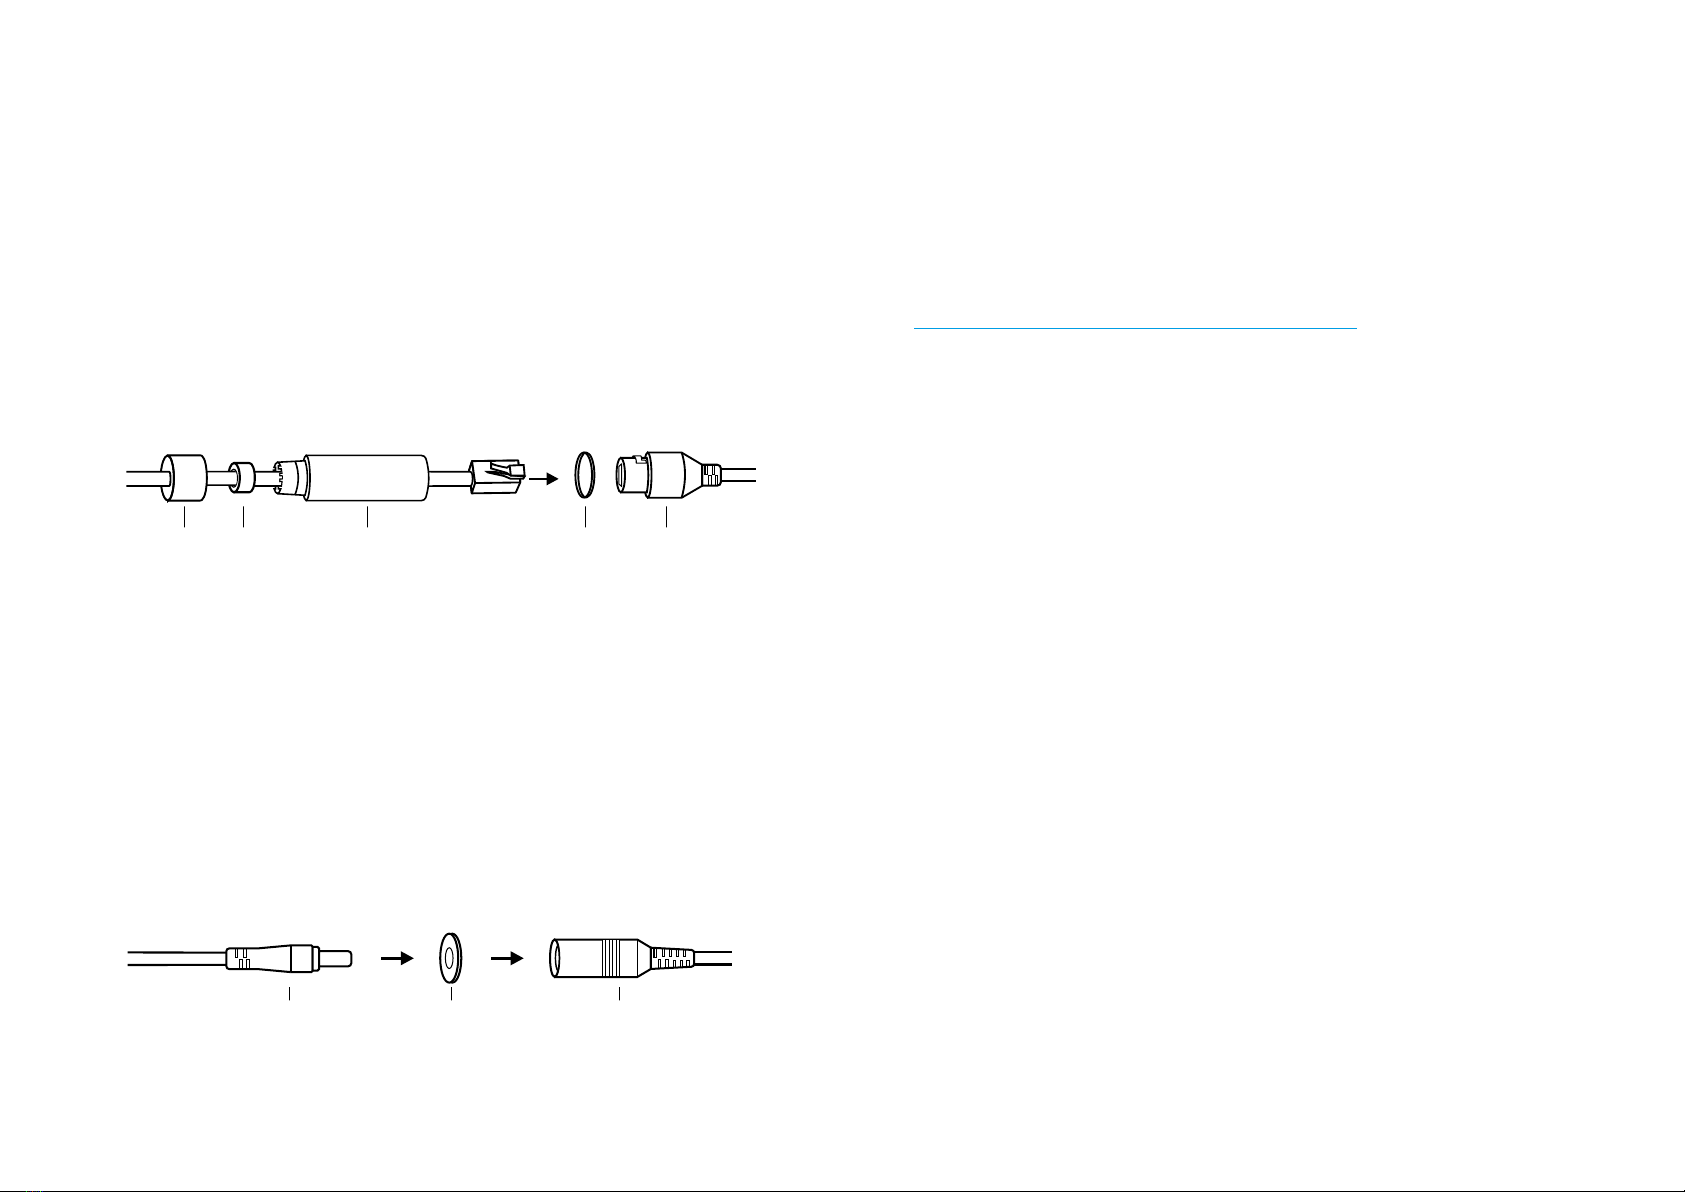
Install Waterproof Cable Attachments
Install the waterproof cable attachments for the network interface when the camera is installed outdoors.
Fix Nut Waterproof
Ring
O-ring Network
Interface
Waterproof
Jacket
1. Route the network cable through the following components in order: x nut, waterproof ring, and then the waterproof jacket.
2. Insert the waterproof ring into the waterproof jacket.
3. Fix the O-ring to the network interface of the camera and connect the network cables.
4. Attach the network interface with the waterproof jacket, then twist to lock. Rotate the x nut to secure it to the waterproof jacket.
Done! The network interface is now waterproof.
Install Waterproof Seal for Power Connectors
Install the waterproof seal for the power connectors when the camera is installed outdoors.
Male Power Connector Waterproof Seal Female Power Connector
14
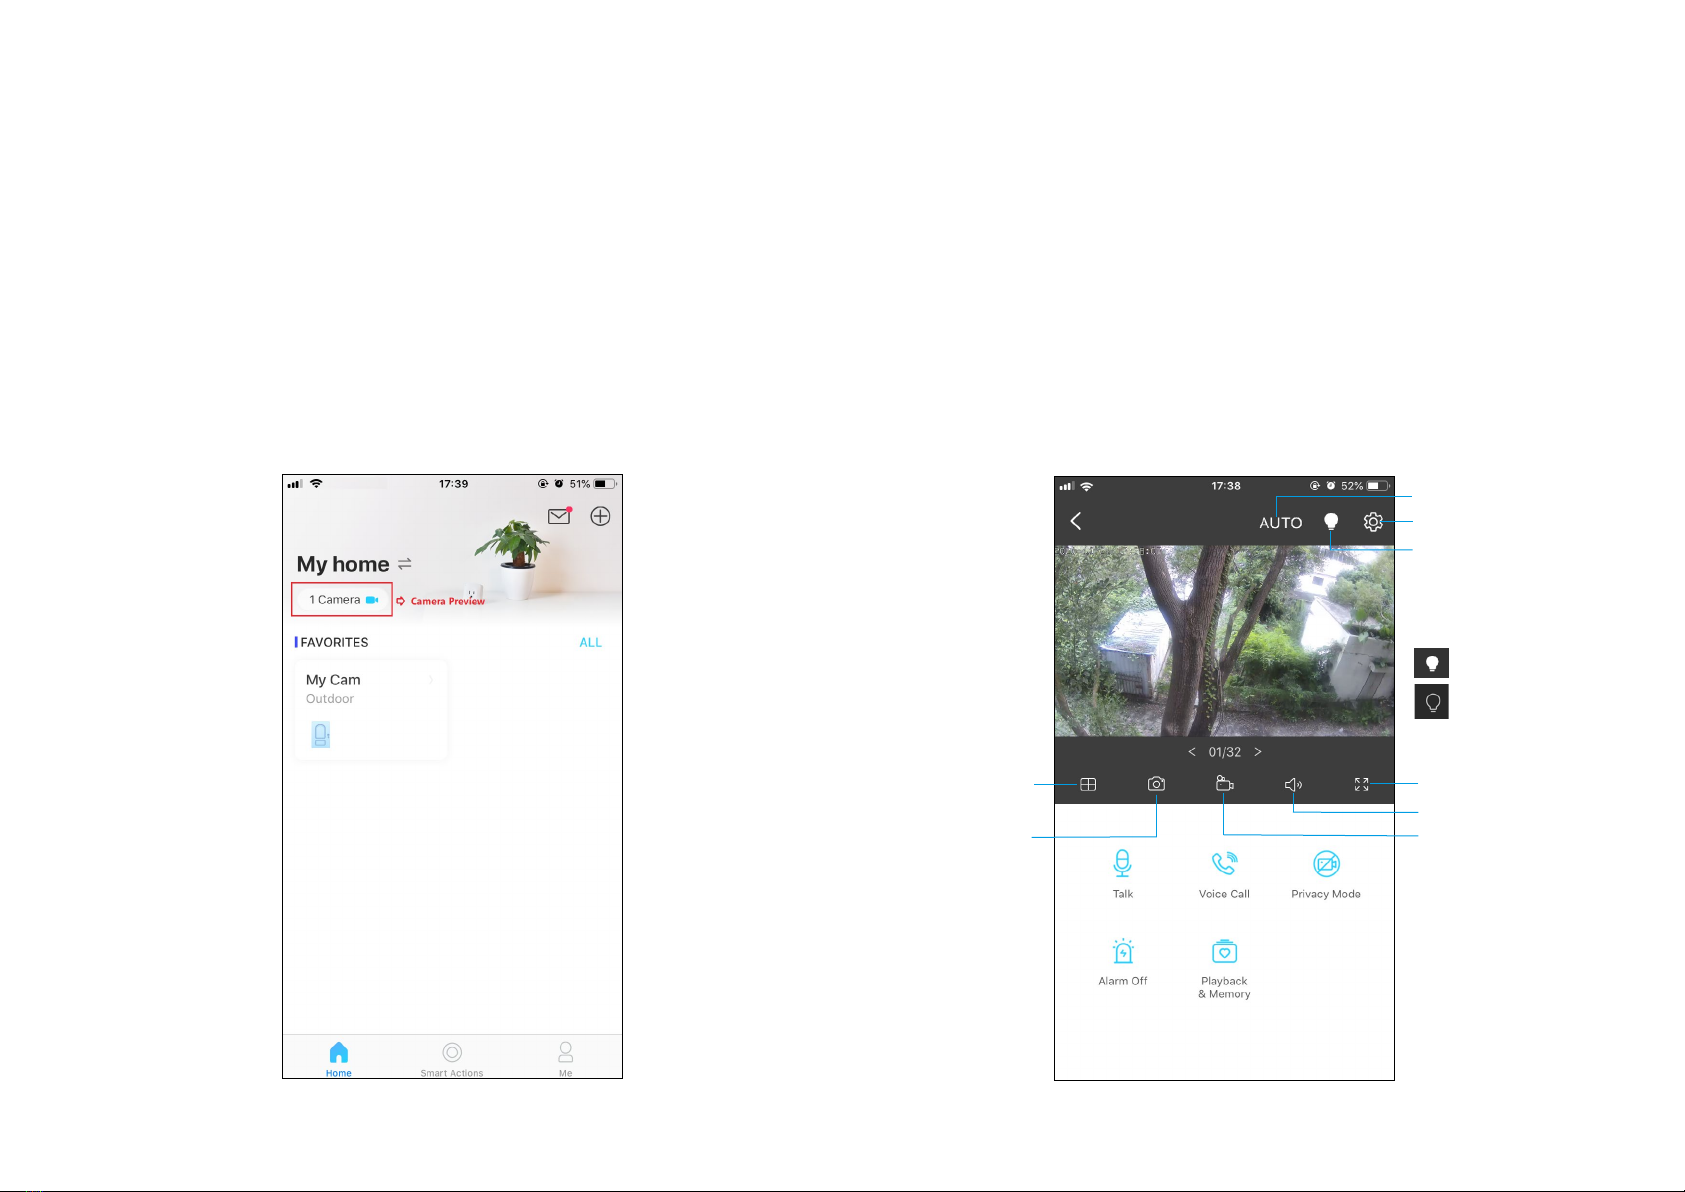
Home Page
This page lists all your cameras you've added and you can view them
directly and manage them easily. Tap the camera or go to Camera
Preview > Manage to enter the Live View page.
Main Camera Controls
After you successfully set up the camera, you will see your camera listed on the home page. You can view and manage your camera from anywhere at
any time with the Tapo app.
Live View
Talk or Voice Call: Communicate with loved ones
Privacy Mode: Enable to temporarily shut down the surveillance for privacy
Alarm On/O: Turn on to get noticed when motion detected
Playback & Memory: Check all recordings and saved moments
Multi-Screen
View live videos from
multiple cameras at
the same time
Screenshot
Full Screen
Volume
Record
Camera Settings
White Light
Get more clear and
vivid image at night. It
cannot be turned o
in Full Color Mode.
Day/Night Mode
The white light is on.
The white light is o.
15
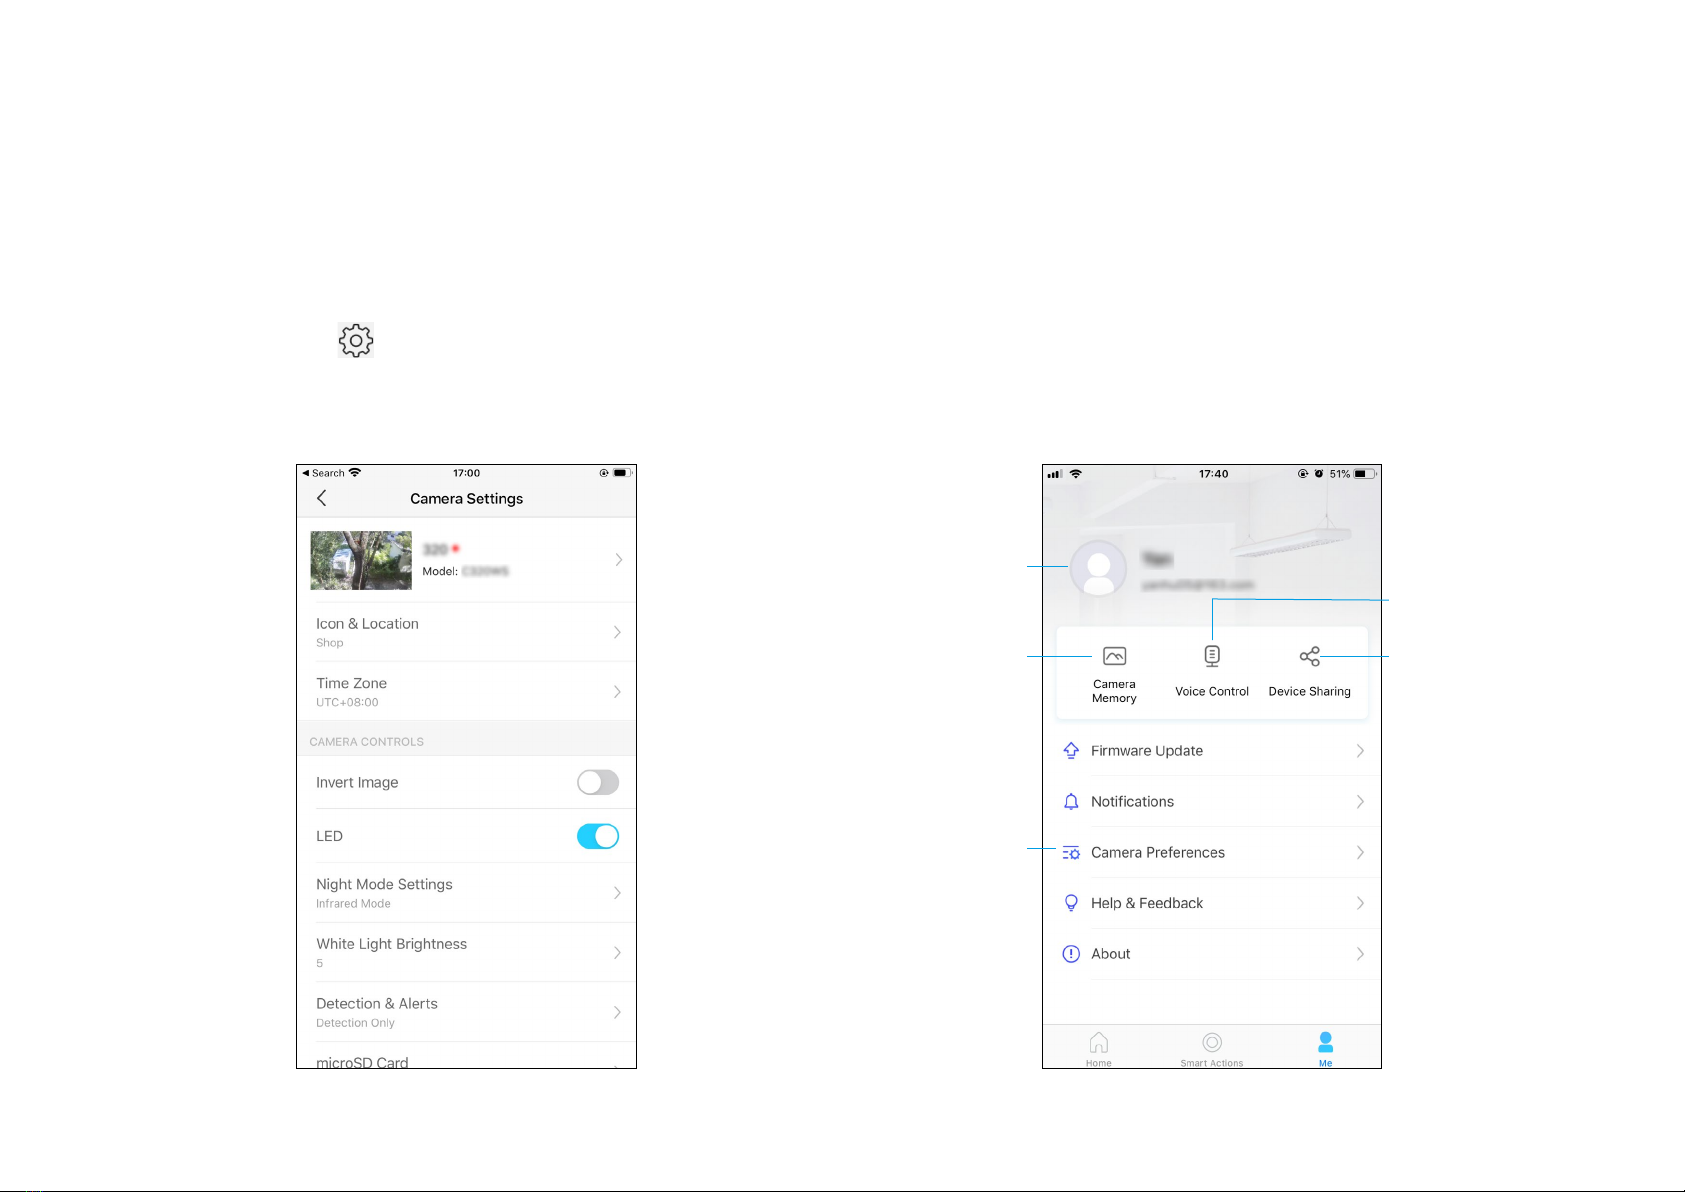
Camera Settings
On Live View page, tap to enter the Camera Settings page. You can
change your camera name, set Night Mode settings, customize detection
settings and recording schedules, turn on/o notications, set activity
zones, remove camera, etc.
Me
On this page, you can edit your account, quickly check the memorable
moments you saved, or nd the FAQs of using smart camera and basic
info related to the Tapo app.
Camera Memory
Photos and videos
you took will appear
here
Device Sharing
Share your Tapo
devices to your family
members to manage
devices together
Camera Preferences
You can choose to display
the Live or Speed tag on
the screen for all your
Tapo cameras
Voice Control
Set up connections with
third-party services
to control your Tapo
devices by voice
Account Info
Change your avatar,
edit your name, or
modify the password
16
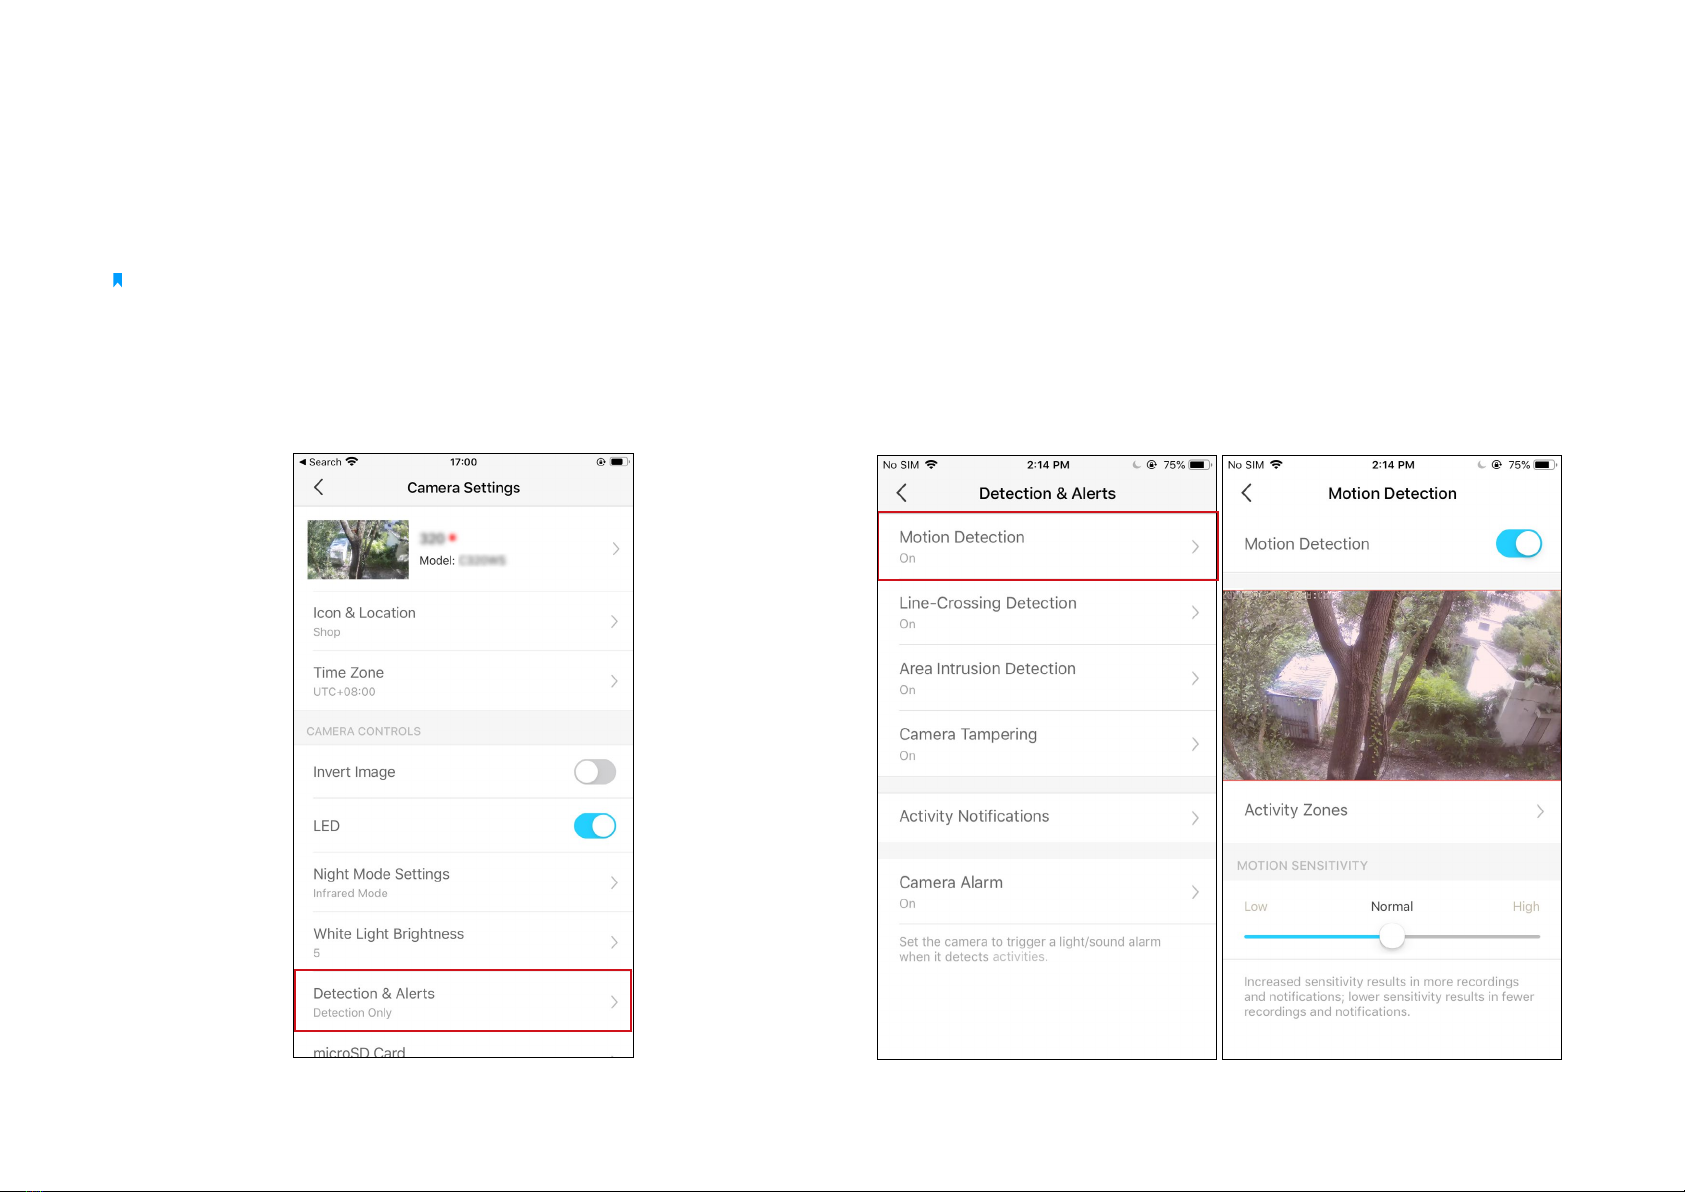
Step 1: Turn On Detection
Go to Camera Settings page and tap Detection & Alerts to turn on the
detection and customize its alert settings.
Motion Detection
When your camera detects motion, it will send you notications or even
sound an alarm. You can personalize your own experience by setting
motion zones to only capture what happens in the area that you set and
adjusting motion sensitivity.
Camera Detection & Alerts
Receive notifications and check feeds when the camera detects a motion, or when someone crosses a boundary, enters an area you've set, or
obstructs the camera. Insert a microSD card to record the clips when activity detected. Otherwise, you can only receive the notications.
Note: Initialize the SD card on the Tapo app before using it.
17
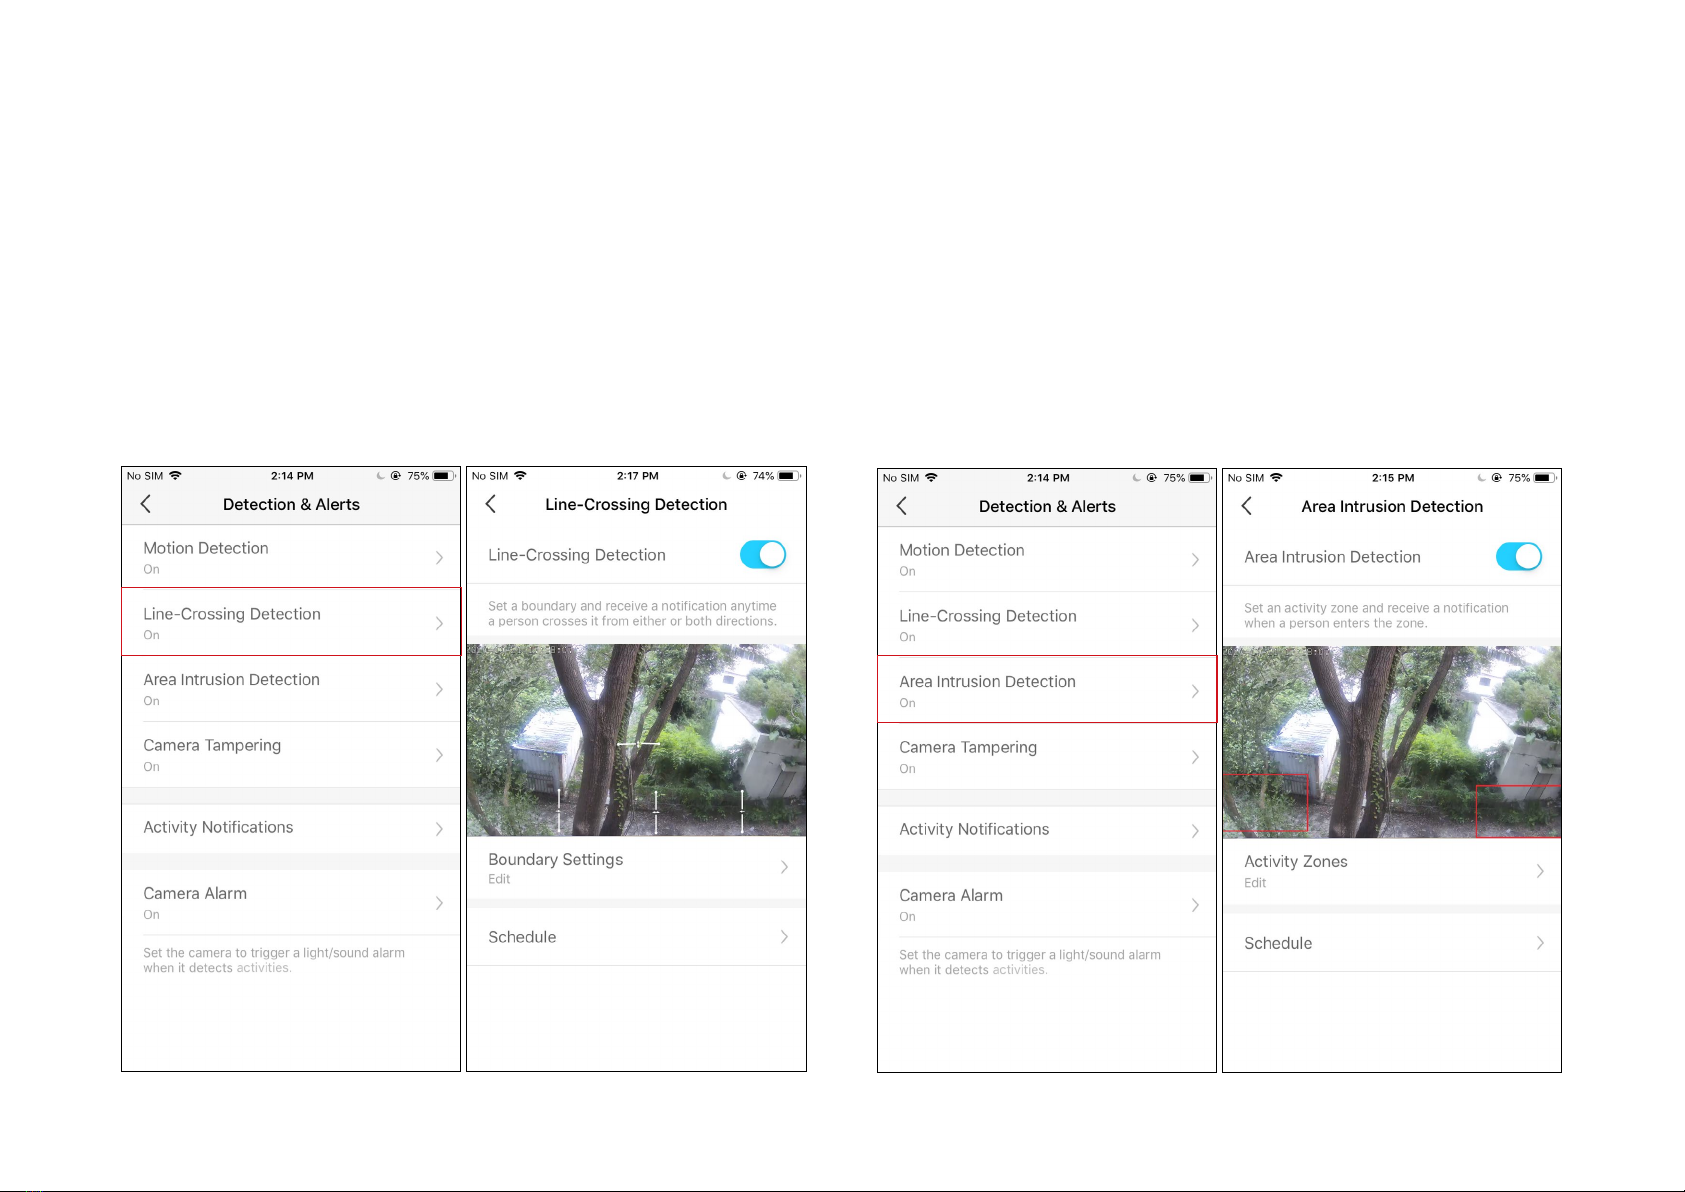
Line-Crossing Detection
Add one or more lines that should not be crossed, then if the set line is
crossed, the camera will send you notications or even sound an alarm.
You can also set the crossing direction and detection schedule. It is ideal
for fence detection, property monitoring, and parking areas.
Area Intrusion Detection
Add one or more activity zones, then when the camera detects someone
enters the set zones, the camera will send you notications or even
sound an alarm. You can set the detection schedule as needed.

18
Camera Tampering Detection
When the camera view is blocked, it will send you notications or even
sound an alarm. You can adjust the detection sensitivity. Increased
sensitivity results in more recordings and notications.
Step 2: Turn On Activity Notications
Turn on Activity Notications to get instant alerts when your camera
detects activities. You can customize the time when the camera sends
you notications.
Other manuals for Tapo C320WS
2
Table of contents
Other TP-Link Digital Camera manuals

TP-Link
TP-Link KC100 User manual

TP-Link
TP-Link Kasa Smart KC310S2 User manual

TP-Link
TP-Link Kasa Spot Pan Tilt KC110 User manual

TP-Link
TP-Link Kasa Cam Outdoor KC200 User manual

TP-Link
TP-Link Cloud Camera Operator's manual

TP-Link
TP-Link Tapo Camera User manual

TP-Link
TP-Link Tapo Smart Hub User manual

TP-Link
TP-Link Tapo C720 User manual

TP-Link
TP-Link Kasa Cam Outdoor User manual

TP-Link
TP-Link NC200 User manual


