TPS easyCHEM 770 User manual

easyCHEM 770 Pool Management System
Chlorine & Acid controller with dosing pumps and timer for pool pump
easyCHEM 770 User Manual
Date : 06-Sep-2007
Author : AB
Version : 1.31

2
TPS Pty Ltd
ABN 30 009 773 371
4 Jamberoo Street
Springwood, Brisbane,
Australia, 4127
Phone : (07) 32 900 400
International : 61 7 32 900 400
Fax : (07) 3808 4871
International : 61 7 3808 4871
Web : www.tps.com.au

3
Contents
Section 1. – Introduction............................................................................................................ 4
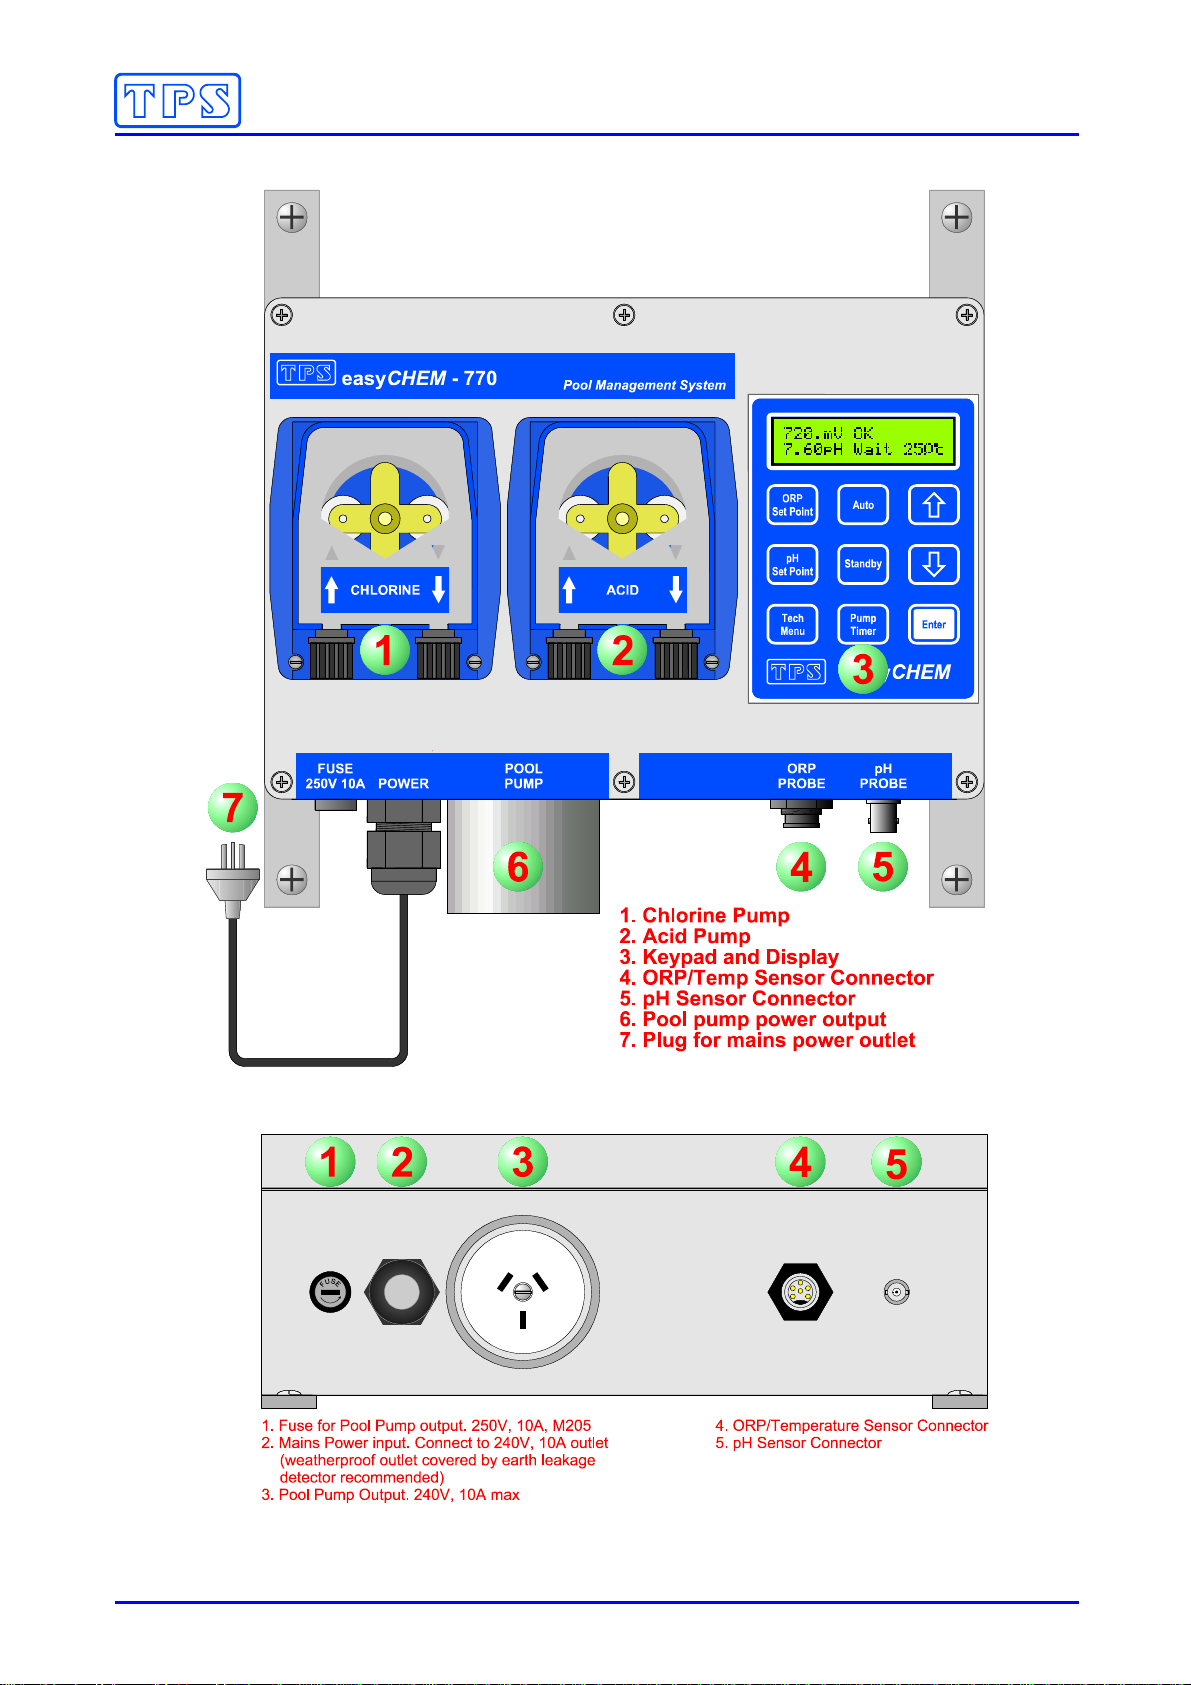
1.1 easyCHEM 770 Display and Controls............................................................................................... 5
1.2 easyCHEM 770 Connectors.............................................................................................................. 5
1.3 Summary of Keypad Buttons............................................................................................................. 6
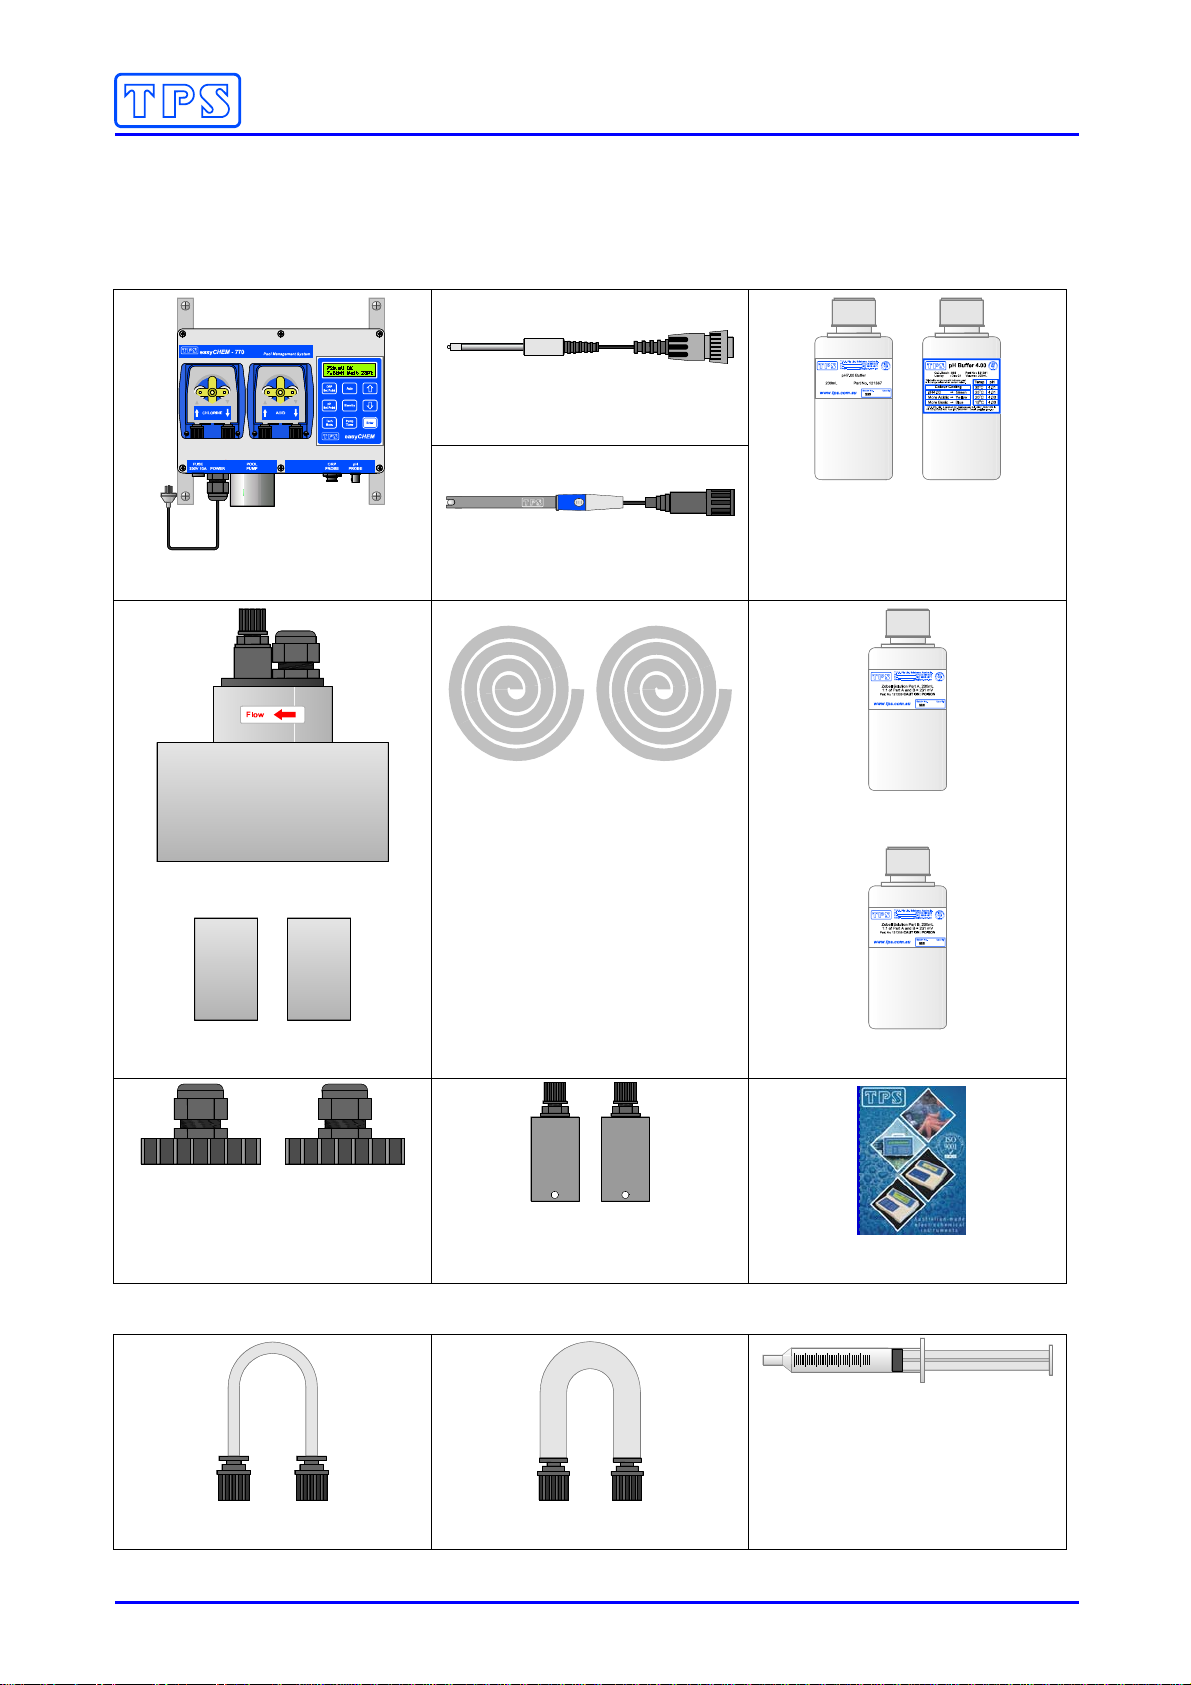
1.4 Unpacking Information....................................................................................................................... 7
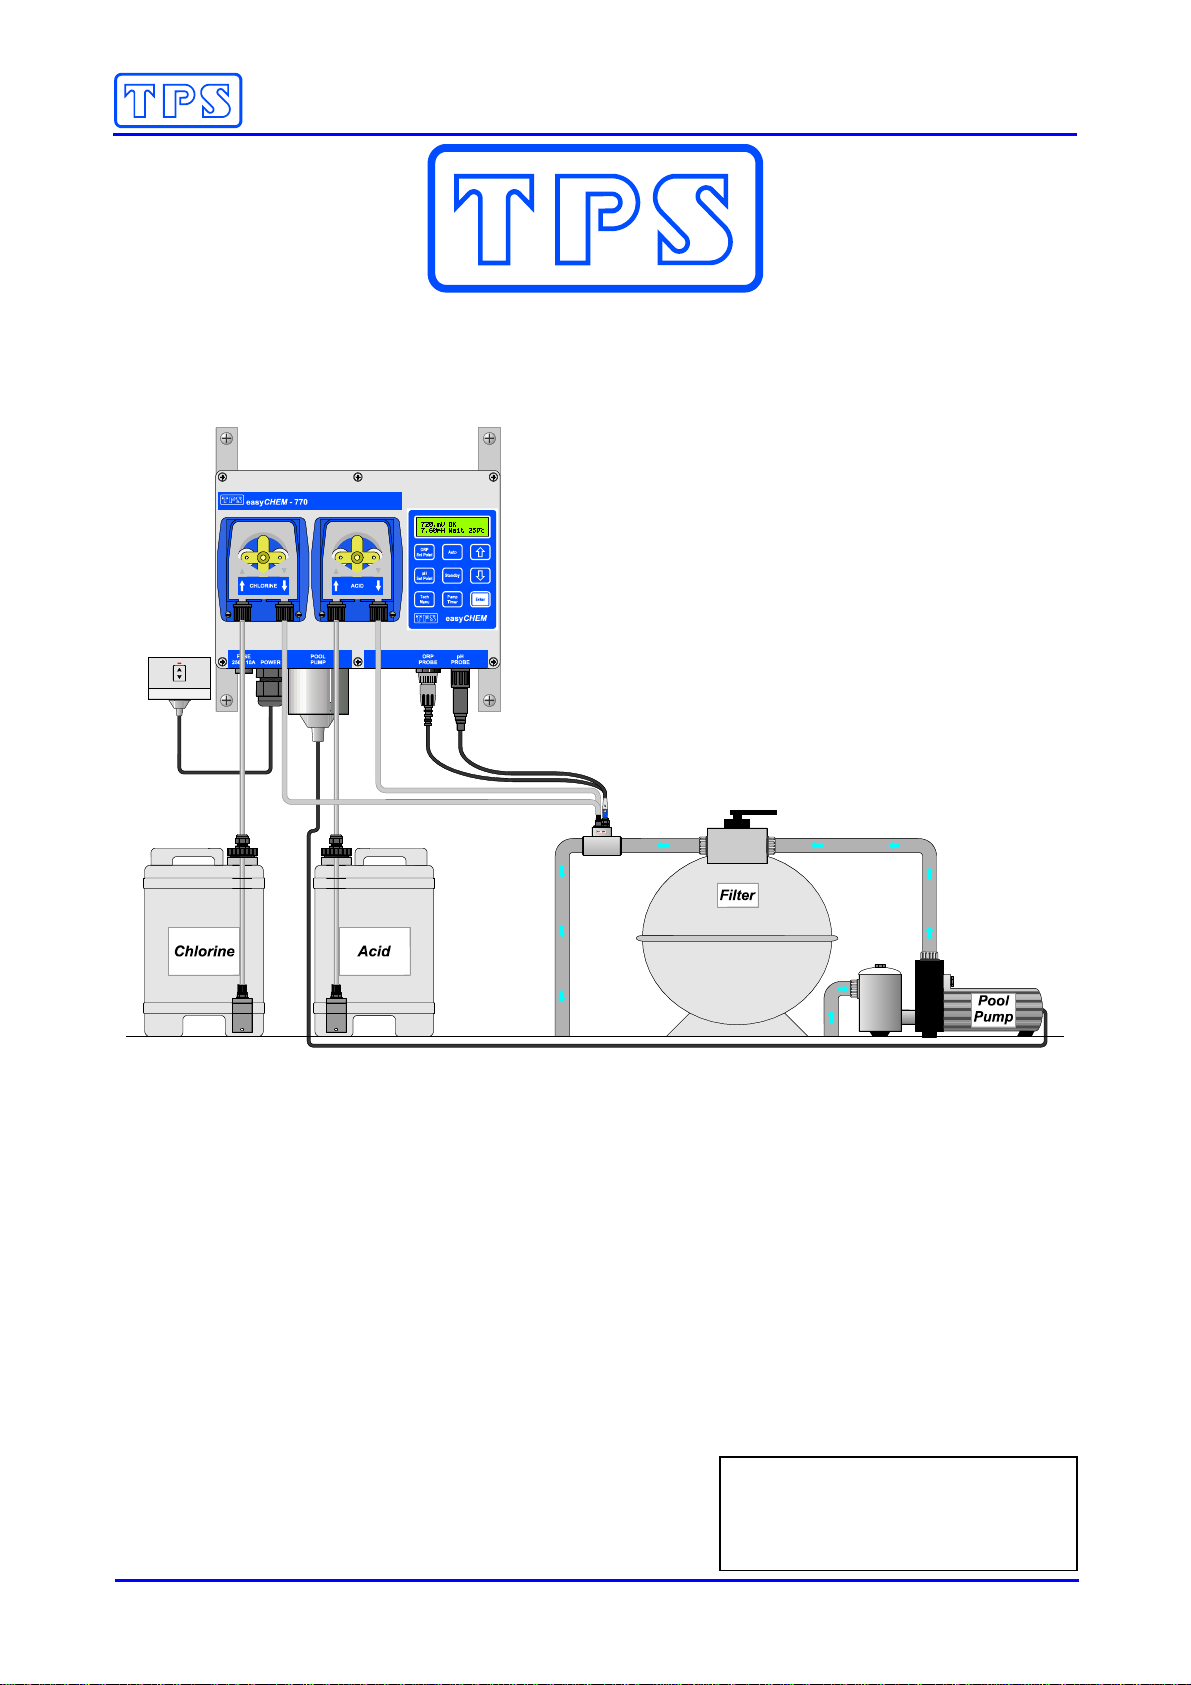
Section 2. – Installation.............................................................................................................. 8
2.1 Plan the installation............................................................................................................................ 8
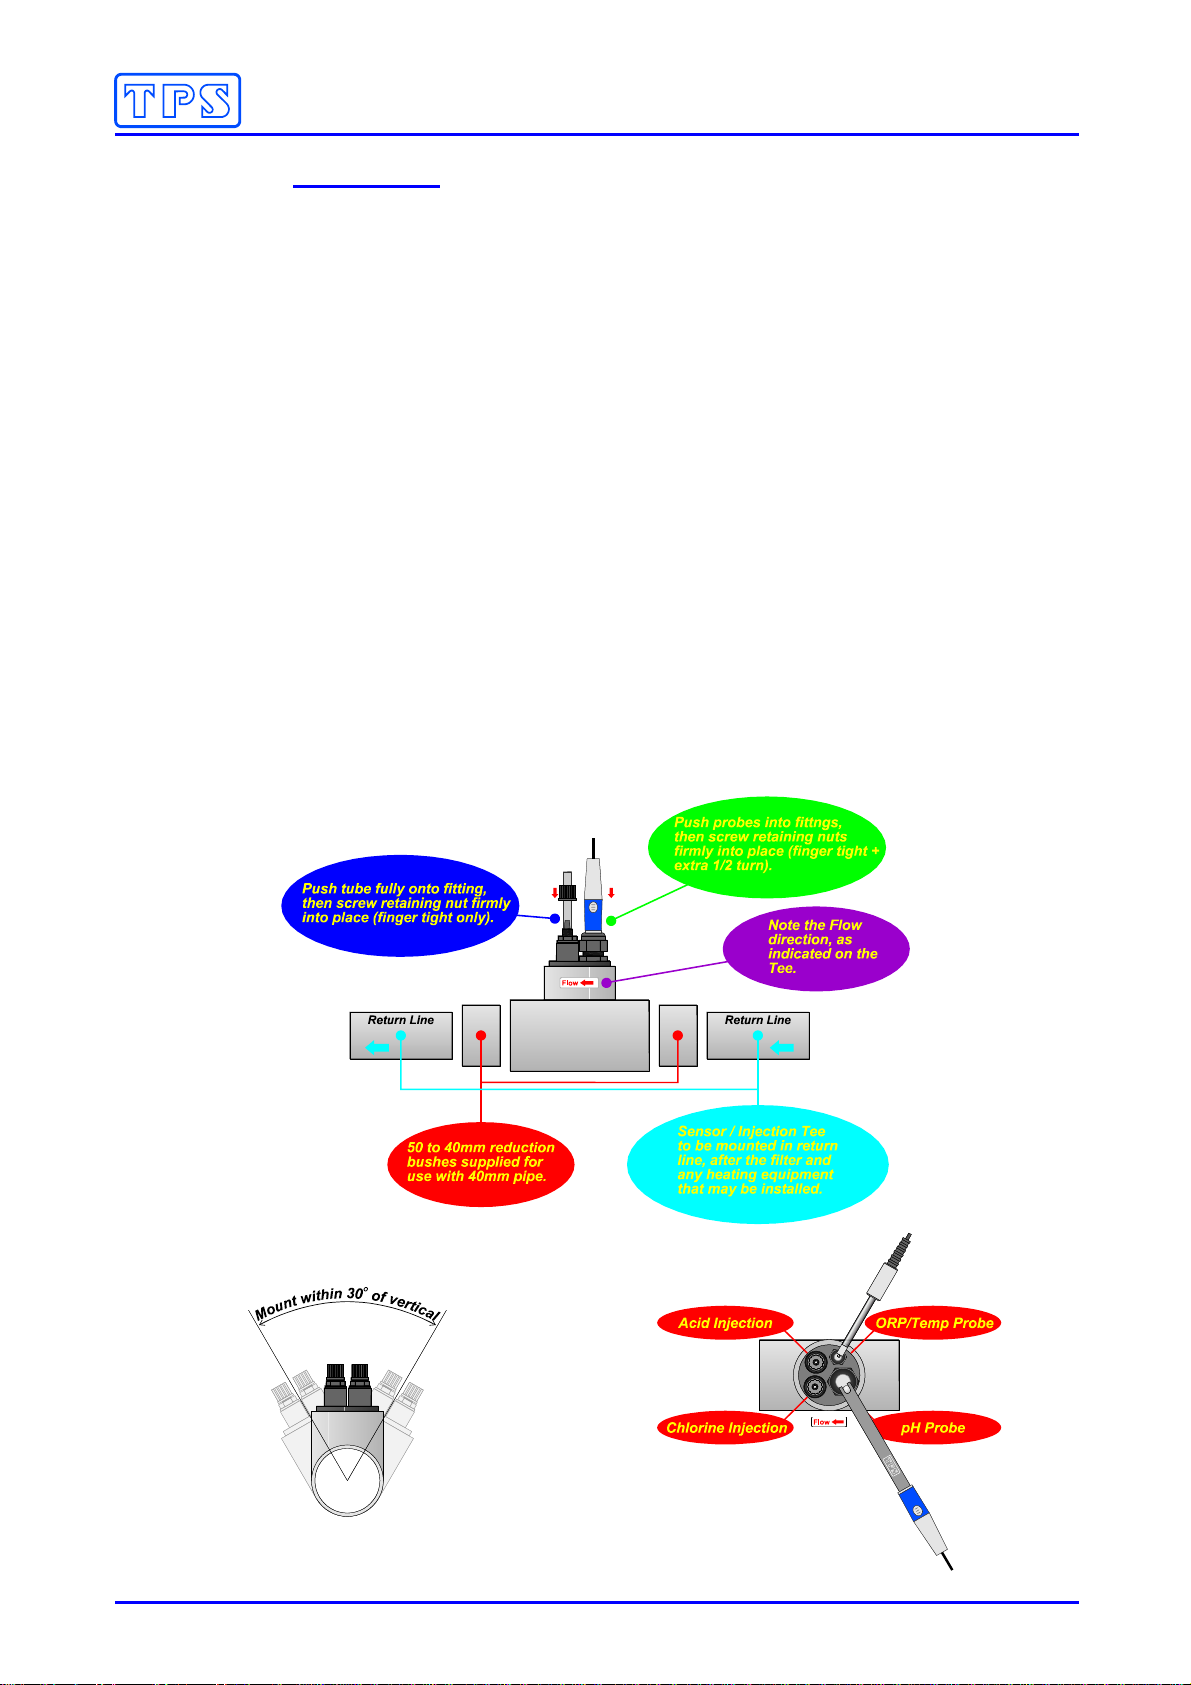
2.2 Install the Sensor and Injection Tee.................................................................................................. 8
2.3 Fit Tubing into Chemical Drums ........................................................................................................ 9
2.4 Fit Tubing to Dosing Pumps .............................................................................................................. 9
2.5 Mount Controller and Make Electrical Connections ........................................................................ 10
2.6 Switch on and Select Pool Size....................................................................................................... 11
2.7 Prime the Dosing Pumps................................................................................................................. 11
Section 3. – Operating Instructions ........................................................................................ 12
3.1 Checking and Setting the ORP Set Point........................................................................................ 12
3.2 Checking and Setting the pH Set Point...........................................................................................13
3.3 Selecting Auto or Standby Modes................................................................................................... 14
3.4 Selecting the Pool Pump Timer Cycle.............................................................................................15
3.5 To Switch the Pool Pump ON manually .......................................................................................... 19
3.6 To Switch the Pool Pump OFF manually......................................................................................... 19
3.7 Pumping to Waste ........................................................................................................................... 20
3.8 Backwashing the Pool Filter ............................................................................................................ 21
3.9 easyCHEM 770 Display Messages................................................................................................. 22
Section 4. – Peristaltic Dosing Pumps ................................................................................... 23
4.1 Lubricating the Pump Tubing........................................................................................................... 23
4.2 Replacing the Pump Tubing ............................................................................................................ 23
4.3 PUMP Error Message...................................................................................................................... 24
Section 5. – Sensor Calibration............................................................................................... 25
5.1 Temperature Calibration.................................................................................................................. 25
5.2 pH Calibration.................................................................................................................................. 27
5.3 ORP Calibration............................................................................................................................... 29
5.4 Action in case of Failed ORP Calibration ........................................................................................30
Section 6. – User Settings........................................................................................................ 31
6.1 Setting the Clock.............................................................................................................................. 31
6.2 Emergency ShutOFF timer.............................................................................................................. 32
6.3 Control Setup................................................................................................................................... 34
6.4 Alarms.............................................................................................................................................. 37
6.5 Super-Chlorinating........................................................................................................................... 39
6.6 Resetting the easyCHEM 770 ......................................................................................................... 40
Section 7. – Troubleshooting .................................................................................................. 41
7.1 General Error Messages from the easyCHEM 770......................................................................... 41
7.2 General Faults................................................................................................................................. 41
7.3 ORP Troubleshooting...................................................................................................................... 41
7.4 pH Troubleshooting ......................................................................................................................... 42
7.5 Temperature Troubleshooting ......................................................................................................... 42
7.6 Instrument firmware version number............................................................................................... 42
7.7 Output Fuse Replacement............................................................................................................... 43
Section 8. – easyCHEM 770 Specifications............................................................................ 44
Section 9. – Warranty ............................................................................................................... 45

Section 1 – Introduction
4
Section 1. – Introduction
Thank you for purchasing an easyCHEM 770.
The easyCHEM 770 a high quality, precision ORP and pH controller and is designed for maximum
reliability to give you many years of reliable service.
Despite its impressive list of features, the easyCHEM 770 is a breeze to operate. This manual has
been designed to help you get started, and also contains some handy application tips. If at any
stage you require assistance, please contact either your local TPS representative or the TPS
factory in Brisbane.
Please note that the easyCHEM 770 must be serviced or repaired by authorised personnel only.
Opening the unit by unauthorised persons may cause an electrical shock, resulting in serious injury
or death. If the power lead becomes damaged, the unit must be returned to TPS or repaired by an
authorised person only. If in doubt, please contact TPS and we will advise you of your nearest
authorised service centre.
The manual is divided into the following sections:
Section 1 – Introduction
The introduction includes a diagram of the easyCHEM 770 unit and its connectors. Brief
descriptions of the controls are provided. Please check the Unpacking Information section to
ensure that you have received all accessories and any options you may have ordered.
Section 2 – Installation
This section provides details on installing the easyCHEM 770. It is a duplicate of the information
found on the easyCHEM 770 Installation Guide card.
Section 3 – Operating Instructions
The Operating Instructions provide details on adjusting user settings such as the Chlorine and pH
set points, pump timer etc. The meanings of the various status and alarm messages are also
described, along with periodic maintenance instructions.
Section 4 – Peristaltic Dosing Pumps
A section devoted to the two dosing pumps fitted to the easyCHEM 770. Describes usage and
maintenance instructions.
Section 5 – Sensor Calibration
Your easyCHEM 770 is supplied pre-calibrated. However, calibration of the sensors should be
checked every 3 months to maintain optimum accuracy. This section describes this procedure.
Section 6 – User Settings
The factory default settings for the easyCHEM 770 should suffice for most domestic pool
installations. However, for larger domestic or commercial pools, refer to this section to customise
the settings.
Section 7 – Troubleshooting
The detailed troubleshooting section provides many useful hints and tips in case there is a problem
with the easyCHEM 770. This section will help solve most problems without the need to return the
unit to the factory for repair.
Section 8 – easyCHEM 770 Specifications
A listing of the technical specifications of the easyCHEM 770.
Section 9 – Warranty
The TPS Warranty conditions are detailed in this section. Also included are details on the
procedure to follow in case the easyCHEM 770 unit needs to be returned for service or repair.

Section 1 – Introduction
5
1.1 easyCHEM 770 Display and Controls
1.2 easyCHEM 770 Connectors

Section 1 – Introduction
6
1.3 Summary of Keypad Buttons
Press to check and/or re-set the ORP set point. Returns to normal display if no key is
pressed for 10 seconds.
Press to check and/or re-set the pH set point. Returns to normal display if no key is
pressed for 10 seconds.
Press to access the technical menu area. Also used as an “escape” key to quit menus
and data entry screens without saving changes.
Press to activate Auto Control mode. The easyCHEM 770 will automatically add
Chlorine and Acid as required.
Press to place the easyCHEM 770 into Standby mode. The easyCHEM 770 will not add
any chemicals, regardless of the readings.
Press to select the desired Pool Pump Timer cycles. See section 3.4 for full details.
Press to scroll up when setting data or making menu selections.
Press to scroll down when setting data or making menu selections.
Press to select and save new data and system settings.

Section 1 – Introduction
7
1.4 Unpacking Information
Please check that you have received all of the items that should have been included with your new
easyCHEM 770.
Standard easyCHEM 770 Kit…
ORP/Temp Sensor, 2m cable
Part No : 111263
easyCHEM 770 Pool Controller
Part No : 117771
pH Sensor, 2m cable
Part No : 111230
pH7.00 Buffer, 200mL
Part No : 121387
pH4.00 Buffer, 200mL
Part No : 121381
Probe & Injection Tee, 50mm
Part No : 117904
50 to 40mm reduction bushes x 2
Part No : NPRB5040
Peristaltic Pump Input and Output
Tube, 4m x 2
Part No : 116360
ZoBell ORP Solution, Part A, 200mL
Part No : 121309-A
ZoBell ORP Solution, Part B, 200mL
Part No : 121309-B
Drum lid with gland fitting x 2
Part No : 116362
Tube weight for chemical drum x 2
Part No : 116354
easyCHEM 770 Handbook
Part No : 130050
Spare Parts, not included in standard kit…
Pump tube assembly, 1.5 L/Hr
Part No : 116353
Pump tube assembly, 5 L/Hr
Part No : 116352
Pump Tube Lubricant, 3mL
Part No : 130103

Section 2 – Installation
8
Section 2. – Installation
The easyCHEM 770 is supplied with an A3 size installation guide. Installers should refer to this
guide. The details have been repeated here for the purpose of having a complete user manual.
2.1 Plan the installation
Ensure that…
1. The easyCHEM 770 controller is installed in a sheltered location
2. The easyCHEM 770 controller is close enough to the expected location of the Sensor/
Injection Tee for the sensor cables and pump output tubing to reach without straining.
3. The maximum suction height from the bottom of the chemical drums to the dosing pumps is 2
metres.
4. The mains power lead from the pool pump reaches the easyCHEM 770 without straining.
5. The mains power lead from the easyCHEM 770 reaches a mains power outlet. If the controller
is mounted in a wet area, a weatherproof power outlet must be used. TPS highly recommends
the use of an earth leakage circuit breaker with this power outlet. Please consult a qualified
electrician if you are not sure if this is fitted.
2.2 Install the Sensor and Injection Tee
Install the Sensor and Injection Tee as per the diagrams below. Use a suitable PVC joining
compound. The Tee is installed in the return line to the pool, as the pressure is low and the
sensors will only be exposed to clean, filtered water.

Section 2 – Installation
9
2.3 Fit Tubing into Chemical Drums
Insert the suction tubing
through the chemical
drum lid supplied and fit
the drum weight, as per
the diagram below. Be
sure to use the correct
type of chemical
resistant drum. Your pool
professional can advise
on this. For installations
where the lid provided is
not compatible with the
container, drill a 1/2” or
13mm hole into the lid of
the container and fit the
compression fitting. Drill
a second 2mm diameter
vent hole to avoid
suction build-up.
IMPORTANT INFORMATION REGARDING ACID
•Always use dilute Hydrochloric Acid.
•Add 5 Litres of Acid to 20 to 25 Litres of water.
•NEVER ADD WATER TO ACID
•Using concentrated acid may damage your equipment and void the
warranty
2.4 Fit Tubing to Dosing Pumps
Insert the suction tubing
from the chemical drum
to the left hand side
compression fitting of the
dosing pump. Screw the
retaining nut into place
firmly, ensuring the tube
is securely anchored.
Repeat for the tubing on
the right hand side of the
pump.
Ensure that the
Chlorine drum is
connected to the
Chlorine pump, and the
Acid drum is
connected to the Acid
pump.

Section 2 – Installation
10
2.5 Mount Controller and Make Electrical Connections
Mount the easyCHEM 770 controller on a sturdy wall or post using minimum 3mm or 1/8” stainless
steel bolts, screws or masonary anchors.
The easyCHEM 770 controller MUST be installed in a sheltered location.
Connect the probes and pool pump to the easyCHEM 770. Plug the easyCHEM 770 into a
suitable power outlet.

Section 2 – Installation
11
2.6 Switch on and Select Pool Size
1. Plug the easyCHEM 770 mains lead into the mains power outlet to switch the controller on.
2. Press .
3. Press until “→Pool Size” is selected and press .
4. Press or until the desired pool size is selected and press . If in doubt, select a size
that is larger than the pool.
The Pool Size set-up adjusts the Emergency ShutOFF Timer and Control Setup to the ideal values
for that pool size. For more details on these topics, see sections 6.2 and 6.3.
2.7 Prime the Dosing Pumps
This step is optional, as the peristaltic dosing pumps are self priming and will operate correctly
when the easyCHEM 770 is switched on. The pump priming function has been included for those
installers who wish to check the operation of the dosing pumps when installation is complete.
The pump priming function can also be used to prime the peristaltic pumps with water. This is
highly recommended when lubricating or changing the pump tubes, to avoid spilling dangerous
chemicals out of the tubes.
1. Press .
2. Press until “→Prime Pumps” is selected and press .
3. Press or to select the Chlorine Pump, Acid Pump, or Both Pumps and press .
4. The easyCHEM 770 will now run the selected pump(s) for 3 minutes. This is enough time to
suck the chemical (or water) through the suction tube, through the pump and feed it through
the output tube…
Priming Pumps
for 3 mins 3:00
Note the countdown timer which is provided on the screen.
Press to quit pump priming.
5. The easyCHEM 770 will resume the normal pool pump cycle and dosing at the end of the 3
minutes.

Section 3 – Operating Instructions
12
Section 3. – Operating Instructions
3.1 Checking and Setting the ORP Set Point
1. Press to check the ORP Set Point.
2. Use the and keys to change the ORP Set Point.
3. Press to save the new ORP Set Point.
4. To quit without making or saving changes, simply allow the unit to return to the normal display,
which occurs when no keys have been pressed for 10 seconds.
Notes
1. The easyCHEM 770 controls ORP within a 20mV “control band”. If the Set Point is 700 mV,
the Chlorine pump will start when the reading drops to 680mV and stop again when the
reading reaches 700mV. The control band stops the pump being rapidly switched on and off
when the reading is close to the Set Point, thereby increasing the pump’s life.
2. The exact ORP Set Point to achieve the correct Chlorine level will vary depending on other
chemical factors such as pH, Alkalinity and Cyanuric Acid (stabiliser) levels.
It is imperative that the pool water is checked once a month to ensure that all other
chemical parameters are correct.
3. When first installing the easyCHEM 770, check the Chlorine levels every few days using a
Chlorine test kit. Increase the ORP Set Point if the Chlorine level is low and decrease it if the
Chlorine level is high. Once the pool has been fine-tuned over a week or two, the controller will
accurately maintain the correct Chlorine level.

Section 3 – Operating Instructions
13
3.2 Checking and Setting the pH Set Point
1. Press to check the pH Set Point.
2. Use the and keys to change the pH Set Point.
3. Press to save the new pH Set Point.
4. To quit without making or saving changes, simply allow the unit to return to the normal display,
which occurs when no keys have been pressed for 10 seconds.
Notes
1. The easyCHEM 770 controls pH within a 0.2pH control band”. If the Set Point is 7.40pH, the
Acid pump will start when the rises above 7.60pH and stop again when the reading reaches
7.40pH. The control band stops the pump being rapidly switched on and off when the reading
is close to the Set Point, thereby increasing the pump’s life.
2. The recommended pH range for swimming pools is pH7.40 to pH7.80. This pH range provides
the best combination of Chlorine effectiveness and compatibility with human skin and eyes.
3. The pH must be reading correctly and the pH Set Point must be set correctly in order for the
Chlorine control system to work effectively.

Section 3 – Operating Instructions
14
3.3 Selecting Auto or Standby Modes
1. Press to place the easyCHEM 770 into Automatic Control mode. In this mode, the unit will
measure the ORP and pH levels of the pool and automatically add Chlorine and Acid as
required.
Auto mode should be selected for normal operation.
2. Press to place the easyCHEM 770 into Standby mode. In this mode, the unit will measure
the ORP and pH levels of the pool, but it will NOT add any chemicals, even if they are
required.
Standby mode should only be used to stop the dosing pumps operating, eg. when
topping up chemical drums. Long term use of this mode will make your pool unfit for
swimming.

Section 3 – Operating Instructions
15
3.4 Selecting the Pool Pump Timer Cycle
The easyCHEM 770 is fitted with a 240V 10A mains power outlet for your pool pump which is
controlled by a Pump Timer system built into the unit. To make its operation as simple as possible,
this timer has several automatic pre-sets. A custom program can also be entered, if required.
3.4.1 To select the default Summer/Winter program
The easyCHEM 770 is provided with an automatic Summer and Winter timer program for the pool
pump. This program reduces the amount of time that the pump operates in Winter, as less filtration
is required when the pool is not in use.
The result is a saving for your power bill and for the environment by reducing the electricity being
used.
1. Press to display the Pump Timer menu…
Pool Pump
>Timed < ↓
2. Select ‘→Timed’ from the menu and press to select the default Timer program.
The default program operates the Pool Pump as follows…
Summer : 06:00 to 10:00 and 15:00 to 19:00.
Winter : 06:00 to 10:00 only.
For the Southern Hemisphere…
The easyCHEM 770 changes to Winter mode on the 15th of May.
The easyCHEM 770 changes to back to Summer mode on the 15th of August.
For the Northern Hemisphere…
The easyCHEM 770 changes to Winter mode on the 15th of November.
The easyCHEM 770 changes to back to Summer mode on the 15th of February.
To change between Southern and Northern Hemisphere…
1. Press to enter the Technical Menu area.
2. Press until ‘→Summer/Winter’ is selected and press …
>Southern ↓
Northern
3. Press or to select ‘Southern’ or ‘Northern’ as required and press .

Section 3 – Operating Instructions
16
To change Winter Start and Winter End dates…
1. Press to enter the Technical Menu area.
2. Press until ‘→Summer/Winter’ is selected and press …
3. Press until ‘Custom’ is selected and press .
4. The easyCHEM 770 will now prompt you to enter the Winter Start date…
Winter Start
15-May ↑↓ Enter
Use the and keys to set the date and press .
Use the and keys to set the month and press .
5. The easyCHEM 770 will now prompt you to enter the Winter Finish date…
Winter Finish
15-Aug ↑↓ Enter
Use the and keys to set the date and press .
Use the and keys to set the month and press .

Section 3 – Operating Instructions
17
3.4.2 To select a pre-set Timer program
Those users who do not wish to use the default Summer/Winter Timer program can select the
Summer or Winter program to operate all year round…
1. Press to display the Pump Timer menu.
Pool Pump
>Timed < ↓
2. Press until ‘>Set Timer<’ is selected and press . The following screen is displayed…
Set Pump Timer
>Auto < ↓
3. Press until the desired choice is selected and press .
‘Auto’ is the default program, and operates the pool pump as per the details in section 3.4.1.
The ‘Summer’ program operates the pool pump from 06:00 to 10:00 and from 15:00 to 19:00 every
day. This cycle operates all year round if selected.
The ‘Winter’ program operates the pool pump from 06:00 to 10:00 every day. This cycle operates
all year round if selected.
The ‘Custom’ program is covered in section 3.4.4.
To operate the pump 24 hours per day, select ‘Continuous’. This is covered in the next section.
3.4.3 To select the Continuous program
The Continuous program is available for installations where the pool pump will be operating 24
hours per day, or some other external timer device is used to control the pool pump. When an
external timer device is being used to control the pool pump, ensure that the easyCHEM 770 is
also controlled by the same device. This will ensure that Chlorine and/or Acid is only dosed when
the pool pump is actually running.
To select the Continuous program…
1. Press to display the Pump Timer menu.
Pool Pump
>Timed < ↓
2. Press until ‘>Set Timer<’ is selected and press . The following screen is displayed…
Set Pump Timer
>Auto < ↓
3. Press until ‘>Continuous<’ is selected and press .
The easyCHEM 770 will now provide mains power to the POOL PUMP output socket continuously
when the easyCHEM 770 is switched on.

Section 3 – Operating Instructions
18
3.4.4 Setting a Custom Timer program
Those users who do not wish to use any of the pre-set programs can enter their own custom Timer
program. Two ON and OFF cycles per day can be entered. These are labelled ‘AM’ and ‘PM’,
although any time of day can be entered for either. The custom program will operate all year round.
1. Press to display the Pump Timer menu.
Pool Pump
>Timed < ↓
2. Press until ‘>Set Timer<’ is selected and press . The following screen is displayed…
Set Pump Timer
>Auto < ↓
3. Press until ‘>Custom<’ is selected and press . The AM ON screen is now displayed…
AM ON : 06:00
↑↓:Set >:Enter
Press or to set the hours for when the pool pump will turn ON and press .
Press or to set the minutes for when the pool pump will turn ON and press .
4. The AM OFF screen is now displayed…
AM OFF : 10:00
↑↓:Set >:Enter
Press or to set the hours for when the pool pump will turn OFF and press .
Press or to set the minutes for when the pool pump will turn OFF and press .
5. The PM ON screen is now displayed…
PM ON : 15:00
↑↓:Set >:Enter
Press or to set the hours for when the pool pump will turn ON and press .
Press or to set the minutes for when the pool pump will turn ON and press .
6. The PM OFF screen is now displayed…
PM OFF : 19:00
↑↓:Set >:Enter
Press or to set the hours for when the pool pump will turn OFF and press .
Press or to set the minutes for when the pool pump will turn OFF and press .
7. The Custom Timer program has now been set and will operate your pool pump accordingly.
Notes
1. Enter 00:00 for the AM or PM ON and OFF times to avoid the pump operating for that cycle.
2. Enter 00:00 for both the AM and PM ON and OFF times to avoid using the pool pump output
entirely. In this case the pool pump would need to be connected to an alternative power outlet.

Section 3 – Operating Instructions
19
3.5 To Switch the Pool Pump ON manually
The pool pump can be switched ON manually using the easyCHEM 770 any time.
1. Press to display the Pump Timer menu.
Pool Pump
>Timed < ↓
2. Press until ‘>ON <’ is selected and press . The word ‘ON’ is now displayed in the
top right of the screen to indicate that the pool pump has been switched ON manually…
700.mV OK ON
7.40pH OK 25
Notes
1. The pool pump will remain ON until the next time it is due to be switched OFF by the Timer
cycle.
2. To stop the pump, press , select ‘Timed’ or ‘OFF’ and press .
3.6 To Switch the Pool Pump OFF manually
The pool pump can be switched OFF manually using the easyCHEM 770 any time.
1. Press to display the Pump Timer menu.
Pool Pump
>Timed < ↓
2. Press until ‘>OFF <’ is selected and press . The easyCHEM 770 will now display
the ‘Pump OFF’ message with the current time, and also indicate when the next pump cycle is
due.
Pump OFF 12:00
Alternates every 2 secs
↔Next Pump Cycle
06:00 > 10:00
Notes
1. The pool pump will remain OFF until the next time it is due to be switched ON by the Timer
cycle.
2. To re-start the pump, press , select ‘Timed’ or ‘ON’ and press .

Section 3 – Operating Instructions
20
3.7 Pumping to Waste
From time to time, all pool users need to pump some water to waste. This is normally the case
when there has been heavy rainfall. The advantage of using the easyCHEM 770 to control the
Pump to Waste function is that the unit will not add any chemicals while the water is being pumped
to waste. Better for the environment, better for your budget ! To pump to waste…
1. Press to display the Pump Timer menu.
Pool Pump
>Timed < ↓
2. Press until ‘>To Waste <’ is selected and press . The following screen is displayed…
Set filter to
Waste Enter
The pool pump is now switched OFF. Set the control on your filter to its “Pump to Waste”
setting, then press .
3. The pool pump is now pumping pool water to waste. The following screen is displayed…
Pumping to Waste
Enter Stops
Press to stop the pool pump.
4. The easyCHEM 770 now prompts you to return the pool filter to its normal filtration setting…
Re-set filter to
Normal Enter
Re-set the filter, then press .
5. The easyCHEM 770 displays the following message before returning to the normal pump
timer cycle and chemical dosing…
Resuming Pump
Cycle & Dosing
Notes
1. The pool pump will remain ON until the user presses to stop it. Care must be taken to
avoid pumping too much pool water to waste.
Table of contents
Popular Lighting Equipment manuals by other brands

ETC
ETC Source Four MultiPAR user manual

Code 3
Code 3 930 Installation & operation manual

Philips
Philips eW Cove QLX Powercore installation instructions

Vision & Control
Vision & Control LDLF60x600-B470/UDC Instructions for use

Fiamma
Fiamma LED AWNING LIGHT Installation and usage instructions

EuroLite
EuroLite LED KLS-50 user manual