manuals.online logo
Brands
  1. Home
  2. •
  3. Brands
  4. •
  5. Trac Vac
  6. •
  7. Lawn And Garden Equipment
  8. •
  9. Trac Vac 652-IC/PRO/H/K Product guide

Trac Vac 652-IC/PRO/H/K Product guide

11-11-05
Model 652-IC/PRO/H/K
Operating and
Assembly
Manual
Midwest Equipment Manufacturing, Inc.
5225 Serum Plant Road
Thorntown, IN 46071
1
SAFETY RULES
Remember, any power equipment can cause injury if operated improperly or if the user does not understand
how to operate the equipment. Exercise caution at all times when using power equipment.
This symbol means Attention!!!!! It is used to point out safety precautions.
▪ Read and follow all instructions in this manual before assembly or operation of this equipment.
Failure to comply with these instructions may result in personal injury. Keep this manual for future
reference and for ordering replacement parts.
▪Read this instruction manual carefully. Become familiar with the controls and proper use of this
equipment.
▪Read the engine owners manual and safe operation rules before using this equipment.
▪Never allow children less than 16 years of age to operate the Trac-Vac. Children 16 years
and older should operate only under close parental supervision.
▪Do not allow anyone to operate this equipment without proper instruction.
▪Do not allow passengers to ride on the Trac-Vac or on the towing vehicle.
▪Keep children and pets out of area of operation.
▪Check fuel before starting engine. Do Not fill fuel tank indoors, or while engine is running or hot.
Wipe off any spilled fuel before starting engine.
▪Engine and muffler get HOT!Do Not touch! Keep debris from accumulating on or around engine
and muffler to avoid fire hazard.
▪Allow engine to cool before storing in any enclosed area. Never store Trac-Vac with fuel in tank.
▪Do not operate engine if air cleaner or cover is removed, except for adjustments. Removal of the part
could create a fire hazard.
▪Keep hands, feet, face, long hair and clothing out of inlet and discharge areas. There are ROTATING
BLADES inside these openings.
▪Make certain that all moving parts come to a complete stop before cleaning, repairing or inspection.
Disconnect spark plug wire and keep away from plug to prevent accidental starting.
▪If Trac-Vac should become clogged with debris, SHUT OFF ALL ENGINES and wait until impeller
comes to a complete stop before attempting to remove obstruction. Disconnect spark plug wire to
prevent accidental starting.
▪If excessive vibration occurs while operating your Trac-Vac, stop the engine immediately, disconnect
the spark plug wire and allow all moving parts to stop completely before taking the following steps.
A. Inspect for damage.
B. Repair or replace any damaged parts.
C. Check for loose parts and tighten to assure continued safe operation.
▪Check all hardware periodically to insure safe operation.
▪Check cart cover periodically for wear and replace if worn or damaged.
▪Never operate Trac-Vac without intake hose and exhaust hose attached in proper place.
▪Do Not remove exhaust hose or attempt to empty contents of container while engine in running.
▪Keep all shields and guards in place and securely attached.
▪Always wear eye protection (safety glasses or goggles) when operating this equipment.
▪Do Not stand behind unit in exhaust discharge area while engine is running.
▪Do Not operate this equipment while intoxicated or while taking medications that could impair
reactions or senses.
▪Operate this equipment at reduced ground speed on rough terrain, along creeks and ditches and on
slopes to prevent tipping or loss of control.
▪Vehicle stability and braking are affected by the addition of this unit. Do not fill the Trac-Vac to its
full capacity without checking the capability of the towing vehicle to safely pull and stop with the unit
attached.
▪Do Not operate on slopes in excess of 10 degrees. STAY OFF OF STEEP SLOPES!
▪Follow the maintenance instructions outlined in this manual.
2
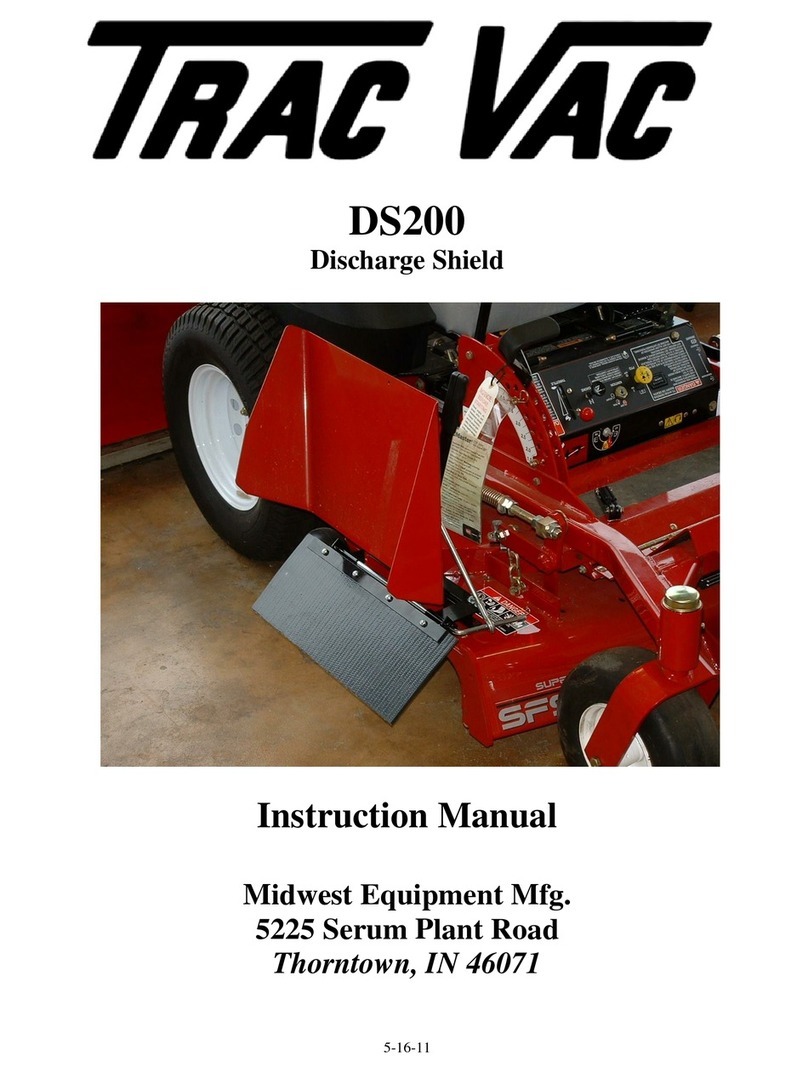
T rac-V ac M odel 652
35 1 88020 H ose S upport A rm
33 1 652 03 H ose, 6" x 42 "
34 2 5610 2 6" H o se C lam p
4624 2 T u rbin e H ousin g (6 .5 B rig gs, K oh ler)
9 1 65031 S teerin g A rm A ss'y, R H
8 1 65030 S teerin g A rm A ss'y, L H
7 1 65016 D raw ba r
4705 0 Inlet, 8" (6 .5 B riggs, K oh ler)
6 1 8804 0 In let, 880 (5.5 B rig g s, H onda )
4625 4 T urbine, 6 H P (6 .5 B rig g s, K ohler)
5 5 60 4 0 T u rb in e, 5 H P (5 .5 B rig gs , H on d a)
3 8 1 5 81 0 4 H itc h P in
4 1 5603 0 T urb in e H o usin g , (5 .5 B rig gs, H on d a)
560 28 E ngin e, 6 H P K ohler
3 1 5 60 21 E n gin e, 5 H P B rig g s
2 1 6 5 20 1 L o w er F ra m e S u p p ort
1 1 6 5 01 0 M a in F ra m e
P /NQ tyK ey Q ty P /NK ey D esc riptio n
D esc riptio n
32 2 47020 V ertical U prig h t
2 6 6 5 61 1 5 N y lo n S p ac er
31 4 3120 5 1 8 E yeb o lt
3 0 4 4 80 3 8 S p rin g
2 9 1 4 62 4 8 F ilter S h ie ld
2 8 1 6 82 3 8 E x hau st B o ot
2 7 2 4 62 1 8 C le v is P in
2 5 2 4 62 1 7 T o p S u p p o rt
2 4 2 4 62 3 3 F ilte r S u p p o rt
2 3 2 4 62 2 8 F ilte r
2 2 1 6 82 2 2 M old ed T op , D o ub le
2 1 2 4 62 1 9 S e al, M o ld e d T o p
20 2 462 10 C o ntainer
19 4 4701 9 B ushin g, C on ta in er H o ld er
18 2 4701 8 C o ntainer H older
1 7 2 4 70 1 4 F ra m e, 4 7 0 -F D
16 4 650 32 1" N y lo n B u sh in g
15 4 650 18 T ie R od B all Joint, 3/8"
14 2 65024 R ear T ie R o d (1 9")
13 2 680 5 0 W h eel
12 2 650 19 T ie R od B all Joint, 1/2"
1 1 1 6 50 2 3 M ain T ie R od
1 0 1 6 50 2 0 S tee rin g A rm A ss'y , C e n te r
3 9 2 4 6 23 5 C o n ta in er L atch
40 1 56107 W asher, T urb in e (5.5 B rig g s, H onda)
2 4 5131 D ecal, T rac -V a c, W hite
41 2 1811 9 H o se C lam p, 8 "
1 451 33 D ecal, W arn in g
42 1 8810 1 H ose , 8" x 90"
8-23-13
1 1 526502 M u ffler D eflector (K o h ler)
1 5612 2 S pacer K it (H o n da)
25
26
14
10
16
42
41
39
38
37
36
35
33
34
32
31
30
29
28 27
24
23
22
21
20
19
18
17
15
13
12 11
9
8
7
6
5
4
3
2
1
43 2 200 18 5 B u sh in g, B ro nze
43
4 4 2 6 52 0 2 S p a ce r, C e nte r P iv o t
44
46
47 1 500 1 3 3 4 C levis Pin , 1/2 " x 3 1/2 "
4 6B 1 6 5 10 2 U n iv ers al H itc h, Z ero T u rn
3 6 1 1 8 1 25 S u p p ort A rm E x te n sio n
3 7 1 1 81 1 8 H o se S u p p o rt S tra p 8 "
40
45 1 86115 M uffler D eflecto r (5 .5 , 6.5 B rig gs)
45
560 22 E n g in e, 5 .5 H P H onda
4 6A 1 6 51 01 U n iv ersa l H itc h, T rac to r M o u nt
A
B
48 1 ***-8 D ec k C h u te A ss'y, (D eck S pec ific)
48
46
4 9 1 3 12 0 60 8 T u rb in e B o lt
42
3
OPERATING PROCEDURE
1. Follow engine manufacturer's instructions in preparing engine for operation.
2. Inspect area to be vacuumed and pickup all harmful objects and litter. Rocks and other harmful debris can do
serious damage to vacuum assembly and cause bodily injury.
3. For best vacuuming results operate tractor at manufacturer's recommended speed for best cutting. If grass is high,
mow first and vacuum on the second pass.
4. When mowing keep discharge chute to the outside of cutting area for better cut and efficient pickup of grass
clippings and leaves.
5. Your vacuum is preset to run at approximately, 3800-RPM (385), at no load. Do not slow down engine.
6. SHUT OFF ENGINE TO UNLOAD.
7. When operating tractor on slope or grade, exercise extreme caution. Do not cut across grade or slope. Mow directly
up and down hills.
8. Periodically check all fasteners for tightness.
9. Listen for unusual vibration of engine or air turbine. If excessive vibration is present, STOP engine and check for
damage to turbine fan.
10.Always shut off tractor engine and vacuum engine before servicing.
11.Replace deflector shield when discharge chute is removed.
12.When removing clogs, SHUT OFF ALL ENGINES.
EXTENDED STORAGE PROCEDURES
1. Wash and clean vacuum, and lubricate any lubrication points.
2. Drain fuel from the tank and run vacuum until fuel is exhausted in carburetor.
3. Drain and change the engine oil.
4. Clean tires and check pressure. Raising and supporting unit with weight off tires is recommended.
5. When storing a unit with Rubbermaidcontainers leave containers latched to top.
TRAC VAC WARRANTY POLICY
Midwest Equipment Manufacturing, Inc. will repair or replace, free of charge, any part, or parts
that are defective in material or workmanship or both for a period of one year residential use, and
90 days for commercial and rental use. The purchaser will pay transportation charges on parts
submitted for replacement under warranty. For warranty service, contact your local dealer from
whom the unit was purchased. There are no other express or implied warranties. Some states do
not allow limitations on how long an implied warranty lasts, and some states do not allow the
exclusion or limitation of incidental or consequential damages, so the above limitation and
exclusion may not apply to you. This warranty gives you specific legal rights and you may also
have other rights, which vary from state to state.
MIDWEST EQUIPMENT MANUFACTURING, INC.-5225 Serum Plant Rd.-
Thorntown, IN 46071
Phone: 1-800-Trac-Vac
Web Page: www.trac-vac.com E-Mail: sales@midmfg.com

Other Trac Vac Lawn And Garden Equipment manuals

Trac Vac CV385-PRO Product guide

Trac Vac

Trac Vac CV385-PRO Product guide

Trac Vac 462-ZIC Product guide

Trac Vac

Trac Vac 462-ZIC Product guide

Trac Vac 380 Product guide

Trac Vac

Trac Vac 380 Product guide

Trac Vac 565CKG Product guide

Trac Vac

Trac Vac 565CKG Product guide

Trac Vac 865 Product guide

Trac Vac

Trac Vac 865 Product guide

Trac Vac 452-DIC/DH Product guide

Trac Vac

Trac Vac 452-DIC/DH Product guide

Trac Vac 565C Product guide

Trac Vac

Trac Vac 565C Product guide

Trac Vac DS200 User manual

Trac Vac

Trac Vac DS200 User manual

Trac Vac 662-IC Product guide

Trac Vac

Trac Vac 662-IC Product guide

Trac Vac 682-IC Product guide

Trac Vac

Trac Vac 682-IC Product guide

Trac Vac 462 IC Product guide

Trac Vac

Trac Vac 462 IC Product guide

Trac Vac 2000-IC Product guide

Trac Vac

Trac Vac 2000-IC Product guide

Popular Lawn And Garden Equipment manuals by other brands

Rutland County Garden Furniture 29688 Assembly instructions

Rutland County Garden Furniture

Rutland County Garden Furniture 29688 Assembly instructions

Caddon Hives WBC Assembly instructions

Caddon Hives

Caddon Hives WBC Assembly instructions

Pond Logic PondShelter 160350 Assembly instructions

Pond Logic

Pond Logic PondShelter 160350 Assembly instructions

Hortensus HOR-PERG3X3 owner's manual

Hortensus

Hortensus HOR-PERG3X3 owner's manual

Raider RD-ESC01 user manual

Raider

Raider RD-ESC01 user manual

Coopers of Stortford 10275 Instructions for use

Coopers of Stortford

Coopers of Stortford 10275 Instructions for use

Billyoh EZE BASE instructions

Billyoh

Billyoh EZE BASE instructions

Toro 131-3302 installation instructions

Toro

Toro 131-3302 installation instructions

Scotts LM71313S owner's manual

Scotts

Scotts LM71313S owner's manual

Northbeam PLT0212212010 manual

Northbeam

Northbeam PLT0212212010 manual

YellaWood Chicken Coop manual

YellaWood

YellaWood Chicken Coop manual

Agria 3100 operating instructions

Agria

Agria 3100 operating instructions

AQUAvalve easy2GO Kit Set-up guidelines

AQUAvalve

AQUAvalve easy2GO Kit Set-up guidelines

ryan JR SODCUTTER 6HP B&S 12" parts manual

ryan

ryan JR SODCUTTER 6HP B&S 12" parts manual

Solar Insect Pynamite Cube Residential Misting System manual

Solar Insect

Solar Insect Pynamite Cube Residential Misting System manual

Billy Goat SC181H Operator's manual

Billy Goat

Billy Goat SC181H Operator's manual

Gecko GKOLT40V1 instruction manual

Gecko

Gecko GKOLT40V1 instruction manual

Royal Well Mini Wall 2 manual

Royal Well

Royal Well Mini Wall 2 manual

manuals.online logo
manuals.online logoBrands
  • About & Mission
  • Contact us
  • Privacy Policy
  • Terms and Conditions

Copyright 2025 Manuals.Online. All Rights Reserved.