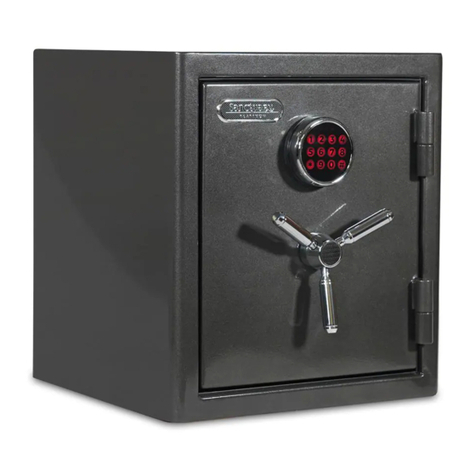
Tracker Safe S Series Assembly instructions

Safe
Owner Use
and
Care Manual
Tracker Safe LLC
6317 NE 63rd Street
Vancouver, WA 98661
(360) 213-0363
www.TrackerSafe.com
Document # Tracker Safe-Owner Use and Care Manual-S-Series-Rev4
Models:
S8-B2
S10-B2
S12-B2
S19-B2

What’s Included with Your Safe............................................Page 2
Safe Identication...................................................................Page 3
Opening your Safe for the First Time..................................Page 4
System Reset/Fingerprint Deletion......................................Page 4
Operating the Lock with a Code..........................................Page 5
Locking the Safe.....................................................................Page 5
Fingerprint Registration........................................................Page 6
Opening the Safe with a Fingerprint...................................Page 7
Locking the Safe.....................................................................Page 7
Other Features........................................................................Page 7
Changing the Batteries..........................................................Page 8
Use, Care, & Maintenance.....................................................Page 8
Warranty.................................................................................Page 10
Warranty Registration Form................................................Page 11
Table of Contents
2
(Qty 1) Hex Wrench Tool
(Qty 2) Keys
• Anchoring Bolts
What’s Included with Your Safe

Serial Number:
Original Receipt: (Attach Here)
Combination:
ATTENTION:
DO NOT STORE THIS MANUAL
IN YOUR SAFE
Tracker Safe LLC
6317 NE 63rd Street
Vancouver, WA 98661
(360) 213-0363
www.TrackerSafe.com
3

4
Opening your safe for the rst time
1) With the door open, locate the Red Button near the hinge side of
the door.
2) Press and hold the Red Button for 10 seconds. e screen will
ash “INIT” and will make one long beep.
3) All of the nger prints have been deleted from the system and
the code has been reset to the factory code of “1234”.
!!!!!! WARNING !!!!!!
If you do not register any ngerprints
then ANY ngerprint will open the safe.
MAKE SURE YOU REGISTER AT LEAST ONE (1)
FINGERPRINT.
See page 6 for how to register ngerprints.
1) Locate the supplied hex wrench and the key from the
packaging.
2) Use the hex wrench to unscrew the chrome lock cover plate.
3) Insert the key into the lock and turn the key clockwise (to the
right) and gently pull the door open.
4) e battery compartment is located on the back side of the door.
Gently li the tab on the battery cover and pull the cover away.
5) Insert four (4) AA alkaline batteries with a “use date” of at least
ve (5) years in the future. Be mindful of the battery orientation.
(Recommended battery brands: Duracell™, Energizer™, Eveready™)
System Reset/Fingerprint Deletion:

5
Operating the Lock with a Code
1) e factory code is “1234”.
2) Input the code and press “*” or “Enter”. e numbers will not
display on the screen for privacy and protection.
3) If you hear one consistent beep it means the door is open. e
screen will display an unlock symbol. e bolts will automaticaly
retract.
Valid Code Entry: One (1) long beep at the same time as the
unlock symbol displayed on screen.
Invalid Code Entry: ree (3) short beeps at the same time as the
“ERR” displayed on screen.
1) Read the entire code changing process rst before attempting to
change the code.
2) is process must be done in one continuous process with no
long pauses. If there are long pauses then the lock will time out.
If this occurs then the new code was not accepted and you must
re-start the code changing process from the begining.
2) Input the existing code or if the code has not been changed then
input the factory code “1234”.
3) Press and hold “*” or “Enter” for two (2) seconds.
You will hear two (2) short beeps. Release the button.
4) Input your new code (4-8 digits) and press “*” or “Enter”.
You will hear two (2) short beeps.
5) Input your new code again and press “*” or “Enter”
You will hear one (1) long Beep.
ATTENTION: ree (3) short quick Beeps and “ERR” displayed
then the code registration failed.
Changing the Code

6
1) READ THE ENTIRE PROCESS FIRST.
a) A maximum of 30 ngerprints can be registered in the
lock.
b) It is recomended that you register the same nger multiple
times with slightly dierent posistions on the scanner.
2) With the door open and in the unlocked position (bolts
retracted), locate the Red Button near the hinge side of the door.
ATTENTION: e lock will not accept ngerprint inputs while the
safe is in the locked position (bolts extended). is
is a security feature.
2) Press and Release the Red Button. You will hear two (2) short
beeps and the ngerprint scanner light will turn on.
3) Put your nger on the scanner and hold until the scanner light
ashes once and turns o. During that time you will hear
two (2) short beeps followed by one (1) long beep signaling a
successfull registration.
e display will show “Id--01” for the rst input, “Id--02 for the
second input,... until display signals “FULL”.
WARNING: You will have four (4) seconds to place your nger on
the scanner.
ATTENTION: ree (3) short quick beeps and “ERR” displayed
indicates the ngerprint input failed.
4) Repeat steps 1-3 for each ngerprint registration.
IMPORTANT SUGGESTIONS:
• Women & Children: If you are having trouble registring your
index nger try using your thumbs.
•Dry Fingers: Try breathing on your ngers before putting them
on the scanner. e extra moisture sometimes helps
with ngerprint recognition.
Fingerprint Registration

7
Low Battery Warning:
Repeated LED ashing and beeping during an opening indicates
that the battery is low and needs immediate replacement.
Wrong Try Lock Out Period:
Five (5) consecutive invalid inputs starts a two (2) minute lock out
period.
Opening the safe with a Fingerprint
1) Press and release “#”. e scanner light will turn on and you will
hear one (1) short beep.
2) Put your nger on the scanner and hold until the scanner light
turns o. en remove your nger. During that time you will
hear one (1) long beep signaling a successful input.
e display will show the Identication Number of the input.
For example, Id--01 for the rst input.
ATTENTION: ree (3) short quick beeps and “ERR” displayed
indicates the ngerprint input failed.
Locking the Safe
1) Close the door and Press “*” or “#”.
e bolts will automatically extend to the lock position.
Other Features
Door Open Alarm:
When the safe is in the open position (bolts retracted) for longer
than one (1) minute you will hear a beep every 5 seconds. is
warning indicates that the safe is not locked. is is a security
feature that reminds you to lock the safe.
Sound On/O:
Turn Sound OFF: Press “0” then press “*” (Star button)
Turn Sound ON: Press “1” then press “*” (Star button). You will
hear a beep.

SAFE LOCATION & MOUNTING:
Tracker Safe recommends that safe be mounted/bolted to another
object (like the wall or the oor) to keep it secure.
WARNING! is safe is not intented to be used on it’s back with
the door facing up. Doing so can damage the safe and void the
warranty.
SECURE YOUR SAFE:
For maximum security make sure you secure your safe to the oor
or wall with the holes provided.
MOVING YOUR SAFE:
Caution: Never move a safe with any contents inside. is can
cause severe damage to the contents being stored and can possibly
cause the safe to be locked in the closed position due to shiing of
contents. In the event that you have to move the safe, it is best to
test the safe aer moving it to ensure it is working properly.
8
1) Unlock the safe.
If the batteries are dead use the key to open the safe.
Refer to section “Opening the Safe for the First Time” on page 4.
2) e battery compartment is located on the back side of the door.
Gently li the tab on the battery cover and pull away the cover.
5) Insert four (4) AA alkaline batteries with a “use date” of at least
ve (5) years in the future. Be mindful of the battery
orientation.
(Recommended battery brands: Duracell™, Energizer™, Eveready™)
Changing the Batteries
Use, Care, & Maintenance

Use, Care, & Maintenance
9
EXTERIOR CLEANING:
Use a so cloth like a microber cloth with a mild cleaner (i.e.,
window cleaner) to clean the exterior of the safe. Make sure to wipe
dry and never use harsh cleaners. Wipe around logos and graphics
gently.
ELECTRONIC LOCKS:
At least once a year, replace the four (4) AA alkaline batteries
with batteries that have a “use date” of at least 5 years on it.
(Recommend: Duracell™, Energizer™, Eveready™)
INTERNAL LOCKING MECHANISM:
e internal locking mechanism does not require maintenance.
However, if there is a sudden change in feel or operation of the safe
or lock, please contact us at TrackerSafe.com or (360) 213-0363.
HINGES:
Once per year, lubricate the hinges with a silicone spray.
MOISTURE/HUMIDITY:
We recommend that you use some form of a dehumidier to
control the level of moisture inside the safe.

Warranty
LIMITED WARRANTY
Tracker Safe hereby warrants to the original purchaser that each new safe will be free from
defects in materials and crasmanship for one (1) year. is warranty applies only to safes
located in the United States and that have been used for Residential use only.
Safe Contents: is warranty only applies to the Tracker Safe itself; the warranty does not
extend to the personal property stored in the safe.
Tracker Safe’s obligation under this Limited Warranty is contingent upon proper use,
installation, and maintenance of the safe and does not apply to the safe or parts that have
been misused, neglected, or exposed to unreasonable wear and tear, or exposed to unusual
or extreme environments. Modifying or changing the safe in ways that alter or eect the
safe’s intended operation or use will void this warranty. e decision to repair a safe in
purchaser’s home, at the factory, or to replace the safe, is solely that of Tracker Safe. If the
safe is to be repaired at the factory or replaced, Tracker Safe will pay for the freight back
to the factory. e purchaser is responsible for packaging the safe at their own expense.
Tracker Safe does not cover any costs to package, remove or install the safe.
To receive support under Tracker Safe’s Limited Warranty the purchaser must provide the
following:
1) Proof of Purchase
2) Warranty Registration Form
Warranty Registration Form: e warranty registration form is located in the Tracker
Safe Owner Use and Care Manual that came with the safe. To validate this warranty, the
original purchaser must ll out the warranty registration form and mail it to Tracker Safe
within sixty (60) days of purchase.
e above warranty is given in place of all other warranties and assurances, whether
expressed or implied, including warranties to tness for purpose, quality, or
merchantability. Tracker Safe accepts no liability, under any circumstances, for any
incidental or consequential damage or loss suered by anyone, or to any property, as a
result of using or being unable to use the safe.
Any claims arising from this limited warranty shall be resolved in the State of Washington
and Washington law will apply to any dispute.
10

Please provide us with a copy of your receipt along with this
registration form within sixty (60) days from original purchase
date.
Name: ________________________________________
Address:_______________________________________
City:__________________________________________
State:_____________Zip:_____________
Phone:________________________________
Email:_________________________________
Date of Purchase:__________________
Model Number:__________________________________
Safe Serial Number: :______________________________
Purchased From:_________________________________
Comments:
_________________________________________________
_________________________________________________
_________________________________________________
Mail to:
Tracker Safe LLC
6317 NE 63rd Street
Vancouver, WA 98661
Tracker Safe
Warranty Registraion form
11
Other manuals for S Series
1
This manual suits for next models
4
Table of contents
Other Tracker Safe Safe manuals
