Trader Hippo HPAI User manual

INSTRUCTIONS - HPAI
Appliance Inlet, 250V~ 15A
WITH
WATERPROOF
FLAP
IP34 SUITABLE
FOR
CARAVANS
CARAVAN
READY
2
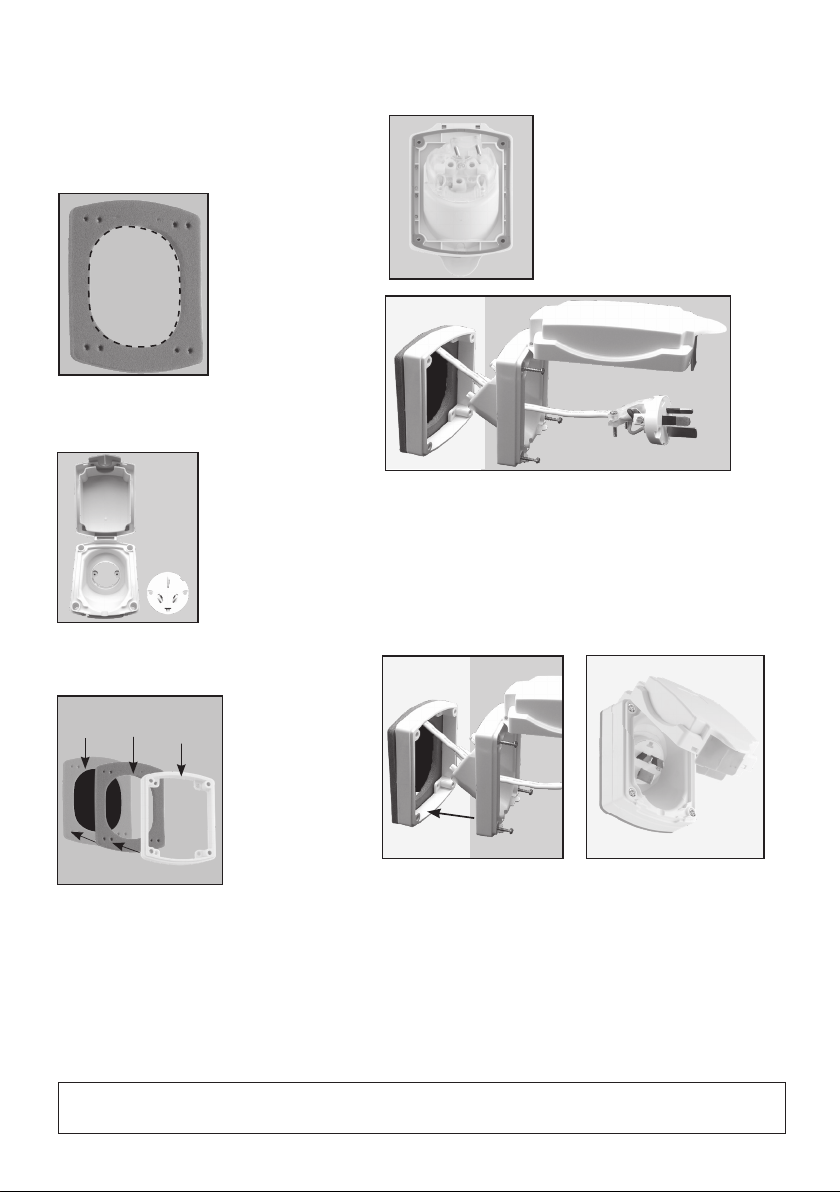
Mounting Instructions:
Note: Foam gasket should always be used. If mounting ange is used, the rubber gasket must be inserted
in the back recess of the inlet unit.
Step 1.
Cut out the hole using the inner hole of
the foam gasket as a template.
Prior to mounting: Locate and position
appliance inlet where it is least likely to be
damaged and ensure the structure of the
panel is suitable.
Step 5.
Run the cable through the hole and connect the cable to
respective active, neutral and earth terminals on the plug base.
Refer to tting instructions for plug base (make sure terminal
screws are tightened and there are no loose strands).
Step 4.
If mounting ange is used,
ensure rubber gasket is
inserted on the back recess
of the inlet unit.
Step 2.
Unscrew and remove the plug base
from the unit body.
Step 3.
Mount the foam gasket on the wall over the
hole. If mounting ange is needed, place
the mounting ange over the foam gasket.
Wall cut out
Foam
Gasket
Wall
cut outMounting
Flange
Step 6.
Fix the cable sheath on the cable clamp and make sure
the cable clamp grips the cable sheath securely.
Step 7.
Mount the unit body on the wall over the hole and
tighten the mounting screws.
Step 8.
Mount the plug base back to the unit body and tighten
the screws.
Silicone may be used to achieve IP34 rating.
Please select suitable screw type according to your mounting surface.
Recommended screw: self tapping Philips head: 6.85mm diameter head, 3.5mm diameter, 30mm long
(or 50mm long if mounting ange is used).
3
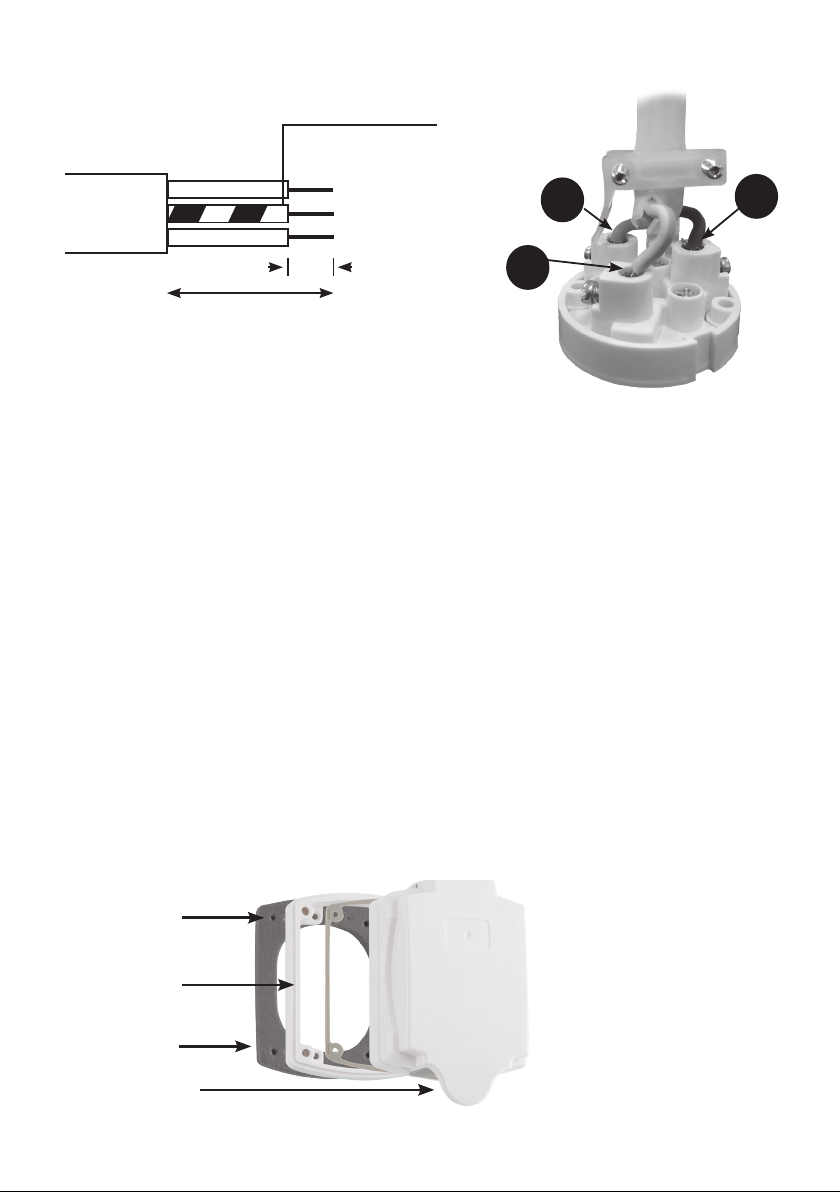
Suits 3 core 1.5mm2 and 2.5mm2cables.
Interior Wiring Instructions:
• Strip the cable sheath and insulation and prepare ex cable as shown above.
• Loosen the terminal screws and ensure adequate space to insert cable.
• Connect Earth wire with Green/Yellow stripe insulation to Earth terminal (marked with “E”& Green indicator)
and tighten the terminal screw.
• Connect Brown (or Red) insulation wire to Active terminal (marked with “A”) and tighten the terminal screw.
• Connect Blue (or Black) insulation wire to Neutral terminal (marked with“N”) and tighten the terminal screw.
• Make sure bare wires are fully inserted into the terminal and there are no loose strands of wire.
• Double check Active, Neutral and Earth wires are connected to the correct terminals and all conductors are
tightened by terminal screws.
• Fit the cable clamp over the cable sheath and tighten the screws. Make sure minimum of 3-5mm sheath must
be beyond the end of the cable clamp. Do not clamp on conductor insulations. Ensure cable sheath
is gripped securely after cable clamp screws tightened.
• Check the wires are in their correct position as shown and terminal screws are tight.
• Mount the plug base back to the unit body and tighten the screws.
Identication:
Fitting Instructions for Plug Base:
N
E
A
Outer
Sheathing
Insulated Cores
Earth Wire
Green/Yellow Stripe
Bare
Wires
8mm
30mm
Foam
Gasket
Rubber
Gasket
Mounting
Flange
Weather proof
ap

4
HPAI Instructions 200901
GSM Electrical (Australia) Pty Ltd, Level 2 142-144 Fullarton Road, Rose Park SA 5067
www.gsme.com.au // Phone: 1300 301 838 // Fax: 1300 301 778
5 Year Manufacturer’s Warranty
This product has been manufactured to the highest quality standards.
This product is warranted to the original purchaser and is not transferable.
The product is guaranteed to be free from defects in workmanship and parts for a period of 5 Years from the date
of purchase. Defects that occur within this warranty period, under normal use and care will be repaired, replaced or
refunded. The benets conferred by this warranty are in addition to all other rights and remedies of the consumer
under Commonwealth, State and Territory laws in relation to the goods or services to which this warranty relates and
Australian Consumer Law. Risk in regard to the product to be repaired shall at all times remain with the Purchaser.
The warranty is given on the condition that the product to which it applies is used for the purpose and in the manner
intended by its construction and for no other purposes whatsoever. GSM Electrical (Australia) Pty Ltd shall not be
responsible for damage of any kind, caused by accidents, power surges, electrical storm damage, incorrect power
current, infestation (vermin or insect), incorrect installation, incorrect electricity or plumbing installation, improper use
of controls or failure to use the product in accordance with the operating instructions, general misuse or abuse or from
normal wear and tear. Any attempt by an unauthorised person to repair or tamper with the equipment shall render the
warranty null and void.
GSM Electrical (Australia) Pty Ltd’s liability under this warranty is limited to the replacement and/or repair of the
defective parts within the warranty period and does not extend to installation or removal of the product. Acceptance
of liability by GSM Electrical (Australia) Pty Ltd contained herein is to the exclusion of any other remedy whatsoever and
howsoever arising in respect of any equipment to which it applies.
Table of contents


