Traeger WiFiRE Assembly instructions

10
YOUR WiFiRE® ELECTRONIC CONTROLLER Your Traeger® Pro Series Grill is equipped with a state-of-the-art
Traeger Controller with WiFIRE® Technology that is Wi-Fi-capable. Before you begin using the grill, it will be helpful to familiarize
yourself with the dierent features of the control panel.
GETTING TO KNOW YOUR GRILL (CONTINUED)
MENU IGNITE
1
2
34
5
NOTES:
• Press any button or the dial to turn on the electronic
controller once the grill’s Main Power switch (located
on the back of the grill) has been turned ON (I).
• Temperature fluctuations are normal for Traeger
grills. Any significant fluctuation could be the result
of wind, air temperature, improper use, or lack of grill
maintenance.
1SELECTION DIAL
Rotate dial to move up and down through the display
menu and to adjust temperature. Press the center
of the dial to make a selection. Press and hold for 3
seconds to initiate the shutdown cycle. Always run
your grill through the full shutdown cycle afer each
cooking task. See “Maintaining Your Grill” for more
information.
2STATUS DISPLAY
Shows current temperature, status of cook program,
cook time remaining, etc.
3MEAT PROBE JACK
Plug the meat probe into the jack for probe cooking.
4MENU
From MENU, you can set up the meat probe and sync
your grill with your home’s Internet and settings.
5IGNITE
Press IGNITE to start the grill.
CONNECTING YOUR GRILL
Follow these instructions to connect your grill to Wi-Fi.
To learn more about WiFIRE®, the Traeger app, and more
ways to connect, go to traegergrills.com/wifire.
1. Download the Traeger app at the Google Play store for
Android or the App Store for Apple.
2. Ensure your smart device is connected to the Wi-Fi
network to which you want your grill connected.
3. Open the Traeger app and follow the instructions.
TIPS:
• For best connectivity results, have your grill facing
the direction of your Wi-Fi router. Ensure you have
a strong Wi-Fi signal where you will use your grill.
• A Wi-Fi extender can help improve your Wi-Fi
strength.
NOTES:
• Make sure your smart device is running the latest
operating system.
• To connect your grill to Wi-Fi, your grill must be
powered on. Make sure the Main Power switch is in
the ON (I) position and the grill controller display is
on the home screen.

11 TRAEGERGRILLS.COM
SEASONING YOUR GRILL
ALL NATURAL
HARDWOOD
TO BE USED ON INITIAL FIRING ONLY. In order to ensure proper operation of the grill, you must first prime the
auger by allowing the auger tube to be “charged” with pellets.
21
3
Make sure there are no foreign objects in the auger before
adding pellets to the hopper.
Turn grill on: Flip the Main Power switch on the back of
the grill to ON (I), press any button on the control panel
to activate the WiFIRE® Electronic Controller. Afer
a few seconds, the home screen will display.
PLUG APPEARANCE MAY VARY BY REGION.
With the Main Power switch in the OFF (O) position, plug
the power cord into an appropriate grounded/earthed
electrical outlet. WARNING! Use ONLY TRAEGER® BRAND
HARDWOOD PELLETS, which are specifically made to
work in our grills. Never use heating fuel pellets in
the grill.
NOTE: The seasoning reminder will display the first few
times you power up the grill. However, you only have to
season your grill upon initial start-up.
AUGER
>Prime Auger
>Clear Auger
>Back
4
Press MENU to display the main menu. Turn the dial to
select AUGER, then select Prime Auger.
The auger tube should take approximately 2 minutes
to fill with pellets and begin dispensing into the firepot.
Once pellets begin to fall into the firepot, select Back
to turn o the auger. You only need a few pellets in the
firepot to season your grill.

12
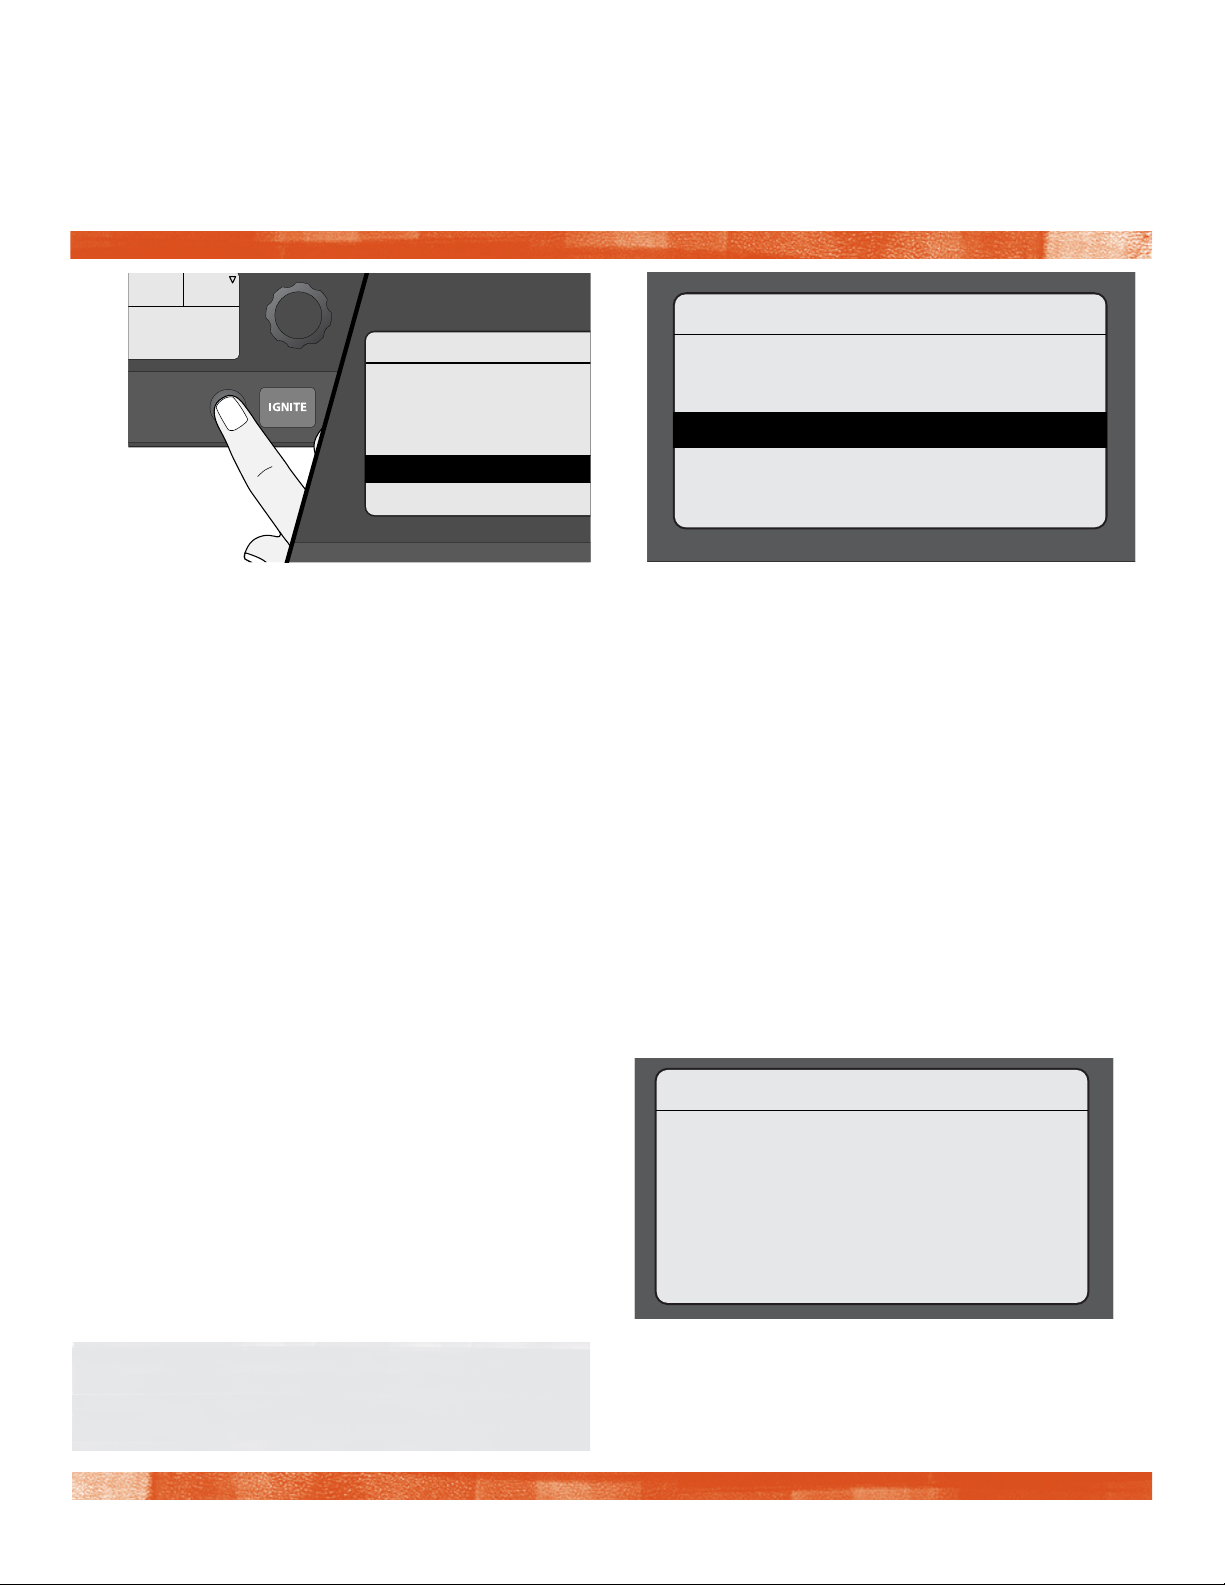
The home screen will display “Press dial to set temp.”
Turn the Selection dial clockwise to 350°F (177°C). Press
IGNITE, close grill door, and run grill for 20 minutes once
it has reached the set temperature.
Press dial
to set temp
450 °F
6
Afer completing Step 5, adjust temperature to 450°F
(232°C) and run grill for an additional 30 minutes.
Shutting down
7
Turn o the grill by pressing and holding the Selection
dial for 3 seconds, initiating the shutdown cycle. When
the full shutdown cycle finishes, seasoning of your grill is
complete.
SEASONING YOUR GRILL (CONTINUED)
NOTE: Whenever you’re instructed to
select or confirm a menu option, turn
the Selection dial to the desired option and press the
center of the dial to lock in your selection.
Press Dial To Set Temp
350 °F
Press Dial To Set Temp
NOTE: If the auger jams during use, allow grill to cool
completely, then press MENU to display the main
menu. Turn the dial to select AUGER, then select
Clear Auger. The auger will run backwards for
60 seconds to clear any jammed pellets.
Press dial
to set temp
350 °F
5

13 TRAEGERGRILLS.COM
USING YOUR GRILL
YOU WILL NEED TO BEGIN WITH THESE STEPS EVERY TIME YOU USE YOUR GRILL.
Press any button to wake the controller.
1
PLUG APPEARANCE MAY VARY BY REGION.
Plug power cord into an appropriate grounded/earthed
electrical outlet and flip Main Power switch to ON (I).
2
NOTES:
• The Traeger app for your mobile device makes
operating your WiFIRE® Electronic Controller
even easier. To connect to your grill, download the
Traeger app and follow the instructions. To learn
more about WiFIRE®, the Traeger app, and more
ways to connect, go to traegergrills.com/wifire.
• Whatever cook method you choose, your Traeger®
Pro Series Grill will always begin with an ignition
and preheat cycle once you press IGNITE.
• Always run your grill through the full shut-down
cycle afer each cooking task. Press and hold the
dial to initiate the shut-down cycle.
• We recommend you clean the grease drip tray
frequently to reduce the possibility of a grease fire.
Please see “Maintaining Your Grill” on page 20 for
more details.
WARNING!
• When operating this grill, maintain a minimum
clearance of 18 inches (45.7 cm) from grill to
combustibles.
• Use ONLY TRAEGER® BRAND HARDWOOD
PELLETS, which are specifically made to work in
our grills. Never use heating fuel pellets in the grill.

14
CHOOSING A COOK METHOD
COOKING AT A SINGLE TEMPERATURE Use this method for simple recipes requiring a single cook cycle
at a set temperature.
Press Dial To Set Temp
350 °F
Press Dial To Set Temp
Turn Dial
To Select Temp
165 °F
1
3
2
4
Afer turning ON (I) the Main Power switch, your grill’s
home screen defaults to the “Turn Dial To Select Temp”
message. Cooking temperature can be set directly from
this screen.
Press IGNITE. The automatic ignition and preheat cycle
will begin.
Once preheating is complete, load food into the grill and
close the grill door.
To select temperature, turn Selection dial right or lef;
once desired temperature is displayed, press the center
of the dial to select.
NOTE: The grill door should be closed once
preheating begins.
TIPS:
• It is recommended, but not necessary, to wait until the preheat cycle is complete before loading food into the grill.
• It is not necessary to keep the grill door open at start-up; however, the grill door should be closed once the preheat
cycle begins so that the grill can reach the desired set temperature.
• Some temperature fluctuations are normal for Traeger grills.

15 TRAEGERGRILLS.COM
COOKING WITH THE PROBE Use these methods when your recipe specifies an internal goal temperature for your food.
057 °F
355
PROBE : COLD
Igniting . .
PROBE
Set Probe Alarm:
145
PROBE
>Set Alarm
>Back
TRAEGER WiFIRE
>Timer
>Probe
>Keep Warm
>Auger
>Wi- Information
1
3
2
Plug the probe into the probe jack located on the WiFIRE®
Controller. See "Using Your Grill" to turn on the grill. Once
the grill is on, the controller will recognize the probe and
the probe icon will light in the controller screen's upper-
right corner.
Press MENU; then scroll and select PROBE. You will
be prompted to set a probe alarm for the internal goal
temperature. Select SET ALARM. Then, at the probe
menu, use the Selection dial to choose the temperature
goal for your meat.
Once the probe alarm is set, the home screen will display
the grill temperature, goal probe temperature, and grill
status. A tone will sound when your meat reaches the
set alarm temperature. If using the Traeger WiFIRE® app,
you will receive a push notification on your connected
smart device, along with a display of your grill's status
throughout the cooking process.
Once the grill is preheated to the desired temperature,
load food into the grill. Feed the probe through the
grommet on the side of the grill and insert the probe tip
halfway into the thickest part of the meat—not in the fatty
portion or touching bone.
If the grill is turned o:
Probe: 72˚ F 145˚
Igniting
054 °F
350
4
NOTE: To calibrate the probe, see "Additional Control
Functions" on page 17.

16
COOKING WITH THE PROBE (continued)
054 °F
355
Set Probe Alarm?
>YES
>NO
PROBE
Set Probe Alarm:
145
1
3
2
Plug the probe into the probe jack located on the WiFIRE®
Controller. The controller will recognize the probe and the
probe icon will light in the controller screen's upper-right
corner. The display will ask if you want to set an alarm.
Select YES.
Rotate the dial to the desired food temperature. Press the
dial center to select/confirm.
Once the grill is preheated to the desired temperature,
load food into the grill. Feed the probe through the
grommet on the side of the grill and insert the probe tip
halfway into the thickest part of the meat—not in the fatty
portion or touching bone.
If the grill is turned on:
Probe: 72˚ F 145˚
Igniting
054 °F
350
4
Once the probe alarm is set, the home screen will display
the grill temperature, goal probe temperature, and grill
status. A tone will sound when your meat reaches the
set alarm temperature. If using the Traeger WiFIRE® app,
you will receive a push notification on your connected
smart device, along with a display of your grill's status
throughout the cooking process.
NOTE: To calibrate the probe, see "Additional Control
Functions" on page 17.
17 TRAEGERGRILLS.COM
ADDITIONAL CONTROL FUNCTIONS
SETTINGS Use the Settings menu to adjust display settings, clear notifications, access important product and contact
information, and more.
TRAEGER WiFIRE
>Keep Warm
>Auger
>Wi- Information
>Settings
>Back
Press Dial To Set Temp
165 °F
SETTINGS
>Speaker
>Contrast
>Probe Calibration
>Clear Notications
>Temperature Units
TO ACCESS THE SETTINGS MENU:
Turn grill on. Once the home screen is displayed, press MENU. The main menu will display several options. Turn the dial
to highlight “Settings.” Press the center of the dial to select.
To change a setting, turn the dial to select the desired setting. Press the center of the dial to confirm. Select Back to
return to the Settings menu.
ABOUT GRILL
Pro 575
SW VER: 00.05.07
CONFIG VER: 04.b05
UUID: 5410EC668632
>Back
SPEAKER
Turns the grill control speaker on or o. The selected
setting will be indicated with a *.
CONTRAST
Rotate the dial to adjust the display contrast from
1 (high) to 5 (low). Default setting is 3. Press the center
of the dial to confirm and return to the Settings menu.
PROBE CALIBRATION
There are two options under this setting:
1. Calibrate Probe: Provides instructions on calibrating
using an ice water bath. “Place probe in ice water for
1 minute before calibrating.” is displayed.
2. Probe Oset: Rotate the dial to adjust the probe
temperature oset in 1° increments, from -15°F to
+15°F/-8°C to +8°C. The default setting is 0. Press the
center of the dial to confirm and return to the Settings
menu.
CLEAR NOTIFICATIONS
Use this function to clear error messages and
notifications.
NOTE: Since an error will put the grill into Cool Down
mode, the display will still show "Cooling Down" when
you exit the Clear Notifications and Settings menus.
TEMPERATURE UNITS
Turn the dial to choose between degrees Fahrenheit (°F)
and Celsius (°C). Press the center of the dial to confirm.
The selected setting will be indicated with a *.
CUSTOMER SERVICE
Displays the Traeger WiFIRE® dedicated customer service
number.
ABOUT GRILL
Provides important information about your grill, including
model number and sofware version.
BACK
Return to the main menu.
18
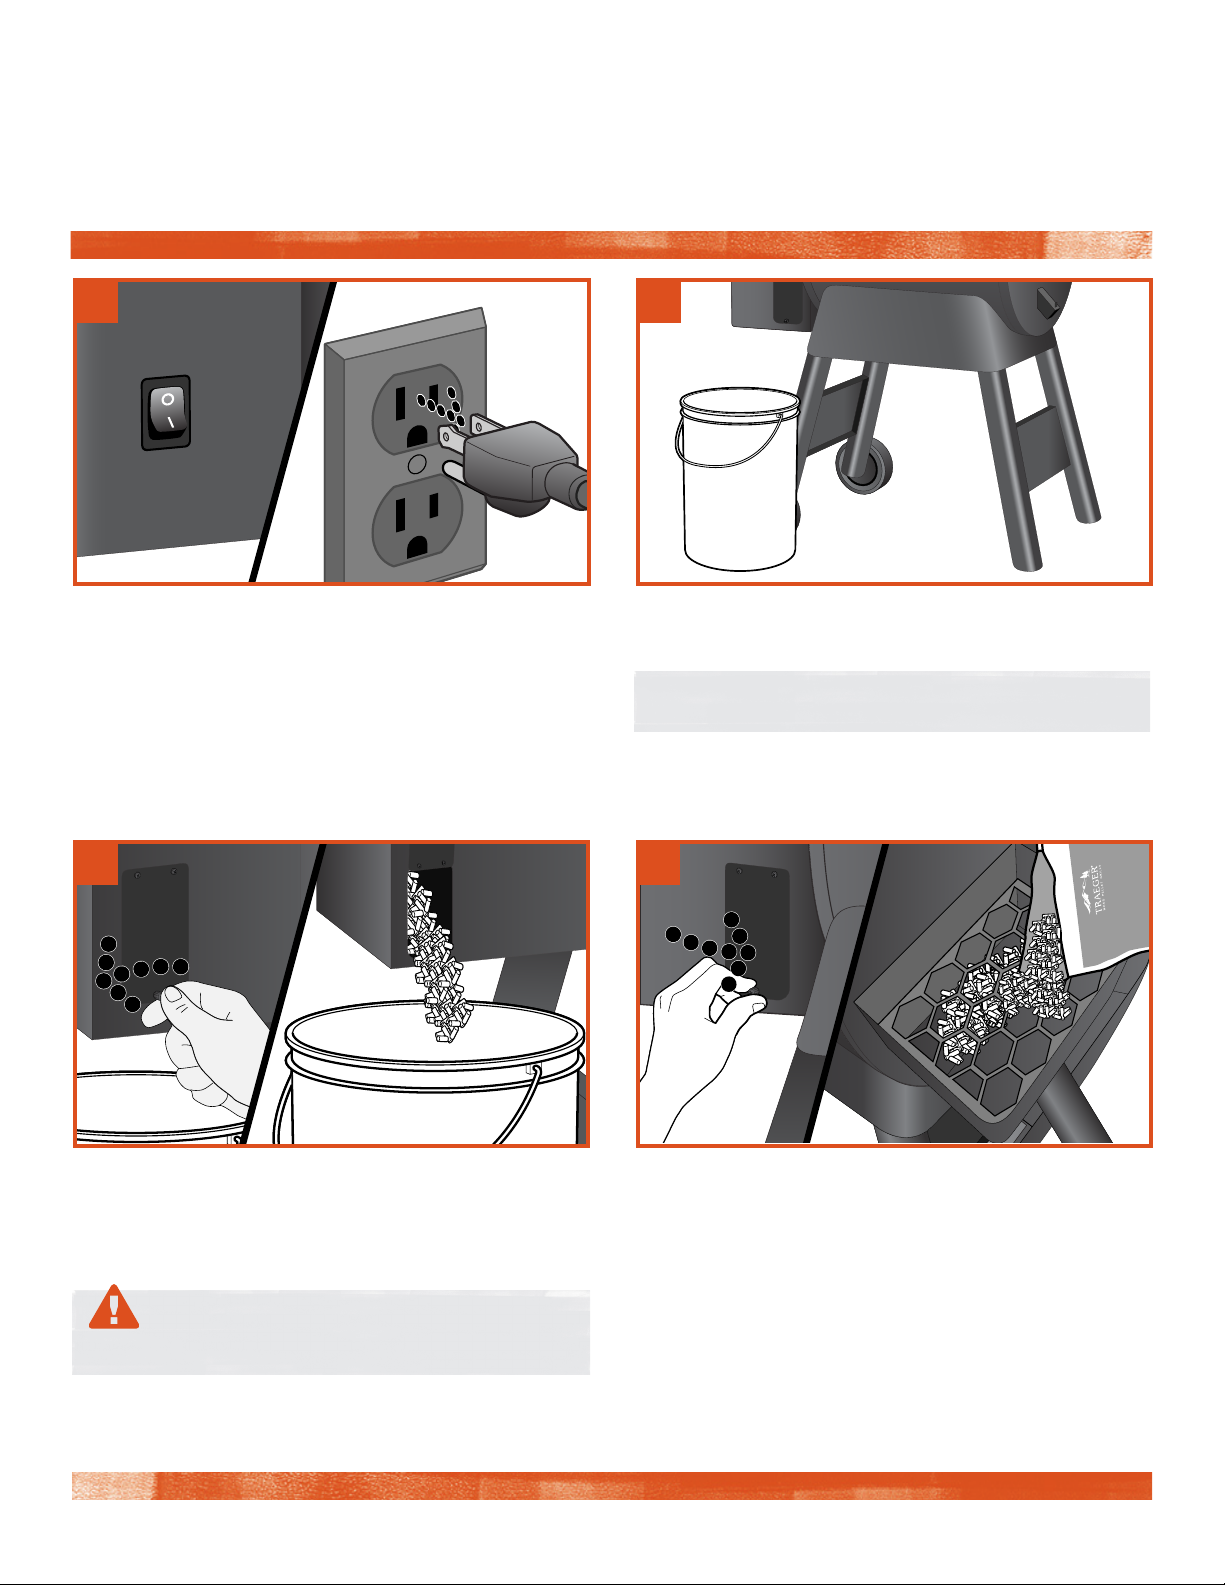
HOPPER CLEAN-OUT
Your Traeger grill has a hopper clean-out system that allows you to quickly change from one pellet flavor to another without
making a mess.
1
3
2
4
PLUG APPEARANCE MAY VARY BY REGION.
Turn the switch to OFF (O) and disconnect the power
cord. If the grill is still hot, allow it to cool completely.
Unscrew the clean-out door fastener and open it. Pellets
will empty into the container you've placed below. You
might need a spatula or spoon to push the remaining
pellets out of the hopper.
Once the hopper's empty, close the door, replace the
fastener, and refill the hopper with a dierent flavor
of TRAEGER® BRAND HARDWOOD PELLETS.
Place a container large enough to hold the discarded
pellets under the pellet clean-out door.
WARNING! Carefully empty out hopper soon afer
grill use. Pellets may be very hot.
TIP: A clean 5-gallon bucket works great!

19 TRAEGERGRILLS.COM
PRO SERIES FEATURES
TRAEGER APP
TIMER
Your Traeger® Pro Series Grill can be controlled remotely using
the Traeger app. To learn more about WiFIRE®, the Traeger app,
and more ways to connect, go to traegergrills.com/wifire.
You will need a home Internet Wi-Fi connection to connect
your Traeger® Pro Series Grill to the Internet. It is required that
your smartphone or tablet is running the latest iOS or Android
operating system. If you leave the range of your home Wi-Fi
network with your device, a data plan is required.
The Traeger app is also an easy way to search, download, and
cook new recipes on your Traeger® Pro Series Grill.
Your Traeger® Pro Series Grill comes equipped with a convenient timer. The Timer function does not impact grill
operation; you can use it to notify you of other needed steps during cooking, such as loading vegetables into the grill
or basting your food.
To set the Timer:
1. Select Timer from the menu.
2. Use the Selection dial to toggle between hours and minutes
to set the time.
Once the dial is pressed afer choosing the time, the Timer
is set and you will be returned to the home screen.
To cancel the Timer:
1. Press the center of the Selection dial until the time remaining is
displayed.
2. You will see the options to Edit, Cancel, or go Back to the menu.
Press Dial To Set Temp
350 °F
TRAEGER WiFIRE
>Timer
>Probe
>Keep Warm
>Auger
>Wi- Information
GRILL COVER
Protect your Traeger® Pro Series Grill with a premium custom cover, designed to withstand the elements.
This durable grill cover is available for purchase at traegergrills.com.
KEEP WARM FUNCTION
Keep Warm (in the menu) can be used to pause the cook cycle
at any time during grilling and maintain the grill temperature at
165°F (74°C). Select Keep Warm again to resume cooking.
Press Dial To Set Temp
350 °F
TRAEGER WiFIRE
>Timer
>Probe
>Keep Warm
>Auger
>Wi- Information
Table of contents
Other Traeger Grill Accessories manuals


