TRAF-X X-Light 01 User manual
Schema3Schema4
Schema2Schema1
+
-
-
RESISTOR
RESISTOR
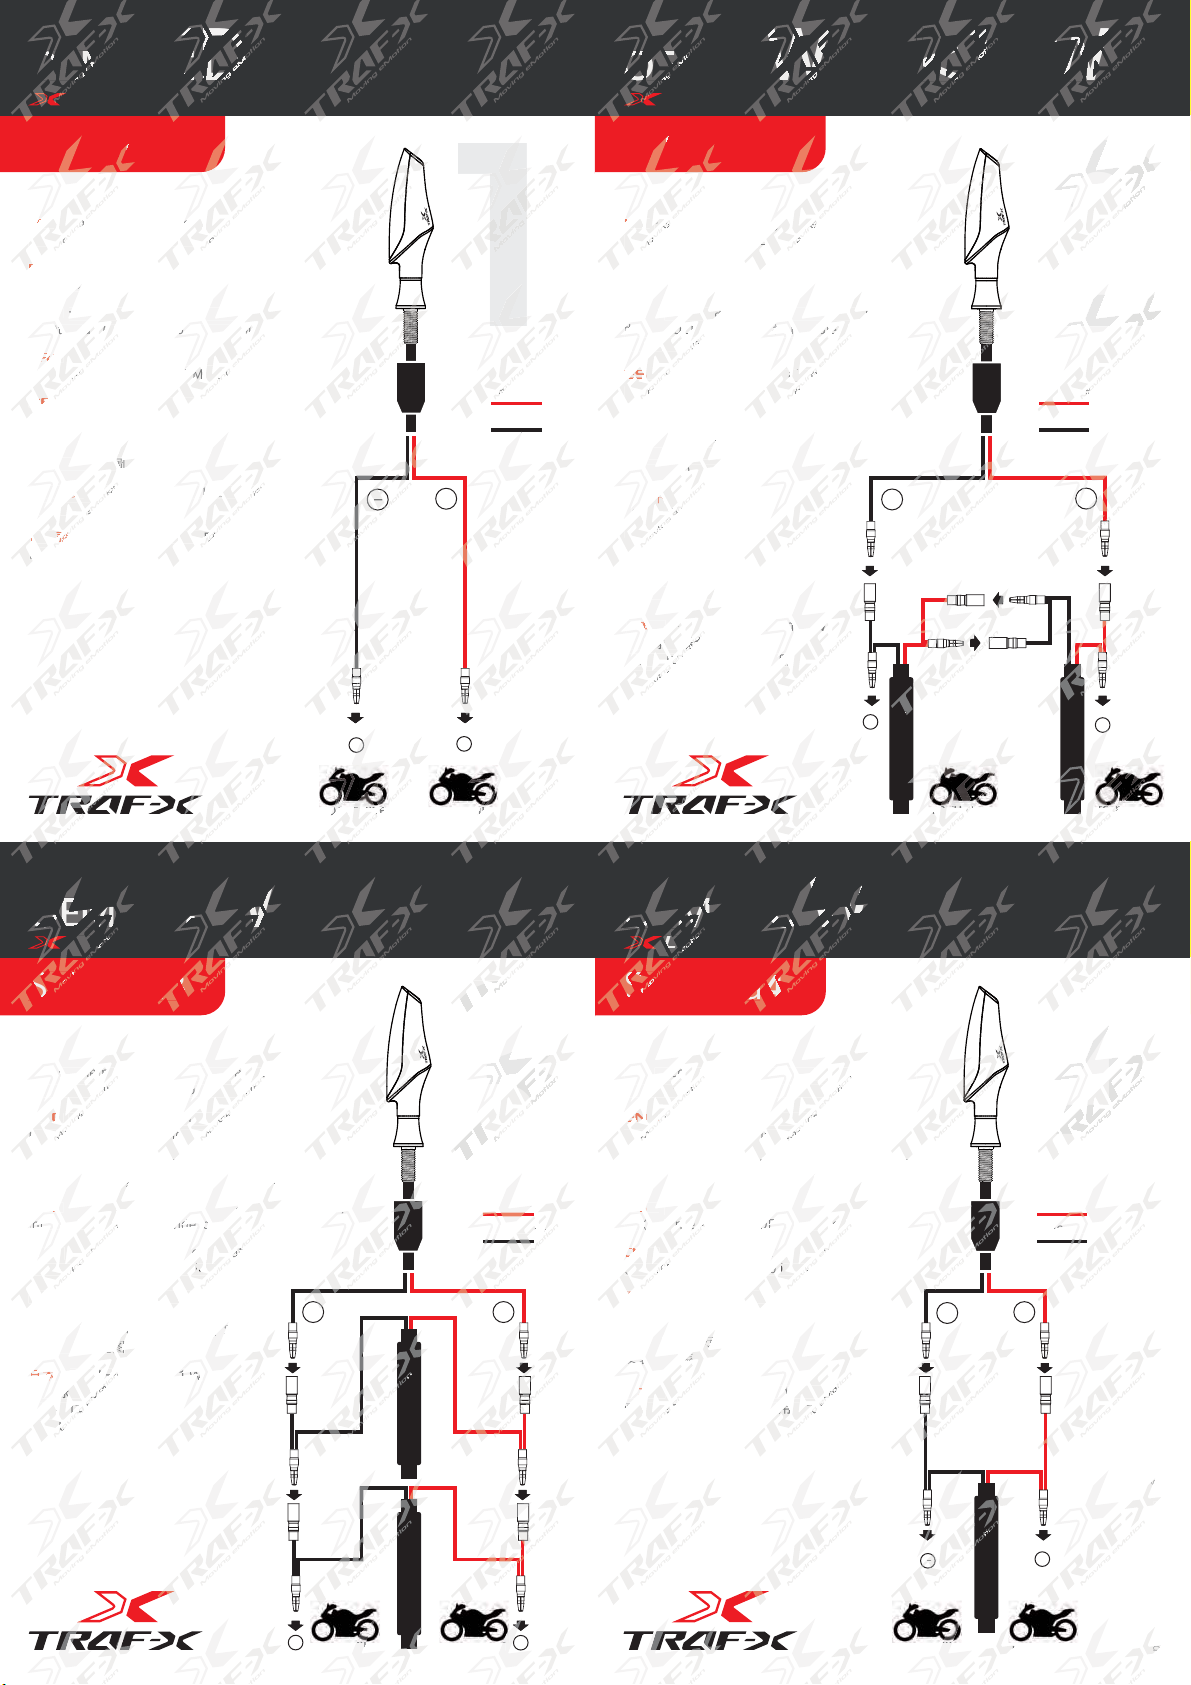
ITA - Schema di montaggio per la
sostituzione di 1 (uno) indicatore OEM a Led
ENG - Assembly diagram to replace
1 (one) OEM LED indicator
ESP - Esquema del montaje para
sustituir a 1 (un) Indicador LED OEM
FRA - Schéma de montage pour
Remplacement d'un (1) OEM clignotant à Led
DEU - Montageplan für den Ersatz
einer (1) OEM Ledanzeige
㐕储Ё᭛ஂןᮍ➜˄2(0/('➜⊵
ᅝ㺱㺱䜡೪
ㅔԧЁ᭛Ͼᮍ♃˄2(0/('♃⊵˅
ᅝ㺙ᤶ㺙䜡
᪥ᮏㄒࣀ࣮࣐ࣝࡀ㹊㹃㹂࣮࢘ࣥ࢝ࡢሙྜ
ᅗࡢᵝ⤖⥺ࡍࡿ
ITA - Schema di montaggio per la sostituzione
di 1 (uno) indicatore OEM a lampada da 6W a < 10W
ENG - Assembly diagram to replace 1 (one)
OEM 6W < 10W Bulb indicator
FRA - Schéma de montage pour Remplacement
d'un (1) OEM clignotant à ampoule à partir
de 6W à < 10W
ESP - Esquema del montaje para sustituir
a 1 (un) Intermittente OEM incandescente
de 6W a < 10W
DEU - Montageplan für den Ersatz einem
(1) OEM Glühbirneblinker
(von 6 W bis < 10 W)
㐕储Ё᭛ஂןᮍ➜
˄2(0➜⊵::˅
ᅝ㺱㺱䜡೪
ㅔԧЁ᭛Ͼᮍ♃
˄2(0♃⊵::˅
ᅝ㺙ᤶ㺙䜡
᪥ᮏㄒࣀ࣮࣐ࣝࡀ㸴㸫㸯㸮㹕
ࡢ㟁⌫ࡢሙྜ
ᅗࡢᵝᒓࡢᢠࢆ⏝
ࡋ࡚⤖⥺ࡍࡿ
ITA - Schema di montaggio per la sostituzione
di 1 (uno) indicatore a lampada da 21W
ENG - Assembly diagram to replace
1 (one) OEM 21W Bulb indicator
FRA - Schéma de montage pour Remplacement
d'un (1) OEM clignotant à ampoule de 21W
ESP - Esquema del montaje para sustituir a 1 (un)
Intermittente OEM incandescente de 21W
DEU - Montageplan für den Ersatz einem
(1) OEM 21-W-Glühbirneblinker
㐕储Ё᭛ᮍ➜˄2(0➜⊵:˅
ᅝ㺱㺱䜡೪
ㅔԧЁ᭛ᮍ♃˄2(0♃⊵:˅
ᅝ㺙ᤶ㺙䜡
᪥ᮏㄒࣀ࣮࣐ࣝࡀ㸰㸯㹕
ࡢ㟁⌫ࡢሙྜ
ᅗࡢᵝᒓࡢᢠࢆ
⏝ࡋ࡚⤖⥺ࡍࡿ
ITA - Schema di montaggio per la sostituzione
di 1 (uno) indicatore a lampada da 10W
ENG - Assembly diagram to replace
1 (one) OEM 10W Bulb indicator
FRA - Schéma de montage pour Remplacement
d'un (1) OEM clignotant à ampoule de 10W
ESP - Esquema del montaje para sustituir
a 1 (un) Intermittente OEM incandescente de 10W
DEU - Montageplan für den Ersatz einem
(1) OEM 10-W-Glühbirneblinker
㐕储Ё᭛ᮍ➜˄2(0➜⊵:˅
ᅝ㺱㺱䜡೪
ㅔԧЁ᭛ᮍ♃˄2(0♃⊵:˅
ᅝ㺙ᤶ㺙䜡
᪥ᮏㄒࣀ࣮࣐ࣝࡀ㸯㸮㹕ࡢ㟁⌫ࡢሙྜ
ᅗࡢᵝᒓࡢᢠࢆ⏝ࡋ࡚⤖⥺ࡍࡿ
red wire
black wire
+
TO THE BIKETO THE BIKE
+
-
-
+
TO THE BIKE TO THE BIKE
+
-
-
+
RESISTOR
+
+
-
-
TO THE BIKE TO THE BIKETO THE BIKETO THE BIKE
RESISTORRESISTOR
2
1
OEM 10W
OEM 21W
4
3
©Copyright TRAF-X - All rights Reserved
OEM 6W to<10W
- Light 01
red wire
black wire
red wire
black wire
red wire
black wire
OEM LED
- Light 01
- Light 01 - Light 01
E
M
M
M
M
M
EM
O
E
O
D
D
D
D
D
D
ED
D
D
ED
D
E
E
E
M
M
M
E
O
OE
O
W
W
W
W
W
W
W
6W
W
<
<
1
1
1
1
1
<1
<
<
1
1
o
<
W
W
W
W
W
W
W
it
u
Sc
ch
h
s
E
A
sostit
- Sc
m
T
ch
at
o
er
r
l
n
gra
gio
dicat
per
g
1
1
1
1
1
1
1
1
1
1
1
1
1
1 (
(u
S
S
TA
di 1 (
A
- S
m
I
ch
a l
a
p
pe
e
OE
iagr
ggi
M a l
o pe
g
<
10W
2
2
2
2
2
2
2
2
2
2
2
2
2
2
2
2
2
2
2
2
2
2
U
a
ac
ce
c
ch
é
n
a 1
Sc
D
em
DE
A
- S
plac
(
uem
(u
ma
sustit
RA
O
P
- Esq
tuir
i
g
gn
r
r
OE
ur
für
g
EM
de
pou
clig
M
or LE
age
E
e para
ED O
re
ed
d
re
1
1
(u
u
P
-
-
1
10
0
0
O
à <
ES
a 1 (
d
W
SP
EM
hé
M
ma
d'un
e 6
E
6W
RA
S
n (1)
in
n
e
p
p
à
oul
O
onta
OEM i
aje
e
Re
à
emp
nt à am
e pou
mpo
re
e
2
d
ac
wire
2
2
2
2
2
ᮏㄒ
ㄒ
ㄒ
㺙
㺙䜡
᭛
ᤶ㺙
᪥
ᅗ
㺙
᪥ᮏㄒ
ᅗࡢ
᭛
ᤶ
䜡೪
ן
೪
㺱
ㅔԧЁ
ᅝ㺙
Ё᭛
㺱
࢘
࢘
࢘
♃
♃
⊵
⊵
⊵
/('♃
㹊㹃
㹃㹂࢘
/
♃⊵
♃˄2(0
/(
-
㺱
㺱
➜
➜
➜⊵
Ё᭛
➜
˄2
ᅝ㺱
Ё
(0➜
㺱
bi
bis
g
birn
<1
(von
㐕储
˄
U
-
OEM
n 6 W
♃
in
E
+
+
⤖
⤖
⤖
⤖
⥺
ሙ
ሙ
ሙ
ሙྜ
ྜ
ྜ
⌫ࡢ
ࡢ
ࡋ࡚
⌫
ࡢᵝ
࡚⤖
ࣀ
ࣀ࣮
ሙ
䜡
᪥ᮏ
ࡢ㟁
ᅗ
♃
ᮏㄒ
㹕
⏝
㸴㸫㸯
⏝
㸮㹕
R
K
KE
E
E
E
TH
E BIK
EBIK
O T
OT
-
E
BIK
IK
HE
E
B
B
T
O TH
OT
H
O
T
T
T
T
TO
TO
c
c
h
h
h
gh
gh
h
h
ht
M
Lig
S
Sc
- L
M
M
2
O
EM
W
a
3
3
W
W
W
1
W
3
3
3
3
Sc
c
Lig
g
g
gh
h
M
EM
Li
Sc
- L
M
M
M
O
OE
W
W
a
4
4
W
W
W
0
0W
4
4
4
4
ne
e)
A
A
n
d
d
i
i
a
he
o) i
1
F
NG
(one
no
G
-
m
ma
ITA
-
1 (u
Sc
to
o
r
e
e
p
2
21
1
W
W
s
la
da
nd
n
m to
dicat
a d
o re
so
os
aggio p
pad
per
e
3
3
3
3
3
3
3
3
3
3
3
3
3
3
3
3
3
3
3
3
3
3
on
ne
G
G
-
i
n
n
nd
d
m
Sch
no)
EN
1 (o
un
NG
e
em
ITA
di 1
A
-S
ca
at
o
r
re
a
1
1
0
1
0
so
er l
a d
b in
o
am t
ndica
da
to
a
s
taggio
mp
ope
m
ne
4
4
4
4
4
4
4
4
4
4
4
4
4
4
4
4
4
4
4
4
4
4
M
M
2
Mo
o
O
ten
Mo
㐕
U
1) OE
㐕储
U
- M
EM
te
uem
e
g
ma
SP
Interm
DE
) O
P
- Esq
mit
r
a
at
2
te
sa
˄2(0
en
linke
➜
Ers
er
de
sus
e
21
stit
taj
ndesc
de
ou
e para
en
n)
wir
e
bla
d wire
E
E
M
M
M
M
r
rm
) In
M
E
(1) O
㐕
EU
-
OE
te
sque
er
cl
em
ES
a 1 (
DE
(1)
SP
- E
un)
e
er
r
rs
sa
s
c
and
rs
˄2(
de
blink
0➜
en E
ke
e
a su
esc
1
ust
onta
OEM i
r d
po
aje pa
nca
0W
ack wi
e
ࡋ
ࡋ
ࡋ
ሙྜ
ྜ
ྜ
࣮
ࣀ
ࡢሙ
ࡢᵝ
⏝ࡋ
⌫ࡢ
ᵝ
ࣀ
䜡
࣮
᪥ᮏㄒ
㟁
ᅗࡢ
Ё᭛
ᤶ
ㄒ
㸯㹕
⊵
E
RE
R
ᵝ
ࣀ
ࣀ
㺙
ᅗࡢ
ᮏㄒ
ࡢᵝ
㺙
㺙䜡
ᮍ
䜡
ᅝ㺙
᪥ᮏ
ᅗ
ԧЁ
㺙ᤶ
࡚
࡚
⤖
㟁⌫
⌫
⌫
㟁
⏝
㹕ࡢ㟁
ࡋ࡚
㸮㹕
⊵
RE
R
R
R
-
ight
T
BIK
BIK
KE
E
T
BIK
IK
erved

CONTENUTO DELLA CONFEZIONE
PACK CONTENTS
GARANZIA
WARRANTY
La Sicurezza di chi è a bordo: prima di installare qualsiasi accessorio sulla tua moto devi verificare se
hai le competenze e l’attrezzatura necessaria per montarlo. Consigliamo sempre di rivolgersi ad un
installatore specializzato, un’installazione impropria, anche di un accessorio semplice, può causare un
guasto ed un’eventuale incidente può causare anche conseguenze fatali. TRAF-X non si assume
alcuna responsabilità per installazione impropria, uso non corretto, incompatibilità del prodotto con
prodotti di terzi o con motocicli non predisposti. Qualsiasi installazione non effettuata correttamente
invalida la garanzia.
1 - Spegni la moto, rimuovi la chiave, scollega la batteria. 2 - Identifica il tipo di indicatore di direzione
montato (se a LED o a lampadina), per verificare i Watt puoi utilizzare il manuale del proprietario o
controllare il bulbo della lampadina o l’esterno della freccia. 3 - Rimuovi gli indicatori originali.
4
- Fissa gli indicatori a LED alla moto utilizzano il dado e la rondella in dotazione. 5 - Fai passare i fili
dell’indicatore a LED uno ad uno attraverso il gommino terminale, poi copri il dado con il gommino.
6 - Segui uno degli schemi (schema 1, 2, 3, o 4) per collegare i fili dell’indicatore a LED al motociclo.
7
- Collega la batteria, gira la chiave su ON; senza accendere il motore, testa il funzionamento delle
frecce, se la frequenza di lampeggio non è corretta prova uno schema alternativo.
I Morsetti dei cavi possono essere diversi da quelli di serie. Non tagliare i fili, se li tagli rischi problemi
elettrici ed invalidi la garanzia. Si consiglia di collegare i fili con specifici adattatori opzionali (non
inclusi). Se lo schema di collegamento è 2/3/4, posiziona la/le resistenze lontano da ogni parte
infiammabile come ad esempio il serbatoio benzina o i serbatoi del liquido dei freni. Le Resistenze
devono essere fissate alla moto, se possibile su una parte metallica. Assicurati che non siano libere di
muoversi.
The rider's safety depends upon the correct mounting of every part installed on the motorcycle. Use
the appropriate service manual procedures. If the procedure is not within your capabilities or you do
not have the correct tools, have a workshop perform the installation. Improper installation of this kit
could result in death or serious injury. Any damage caused by wrong installation shall be imputed to
the user. TRAF-X will not assume any responsibility for improper installation, misuse, incompatibility
with other manufacturers’ products or with the motorcycle.
1 - Turn off the ignition key, remove the ignition key, disconnect the battery. 2 - Identify the OEM
indicator type (LED or Bulb) using the owner's manual or by inspecting the indicator bulb or the
indicator body. 3 - Remove OEM indicators. 4 - Install LED indicators using the nut and the washer to
mount the indicator on the motorcycle. 5 - Slip wires one by one through the rubber cap, then cover
the nut with the cap. 6 - Follow wiring scheme 1, 2, 3, or 4 to connect indicators to the motorcycle.
7
- Connect the battery, turn the key to the ON position without starting the engine, and test indicator
flashing If flashing is too short or too long try a different wiring scheme.
Wire terminals may be different from OEM plugs. Do not cut the wires. We recommend connecting the
wires using specific optional adapters (not included). For scheme 2/3/4, place resistors far from any
flammable part such as fuel tank or brake fluid reservoirs. Resistors should be secured to the
motorcycle when it is possible to mount them to a metal part. Ensure that they are not free to move
around.
ITA - Tutti i prodotti e gli accessori complementari ai prodotti a marchio TRAF-X sono coperti dalla
garanzia di 24 mesi per i difetti di conformità, ai sensi del DL 24/02. Per fruire dell'assistenza in
garanzia, il Cliente dovrà conservare la fattura o la ricevuta d’acquisto. La garanzia copre eventuali
difetti dei materiali e di fabbricazione. La garanzia non copre l'usura causata dal normale utilizzo del
prodotto, guasto causato da utilizzo improprio, errata installazione, interventi di assistenza, manuten-
zione o riparazione effettuata da Tecnici non autorizzati dai rivenditori/distributori autorizzati
TRAF-X. Per ottenere assistenza, contatta i rivenditori/distributori autorizzati TRAF-X.
TRAF-X potrà a propria discrezione decidere di riparare, sostituire o rimborsare il prodotto o gli
accessori in garanzia. Ad eccezione dei prodotti definiti nella descrizione con i termini "omologato"
e/o "street legal", i prodotti a marchio TRAF-X non sono omologati per l'utilizzo su strada aperta al
pubblico, si intendono unicamente destinati all'utilizzo in manifestazioni sportive in pista o in circuito
chiuso nonché fiere o mostre. L'omologazione si intende limitata ai paesi appartenenti alla Unione
Europea o che recepiscono le omologazioni UE.
ENG - According to the EU law DL 24/02, every TRAF-X product and its complementary accessories
are covered by a 24-month warranty for defects. The original purchase receipt is required for
warranty services. The warranty covers any defects in materials and workmanship. The warranty does
not cover wear and tear caused by normal use of the product, or failure caused by misuse, improper
installation, servicing, maintenance or repair by technicians not authorized by TRAF-X. If you need
assistance, please contact your local TRAF-X distributor, or contact a TRAF-X dealer. When a product
is recognized as defective, TRAF-X will repair, replace or refund the product and/or the accessories.
With the exception of the products described with the words "homologated" and/or "street legal",
products sold by TRAF-X are not approved for use on public roads, but only for use in demonstration
sports on the track or in closed circuits, fairs or exhibitions. The homologated approval is limited to
countries belonging to the European Union or transposing EU approvals.
RESISTOR
1Indicatori di
direzione al LED
Led indicators
Resistenze per
Indicatori di
direzione al LED
Resistor for
Led indicators
Rondelle
Washers
12/8
Dadi esagonali 12/8
Hex nuts 12/8
Gommini
Rubber Caps
PCS
2
PCS
1
PCS 1
PCS 1
PCS
PRECAUZIONI - GUIDA ALL’INSTALLAZIONE
SAFETY PRECAUTIONS - INSTALLATION GUIDE
ITA - Grazie per aver acquistato un prodotto TRAF-X. Prima di procedere con l’installazione leggi
attentamente le istruzioni e raccomandazioni che trovi in queste pagine.
ATTENZIONE
WARNING
- Light 01
- Light 01
ENG - Thank you for purchasing a TRAF-X product. Please read the instruction throughly before
installing.
©Copyright TRAF-X - All rights Reserved
INDICATORE DI DIREZIONE OMOLOGATO
STREET LEGAL INDICATOR
- Light 01
L
Li
Li
ig
L
Li
Lig
i
-
-L
1
1
1
0
01
01
ht
0
P
T
T
EN
d
U
UT
CONT
TE
T
TS
S
F
E
T
ON
EN
F
NT
LLA
C
E
2
P
2
2
2
2
n
CS
tors
D
TO
OR
S
PCS
1
/8
8
li
i12
2
/8
ali
uts
gona
s 12/
esa
n
12/
R
Go
R
om
Go
S
1
PC
zio
o
od
d
do
d
a
de
,
i
i
l
2
nzia
nzi
d
pr
ran
ifetti
rod
utti i
di
p
IT
ga
g
TA -
T
ua
at
ti
l
iz
o
re
on
e
e
o
l
on
i di
rva
i
ef
re as
i
bb
o da u
fettu
i
ser
ricaz
uti
c
i com
co
A
mp
gli ac
er i dif
co
fab
ccesso
tt
riz
zz
a
l
la
l
a
l'
ac
c
c
2
24
el D
a d
a
ndit
n
ta inst
utori
vuta
copre
sta
L
a m
2
mar
ai p
i sensi
rice
non
T
prodott
d
ib
u
te
e
en
e
e
u
e
e
e
te
e
'ass
opr
i/d
ati T
no
assis
distrib
RA
co
rma
ste
sis
pert
ste
ti d
FX
s
fruire d
nzi
al n
sono co
dll
D
D
D
I
IN
D
L
LE
R
R
R
D
L
E
ET
R
RE D
E
O
R
O
O
O
G
OL
O
C
ATO
O
E O
IC
ar
re
N
G
G
o
o
o
c
c
o n
opea
E
ar
ro
ENG
on
, si i
nc
a
eg
inte
p
ch
E
es
/o "
ubblico
hiuso
h
w
w
D
g
g
a
a
og
om
mol
m
The w
ar
EU
month
ar
om
law
o
esti
lo
p
TR
inat
mostre
o le
zio
a m
mente
eL'
he
e
p
r
ro
od
a
mit
cts
ects
th
AF-X
s. The
n
X
pr
at
esta
ta
ti
azio
intend
A
ell
o om
n mani
e lim
pt
T
t
a
ar
ry
U
i a
re
mans
se
eme
eceipt
ip
nta
lla
in c
a
g
er
circu
pparten
ni
str
pista o
nent
nt
tr
i
on
n
s
o
ol
he
ucts
s o
c
ports
oun
e
ize
exc
so
ple
d as
W
pr
s
al
sis
s recog
With th
p
pe
rc
cu
ro
o
v
ts
t ap
cir
e E
sed c
urop
d
will
des
ro
A
rep
he pr
X
are
clo
he
an
ur l
RAF-X
roduc
E
EU
U
Th
he
s
s,
s
c roa
. T
osi
ons.
ng E
"h
th
"ho
ds
a
e p
h the w
on pu
ibit
po
ns
or
r refun
word
is
l
n
ns
st
tr
dem
al i
rova
ee
ces
eet
n
ro
ssor
and/
or use
app
X
Wh
r the a
/or "s
mp
e
a
d
di
i
E
ru
u
z
r
le is
NE
le
stalla
t
urezz
comp
t
za d
ZION
av
ave
ru
Y
Graz
tamen
TEN
AF
zie pe
ece
e
ns
s
ta
h
he
e
tt
ioni
ura
nsta
t
a di i
a nec
ins
o
TR
ch
-
o un p
omand
TI
prodo
si
g
o
s
d
ine.
o.
he di
essor
Cons
rio
er
ere
N
a di p
ueste p
LA
proce
rsi
i
a
r
re
g
vo
, può
verific
lgers
ca
azion
ne leg
-
t
t
0
0
0
0
ht
ht
0
gh
to
or
in
n
d
di
lb
D
bo
D
o
o
mu
oto,
LE
l
in
-
Se
C
re
sa gli
dicat
a
il bu
iin
r
a.
im
m
pegni la
o (s
lar
nsa
erz
garanz
mo
av
e
ti
l
liz
rn
c
no
ca
a
r
a
ga
erif
o a
chem
h
o
moto u
attrav
ve
’este
uti
a
b
Qu
ave, sco
pe
a o
mp
edis
olle
e,
p
a
i
in
v
vi
m
m
m
d
il t
re i
mi
gare
R
ondell
nale,
f
zar
imuo
la
p
o
ffe
Identif
tili
3 -
in
ion
ica
mm
m
re
e
e
i
o
one
rio
n il
ED al
na
passa
gom
tari
i.
are
e di dir
prie
gin
o c
me
ezi
f
is
me
e
m
ma
id
sch
om
G
ess
ersi.
le co
ere f
l
os
i la
em
son
ci ed
si). Se
mab
oe
re
ei cavi
inval
le
e
be
e
/
4
4
d
è 2/
io
in
pos
atoi
ssibile
i
3
ell
i co
/4
i di
con
ament
erb
ep
è
rsi da q
siglia
ss
si
ui
d
d
ze
e
fi
siste
liqu
se
ic
del l
a. As
ci
li,
ci ad
ze
se li
d
con
la/le
toi
al
ma
gliare i
speci
e
d
ze
d
on
arte
nz
ou
o l
isten
ibere
ziona
a ogni
Res
an
roblem
ali (no
rm
A
A
AF
A
F
d
e
re
ec
t
v
vi
c
y
te se
orr
h o
Tur
sul
er.
TR
the
e co
t in d
RA
de
dep
vi
der's
ppropr
e th
es
safety
NG
rw
e
es
s
y
p
y
d
p
pe
th
h
e
m
es. If
op
duc
rem
ry.
any r
ts o
ksho
Any
res
mo
mou
th
he co
proced
wor
u
orrect
n
s
st
t
in
ns
mp
pr
y
yo
ou
ta
ithin
Im
e.
scon
wr
oper i
on.
ong i
ins
all
alled
yo
ry pa
e is not
llat
yw
art ins
at
t
i
i
b
d
t
kit
t
t
se
u do
s k
dent
mp
compa
this
puted
at
e
torcyc
ties or
n o
ei
cle. U
g
s
s
s
m
ng
i
e
er
c
e ba
hin
s
amm
or
rmin
using
b
lash
nals
ap
r o
ap.
6
te
mo
n th
t with
onnect
If
(
dy.
indicat
h the
s (
(n
M
M
p
ry
a
p
po
os
m
e ON
tr
ap
l tan
o
om O
pters
k
ong
OEM
e 1
N
p w
e 1, 2
po
st
wires
iring
key to
oo
w
ors
e.
5
schem
e 2
2
2/
s
s.
W
e e
e
d
ng t
me
ch
rvoir
ar
e w
heme
hem
res
ca
h
th
icato
e
e
e ru
conn
out sta
g s
c
rs u
throug
ect in
fro
d
o
ng
g
t
cato
s
sec
t
nec
far fro
ur
ting
otorc
test in
she
en cove
cycle.
ght 01
Popular Motorcycle Accessories manuals by other brands

Nolan
Nolan N20 Traffic Safety and instructions for use

Gentex
Gentex SPH-5 Fitting, operation and maintenance instructions

Crivit
Crivit DS-MULTIX400 Instructions for use

Louis
Louis 10026095 Instructions for use

Honeywell
Honeywell HW100 Important Instructions & Warnings

hepco & becker
hepco & becker 6307581 00 01 quick start guide


