Trainertec Electronic DT1200V User manual

Remote Dog Training Collar
Shenzhen Trainertec Electronic Co., Ltd
Http://www.trainertec.com

Remote Dog TrainerOperation Guide
Thank you for choosing Trainertec, the best electronic
training collar in China. We want to ensure your pet’s
safety by providing you with the tools and techniques
to successfully train your pet.
If you have any questions, please contactus by email
sales@trainertec.com or
visit our website at www.trainertec.com.
Please read the operation guide carefully before start to
train your pets .
This instruction is suitable for Remote dog training
collar DT1200V.
- 1 -

Table of Contents
Components…………………………….…….....3
How the system works…………………………..3
Main Features……………………….…..……….4
Transmitter……………………………...….........6
Receive Collar……………………...………........9
Setting Up Multi-dog System……….………….10
Charging ……………………………..……........14
Training Guide ………………………............…16
Troubleshooting Guide……………...…...…..…17
- 2 -

Components
How the System Works
The Remote Dog Trainer has been proven safe,
comfortable, and effective for all pets over 10 pounds.
This system assists you in controlling your pet without
a leash in a long distance range . At the push of a
button, the Remote Transmitter sends a signal,
- 3 -

activating the Receiver Collar. Using the Remote
Trainer consistently and correctly, many misbehaviors
that your pet exhibits can be corrected or any basic
obedience commands can be taught
Important: The Remote Trainer actual distance
depending on the way you hold the Remote
Transmitter, the range may vary. Hold the Remote
Transmitter in a horizontal position away from your
body to achieve optimum range. Terrain, weather,
vegetation , Ve hicle , Building, transmission from
other radio devices, and other factors will affect the
range of your Remote Trainer.
Main Features
1. Range in open field is up to 1200 meters,
2. Train up to 3 dogs from the same transmitter
3. 10 levels of static shock
4. 10 levels of vibration
5. “Buzz” sound activated with a separate button
- 4 -

6. Two buttons “+” and “-” allow you to set your
shock and vibration intensity
7. Dog Selection Button allow you to select your dog
8. Lcd digital display for 10 shock & vibration levels
and dog ID
9. Memorize shock & vibrate level in transmitter for
different dogs
10. Easy to operation with rubber button
11. Waterproof transmitter and receiver. Dog can swim
freely.
12. Rechargeable 3.7V Li-ion battery for transmitter
and receiver
13. Strong TPU Collar Strap
14. Led low power indication, red light will flash when
battery level is low.
15. Full functional multi-dog training system
16. Around 8 seconds safe static shock protection
17. 2-year warranty
- 5 -

Transmitter
Antenn
Stimulation
Le vel
Button
On/Off
Button
Dog
Selection
Button
Le d Light
LC D display
Buzz Button
Vibration
Button
Static
Shock
Button
DC Jack Cover
- 6 -
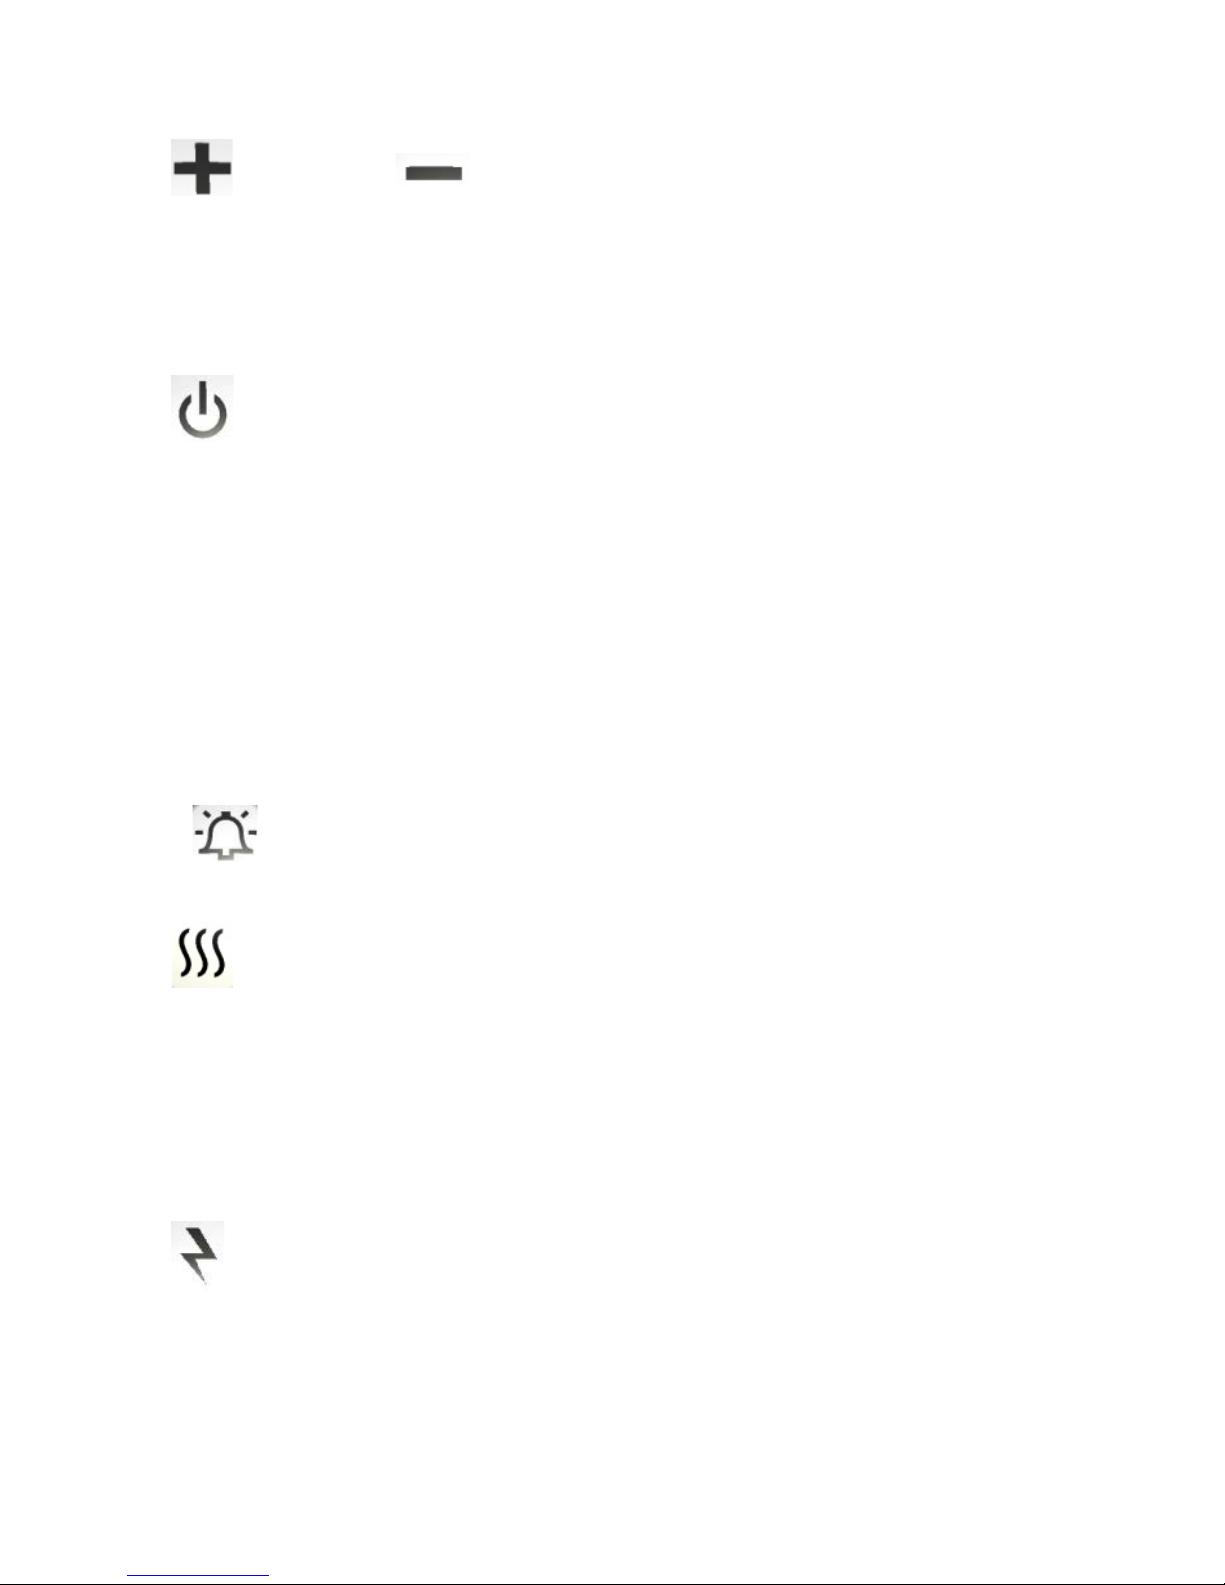
“ ” and “ “ buttons:press these buttons to
adjust the shock intensity and Vibration intensity from
1 to 10 level
“ ” button: it is the power switch; hold this button
for 4 seconds to switch on power, then LCD will
display the default “A01”. You may change Dog ID by
press the relative buttons. If you want to switch off the
power, hold this button for 4 seconds to switch off
power.
“ ” button: no-stimulation warning buzz
“ ” button: Emit vibration stimulation. Press 1
time , vibrate 1 time . Press and hold on , emit
continuous vibration, and will stop automatically after
8 seconds
“ ” button: Emit shock stimulation. Press 1 time ,
emit 1 shock . Press and hold on , emit continuous
- 7 -

shock, and will stop automatically after 8 seconds
“1,2,3 ” buttons: Dog Selection Button , default is “1” .
Your transmitter is capable of training up to three dogs
with optional receive collars. You select1dog, LCD
display dog ID “A XX”. If you want to train 2dog,
press “2” button , LCD will display “BXX” If you want
to train 3dog, press “3” button again, LCD will display
“C XX”. “XX” is for showing the shock & vibration
level .
The transmitter has the memory functions to keep up
the suitable shock & vibration levels for different dogs.
10 levels of shock stimulation, 10 levels of vibration
stimulation. One tone
NOTE: The redLedlight will flash whenthe
battery is low power. Recharge the battery at once.
- 8 -
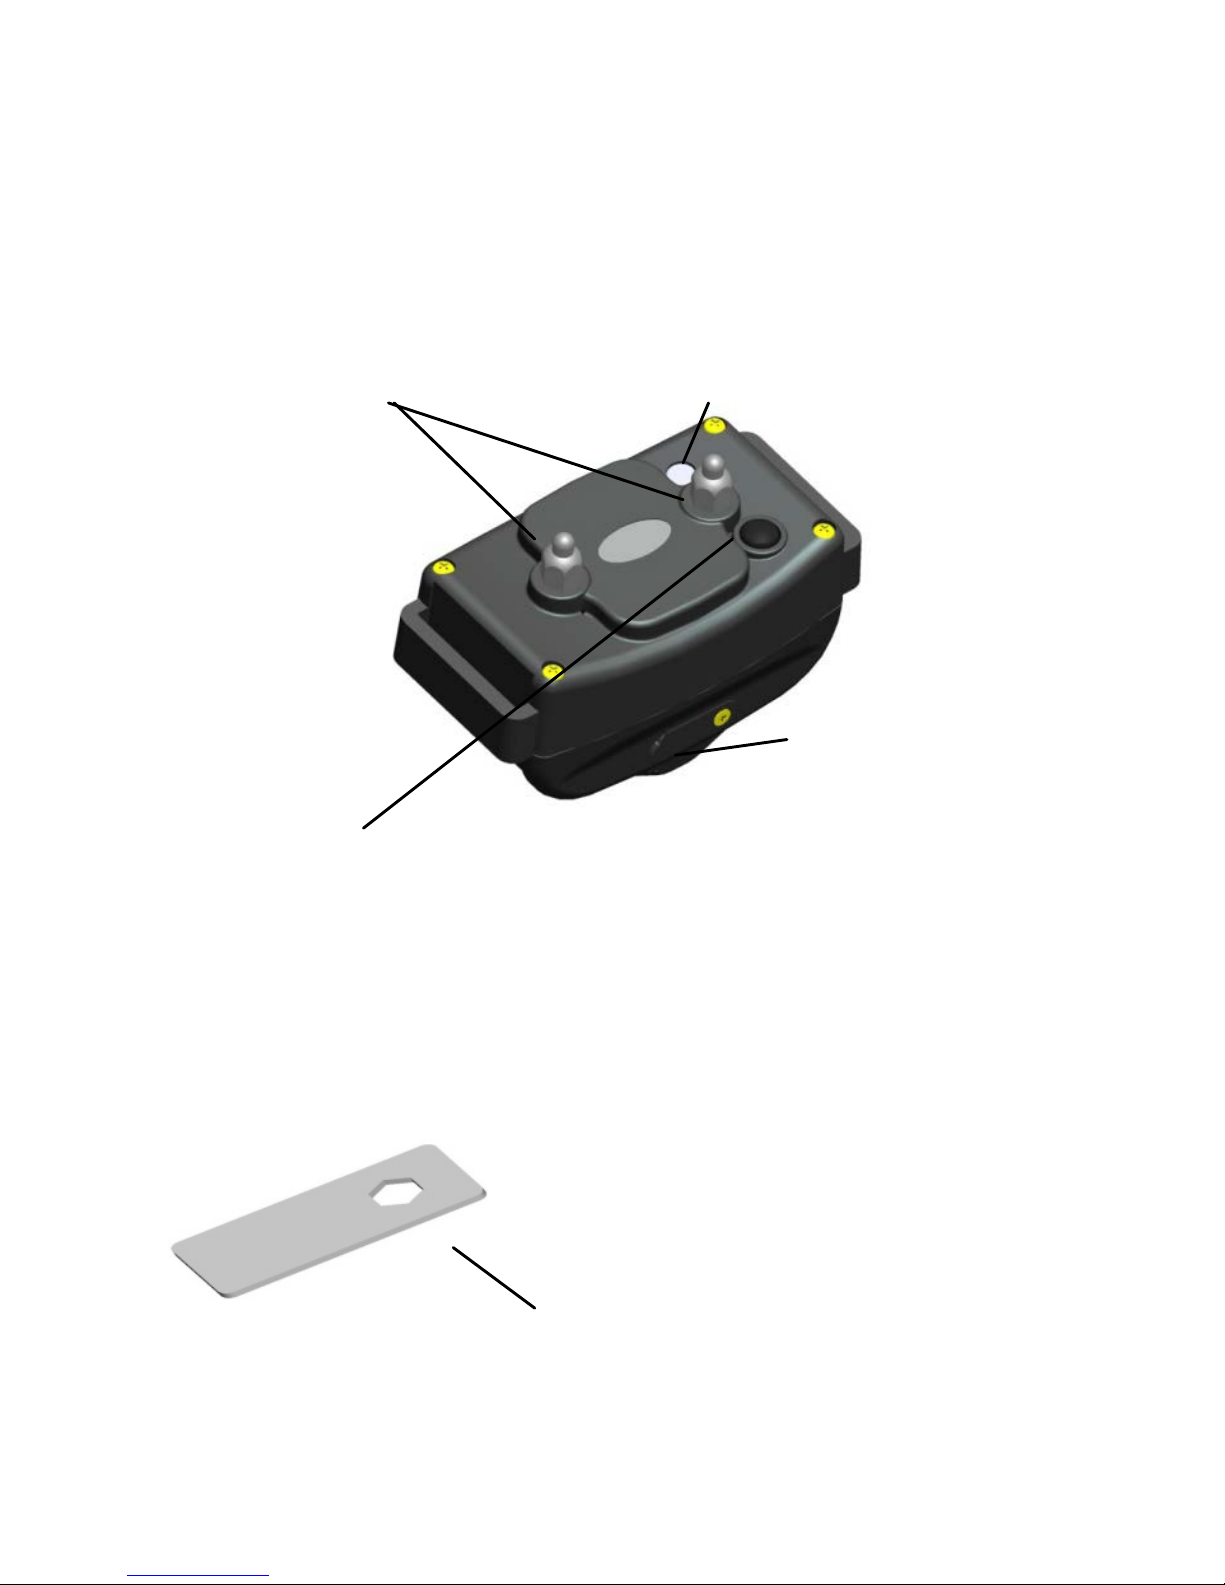
Receive Collar
NOTE: CHARGE RECEIVER BEFORE FIRST USE
On/Off Button
Press and hold on 4 seconds to turn thecollaron.Two
confirming tones will sound and thecollargreen Led
light will flash 1 timeper5 seconds.
P
ress and hold on 4 seconds to turn thecollaroff.One
long tone will sound and thegreen Led light will stop
flashing and off.
Turn the
collar offwhen not in useto conservebattery
ContactProng
Chooseshort orlong prong to match
thedog’s coat type
Spanner
Change theContactProng basing on thepet’s
coat type .
Notes:If theContactProng is tight,
Continue to turn the spanner clockwise,
TheContact Prong will bebroken .Never
turnthe contactprong too tightly .
LED Light
Indicatetheworking status,
Low battery ,Charging status
DC JackCover
Open theRubberCover
and inserttheadaptor
plug into DCJack to
charge .
- 9 -

Setting Up Multi-dog System
You can expand your one-dog Remote Trainer into
multi-dog Remote Trainer by yourself. Simply purchase
extra receive collar and add them to your system.
1. Match a Receive collar To add a Receive collar to
your remote dog training system, following the
below steps:.
Step 1 : Take out 1 Pcs unmatched receive collar .
Press and hold “ON/OFF” button .after two
“beep” sound ,then release , receiver is power
on ,Green Led flash frequently .(Note : never
open 2 or more unmatched receivers .)
Step 2 : Take out the transmitter that you want to match
receiver . Press and hold on “ ” button until
LCD display occur then release , Transmitter is
power on .
Step 3: Press and hold “ ” button and “ ”button
at the same time ,until the digital number on the
- 10 -

LCD display change automatically ,then release.
Enter match receiver mode . The number
changes like “08,09,10,11……”, increasing
automatically .
Step 4: Take the transmitter to close the unmatched
receiver 50~100mm .
Step 5: Press and hold on the Dog selection button .If
you match “1” dog, Press “1” button ; If you
match “2” Dog , Press “2” button ; If you
match “3” dog , Press “3” button .After listen
to 3 “beep” sound from receiver and see green
Led flash slow down , Then release .
Special note: Yo u must confirm that listen
to 3 sound “beep” from unmatched receiver
and see gree n Led flash slow down first ,
then release dog selection button . If you
match receiverfailure , you need to cancel
the failure matched receiverfirst, then
re-match again. .
- 11 -

Step 6: Press and hold “ ” button and “ ” button
at the same time again ,until the digital number
on the LCD display no change ,then release .
Step 7:Test matched Receiver---Chose dog first, then
press “ ” button , you can hear the “beep”
sound from the matched receiver .
Congratulate you , match receiver
successfully .
Note: After matched receive collar , the
dog selection button will return to “1”
default . Before test the matchedcollar ,
Please chose dog first .
2. Cancel a matched ReceiverFollow up the below
steps one by one to cancel the matched Receiver:
Step 1 : Take out 1 Pcs matched receiver . Press and
hold “ON/OFF” button .after two “beep”
sound , receiver is power on ,Green Led flash
1 time per 5 second .
- 12 -

Step 2 : Press and hold “ ” button until LCD
display occur then release , Transmitter is
power on .
Step 3: Press and hold “ ” button and “ ” button
at the same time ,until the digital number on
the LCD display change automatically ,then
release. Enter cancelmatched receiver mode .
The number changes like “08,09,10,11……”,
increasing automatically
Step 4: Close the Receive Collar 50~100mm, Press the
Dog Selection Button one time ( You can
press “1” or “2” or “3” freely, It is same). You
can listen to 2 “beep” sound from receiver.
Step 5: The green Led light of Receiver flash
frequently . Congratulate You cancelthe
matched Receiver successfully .
- 13 -

Step 6 : Press and hold “ ” button and “ ” button
at the same time again ,until the digital number
on the LCD display no change ,then
release .Exit the cancelmatched receiver
mode .
Charging
The transmitter and receiver charge rapidly – about 2
hours are needed.
The transmitter and receive collar can be charged at
same time
Common adaptor for transmitter and receiver charging
To recharge, Open the Rubber Cover first . Plug the
Adaptor Contact Pin into household AC power outlet
and insert the Adaptor Plug into Receiver DC Jack .
The Transmitter and Receive Collar can be charged by
connecting USB Cable and other 5V DC power
supply ,such as Cell phone Adaptor , Notebook ,
Computer .
- 14 -

Do not charge batteries in especially hot areas , far
away from a fire.
1. Receive Collar Charging
The red Led light is on when charging .
The green Led light is on and the red Led light is off
when the receive collar is full charged
The Receiver red Led light will flash when the battery
is low power. Recharge the battery atonce.
2. Transmitter Charging
The LCD display is “CHA” when charging.
The LCD display is “FUL” when the transmitter is full
charged
The transmitter red light flashes if the battery is low.
Charge it promptly
Important : When stock the products for 4~5 weeks ,
Please give a full charge forTransmitterand receive
collar.
- 15 -

Training Guide
1. Fitting Collar on the Dog
Place the collar strap in the middle of the dog’s neck.
The receiver should be on the underside of his neck
although on some dog’s necks the receiver will
naturally seek a slightly off-center position. The Rubber
Cover should face backwards( toward the dog’s chest).
Tighten the buckle by holding it with two fingers as
you pull the strap snug. Remote training collars must be
put on a dog quite snugly to ensure consistent contact
and reliable stimulation.
Do not put any fingers under the strap as you tighten it.
2. Stimulation
Your Remote Trainer has 10 levels of intensity . So you
can find the best level for your dog’s temperament and
the type of training your dog. You may also select
either shock or vibrate stimulation, depending on your
dog’s temperament and your training purpose.
- 16 -

You may press “+” or “-“ button to select suitable
shock level, then press and hold on the “ ” button
for around 8 seconds continuous stimulation ; press one
time , emit one static shock
You may press “+” or “-“ button to select suitable
vibration level, then press and hold on the “ ”
button for around 8 seconds continuous vibrate ; press
one time , emit one vibrate .
Troubleshooting Guide
Problem#1: No stimulation when a transmitter
button is pressed.
The receiver has not been activated. The receiver must
be turned on otherwise it won’t work at all.
The receiver has not been set to your transmitter.
Follow the instruction to match.
Problem#2: The Beeper of Receiver doesn’t make
any sound when the Receiver is turned on.
Press dog selection button to choose correct Dog ID
- 17 -

before press transmitter buzz control button.
The Beeper component is loose , send to service center
to repair .
Problem#3: The stimulation seems too high, not
high enough or no feeling at all
The collar strap is not tight enough. Make sure the
contacts points connect the dog’s skin well.
The intensity level is not correct. Change the shock
level.
The batteries are dead. Recharge as needed.
Problem#4: The receiverlightchangescolor to
indicate low battery very quickly
The unit has been left turned on between training
session.
Make sure the receiver is turned off afteruse.
You are training in very cold weather.
Problem#5:The Remote Trainerdoesn’t have range
or the range is significantly reduced.
Either you or the dog is shielded by a metal structure.
Operate it farawayfrom these structure.
The receiver is on backwards. For best range, position
- 18 -

the receiver so that the light face toward the dog’s nose.
Radio Interference. Wait a short while then try again, or
move to another area.
Problem#6:The receiverseems can’t receive any
signal or can not work at all
Check the receiver on/off button, make sure the
receiver is turned on.
Check the transmitter , If it is low battery, charge
transmitter first .
Cancelthe receiver match , then re-match it with
transmitter . If receiver can not work
too, send back to service center to repair or replace .
Warning:
Changes or modifications not expressly approved by
the party responsible for compliance could void the
user’s authority to operate the equipment.
- 19 -
Table of contents
Other Trainertec Electronic Pet Care Product manuals


