Trans-Canada RC2012 User manual


Table of Contents
Introduction
Important
Caution
Features
Replacing A Charging Pod
Charging A Battery
Battery Fault Conditions
Specications
Accessories
Term and Conditions of Warranty
1
2
2-3
4-5
6
7-8
9
10
11
11

Introduction
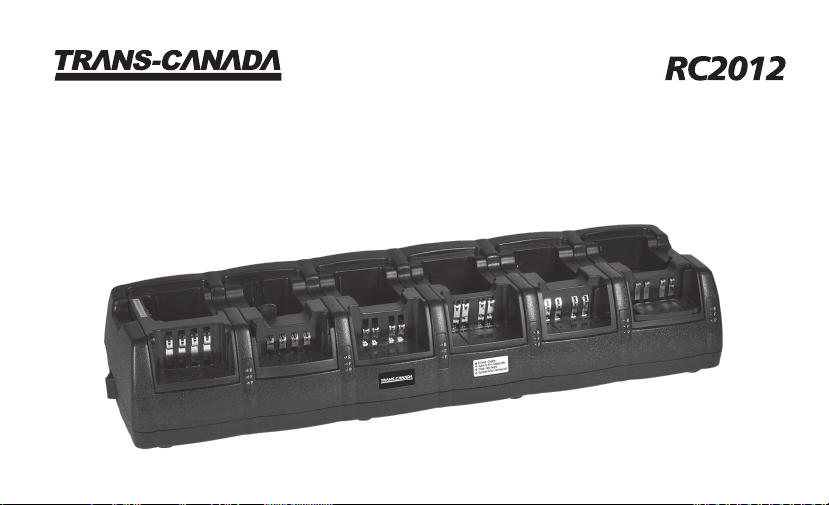
Congratulations on your purchase of your new Trans-Canada™ RC2012, 12-Unit Rapid Charger.
This high quality charging station is designed for charging two-way radio batteries whether on or
off a radio. Using six replaceable pods, the RC2012 can charge twelve batteries at the same time
and the batteries may be the same or different chemistries.
This ultra-convenient charging station enables you to install six different replaceable charging pods,
therefore allowing to charge two batteries for each of six different radio brands to be charged. It
also features separate LED indicators displaying the charge status of each battery.
With the compatible charging pods installed, RC2012 can charge these battery chemistries: lithium
ion (Li-Ion), lithium polymer (LiPo), nickel-metal hydride (NiMH), or nickel cadmium (NiCd).
For a complete list of charging pods available for this charger, please contact your dealer or
Trans-Canada Energies customer service at 1 855 348-8720.
1

1
2
3
Read all Caution statements below and this User Manual before attempting to charge a battery.
Always charge new batteries completely before initial use. Recycle batteries when they can no longer
be used. Do not discard unwanted batteries in the trash or incinerate. Batteries exposed to re or
excessive heat may explode.
For best battery performance, charge NiCd and NiMH batteries when they are fully discharged.
1
2
3
Never charge alkaline or dry cell batteries with this charger. Do not charge Li-Ion, LiPo, NiMH, or
NiCd batteries unless they are designed with overcharge protection.
Use charger in areas protected from the weather. Do not expose the charger to rain, any liquids,
or excessive moisture.
Do not attempt to charge a battery without rst installing the appropriate charging pod. Use only
charging pods designed for the TRANS-CANADA RC2012 charger. Disconnect charger from power
supply before installing, adjusting, or removing the charging pod.
Important
Caution
2

Make sure contacts in charging pod and battery are clean. Do not allow wire or metal objects to
touch contacts in charging pod or any internal part of the charger.
Do not remove the charger’s housing or make any modication to the charger.
Use only the power supply provided with the RC2012 charger. If a replacement power supply is
required, order part number RC2012-PSA. Use of other power supplies may damage the charger
or batteries you may be attempting to charge.
Caution (continued)
4
5
6
CAUTION
Risk of electric shock
DO NOT OPEN
Caution: To reduce the risk of electric shock, do not remove
cover. No user serviceable parts are inside. Refer any servicing
to qualied service personnel.
The lightning ash and arrowhead within
the triangle is a warning sign alerting you
of ‘dangerous voltage’ inside the product.
The exclamation point within the triangle
is a warning sign alerting you of important
instructions accompanying the product.
!
3

DC power connection (see next page).
Charge status LED indicators – for front and
rear positions.
Quick reference information for charge status
LED indicators.
4
5
6
Rapid charger base.
Power on/off switch (left side of unit).
Removable charging pod for two batteries
(shown for rst position only).
Features
1
5
6
2
3
4
Note: Additional reference information
for charge status LED indicators is located
on bottom of charger.
4
7
8
9
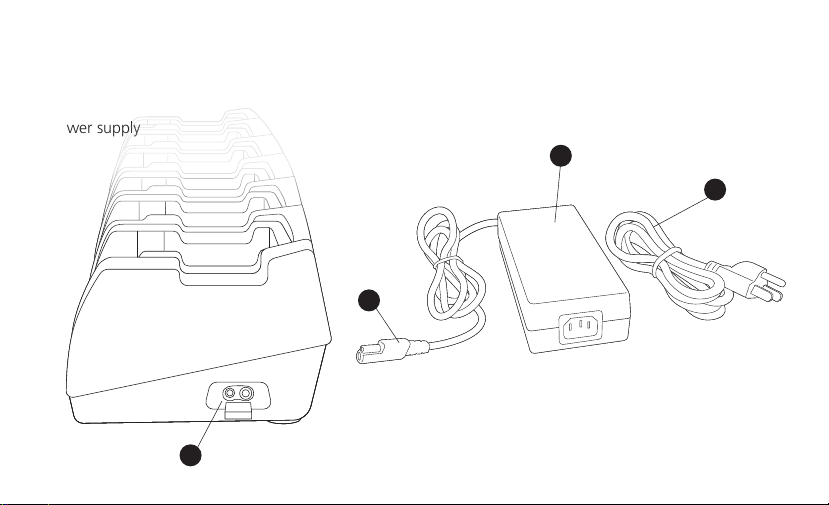
DC power connection.
DC plug from power supply.
Power supply
10 Power cord to connect RC2012-PSA with AC wall
outlet.
DC power connection (7) is a custom design
that securely holds the DC plug (8).
Features (continued)
9
8
10
7
Note:
5

Obtain a charging pod made specically for the charger. Conrm that the charging pod is compatible
with the battery you want to charge.
Unplug the power supply from the charger.
The charging pod is secured to the base with a single screw. Turn the locking screw on the bottom of
the rear charging pod counter-clockwise until it no longer holds the pod. Lift the charging pod from the
charging base.
Insert the replacement charging pod into the charging base and secure with the locking screw. Do not
over tighten the screw.
Inspect the charging contacts to ensure they are clean and unobstructed.
Connect the power supply to the charger. You are now ready to charge a battery compatible with the
charging pod.
Follow these steps to change the charging pod:
Replacing A Charging Pod
The charging pod is made from quality materials and designed to provide years of service when properly
used. In most cases, the charging pod will only be replaced when you want to use the charger with a
different battery. Each pod charges two batteries for a specic radio; the two batteries may have
different capacities or chemistries.
1
2
3
4
5
6
6

1
2
3
4
Conrm that the charging pod and battery are compatible.
Insert the DC plug from the power supply into the opening on the
right side of charger, connect the AC wall plug to a 120 V outlet,
and turn the power switch (left side) to the on position. The
status LED indicators marked “P” illuminate green to conrm the
front and rear positions for each pod are receiving power.
Place the battery to be charged in either the front or rear position
of the charging pod. The status LED marked “F” or “R” will
illuminate to conrm which position is charging the battery. The
battery may be charged while attached to the radio and two
batteries may be charged simultaneously.
When a battery is placed in the charging pod and while charging,
the charge status LED (F or R) will illuminate red with no ashing.
If the charge status LED is red and ashes, a fault has been detec-
ted. The ash pattern represents a specic fault condition.
See section Fault Conditions for details.
Charging a Battery
Status LED for rear position.
Status LED for front position.
Illuminates green when charger
is connected to power.
R
F
P
7

5
6
7
8
When the battery is charged to 80 % of capacity, the charge status LED will change to green and
begin to ash. It is recommended that the battery be charged to at least 80 % capacity before use.
The charge status LED will illuminate green with no ashing when the battery is fully charged.
After removing a fully charged battery, the charge status LED will illuminate orange for a few
seconds. Allow the charge status LED to go off before placing another battery in the charging pod.
The charger is designed to operate at room temperatures between 15 °C and 30 °C (59 °F – 86 °F ).
Do not charge batteries at temperatures below 0 °C (32 °F) or above 45 °C (113 °F).
Charging a Battery (continued)
8

Flash Pattern Fault Type
Flashes 1 Time Indicates charging complete, but battery is under charged. Battery voltage is
below minimum level required. This warning is provided after the rapid
charging stage is complete.
Fault Conditions
When the F or R charge status LED ashes red, a fault condition exists. There are three different ash
patterns, each indicating a specic type of fault. The ash patterns and fault conditions are as
follows:
Flashes 2 Times Indicates battery contact is “open” and current is not passing through the
(+) and (-) contacts on the battery. This warning is provided after the initial
diagnostic stage is complete. Check charging pod to conrm compatibility
with battery.
Flashes 3 Times Indicates over-current condition caused by battery short circuit. Have the
battery checked by a qualied technician. Do not attempt charging the
battery if a short circuit exists.
9

RC2012 Charger Specications
Dimensions (W x L x H)
Weight (Charger Only)
Weight (Power Supply)
Compatible Chemistries
Recommended Operating Temperature
Storage Temperature
Power Supply Input
Charger Input
Charge Rate
Product Approval
509x148x94 mm / 20x5.8x3.7 in
1.63 kg / 3.6 lbs
0.86 kg / 1.9 lbs
Li-Ion / LiPo / NiMH / NiCd
15 ºC – 30 ºC / 59 ºF – 86 ºF
0 ºC – 65 ºC / 32 ºF - 149 ºF
100 V – 240 V AC / 50 Hz – 60 Hz / 2.2 A (max)
12-24 V DC / 12.5 A
800 mA (10.6 V – 13.5 V)
FCC, CE, UL (power supply)
Specications subject to change without notice.
This device complies with Part 15 of the FCC Rules. Operation is subject to the following conditions: (1) this device may not cause harmful
interference, and (2) this device must accept any interference received, including interference that may cause undesired operation.
10

RC2012 Charger Accessories
RC2012-WMB
Part Number Description
RC2012-PSA
RC2012-PC
Bracket for mounting on a wall or horizontal surface.
Power supply (included with charger).
Power cord (included with charger).
Terms and Conditions of Warranty
Any battery charger defective in material or workmanship will be repaired or replaced according to
published defective return test repair procedures. The existence of a defect shall be determined by the
seller in accordance with published procedures. The published test procedures are available upon request.
This warranty does not cover any unit that has been damaged due to accident, abuse, alternation,
use for a purpose other than that for which it was intended, or failure to follow operating instruc-
tions. This warranty is expressly limited to original retail buyers. This warranty is not assignable or
transferable. Proof of purchase is required for all alleged claims. Warranty cannot be authorized
without proof of purchase.
Please contact your dealer for more details.
11

Toll free: 1 855 348-8720
Chargeur rapide à 12 unités
pour batteries de radios bidirectionnelles rechargeables
Manuel de l’utilisateur

Table des matières
Introduction
Important
Mise en garde
Caractéristiques
Remplacement d’un socle de charge
Recharge d’une batterie
État de défaut de la batterie
Spécications
Accessoires
Garantie
1
2
2-3
4-5
6
7-8
9
10
11
11

Introduction
Nous sommes ravis que vous ayez fait l’acquisition de votre nouveau chargeur rapide à 12 unités,
Trans-Canada™ RC2012. Ce produit de haute qualité est conçu pour recharger les batteries de
radios bidirectionnelles avec ou sans la radio. Grâce à ses six socles de charge, le chargeur RC2012
est capable de recharger simultanément jusqu’à 12 batteries du même type ou de différents types
combinés. Chacun des emplacements de la station de charge est muni d'un voyant lumineux
indiquant l’état de charge individuelle de chacune des batteries.
Les six socles de charge sont remplaçables et peuvent être combinés. Par exemple, six socles de
charge peuvent être installés, permettant la recharge simultanée de deux batteries de six radios
bidirectionnelles de différents modèles.
Lorsque les socles de charge compatibles sont installés, le chargeur RC2012 peut recharger une
variété de batteries de différents types : lithium ion (Li-Ion), lithium polymère (LiPo), nickel-mé-
tal-hydrure (NiMH), or nickel cadmium (NiCd).
Pour la liste complète des socles de charge disponibles pour ce chargeur, veuillez contacter
votre vendeur ou le département du service à la clientèle de Trans-Canada Energies au 1 855 348-8720.
1

1
2
3
Veuillez lire toutes les indications de mise en garde décrites dans ce manuel avant d’utiliser votre
chargeur.
Toujours charger complètement une batterie neuve avant la première utilisation. Recyclez vos batteries
dans un endroit approprié prévu à cet effet lorsqu’elles deviennent inutilisables. Ne jetez pas vos batte-
ries usagées avec les déchets ménagers ou incinérer. Les batteries exposées aux ammes ou à la
chaleur excessive peuvent exploser.
An de maximiser la performance de vos batteries, rechargez les batteries de types NiCd et NiMH
seulement lorsqu’elles sont pratiquement entièrement déchargées.
1
2
Ne jamais charger des batteries alcalines ou sèches avec ce chargeur. Ne pas charger les batteries
de types LiPo, NiMH, or NiCd ne comportant pas de dispositif de protection contre les surcharges.
Utilisez votre chargeur dans un endroit sec et protégé des intempéries. Ne pas exposer le chargeur
à la pluie, d’autres liquides et à l’humidité excessive.
Important
Mise en garde
2

Ne pas essayer de charger une batterie sans d’abord avoir installé un socle de charge compatible.
Utilisez seulement les socles de charge conçus pour le chargeur. Déconnectez le chargeur de la
source d’alimentation avant d’installer, ajuster ou retirer le socle de charge.
Assurez-vous que les contacts du socle de charge et de la batterie soient toujours propres. Évitez
que tout objet métallique ne touche les contacts à l’intérieur du socle de charge ou toute partie
interne du chargeur.
Ne pas retirer le boîtier du chargeur ni effectuer de modications au chargeur.
Utilisez uniquement le bloc d’alimentation fourni avec votre chargeur. Si vous nécessitez un bloc
d’alimentation de remplacement, commandez la pièce de référence RC2012-PSA. L’utilisation d’un
autre bloc d’alimentation pourrait causer des dommages au chargeur ou aux batteries que vous
tentez de charger.
Mise en garde (suite)
4
5
6
7
ATTENTION
Risque de choc électrique
NE PAS OUVRIR
Avertissement: An de réduire le risque de choc électrique, veuillez ne pas retirer le
couvert, les éléments internes ne se prêtent à aucune intervention de l'utilisateur. Veuillez
vous référer au personnel de service qualié.
Le symbole composé d’un éclair terminé par une èche, dans
un triangle est destiné à avertir l’utilisateur de la présence d’un
voltage dangereux sans isolation à l’intérieur du produit d’une
force sufsant à provoquer un risque de choc électrique.
Le symbole composé d’un point d’exclamation dans un triangle
est destiné à avertir l’utilisateur de la présence d’instructions
concernant le produit.
!
3

1
2
3
Connexion d’alimentation CC.
(voir la page suivante).
Indicateurs de charge lumineux à DEL
pour les positions avant et arrière.
Référence des indicateurs de charge lumineux.
4
5
6
Base du chargeur rapide.
Interrupteur on/off (allume/éteint) -
(côté gauche de l’unité).
Socles de charge amovibles pour deux batteries
(Présentation dans la première position seulement).
Caractéristiques
1
5
6
2
3
4
4
Table of contents
Languages:
Other Trans-Canada Batteries Charger manuals


