HOTA F6 User manual

F6 4-Channel DC
Smart Charger Operating Instructions

Thank you for purchasing the HOTA series of smart
chargers. Please read this Instructions carefully
before use so as to use the product better . Keep
this Instruction in a place safe for easy access.
If you want to know more about our smart chargers,
please visit our website: www.hota-exp.com
F6 4-Channel DC Smart Charger
Thank you for using
Ver 1.0.5

01
01
02
03
04
07
07
08
18
20
22
Product Overview
1、Specifications
2、Introduction
3、Warnings and Safety Notes
4、Recommended Way of Connection
5、Balance port connection and Notes
6、Mutli-Function port
7、Standard battery types and task parameters
Operation and setup
1、How to confirm the Charging Current
2、Operative Skills
3、Display of the working status
4、Charger Settings
5、Charger Settings >Task Parameters
6、Charger Settings >System Parameters
7、Charger Settings > Tools
8、Task Settings
9、Task Settings and Notes
Product Qualification Declaration
Troubleshooting
Warranty and Services
Safety Tips
Safety Notes
21
19
27
23
28
28
29
30
07
05
06
03
Contents

F6 4-Channel DC Smart Charger
Product Overview
Multiple Outputs , High Performance
Safety Protection , make things simple
Based on advanced design of the circuit and the software algorithm , this charger
assures users that no matter in charging or in discharging , troubles such as
over-voltage ,over-current overheat and short circuit can be handled easily.
Support various types of batteries
By using innovative , self-defined algorithm for charging lithium batteries , F6 charger not
only charges smart batteries and other standard types of batteries , but charges them
much quicker than others
Internationalization
Full support for simplified Chinese, traditional Chinese, Japanese, English, German, etc. to
ensure unobstructed use.
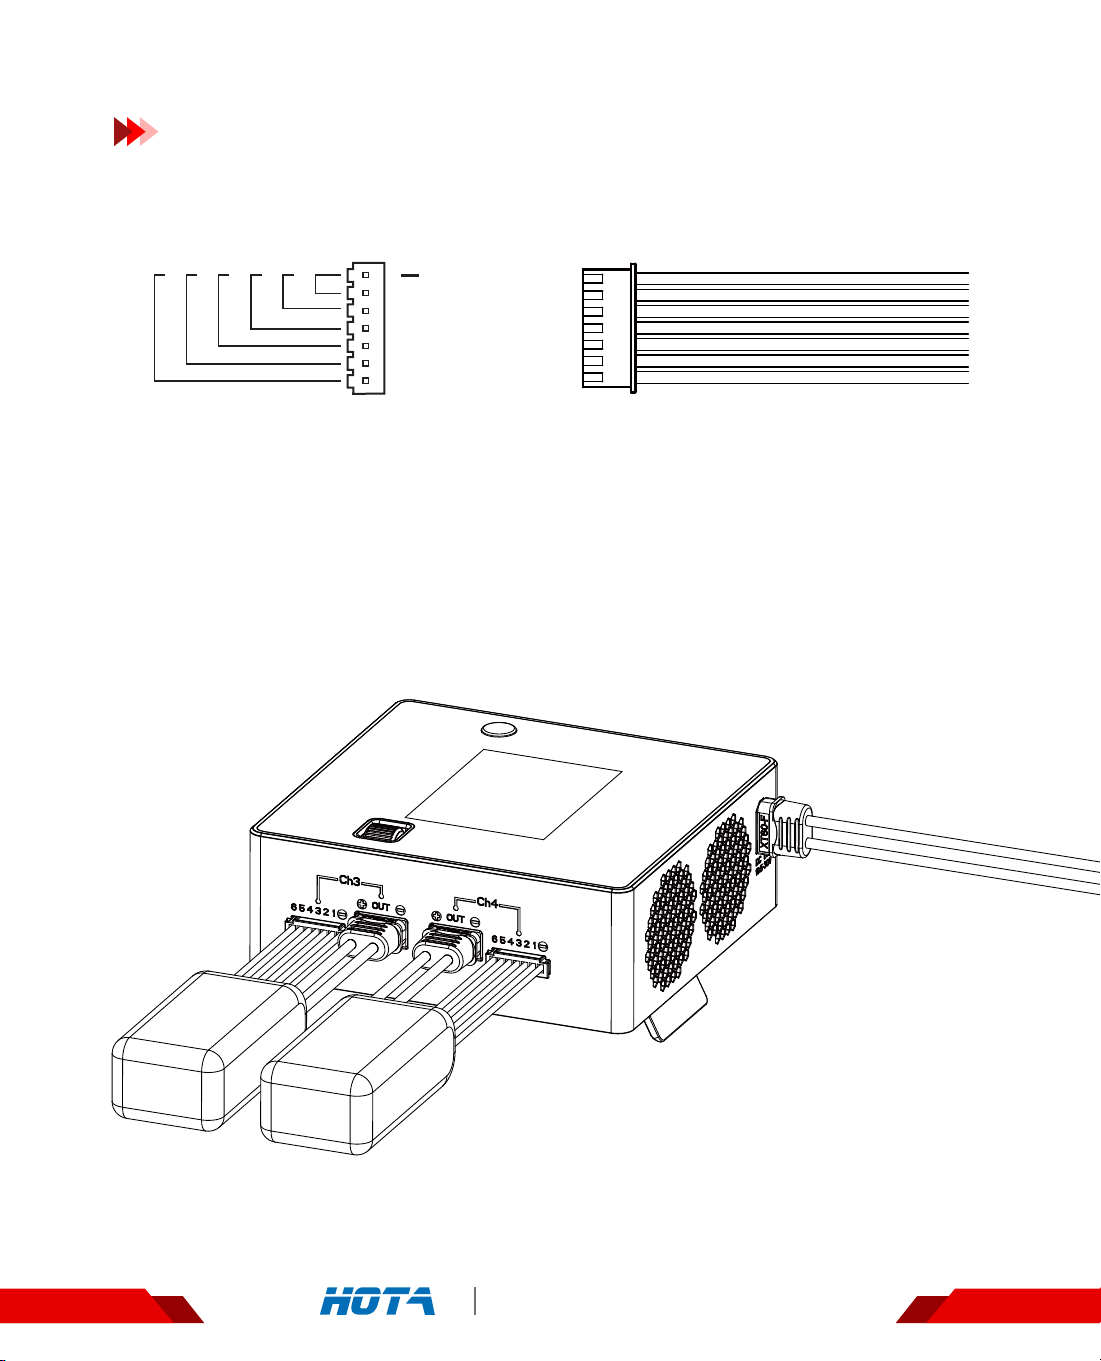
A 4-Channel DC charging system that can handle tasks under any circumstance.
A powerful function of combined charging
F6 can concentrate the output power of two channels on one battery, making the
combined charging power up to 500W and combined charging current up to 22A .
IPS sunlight screen
High contrast, full color, full viewing angle, even under sunlight ,images are clearly displayed.
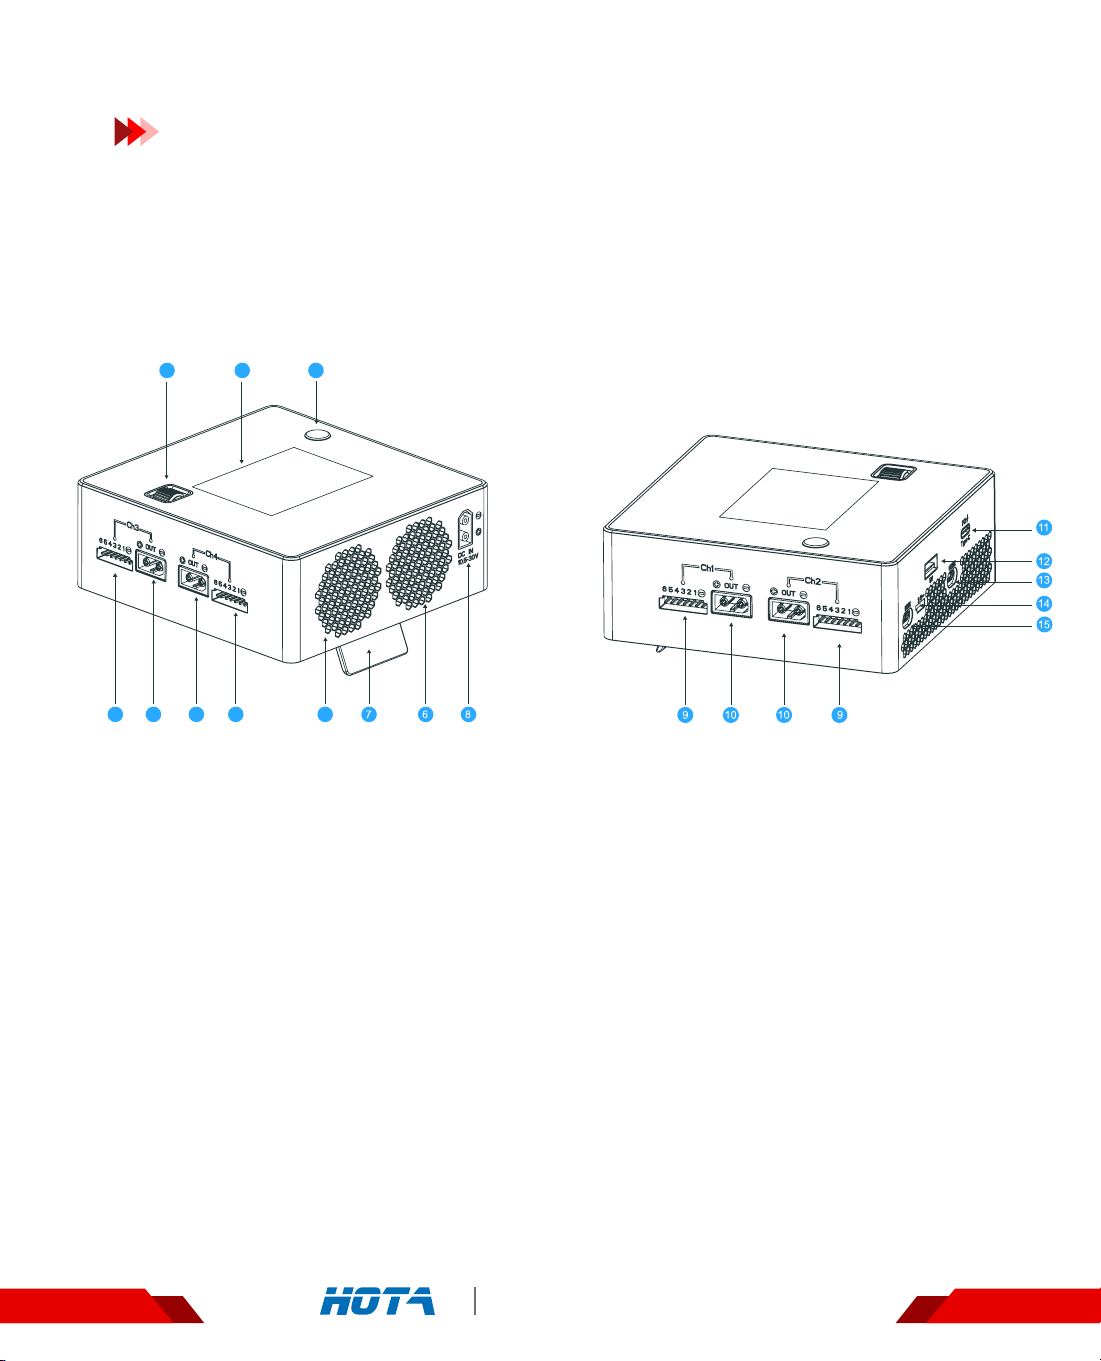
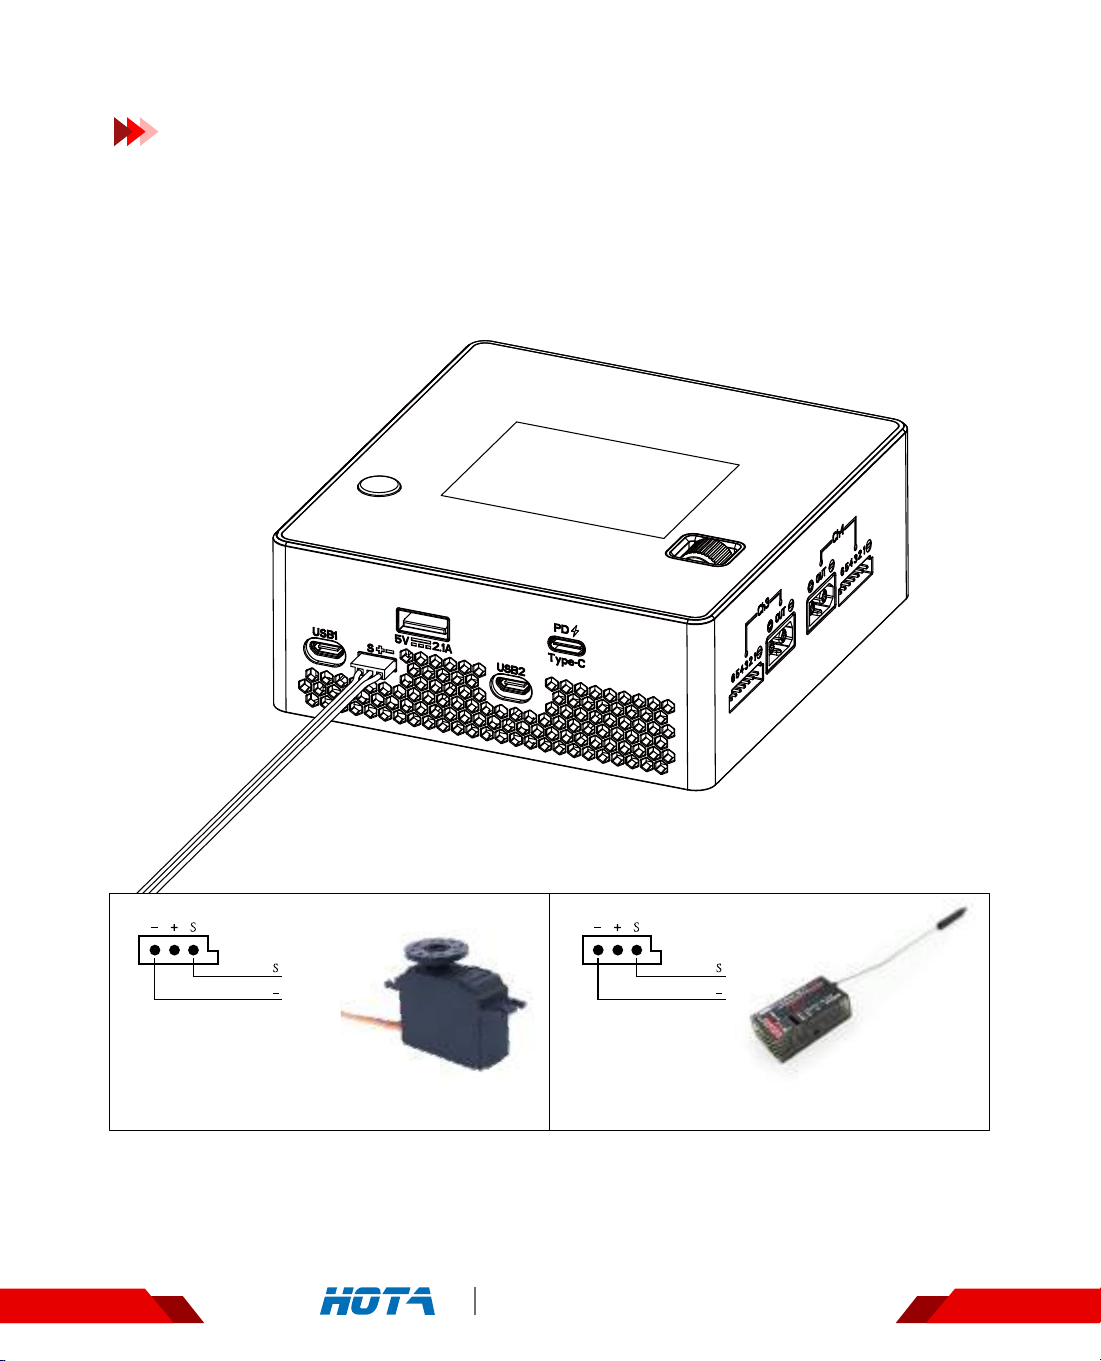
Abundant mainstream interfaces , meet requirements of any applications
The front panel is equipped with dual USB charging ports, plug and play, capable of performing
any applications with ease.More to emphasize is the Type-C interface which gets excellent current
output capability that supports charging of laptops, tablets and other devices, making user's travel
much easier.
High efficiency in heat dissipation
Seemingly simple and easy-to-use intelligence that hides powerful technology
Four channel outputs, 250W 15A each
Highly optimized algorithm for management of charging, up to 94% operating efficiency ,
four channel high-power output , a temperament of supremacy that makes others envy.

Product Overview
Specifications
Net weight
Input Voltage
Charge Power
Discharge Power
475g
USB output 5V / 2.1A
Type-C Output Max. 45W
Regenerative
Discharge current
0.1~15A x 4
DC 10.5~30V
250W x 4 @ Input Voltage > 23V
Protection
Function
Temperature protection, Time Protection, Capacity protection, Input
reverse protection,Output reverse protection, Short circuit protection,
Output overcurrent protection, Output overvoltage protection, overcharge
protection,over discharge protection .
Internal Discharge: 12W x 4
(balance port6Wx4)
Regenerative Discharge: 250W x 4 (1000W)
Balance Current
Screen Size
Charge Current Discharge Current 0.1~3A x 4
Combined
charge power 500W x 2 @Input voltage>>23V
1000mA x 4
2.8“ IPS 320x240,
260,000 colors
Dimensions 115mm×121mmx46mm
Storage
Temperature -20~60°C
Operating
Temperature 0~40°C
Battery Type
LiHV/LiPo/LiFe/Lilon/Lixx : 1~6S
NiZn/NiCd/NiMH : 1~14S
Smart Battery : 1~6S
Lead Acid(Pb) : 1~12S(2~24V)
Eneloop : 1~14S
0.1~15A x 4
F6 4-Channel DC Smart Charger 01

Product Overview
An introduction
1.Speed shuttle key
2. Screen
3. Channel switch key
4. Balance port
5. Battery port
6. Ventilation air out
7. Support
8. DC Input port
9. Balance port
10. Battery port
11. Type-C output
12. USB-A Output
13. Update port for 1
and 2 channels
14. Multi-function port
15. Update port for 3
and 4 channels
02
F6 4-Channel DC Smart Charger
1 2 3
64 45 5

Recommended way of connection
Product Overview
Warnings and Safety Notes
LiPo 6S
03
F6 4-Channel DC Smart Charger
LiPo 6S
1. Do not use the charger in an unattended manner, in case of any functional abnormality,please
stop using it and refer to the manual.
2. Keep the charger away from dust, humidity, rain and high temperature, as well as direct expo
sure to sunlight and intense vibration.
3. Input voltage of the charger is 10.5-30V DC. When connecting to the power supply, make sure
that the input voltage match the operating voltage range of the charger.
4. Please place the charger on a heat-resisting, non-flammable and insulating surface. Do not
use it by placing it on the car's seat, carpet or other similar place. Keep inflammable and
explosive objects away from operation areas of the charger.
5. Make sure the heat dissipation hole at the bottom of the charger is not covered while in use,
and ensure the cooling fan smoothly extracts heat.
6. Please fully understand the charging and discharge characteristics as well as the battery‘s
specifications. Additionally, set up proper charging parameters in the charger. Incorrect
setting of parameters can cause damage to the charger and battery ,even give rise to
disastrous consequences such as fire and explosion.
7. When charging or discharging is completed, please first press the speed shuttle key to terminate
the current task, then remove the battery when the charger shows the standby screen.
1、Connect power supply to the charger, wait for the system to
complete its self-checking ;
2、Choose the channel that is linked with the battery ;
3、Through scrolling the Speed Shuttle key and the screen to set
the task parameters suitable for the battery ;
4、Enjoy。

Balance Port Connection and Notes
Product Overview
LiPo 6S
LiPo 6S
1S
2S
3S
4S
5S
6S
04
F6 4-Channel DC Smart Charger
1. The detection balance port of this product is suitable for lithium battery packs;
2. When the battery is connected, it is aligned with the " - " sign . The diagram above
shows the alignment of the balance plug;

Multi-Function Port
Product Overview
05
F6 4-Channel DC Smart Charger
RC airplane control servo connects to the
Multi-function port
RC airplane receiver or RF transmitter
connects to the Multi-function port
Multi-Function Port
1. Connect to the RC airplane control servo
2. Connect to the RC airplane receiver or RF transmitter

Product Overview
06
F6 4-Channel DC Smart Charger
Be very careful to choose the correct voltage for different types of batteries otherwise it
may cause damages to them. Incorrect settings could cause the battery to burn or to
explode , leading to injury of people or loss of property.
Standard Battery Types and Task Parameters
Rated
Voltage
Battery Type
Task
Parameters
Full Charge
Voltage
Storage
Voltage
No
support
No
Support
Support
Discharge
Voltage
Balance
Charge
Unbalanced
Charge
Support
Cells
Max Charge
Current
NiCd
NiMH LiFe
1.20V
1.50V
0.90V
1-14S
15.0A
3.30V
Support
Support
3.20V
3.65V
2.90V
1-6S
15.0A
3.70V
Support
Support
3.6V
4.10V
3.20V
1-6S
15.0A
3.80V
Support
Support
3.70V
4.20V
3.30V
1-6S
15.0A
3.85V
Support
Support
3.80V
4.35V
3.40V
1-6S
15.0A
1.60V
Support
Support
1.50V
1.93V
1.20V
1-14S
15.0A
3.80V
Support
Support
3.7V
4.20V
3.30V
1-6S
15.0A
3.80V
Support
Support
3.70V
4.20V
3.30V
1-6S
15.0A
Support
2.00V
2.46V
1.90V
1-12S
15.0A
Support
1.20V
1.50V
0.90V
Max Charge
C Value ≦2C ≦4C ≦1C ≦1C ≦1C ≦0.5C ≦1C ≦1C ≦0.5C ≦0.5C
1-14S
15.0A
Lilon LiPo LiHV NiZn Lixx Pb
Smart
Ba�ery Eneloop
No
Support
No
Support
No
Support
No
Support

07
F6 4-Channel DC Smart Charger
How to conform the charging current
Operative Skills
It is important to know the maximum charging current of the battery before charging as
excessive current could influence the life span of battery ,even cause damages. In addi-
tion, excessive current can cause heating even explosion of the battery during the
charging process.
The charging and discharge capacity of battery is usually marked with C value. Multiply-
ing the charging C value and battery capacity equals to the maximum charging current
supported by the battery. For example, for a 1000 mAh battery with a charging capacity
of 5C, its maximum charging current would be l000 * 5 = 5000mA; that is , the maximum
charging current is 5A.
For a lithium battery, if it is impossible to confirm the supported charging C value, please
set the charging current below 1C for the sake of its (lithium battery) safety.
The reference relation between C value and charging time: charging time >= 60
minutes/ charging C value (it therefore needs around 60~70 minutes to complete
charging with 1C). Due to the differences in battery power conversion efficiency, this
period of time to complete the charging may be extended.
1. Connect power supply to the charger and
wait for the system to complete its self-check-
ing. In standby interface, connect well the
battery to the charger. Short press the Channel
switch key to choose whatever channel prefers
. After having chosen the channel, short press
the speed shuttle key to pop up the “ Task
Settings “ menu ;
2.2.When a task is being executed, short press
the speed shuttle key to pop up the " Adjust
Task" menu to adjust the task’s current ;
3.Long press the Channel switch key can end
the task of current channel quickly or enter the
"Task Settings" menu of the channel .
Operation and Setup
Channel switch key Speed Shuttle Key
Standby
CH1
Standby
CH2
LiPo-�sCHG
CH4
LiPo-�sCHG
CH3
23.44
V
29.1V
23.44
V
29.1V
2.0
A
24.4V/45W
3.8
A
23.3V/85W

Standby
CH1
Standby
CH2
LiPo-�sCHG
CH4
LiPo-�sCHG
CH3
23.44
V
29.1V
23.44
V
29.1V
2.0
A
24.4V/45W
3.8
A
23.3V/85W
Working parameters Display
Operation and Setup
Split Screen Display
08
F6 4-Channel DC Smart Charger
Current
channel
Current
channel
Electric current
of current task
Output voltage
/power
Electric current
of current task
Output voltage
/power
Electric current
of current task
Output voltage
/power
Electric current
of current task
Output voltage
/power
Battery
parameters
Battery
parameters
Channel 1,2 : Standby Channel 3,4 : Charging status
Task status Task status
Split-Screen Display : Simple Operation
1. Boot into the Split-screen display ----- Standby state;
2. In the standby state,long press the speed shuttle key to enter "Charger
Settings" ;
3. Short press CH key to display the channel you choose;
4. Long press the CH key to stop the current task of double channels .

Standby
Name 00:00:00
CH1
Standby 00:00:00
CH2
0 mAh 22.84 V
0.0A0W
3.991V
3.989V
1
4
3.991V
3.989V
2
5
3.991V
3.989V
3
6
09
F6 4-Channel DC Smart Charger
Operation and Setup
Working parameters Display
Standby
Operation
Time
Operation
time
Capacity
charged
Task status
Output
Current
Output
Power
Total Battery
Voltage
Cell Voltage
Device Name
Current
channel
Current
channel
Standby State : Simple Operation
1.Connect power supply to the charger, wait for the system to complete its self-checking.
Connect the battery to the charger in the standby interface;
2. In the standby state, the screen is in blue color .At that time, the output current, total
battery voltage ,capacity completed and operation time are all shown as zero .
Scroll the speed shuttle key can switch the display information in the lower half of the screen, which are cell voltage and the
operating data.
3. After selecting the corresponding channel, short press the speed shuttle key can pop up
the "Task Settings" menu.
4. Short press CH key can switch the channel ;
5. Long press the speed shuttle key to enter the “Charger Settings” menu.

Charging
LiPo-6S(4.20V) 43% 00:00:01
CH1
0
mAh
22.83
V
0.0A0W
3.802V
3.807V
1
4
3.808V
3.801V
2
5
3.801V
3.814V
3
6
Standby 00:00:00
CH2
10
F6 4-Channel DC Smart Charger
Charging
Operation
Time
Capacity
charged
Task Status
Output
Current
Total Battery
Voltage
Output
Power
Operation
Time
Cell Voltage
Current
channel
Current
channel
Battery parameters and
Percentage of completion
Operation and Setup
Working parameters Display
Charging Status : Simple Operation
1. Connect power supply to the charger, wait for the system to complete its self-checking.
Connect the battery to the charger in the standby interface;
2. After selecting the corresponding channel, short press the speed shuttle key to pop up
the "Task Settings" menu, set the task to "Charge" ; adjust the task parameters, and short
press the speed shuttle key to start the task;
Scroll the speed shuttle key can switch the display information in the lower half of the screen, which are cell voltage, cell
internal resistance and the operating data. Cell voltage can only be displayed in the mode of balance charging and the
internal resistance can only be displayed while measurement is valid ( not in precharged status and none of the cells
reaches fully charged status within 2 minutes);
3. When the charge task is executing, short press the speed shuttle key can pop up the "Adjust
Task” menu to adjust the charge current ; long press the CH key can stop the current task ;
4. Enjoy.

11
Fast Charging Completed Status
LiPo-6S(4.20V) 100% 00:09:00
CH1
708 mAh 25.22V
0.0A0W
4.200V
4.198V
1
4
4.196V
4.205V
2
5
4.201V
4.225V
3
6
00:00:00
CH2 Standby
F6 4-Channel DC Smart Charger
Operation and Setup
Working parameters Display
Fast Cha rging Completed Status : Simple Operation
1. When fast charging is completed, the cell voltage difference is less than 2OmV ,show
ing fast charging completed ;
( At that time, press the speed shuttle key to stop the task before removing the battery)
2.Long press the CH key can stop the current task;
3. Short press the CH key can switch the channel .
Fast Charging Completed Status
Operation
Time
Capacity
charged
Task Status
Output
Current
Total Battery
Voltage
Output
Power
Operation
Time
Cell Voltage
Current
channel
Current
channel
Battery parameters and
Percentage of completion

12
F6 4-Channel DC Smart Charger
Discharging
Discharging
LiPo-6S(3.60V) 36% 00:00:40
CH1
-5 mAh 22.85V
-0.3A-13W
3.787V
3.789V
1
4
3.792V
3.787V
2
5
3.788V
3.703V
3
6
00:00:00
CH2 Standby
Operation and Setup
Working parameters Display
Discharging Status : Simple Operation
1.Connect power supply to the charger, wait for the system to complete its self-checking. Con
nect the battery to the charger in the standby interface;
2. After selecting the corresponding channel, short press the speed shuttle key to pop upthe
"Task Settings” menu, set the task to "Discharge" ; adjust the task parameters andshort
press the speed shuttle key to start the task;
Scroll the speed shuttle key during operation can switch the display information in the lower half of the screen which are
cell voltage and operating data ; the cell voltage can only be displayed in the mode of balance charging;
3. When the discharge task is executing, short press the speed shuttle key can pop up the
"Adjust Task” menu to adjust the discharge current ; long press the CH key can stop
the current task;
4. Enjoy.
Operation
Time
Capacity
charged
Task Status
Output
Current
Total Battery
Voltage
Output
Power
Operation
Time
Cell Voltage
Current
channel
Current
channel
Battery parameters and
Percentage of completion

External Discharging
Pb-12S(1.90V) 00:00:45
CH1
-111 mAh 26.79V
-9.1A-245W
00:00:00
CH2
0
pcs
36
C2.99
mWh
26.79V
Standby
External Discharging
13
F6 4-Channel DC Smart Charger
Operation and Setup
Working parameters Display
External Discharging status : Simple Operation
1. Connect the battery, which is going to discharge ,to the input ends( DC port) of the
charger, and wait for the system to complete its self—checking, then in the standby
interface, connect the high power resistance load to the charger's output ends ;
2. After selecting the corresponding channel, short press the speed shuttle key to pop up
the "Task Settings” menu, set the task to "External Discharge” ; adjust the task parameters and
short press the speed shuttle key to start the task;
3. When the External discharge task is executing, short press the speed shuttle key can pop up the
“Adjust Task" menu to adjust the external discharge current ; long press the CH key can stop the
current task;
4. Enjoy.
Operation
Time
Capacity
charged
Task Status
Output
Current
Total Battery
Voltage
Output
Power
Operation
Time
Cell Voltage
Current
channel
Current
channel
Battery parameters and
Percentage of completion

14
F6 4-Channel DC Smart Charger
Storage Charging
Storage Charging
LiPo-6S(3.80V) 00:00:19
CH1
0 mAh 22.70V
0.0A0W
3.806V
3.806V
1
4
3.806V
3.810V
2
5
3.806V
3.811V
3
6
00:00:00
CH2 Standby
Operation and Setup
Working parameters Display
Storage Charging Status : Simple Operation
1. Connect power supply to the charger, wait for the system to complete its self-checking. Con
nect the battery to the charger in the standby interface;
2. After selecting the corresponding channel, short press the speed shuttle key to pop up the
“Task Settings" menu, set the task to “Storage” ; adjust the task parameters, and short
press the speed shuttle key to start the task;
Scroll the speed shuttle key during operation can switch the display information in the lower half of the screen, which are
cell voltage and the operating data ; the cell voltage only be displayed in the mode of balance charging.
3. When the storage task is executing, short press the speed shuttle key can pop up the"Adjust
Task" menu to adjust the storage current ; long press the CH key can stop the current task;
4. Enjoy.
Operation
Time
Capacity
charged
Task Status
Output
Current
Total Battery
Voltage
Output
Power
Operation
Time
Cell Voltage
Current
channel
Current
channel
Battery parameters and
Percentage of completion

15
Balancing
LiPo-6S(3.80V) 40% 00:00:22
CH1
1 mAh 22.70V
0.0A-6W
3.801V
3.799V
1
4
3.799V
3.798V
2
5
3.797V
3.703V
3
6
00:00:00
CH2 Standby
F6 4-Channel DC Smart Charger
Balancing
Operation and Setup
Working parameters Display
Balancing Status : Simple Operation
1. Connect power supply to the charger, wait for the system to complete its self-checking.
Connect the battery to the charger in the standby interface;
2. After selecting the corresponding channel, short press the speed shuttle key to pop up
the “Task Settings" menu, set the task to “Balance” ; adjust the task parameters, and
short press the speed shuttle key to start the task;
Scroll the speed shuttle key during operation can switch the display information in the lower half of the screen which are
cell voltage and the operating data;
3. When the balance task is executing, short press the speed shuttle key can pop up the“Adjust
Task" menu to adjust the balance current ; long press the CH key can stop the current task;
4. Enjoy.
Operation
Time
Capacity
charged
Task Status
Output
Current
Total Battery
Voltage
Output
Power
Operation
Time
Cell Voltage
Current
channel
Current
channel
Battery parameters and
Percentage of completion

Regenerative Discharge
16
Regenerative Discharge
LiPo-6S(3.60V) 56% 00:00:06
CH1
-3 mAh 23.46V
-3.1A-71W
3.898V
3.897V
1
4
3.900V
3.905V
2
5
3.903V
3.893V
3
6
00:00:00
CH2 Standby
F6 4-Channel DC Smart Charger
Operation and Setup
Working parameters Display
Regenerative Discharge status : Simple Operation
1. Connect the battery ,which is going to receive power ,to the input ends of the charger
and wait for the system to complete the self-checking . Connect the discharge battery
to the output ends of the charger in the standby interface ;
2. In the standby state , short press the speed shuttle key to pop up the “Task Settings"
menu, set the task to “Regenerative Discharge" ; adjust the task parameters, short
press the speed shuttle key to start the task ;
Scroll the speed shuttle key during operation can switch the display information in the lower half of the screen, which
are cell voltage and the operating data ; the cell voltage can only be displayed in the mode of balance charging.
3. When the task of Regenerative Discharge is executing, short press the speed shuttle key
can pop up the "Adjust Task” menu to adjust the Regenerative Discharge current ;
long press the CH key can stop the current task ;
4. Enjoy.
Operation
Time
Capacity
charged
Task Status
Output
Current
Total Battery
Voltage
Output
Power
Operation
Time
Cell Voltage
Current
channel
Current
channel
Battery parameters and
Percentage of completion
Table of contents
Other HOTA Batteries Charger manuals